


SparroWocky is a purpose-built Windows backdoor associated with a long-running espionage actor. Its quiet modular design favors sustained access over visible disruption.
The threat is sophisticated, but it is not mysterious. Its persistence, network communication, surveillance, and command functions leave evidence defenders can investigate.
Overview
What SparroWocky is
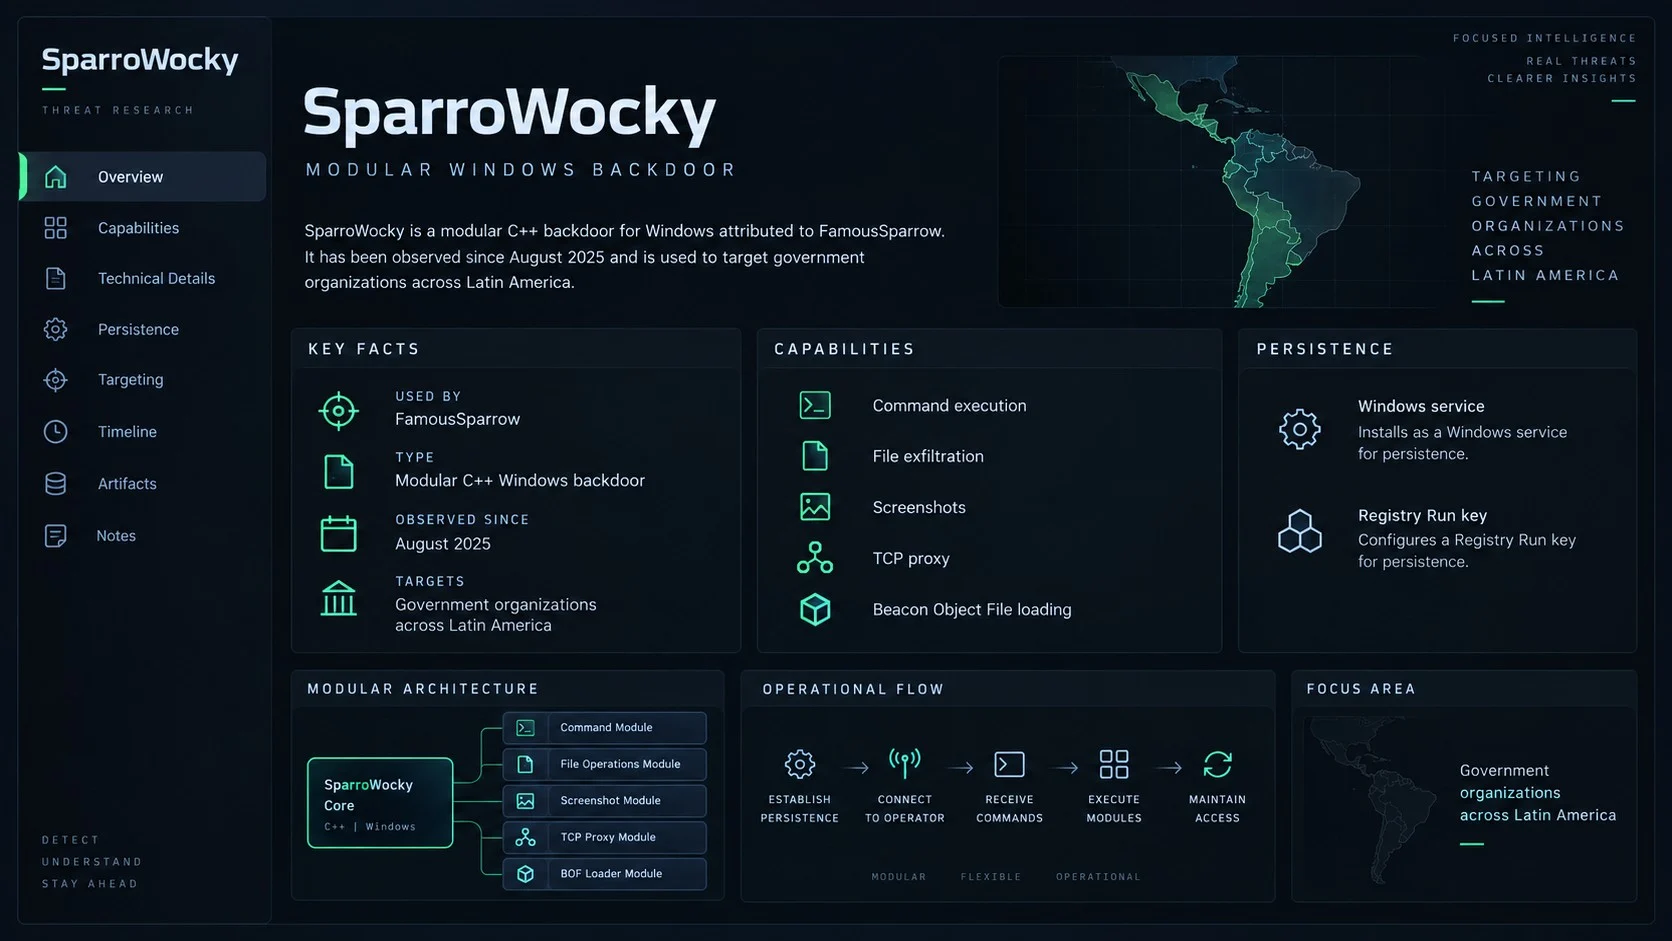
SparroWocky is a modular Windows backdoor written in C++. It enables remote command execution, file theft, screenshot capture, traffic proxying, and additional in-memory capabilities.
Researchers observed the malware from at least August 2025. It appears to have replaced SparrowDoor in newer operations linked to the FamousSparrow group.
The new family is not merely another SparrowDoor version. Its architecture, code, and supported modules make it a separate custom backdoor.
FamousSparrow is a China-aligned espionage actor active since at least 2019. Attribution of SparroWocky to this group was assessed with high confidence.
Who the campaign has targeted
Recent operations concentrated heavily on government organizations across Latin America. Observed countries included Argentina, Ecuador, Guatemala, Honduras, Panama, Peru, Puerto Rico, and Venezuela.
The focus is unusually regional for a group previously seen across hotels, governments, international bodies, engineering companies, trade organizations, and legal firms.
Target selection supports an espionage objective. The malware is designed to maintain access, gather information, and give operators flexible control over selected systems.
Attribution and geopolitical assessment come from combined telemetry, tool overlap, victim patterns, and deployment history. They should not be reduced to a filename alone.
What the backdoor can do
SparroWocky includes core remote-access functions and can extend itself with executable modules used by offensive security frameworks.
- Collect computer, user, domain, Windows, and network-interface details.
- Execute commands and launch arbitrary files on the compromised host.
- Exfiltrate selected files and capture desktop screenshots periodically.
- Route traffic through the victim by operating as a TCP proxy.
- Load and execute Beacon Object Files directly in memory.
- Persist through a Windows service or a Registry Run entry.
These capabilities allow an operator to adapt after entry. The core implant establishes control, while modules and commands support objectives inside each victim environment.
How Researchers Connected SparroWocky to FamousSparrow
Malware attribution requires more than similar names. Investigators compared deployment relationships, affected organizations, code behavior, and the actor’s known operational history.
In some early incidents, SparrowDoor deployed SparroWocky. SparrowDoor is a custom backdoor previously associated exclusively with FamousSparrow.
Researchers also saw SparroWocky deployment attempts against organizations previously targeted with SparrowDoor. That continuity strengthened the connection.
The victim profile aligned with the group’s established interests. Government and strategic entities fit an intelligence-collection mission rather than ordinary cybercrime.
SparroWocky samples contained a stanza from “Jabberwocky,” which inspired the research name. That artifact is trivia, not the technical basis for attribution.
The group’s earlier intrusions included exploitation of internet-facing Microsoft Exchange servers through ProxyLogon vulnerabilities. Historical methods help guide defensive review.
However, defenders should not claim every SparroWocky case began with the same vulnerability. Initial access must be determined from the specific organization’s evidence.
An exposed server can be one entry point, while stolen credentials or an existing implant can provide another. Incident timelines must distinguish access from payload deployment.
High-confidence attribution still allows uncertainty about individual events. Response priorities remain containment, evidence preservation, and scope, regardless of the suspected sponsor.
Why a Modular Espionage Backdoor Is Difficult to Scope
Finding the core implant answers only one question. It does not reveal every command executed, file collected, or secondary tool introduced.
A modular design lets operators choose capabilities according to the target. Two compromised hosts can show different artifacts while belonging to one campaign.
Command execution can rely on built-in Windows utilities. Those legitimate programs may remain after the malicious parent process disappears.
Beacon Object Files complicate traditional file hunting because compact modules can run in memory without a normal standalone executable on disk.
Screenshot collection creates a different exposure than document theft. Visible passwords, messages, dashboards, and meetings may be captured without opening their underlying files.
TCP proxying broadens the incident beyond one machine. The host can become a relay toward internal assets or an exit point for external activity.
Encrypted exfiltration makes content inspection harder. Analysts often infer staging and theft from file access, archive creation, volume, timing, and destination patterns.
Long dwell time adds another challenge. Logs may expire before discovery, leaving gaps between initial access and the surviving implant.
Government environments can include legacy systems with limited telemetry. Investigators may need to reconstruct activity from firewalls, identity services, and neighboring hosts.
Compromised service accounts can move beyond the original device. Their authentication history may identify systems never containing a known SparroWocky file.
Operators may deploy ordinary remote administration utilities alongside custom malware. An approved tool becomes suspicious when installed outside change-control records.
Earlier FamousSparrow tooling also matters. SparrowDoor or web-shell traces can reveal how access existed before the newer backdoor arrived.
Responders should build a timeline from independent data sources. Endpoint events, identity logs, DNS, proxy, firewall, and server records correct one another’s gaps.
Data owners must help interpret access. A filename that appears routine to an analyst may contain diplomatic, legal, or infrastructure-sensitive information.
Scoping should include screenshots and temporary staging directories. Sensitive material can leave the organization without a conventional file-download event.
Memory analysis may uncover injected code and BOFs unavailable on disk. Capturing volatile state before rebuilding improves investigative confidence.
Network teams should search for proxy-like connections crossing normal trust zones. Repeated internal sessions from one server can indicate relay activity.
Identity teams should revoke rather than merely change exposed sessions and tokens. Active authentication artifacts can outlive a password reset.
A narrow cleanup risks preserving the operator’s alternate route. Eradication should begin only after responders understand persistence, accounts, tools, and accessible systems.
The objective is not to find one named file. It is to establish when attacker access began, what it reached, and whether any path remains.
How SparroWocky Works
Step 1: Attackers establish access to a selected network
SparroWocky appears in targeted operations rather than broad consumer distribution. Operators first need a route into the chosen organization.
Historical FamousSparrow activity exploited vulnerable internet-facing servers. Early SparroWocky cases also showed deployment through the group’s older SparrowDoor backdoor.
The exact route can vary. Responders must identify the first compromised asset, account, vulnerability, or administrative channel in their own environment.
Step 2: The implant establishes persistence
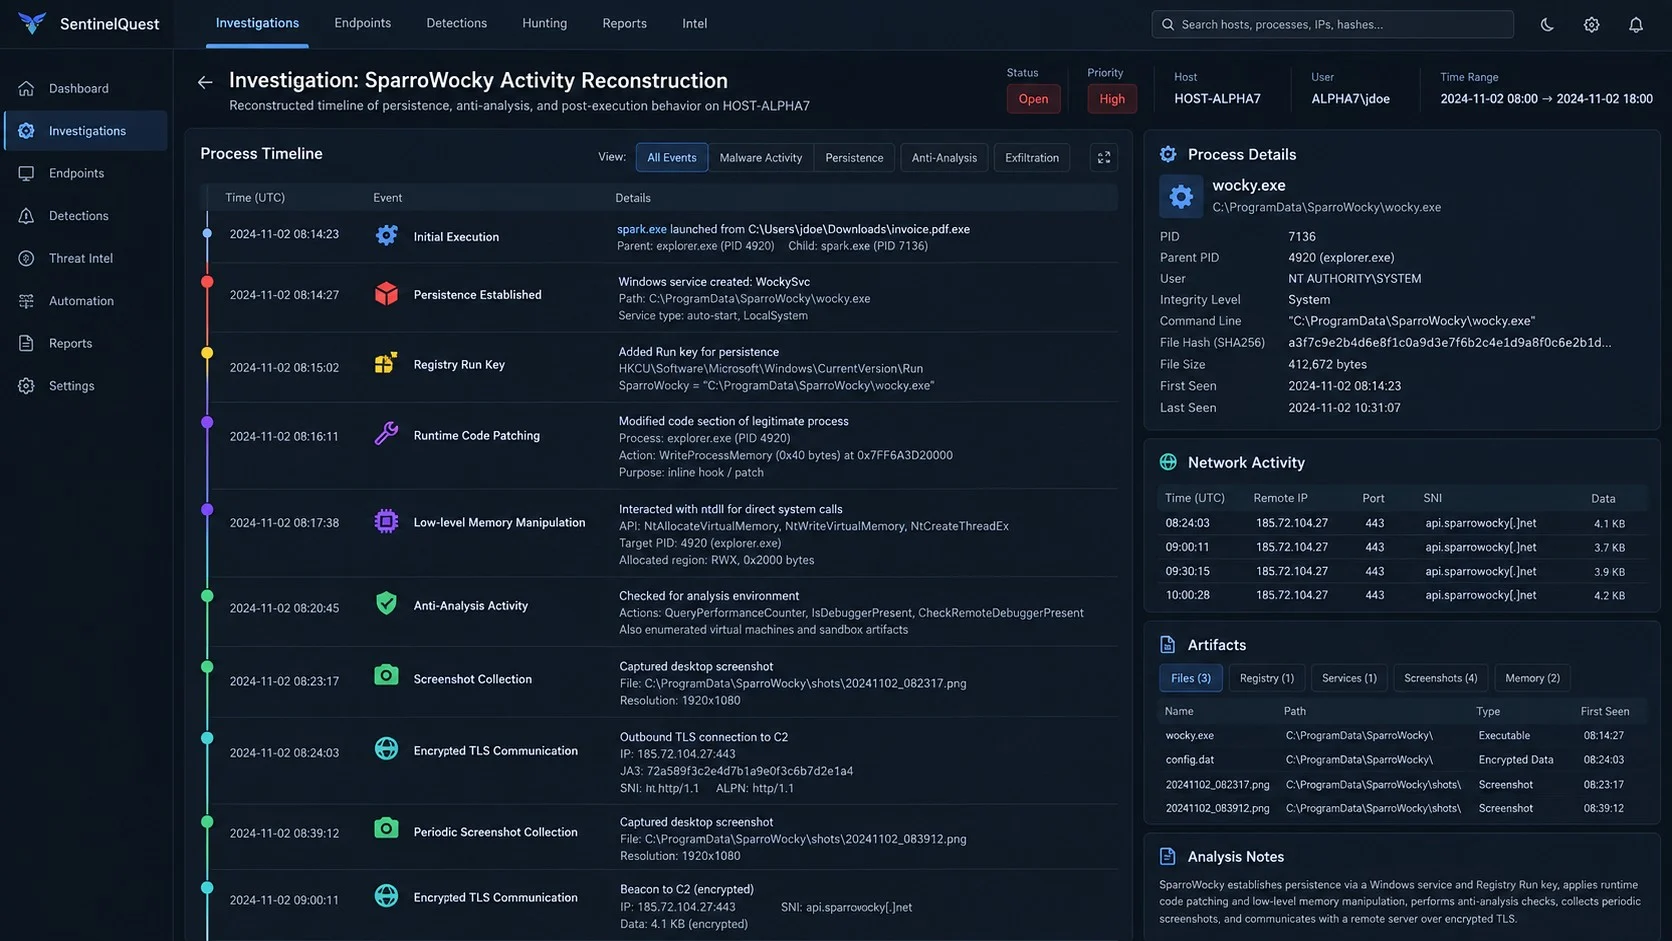
Depending on its configuration, SparroWocky can install itself as a Windows service or create a Registry Run key.
A service can launch with the operating system and may run under a powerful account. A Run entry executes when its associated user signs in.
Both locations require inspection during containment. Removing the visible process without its startup mechanism can allow the implant to return.
Step 3: It profiles the compromised machine
The backdoor gathers computer name, username, domain, Windows version, and addresses assigned to network interfaces.
This inventory helps operators understand the host’s organizational role and connectivity. A domain-joined server may offer different opportunities than an isolated workstation.
Collected context can also guide later commands, file selection, and movement toward systems holding more valuable information.
Step 4: The malware opens an encrypted operator channel
SparroWocky communicates over TLS, which protects the network session from simple content inspection. Exfiltrated material receives an additional RC4 encryption layer.
Encrypted traffic does not become invisible. Destination reputation, certificate details, process ownership, timing, volume, and host behavior remain useful signals.
Command polling allows the operator to assign tasks while the implant remains concealed inside normal Windows activity.
Step 5: Commands enable surveillance and file theft
Operators can execute arbitrary commands and launch selected files. They can collect documents directly or stage information before exfiltration.
Periodic screenshots reveal visible applications, conversations, documents, and user activity. Screenshots can provide context that raw files and credentials do not.
The backdoor’s flexibility means impact depends on operator choices and host access. Not every capability must appear in every incident.
Step 6: TCP proxying turns the victim into a relay
The TCP proxy feature can route network connections through a compromised machine. This helps operators reach internal services or obscure their true origin.
Proxy traffic may make malicious connections appear to come from an approved host. Segmentation and east-west monitoring become important during investigation.
Unusual listening sockets, tunneling patterns, and connections inconsistent with the host’s function can reveal this activity.
Step 7: In-memory modules expand available actions
SparroWocky can load Beacon Object Files, a format supported by multiple red-team and penetration-testing frameworks.
BOFs let operators execute compact modules in memory without installing a conventional standalone program for each task.
The backdoor integrates open-source components alongside custom code. Defenders should hunt behaviorally because shared tooling can make simple family signatures incomplete.
Host, Persistence, Network, and Campaign Verification Checks
Confirm the implant and its loading path
Collect the suspected file, memory image, process tree, loaded modules, command lines, and execution timestamps. Validate hashes against current trusted intelligence.
A filename is insufficient because malware can rename itself. Code characteristics and behavior provide stronger identification than one path or label.
Preserve chain of custody for government and regulated environments. Investigative handling may affect legal, intelligence, and disclosure decisions.
Inspect both persistence options
Review newly created or modified Windows services and Registry Run locations. Compare entries with approved baselines and software deployment records.
Check the executable paths, service accounts, permissions, creation times, and digital signatures associated with suspicious startup entries.
Search other hosts for matching names and paths, but expect variation. Targeted operators can customize deployments between organizations.
Analyze encrypted communication in context
Identify which process owns the network connection and whether the destination is expected. Compare connection timing with screenshots, file access, and command activity.
Review proxy behavior, listening ports, unusual internal connections, and outbound sessions from servers that rarely initiate external traffic.
TLS alone does not identify SparroWocky. Correlate traffic with persistence, host reconnaissance, file staging, and known campaign indicators.
Scope the broader intrusion
Investigate internet-facing servers, privileged accounts, remote administration, and evidence of older FamousSparrow tooling. SparroWocky may not be the first implant deployed.
Look for web shells, credential theft, lateral movement, anomalous service creation, and BOF-related in-memory activity across reachable systems.
Determine which documents, screenshots, or repositories were accessible. Data exposure analysis should follow evidence rather than the malware’s theoretical maximum capability.
How to Remove SparroWocky and Recover Safely
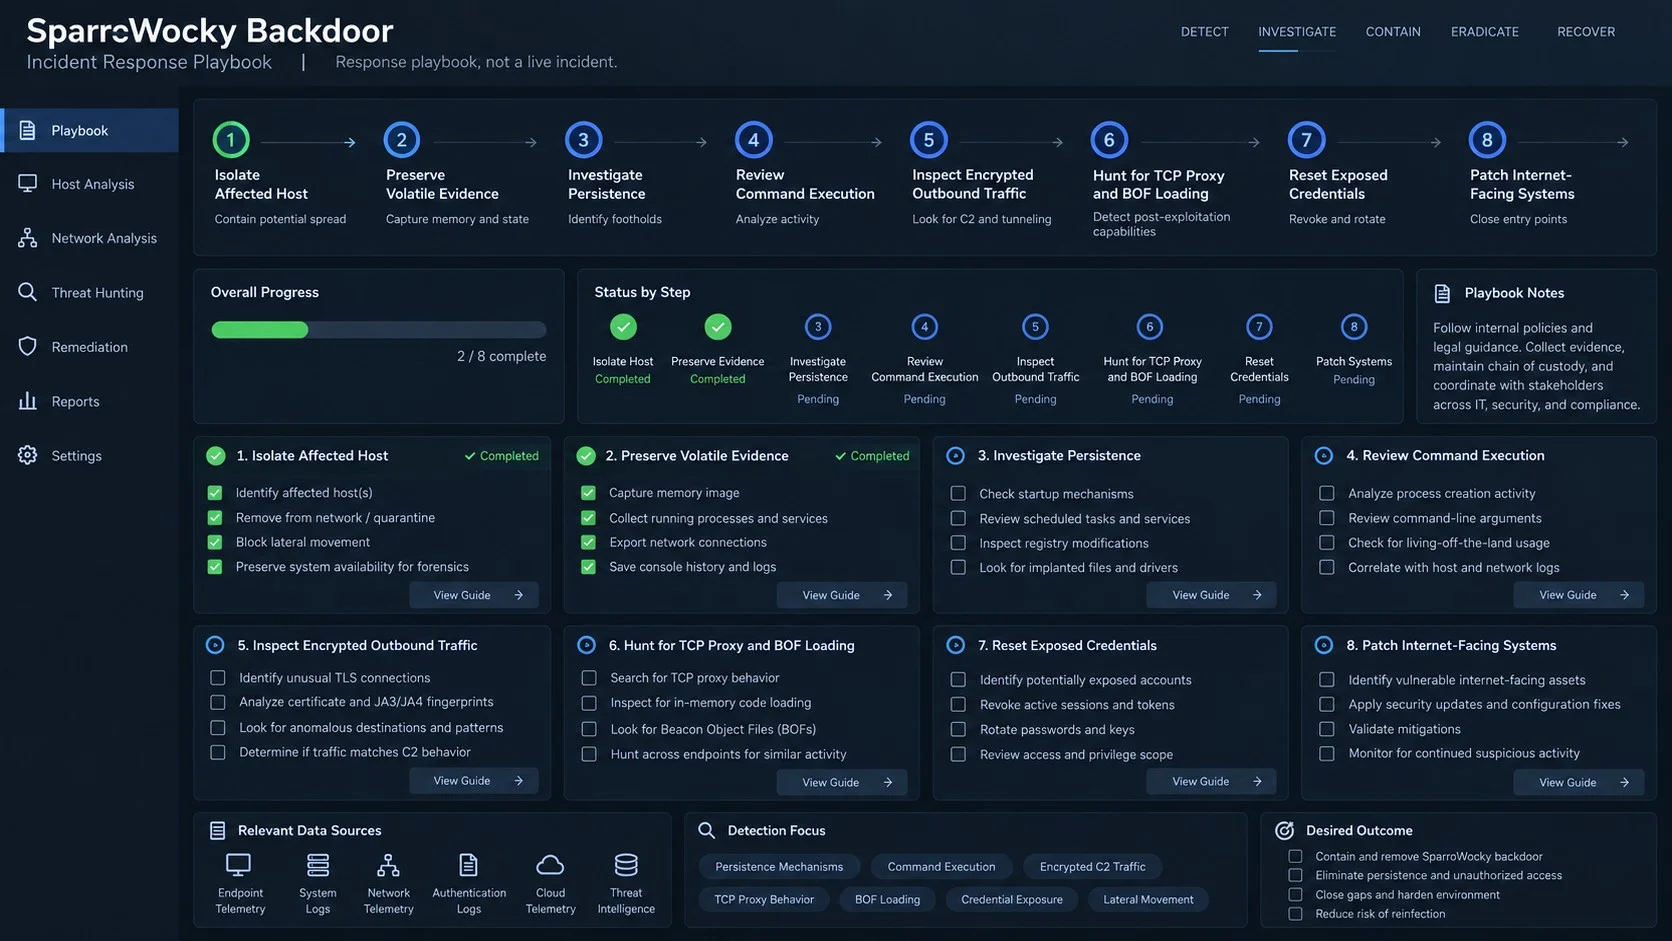
- Activate the incident response process. SparroWocky is linked to targeted espionage. Involve security, leadership, legal, and relevant authorities according to organizational policy.
- Contain affected systems carefully. Isolate compromised hosts and exposed servers while preserving forensic access. Consider whether abrupt shutdown could destroy volatile evidence.
- Capture a complete evidence set. Preserve memory, storage images, services, Registry data, process details, connections, authentication logs, and suspected malware samples.
- Scan with layered tools. Use enterprise EDR and a current Malwarebytes scan where appropriate. Treat detections as inputs to investigation, not the entire conclusion.
- Eradicate persistence and related tooling. Remove malicious services, Run entries, web shells, loaders, BOFs, and any earlier implants identified during scoping.
- Patch the original entry point. Update vulnerable internet-facing systems, correct unsafe configurations, close unnecessary exposure, and validate that mitigations are effective.
- Rotate credentials and secrets. Reset accounts, service passwords, keys, certificates, tokens, and sessions accessible from compromised assets, beginning with privileged identities.
- Hunt across connected environments. Search for related persistence, encrypted destinations, screenshot staging, TCP proxy behavior, command execution, and unusual lateral authentication.
- Rebuild high-risk hosts. Reimage systems from trusted media when remote command execution prevents a defensible claim that cleanup restored integrity.
- Strengthen layered prevention. AdGuard can block numerous malicious web destinations for users, while server patching, EDR, segmentation, and application control address this campaign’s deeper risks.
Is Your Device Infected? Run a Free Malware Scan
Slow performance, constant pop-ups, or strange behavior? These are classic signs of a malware infection. A quick way to check is to scan your device with Malwarebytes Free, one of the most trusted malware removal tools available. If you only visited a scam page and didn’t download or install anything, this scan is optional.
The free version detects and removes the most common threats, including:
- Adware — the cause of those annoying pop-ups
- Browser hijackers — unwanted redirects and changed homepages
- Trojans and spyware — hidden programs stealing your data
- Potentially unwanted programs (PUPs) — software you never asked for
👉 Select your device below — Windows, Mac, or Android — then follow the simple steps to download Malwarebytes, scan your system, and remove any threats it finds. The scan usually takes 5 to 20 minutes.
Run a Malware Scan with Malwarebytes for Windows
Malwarebytes is one of the most popular and trusted anti-malware tools for Windows — and it’s completely free for removing infections. It catches threats that many antivirus programs miss, including adware, browser hijackers, and trojans. Follow the steps below to scan your PC and remove what Malwarebytes finds.
Download Malwarebytes
Click the button below to download the latest version of Malwarebytes for Windows from the official source. The free version is all you need — it will scan your computer and remove adware, browser hijackers, and other malicious software at no cost.
Download MalwarebytesOfficial installer for Windows 11 and 10. Your download starts right away.Want real-time protection? See Malwarebytes Premium Malwarebytes Free for WindowsScans and removes malware at no cost
-
Install Malwarebytes
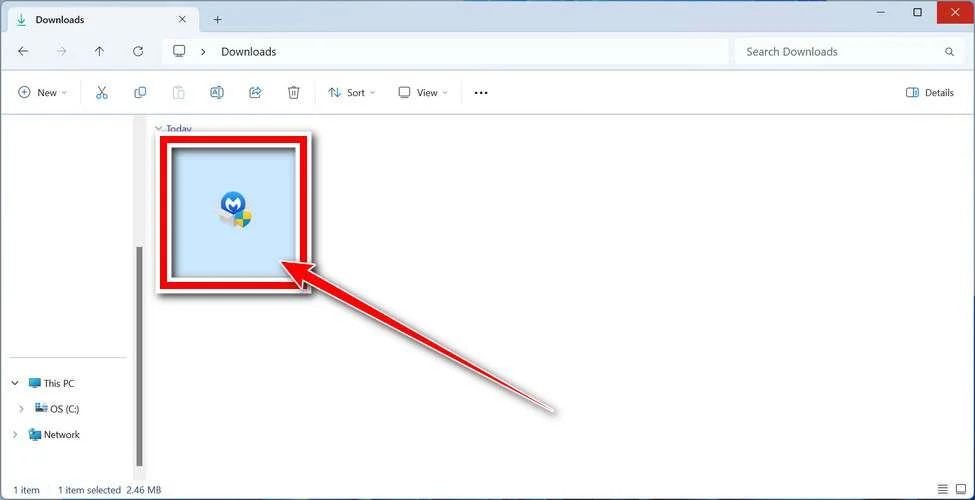
When the download finishes, open your Downloads folder and double-click the MBSetup file. If Windows shows a User Account Control pop-up, click “Yes” to allow the installation.
Follow the On-Screen Prompts to Install Malwarebytes
The setup wizard will walk you through a few quick screens:
-
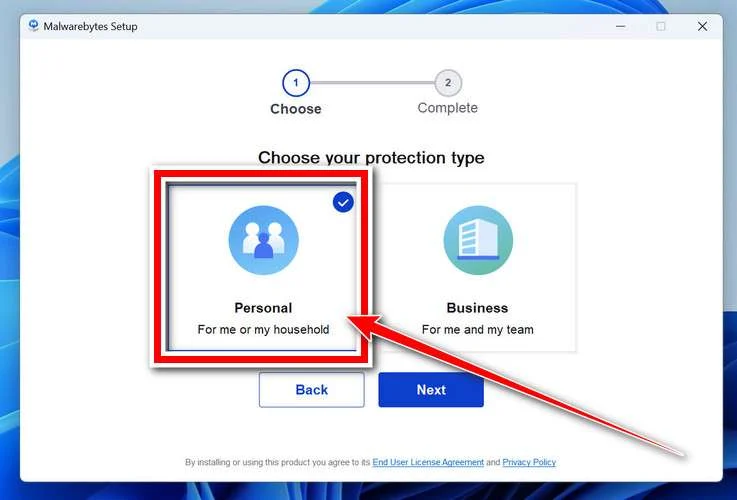
Choose where you’re installing the program — “Personal Computer” or “Work Computer” — then click Next.
-
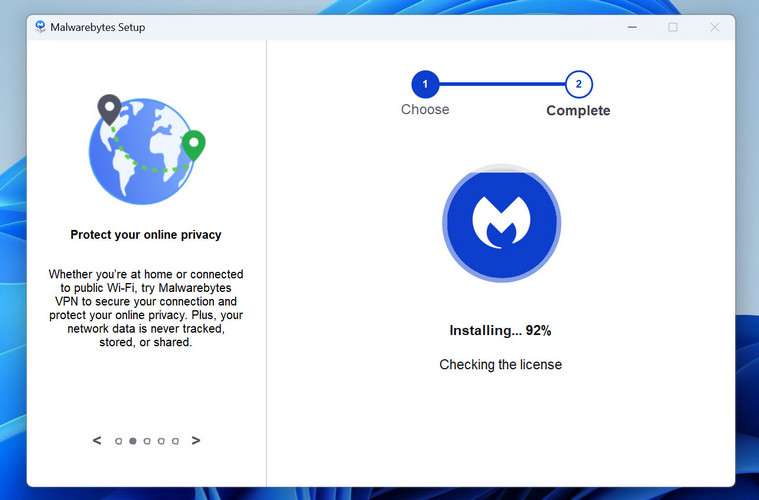
Malwarebytes will now install on your device. This usually takes under a minute.
-
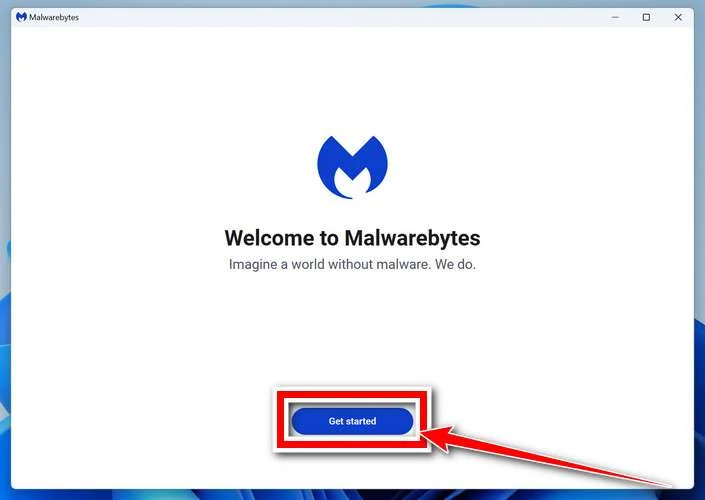
When installation is complete, the “Welcome to Malwarebytes” screen will open automatically.
-
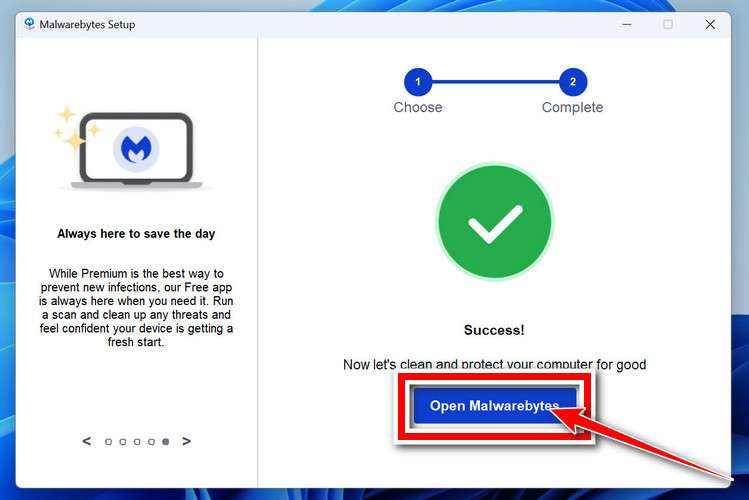
On the final screen, click Open Malwarebytes to launch the program.
-
Optional: Check for rootkits with a Custom Scan
You don’t need to change any settings for a normal scan. The standard Threat Scan in the next step is enough for most problems, so you can go straight to it.
If you also want to check for rootkits, use a Custom Scan. In current versions of Malwarebytes, rootkit scanning is only available there:
- On the Scanner tile, click the three-dot menu and select Advanced Scan.
- Choose Custom Scan. In its options, check Scan for rootkits.
- Select your system drive (usually C:\) as the location to scan, then start the scan. It takes longer than a Threat Scan.
- When it finishes, review and quarantine the results as described in the steps below.
Rootkit scanning isn’t available on Windows devices with ARM processors.
Start the Scan
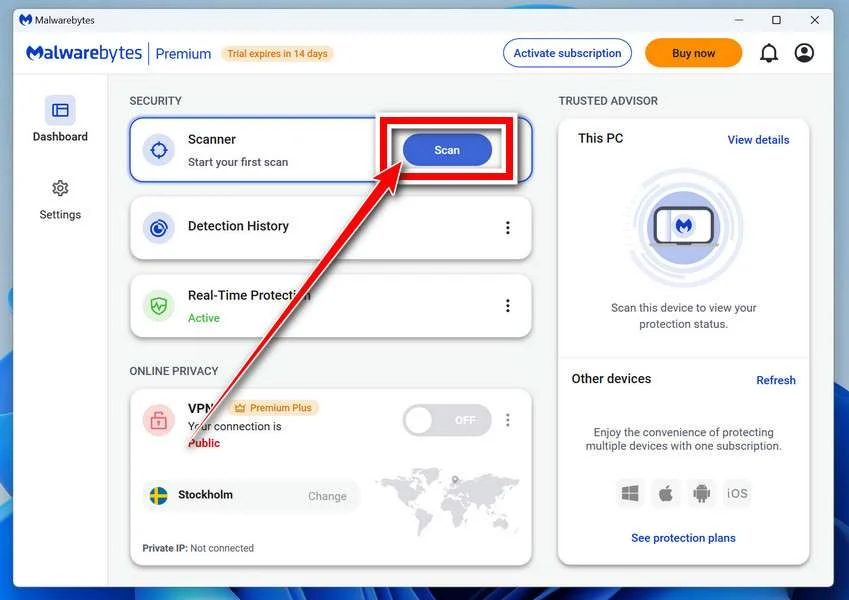
Click the blue Scan button. Malwarebytes will automatically update its virus database and start checking your computer for malware.
-
Wait for the Scan to Finish
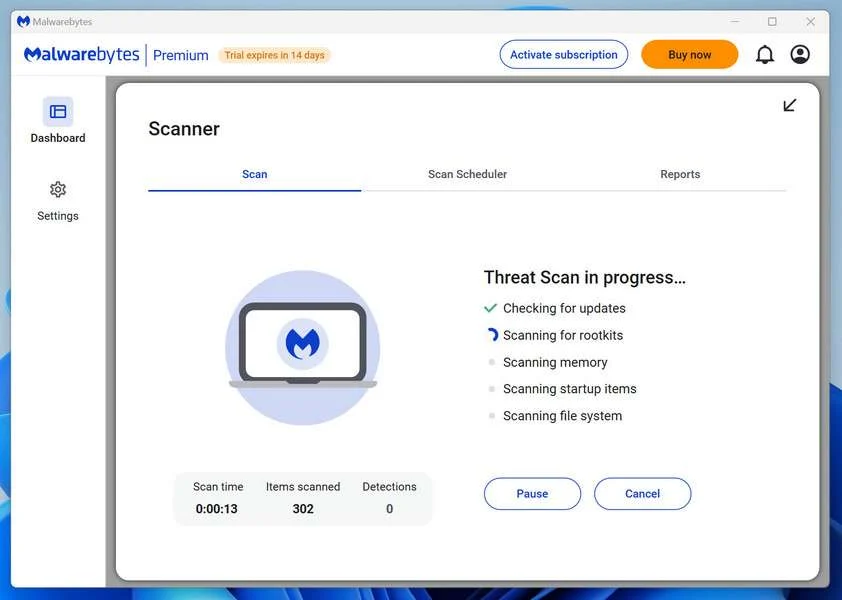
The scan checks your entire system for browser hijackers and other malicious programs, so it can take 5 to 20 minutes depending on your computer. Feel free to do something else — just check back occasionally to see the progress.
-
Quarantine the Detected Threats
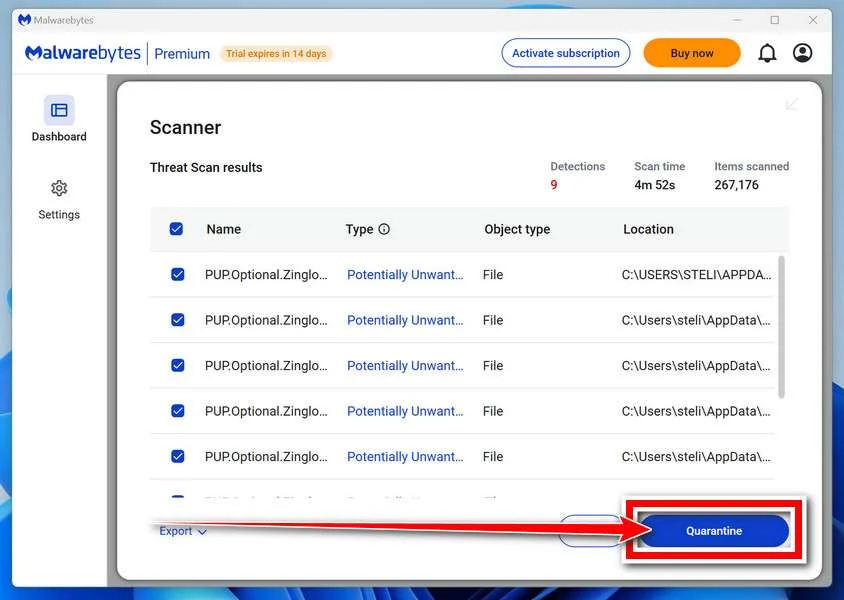
When the scan is done, you’ll see a list of everything Malwarebytes found — malware, adware, and potentially unwanted programs. Click the “Quarantine” button to remove all of them at once.
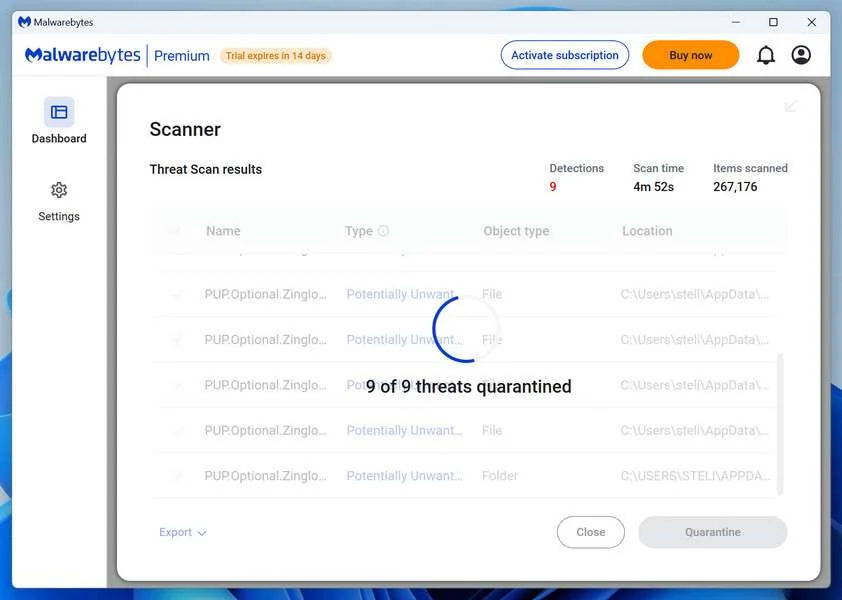
Malwarebytes will now remove the malicious files and registry entries and move them safely into quarantine.
-
Restart Your Computer
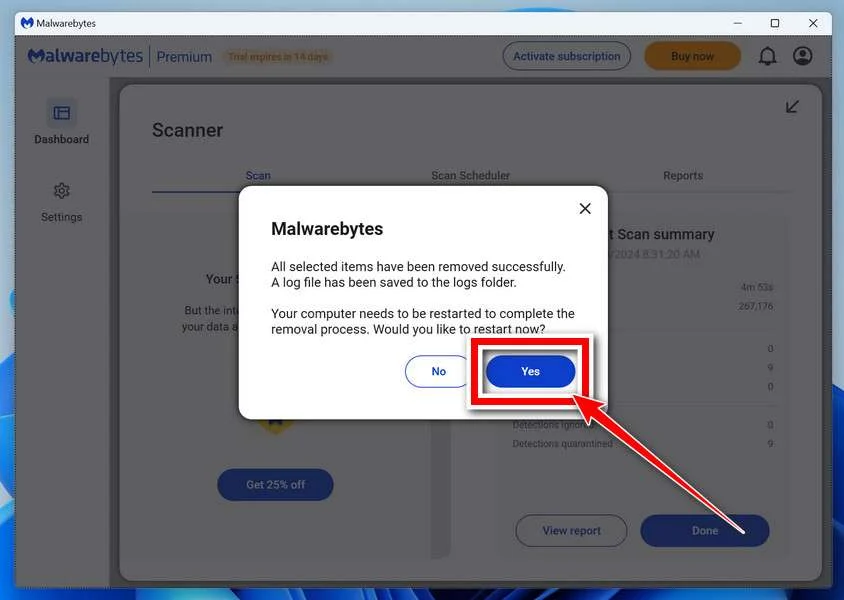
Some threats can only be fully removed after a reboot. If Malwarebytes asks you to restart, click Yes. Once you’re logged back in, Malwarebytes has finished removing the threats it found.
When the scan is done, check whether the problems you noticed have stopped. If they continue, see the options below.
If you are still having problems with your computer after completing these instructions, then please follow one of the steps:
- Run a computer scan with ESET Online Scanner
- Ask for help in our Windows Malware Removal Help & Support forum.
Run a Malware Scan with Malwarebytes for Mac
Malwarebytes for Mac is a free on-demand scanner that removes the malware other security software tends to miss — adware, browser hijackers, and unwanted programs included. Cleaning an infected Mac with Malwarebytes has always been completely free, and it’s our go-to recommendation. Follow the steps below to scan your Mac and remove what Malwarebytes finds.
-
Download Malwarebytes for Mac
Click the button below to download the latest version of Malwarebytes for Mac.
Download MalwarebytesOfficial installer for macOS. Your download starts right away.Want real-time protection? See Malwarebytes PremiumMalwarebytes Free for MacScans and removes malware at no cost -
Open the Malwarebytes setup file
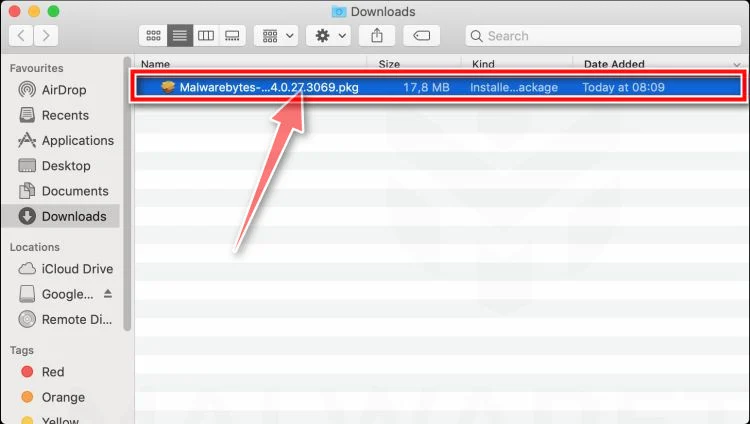
When the download finishes, open your Downloads folder and double-click the setup file to begin the installation.
-
Follow the On-Screen Prompts to Install Malwarebytes
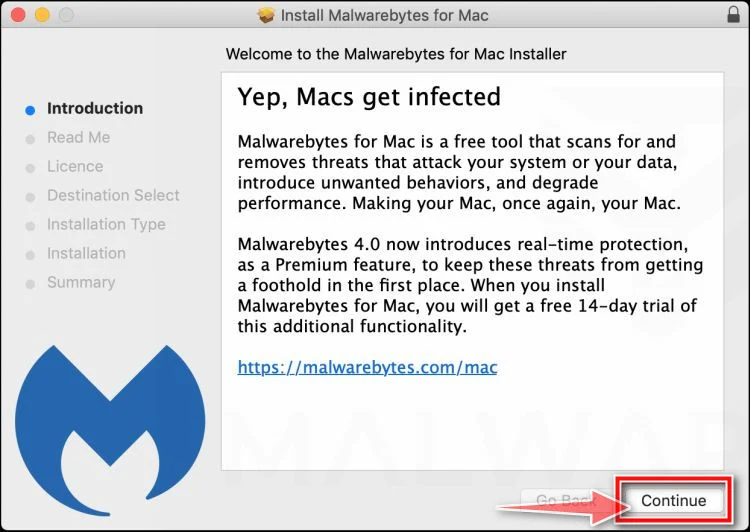
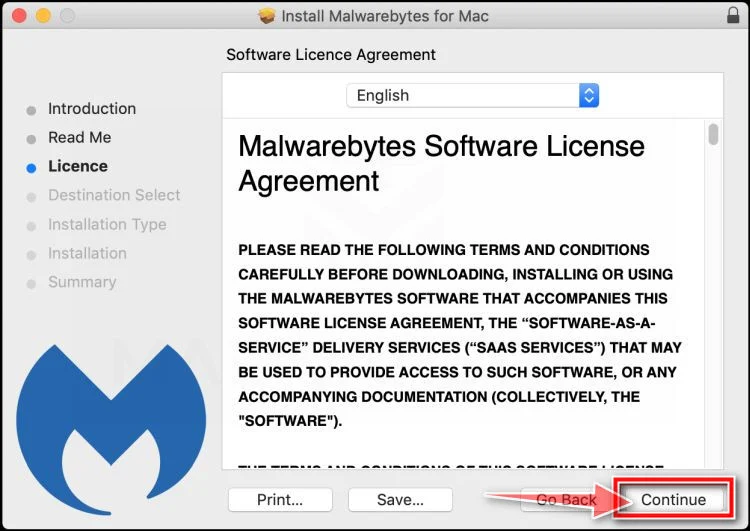
The Malwarebytes for Mac Installer will guide you through a few quick screens. Click “Continue” and keep following the prompts until the installation completes.
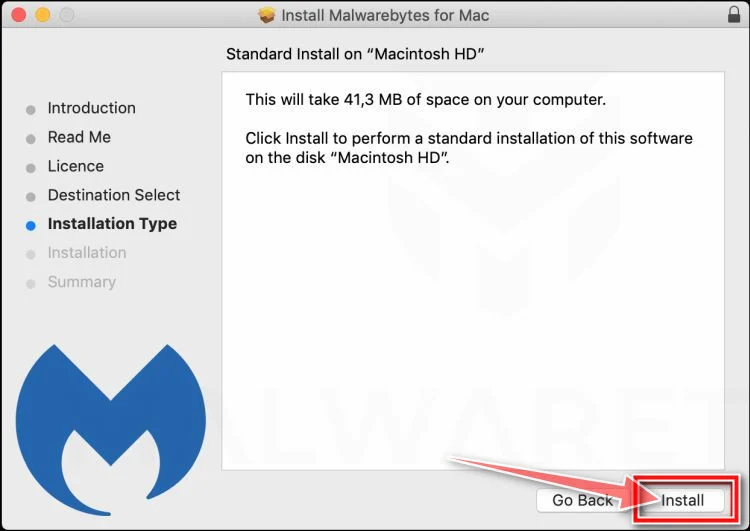
When the installation is complete, Malwarebytes opens to the Welcome to Malwarebytes screen. Click “Get started“.
Malwarebytes needs Full Disk Access to check your whole Mac. When it asks, open System Settings > Privacy & Security > Full Disk Access, turn on Malwarebytes (it may be listed as Malwarebytes Protection), and confirm with your password or Touch ID. Then return to Malwarebytes. On macOS Monterey and earlier, this setting is in System Preferences > Security & Privacy > Privacy.
-
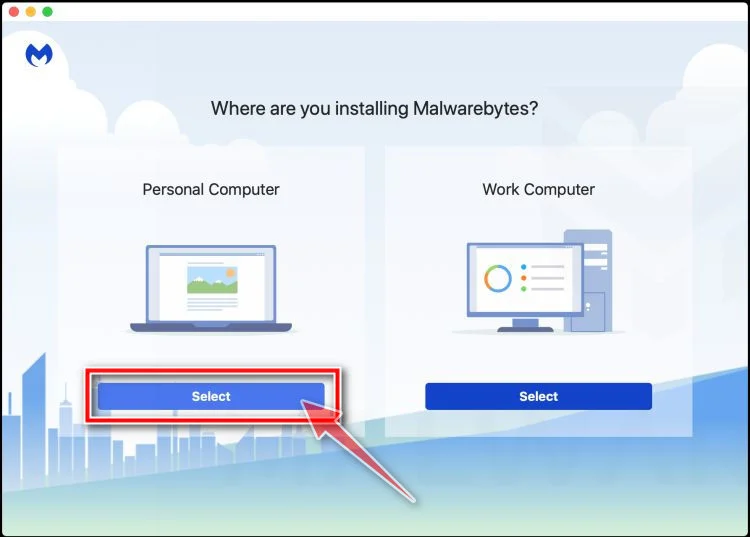
Select “Personal Computer” or “Work Computer”
Malwarebytes will ask what type of computer you’re installing it on. Click either Personal Computer or Work Computer, whichever applies.
-
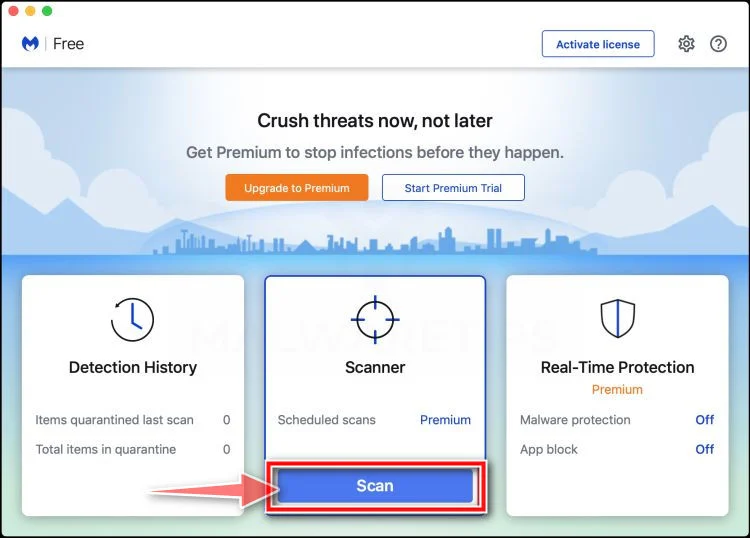
Start the Scan
Click the “Scan” button. Malwarebytes will automatically update its detection database and begin checking your Mac for malware.
-
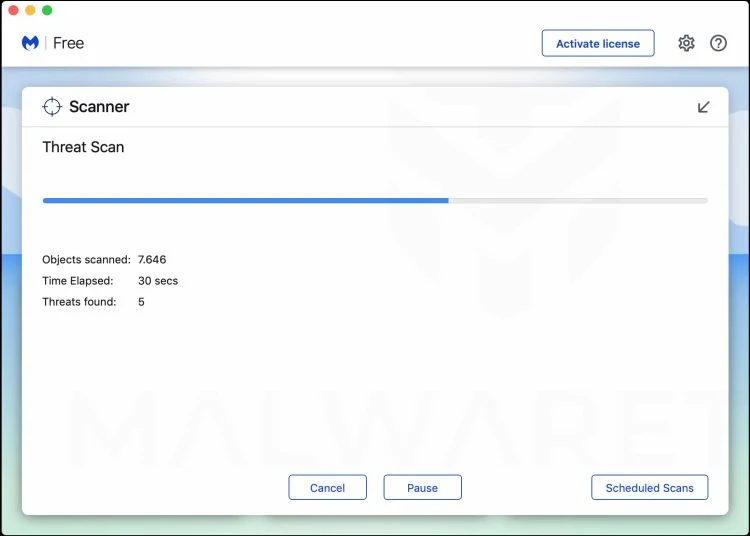
Wait for the Scan to Finish
Malwarebytes will scan your Mac for adware, browser hijackers, and other malicious programs. This can take a few minutes, so feel free to do something else — just check back occasionally to see the progress.
-
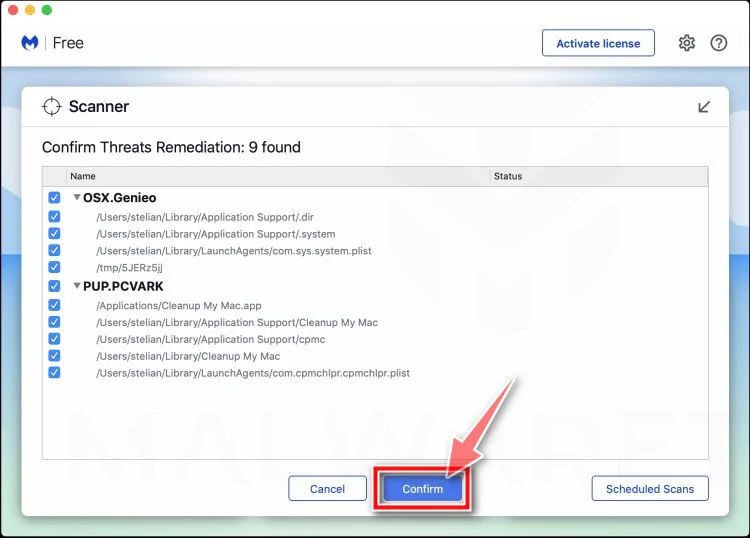
Quarantine the Detected Threats
When the scan is done, you’ll see a list of everything Malwarebytes found. Click the “Quarantine” button to remove all the threats at once.
-
Restart Your Mac
Malwarebytes will now remove all the malicious files it found. Some threats can only be fully removed after a reboot — if Malwarebytes asks you to restart, allow it. Once you’re logged back in, check whether the problems you noticed have stopped. If they come back, save the scan report and ask for help in our forum.
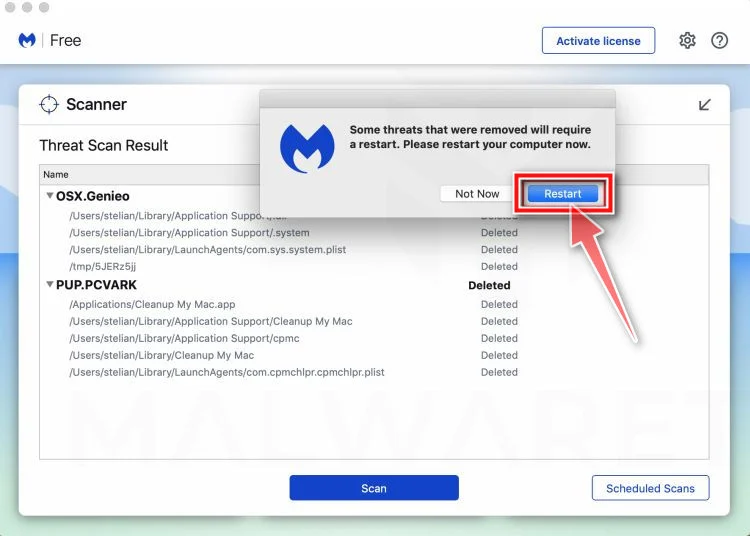
If the problems you noticed continue after the scan, see the options below.
If you are still experiencing problems while trying to remove a malicious program from your computer, please ask for help in our Mac Malware Removal Help & Support forum.
Run a Malware Scan with Malwarebytes for Android
Malwarebytes for Android scans your phone or tablet for malware, adware, and potentially unwanted apps. The free version scans only when you start a scan. Real-time protection, which checks apps automatically, is part of the paid Premium version.
-
Download Malwarebytes for Android.
You can download Malwarebytes for Android by clicking the link below.
Get Malwarebytes for AndroidOpens Google Play in a new tab.Want real-time protection? See Malwarebytes Premium for AndroidMalwarebytes for AndroidScans your phone and removes malware at no cost -
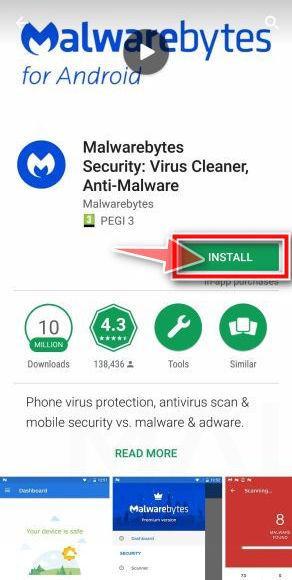
Install Malwarebytes for Android on your phone.
In the Google Play Store, tap “Install” to install Malwarebytes for Android on your device.
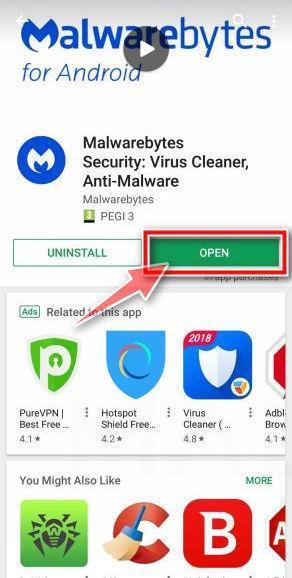
When the installation process has finished, tap “Open” to begin using Malwarebytes for Android. You can also open Malwarebytes by tapping on its icon in your phone menu or home screen.
-
Follow the on-screen prompts to complete the setup process
When Malwarebytes opens, it walks you through a short setup. Tap Get started and follow the prompts. If you see an offer for a trial or a paid plan, read it before you accept. You can skip it and keep using the free scanner.
Malwarebytes will ask for permission to access the files on your phone so it can scan them. Tap Allow, or turn on the permission in the Android screen that opens, then return to Malwarebytes.
-
Run a scan with Malwarebytes for Android
On the main screen, tap Scan now. In some versions, you open the menu, tap Scanner, and then tap Run a scan.
-
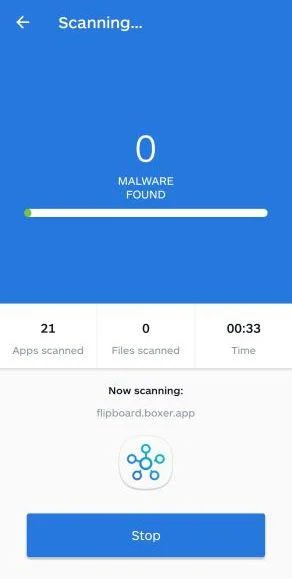
Wait for the Malwarebytes scan to complete.
Malwarebytes will now start scanning your phone for adware and other malicious apps. This process can take a few minutes, so we suggest you do something else and periodically check on the status of the scan to see when it is finished.
-
Remove the detected apps.
When the scan has been completed, you will see a list of the threats that Malwarebytes for Android has detected. Next to each detected item, tap the menu icon (three dots), then choose to uninstall the app or delete the file. Android then asks you to confirm. Tap OK or Uninstall to remove the app.
-
Restart your phone.
When the detected apps are removed, restart your phone if Malwarebytes asks you to. Then check whether the problems you noticed have stopped.
If the problems you noticed continue after the scan, see the options below.
If you are still having problems with your phone after completing these instructions, then please follow one of the steps:
- Ask for help in our Mobile Malware Removal Help & Support forum.
- Only as a last resort, reset your phone to factory settings. Read the warning below first.
- Back up your photos, videos, files, and messages, for example to your Google account or a computer.
- Make sure you know your Google account email and password. The phone asks for them after the reset. If you changed the password recently, Google recommends waiting 24 hours before you reset.
- On a Samsung phone, also make sure you know your Samsung account password.
- If you use an authenticator app for two-step verification, move your accounts to another device or save your backup codes first.
Stay Protected: Block Ads and Malicious Sites
No scan can prove a device is completely clean, so it helps to block threats before they reach you. Most infections start with a malicious ad or a fake download button — so blocking them at the source is your best defense.
We recommend AdGuard, which blocks malicious ads, phishing pages, and dangerous redirects before they can reach you.
👉 Download AdGuard and browse safely
Hardening Against Targeted Backdoor Operations
Patch public services quickly and remove unsupported software from internet exposure. High-value organizations need continuous external attack-surface review, not occasional inventories.
Restrict service creation and Registry startup changes through least privilege and application control. Alert when administrative mechanisms launch binaries from unusual directories.
Centralize endpoint, identity, server, and network telemetry with adequate retention. Targeted actors may remain present long before a decisive detection appears.
Segment sensitive government, legal, engineering, and identity systems. A foothold on one public server should not provide unrestricted paths to internal repositories.
Monitor encrypted outbound traffic behaviorally. Rare destinations, unexpected proxying, repeated screenshots, and file staging can reveal activity without decrypting every session.
Test response playbooks through exercises. Teams should know how to isolate servers, preserve memory, rotate institutional secrets, and coordinate disclosure under pressure.
Frequently Asked Questions
Is SparroWocky ransomware?
No. It is a backdoor designed for remote access and espionage. Its confirmed purpose is not file encryption followed by a ransom demand.
Who operates SparroWocky?
Researchers attributed it with high confidence to FamousSparrow, a China-aligned espionage group, based on deployment links, victimology, and prior exclusive tooling.
Does SparroWocky only target Latin America?
Recent observed operations concentrated there, especially against governments. The group’s historical targeting spans other regions and organizational sectors.
Was every infection caused by ProxyLogon?
No universal route was established. FamousSparrow historically exploited ProxyLogon, while early SparroWocky deployments also arrived through SparrowDoor access.
What is a Beacon Object File?
It is a compact object-code module used by some security testing frameworks. Attackers can abuse BOFs to add in-memory capabilities after compromise.
Can deleting the backdoor restore trust?
Not by itself. Operators may create accounts, deploy other tools, steal credentials, and alter servers. Recovery requires scoping, eradication, rotation, and often rebuilding.
The Bottom Line
SparroWocky is a capable espionage backdoor that gives FamousSparrow modular control, surveillance, file theft, TCP proxying, and in-memory expansion on targeted Windows systems.
Organizations should respond as though the wider network may be affected. Preserve evidence, close the entry route, rotate secrets, and hunt beyond the first detected host.

Join the discussion
0 commentsShare your experience or ask a question about this article.
Discussion
Start the conversation
Have a question or something useful to share? Add the first comment.