Remove “File contained a virus and was deleted” (Virus Removal Guide)

If you are seeing a “this file contained a virus and was deleted” message, when trying to download a program using Internet Explorer 8, 9 or 10, then your computer is infected with a ZeroAccess rootkit.

[Image: file contained a virus and was deleted Internet Explorer]

The ZeroAccess trojan is a dangerous threat that has been circulating for several years. In the time that ZeroAccess has been in the wild there have been a number of revisions, with modifications to its functionality, infection strategy and its persistence mechanisms on an infected machine. However, the core purpose has remained: to assume full control of the machine by adding it to the ZeroAccess botnet and to monetize the new asset by downloading additional malware.
Primarily, Trojan ZeroAccess is a kernel-mode rootkit, similar in ethos to the TDL family of rootkits. It uses advanced techniques to hide its presence, is capable of functioning on both 32 and 64-bit flavors of Windows from a single installer, contains aggressive self defense functionality and acts as a sophisticated delivery platform for other malware.

Trojan ZeroAccess remains hidden on an infected machine while downloading more visible components that generate revenue for the botnet owners. Currently the downloaded malware is mostly aimed at sending spam and carrying out click fraud, but previously the botnet has been instructed to download other malware and it is likely that this will be the case again in the future.

The “program contained a virus and was deleted” trojan has been observed being distributed by exploits and programs that promote software-piracy, such as ‘keygens’ and ‘cracks’ (programs designed to bypass software licensing).

To protect itself from being removed, the ZeroAccess rootkit will prevent Internet Explorer 8, 9 and 10 users from downloading any piece of software that might lead to its removal.
When this happens, the Internet Explorer users will see a “filename.exe contained a virus and was deleted” message, which is obviously generated by this infection.
[Image: program contained a virus and was deleted infection]
The “file contained a virus and was deleted” infection, will only affect the Internet Explorer users, so if you are using Google Chrome or Mozilla Firefox, you should be able to download any piece of software without seeing this bogus alert.

In order to remove “[filename].exe contained a virus and was deleted” infection and stop this fake message from showing up and blocking software downloads you need to remove the ZeroAccess rootkit from your computer.

How to remove File contained a virus and was deleted virus (Virus Removal Guide)

This malware removal guide may appear overwhelming due to the amount of the steps and numerous programs that are being used. We have only written it this way to provide clear, detailed, and easy to understand instructions that anyone can use to remove malware for free.
Please perform all the steps in the correct order. If you have any questions or doubt at any point, STOP and ask for our assistance.

STEP 1:  Use ESETSirfefCleaner tool to remove File contained a virus and was deleted

In this first step, we will use the ESETSirefefCleaner tool to remove the File contained a virus and was deleted from your computer.

  1. You can download ESETSirefefCleaner from the below link.
    ESETSIREFEFCLEANER DOWNLOAD LINK(This link will automatically download ESETSirfefCleaner on your computer.)

    Unable to download “ESETSirefefCleaner.exe contained a virus and was deleted”.
    More recent variants of Sirefef might prevent you from downloading this removal tool. If you cannot download the tool, follow the steps below:

    1. Click Start → Computer → Local Disk (C:) → Program Files.
    2. Right-click the Windows Defender folder and select Rename from the context menu.
    3. Add a unique variation to the filename, such as .old (for example, Windows Defender.old).
    4. Click the link above to download the ESETSirefefCleaner tool.When the download is complete, make sure to rename the Windows Defender folder back to its original filename before running the ESET SirefefCleaner tool.
  2. Double-click on ESETSirefefCleaner.exe to start this utility. You may be presented with an User Account Control pop-up asking if you want to allow this to make changes to your device. If this happens, you should click “Yes” to continue.
  3. The message “Win32/Sirefef.EV found in your system” will be displayed if an infection is found. To remove File contained a virus and was deleted from your computer, press the Y key on your keyboard
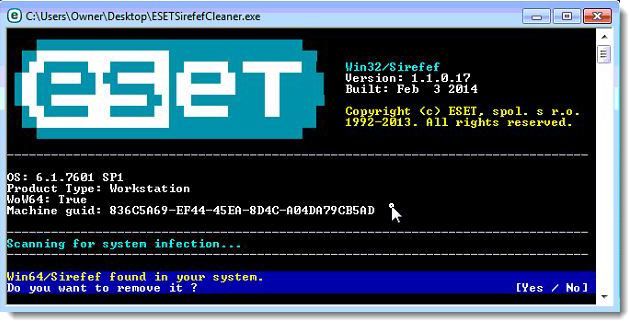
    ESETSirefefCleaner virus detected
  4. Once the tool has run, you will be prompted to restore system services after you restart your computer. Press Y on your keyboard to restore system services and restart your computer.
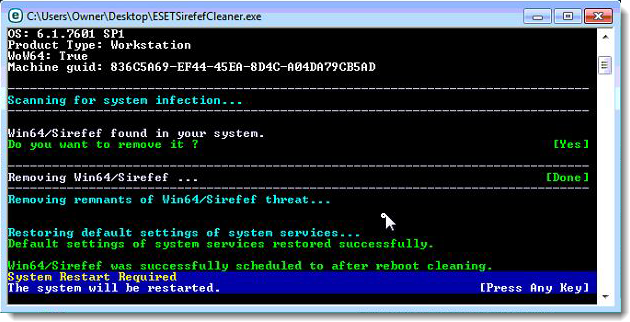
    ESETSirefefCleaner Press Y to remove malware
  5. Once your computer has restarted, if you are presented with a security notification click Yes or Allow. and then continue wit the next step.

STEP 2: Use RKill to stop the File contained a virus and was deleted malicious processes

RKill is a program that will attempt to terminate all malicious processes associated with File contained a virus and was deleted, so that we will be able to perform the next step without being interrupted by this malicious software.

Because this utility will only stop File contained a virus and was deleted running process and does not delete any files, after running it you should not reboot your computer as any malware processes that are configured to start automatically will just be started again.
  1. You can download Rkill from the below link.
    RKILL DOWNLOAD LINK (his link will open a new web page from where you can download “RKill”)
  2. Double click on Rkill program to stop the malicious programs from running.

    Start the Rkill program
  3. RKill will now start working in the background, please be patient while this utiltiy looks for malicious process and tries to end them.
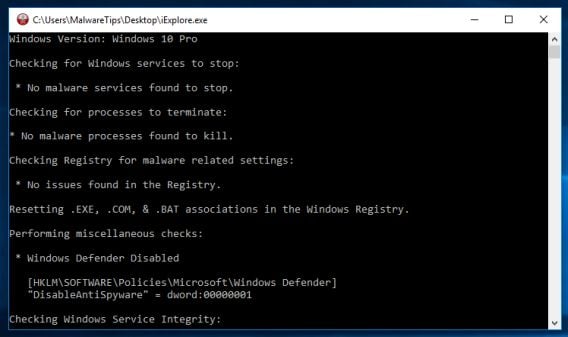
    Rkill Running
  4. When the Rkill tool has completed its task, it will generate a log. Do not reboot your computer after running RKill as the malware programs will start again.
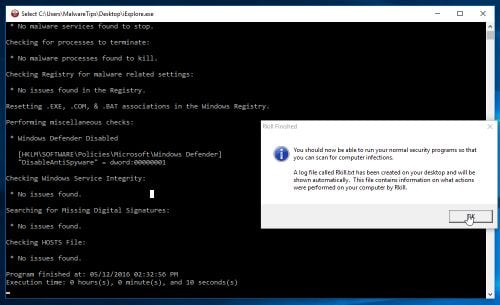
    Rkill Program


STEP 3: Scan your computer with Malwarebytes Anti-Malware to remove File contained a virus and was deleted

Malwarebytes Anti-Malware is a powerful on-demand scanner which should remove the File contained a virus and was deleted virus from your machine. It is important to note that Malwarebytes Anti-Malware will run alongside antivirus software without conflicts.

  1. You can download download Malwarebytes Anti-Malware from the below link.
    MALWAREBYTES ANTI-MALWARE DOWNLOAD LINK (This link open a new page from where you can download “Malwarebytes Anti-Malware”)
  2. When Malwarebytes has finished downloading, double-click on the “mb3-setup-consumer” file to install Malwarebytes Anti-Malware on your computer.
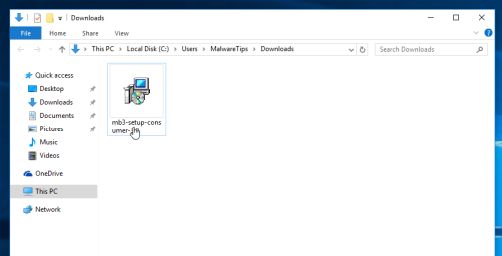
    Malwarebytes installer
    You may be presented with an User Account Control pop-up asking if you want to allow Malwarebytes to make changes to your device. If this happens, you should click “Yes” to continue with the installation.
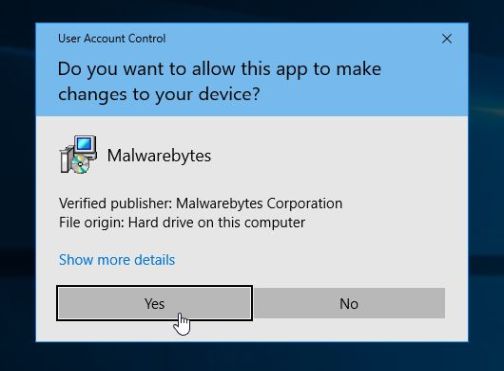
    Malwarebytes User Account Control Prompt
  3. When the Malwarebytes installation begins, you will see the Malwarebytes Setup Wizard which will guide you through the installation process.
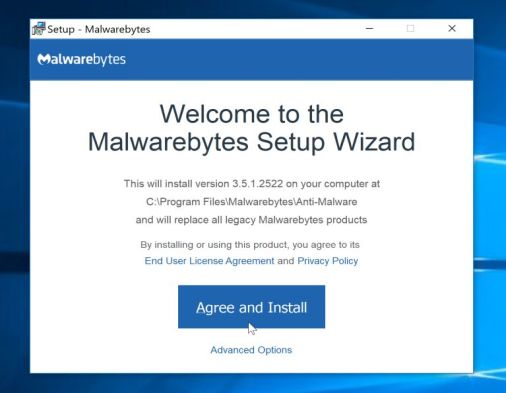
    Setup Malwarebytes installer
    To install Malwarebytes Anti-Malware on your machine, keep following the prompts by clicking the “Next” button.
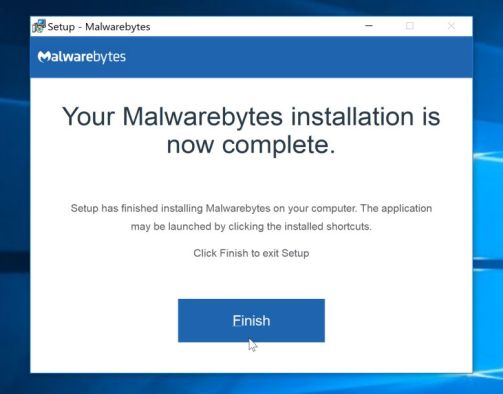
    Completing the Malwarebytes Setup Wizard
  4. Once installed, Malwarebytes will automatically start and update the antivirus database. To start a system scan you can click on the “Scan Now” button.
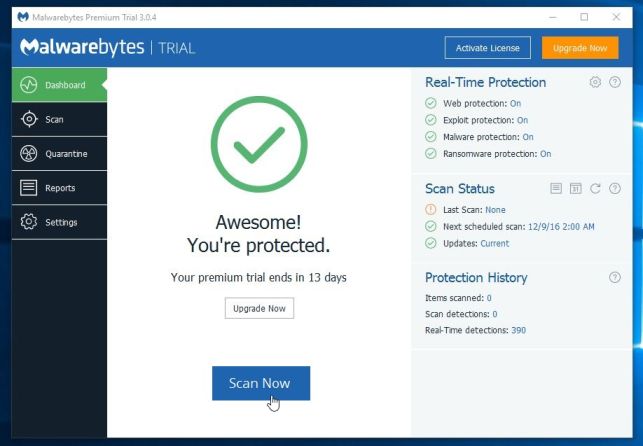
    Perform a system scan with Malwarebytes
  5. Malwarebytes Anti-Malware will now start scanning your computer for malicious programs.
    This process can take a few minutes, so we suggest you do something else and periodically check on the status of the scan to see when it is finished.
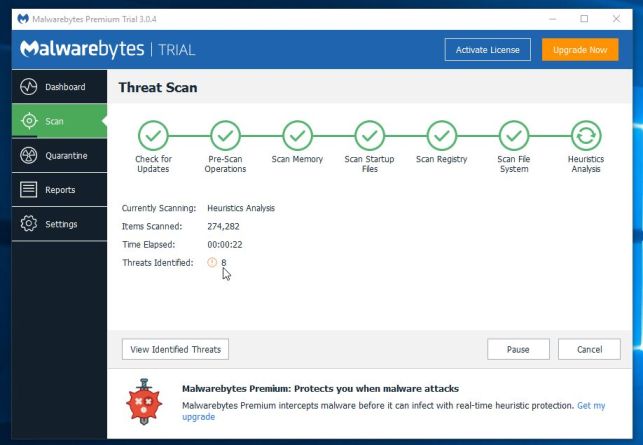
    Malwarebytes scanning for malware
  6. When the scan has completed, you will be presented with a screen showing the malware infections that Malwarebytes Anti-Malware has detected.
    To remove the malicious programs that Malwarebytes has found, click on the “Quarantine Selected” button.
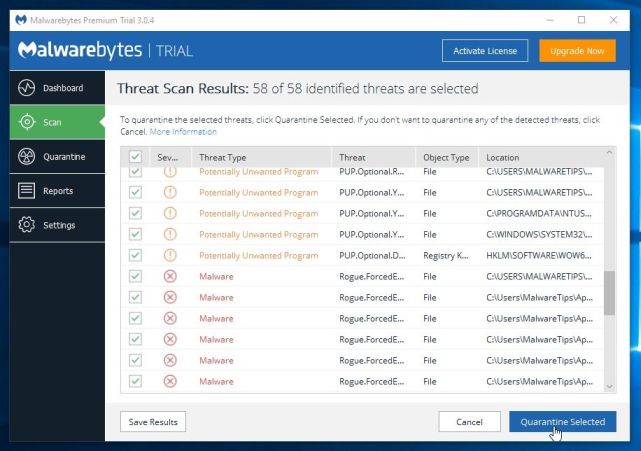
    Malwarebytes Quarantine Selected
  7. Malwarebytes Anti-Malware will now quarantine all the malicious files and registry keys that it has found.
    To complete the malware removal process, Malwarebytes may ask you to restart your computer.
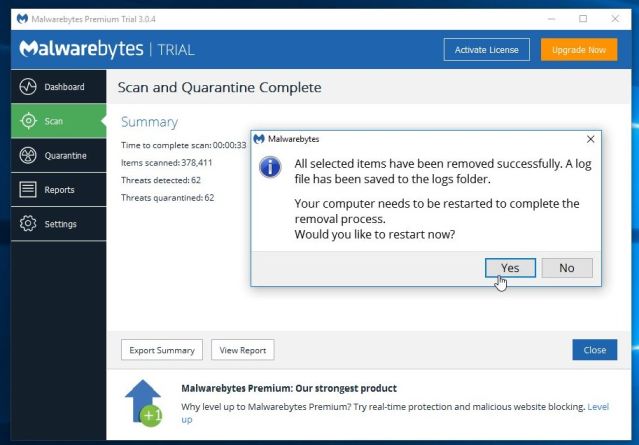
    Malwarebytes removing malware from computer
    When the malware removal process is complete, you can close Malwarebytes Anti-Malware and continue with the rest of the instructions.

STEP 4: Double-check for malicious programs with HitmanPro

HitmanPro can find and remove malware, adware, bots, and other threats that even the best antivirus suite can oftentimes miss. HitmanPro is designed to run alongside your antivirus suite, firewall, and other security tools.

  1. You can download HitmanPro from the below link:
    HITMANPRO DOWNLOAD LINK (This link will open a new web page from where you can download “HitmanPro”)
  2. When HitmanPro has finished downloading, double-click on the “hitmanpro” file to install this program on your computer.
    HitmanPro icon
    You may be presented with an User Account Control pop-up asking if you want to allow HitmanPro to make changes to your device. If this happens, you should click “Yes” to continue with the installation.
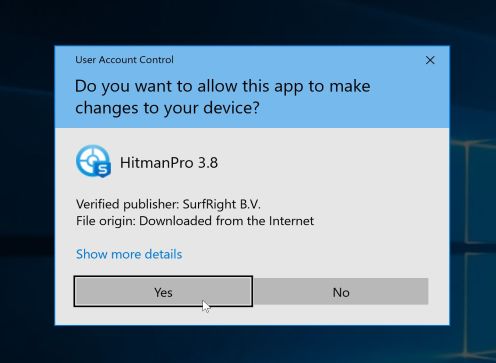
    HitmanPro User Account Control Pop-up
  3. When the program starts you will be presented with the start screen as shown below. Now click on the Next button to continue with the scan process.
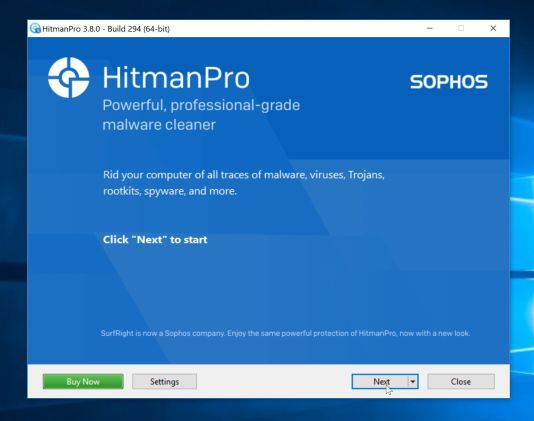
    HitmanPro setup process
  4. HitmanPro will now begin to scan your computer for malware.
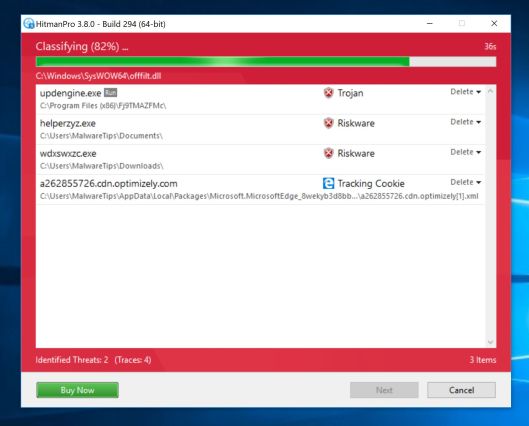
    HitmanPro scanning for File contained a virus and was deleted virus
  5. When it has finished it will display a list of all the malware that the program found as shown in the image below. Click on the “Next” button, to remove malware.
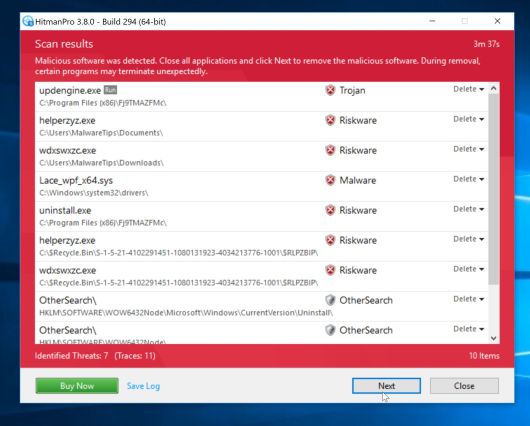
    HitmanPro detected malware
  6. Click on the “Activate free license” button to begin the free 30 days trial, and remove all the malicious files from your computer.
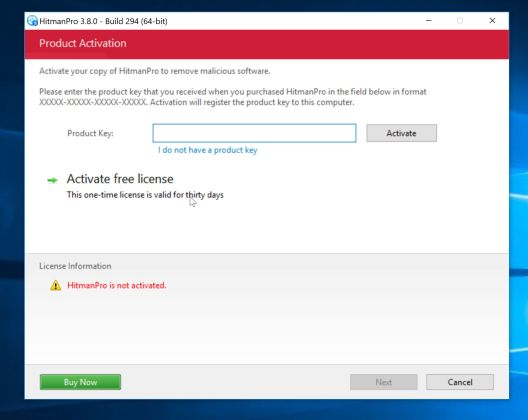
    Activate HitmanPro to remove malware
    When the process is complete, you can close HitmanPro and continue with the rest of the instructions.

(OPTIONAL) STEP 5: Use Zemana AntiMalware Portable to remove File contained a virus and was deleted

Zemana AntiMalware Portable is a free utility that will scan your computer for the File contained a virus and was deleted and other malicious programs.
This step should be performed only if your issues have not been solved by the previous steps.
  1. You can download Zemana AntiMalware Portable from the below link:
    ZEMANA ANTIMALWARE PORTABLE DOWNLOAD LINK (This link will open a new web page from where you can download “Zemana AntiMalware Portable”)
  2. Double-click on the file named “Zemana.AntiMalware.Portable” to perform a system scan with Zemana AntiMalware Free.
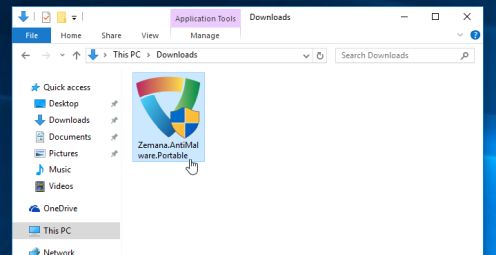
    Zemana AntiMalware portable
    You may be presented with a User Account Control dialog asking you if you want to run this program. If this happens, you should click “Yes” to allow Zemana AntiMalware to run.
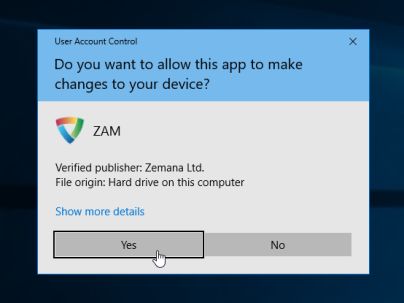
    Zemana AntiMalware User Account Control
  3. When Zemana AntiMalware will start, click on the “Scan” button to perform a system scan.
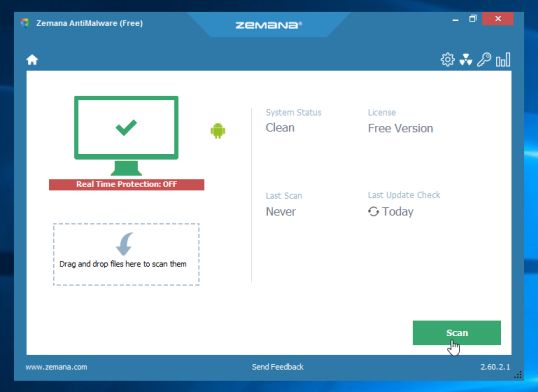
    Zemana AntiMalware Free Scan
  4. Zemana AntiMalware will now scan your computer for malicious programs. This process can take up to 10 minutes.
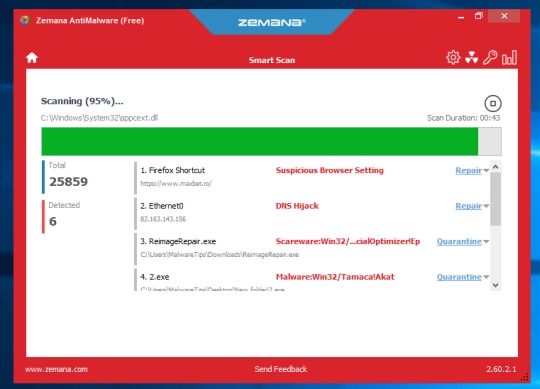
    Zemana AntiMalware scanning for virus
  5. When Zemana has finished finished scanning it will show a screen that displays any malware that has been detected. To remove all the malicious files, click on the “Next” button.
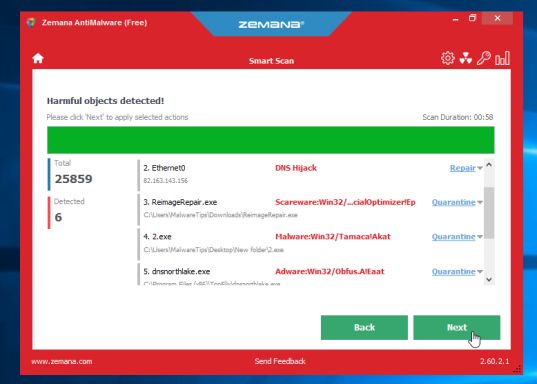
    Zemana AntiMalware Removing File contained a virus and was deleted Virus
    Zemana AntiMalware will now start to remove all the malicious programs from your computer.
Your computer should now be free of the File contained a virus and was deleted. If you are still experiencing problems while trying to remove File contained a virus and was deleted from your machine, you can ask for help in our Malware Removal Assistance forum.
How to Stay Safe Online

Here are 10 basic security tips to help you avoid malware and protect your device:

  1. Use a good antivirus and keep it up-to-date.

    Shield Guide

    It's essential to use a good quality antivirus and keep it up-to-date to stay ahead of the latest cyber threats. We are huge fans of Malwarebytes Premium and use it on all of our devices, including Windows and Mac computers as well as our mobile devices. Malwarebytes sits beside your traditional antivirus, filling in any gaps in its defenses, and providing extra protection against sneakier security threats.

  2. Keep software and operating systems up-to-date.

    updates-guide

    Keep your operating system and apps up to date. Whenever an update is released for your device, download and install it right away. These updates often include security fixes, vulnerability patches, and other necessary maintenance.

  3. Be careful when installing programs and apps.

    install guide

    Pay close attention to installation screens and license agreements when installing software. Custom or advanced installation options will often disclose any third-party software that is also being installed. Take great care in every stage of the process and make sure you know what it is you're agreeing to before you click "Next."

  4. Install an ad blocker.

    Ad Blocker

    Use a browser-based content blocker, like AdGuard. Content blockers help stop malicious ads, Trojans, phishing, and other undesirable content that an antivirus product alone may not stop.

  5. Be careful what you download.

    Trojan Horse

    A top goal of cybercriminals is to trick you into downloading malware—programs or apps that carry malware or try to steal information. This malware can be disguised as an app: anything from a popular game to something that checks traffic or the weather.

  6. Be alert for people trying to trick you.

    warning sign

    Whether it's your email, phone, messenger, or other applications, always be alert and on guard for someone trying to trick you into clicking on links or replying to messages. Remember that it's easy to spoof phone numbers, so a familiar name or number doesn't make messages more trustworthy.

  7. Back up your data.

    backup sign

    Back up your data frequently and check that your backup data can be restored. You can do this manually on an external HDD/USB stick, or automatically using backup software. This is also the best way to counter ransomware. Never connect the backup drive to a computer if you suspect that the computer is infected with malware.

  8. Choose strong passwords.

    lock sign

    Use strong and unique passwords for each of your accounts. Avoid using personal information or easily guessable words in your passwords. Enable two-factor authentication (2FA) on your accounts whenever possible.

  9. Be careful where you click.

    cursor sign

    Be cautious when clicking on links or downloading attachments from unknown sources. These could potentially contain malware or phishing scams.

  10. Don't use pirated software.

    Shady Guide

    Avoid using Peer-to-Peer (P2P) file-sharing programs, keygens, cracks, and other pirated software that can often compromise your data, privacy, or both.

To avoid potential dangers on the internet, it's important to follow these 10 basic safety rules. By doing so, you can protect yourself from many of the unpleasant surprises that can arise when using the web.

46 thoughts on “Remove “File contained a virus and was deleted” (Virus Removal Guide)”

  1. I legit can’t believe that my problem is fixed. 2-3 years after my problem started on my old laptop & I was about to give up. I came across this article & all I did was change the Windows Defender folder name & I no longer get the error messages. I saw someone else experienced the same success in the comments so I tried that before continuing the other steps. THANK YOU, THANK YOU, THANK YOU! I hope I can move forward without ever needing those other steps but at least I know the article is here if I need it!

  2. Option 1 worked like a charm! I had to use Rkill instead of Comofix as it does not work with Windows 8.1 Also if you are within a domain there is no free option for HitmanPro (I skipped this step) Thank you for the guidance….

  3. One of the most comprehensive collections of tools I have seen in a long time. Thank you for posting.

  4. Finally!!!! I was 30-sec close to restoring my computer.. I’m no way near being a computer genius, so option 1 worked like a charm!! I’m SUPER ecstatic!! Thank you for your simple step-by-step process.. Truly appreciate it! You jus saved me $400.. Works like a charm ;)

  5. Very grateful to you, Stilian, for what you’re doing. I think the Option 1 steps have cleared the Zero Access trojan from my laptop – it showed up early on in ComboFix. However, I made a stupid mistake with your instructions about renaming the Windows Defender file – I ran all the scans with the file renamed, and only went back to the normal name afterwards. So Defender still doesn’t have its full icon in Control Panel, and I still can’t download files in Internet Explorer (though I can at least open the Defender folder and see the list of files in it). I’ve tried giving it back its original name and re-running ComboFix (no problems reported) and Services Repair. But the problem isn’t solved. Is there anything more I can do?

  6. Oh my goodness!!! My computer is free from this terrible virus. I followed Option one step by step and it worked like a charm. My firewall is turned on and everything. I have been working on this for a week now. Cannot thank you enough.

  7. Dear Stelian,
    Thank you so much for this manual, it takes time but it soooo worth it!!
    a million thanks, you are a life saver!!

  8. Thank you soooo much!!! Worked a treat!! Long process but instructions were spot on and accurate. Highly recommended even for the not so computer literate out there.
    Thanks again!!

  9. Hello,
    Please go ahead with the other steps as the infection is still present on your machine. This is a very serious piece of malware, so as soon as you get rid of it, the better it is.

    Stay safe!

  10. My troubles started with the FBI moneypak virus and I thought this “file deleted” started from that virus. So, when I fixed the FBI virus I thought I was OK. But I tried to download a day later and couldn’t. I tried RKILL and then ran malwarebytes. Ran it in safemode had to use a USB flash drive to run the programs. That didn’t fix the problem. Then I found your blog. Option 1 seemed to work I still had to use a USB flash drive to run COMBOFIX. Its took hours to run and I don’t think it turned off my internet access. At the end it wouldn’t completely shutdown. It was shutting down for hours. So I forced it and then it took a long time to do the report. I downloaded rougueKiller but when I double clicked on it, it wouldn’t run. So I ran Malwarebytes and found no threats. And every thing seems to be okay. I hope. I have Norton 360 and don’t really understand how I got this. But it fix the FBI moneypak and not the this.
    Thanks for you Tips.

  11. Hello Rick,
    Indeed, this is one of the most stubborn infections to remove. The worst part is that the infection is very wide spread, and as you’ve seen, the removal process is time consuming.

    Stay safe!

  12. Thanks for this great information Stelian. I followed the plan step by step and it worked perfectly. One less headache to worry about. You da man!

  13. Hello,
    Lets try to enable the Admin account, and clean up your computer from this account.

    1.Open the Command Prompt window by clicking the Start button, clicking All Programs, clicking Accessories, and then right-click on the Command Prompt icon and select ““Run as administrator”
    2.Now type the below command:
    net user administrator /active:yes
    3.You should see a message that the command completed successfully. Log out or restart your computer and you’ll now see the Administrator account as a choice.
    4. After you have chose to login into the Administrator account, run a scan with all the tools from OPTION 1.
    5. Once this process has been completer, you can then log back in into your regular account.
    Stay safe!

  14. Trying option 1 renamed windows defender as described, when I move to the next step Roguekiller it says the link contains a virus and was deleted, then go to step 4 run as described tick everything and remove then go to step 5 and hitmanpro has the original virus message hitmanPro.exe contained a virus and was deleted.
    So the only one I can run is Malwarebytes but it does not seem to be removing the virus on its own. Any advice greatly appreciated

  15. Option 1 worked great for me. Disabling antivirus programs was harder than it sounds. I wasn’t sure if there might be some running I didn’t know about. Mcafee said it was disabled, but Combofix alerted me that it was not. I finally just went ahead and ran Combofix and ignored the warning. Luckily it ran with no problems although it took at least a half hour and wasn’t sure it was actually doing anything – just takes patience. The full Malwarebytes scan took about 4 hours. Before running I checked a thumb drive with Malwarebytes and it had the same 2 unremovable registry issues my hard drive had. I’ll need to check the drive I have my backup data on to see if it is also infected. I can just reformat the thumb drive, but I’m not sure how to apply option 1 to my backup drive. Maybe just connect it and rerun all of option 1?

  16. That did the trick! After spending hours researching this problem, you seem to be the only guy that really knew what victims were talking about and how to handle it. Thanks!

  17. Hello Ken,
    I fixed the link, thank you! Now, HitmanPro has a free 30-days trial for home users, however if you are using a laptop from work you will need to buy this product.

    Stay safe!

  18. Hello,
    Yes please follow the other steps. If you cannot download the utilities, you ca use a USB stick to transfer them to the infected computer.
    ESET Service Repair and the other tools should fix your issues.

    Stay safe!

  19. Hello Mark,
    Yes, this infection can corrupt your video or audio drivers, and you will need to uninstall and reinstall to fix the problem.
    Lets run a scan with ESETSirefefCleaner tool:
    1.Click the link below to download the ESETSirefefCleaner tool, and save the file to your Desktop : http://download.eset.com/special/ESETSirefefCleaner.exe
    2.From your Desktop, double-click ESETSirefefCleaner utility. If security notifications appear, click Continue or Run.
    3.The message “Win32/Sirefef.EV found in your system” will be displayed If an infection is found. Press Y on your keyboard to remove the infection.
    4.Once the tool has run, you will be prompted to restore system services after you restart your computer. Press Y on your keyboard to restore system services and restart your computer.
    5.Once your computer has restarted, if you are presented with a security notification click Yes or Allow.
    6.Click Yes at the ESET Services Repair tool window.
    7.Once the ESET Services Repair process is complete, you will again be prompted to restart your computer, to do so click Yes.

    Then, please perform a scan with HitmanPro, RogueKiller and Malwarebytes Anti-Malware. Let me know how your computer is running.

  20. Option 2 HitmanPro Kickstart worked a treat to fix this problem where a couple of other USB bootable scanners had failed. A huge thanks to Stelian for this page and to Mark from SurfRight for that great little “Flying Kick Guy”.
    Cheers.

  21. Wow it actually worked, ok I dont normally write on these but this site deserves a big Thankyou. So THANKYOU!

  22. Hello Steven,
    Lets run a scan with ESETSirefefCleaner tool:

    1.Click the link below to download the ESETSirefefCleaner tool, and save the file to your Desktop.
    ESET SIREFEFCLEANER TOOL DOWNLOAD LINK : http://download.eset.com/special/ESETSirefefCleaner.exe
    2.From your Desktop, double-click ESETSirefefCleaner utility. If security notifications appear, click Continue or Run.
    3.The message “Win32/Sirefef.EV found in your system” will be displayed If an infection is found. Press Y on your keyboard to remove the infection.
    4.Once the tool has run, you will be prompted to restore system services after you restart your computer. Press Y on your keyboard to restore system services and restart your computer.
    5.Once your computer has restarted, if you are presented with a security notification click Yes or Allow.
    6.Click Yes at the ESET Services Repair tool window.
    7.Once the ESET Services Repair process is complete, you will again be prompted to restart your computer, to do so click Yes.

    Then, please perform a scan with HitmanPro, RogueKiller and Malwarebytes Anti-Malware. Let me know how your computer is running.

  23. Stelian-

    thank you very much for your assistance. I went through the process noted under option 1 and my system appears to working fine again. Interestingly, the Malwarebytes application did not find any infected files and the HitmanPro only found tracking cookies. But all seems to be fine.

    As an aside- I did call McAfee to see if they could help me originally, and the guy told me that I had an operating system problem as I was running an older version of Java and that my McAfee security software was not at all responsible for the infection. Then he tried to sell me a year’s worth of tech support for $190 and when I rejected that offer he tried to sell me a one time fix for $90. I won’t be renewing with them when my subscription is up.

    Thanks again you- provide tremendous help.

  24. YES!!!! FINALLY!!!!!! Step 1 worked like a charm!! Thanks so much! You’re a true lifesaver!!

  25. Click Start –> Computer –> Local Disk (C:) –> Program Files.
    Right-click the Windows Defender folder and select Rename from the context menu.
    Add a unique variation to the filename, such as .old (for example, Windows Defender.old).
    After you have downloaded and run all the scans, make sure to rename the Windows Defender folder back to its original filename.

    Stay safe!

  26. I did apply all instructions of OPTION 1 including ComboFix and I still have the problem during download with IE10, but not with Google Chrome!!

    Is it a but with IE10? Your help would be greatly appreciated.
    Thanks!

  27. Hello,
    Do you have an USB stick? If yes, then copy the tools from this guide and run them on the infected machine… Is that easy…. :)
    Stay safe!

  28. Good instruction – but it dosent work – I get the same – contained a virus…. message when I try to download your recommended fixes!

  29. Hello Mark,
    Can you please run a scan with Combofix and post the logs here so that I can get an idea on what’s going on:

    You can download ComboFix from here: http://download.bleepingcomputer.com/sUBs/ComboFix.exe

    VERY IMPORTANT !!! Save as Combo-Fix.exe during the download.
    ComboFix must be renamed before you download to your Desktop

    Close any open browsers.

    Very Important!!!> Temporarily disable your anti-virus, script blocking and any anti-malware real-time protection before performing a scan. They can interfere with ComboFix or remove some of its embedded files which may cause “unpredictable results”.

    WARNING: Combofix will disconnect your machine from the Internet as soon as it starts

    Please do not attempt to re-connect your machine back to the Internet until Combofix has completely finished.

    If there is no internet connection after running Combofix, then restart your computer to restore back your connection.

    1. Double click on ComboFix.exe & follow the prompts.

    2. Accept the disclaimer and allow to update if it asks

    3. When finished, it shall produce a log for you.

    Notes:

    Do not mouse-click Combofix’s window while it is running. That may cause it to stall.

    Do not “re-run” Combofix. If you have a problem, reply back for further instructions.

    If after the reboot you get errors about programs being marked for deletion then reboot, that will cure it.

  30. Great job man! Used this on a customers computer via teamviewer and it worked like a champ.

Comments are closed.