


A notification says the Finance Department's general manager has shared a secure PDF with you. The file is approved, small, and important enough to open before the next meeting.
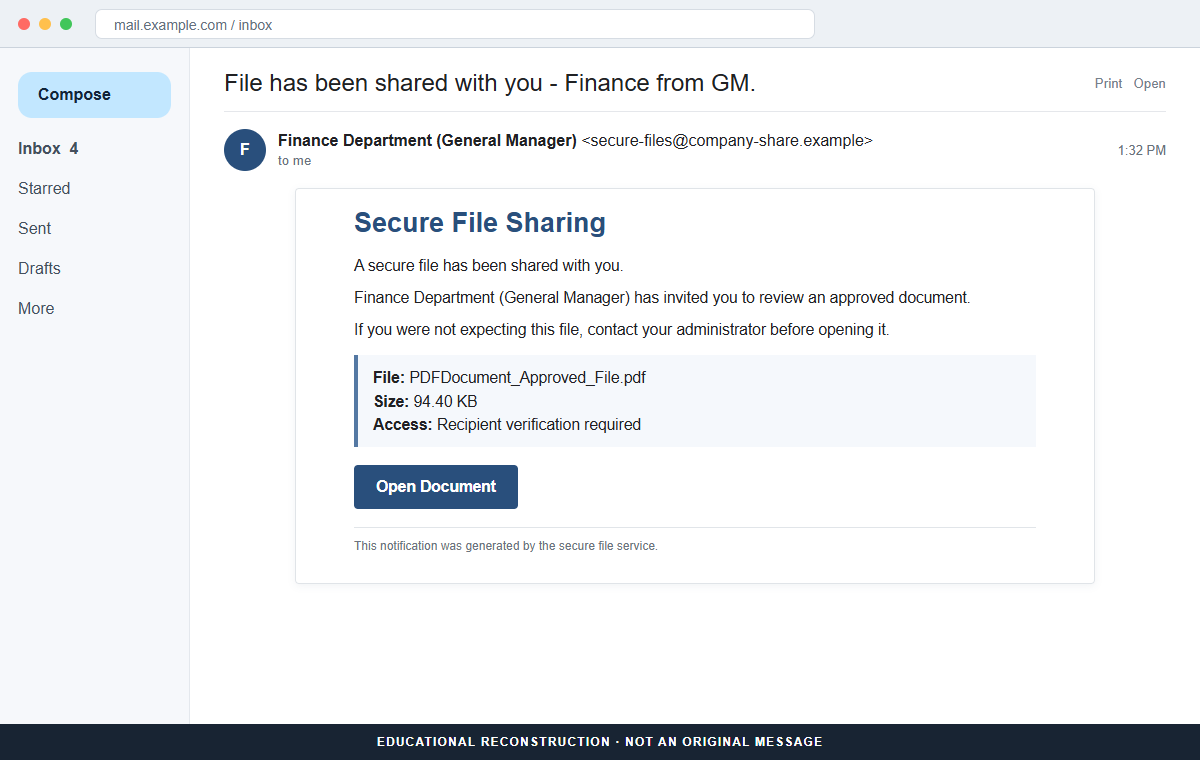
The Finance Department Secure File email scam uses that internal-business story to steal email credentials. Its Open Document button leads to an unrelated website that imitates the recipient's usual sign-in provider.
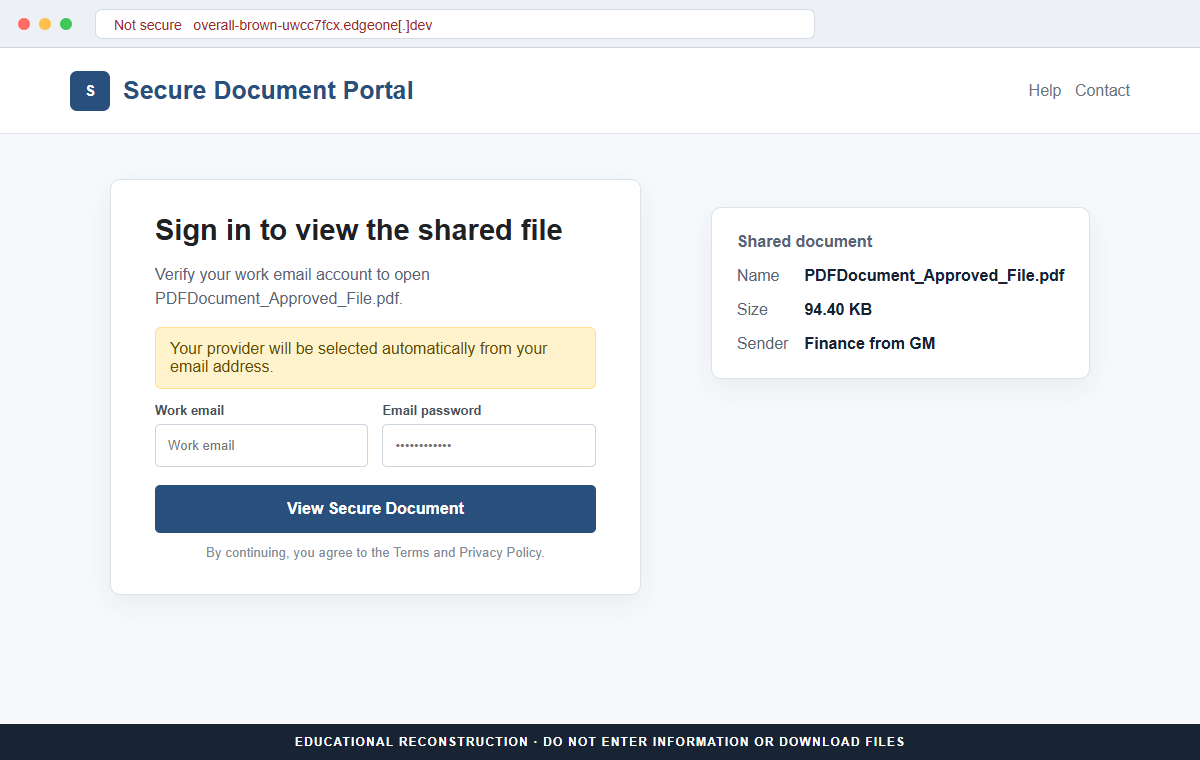
The page may switch between Gmail, Outlook, Yahoo, or another familiar design after reading the email address. That adaptive branding is a feature of the phishing kit, not evidence that the real provider authorized the page.
No malware was confirmed in the documented campaign. The direct risk is account takeover, followed by access to company messages, documents, contacts, password resets, and trusted conversations that can be reused for financial fraud.
Overview
The notice impersonates an internal finance workflow
The subject reads File has been shared with you – Finance from GM. The message says Finance Department (General Manager) shared a secure file and asks the recipient to review it.
A finance-and-management combination carries natural authority. Employees may assume the document concerns a budget, payment, payroll, contract, or approval that should not be delayed.
A precise file name and size make the lure tangible
The supposed file is PDFDocument_Approved_File.pdf and its displayed size is 94.40 KB. Those small technical details make the notification resemble an automated document-sharing service.
The email even advises recipients to contact an administrator if the file is unexpected. That borrowed safety language can lower suspicion because a criminal message appears to acknowledge the possibility of fraud.
The Open Document button leads to credential theft
The link opens overall-brown-uwcc7fcx.edgeone[.]dev, not a recognized company document platform or the recipient's normal email-provider domain.
The destination asks for an email address and password to view the PDF. Credentials entered there can be captured by the attacker, while the promised document may never exist.
- The sender claims to be Finance Department (General Manager).
- The subject says a file was shared by Finance from GM.
- The alleged document is PDFDocument_Approved_File.pdf.
- A precise size of 94.40 KB gives the notice a system-generated appearance.
- The message uses security language about unexpected files to build trust.
- Open Document leads to overall-brown-uwcc7fcx.edgeone[.]dev.
- The page adapts its appearance to the visitor's email provider.
- The form asks for the current email-account password.
Why a Finance File Shared by the General Manager Gets Clicked
Finance messages sit near the center of many organizations. They can involve salaries, supplier payments, banking, tax records, forecasts, contracts, or confidential management decisions. Employees may hesitate to challenge them publicly.
The general-manager reference adds hierarchy. Even when the employee does not know exactly why the document was shared, opening it may feel safer than appearing unresponsive to senior leadership.
A secure-file notification also explains why the document is not attached. Cloud collaboration is common, and recipients are used to following a button before they can see a protected PDF.
Attackers exploit that familiarity without needing to copy a real conversation. Generic labels such as Finance Department and General Manager can work across thousands of companies while still feeling internal to each recipient.
The warning about unexpected files is especially manipulative. It imitates responsible security advice, then places the attacker-controlled button immediately beside it, encouraging the recipient to trust the very route that should be verified.
What the Link and Login Request Reveal
A legitimate shared file should open on the organization's approved Microsoft 365, Google Workspace, Dropbox, Box, SharePoint, or other documented platform. The employee should recognize that platform and its domain from normal work.
The campaign domain, overall-brown-uwcc7fcx.edgeone[.]dev, does not become an email provider because it displays a copied sign-in form. HTTPS only encrypts the connection to whoever controls that address.
Adaptive phishing pages often use the part after the @ in an email address to select a logo and background. They may also pass the address in the URL so the correct theme appears before the victim types anything.
A real identity provider authenticates users only on its verified domain or through an approved company single-sign-on route. A file-sharing page has no reason to collect the employee's current mailbox password directly.
Because the campaign is credential phishing, entering the password is the critical event. Clicking alone is less serious if nothing was downloaded, but the message and destination should still be reported so other recipients can be protected.
How the Finance Department Secure File Email Scam Works
Step 1: A fake automated notification enters the inbox
The attacker sends a message designed to resemble a cloud-file alert. The sender display name may mention finance, the general manager, secure documents, approvals, or a familiar collaboration service.
Automated alerts receive less conversational scrutiny than handwritten messages. Recipients may not expect a greeting, personal signature, or detailed explanation from a system-generated notice.
Step 2: Authority and confidentiality discourage questions
The phrase Finance from GM suggests a senior, sensitive matter. An employee may avoid forwarding the message for confirmation because the document could contain private financial or personnel information.
That reluctance benefits the attacker. A quick call to the assistant, finance office, or help desk would often expose the fact that no file was shared.
Step 3: File details create the illusion of a real object
PDFDocument_Approved_File.pdf and 94.40 KB make the claim feel measurable. The word Approved implies that someone already reviewed the content and that the recipient's task is merely to open it.
Attackers can invent a file name and size without hosting any PDF. The visible details are ordinary text inside the email and do not prove that a document exists.
Step 4: Open Document leaves the company's normal platform
The button routes the visitor to overall-brown-uwcc7fcx.edgeone[.]dev. A redirect may briefly show other addresses, but the final domain requesting credentials is the one that matters.
On mobile devices, a shortened address bar and full-screen login design can hide the mismatch. Pause and expand the entire address before interacting with any field.
Step 5: The phishing kit selects familiar provider branding
The page can show Gmail, Outlook, Yahoo, or another theme based on the submitted address or data embedded in the link. Matching colors and logos make the sign-in request feel routine.
The kit does not need a live connection to the provider to copy its appearance. A familiar sign-in design on the wrong domain remains a counterfeit page.
Step 6: The password is sent to the attacker
When the victim submits the form, the address and password can be transmitted immediately. An error message may request a second attempt, giving the attacker another credential if the user tries an alternative.
The page may then redirect to a genuine service or display a harmless PDF error. That ending can convince the victim that access failed for an ordinary technical reason.
Step 7: The captured account becomes a business foothold
Criminals can read internal mail, search for payments, download cloud documents, and request password resets for connected services. They may add forwarding rules to monitor future conversations.
Messages sent from the real mailbox can target finance employees, vendors, or customers with believable bank changes and secure-file links. One stolen password can therefore expand into a wider business-email compromise.
Company and Checkout Checks
Check the approved collaboration platform
Open the normal document service from the company portal, a saved bookmark, or its official application. Search shared items, notifications, and recent activity for PDFDocument_Approved_File.pdf.
If the file is legitimate, its sharing event should exist inside the authenticated platform. Do not use an unrelated email destination to create a document that the real service cannot show.
Confirm with finance or the general manager's office
Use a known internal number, directory entry, or separate chat conversation. Ask whether the file was shared, who approved it, and which platform should contain it.
Do not reply to the suspicious notice for confirmation. The reply address may belong to the attacker, and a reassuring answer from the same unverified channel adds no independent evidence.
Read the registrable domain
Identify the main domain immediately before the suffix. overall-brown-uwcc7fcx.edgeone[.]dev is not Gmail, Microsoft, Yahoo, or a recognizable company identity portal.
A padlock, provider logo, privacy link, or professional layout cannot repair that mismatch. Those elements can be copied, and free hosting services can provide HTTPS to attacker-controlled pages.
Keep passwords inside the identity provider
Enter a company password only on the verified single-sign-on or email-provider domain reached independently. A document portal should redirect to the real identity service rather than recreating its password fields.
Password managers provide a useful warning because they normally refuse to autofill credentials on an unfamiliar domain. Treat that refusal as a reason to stop, not as a problem to solve by typing manually.
Warning Signs to Check Before You Act
- An unexpected file is supposedly shared by Finance from GM.
- The sender uses a generic department title rather than a verifiable employee identity.
- PDFDocument_Approved_File.pdf is vague and lacks business context.
- The precise 94.40 KB size is used as a substitute for a real sharing record.
- The message borrows security advice to make its own button appear trustworthy.
- Open Document leads to overall-brown-uwcc7fcx.edgeone[.]dev.
- The destination is not the organization's approved collaboration platform.
- A file page asks for the current email-account password.
- The login branding changes after the email address is entered.
- A password manager will not autofill on the unfamiliar domain.
- No matching share appears in the independently opened document service.
- Finance or the general manager's office cannot confirm sending the file.
The phrase secure file describes the story, not the security of the destination. Trust comes from the verified platform, domain, account session, and known sender. In this campaign, every meaningful check points away from the button.
What to Do if You Have Fallen Victim to This Scam
- Change the exposed email password immediately. Open the real provider through a saved bookmark or its official app, not through the Finance Department secure-file notice message. Create a strong unique password and replace it anywhere the same or a similar password was reused.
- Enable stronger multi-factor authentication. Prefer a passkey, hardware security key, or authenticator app when available. Review existing methods and remove telephone numbers, recovery addresses, app passwords, and devices you do not recognize.
- Revoke active sessions and connected applications. Sign out other sessions and inspect OAuth access, mail clients, browser sessions, and third-party applications. Criminals may retain access through a token even after the main password has been changed.
- Inspect mailbox rules and forwarding settings. Remove unknown forwarding addresses, delegates, filters, automatic replies, and rules that hide security messages. Review sent mail, deleted messages, trash, and account-recovery notifications for activity you did not initiate.
- Secure accounts that use the mailbox for recovery. Prioritize banking, payment services, cloud storage, shopping, social media, workplace tools, and password managers. Change credentials and review recent activity wherever the compromised mailbox could receive a reset link.
- Contact financial institutions if sensitive data was entered. If the fake form also collected bank, card, tax, payroll, or identity information, call the relevant institution using a trusted number. Ask about account monitoring, replacement credentials, transfer recalls, and fraud alerts.
- Scan the device if anything was downloaded. Run a full scan with Malwarebytes or another trusted security product if a file, browser extension, or remote-support application was installed. Remove unfamiliar software and install operating-system and browser updates.
- Add a blocking layer for future attempts. AdGuard or another reputable DNS and content blocker can prevent some known phishing pages and malicious advertising from loading. Continue checking addresses because a newly registered domain can appear before blocklists update.
- Report the phishing message. Use the email provider's Report Phishing control and notify a workplace or school security team. Preserve the full message and headers first, especially when multiple users received the same lure.
- Warn contacts if the mailbox was misused. Contact colleagues, customers, friends, and vendors through another channel. Ask them to ignore recent links, credential requests, invoice changes, and payment instructions sent during the possible compromise window.
- Reject unsolicited account-recovery offers. A person who claims to restore the account or recover money for an advance fee may be continuing the fraud. Work only with the provider, financial institution, employer, police, or a verified incident-response professional.
Is Your Device Infected? Run a Free Malware Scan
Slow performance, constant pop-ups, or strange behavior? These are classic signs of a malware infection. A quick way to check is to scan your device with Malwarebytes Free, one of the most trusted malware removal tools available. If you only visited a scam page and didn’t download or install anything, this scan is optional.
The free version detects and removes the most common threats, including:
- Adware — the cause of those annoying pop-ups
- Browser hijackers — unwanted redirects and changed homepages
- Trojans and spyware — hidden programs stealing your data
- Potentially unwanted programs (PUPs) — software you never asked for
👉 Select your device below — Windows, Mac, or Android — then follow the simple steps to download Malwarebytes, scan your system, and remove any threats it finds. The scan usually takes 5 to 20 minutes.
Run a Malware Scan with Malwarebytes for Windows
Malwarebytes is one of the most popular and trusted anti-malware tools for Windows — and it’s completely free for removing infections. It catches threats that many antivirus programs miss, including adware, browser hijackers, and trojans. Follow the steps below to scan your PC and remove what Malwarebytes finds.
Download Malwarebytes
Click the button below to download the latest version of Malwarebytes for Windows from the official source. The free version is all you need — it will scan your computer and remove adware, browser hijackers, and other malicious software at no cost.
Download MalwarebytesOfficial installer for Windows 11 and 10. Your download starts right away.Want real-time protection? See Malwarebytes Premium Malwarebytes Free for WindowsScans and removes malware at no cost
-
Install Malwarebytes
When the download finishes, open your Downloads folder and double-click the MBSetup file. If Windows shows a User Account Control pop-up, click “Yes” to allow the installation.
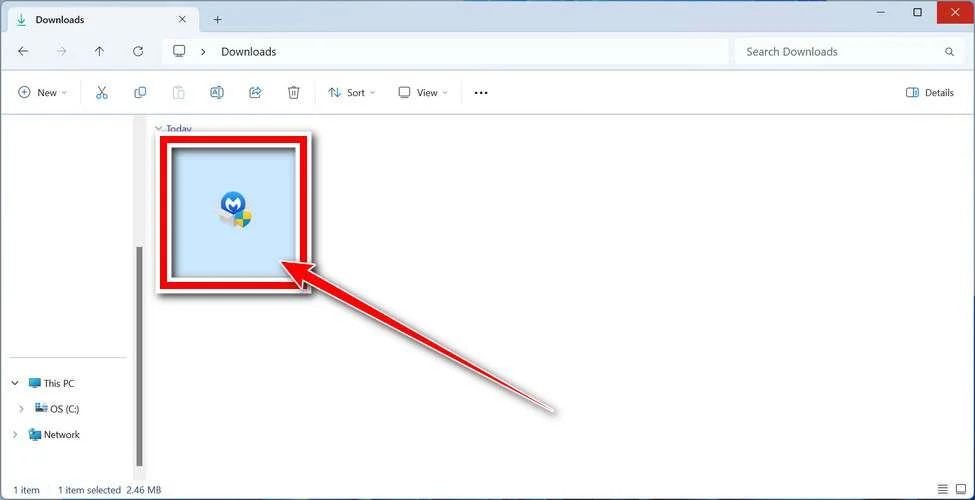
Follow the On-Screen Prompts to Install Malwarebytes
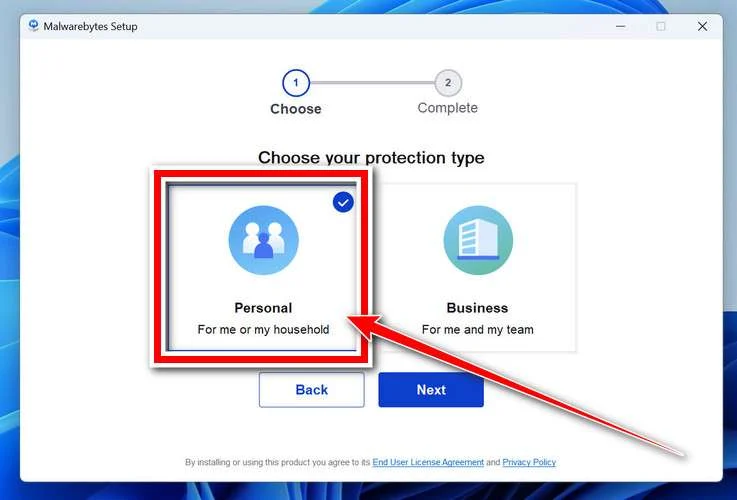
The setup wizard will walk you through a few quick screens:
-
Choose where you’re installing the program — “Personal Computer” or “Work Computer” — then click Next.
-
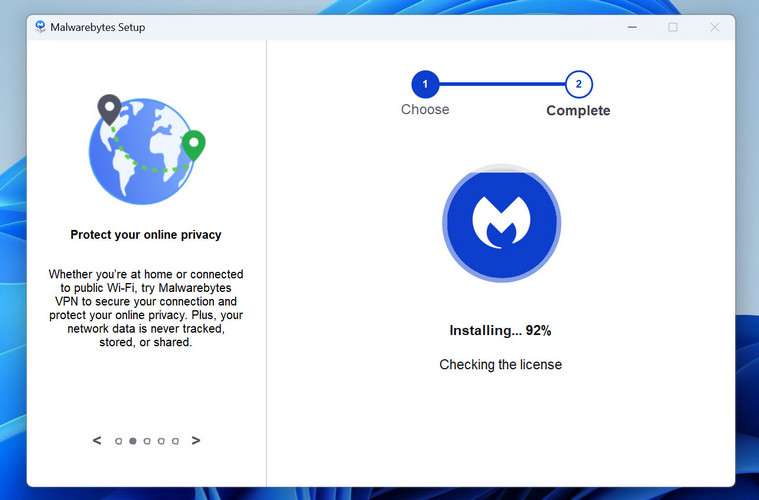
Malwarebytes will now install on your device. This usually takes under a minute.
-
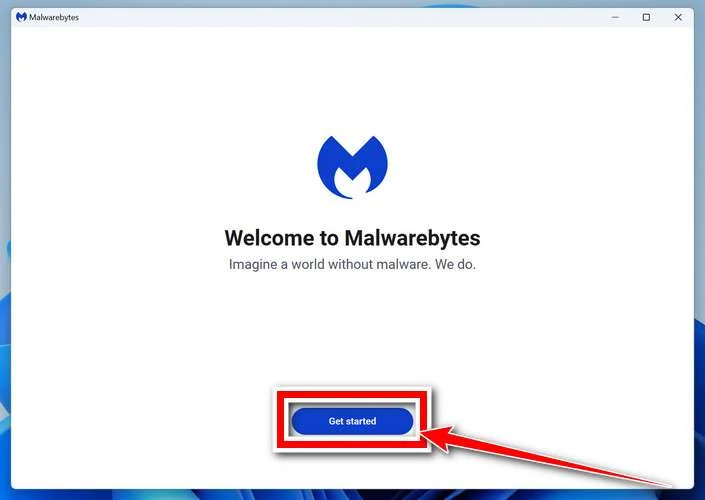
When installation is complete, the “Welcome to Malwarebytes” screen will open automatically.
-
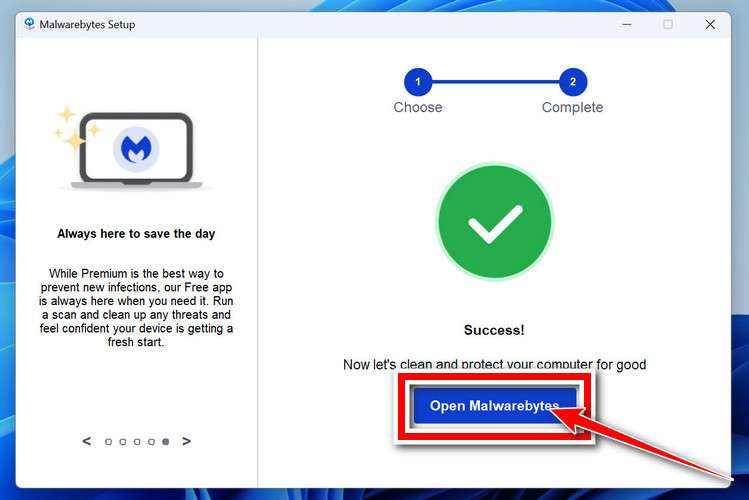
On the final screen, click Open Malwarebytes to launch the program.
-
Optional: Check for rootkits with a Custom Scan
You don’t need to change any settings for a normal scan. The standard Threat Scan in the next step is enough for most problems, so you can go straight to it.
If you also want to check for rootkits, use a Custom Scan. In current versions of Malwarebytes, rootkit scanning is only available there:
- On the Scanner tile, click the three-dot menu and select Advanced Scan.
- Choose Custom Scan. In its options, check Scan for rootkits.
- Select your system drive (usually C:\) as the location to scan, then start the scan. It takes longer than a Threat Scan.
- When it finishes, review and quarantine the results as described in the steps below.
Rootkit scanning isn’t available on Windows devices with ARM processors.
Start the Scan
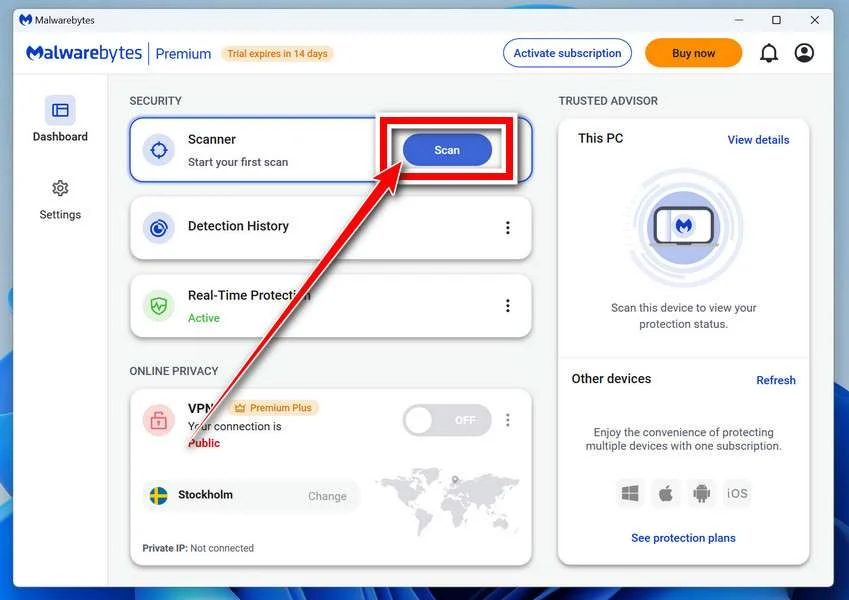
Click the blue Scan button. Malwarebytes will automatically update its virus database and start checking your computer for malware.
-
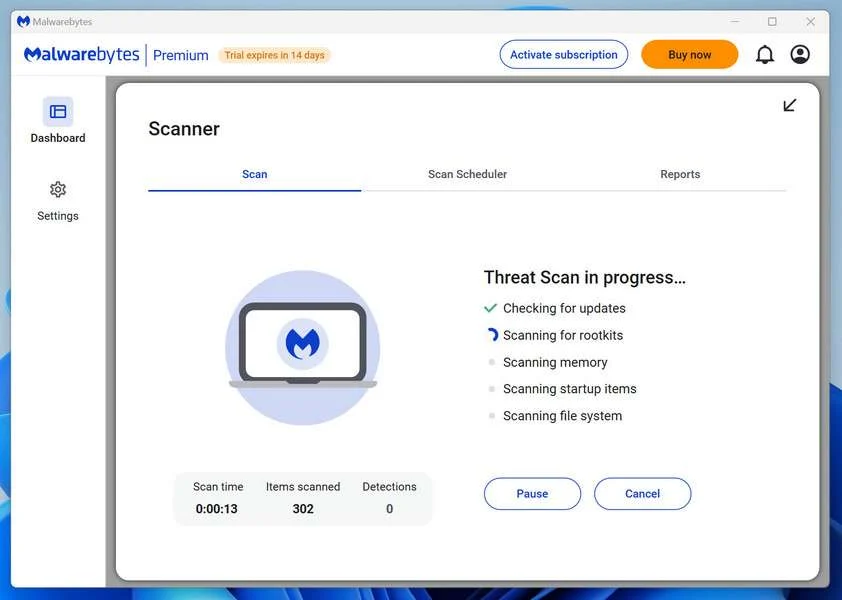
Wait for the Scan to Finish
The scan checks your entire system for browser hijackers and other malicious programs, so it can take 5 to 20 minutes depending on your computer. Feel free to do something else — just check back occasionally to see the progress.
-
Quarantine the Detected Threats
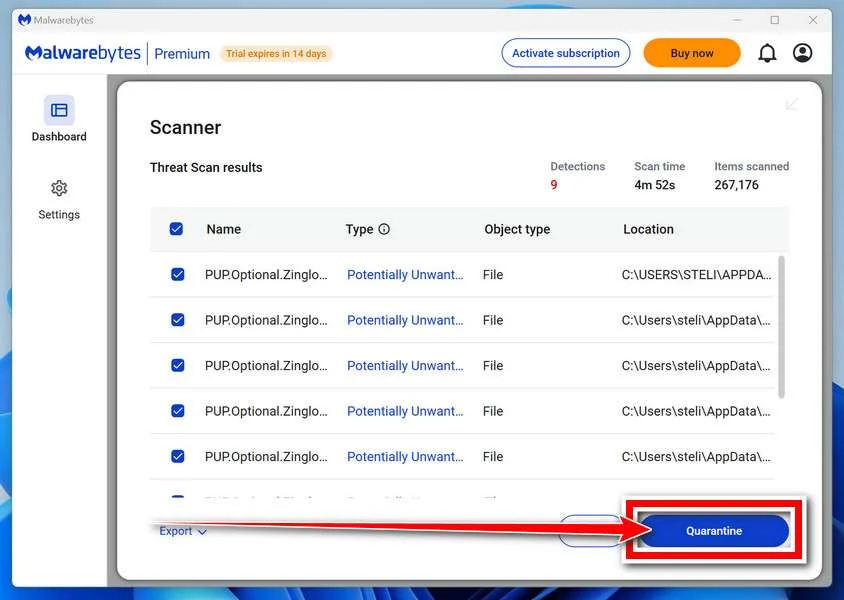
When the scan is done, you’ll see a list of everything Malwarebytes found — malware, adware, and potentially unwanted programs. Click the “Quarantine” button to remove all of them at once.
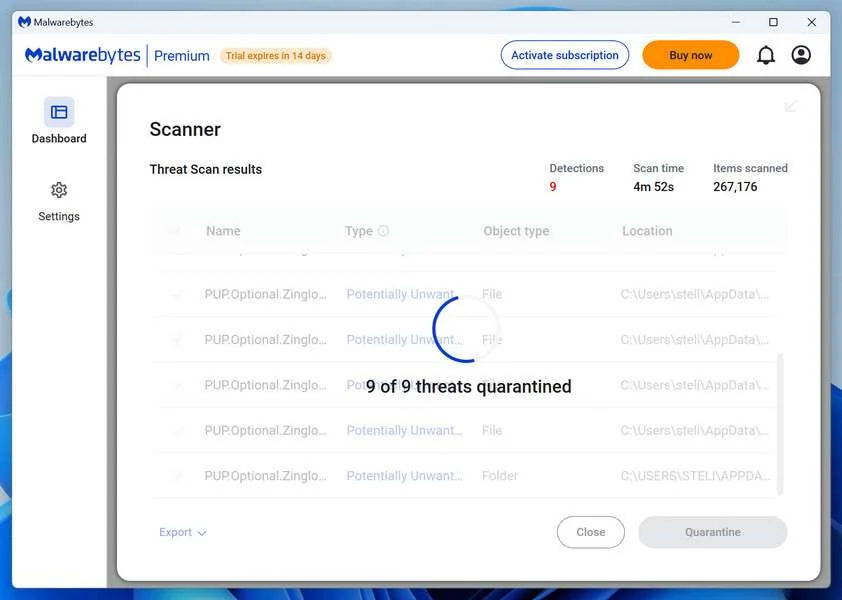
Malwarebytes will now remove the malicious files and registry entries and move them safely into quarantine.
-
Restart Your Computer
Some threats can only be fully removed after a reboot. If Malwarebytes asks you to restart, click Yes. Once you’re logged back in, Malwarebytes has finished removing the threats it found.
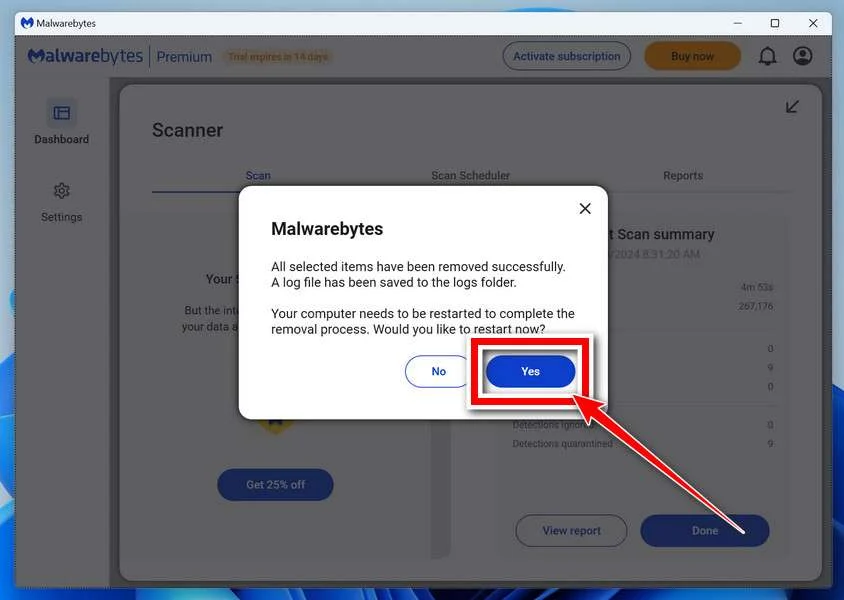
When the scan is done, check whether the problems you noticed have stopped. If they continue, see the options below.
If you are still having problems with your computer after completing these instructions, then please follow one of the steps:
- Run a computer scan with ESET Online Scanner
- Ask for help in our Windows Malware Removal Help & Support forum.
Run a Malware Scan with Malwarebytes for Mac
Malwarebytes for Mac is a free on-demand scanner that removes the malware other security software tends to miss — adware, browser hijackers, and unwanted programs included. Cleaning an infected Mac with Malwarebytes has always been completely free, and it’s our go-to recommendation. Follow the steps below to scan your Mac and remove what Malwarebytes finds.
-
Download Malwarebytes for Mac
Click the button below to download the latest version of Malwarebytes for Mac.
Download MalwarebytesOfficial installer for macOS. Your download starts right away.Want real-time protection? See Malwarebytes PremiumMalwarebytes Free for MacScans and removes malware at no cost -
Open the Malwarebytes setup file
When the download finishes, open your Downloads folder and double-click the setup file to begin the installation.
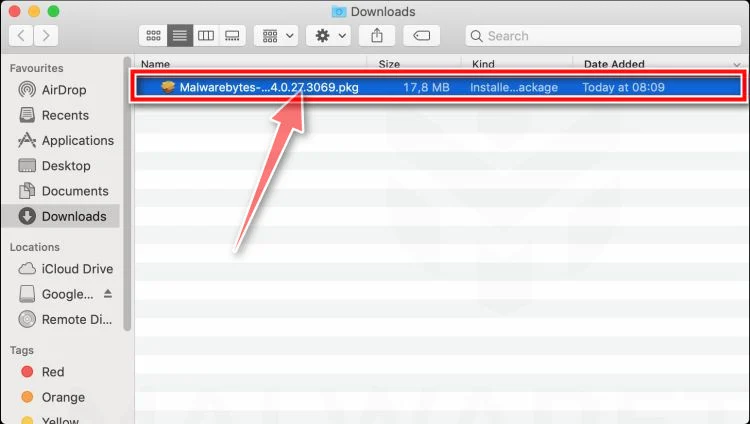
-
Follow the On-Screen Prompts to Install Malwarebytes
The Malwarebytes for Mac Installer will guide you through a few quick screens. Click “Continue” and keep following the prompts until the installation completes.
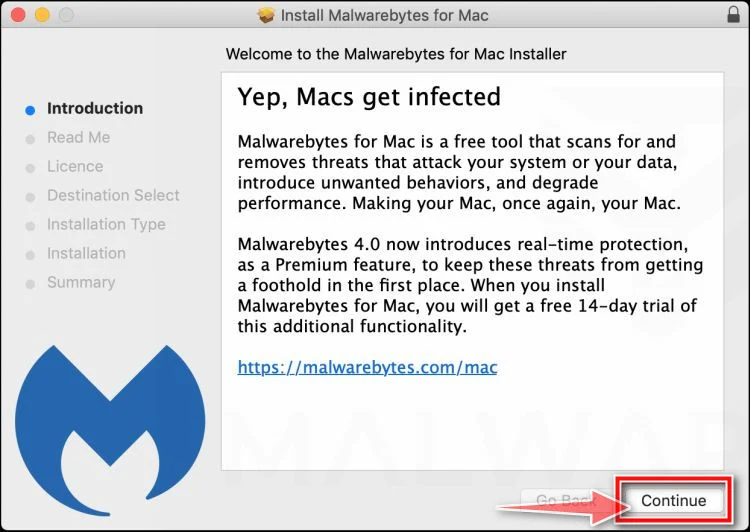
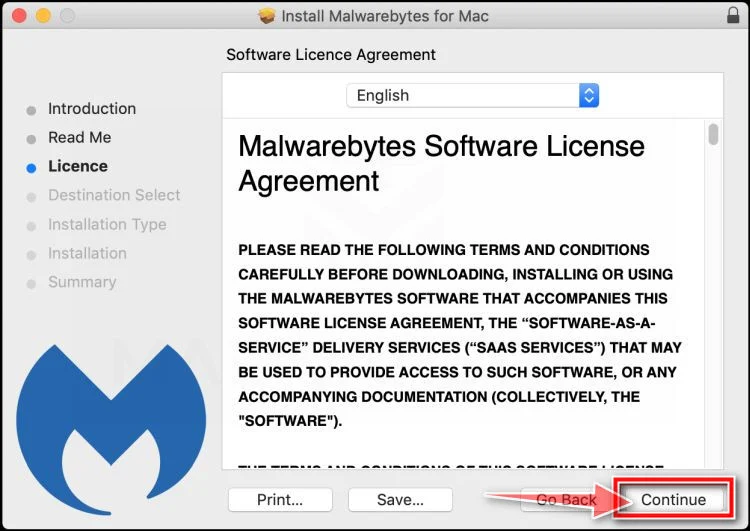
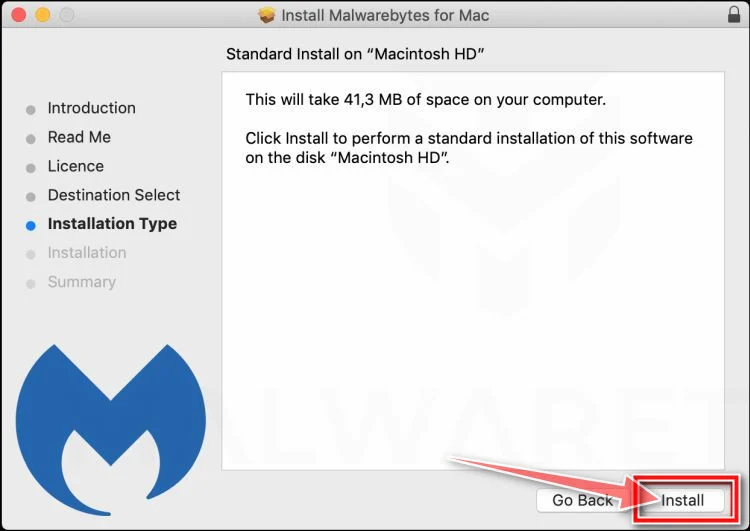
When the installation is complete, Malwarebytes opens to the Welcome to Malwarebytes screen. Click “Get started“.
Malwarebytes needs Full Disk Access to check your whole Mac. When it asks, open System Settings > Privacy & Security > Full Disk Access, turn on Malwarebytes (it may be listed as Malwarebytes Protection), and confirm with your password or Touch ID. Then return to Malwarebytes. On macOS Monterey and earlier, this setting is in System Preferences > Security & Privacy > Privacy.
-
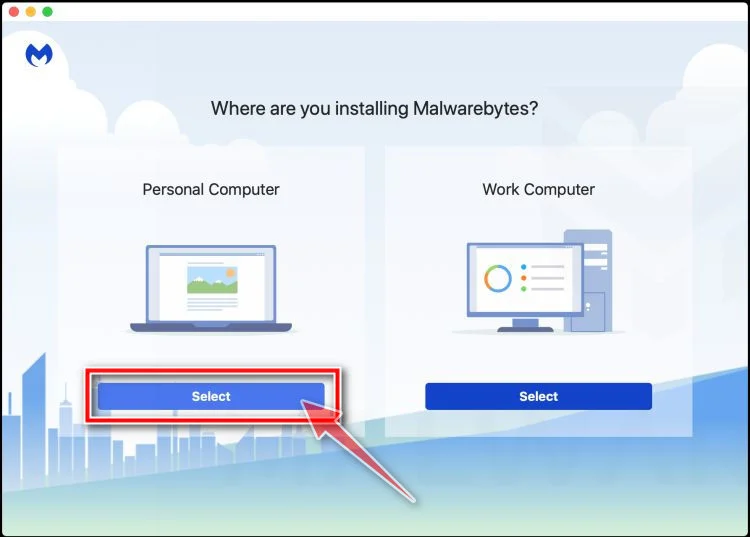
Select “Personal Computer” or “Work Computer”
Malwarebytes will ask what type of computer you’re installing it on. Click either Personal Computer or Work Computer, whichever applies.
-
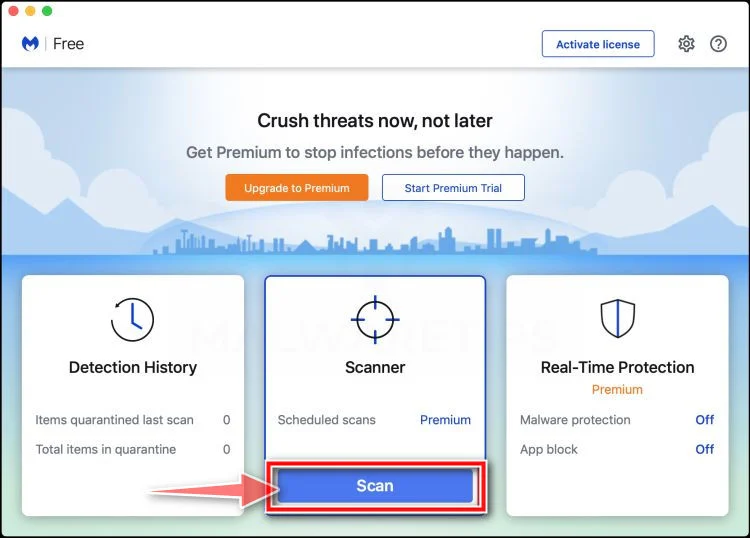
Start the Scan
Click the “Scan” button. Malwarebytes will automatically update its detection database and begin checking your Mac for malware.
-
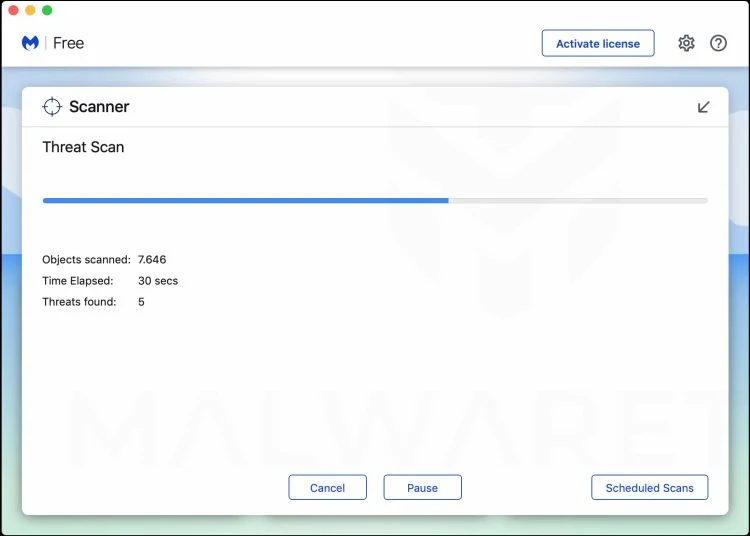
Wait for the Scan to Finish
Malwarebytes will scan your Mac for adware, browser hijackers, and other malicious programs. This can take a few minutes, so feel free to do something else — just check back occasionally to see the progress.
-
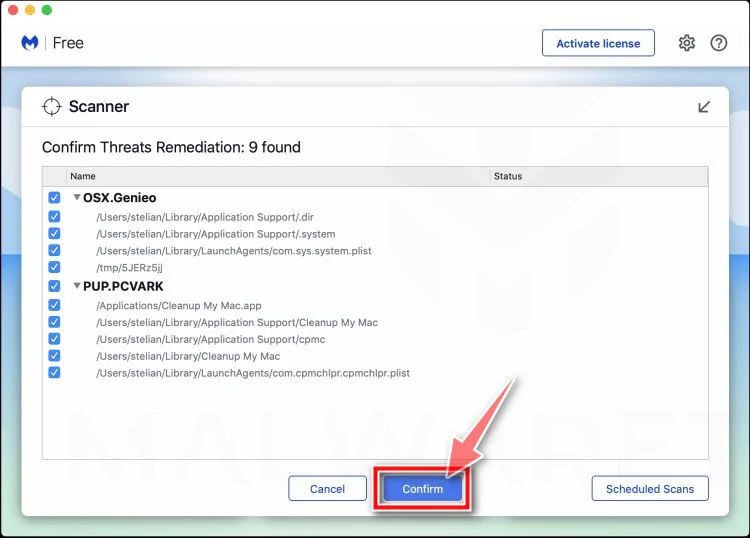
Quarantine the Detected Threats
When the scan is done, you’ll see a list of everything Malwarebytes found. Click the “Quarantine” button to remove all the threats at once.
-
Restart Your Mac
Malwarebytes will now remove all the malicious files it found. Some threats can only be fully removed after a reboot — if Malwarebytes asks you to restart, allow it. Once you’re logged back in, check whether the problems you noticed have stopped. If they come back, save the scan report and ask for help in our forum.
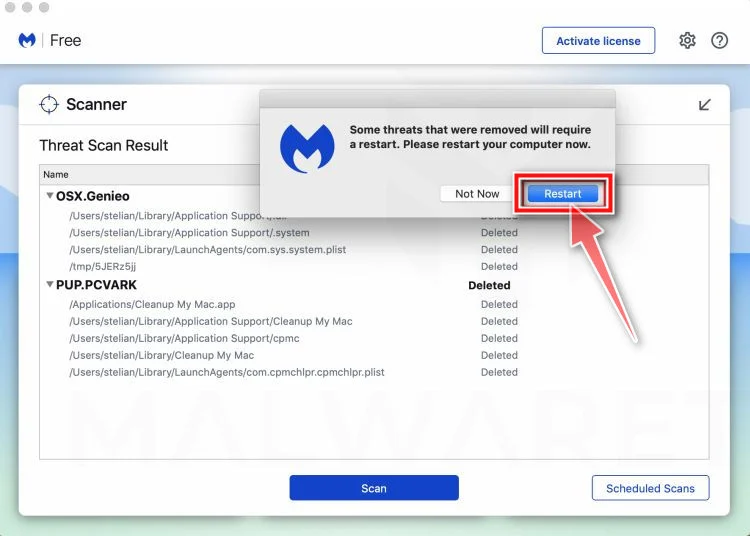
If the problems you noticed continue after the scan, see the options below.
If you are still experiencing problems while trying to remove a malicious program from your computer, please ask for help in our Mac Malware Removal Help & Support forum.
Run a Malware Scan with Malwarebytes for Android
Malwarebytes for Android scans your phone or tablet for malware, adware, and potentially unwanted apps. The free version scans only when you start a scan. Real-time protection, which checks apps automatically, is part of the paid Premium version.
-
Download Malwarebytes for Android.
You can download Malwarebytes for Android by clicking the link below.
Get Malwarebytes for AndroidOpens Google Play in a new tab.Want real-time protection? See Malwarebytes Premium for AndroidMalwarebytes for AndroidScans your phone and removes malware at no cost -
Install Malwarebytes for Android on your phone.
In the Google Play Store, tap “Install” to install Malwarebytes for Android on your device.
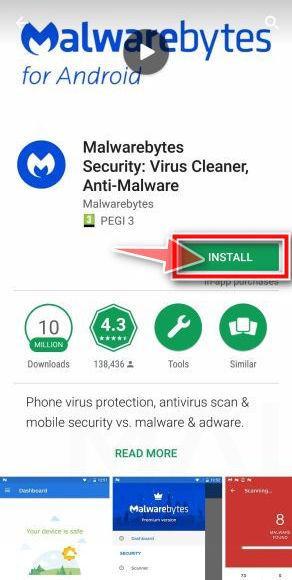
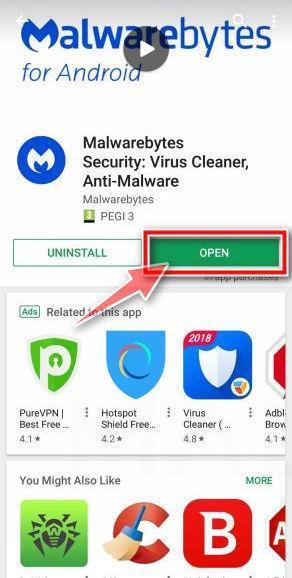
When the installation process has finished, tap “Open” to begin using Malwarebytes for Android. You can also open Malwarebytes by tapping on its icon in your phone menu or home screen.
-
Follow the on-screen prompts to complete the setup process
When Malwarebytes opens, it walks you through a short setup. Tap Get started and follow the prompts. If you see an offer for a trial or a paid plan, read it before you accept. You can skip it and keep using the free scanner.
Malwarebytes will ask for permission to access the files on your phone so it can scan them. Tap Allow, or turn on the permission in the Android screen that opens, then return to Malwarebytes.
-
Run a scan with Malwarebytes for Android
On the main screen, tap Scan now. In some versions, you open the menu, tap Scanner, and then tap Run a scan.
-
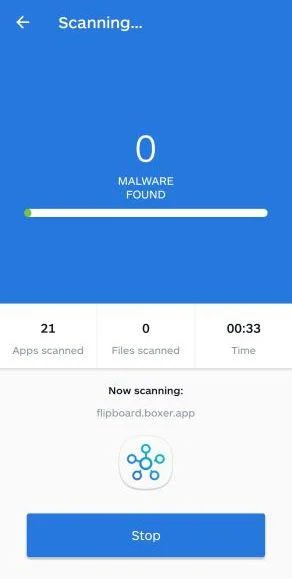
Wait for the Malwarebytes scan to complete.
Malwarebytes will now start scanning your phone for adware and other malicious apps. This process can take a few minutes, so we suggest you do something else and periodically check on the status of the scan to see when it is finished.
-
Remove the detected apps.
When the scan has been completed, you will see a list of the threats that Malwarebytes for Android has detected. Next to each detected item, tap the menu icon (three dots), then choose to uninstall the app or delete the file. Android then asks you to confirm. Tap OK or Uninstall to remove the app.
-
Restart your phone.
When the detected apps are removed, restart your phone if Malwarebytes asks you to. Then check whether the problems you noticed have stopped.
If the problems you noticed continue after the scan, see the options below.
If you are still having problems with your phone after completing these instructions, then please follow one of the steps:
- Ask for help in our Mobile Malware Removal Help & Support forum.
- Only as a last resort, reset your phone to factory settings. Read the warning below first.
- Back up your photos, videos, files, and messages, for example to your Google account or a computer.
- Make sure you know your Google account email and password. The phone asks for them after the reset. If you changed the password recently, Google recommends waiting 24 hours before you reset.
- On a Samsung phone, also make sure you know your Samsung account password.
- If you use an authenticator app for two-step verification, move your accounts to another device or save your backup codes first.
Stay Protected: Block Ads and Malicious Sites
No scan can prove a device is completely clean, so it helps to block threats before they reach you. Most infections start with a malicious ad or a fake download button — so blocking them at the source is your best defense.
We recommend AdGuard, which blocks malicious ads, phishing pages, and dangerous redirects before they can reach you.
👉 Download AdGuard and browse safely
Frequently Asked Questions
Is the Finance Department secure file email genuine?
No. The documented message is a phishing lure that sends recipients to overall-brown-uwcc7fcx.edgeone[.]dev and asks for email credentials.
Does PDFDocument_Approved_File.pdf really exist?
The email supplies a name and size, but those details can be invented. Check the real company collaboration platform and confirm with finance before assuming any file exists.
Why did the page show my correct email provider?
The phishing kit can select branding from your email domain or information placed in the link. That adaptation does not mean Gmail, Microsoft, Yahoo, or your employer approved the page.
What if I clicked Open Document but entered nothing?
Close the page, report the message, and review browser downloads. If no credential was submitted and nothing was installed, account theft is less likely.
What if I typed my password and then saw an error?
Assume the password was captured before the error appeared. Change it through the real provider, revoke sessions, enable stronger authentication, and inspect mailbox rules immediately.
Can a general manager legitimately share a secure PDF?
Yes, which is why the lure is believable. A real share should appear in the approved company platform and can be confirmed through a known internal channel without using the email button.
The Bottom Line
The Finance Department Secure File email scam turns familiar collaboration habits into a credential trap. Authority, confidentiality, a precise file size, and adaptive provider branding all support one goal: getting the employee to type a password on the wrong domain.
Open the company's real document platform independently and confirm the share with a known person. A secure-file notice does not need an unrelated edgeone[.]dev page to authenticate an employee.
If a password was entered, contain the account quickly. Change credentials, revoke sessions, review forwarding and connected applications, protect recovery accounts, and alert the organization before the stolen mailbox is used against colleagues or vendors.

Join the discussion
0 commentsShare your experience or ask a question about this article.
Discussion
Start the conversation
Have a question or something useful to share? Add the first comment.