


Five emails supposedly never reached your inbox. Two buttons offer a quick fix, tempting when you’re waiting for something important.
If you received an Inbound Message Rejection Report, look closely at the repair it proposes before trying to retrieve anything.
Overview
A missing-mail warning with two routes to the same place
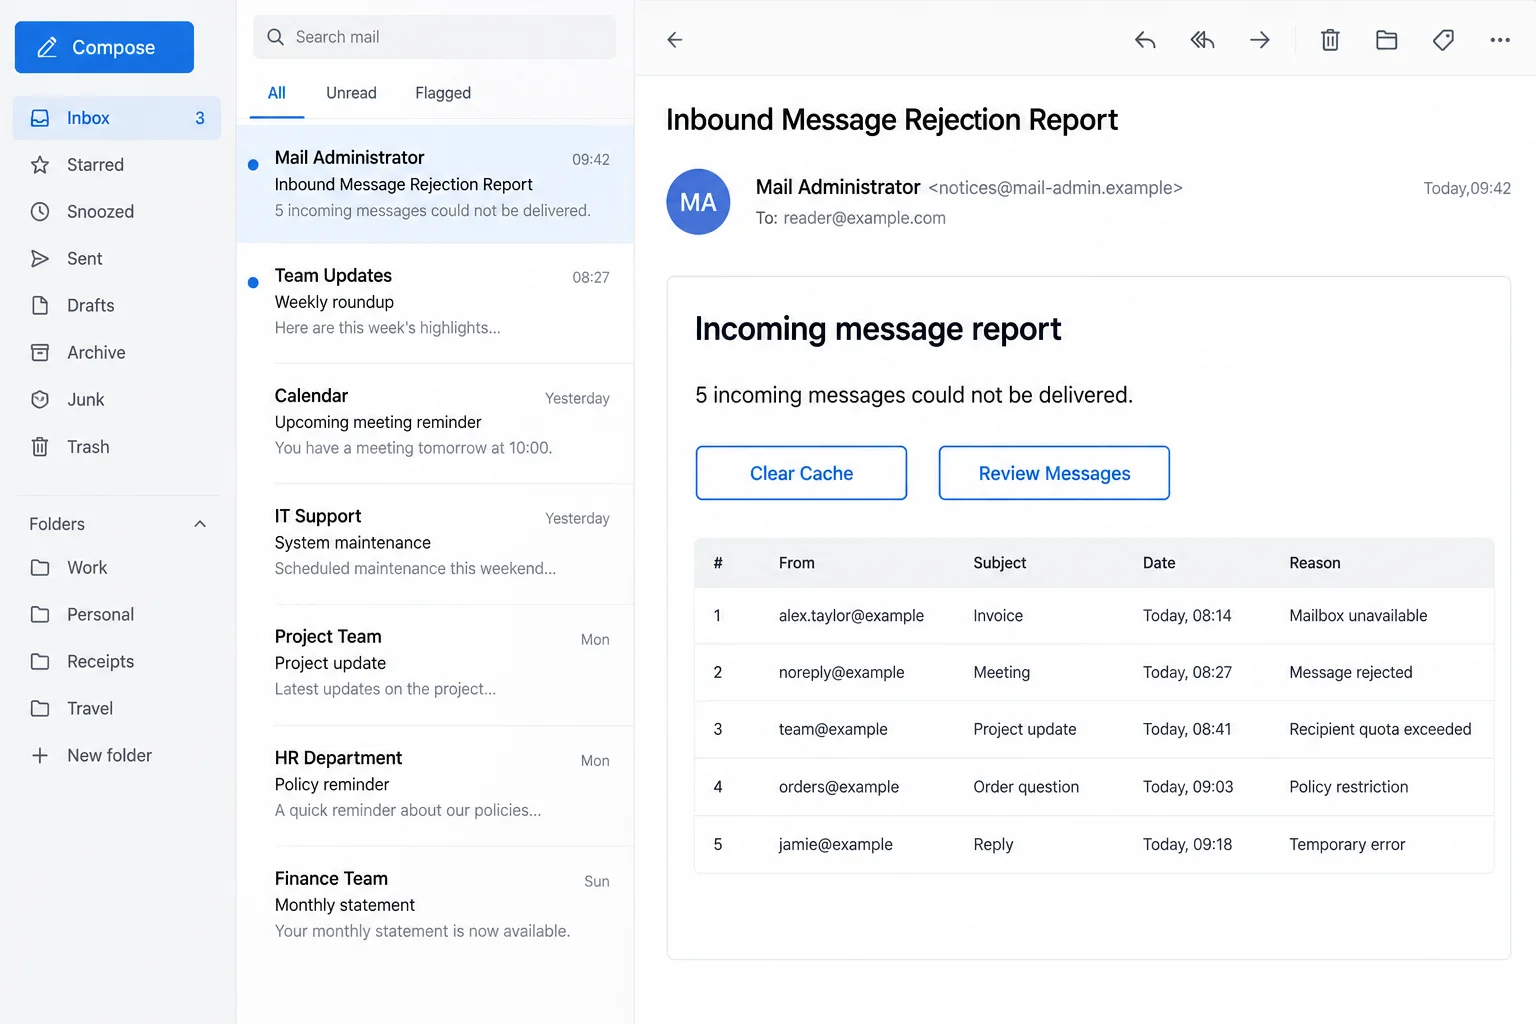
The Inbound Message Rejection Report scam impersonates a mail administrator. Its reported message says five incoming emails failed, then offers Clear Cache and Review Messages.
Both choices reportedly lead to one counterfeit Webmail Login page. The apparent choice between maintenance and message review does not provide two independent solutions.
Someone waiting for a purchase order, interview reply, or customer complaint has a reason to investigate. The pitch borrows that everyday concern.
The illustration above uses fictional mail details. It shows the competing button labels, not an authenticated message received by a particular person.
The requested password is the important change
The destination is described as a generic login form with the recipient’s email address already filled in. It then requests the account password.
A prefilled address can feel reassuring. However, knowing where an email was sent does not demonstrate that the page controls the mailbox or its delivery queue.
The reported form uses Google Cloud Storage infrastructure. Hosting on a familiar platform does not turn a customer’s uploaded page into an official Google account service.
Separate delivery trouble from an unexpected sign-in
- Check missing correspondence through your normal mail application or provider dashboard.
- Do not give an unfamiliar page your password to repair a supposed queue.
- Record what you actually entered or downloaded before choosing recovery steps.
Real delivery problems occur. This warning concerns the deceptive repair route, not every bounce notice, quarantine report, or administrator message.
Receiving the email alone does not mean your device is infected. Entering credentials creates an account problem even when no software is installed.
Why a Cache Fix Sounds Believable
You may have cleared a browser cache before fixing a stubborn website. That familiar phrase makes the proposed action sound routine and low risk.
But the browser’s stored page data and a mail server’s handling of incoming messages are different things. One label cannot explain both processes.
A cache problem might affect how a webmail page displays. It does not establish that an emailed button can release messages from a server you have not authenticated.
The other button, Review Messages, appeals to a different instinct. Instead of fixing technology, you appear to be checking whether anything important needs attention.
That makes the message work for readers with different levels of confidence. The technical reader sees maintenance; the busy reader sees a short task.
Before accepting either route, ask what evidence the sender provides. A count of rejected emails is a claim, not a list of verified failed deliveries.
A genuine problem can be checked independently. You do not need to use the report’s own access route to find out whether your mailbox works.
How the Inbound Message Rejection Report Scam Works
Step 1: The email gives you a problem you cannot easily see
Missing incoming mail creates an awkward uncertainty. You cannot open a message that supposedly never arrived, and you may not know who attempted to contact you.
The warning fills that gap with an apparently precise explanation. A small message count feels plausible, unlike an enormous claim that immediately demands skepticism.
The reader may start supplying their own examples: a late invoice, a job application, or a reply that has taken longer than expected.
Those examples make the notice relevant without the sender proving that any such correspondence exists. Your real concerns do part of the persuasion.
If a specific sender matters, contact that person through an established channel. Ask whether they sent anything and whether they received a genuine delivery error.
Step 2: Two button labels reduce the chance you leave
The email presents action as a choice within the report. You can perform maintenance or inspect messages, rather than deciding whether to trust the report at all.
That distinction matters. A page can offer several controls while keeping every route under one operator’s control.
On a desktop, hovering over a link may reveal its destination. On mobile, inspect it carefully without opening a preview that loads the suspicious page.
Do not repeatedly test the buttons to see whether one works differently. The appropriate comparison is with your provider’s independently opened service.
If a browser or security product blocks the destination, leave the warning in place. Missing correspondence is not a reason to bypass a protective interstitial.
Step 3: Familiar hosting makes an unfamiliar form less noticeable
A cloud-hosted address may contain a recognizable company name. Readers sometimes treat that name as though it identifies the person asking for their password.
In reality, infrastructure and account administration are separate roles. A storage service can serve customer content without endorsing its claims.
Read the full address and consider the workflow. A generic form reached through an unexpected repair email is not your established provider dashboard.
An encrypted connection is useful, but it protects the connection to that destination. It does not establish that the destination should receive your credentials.
Likewise, a page that loads quickly and has no spelling mistakes can still be deceptive. Presentation is not an authentication method.
Step 4: Your own email address makes the password request feel personal
The filled username creates the impression that the page has already found your account. The remaining field appears to be a final identity check.
A sender can insert the address used to contact you. That information is not the same as access to the mailbox.
The harmful change happens when you provide a secret the sender did not previously have. Stop if a repair task unexpectedly becomes a password submission.
Do not substitute another account’s password or enter a fake one to investigate. Neither action is needed to establish that this route is unsuitable.
Open the normal mail service yourself. If it requires authentication, complete that through the address and account process you already trust.
Step 5: Mailbox access can spread the problem beyond missing messages
An attacker with usable credentials may attempt to read correspondence or send messages as you. Available access depends on the provider and its additional protections.
Business conversations deserve particular attention. An intruder may learn who is awaiting payment or which supplier is expected to send revised banking instructions.
Account recovery messages can also arrive in the inbox. That makes email important when reviewing other accounts after a confirmed unauthorized sign-in.
These are risks to assess, not proof that every recipient lost money. Check actual activity rather than treating every possible consequence as something already completed.
Act promptly if you entered the password. Waiting for an obvious symptom can leave a working account available to someone else.
How to Check Whether Mail Really Is Missing
Start with the mailbox you normally use
Open your saved mail application or a trusted bookmark. Look for account warnings there, rather than using a link supplied by the unexpected report.
Check Spam, Junk, and any legitimate quarantine area you already recognize. Search by sender and date if you are expecting a specific conversation.
Do not delete large amounts of mail to satisfy an unverified warning. Removing useful evidence or correspondence does not repair a phishing message.
Ask for a real delivery record
A known sender can provide the time of sending and any delivery error they received. Your administrator can compare that with the organization’s own records.
Give IT the original suspicious message through the approved reporting process. Forwarding a screenshot alone may omit headers and destinations needed for investigation.
Keep private customer information out of public help requests. A useful description does not require posting entire invoices, authentication codes, or personal correspondence.
Use provider guidance rather than a message’s repair instructions
Google’s phishing guidance recommends opening the intended service directly when an emailed link asks for a password.
The principle applies even when your mailbox is hosted elsewhere. Use that provider’s own support and recovery route, not a universal form promoted by the email.
If several colleagues received the same warning, report that pattern. Do not make each person reproduce the sign-in page to confirm it.
What to Do If You Responded to the Rejection Report
Stop the repair attempt and preserve a short record. Close the linked form. Keep the subject, sender address, destination, and approximate time you interacted.
Write down whether you only viewed it, typed a password, approved another prompt, or downloaded anything. Do not include the actual password in your notes.
This distinction helps support choose the right response. It also prevents a frightening email from turning into unnecessary changes across every device you own.
If credentials were entered, secure the real account. Use a trusted device and the provider’s genuine password-change process. Replace the exposed secret with a unique password.
If you cannot sign in, start official account recovery. For Google accounts, the compromised-account guidance describes recovery and security review.
Do not trust a recovery link sent by the same administrator identity that delivered the original report. It may be another attempt.
Review access that a new password may not end. Check recent sign-ins, active sessions, recovery contacts, and connected applications using your provider’s controls.
Ask your workplace administrator to assess the account if it belongs to an organization. They may have logs and containment options unavailable to an individual user.
Review unfamiliar forwarding rules and mailbox filters. A rule can quietly redirect useful messages or hide replies even after the original phishing page disappears.
Address password reuse and consequential messages. Replace the same password wherever else you used it, starting with accounts connected to important personal or business information.
Inspect sent mail and relevant ongoing conversations. If suspicious instructions went to a supplier or customer, warn them through a separate known contact route.
Do not assume a forged payment request was followed. Ask the intended recipient what happened and preserve any actual payment details for the appropriate fraud team.
Check the device only when there was device exposure. If the page prompted a download or installation, leave the file unopened and obtain trusted cleanup guidance.
Malwarebytes can help inspect suspected malicious software. A device scan does not revoke mailbox sessions or recover a password already supplied to a website.
AdGuard may reduce exposure to harmful advertising and some dangerous destinations. It is an additional browsing measure, not a substitute for fixing the affected account.
Report the message and check the real delivery issue separately. Use your mail application’s phishing-report control or your organization’s reporting channel.
After the account is secure, follow up on genuinely missing correspondence with known senders. That resolves the original concern without returning to the counterfeit form.
Keep the support case number and any findings. If further messages arrive using the same pretext, add them to that record instead of restarting the process.
Is Your Device Infected? Run a Free Malware Scan
Slow performance, constant pop-ups, or strange behavior? These are classic signs of a malware infection. A quick way to check is to scan your device with Malwarebytes Free, one of the most trusted malware removal tools available. If you only visited a scam page and didn’t download or install anything, this scan is optional.
The free version detects and removes the most common threats, including:
- Adware — the cause of those annoying pop-ups
- Browser hijackers — unwanted redirects and changed homepages
- Trojans and spyware — hidden programs stealing your data
- Potentially unwanted programs (PUPs) — software you never asked for
👉 Select your device below — Windows, Mac, or Android — then follow the simple steps to download Malwarebytes, scan your system, and remove any threats it finds. The scan usually takes 5 to 20 minutes.
Run a Malware Scan with Malwarebytes for Windows
Malwarebytes is one of the most popular and trusted anti-malware tools for Windows — and it’s completely free for removing infections. It catches threats that many antivirus programs miss, including adware, browser hijackers, and trojans. Follow the steps below to scan your PC and remove what Malwarebytes finds.
Download Malwarebytes
Click the button below to download the latest version of Malwarebytes for Windows from the official source. The free version is all you need — it will scan your computer and remove adware, browser hijackers, and other malicious software at no cost.
Download MalwarebytesOfficial installer for Windows 11 and 10. Your download starts right away.Want real-time protection? See Malwarebytes Premium Malwarebytes Free for WindowsScans and removes malware at no cost
-
Install Malwarebytes
When the download finishes, open your Downloads folder and double-click the MBSetup file. If Windows shows a User Account Control pop-up, click “Yes” to allow the installation.
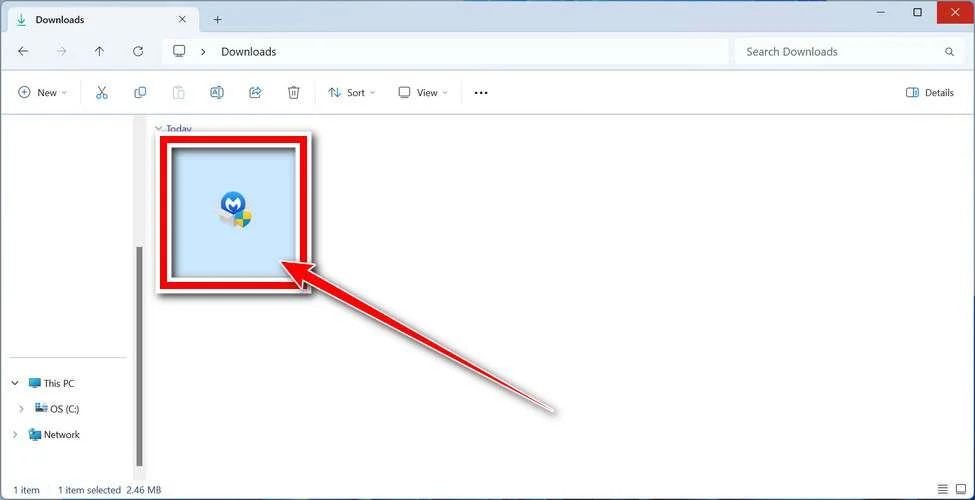
Follow the On-Screen Prompts to Install Malwarebytes
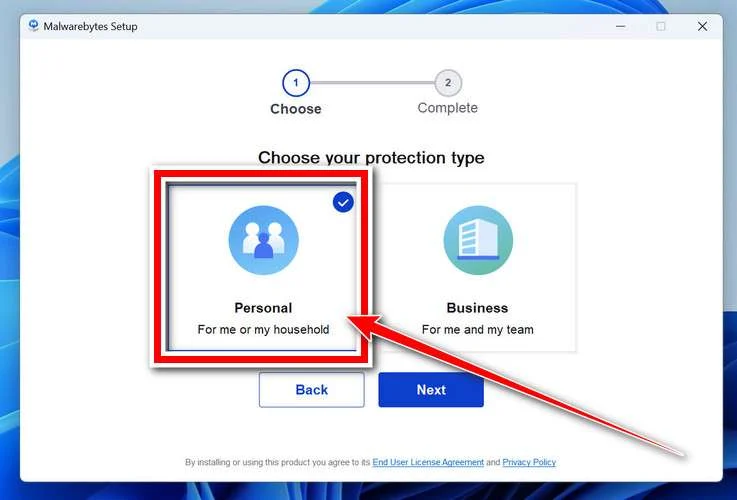
The setup wizard will walk you through a few quick screens:
-
Choose where you’re installing the program — “Personal Computer” or “Work Computer” — then click Next.
-
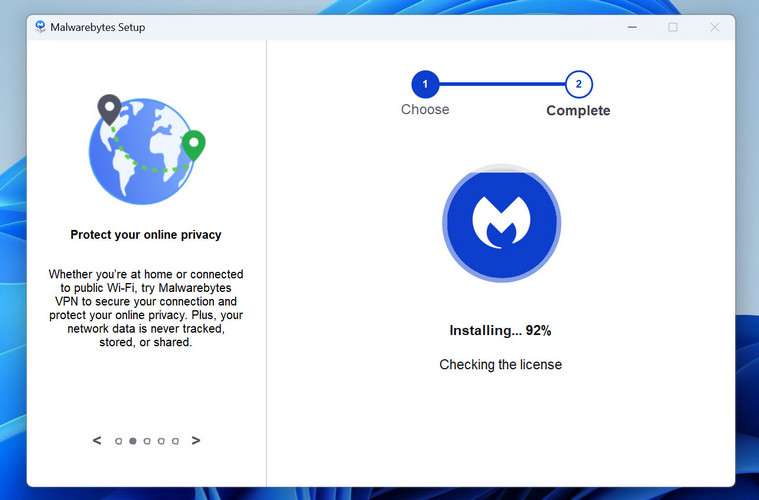
Malwarebytes will now install on your device. This usually takes under a minute.
-
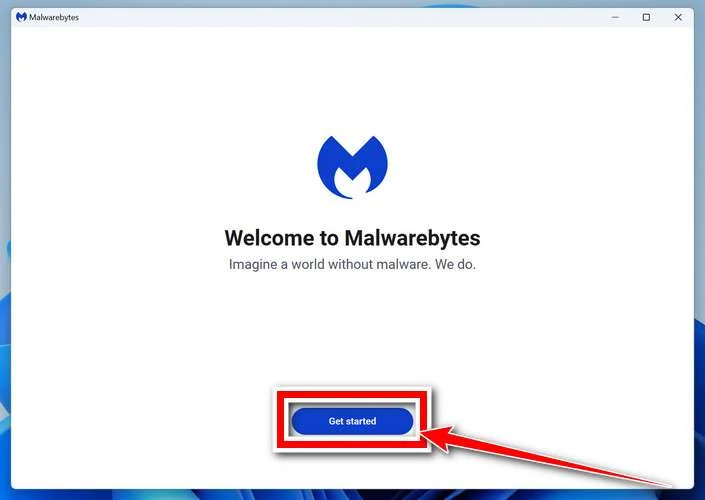
When installation is complete, the “Welcome to Malwarebytes” screen will open automatically.
-
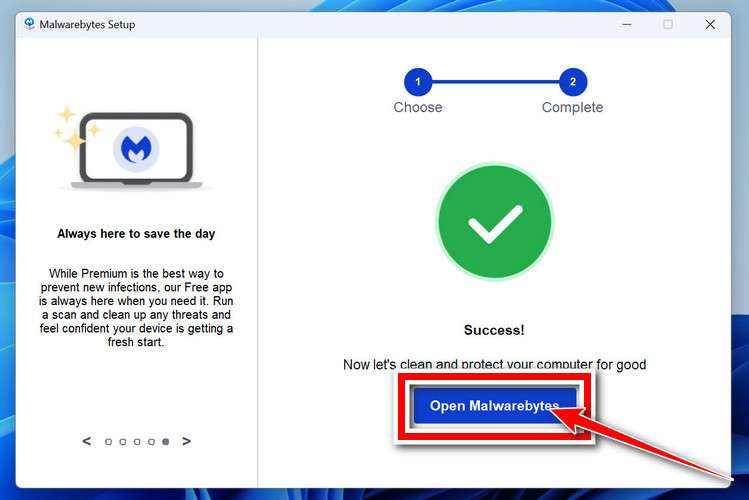
On the final screen, click Open Malwarebytes to launch the program.
-
Optional: Check for rootkits with a Custom Scan
You don’t need to change any settings for a normal scan. The standard Threat Scan in the next step is enough for most problems, so you can go straight to it.
If you also want to check for rootkits, use a Custom Scan. In current versions of Malwarebytes, rootkit scanning is only available there:
- On the Scanner tile, click the three-dot menu and select Advanced Scan.
- Choose Custom Scan. In its options, check Scan for rootkits.
- Select your system drive (usually C:\) as the location to scan, then start the scan. It takes longer than a Threat Scan.
- When it finishes, review and quarantine the results as described in the steps below.
Rootkit scanning isn’t available on Windows devices with ARM processors.
Start the Scan
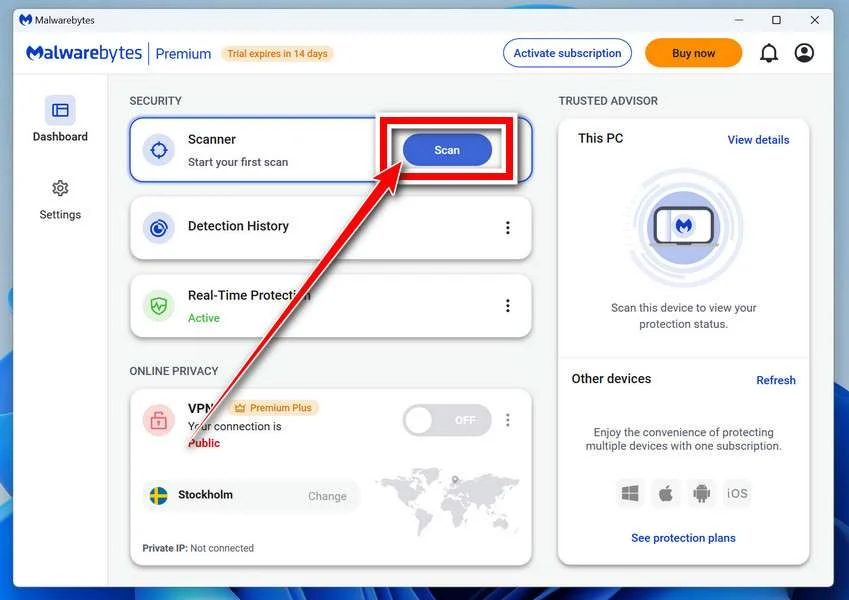
Click the blue Scan button. Malwarebytes will automatically update its virus database and start checking your computer for malware.
-
Wait for the Scan to Finish
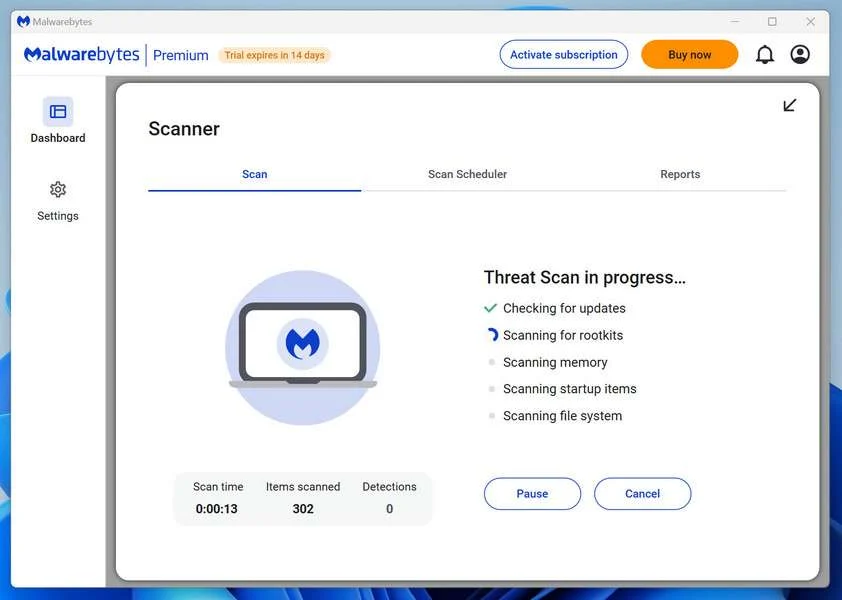
The scan checks your entire system for browser hijackers and other malicious programs, so it can take 5 to 20 minutes depending on your computer. Feel free to do something else — just check back occasionally to see the progress.
-
Quarantine the Detected Threats
When the scan is done, you’ll see a list of everything Malwarebytes found — malware, adware, and potentially unwanted programs. Click the “Quarantine” button to remove all of them at once.
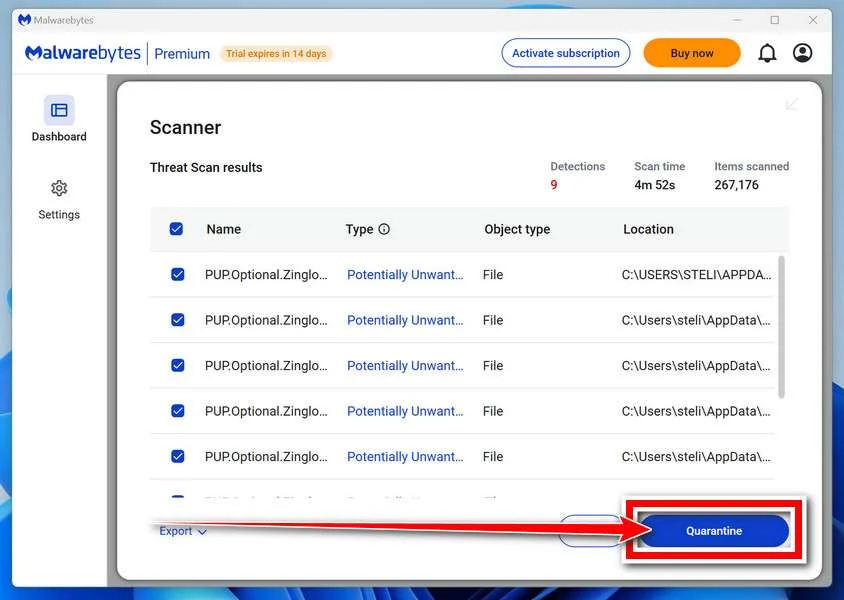
Malwarebytes will now remove the malicious files and registry entries and move them safely into quarantine.
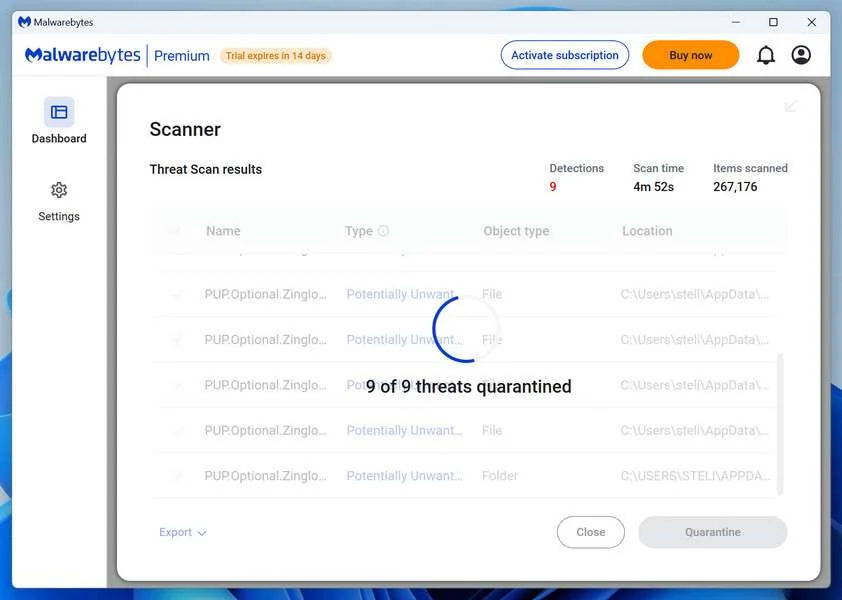
-
Restart Your Computer
Some threats can only be fully removed after a reboot. If Malwarebytes asks you to restart, click Yes. Once you’re logged back in, Malwarebytes has finished removing the threats it found.
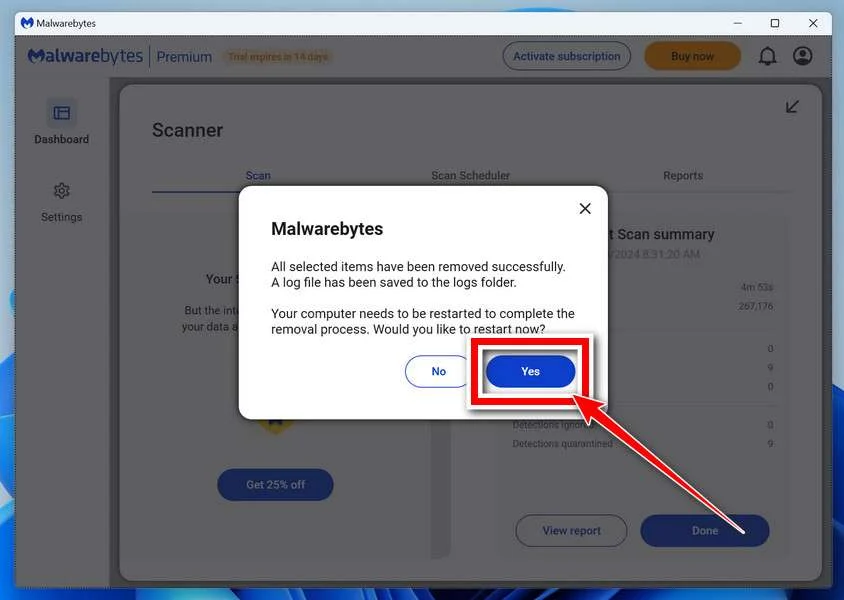
When the scan is done, check whether the problems you noticed have stopped. If they continue, see the options below.
If you are still having problems with your computer after completing these instructions, then please follow one of the steps:
- Run a computer scan with ESET Online Scanner
- Ask for help in our Windows Malware Removal Help & Support forum.
Run a Malware Scan with Malwarebytes for Mac
Malwarebytes for Mac is a free on-demand scanner that removes the malware other security software tends to miss — adware, browser hijackers, and unwanted programs included. Cleaning an infected Mac with Malwarebytes has always been completely free, and it’s our go-to recommendation. Follow the steps below to scan your Mac and remove what Malwarebytes finds.
-
Download Malwarebytes for Mac
Click the button below to download the latest version of Malwarebytes for Mac.
Download MalwarebytesOfficial installer for macOS. Your download starts right away.Want real-time protection? See Malwarebytes PremiumMalwarebytes Free for MacScans and removes malware at no cost -
Open the Malwarebytes setup file
When the download finishes, open your Downloads folder and double-click the setup file to begin the installation.
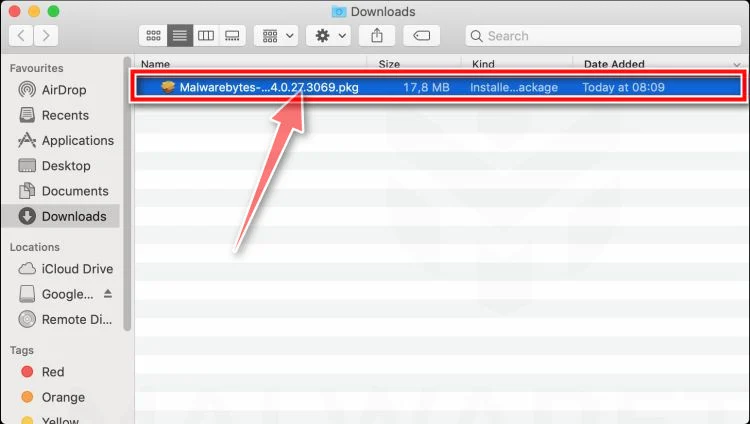
-
Follow the On-Screen Prompts to Install Malwarebytes
The Malwarebytes for Mac Installer will guide you through a few quick screens. Click “Continue” and keep following the prompts until the installation completes.
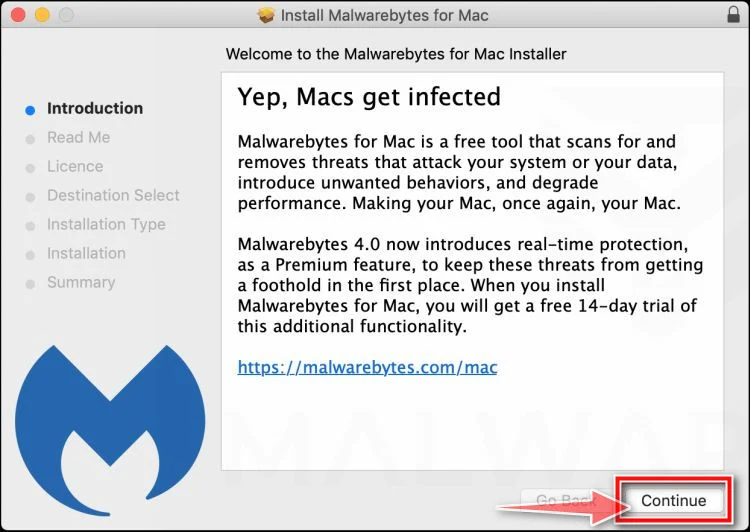
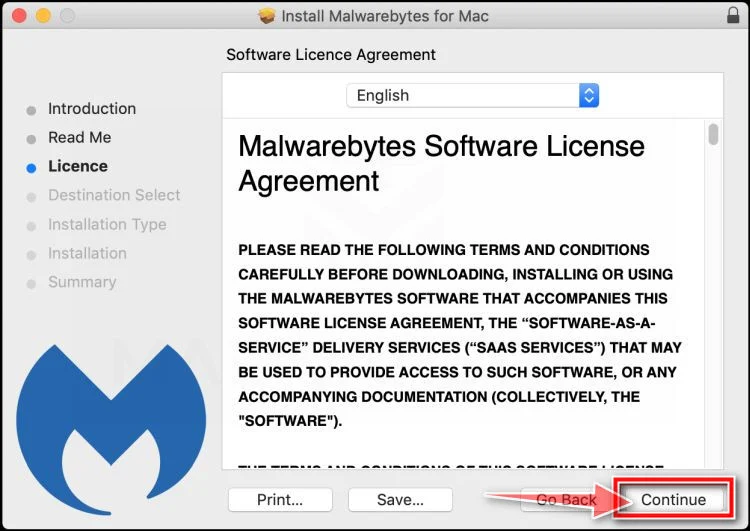
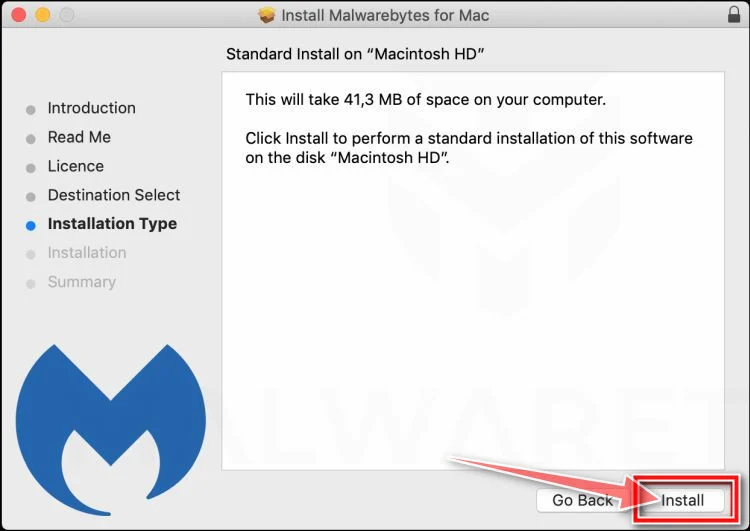
When the installation is complete, Malwarebytes opens to the Welcome to Malwarebytes screen. Click “Get started“.
Malwarebytes needs Full Disk Access to check your whole Mac. When it asks, open System Settings > Privacy & Security > Full Disk Access, turn on Malwarebytes (it may be listed as Malwarebytes Protection), and confirm with your password or Touch ID. Then return to Malwarebytes. On macOS Monterey and earlier, this setting is in System Preferences > Security & Privacy > Privacy.
-
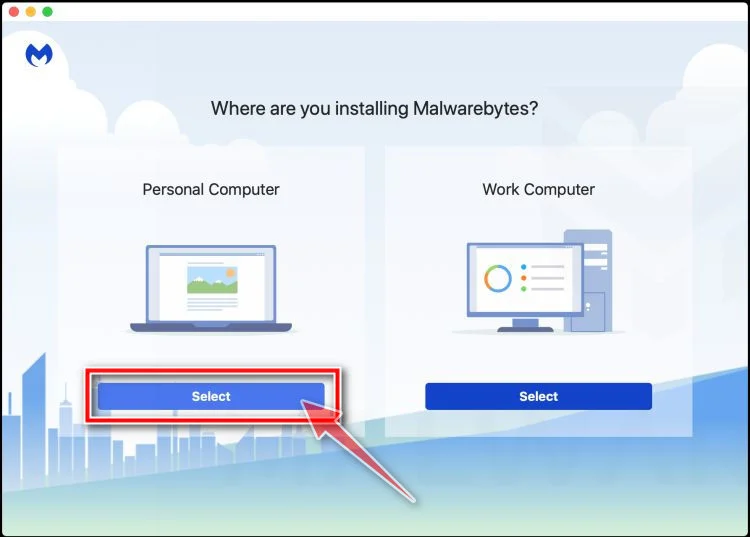
Select “Personal Computer” or “Work Computer”
Malwarebytes will ask what type of computer you’re installing it on. Click either Personal Computer or Work Computer, whichever applies.
-
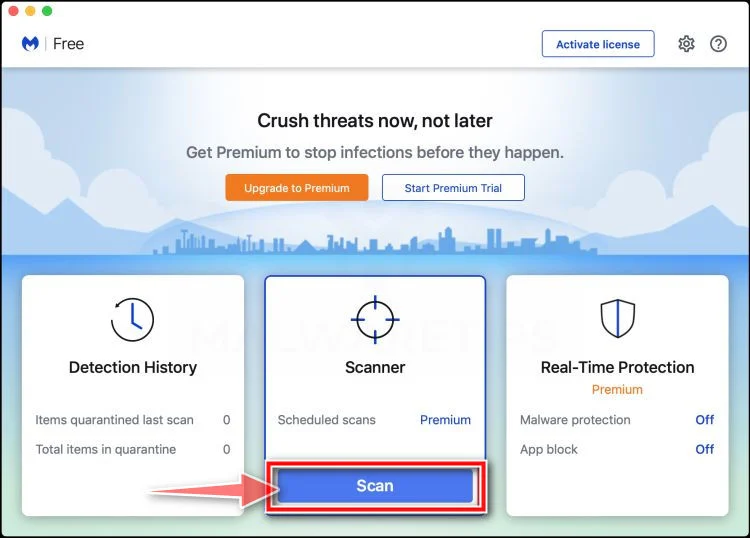
Start the Scan
Click the “Scan” button. Malwarebytes will automatically update its detection database and begin checking your Mac for malware.
-
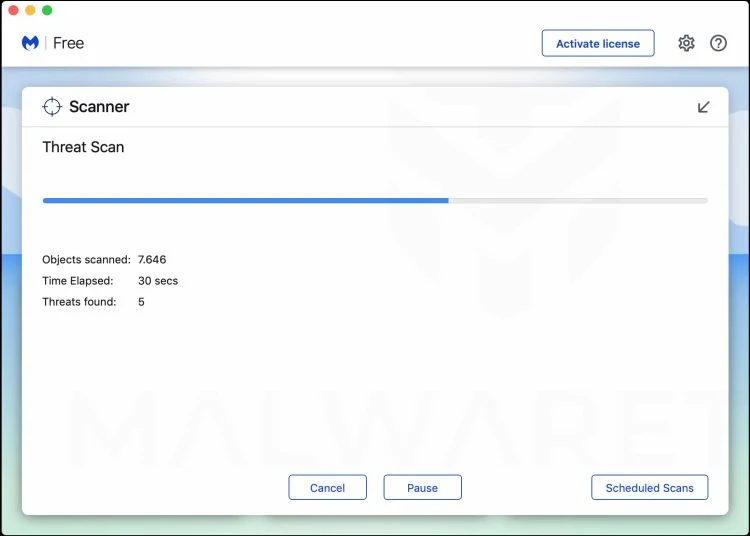
Wait for the Scan to Finish
Malwarebytes will scan your Mac for adware, browser hijackers, and other malicious programs. This can take a few minutes, so feel free to do something else — just check back occasionally to see the progress.
-
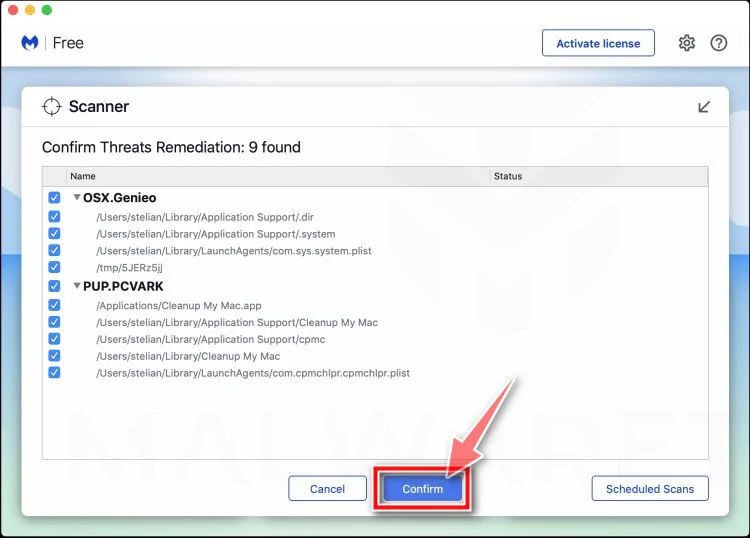
Quarantine the Detected Threats
When the scan is done, you’ll see a list of everything Malwarebytes found. Click the “Quarantine” button to remove all the threats at once.
-
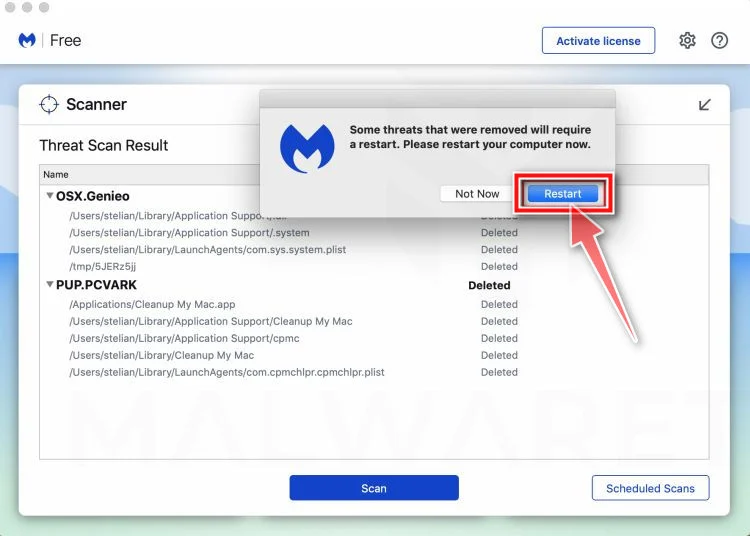
Restart Your Mac
Malwarebytes will now remove all the malicious files it found. Some threats can only be fully removed after a reboot — if Malwarebytes asks you to restart, allow it. Once you’re logged back in, check whether the problems you noticed have stopped. If they come back, save the scan report and ask for help in our forum.
If the problems you noticed continue after the scan, see the options below.
If you are still experiencing problems while trying to remove a malicious program from your computer, please ask for help in our Mac Malware Removal Help & Support forum.
Run a Malware Scan with Malwarebytes for Android
Malwarebytes for Android scans your phone or tablet for malware, adware, and potentially unwanted apps. The free version scans only when you start a scan. Real-time protection, which checks apps automatically, is part of the paid Premium version.
-
Download Malwarebytes for Android.
You can download Malwarebytes for Android by clicking the link below.
Get Malwarebytes for AndroidOpens Google Play in a new tab.Want real-time protection? See Malwarebytes Premium for AndroidMalwarebytes for AndroidScans your phone and removes malware at no cost -
Install Malwarebytes for Android on your phone.
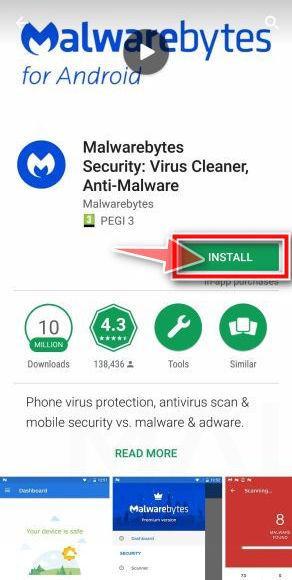
In the Google Play Store, tap “Install” to install Malwarebytes for Android on your device.
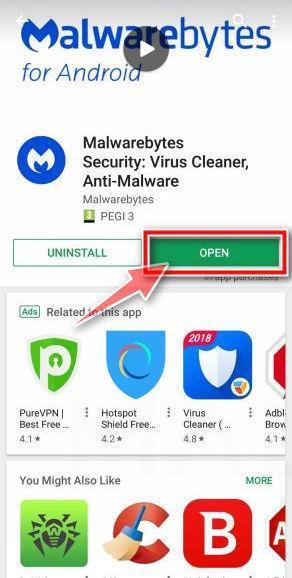
When the installation process has finished, tap “Open” to begin using Malwarebytes for Android. You can also open Malwarebytes by tapping on its icon in your phone menu or home screen.
-
Follow the on-screen prompts to complete the setup process
When Malwarebytes opens, it walks you through a short setup. Tap Get started and follow the prompts. If you see an offer for a trial or a paid plan, read it before you accept. You can skip it and keep using the free scanner.
Malwarebytes will ask for permission to access the files on your phone so it can scan them. Tap Allow, or turn on the permission in the Android screen that opens, then return to Malwarebytes.
-
Run a scan with Malwarebytes for Android
On the main screen, tap Scan now. In some versions, you open the menu, tap Scanner, and then tap Run a scan.
-
Wait for the Malwarebytes scan to complete.
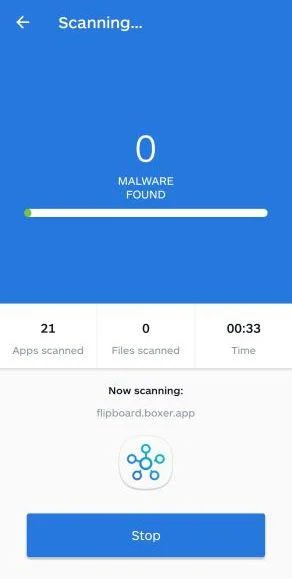
Malwarebytes will now start scanning your phone for adware and other malicious apps. This process can take a few minutes, so we suggest you do something else and periodically check on the status of the scan to see when it is finished.
-
Remove the detected apps.
When the scan has been completed, you will see a list of the threats that Malwarebytes for Android has detected. Next to each detected item, tap the menu icon (three dots), then choose to uninstall the app or delete the file. Android then asks you to confirm. Tap OK or Uninstall to remove the app.
-
Restart your phone.
When the detected apps are removed, restart your phone if Malwarebytes asks you to. Then check whether the problems you noticed have stopped.
If the problems you noticed continue after the scan, see the options below.
If you are still having problems with your phone after completing these instructions, then please follow one of the steps:
- Ask for help in our Mobile Malware Removal Help & Support forum.
- Only as a last resort, reset your phone to factory settings. Read the warning below first.
- Back up your photos, videos, files, and messages, for example to your Google account or a computer.
- Make sure you know your Google account email and password. The phone asks for them after the reset. If you changed the password recently, Google recommends waiting 24 hours before you reset.
- On a Samsung phone, also make sure you know your Samsung account password.
- If you use an authenticator app for two-step verification, move your accounts to another device or save your backup codes first.
Stay Protected: Block Ads and Malicious Sites
No scan can prove a device is completely clean, so it helps to block threats before they reach you. Most infections start with a malicious ad or a fake download button — so blocking them at the source is your best defense.
We recommend AdGuard, which blocks malicious ads, phishing pages, and dangerous redirects before they can reach you.
👉 Download AdGuard and browse safely
A Useful Handoff to Your Mail Administrator
A concise incident summary is more helpful than a long account of every worry the warning raised. Describe the message, the action, and the time.
Include the affected mailbox and whether it is shared. A shared inbox may have several legitimate users whose access needs to be coordinated during recovery.
If you submitted a password more than once, say so without writing it down. The timing can help an administrator compare later login attempts.
Explain whether another page requested a code or application approval. Do not approve a fresh notification merely because support is discussing the incident.
Also identify the device used. A personal computer and a managed work computer may require different handling, even though the phishing message looks identical.
Once support has what it needs, follow its containment instructions. Avoid independently deleting accounts or resetting managed equipment while someone is preserving evidence.
Frequently Asked Questions
Is the Inbound Message Rejection Report a real provider warning?
The reported email uses a false delivery problem to solicit a password. Check any genuine mailbox issue through the service you normally use.
Will clearing my browser cache release the five emails?
The report provides no reliable basis for that claim. Browser cache maintenance and server-side delivery are different issues, and an unfamiliar login does not verify either.
Why does the form already know my address?
The sender already had an address to email. Prefilling it personalizes the page but does not prove access to your account or missing messages.
Does Google hosting make the form legitimate?
No. A familiar infrastructure provider can host content supplied by someone else. Judge the account workflow and exact destination, not one recognizable hostname component.
Am I infected because I read the message?
Reading it does not establish infection. Credential exposure, a downloaded file, and executed software are different events that require different checks.
What if the password stopped working afterward?
Use official account recovery immediately and notify your administrator if applicable. Do not seek access through the report’s buttons or its supposed support contact.
The Bottom Line
Do not use either button in the fake Inbound Message Rejection Report. A missing-mail claim is not a reason to surrender your password.
If you already entered it, recover the real mailbox and review access settings. Investigate any actual delivery problem afterward through trusted mail support.

Join the discussion
0 commentsShare your experience or ask a question about this article.
Discussion
Start the conversation
Have a question or something useful to share? Add the first comment.