

The note does not ask for money. That is the part that throws people. Photos, documents, and work files suddenly end in .KIMO. A text file named How to DeCrypt Your Files.txt sits next to them. There is no Bitcoin wallet. There is no deadline. There is no threat to leak a private folder. There is no inbox to write to. The message tells you to run a program called KimoLabDecrypt.exe with the same key that was inside the payload that locked the files.
That instruction is the trap. It sounds like a lab note, not a ransom. It sounds like someone left you a tool. KimoLabDecrypt.exe is not a public free decryptor you can download from a store, an app gallery, or a random “unlock my files” page. Without the key from that same payload, the files stay locked. Treat this as ransomware that still wrecks data even when nobody asks for a payment.
If you are staring at a folder of .KIMO files right now, stop hunting for a miracle button. Do not run a stranger’s “Kimo” unlocker. Do not paste a key you found in a comment thread. Isolate the machine, keep an offline copy of the locked files, and scan with a real antivirus you already trust. Then look at official pages such as No More Ransom and CISA StopRansomware. Those are places to look. They are not a promise that a KIMO decryptor exists today.
Overview
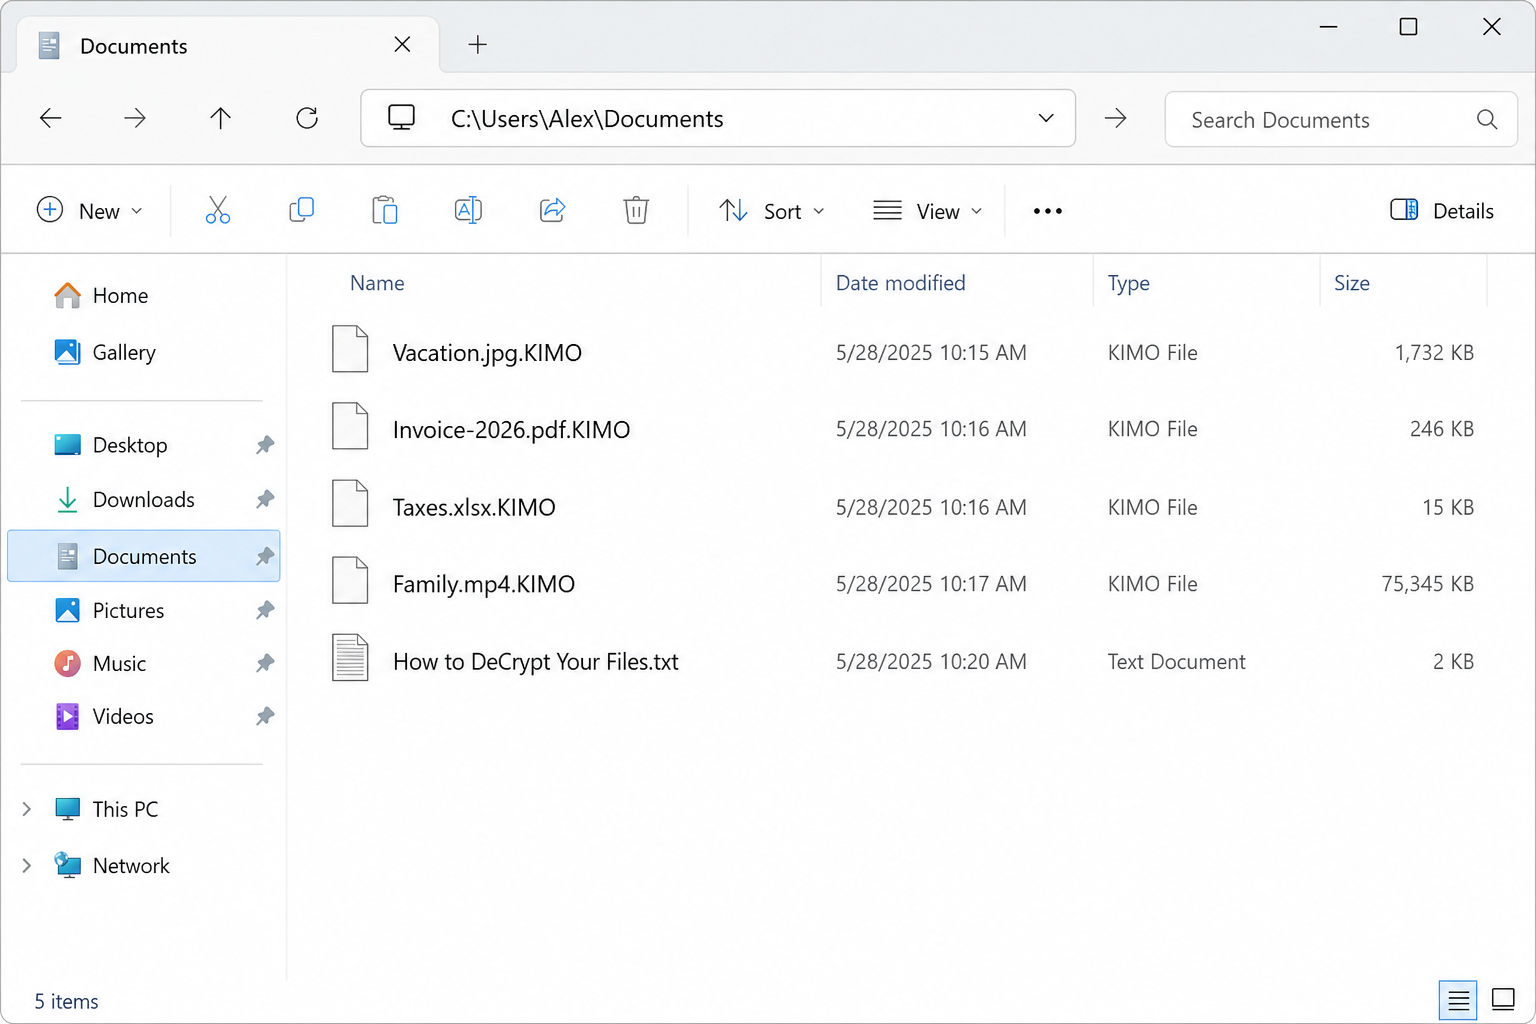
KIMO is ransomware. The public signs are simple. Locked files pick up a .KIMO extension. A note named How to DeCrypt Your Files.txt explains that the files were encrypted with AES-256-CTR. The same note points to KimoLabDecrypt.exe and says you need the key that was already in the payload. It does not print a ransom sum.
That last sentence is why people hesitate to call it ransomware at all. Classic lockers shout. They name a $ amount. They give a countdown. They threaten to publish payroll files if you stay quiet. KIMO does none of that. The damage is still the same. A family photo will not open. A tax PDF will not open. A client spreadsheet will not open. The file name looks familiar, then .KIMO is glued on the end, and the contents are unreadable.
Ransomware is malware that encrypts files so the system that relies on them becomes useless. That is the definition governments use when they talk about file lockers. Payment is a common next step in many families. It is not a required feature. If the files are locked and you cannot use them, you are in a ransomware incident even if the author never asked you for coin.
The note that asks for nothing
How to DeCrypt Your Files.txt is the message victims find after the rename. Public descriptions of that note are consistent. It names the encryption as AES-256-CTR. It names a decrypt program, KimoLabDecrypt.exe. It says that program has to be used with the same key that was embedded in the payload. It does not give a contact. It does not give a wallet. It does not threaten a leak site.
Read that again if you just opened the note and felt a wave of relief. No payment demand is not the same thing as a way out. It only means there is no official checkout page for this strain. There is also no official inbox where a victim can “buy” the missing key. The note hands you a homework assignment that you cannot complete from a clean download.
That empty space is easy to fill with hope. Search results will try to fill it for you. Pages will claim they have KimoLabDecrypt.exe as a free fix. Commenters will paste strings and call them keys. None of that is how this locker is described in public. The key the note talks about is the key from that payload, not a community password, not a coupon code, and not a file you grab from a software store.
Why a missing Bitcoin address still wrecks a folder
People sort threats by the bill. A locker that asks for $500 feels like crime. A locker that asks for nothing feels like a glitch, a prank, or a research toy that should come with an undo button. AES-256-CTR does not care about that feeling. If the files were locked with a real key, they stay locked until that key and the matching decryptor are both present.
Some lockers are sloppy. Some reuse a key. Some leave a flaw that a trusted lab can later turn into a public tool. None of that should be assumed for KIMO. There is no public free decryptor to point you to. Inventing one would be a kindness that gets someone else hurt. If a later official tool appears, it will show up on a project such as No More Ransom, not in a pop-up that arrived the same hour your files changed.
This is also why “maybe it is only a rename” is a bad bet. Adding .KIMO is the visible stamp. The note itself says the contents were encrypted. A renamed file can be renamed back. An encrypted file cannot. If you strip the extension and the file still will not open in the app that created it, you are not looking at a costume. You are looking at locked data.
Keep the note. Keep the .KIMO files. Do not tidy the desktop by deleting “junk” while you are scared. That note is how you identify the strain later. The locked files are the only copy you may have of the original photos until a clean backup is found.
How The Ransomware Works
You do not need a lab report to understand what KIMO does to a home or office PC. The victim-facing story is short. Something runs. Files that used to open pick up .KIMO. A note named How to DeCrypt Your Files.txt appears. The note names AES-256-CTR and a program called KimoLabDecrypt.exe. It says the key is the one from the payload. Then the noise stops. No payment page follows.
This section stays on that story. It is not a build guide. It is not a list of switches, offsets, or sample hashes. If someone asks you how to “make a KIMO” or how to pull a key out of a binary, the answer is no. The useful work is recovery, isolation, and a clean restore.
The .KIMO rename you can see without opening anything
The extension is the first public fingerprint. A file that was invoice.pdf becomes invoice.pdf.KIMO. A file that was beach.jpg becomes beach.jpg.KIMO. The original name is still sitting there, which is why the folder still looks like your life, only broken. That is deliberate. It helps you recognize what was taken from you. It also helps a later decryptor, if one ever exists for your case, put names back where they belong.
Do not spend the afternoon renaming a hundred files by hand. Taking .KIMO off the end will not rebuild the bytes inside. It can also make a later official tool harder to match, because many tools look for the stamp the family left. Leave the locked files as they are. Copy them first if you are about to scan or reinstall.
The same stamp is how you talk to a helper without guessing. You can say the files end in .KIMO and the note is How to DeCrypt Your Files.txt. That pair is enough to identify the family in public writeups. You do not need a hash. You do not need to upload a family photo to a random “identify this virus” form that you do not trust.
AES-256-CTR, in the language of a locked photo
The note names AES-256-CTR. In plain language, that is a modern way to scramble a file so it looks like noise unless you have the right key. AES-256 is a standard cipher. CTR is a mode that turns that cipher into a stream over the file. Victims do not need the math. They need the consequence. Guessing the key is not a weekend project. Brute force is not a plan.
When encryption is done correctly, the only honest unlock is the matching key plus a decryptor that knows the format. That is why so many ransomware notes exist. They are sales pages for a key the victim does not have. KIMO skips the sales page and still keeps the lock. The note tells you the key was already in the payload. If you do not have that payload key, you do not have an unlock path from the note alone.
This is also why a “universal KIMO key” on a forum should make your stomach drop. A public, reusable password would be news on official recovery projects. It would not arrive as a drive-by download next to a countdown gif. If you did not keep the payload that hit that machine, you should assume you do not have the key the note is talking about.
KimoLabDecrypt.exe is a name in a note, not a store app
The note tells victims to run KimoLabDecrypt.exe with the same key that was in the payload. That sentence has two parts, and both matter. The program name is specific. The key is specific. A file that happens to be named KimoLabDecrypt.exe on a download site is not automatically the tool the note meant. Even a real copy of that program is useless without the key from that payload.
This is the moment a second infection loves. You search the program name. You land on a page with a big green button. You run what you got. Now you have a locker and a new steal-your-passwords problem. The note never said “search the web and trust the first result.” It said to use that tool with that key. If you do not have both, you are not decrypting. You are gambling.
There is no public store listing to send you to. There is no official vendor page in this article that hosts KimoLabDecrypt.exe as a free recovery product. That absence is the point. A real, trusted decryptor for a ransomware family is published by a known lab or by a project such as No More Ransom, with a how-to and a warning to clean the machine first. That is not the situation described for KIMO today.
If you still have the original payload file on the machine, do not “try it again” to see the key. Do not send that file to a friend. Do not upload it to a random chat. Treat it as malware. A trusted responder or a trusted antivirus vendor can talk about next steps. A stranger who wants the file and your remote desktop is not a responder.
What the note refuses to give you
Most locker notes are crowded. They list a $ price, a discount if you write within 72 hours, a test decrypt, and two emails. KIMO’s public note is the opposite. No ransom sum. No contact. No leak threat. That quiet is not mercy. It removes the one ugly path some victims still try, which is paying a person who answers.
It also removes a negotiation fantasy. There is no desk to beg. There is no “support” chat that will decrypt one picture to prove they are real. There is no onion site with a ticket number. If you feel the urge to find the author anyway, stop. You would be hunting a person who already declined to be found, and you would likely land on impersonators.
The practical reading is blunt. Recovery is not a purchase. Recovery is a backup you made before this happened, plus a clean machine. Everything else is a maybe that belongs on official trackers, not on your credit card and not on a used-key market.
The U.S. government’s ransomware hub says the same thing in calmer language. CISA StopRansomware describes ransomware as malware that encrypts files and makes the systems that rely on them unusable. The official one-stop site, StopRansomware.gov, is built for prevention, reporting, and recovery advice. It is not a vending machine for family-specific keys. Use it as a map. Do not wait there for a KIMO miracle that has not been announced.
What To Do If Your Files End In .KIMO
Copy the .KIMO files and the How to DeCrypt Your Files.txt note to a disk that will not stay plugged into the sick machine. Those exact locked copies are what a later trusted decryptor would need. KIMO’s public note has no contact and no $ demand, so anyone who emails you first is guessing, scraping, or impersonating.
Do not run KimoLabDecrypt.exe from a zip you do not trust. Do not run “KIMODecryptor-Full.exe” from a video description. Do not paste a “payload key” from a screenshot into a prompt a stranger sent you. The key the note describes is the key from that payload. A typed string from the internet is a different object with the same word on it. There is no public KimoLabDecrypt sitting in a store.
- STEP 1: Use Rkill to terminate suspicious programs.
- STEP 2: Use Malwarebytes to remove Ransomware and Unwanted Programs
- STEP 3: Use HitmanPro to remove Trojans and other Malware
- STEP 4: Use AdwCleaner to remove Malicious Browser Extensions and Adware
- STEP 5: Perform a final check with ESET Online Scanner
- STEP 6: Restore the files encrypted by ransomware
STEP 1: Use Rkill to terminate suspicious programs.
In this first step, we will download and run Rkill to terminate suspicious programs that may be running on your computer.
RKill is a program that was developed at BleepingComputer.com that attempts to terminate known malware processes so that your normal security software can then run and clean your computer of infections. When RKill runs it will kill malware processes and then removes incorrect executable associations and fixes policies that stop us from using certain tools.
-
Download Rkill.
You can download RKill to your computer from the below link. When at the download page, click on the Download Now button labeled iExplore.exe. We are downloading a renamed version of Rkill (iExplore.exe) because some malware will not allow processes to run unless they have a certain filename.
Download RKillOpens the BleepingComputer download page in a new tab. RKillStops malware processes so other tools can run
 -
Run RKill.
After downloading, double-click the iExplore.exe icon to kill malicious processes. In most cases, downloaded files are saved to the Downloads folder.
The program may take some time to search for and end various malware programs.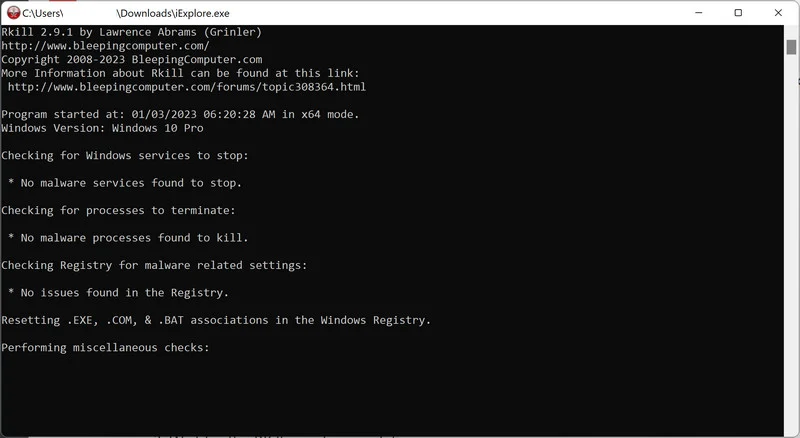
When it is finished, the black window will close automatically and a log file will open. Do not restart your computer. Proceed to the next step in this guide.
STEP 2: Use Malwarebytes to remove Ransomware and Unwanted Programs
In this second step, we will install Malwarebytes to scan and remove any infections, adware, or potentially unwanted programs that may be present on your computer.
Malwarebytes is one of the most popular and trusted anti-malware tools for Windows — and it’s completely free for removing infections. It catches threats that many antivirus programs miss, including adware, browser hijackers, and trojans. Follow the steps below to scan and clean your PC in just a few minutes.
Download Malwarebytes
Click the button below to download the latest version of Malwarebytes for Windows from the official source. The free version is all you need — it will scan your computer and remove adware, browser hijackers, and other malicious software at no cost.
Download MalwarebytesOfficial installer for Windows 11 and 10. Your download starts right away.Want real-time protection? See Malwarebytes Premium Malwarebytes Free for WindowsScans and removes malware at no cost
-
Install Malwarebytes
When the download finishes, open your Downloads folder and double-click the MBSetup file. If Windows shows a User Account Control pop-up, click “Yes” to allow the installation.

Follow the On-Screen Prompts to Install Malwarebytes
The setup wizard will walk you through a few quick screens:
-
Choose where you’re installing the program — “Personal Computer” or “Work Computer” — then click Next.

-
Malwarebytes will now install on your device. This usually takes under a minute.

-
When installation is complete, the “Welcome to Malwarebytes” screen will open automatically.

-
On the final screen, click Open Malwarebytes to launch the program.

-
Enable “Scan for Rootkits”
Before scanning, turn on rootkit detection so Malwarebytes can find even the most hidden threats. Click the Settings gear icon on the left side of the screen.

In the settings menu, find “Scan for rootkits” and click the toggle so it turns blue.

Done? Click “Dashboard” in the left pane to return to the main screen.
Start the Scan
Click the blue Scan button. Malwarebytes will automatically update its virus database and start checking your computer for malware.

-
Wait for the Scan to Finish
The scan checks your entire system for browser hijackers and other malicious programs, so it can take 5 to 20 minutes depending on your computer. Feel free to do something else — just check back occasionally to see the progress.

-
Quarantine the Detected Threats
When the scan is done, you’ll see a list of everything Malwarebytes found — malware, adware, and potentially unwanted programs. Click the “Quarantine” button to remove all of them at once.

Malwarebytes will now remove the malicious files and registry entries and move them safely into quarantine.

-
Restart Your Computer
Some threats can only be fully removed after a reboot. If Malwarebytes asks you to restart, click Yes. Once you’re logged back in, Malwarebytes has finished removing the threats it found.

STEP 3: Use HitmanPro to remove Rootkits and other Malware
In this third step, while the computer is in normal back, we will download and run a scan with HitmanPro to remove Trojans, rootkits, and other malicious programs.
HitmanPro is a second-opinion scanner — it’s designed to catch what your main antivirus might have missed. Instead of relying on a single detection engine, it checks the behavior of files in the locations where malware usually hides. Anything suspicious gets sent to the cloud, where it’s analyzed by two of the best antivirus engines available: Bitdefender and Kaspersky.
Good news: scanning is completely free, with no limits. You only need a license when it’s time to remove what was found — and even then, you can activate a free one-time 30-day trial to clean your PC at no cost. (A full license is $24.95 per year for 1 PC.)
-
Download HitmanPro
Click the button below to download HitmanPro. Remember — the scan is free, so you have nothing to lose by checking your PC.
Download HitmanProFree scan. Removing threats needs the free 30-day trial. Opens the official HitmanPro page in a new tab. HitmanProSecond-opinion malware scanner from Sophos
 -
Install HitmanPro
When the download finishes, open your Downloads folder and double-click the file: “hitmanpro.exe” on 32-bit Windows, or “hitmanpro_x64.exe” on 64-bit Windows.
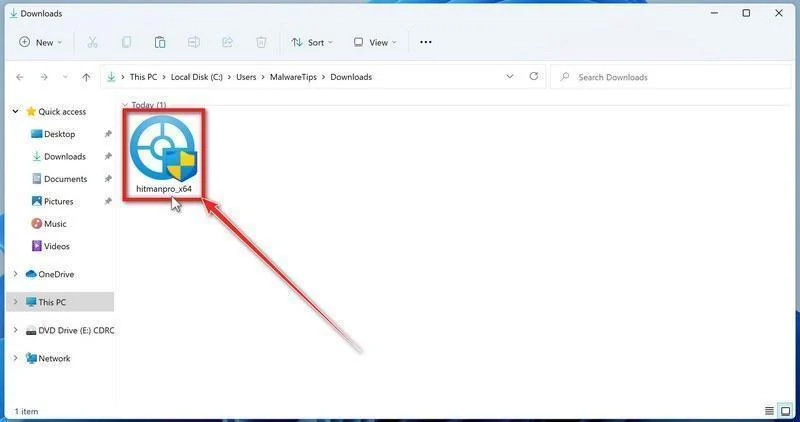
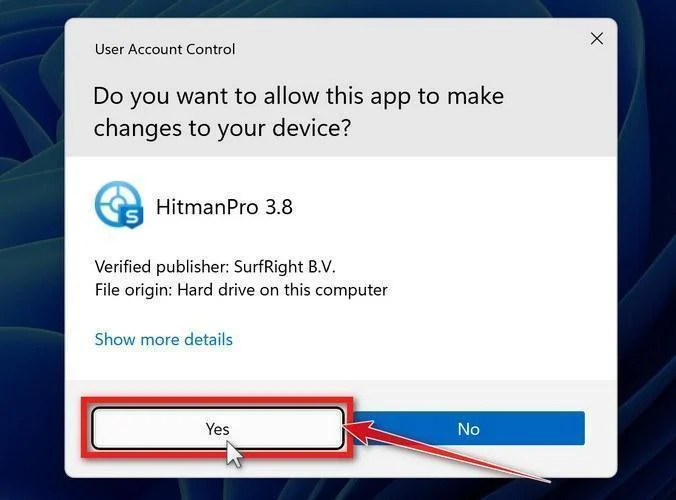
If a User Account Control pop-up asks whether HitmanPro can make changes to your device, click “Yes” to continue.
-
Follow the On-Screen Prompts
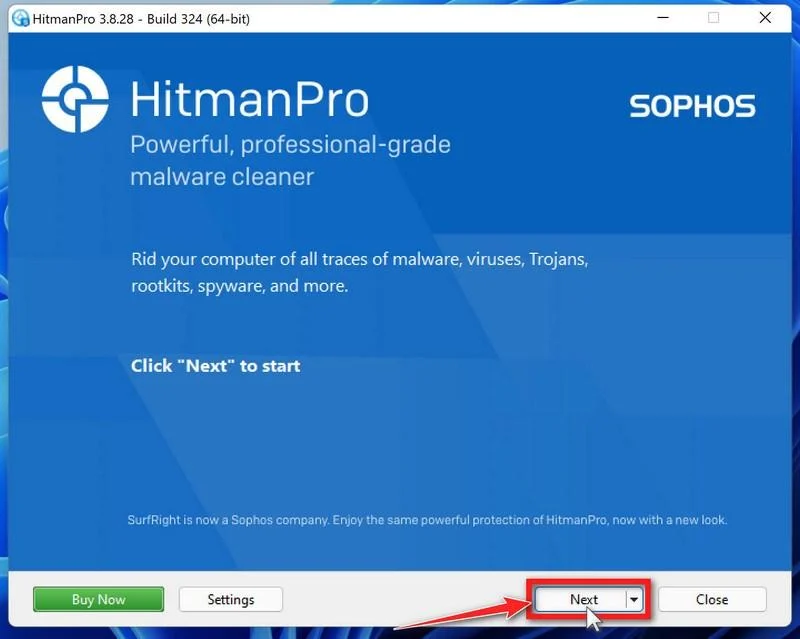
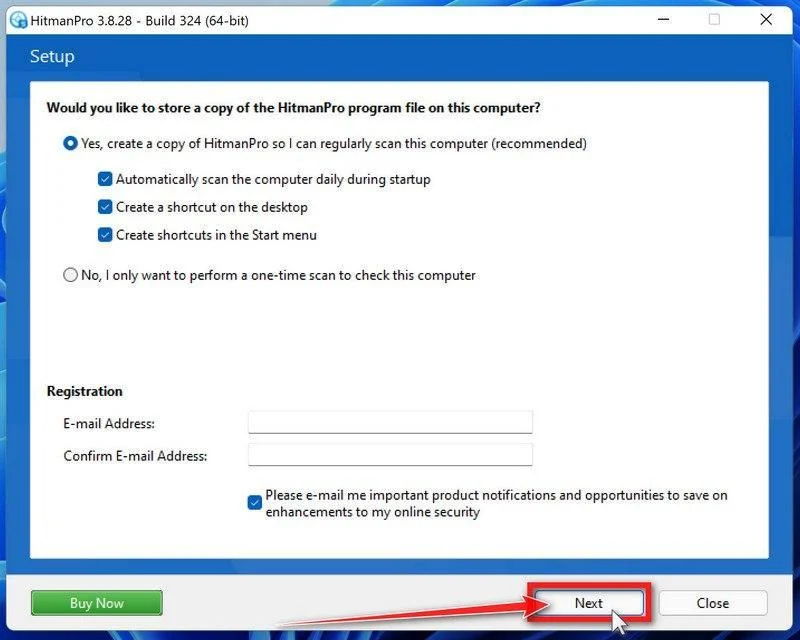
On the HitmanPro start screen, click “Next” to begin the system scan. No lengthy setup required — it goes straight to work.
-
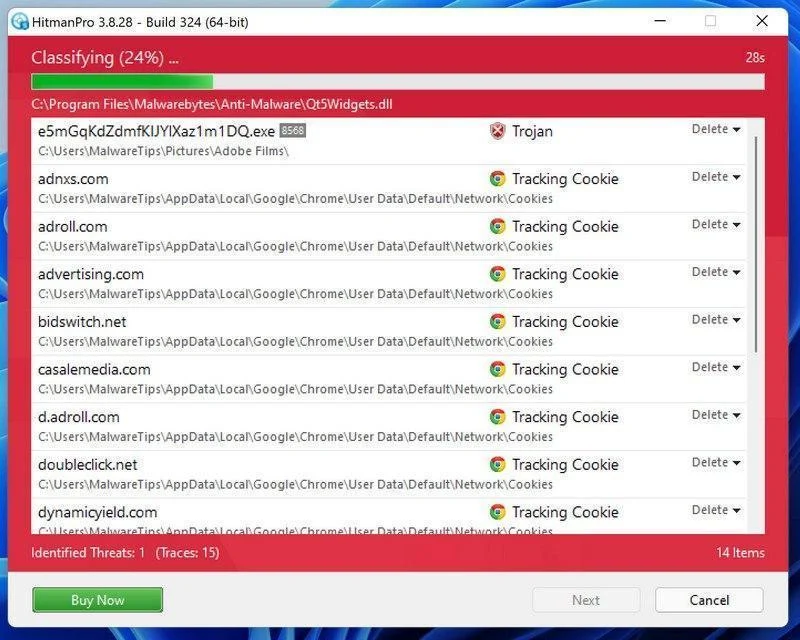
Wait for the Scan to Finish
HitmanPro will now check your computer for malicious programs. This usually takes just a few minutes thanks to its cloud-based scanning.
-
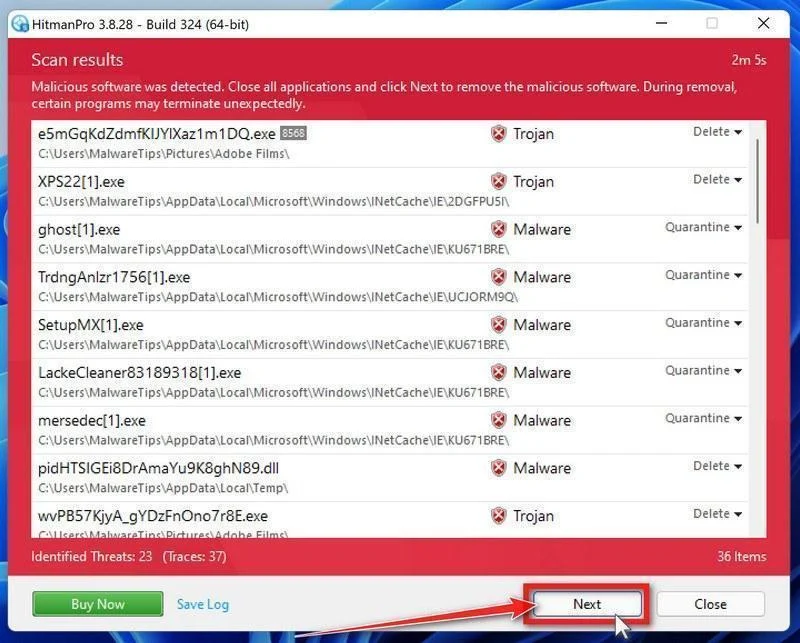
Review the Results and Click “Next”
When the scan is done, HitmanPro will show you everything it found. Click “Next” to remove the detected threats.
-
Click “Activate Free License”
To remove the malicious files, click the “Activate free license” button. This starts your free 30-day trial — no payment details needed — and unlocks the full cleanup.
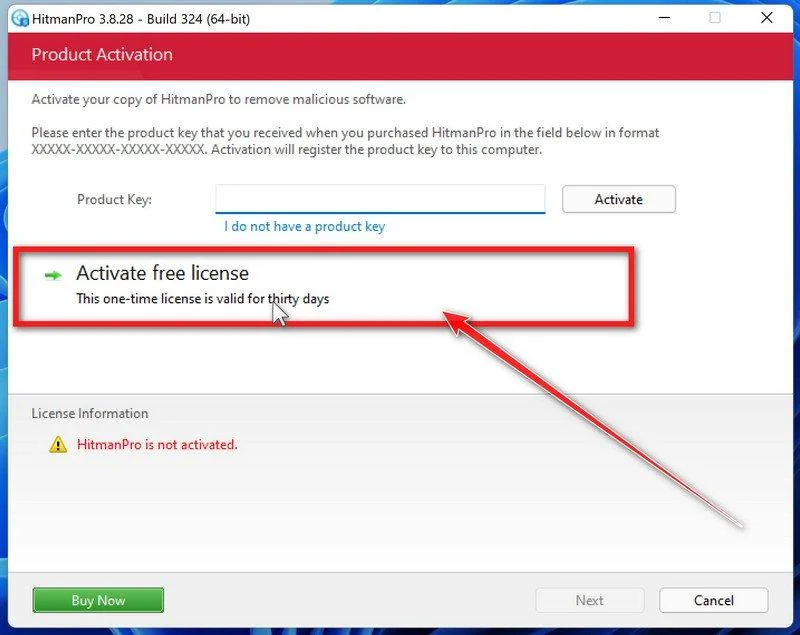
When the removal is complete, HitmanPro will show a summary of everything it cleaned. Click Next, then click Reboot if prompted. If there’s no reboot prompt, just click Close — your PC is clean.
STEP 4: Use AdwCleaner to remove Malicious Browser Extensions and Adware
In this next step, we will use AdwCleaner to remove malicious browser policies and unwanted browser extensions from your computer.
AdwCleaner is a free on-demand scanner that specializes in adware, browser hijackers, and unwanted toolbars — the exact threats that mainstream antivirus programs often miss. It also includes tools that repair the damage malware leaves behind, like hijacked browser settings and malicious policies. It’s a quick scan that’s well worth running.
-
Download AdwCleaner
Click the button below to download AdwCleaner — it’s free, portable, and requires no installation.
Download AdwCleanerOpens the official download page in a new tab. Malwarebytes AdwCleanerRemoves adware and unwanted programs at no cost
 -
Run AdwCleaner
Open your Downloads folder and double-click the file named “adwcleaner.exe“. There’s no installation — the program starts right away.
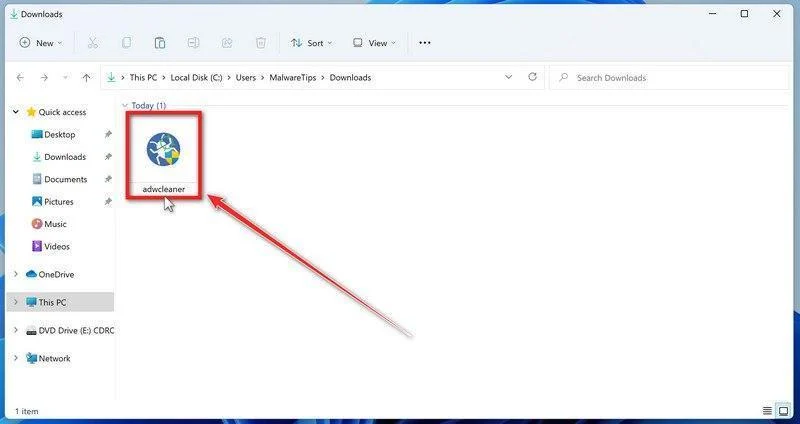
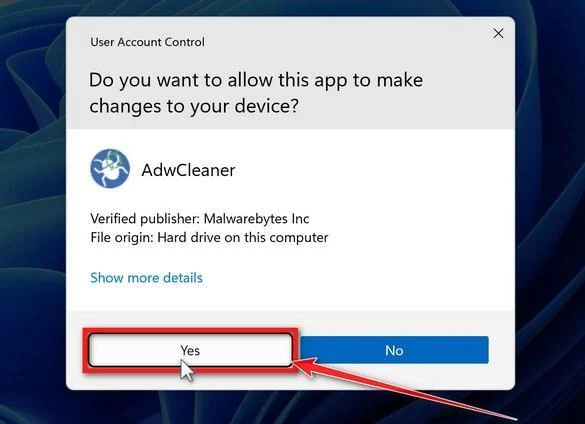
If Windows asks whether you want to allow AdwCleaner to run, click “Yes“. When the license agreement appears, click I agree to continue.
-
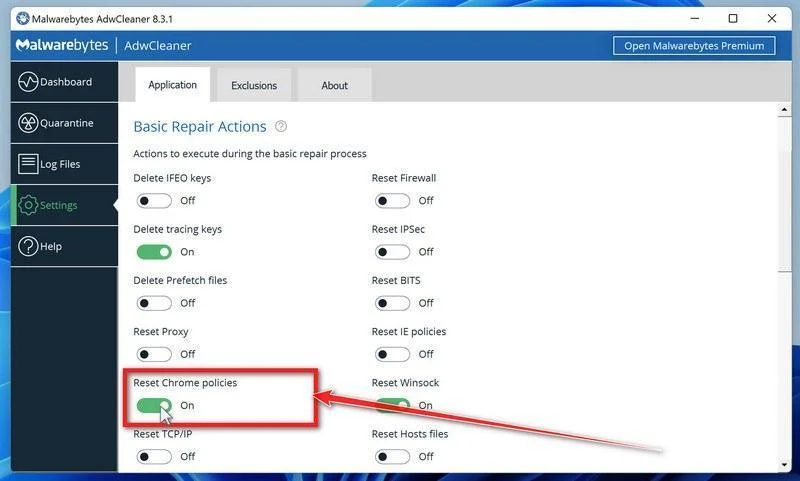
Enable “Reset Chrome policies”
This setting removes malicious browser policies — a trick malware uses to lock your browser settings so you can’t change them back. Click “Settings” on the left side of the window, then turn on “Reset Chrome policies“.
-
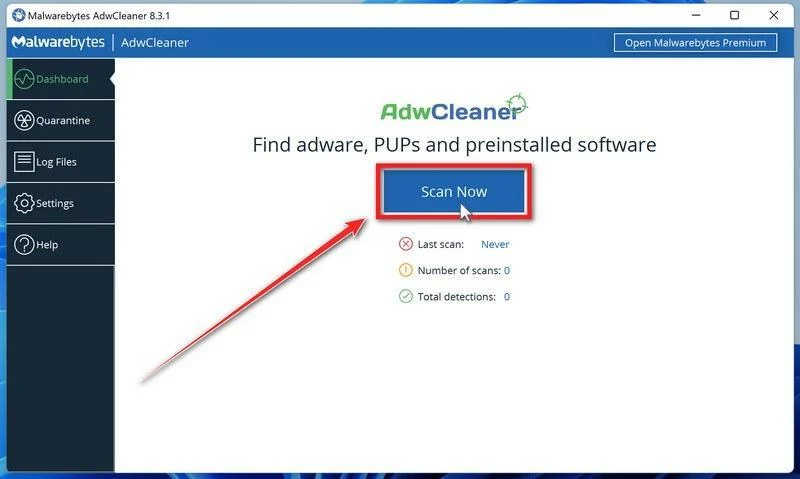
Start the Scan
Click “Dashboard” on the left side of the window, then click the “Scan” button.
-
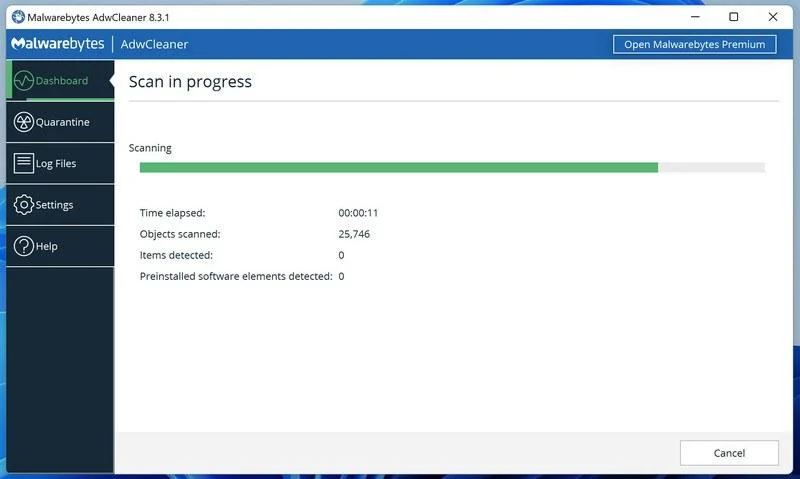
Wait for the Scan to Finish
AdwCleaner will now check your computer for adware and other malware. This usually takes only a few minutes — it’s one of the fastest scanners around.
-
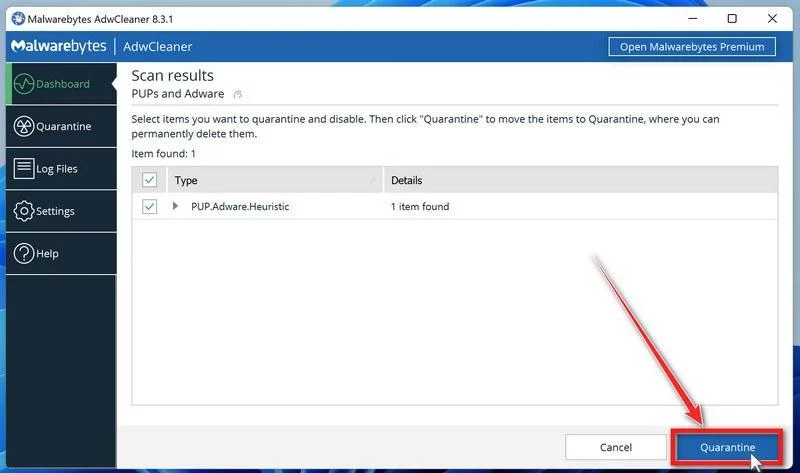
Quarantine the Detected Threats
When the scan finishes, AdwCleaner will list everything it found. Click the “Quarantine” button to remove all the malicious items at once.
-
Click “Continue” to Finish the Cleanup
Save any open work first — AdwCleaner needs to close your open programs before it can clean. When you’re ready, click the “Continue” button.
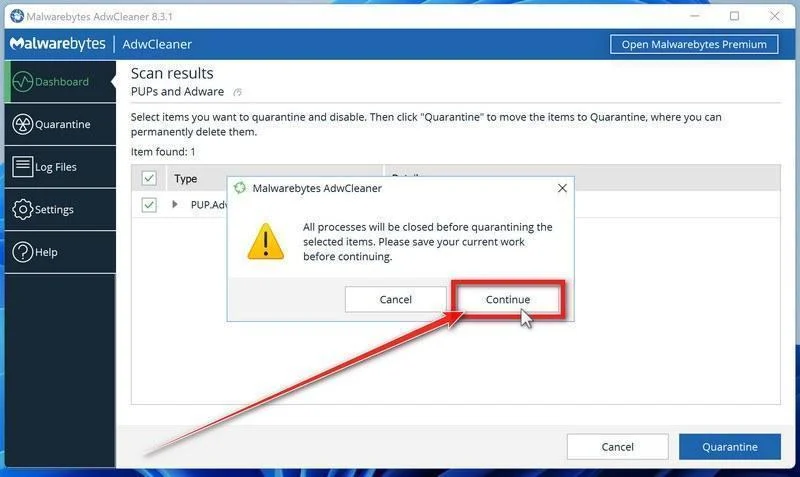
AdwCleaner will now delete all detected malware from your computer. If it asks you to restart your PC, allow it — your computer will be clean when you log back in.
STEP 5: Perform a final check with ESET Online Scanner
This final step involves installing and running a scan with ESET Online Scanner to check for any additional malicious programs that may be installed on the computer..
ESET Online Scanner is a free second-opinion scanner that performs a deep, full-system check for viruses, trojans, rootkits, and other malware. We use it as the final step because it’s thorough — if anything slipped past the previous scans, ESET will find it. A clean result here means your computer is malware-free.
-
Download ESET Online Scanner
Click the button below to download ESET Online Scanner.
Download ESET Online ScannerOpens the official download page in a new tab. ESET Online ScannerFree one-time malware scan from ESET
 -
Run the Installer
When the download finishes, open your Downloads folder and double-click “esetonlinescanner.exe“.
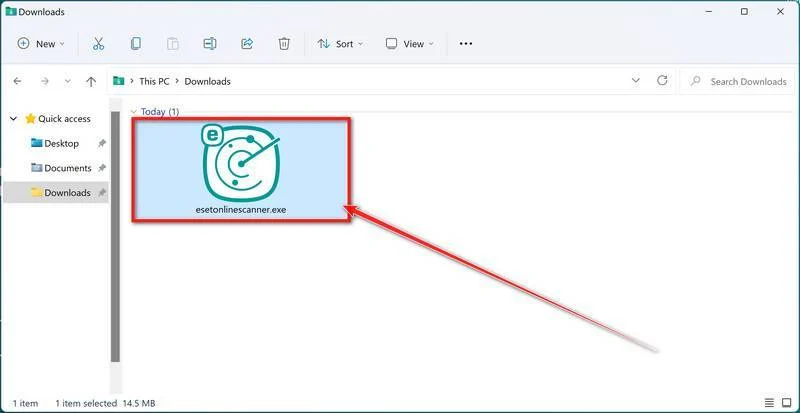
-
Install ESET Online Scanner
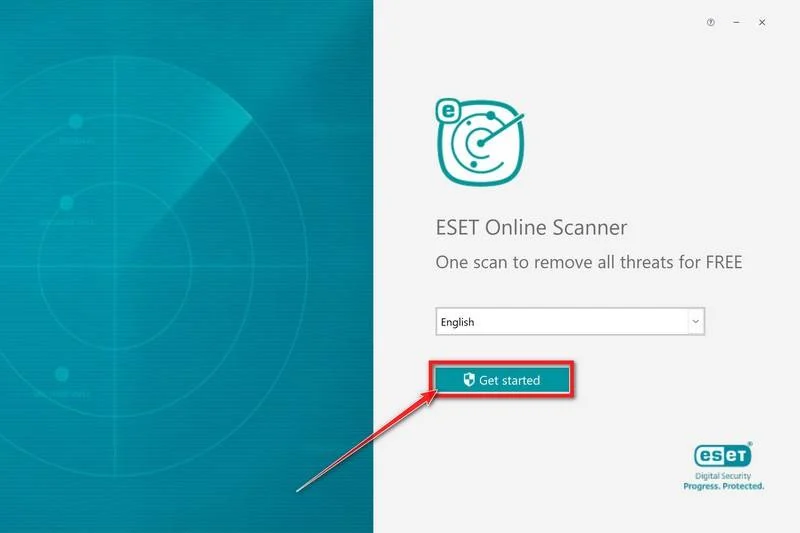
On the start screen, select your language from the drop-down menu and click Get started.
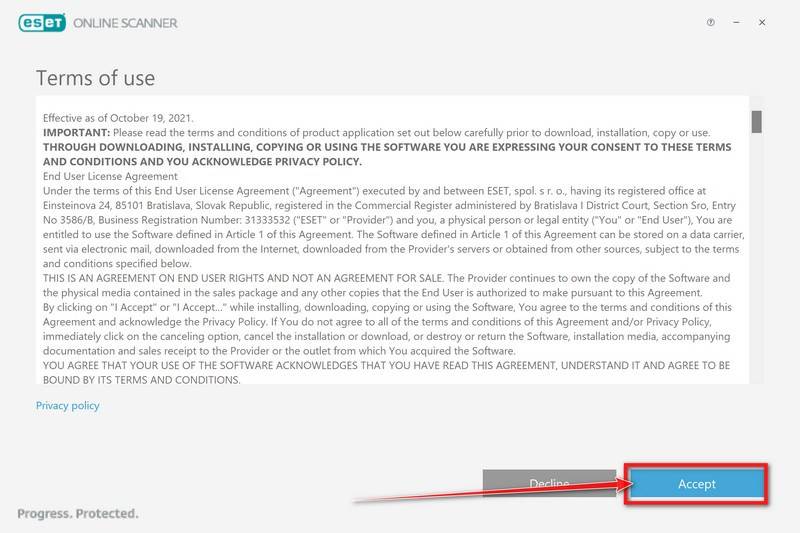
On the Terms of use screen, click Accept.
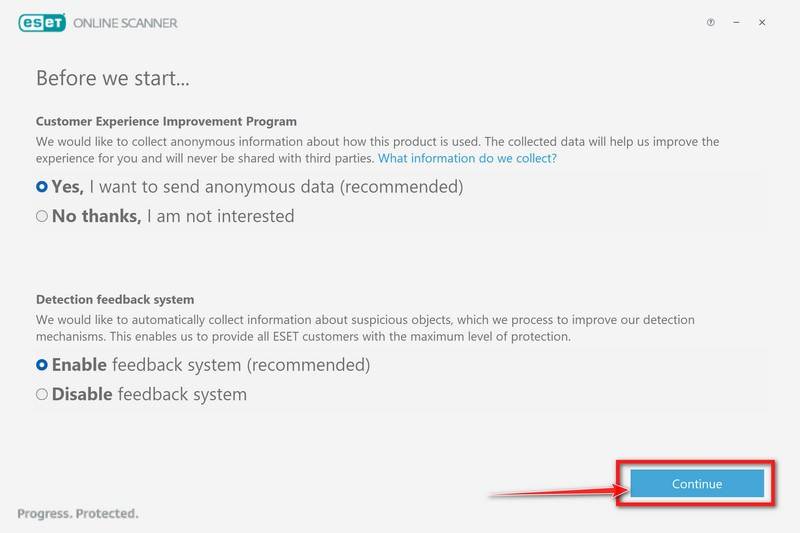
Choose your preferences for the Customer Experience Improvement Program and the Detection feedback system (either choice is fine), then click Continue.
-
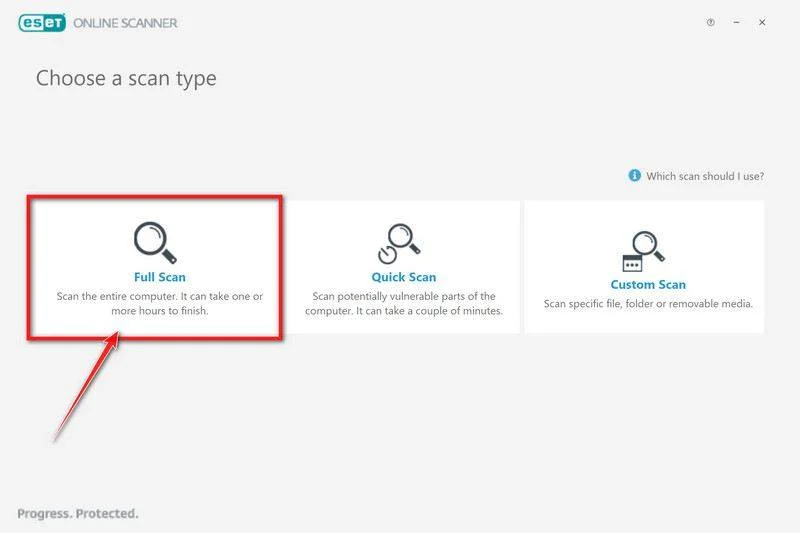
Start a Full Scan
Click Full Scan — this checks your entire computer, not just the common hiding spots.
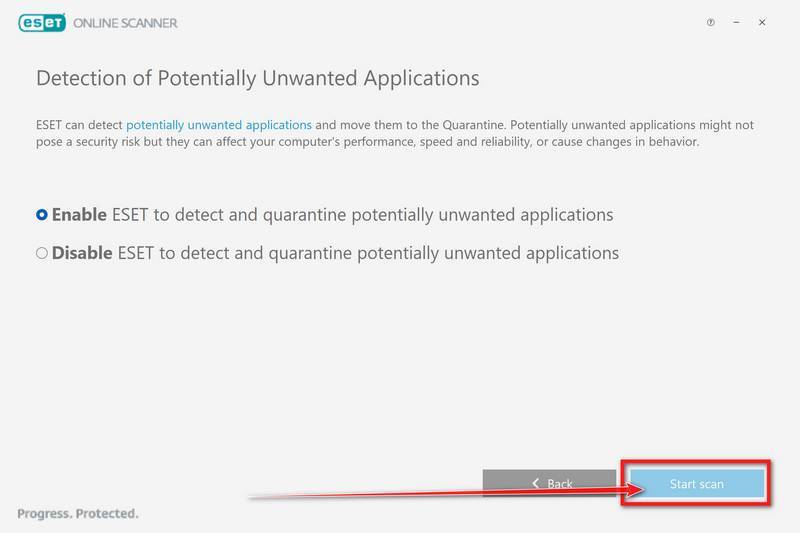
Select Enable for Detection of Potentially Unwanted Applications — this lets ESET catch adware and bundled junk programs, not just viruses. Then click Start scan.
-
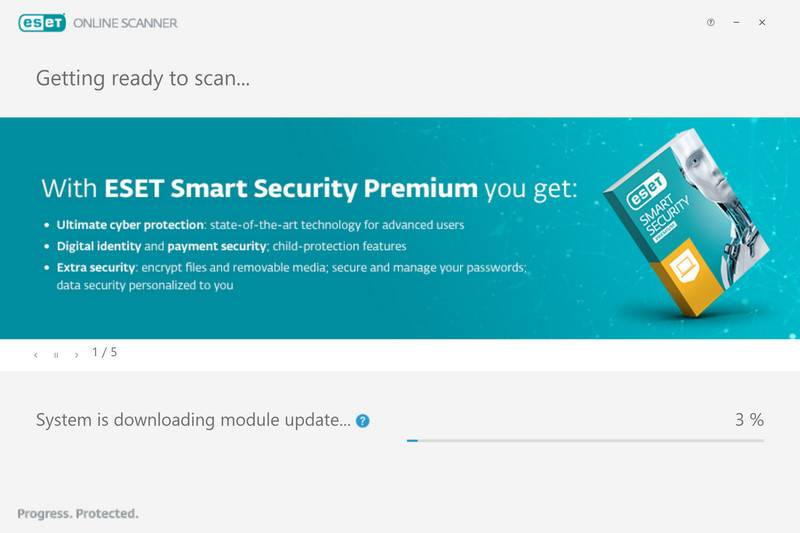
Wait for the Scan to Finish
ESET will now check every file on your computer. Because it’s a full scan, this can take a while — often an hour or more, depending on how much data you have. Leave it running in the background and check on it from time to time.
-
Review the Results
When the scan completes, the Found and resolved detections screen appears. Any threats found were automatically cleaned and quarantined — there’s nothing extra you need to do. Click View detailed results if you want to see exactly what was removed.
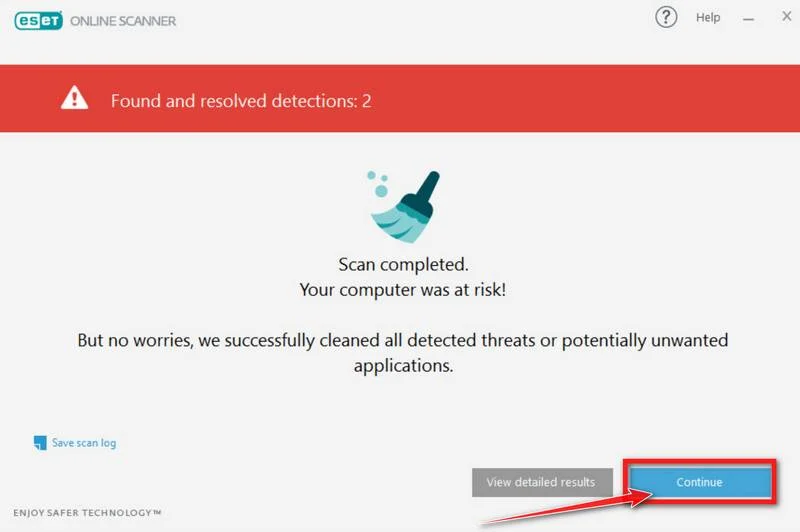
If ESET found nothing — congratulations, your computer has passed the final check and is malware-free.
STEP 6: Restore the files encrypted by ransomware
Unfortunately, in most cases, it’s not possible to recover the files encrypted by this ransomware virus because the private key which is needed to unlock the encrypted files is only available through the attackers. However, below we’ve listed three options you can use to try and recover your files.
Option 1: Search a decryption tool for this ransomware
The cybersecurity community is constantly working to create ransomware decryption tools, so you can try to search these sites for updates:
- https://id-ransomware.malwarehunterteam.com/
- https://decrypter.emsisoft.com/
- https://noransom.kaspersky.com/
- https://www.avast.com/ransomware-decryption-tools
Option 2: Use EaseUS Data Recovery Wizard Free to recover the encrypted files
EaseUS Data Recovery Wizard Free can restore files and repair corrupted files with simple clicks. Its powerful scanning algorithms can identify and retrieve huge file type library, including all of the popular video files, audio files, photos, and document formats.
While the free version only allows you to recover 2 GB of data, this can be helpful to see if the recovery is possible and restore back the most important files from your computer.
-
Download EaseUS Data Recovery Wizard Free.
You can download EaseUS Data Recovery Wizard Free by clicking the link below.
Download EaseUS Data Recovery WizardOpens the download page in a new tab. EaseUS Data Recovery WizardFile recovery tool with a free version
 -
Double-click on the EaseUS Data Recovery Wizard Free setup file.
When EaseUS Data Recovery Wizard Free has finished downloading, double-click on the setup file to install EaseUS Data Recovery Wizard on your computer. In most cases, downloaded files are saved to the Downloads folder.
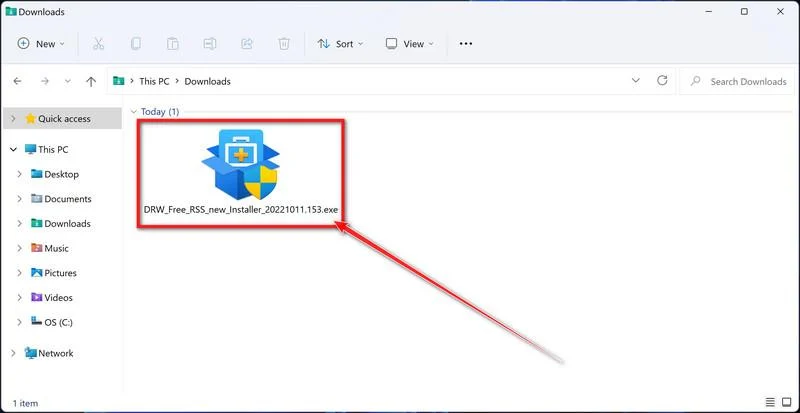
You may be presented with a User Account Control pop-up asking if you want to allow EaseUS to make changes to your device. If this happens, you should click “Yes” to continue with the EaseUS Data Recovery Wizard Free installation.
-
Follow the on-screen prompts to install EaseUS Data Recovery Wizard.
When the EaseUS Data Recovery Wizard installation begins, click on the “Install Now” as seen in the image below.
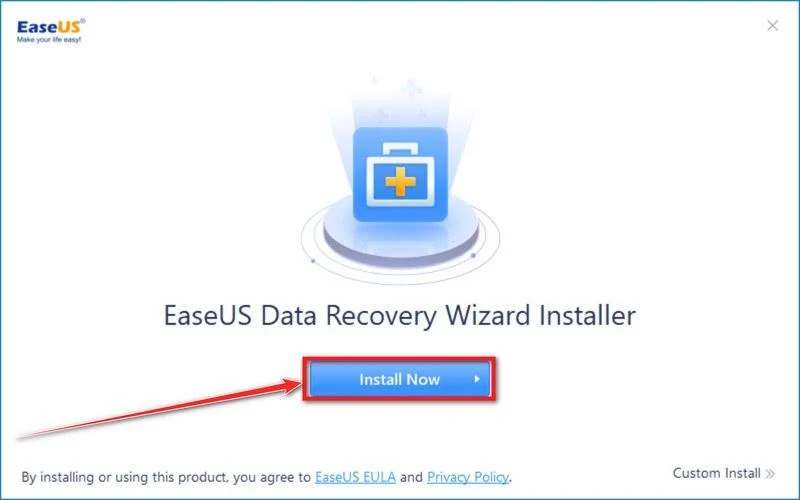
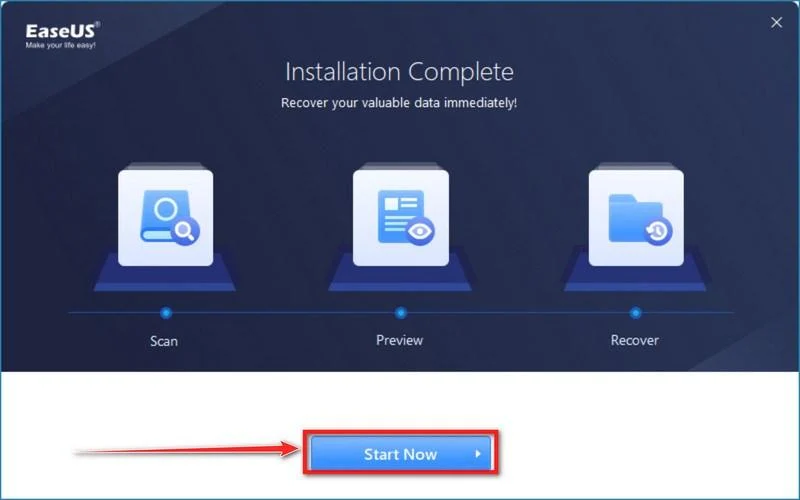
When your EaseUS Data Recovery Wizard installation completes, click the “Start Now” button to start the program.
-
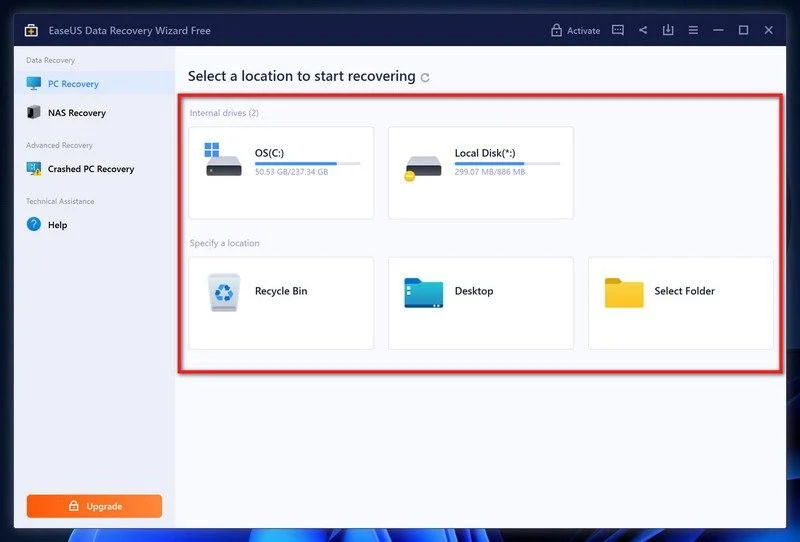
Select a location to start recovering the encrypted files.
Choose the drive or folder where you are the encrypted files that you want to recover and click “Scan“.
-
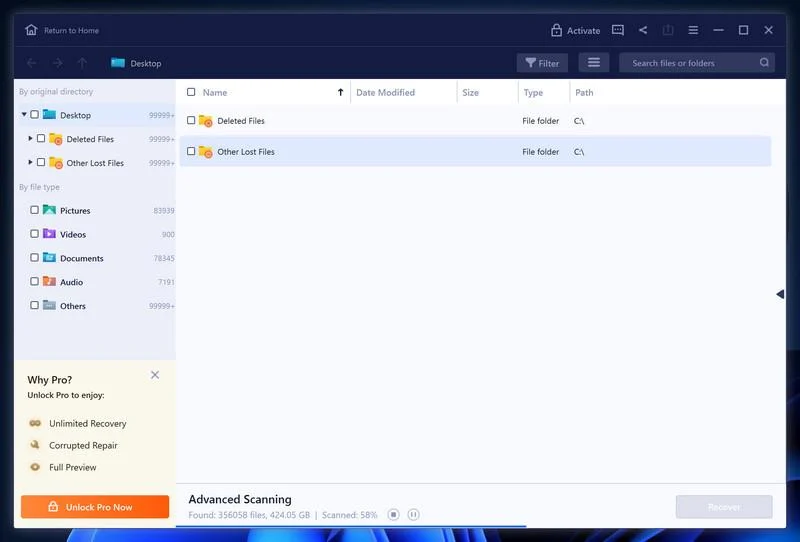
Wait for the EaseUS Data Recovery Wizard scan to complete.
EaseUS Data Recovery Wizard will now scan your computer files that can be restored. This process can take a few minutes, so we suggest you do something else and periodically check on the status of the scan to see when it is finished.
-
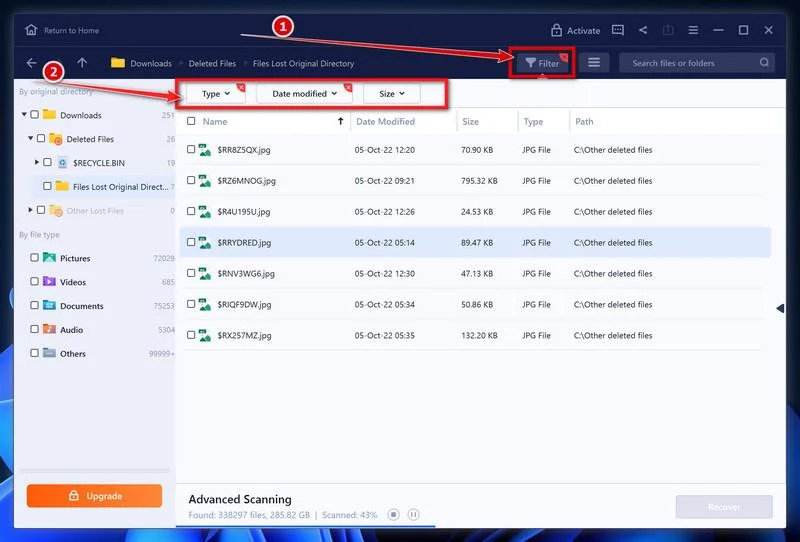
Find the files you want to recover.
When the EaseUS Data Recovery Wizard scan is finished scanning it will show a screen that displays the files that can be recovered. This tool can recover a lot of data, use the “Filter” button to quickly filter specific file types and find the files that you want to recover.
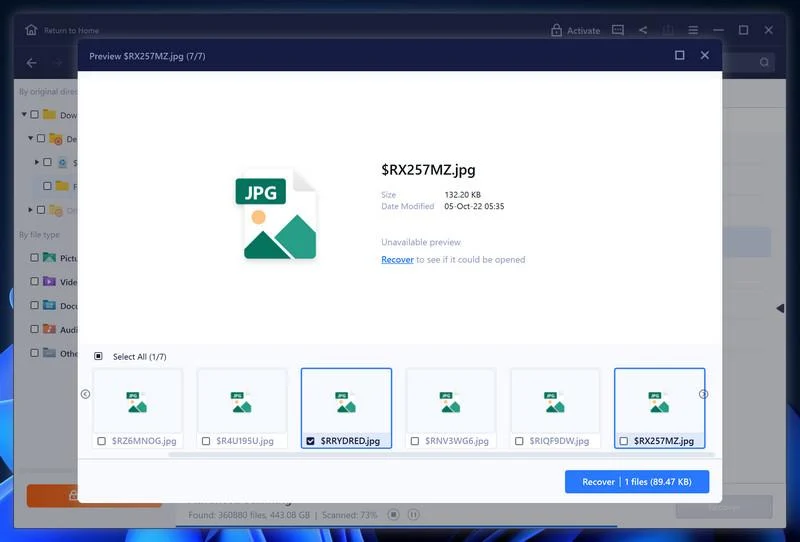
Click the “Preview” button or double-click on a file for a full preview.
-
Select your files and click “Recover”.
Finally, select the the files you want to recover and click “Recover“.
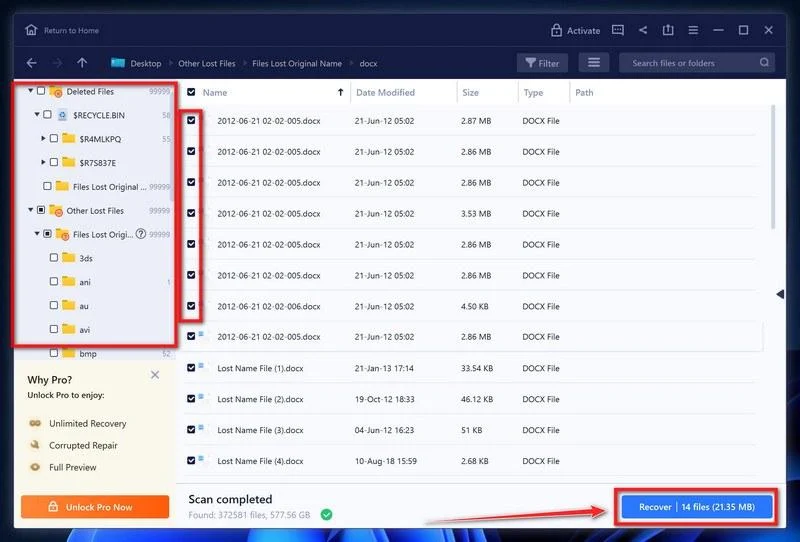
Choose a safe location to save all the files.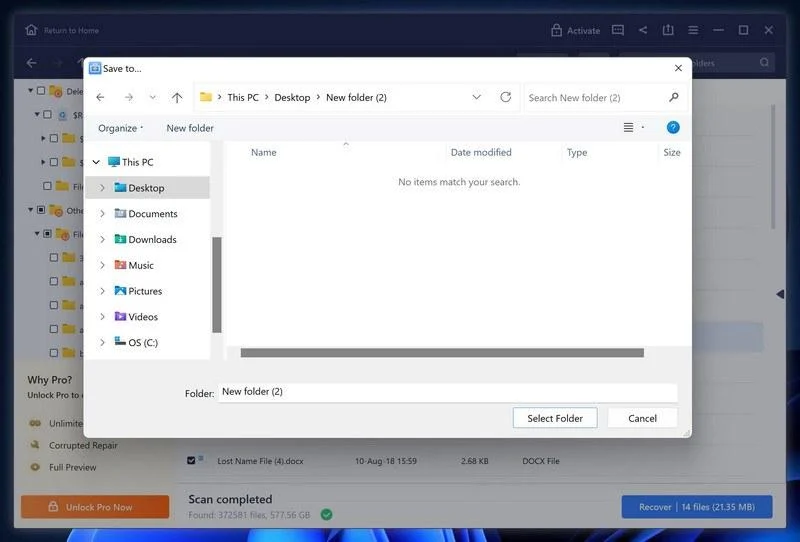
The free version only allow you to recover 2 GB of data, however, this will allow you to recover the most important files and see if EaseUS Data Recovery Wizard can correctly recover them.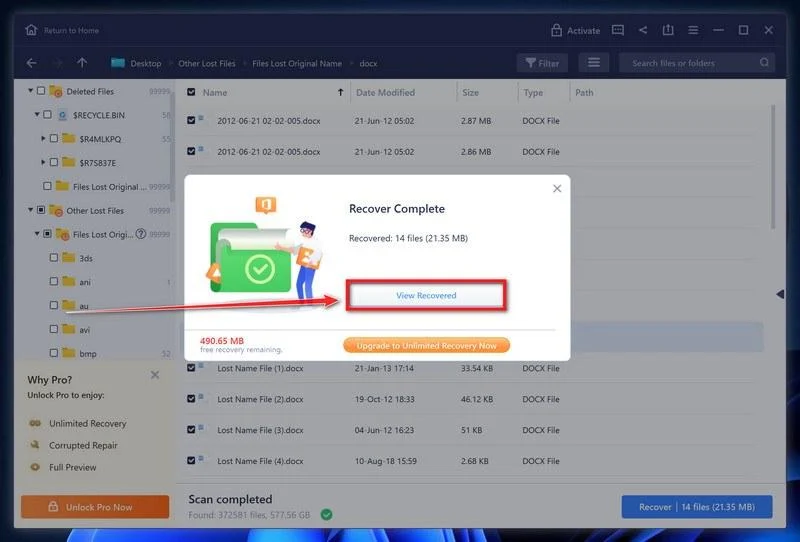
Option 3: Try to restore your files with ShadowExplorer
This ransomware will attempt to delete all shadow copies when you first start any executable on your computer after becoming infected. Thankfully, the infection is not always able to remove the shadow copies, so you should continue to try restoring your files using this method.
-
Download ShadowExplorer.
You can download ShadowExplorer from the below link.
Download ShadowExplorerOpens the official download page in a new tab.ShadowExplorerRestores files from Windows Shadow Volume Copies -
Install ShadowExplorer.
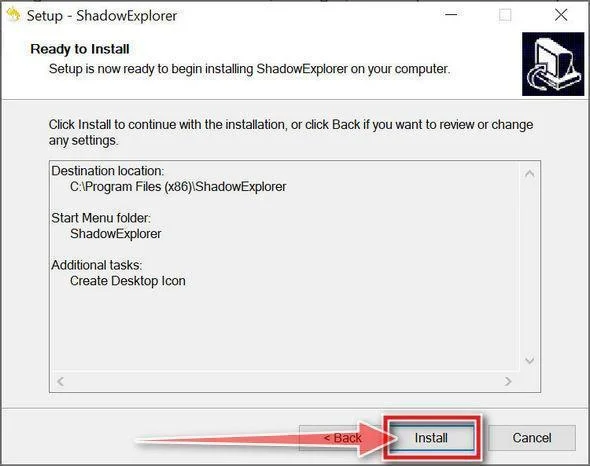
Double-click on the ShadowExplorer-x.x-setup file to start the installation process, then follow the on-screen promts to install this program.
-
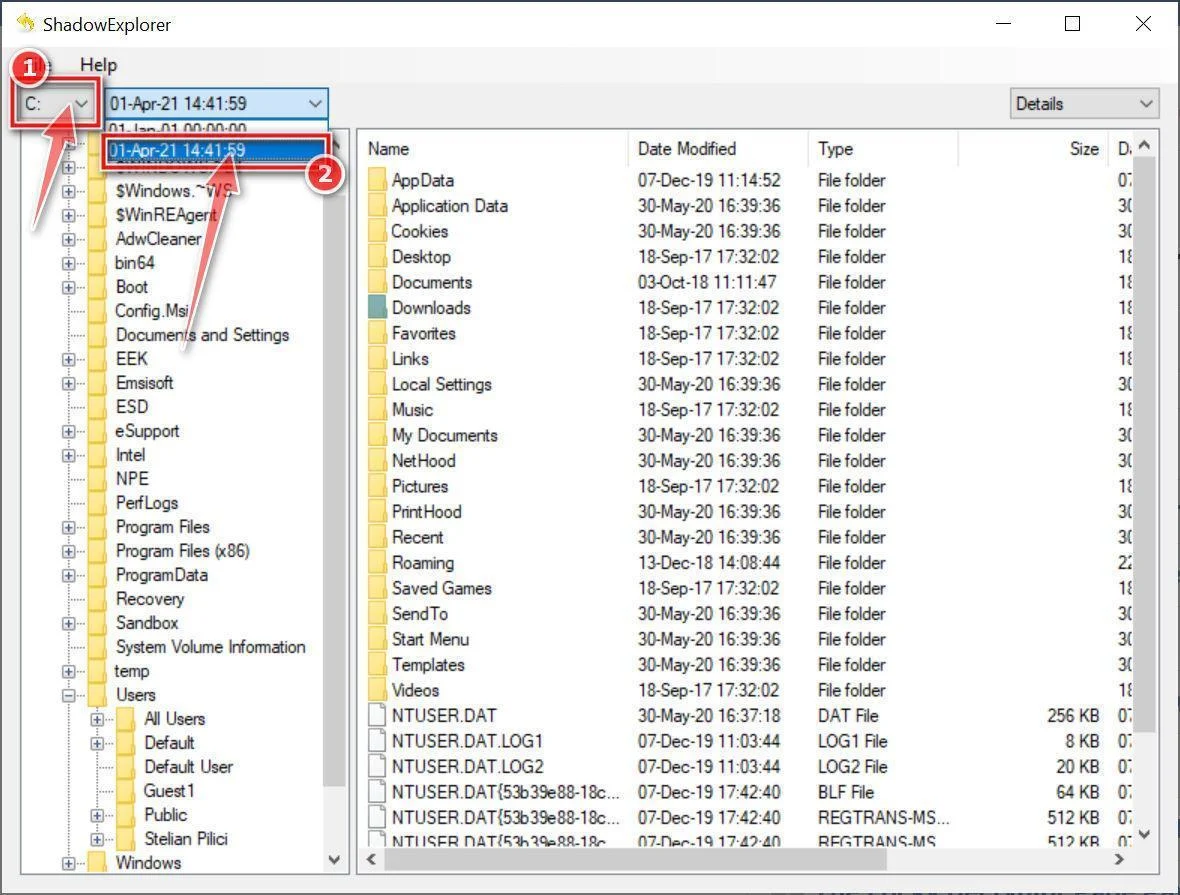
Select snapshot date.
Open ShadowExplorer and then from the top bar select the drive where the files that you want to save are located, then select from the snapshot available one previous to this infection.
-
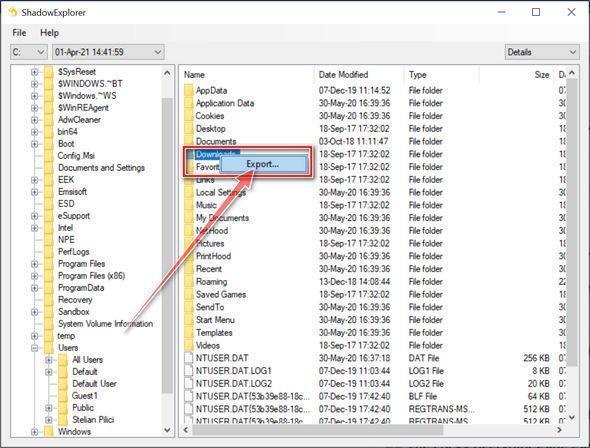
Export the files that you want to recover.
Once you have found a copy of the original file or folder, right-click on it and the select “Export”. A window will prompt you where you want to save the file or folder.
The Bottom Line
KIMO locks files, stamps them with .KIMO, and leaves How to DeCrypt Your Files.txt. The note names AES-256-CTR. It names KimoLabDecrypt.exe. It says you need the key from that payload. It does not name a $ ransom. It does not give a contact. It does not threaten a leak. That quiet is the trap, not the mercy.
KimoLabDecrypt.exe is not a public free decryptor sitting in a store. Without the key from that same payload, the files stay locked. There is no honest shortcut in this article because inventing one would be a lie. If an official tool appears later, look for it on No More Ransom. Until then, assume the lock holds.
Your job is the boring one that still works. Isolate the PC. Keep an offline copy of the locked files and the note. Scan with a real antivirus you already trust. Restore from a backup that never sat plugged into the sick machine. Use CISA StopRansomware for official guidance and reporting, not for a promised key.
If you take one sentence with you, take this. A locker that does not ask for Bitcoin can still take the year of photos you cannot replace. Treat .KIMO like ransomware on the first sighting, not on the day a stranger finally names a price.

Join the discussion
0 commentsShare your experience or ask a question about this article.
Discussion
Start the conversation
Have a question or something useful to share? Add the first comment.