

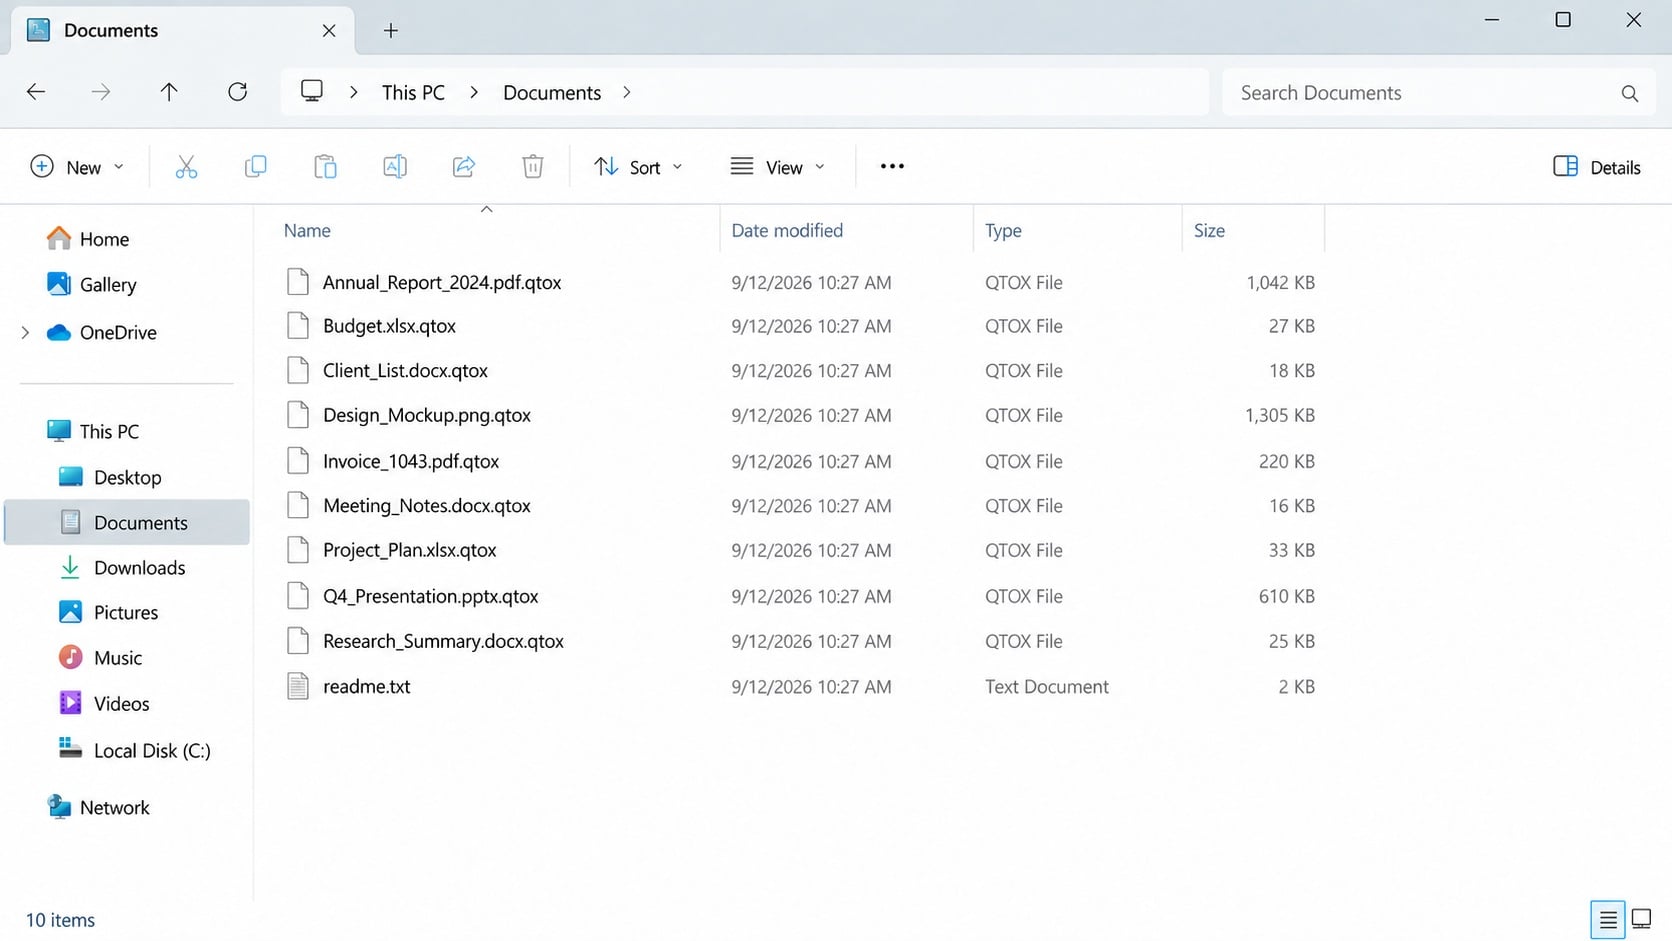
A folder still contains the files you recognize, but their names now end in .qtox. Double-clicking one no longer opens the document you need.
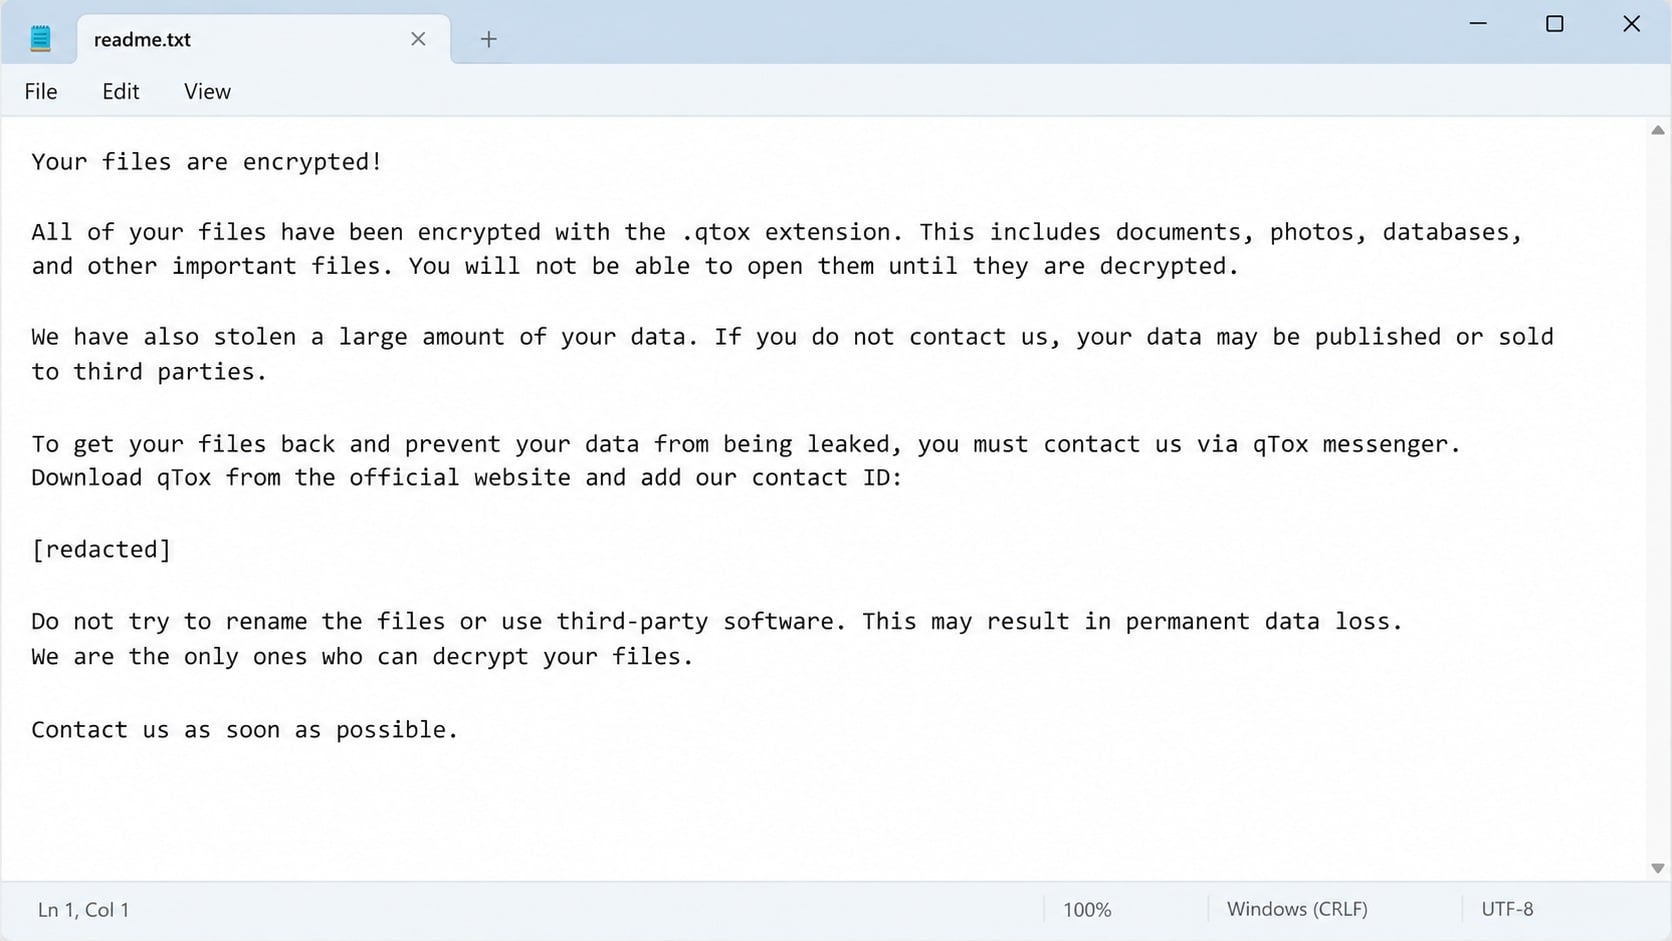
Nearby is a text file called readme.txt. Before reacting to the qTox ransomware note, it helps to understand what changed and what remains recoverable.
Overview
What identifies this ransomware
qTox ransomware encrypts files and appends .qtox to their names. In the analyzed sample, it also creates a ransom note named readme.txt.
A file such as budget.xlsx may become budget.xlsx.qtox. The new name is a clue, but the file contents are no longer readable.
The note claims the attackers took confidential information before encryption. That is a serious assertion requiring investigation, not proof of what was actually removed from every affected system.
The malware’s name should not be confused with the qTox messaging application. The note asks victims to use that application to contact the attackers.
Encryption and data exposure are separate problems
A clean backup can solve the availability problem if it was not reached by the ransomware. It does not automatically answer whether data was copied before files were locked.
The note threatens publication through a ransomware leak site. Responders should preserve logs and assess possible exfiltration without treating the threat text as verified evidence.
Payment is not a reliable safety control. Attackers can take money without providing a working decryptor or keeping a promise to delete stolen data.
Removing the malware also does not decrypt files already affected. The two tasks, stopping the infection and recovering data, must be handled in the right order.
The first decisions to make
- Isolate the affected computer and any reachable storage.
- Preserve readme.txt and a small sample encrypted file for identification.
- Do not connect a backup to a machine that may still be infected.
- Check whether clean offline backups or cloud version history exist.
- Assess whether the data-theft claim has supporting evidence.
For a business, involve the incident-response team early. Shared drives, cloud synchronization, and disclosure obligations can make the scope larger than one desktop.
The interface images here illustrate the extension and note without including a real attacker contact identifier.
How to Recognize qTox Without Mistaking a Filename for Proof
The .qtox extension and readme.txt are useful indicators. However, filenames alone are not a complete malware identification.
Other software can rename files, and criminals can copy a note’s wording. Use the extension, note contents, sample hashes, and endpoint telemetry together.
A document that still appears in File Explorer may not be usable. Its usual application may report an invalid format because the underlying bytes were encrypted.
Do not delete the encrypted copy because you cannot open it today. A future decryptor, forensic analysis, or discovered backup may still make it useful.
Keep at least one original affected file untouched. Work on copies when testing identification or recovery tools, so a failed experiment does not reduce your options.
The ransom note may tell you not to rename files or restore from backups. Such instructions serve the attacker’s leverage and should not govern a professional recovery plan.
At the same time, changing filenames at random will not reverse encryption. Preserve the evidence before trying any repair.
On a corporate network, an apparent single-system infection can indicate access to mapped drives or shared folders. Check whether the same extension appears elsewhere.
How qTox Ransomware Operates
Step 1: The attacker gets code onto a Windows system
The analyzed sample establishes what qTox does after execution, not a single proven delivery route for every infection.
Ransomware can arrive through malicious attachments, untrusted software, exposed remote access, or another compromise. Treat those as investigative possibilities until logs identify your entry point.
Before changing the system, preserve suspicious emails, download records, and security alerts that might explain how the attacker gained access.
Step 2: Files become unreadable and gain .qtox
The ransomware encrypts targeted data and adds its extension. The original file type may remain visible earlier in the name, but the application cannot read encrypted contents.
Encryption can affect different file types and storage locations depending on access. A shared drive may be exposed if the infected account can write to it.
Do not assume that an unaffected folder means the attack stopped on its own. Scope requires a systematic check across connected systems.
Step 3: The note claims a second form of leverage
The readme.txt note says confidential information was taken and threatens publication if the victim refuses to communicate.
This is a double-extortion claim. It combines unavailable files with fear of exposure, even when a backup might allow technical restoration.
Investigators need outbound network, access, archive, and identity logs to evaluate that claim. The wording of the note alone cannot prove exfiltration.
Step 4: Contact is routed through qTox messenger
The note directs victims toward the qTox application and a contact ID. This gives the attackers a private channel for negotiations.
Installing the messenger does not restore files. It only opens communication with the people who caused the problem.
If legal counsel or responders decide communication is necessary, keep it controlled and documented. An individual employee should not negotiate from the affected device.
Step 5: Recovery depends on a clean source
Removing active ransomware prevents further damage but leaves existing encrypted files locked. Restoring backups onto an unclean machine can result in another loss.
Use verified offline or immutable backups when available. Check version history and reputable decryptor databases, but do not trust sites promising universal qTox decryption.
A public decryptor may not exist for this variant. That status can change, so verify it through trustworthy recovery projects rather than assuming a dated article remains current.
Variant, Scope, Backup, and Disclosure Checks
Confirm the variant before choosing a tool
Record the exact extension, note filename, and representative encrypted file. Use a trusted identification service or incident-response specialist on copies.
Do not upload sensitive files to an unknown “free decryptor” page. Such sites can collect data, charge a fee, or deliver additional malware.
Map every system the attacker could reach
Review shared folders, network drives, synchronization clients, and accounts used on the infected computer. Look for encryption timing and suspicious logins.
An organization should preserve firewall, identity, endpoint, and cloud logs before their retention window closes. Those records may identify lateral movement or data transfer.
Validate backups before restoring them
Check a backup’s creation time, integrity, and isolation. A backup connected during the attack may already contain encrypted versions.
Cloud version history can help for individual files, but restore cautiously and inspect whether synchronization has overwritten clean copies.
Assess the claimed data theft separately
List the sensitive information accessible to affected accounts. Look for unusual archives, large transfers, staging folders, or access to high-value repositories.
Bring legal, privacy, and communications teams into the decision if regulated or customer data might be involved. Do not promise that paying would prevent disclosure.
What to Do if qTox Ransomware Infected Your Computer
- Disconnect the affected system. Remove network access and isolate mapped drives. If this is a business computer, notify IT rather than trying to clean several machines independently.
- Keep evidence intact. Save readme.txt, a small encrypted file, event timestamps, and any suspicious email. Avoid reformatting or deleting files before responders review them.
- Protect your backups. Disconnect external storage and pause cloud synchronization where appropriate. Never connect a clean backup to a system with active ransomware.
- Determine the scope. Check other endpoints, shared folders, and accounts for encryption or suspicious access. Preserve logs before they expire.
- Remove active malicious components. On a home computer, a Malwarebytes scan and Windows Security can help identify ransomware and related payloads. Organizations should follow their incident-response plan.
- Recover from clean sources. After confirming the system is clean, restore verified offline backups or clean cloud versions. Check No More Ransom for an applicable free decryptor.
- Change credentials from a clean device. Reset accounts used on the affected machine, revoke sessions, and examine privileged access if a business network was involved.
- Investigate possible exposure. Treat the note’s theft claim seriously, but verify it through evidence. Seek legal advice about notification duties instead of relying on attacker statements.
Remove qTox Ransomware and Recover the Files
Carry out removal and restoration in sequence. Scanner results are not a decryptor, and a successful restoration is not proof that the attacker’s access is gone.
Removal phase 1: Start from a controlled environment
Use a trusted recovery environment or Safe Mode when appropriate. If the device is part of a company network, allow the security team to collect forensic evidence first.
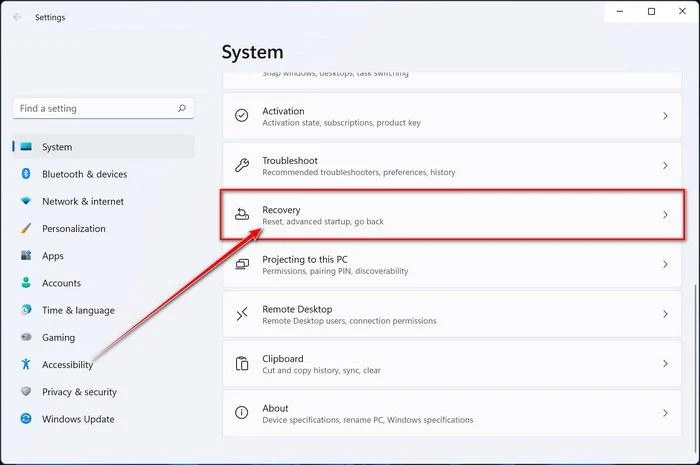
- Press Windows key + I to open Settings. If that doesn’t work, right-click the Start button and select Settings. Then, in the right-hand pane, click Recovery.
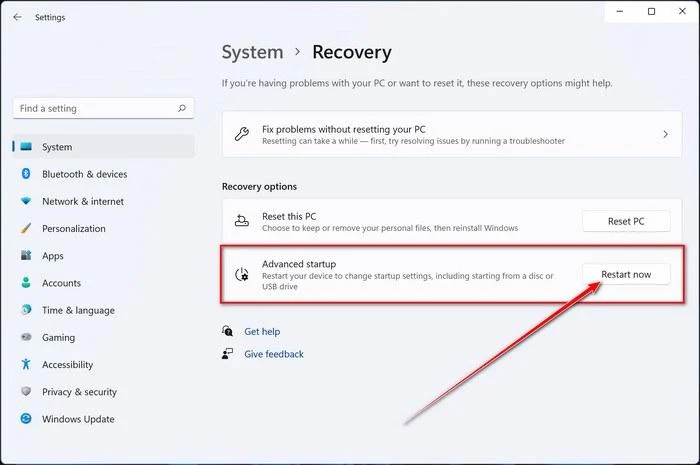
- Under Advanced startup, click Restart now. Save any open work first — your PC will restart immediately.
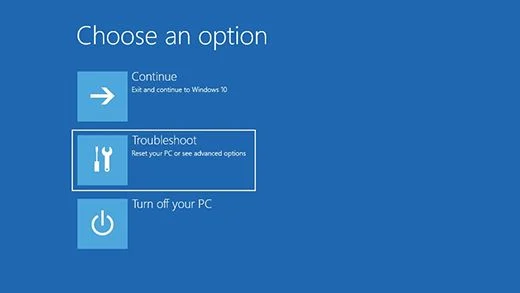
Your PC will restart into the Windows Recovery Environment. From there, follow these steps to reach Safe Mode:
- On the Choose an option screen, select Troubleshoot.
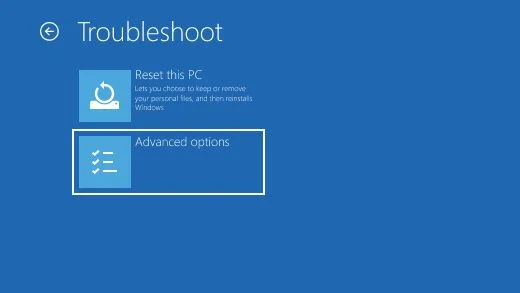
- On the Troubleshoot screen, click Advanced Options.
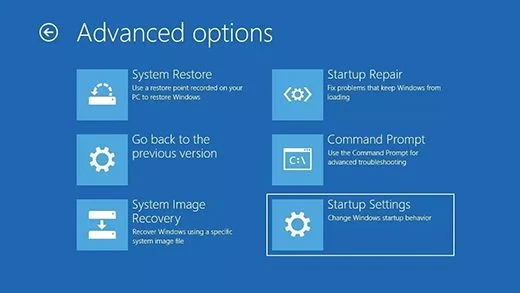
- On the Advanced Options page, click Startup Settings.
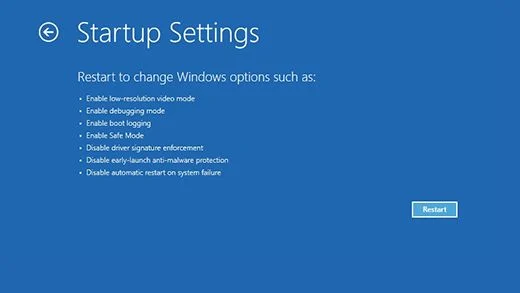
- On the Startup Settings page, click Restart.
- After your PC restarts, you’ll see a list of startup options. Press 5 or F5 to start Safe Mode with Networking.
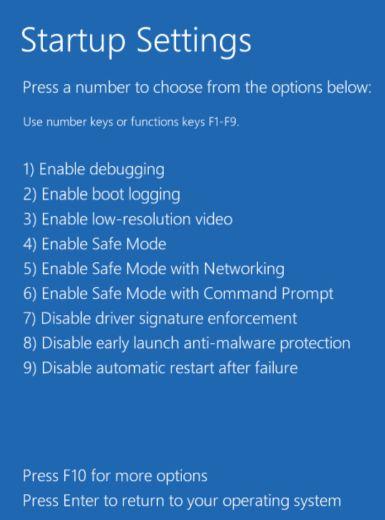
- You’ll know you’re in Safe Mode when “Safe Mode” appears in the corners of the screen. Now continue with the next step of this guide — downloading and running Malwarebytes (explained in Step 2).
- Press Windows key + I to open Settings. If that doesn’t work, click the Start button and select Settings (the gear icon).
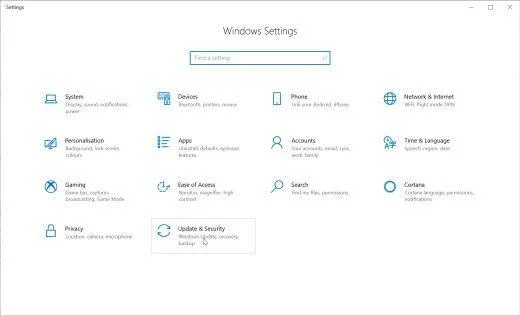
- In the Windows Settings window, select Update & Security, then click Recovery.
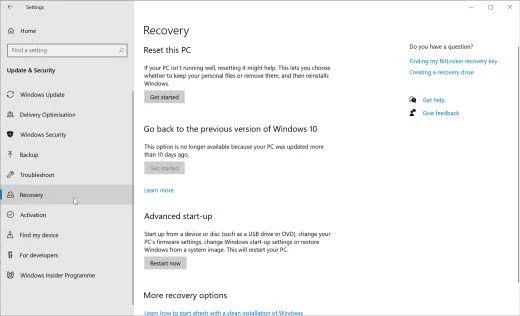
- Under Advanced startup, click Restart now. Save any open work first — your PC will restart immediately.
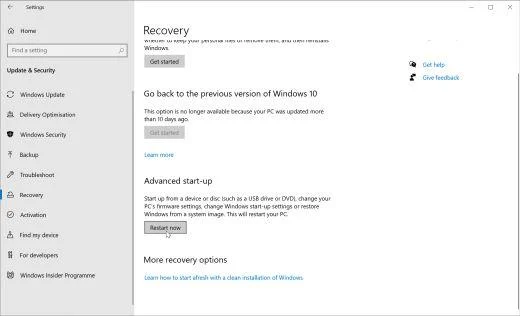
Your PC will restart into the Windows Recovery Environment. From there, follow these steps to reach Safe Mode:
- On the Choose an option screen, select Troubleshoot.
- On the Troubleshoot screen, click Advanced Options.
- On the Advanced Options page, click Startup Settings. (On Windows 8, this option is labeled Windows Startup Settings.)
- On the Startup Settings page, click Restart.
- After your PC restarts, you’ll see a list of startup options. Press 5 or F5 to start Safe Mode with Networking.
- You’ll know you’re in Safe Mode when “Safe Mode” appears in the corners of the screen. Now continue with the next step of this guide — downloading and running Malwarebytes (explained in Step 2).
- Remove any CDs, DVDs, or USB drives from your computer, then restart it.
- As soon as the computer starts (when the hardware information appears on screen), press the F8 key repeatedly until the Advanced Boot Options menu appears. If Windows starts normally instead, you pressed F8 too late — restart and try again.
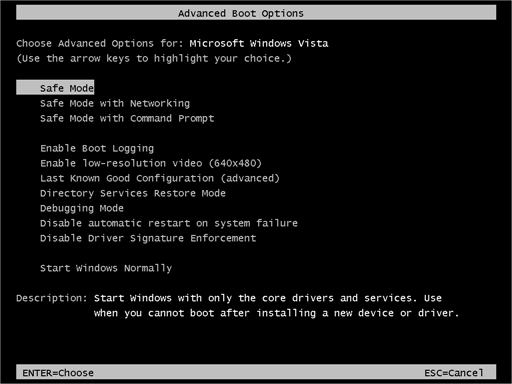
- On the Advanced Boot Options screen, use the arrow keys to highlight Safe Mode with Networking, then press Enter.
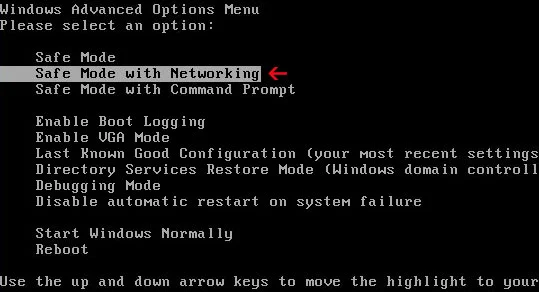
- Once you’re in Safe Mode with Networking, continue with the next step of this guide — downloading and running Malwarebytes (explained in Step 2).
Can’t get into Safe Mode with Networking? No problem — you can run the Malwarebytes scan in normal mode instead and continue the guide from there.
Removal phase 2: Scan for the ransomware and related payloads
Update Malwarebytes from an official source and run a full scan. Review detections rather than assuming the .qtox extension identifies every malicious component.
Malwarebytes is one of the most popular and trusted anti-malware tools for Windows — and it’s completely free for removing infections. It catches threats that many antivirus programs miss, including adware, browser hijackers, and trojans. Follow the steps below to scan and clean your PC in just a few minutes.
Download Malwarebytes
Click the button below to download the latest version of Malwarebytes for Windows from the official source. The free version is all you need — it will scan your computer and remove adware, browser hijackers, and other malicious software at no cost.
Download MalwarebytesOfficial installer for Windows 11 and 10. Your download starts right away.Want real-time protection? See Malwarebytes Premium Malwarebytes Free for WindowsScans and removes malware at no cost
-
Install Malwarebytes
When the download finishes, open your Downloads folder and double-click the MBSetup file. If Windows shows a User Account Control pop-up, click “Yes” to allow the installation.

Follow the On-Screen Prompts to Install Malwarebytes
The setup wizard will walk you through a few quick screens:
-
Choose where you’re installing the program — “Personal Computer” or “Work Computer” — then click Next.

-
Malwarebytes will now install on your device. This usually takes under a minute.

-
When installation is complete, the “Welcome to Malwarebytes” screen will open automatically.

-
On the final screen, click Open Malwarebytes to launch the program.

-
Enable “Scan for Rootkits”
Before scanning, turn on rootkit detection so Malwarebytes can find even the most hidden threats. Click the Settings gear icon on the left side of the screen.

In the settings menu, find “Scan for rootkits” and click the toggle so it turns blue.

Done? Click “Dashboard” in the left pane to return to the main screen.
Start the Scan
Click the blue Scan button. Malwarebytes will automatically update its virus database and start checking your computer for malware.

-
Wait for the Scan to Finish
The scan checks your entire system for browser hijackers and other malicious programs, so it can take 5 to 20 minutes depending on your computer. Feel free to do something else — just check back occasionally to see the progress.

-
Quarantine the Detected Threats
When the scan is done, you’ll see a list of everything Malwarebytes found — malware, adware, and potentially unwanted programs. Click the “Quarantine” button to remove all of them at once.

Malwarebytes will now remove the malicious files and registry entries and move them safely into quarantine.

-
Restart Your Computer
Some threats can only be fully removed after a reboot. If Malwarebytes asks you to restart, click Yes. Once you’re logged back in, Malwarebytes has finished removing the threats it found.

Removal phase 3: Run an independent second-opinion scan
Use a separate reputable scanner to look for remnants and downloaders. Business machines may need professional review before tools quarantine custom software.
HitmanPro is a second-opinion scanner — it’s designed to catch what your main antivirus might have missed. Instead of relying on a single detection engine, it checks the behavior of files in the locations where malware usually hides. Anything suspicious gets sent to the cloud, where it’s analyzed by two of the best antivirus engines available: Bitdefender and Kaspersky.
Good news: scanning is completely free, with no limits. You only need a license when it’s time to remove what was found — and even then, you can activate a free one-time 30-day trial to clean your PC at no cost. (A full license is $24.95 per year for 1 PC.)
-
Download HitmanPro
Click the button below to download HitmanPro. Remember — the scan is free, so you have nothing to lose by checking your PC.
Download HitmanProFree scan. Removing threats needs the free 30-day trial. Opens the official HitmanPro page in a new tab. HitmanProSecond-opinion malware scanner from Sophos
 -
Install HitmanPro
When the download finishes, open your Downloads folder and double-click the file: “hitmanpro.exe” on 32-bit Windows, or “hitmanpro_x64.exe” on 64-bit Windows.
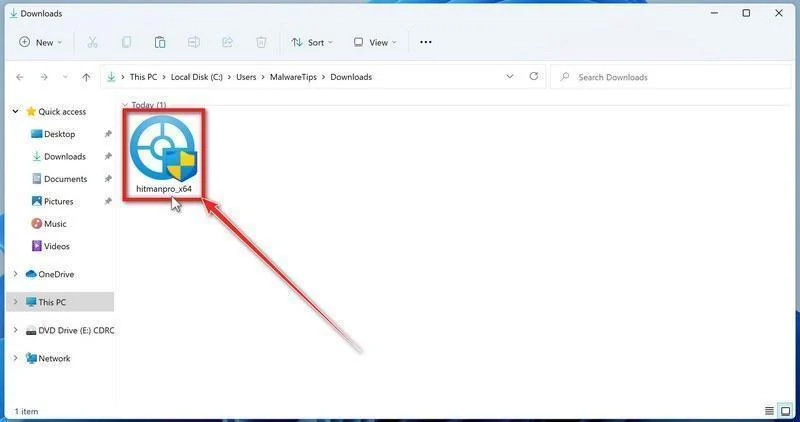
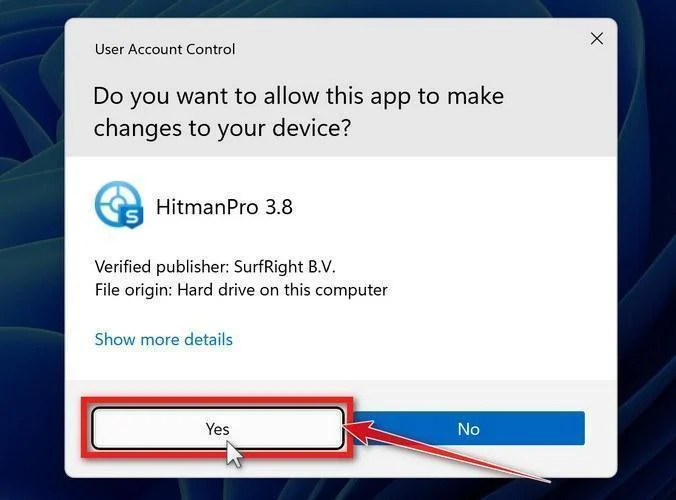
If a User Account Control pop-up asks whether HitmanPro can make changes to your device, click “Yes” to continue.
-
Follow the On-Screen Prompts
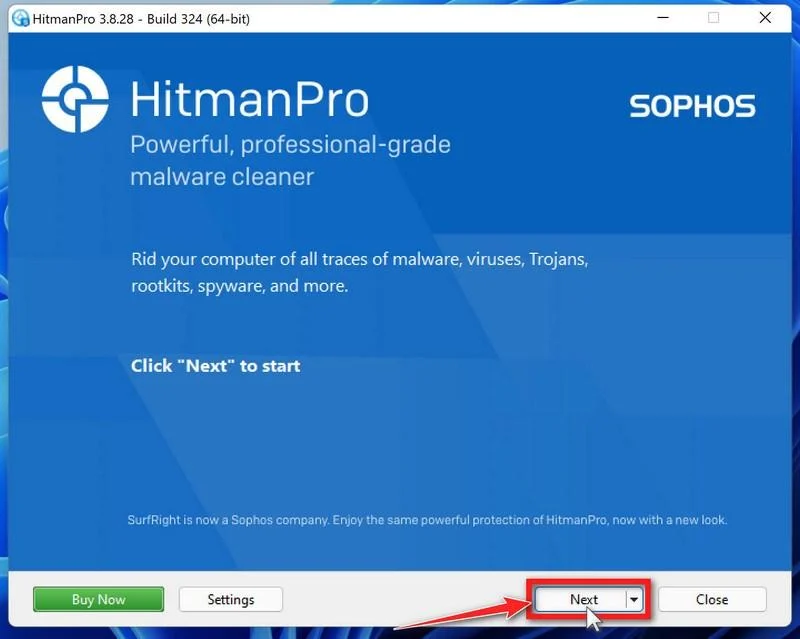
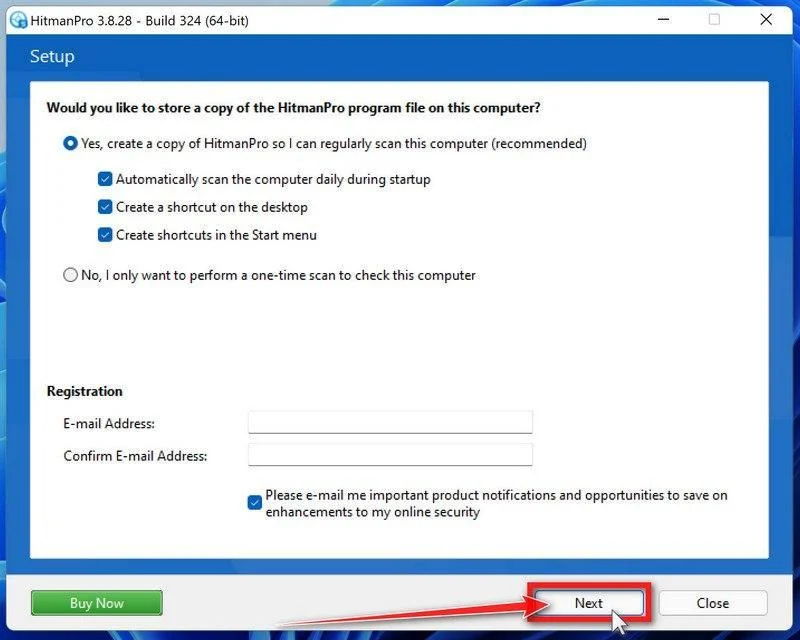
On the HitmanPro start screen, click “Next” to begin the system scan. No lengthy setup required — it goes straight to work.
-
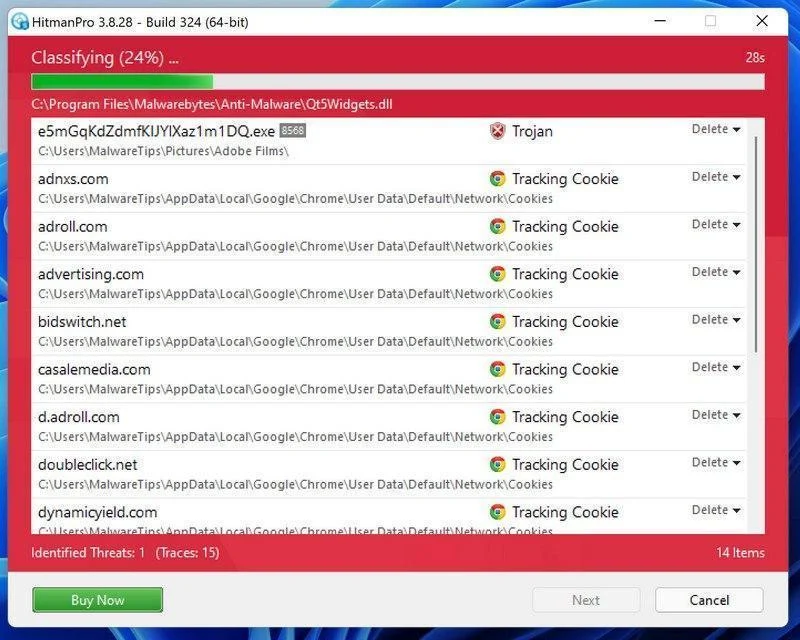
Wait for the Scan to Finish
HitmanPro will now check your computer for malicious programs. This usually takes just a few minutes thanks to its cloud-based scanning.
-
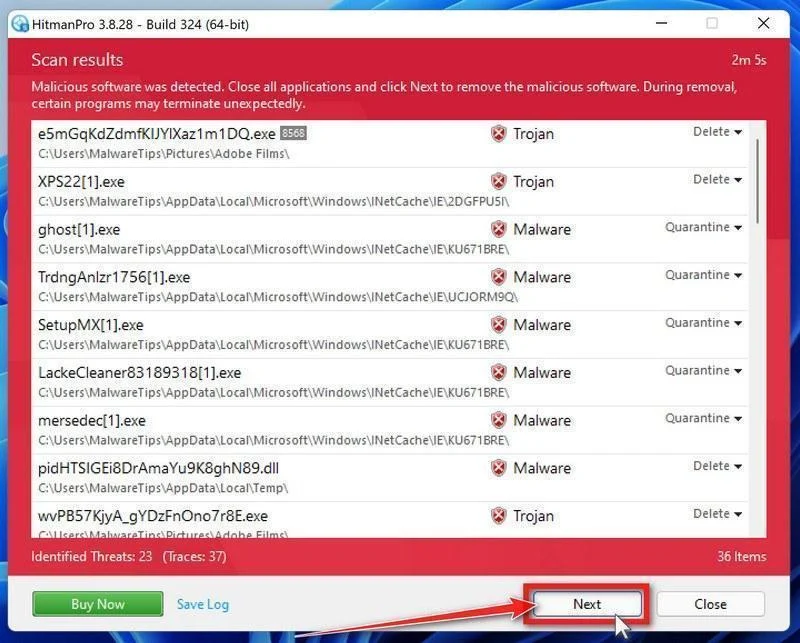
Review the Results and Click “Next”
When the scan is done, HitmanPro will show you everything it found. Click “Next” to remove the detected threats.
-
Click “Activate Free License”
To remove the malicious files, click the “Activate free license” button. This starts your free 30-day trial — no payment details needed — and unlocks the full cleanup.
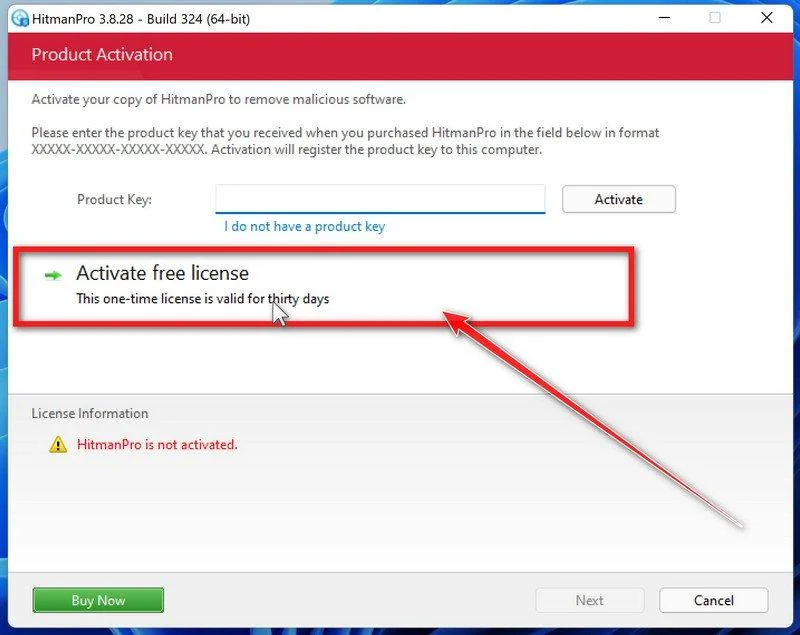
When the removal is complete, HitmanPro will show a summary of everything it cleaned. Click Next, then click Reboot if prompted. If there’s no reboot prompt, just click Close — your PC is clean.
Removal phase 4: Confirm the endpoint is clean
Check startup entries, security logs, and other endpoints. A second scan helps, but network-wide compromise requires more than a single clean result.
ESET Online Scanner is a free second-opinion scanner that performs a deep, full-system check for viruses, trojans, rootkits, and other malware. We use it as the final step because it’s thorough — if anything slipped past the previous scans, ESET will find it. A clean result here means your computer is malware-free.
-
Download ESET Online Scanner
Click the button below to download ESET Online Scanner.
Download ESET Online ScannerOpens the official download page in a new tab. ESET Online ScannerFree one-time malware scan from ESET
 -
Run the Installer
When the download finishes, open your Downloads folder and double-click “esetonlinescanner.exe“.
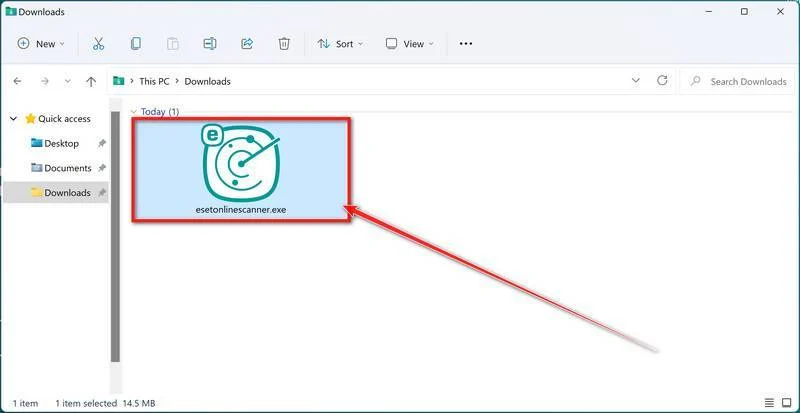
-
Install ESET Online Scanner
On the start screen, select your language from the drop-down menu and click Get started.
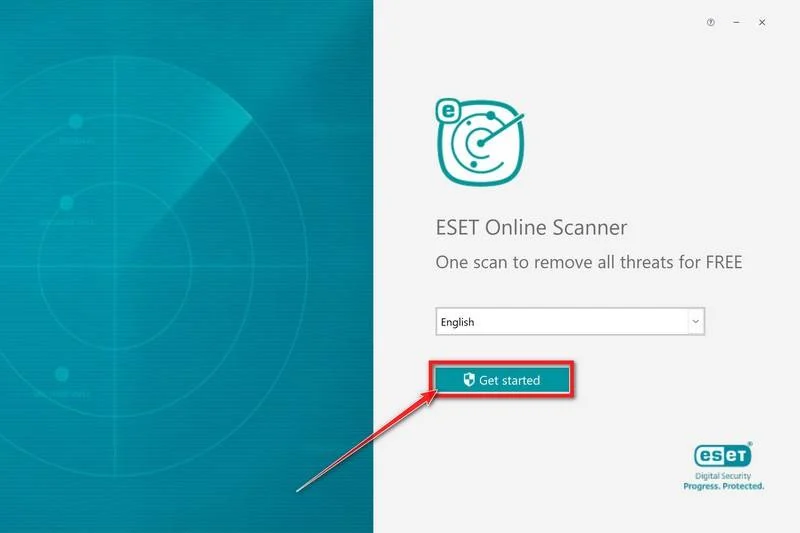
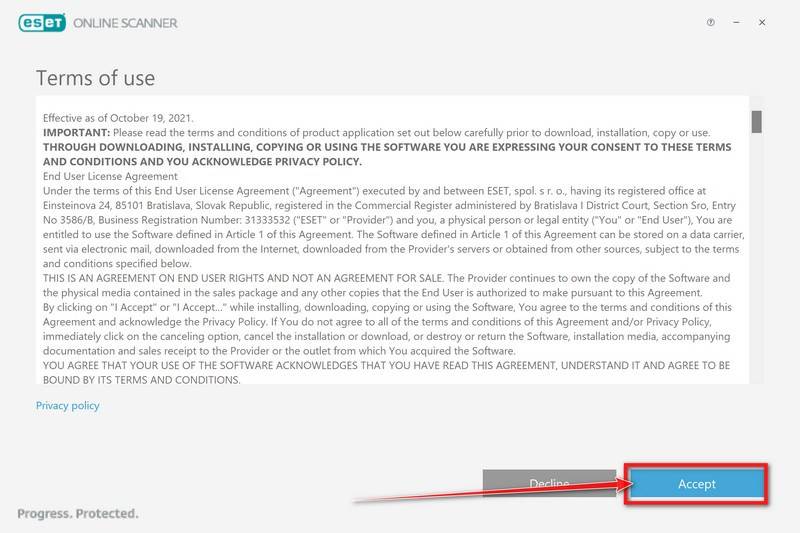
On the Terms of use screen, click Accept.
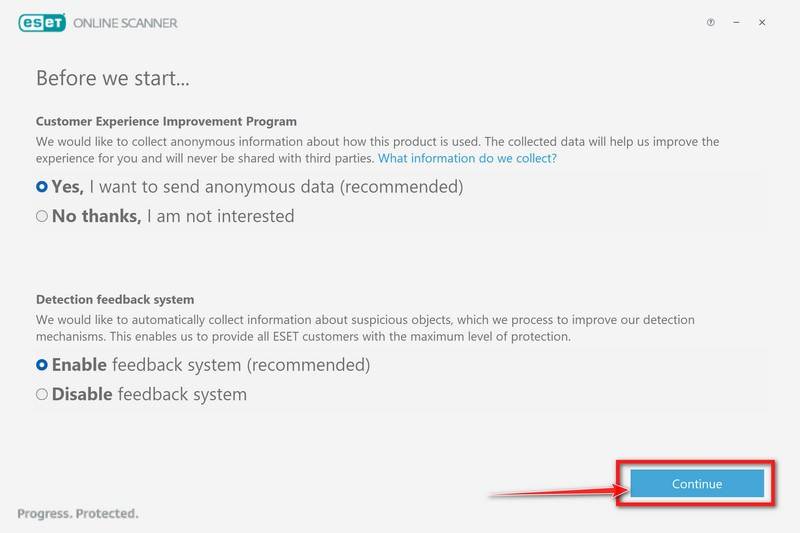
Choose your preferences for the Customer Experience Improvement Program and the Detection feedback system (either choice is fine), then click Continue.
-
Start a Full Scan
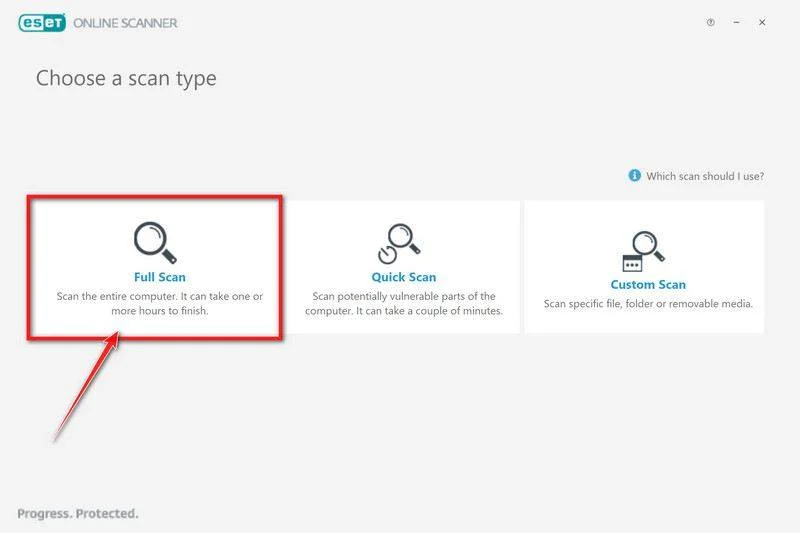
Click Full Scan — this checks your entire computer, not just the common hiding spots.
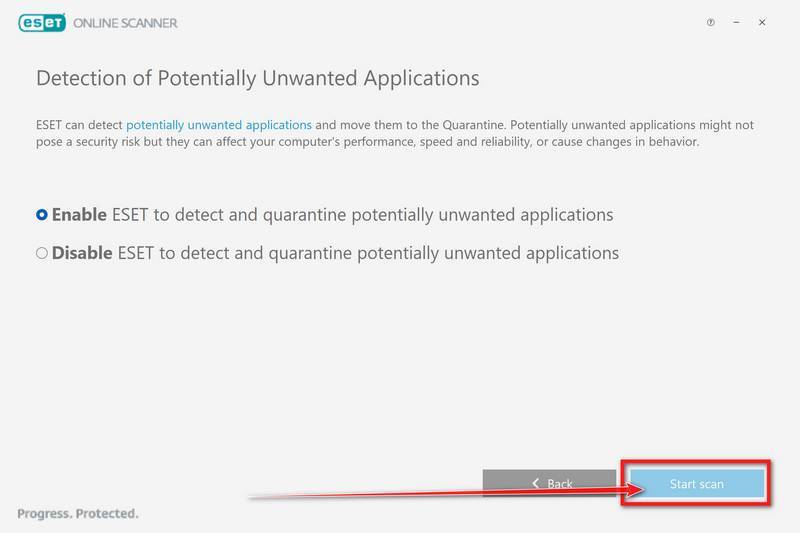
Select Enable for Detection of Potentially Unwanted Applications — this lets ESET catch adware and bundled junk programs, not just viruses. Then click Start scan.
-
Wait for the Scan to Finish
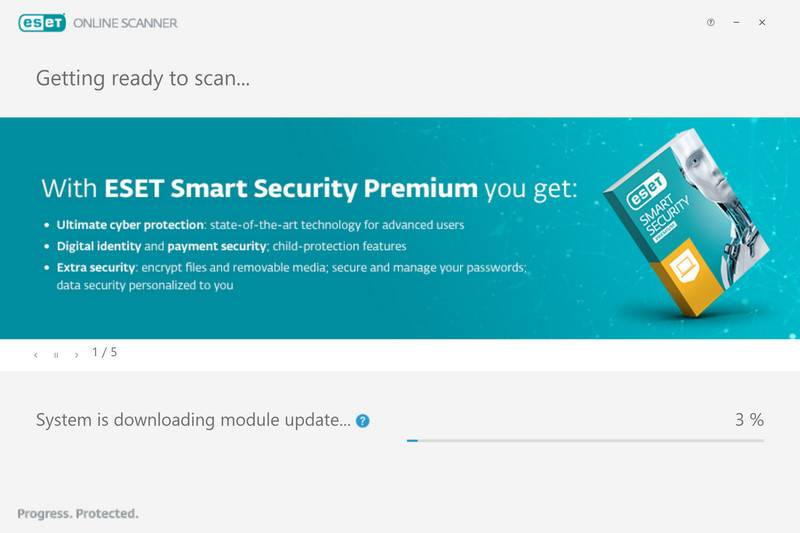
ESET will now check every file on your computer. Because it’s a full scan, this can take a while — often an hour or more, depending on how much data you have. Leave it running in the background and check on it from time to time.
-
Review the Results
When the scan completes, the Found and resolved detections screen appears. Any threats found were automatically cleaned and quarantined — there’s nothing extra you need to do. Click View detailed results if you want to see exactly what was removed.
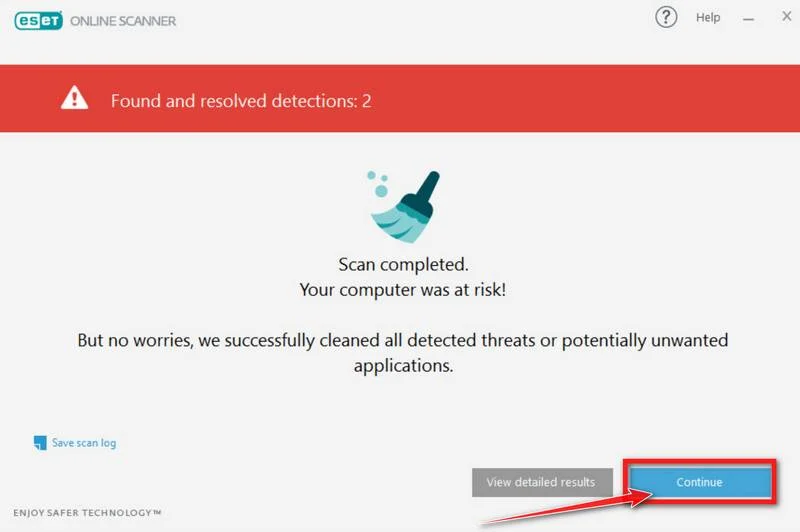
If ESET found nothing — congratulations, your computer has passed the final check and is malware-free.
Recovery phase 5: Restore only verified data
Test one small restore first. Use an offline backup, immutable snapshot, or clean version history, and keep original encrypted files until recovery is complete.
Unfortunately, in most cases, it’s not possible to recover the files encrypted by this ransomware virus because the private key which is needed to unlock the encrypted files is only available through the attackers. However, below we’ve listed three options you can use to try and recover your files.
Option 1: Search a decryption tool for this ransomware
The cybersecurity community is constantly working to create ransomware decryption tools, so you can try to search these sites for updates:
- https://id-ransomware.malwarehunterteam.com/
- https://decrypter.emsisoft.com/
- https://noransom.kaspersky.com/
- https://www.avast.com/ransomware-decryption-tools
Option 2: Use EaseUS Data Recovery Wizard Free to recover the encrypted files
EaseUS Data Recovery Wizard Free can restore files and repair corrupted files with simple clicks. Its powerful scanning algorithms can identify and retrieve huge file type library, including all of the popular video files, audio files, photos, and document formats.
While the free version only allows you to recover 2 GB of data, this can be helpful to see if the recovery is possible and restore back the most important files from your computer.
-
Download EaseUS Data Recovery Wizard Free.
You can download EaseUS Data Recovery Wizard Free by clicking the link below.
Download EaseUS Data Recovery WizardOpens the download page in a new tab. EaseUS Data Recovery WizardFile recovery tool with a free version
 -
Double-click on the EaseUS Data Recovery Wizard Free setup file.
When EaseUS Data Recovery Wizard Free has finished downloading, double-click on the setup file to install EaseUS Data Recovery Wizard on your computer. In most cases, downloaded files are saved to the Downloads folder.
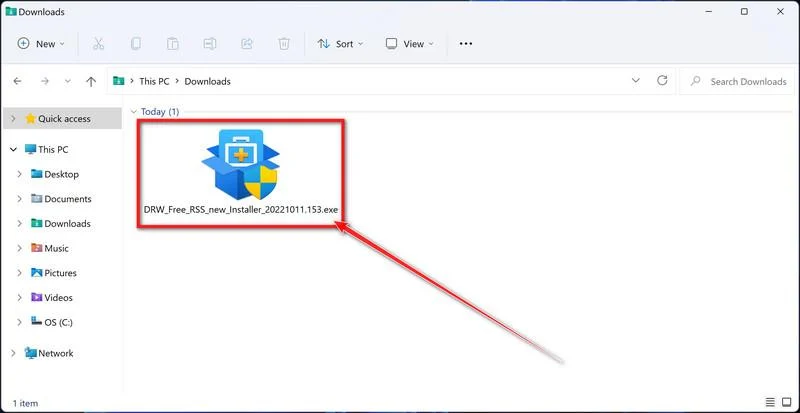
You may be presented with a User Account Control pop-up asking if you want to allow EaseUS to make changes to your device. If this happens, you should click “Yes” to continue with the EaseUS Data Recovery Wizard Free installation.
-
Follow the on-screen prompts to install EaseUS Data Recovery Wizard.
When the EaseUS Data Recovery Wizard installation begins, click on the “Install Now” as seen in the image below.
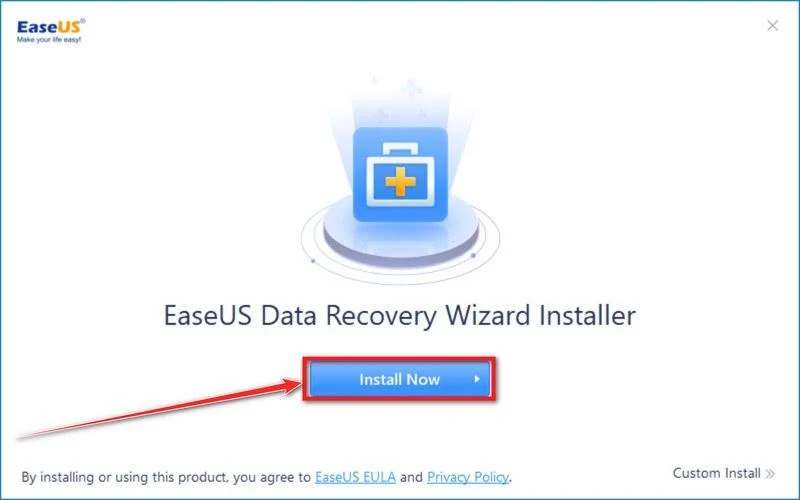
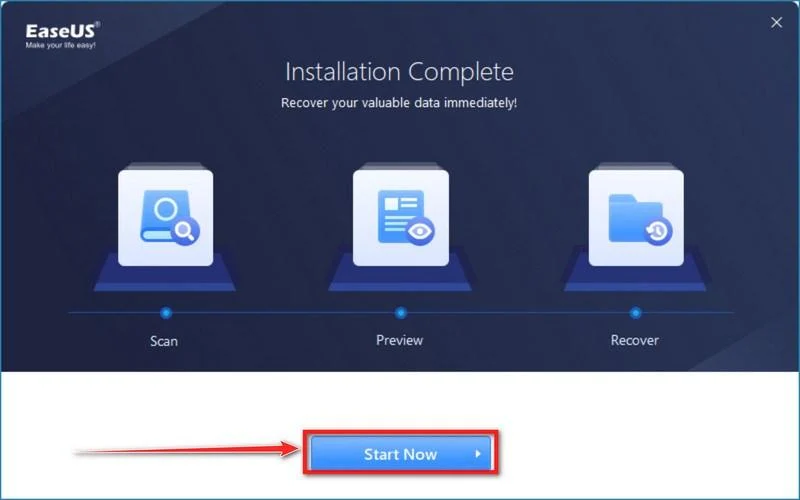
When your EaseUS Data Recovery Wizard installation completes, click the “Start Now” button to start the program.
-
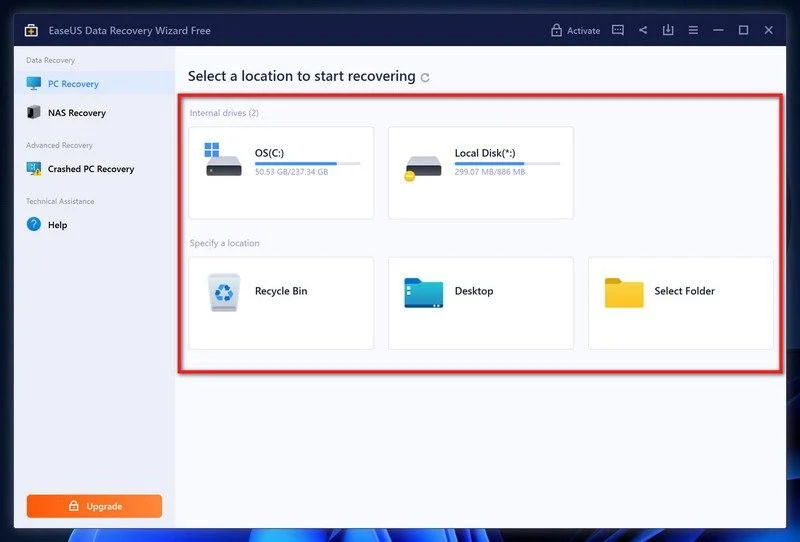
Select a location to start recovering the encrypted files.
Choose the drive or folder where you are the encrypted files that you want to recover and click “Scan“.
-
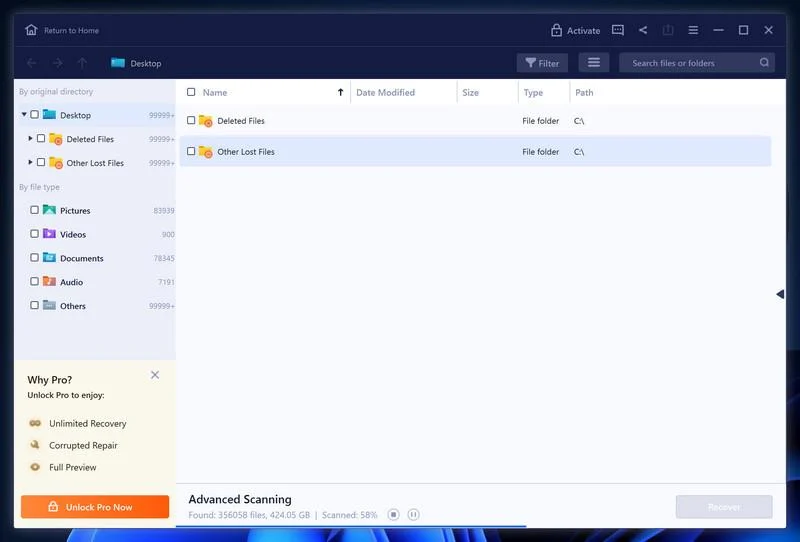
Wait for the EaseUS Data Recovery Wizard scan to complete.
EaseUS Data Recovery Wizard will now scan your computer files that can be restored. This process can take a few minutes, so we suggest you do something else and periodically check on the status of the scan to see when it is finished.
-
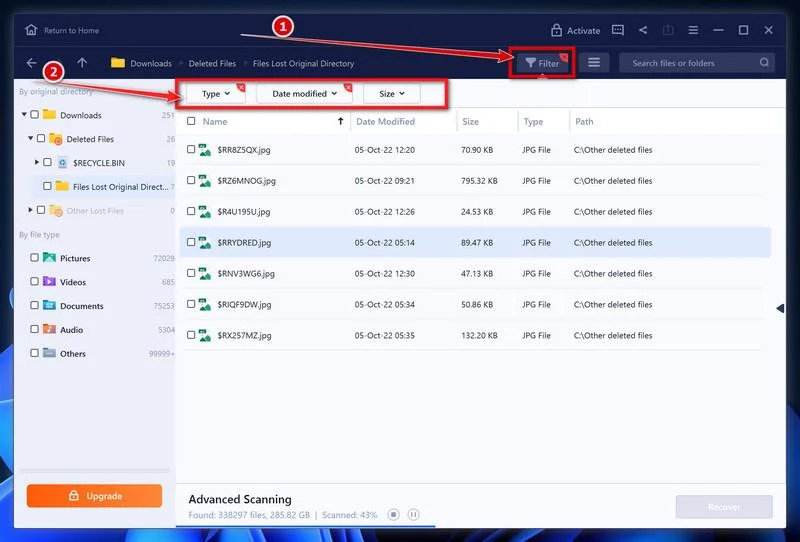
Find the files you want to recover.
When the EaseUS Data Recovery Wizard scan is finished scanning it will show a screen that displays the files that can be recovered. This tool can recover a lot of data, use the “Filter” button to quickly filter specific file types and find the files that you want to recover.
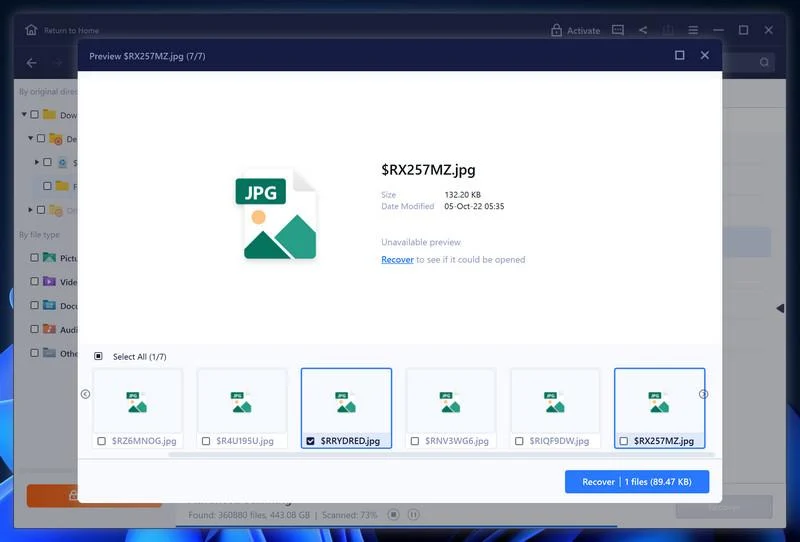
Click the “Preview” button or double-click on a file for a full preview.
-
Select your files and click “Recover”.
Finally, select the the files you want to recover and click “Recover“.
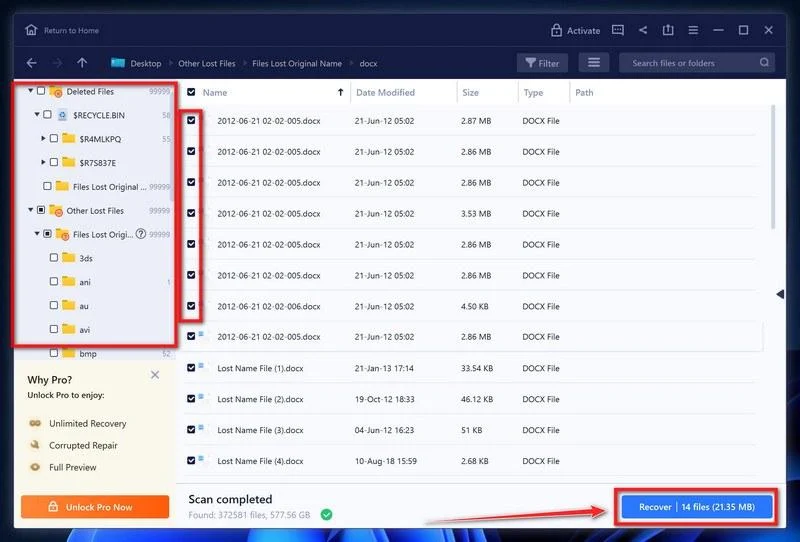
Choose a safe location to save all the files.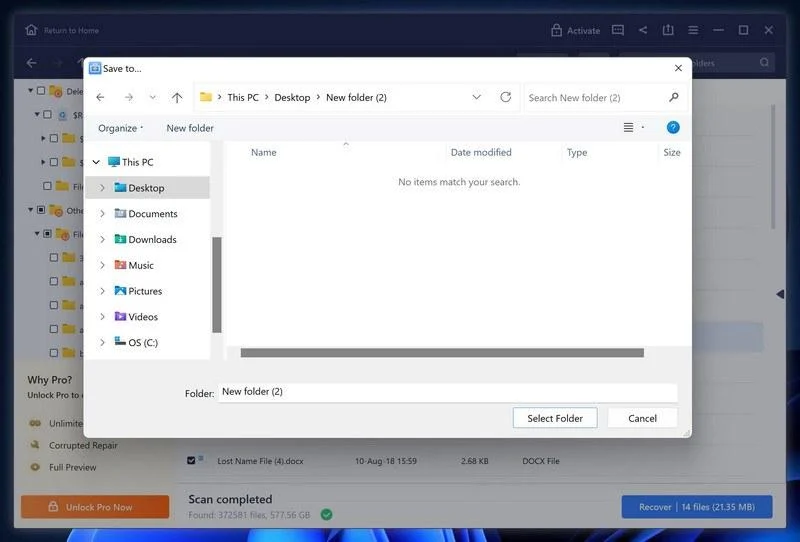
The free version only allow you to recover 2 GB of data, however, this will allow you to recover the most important files and see if EaseUS Data Recovery Wizard can correctly recover them.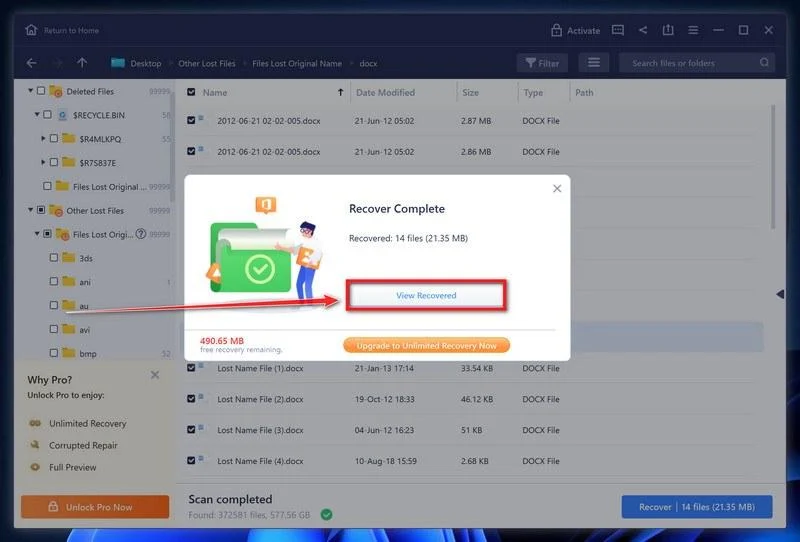
Option 3: Try to restore your files with ShadowExplorer
This ransomware will attempt to delete all shadow copies when you first start any executable on your computer after becoming infected. Thankfully, the infection is not always able to remove the shadow copies, so you should continue to try restoring your files using this method.
-
Download ShadowExplorer.
You can download ShadowExplorer from the below link.
Download ShadowExplorerOpens the official download page in a new tab.ShadowExplorerRestores files from Windows Shadow Volume Copies -
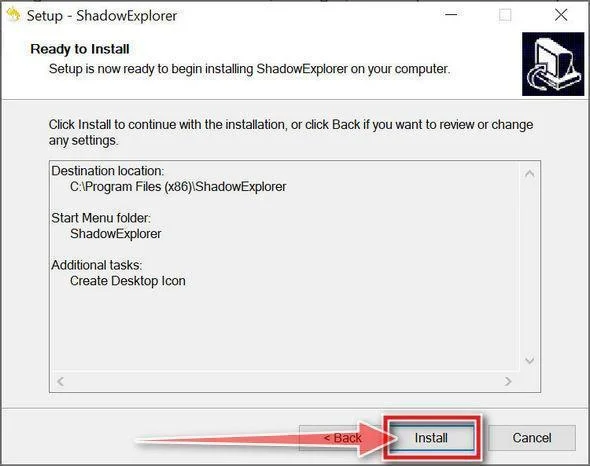
Install ShadowExplorer.
Double-click on the ShadowExplorer-x.x-setup file to start the installation process, then follow the on-screen promts to install this program.
-
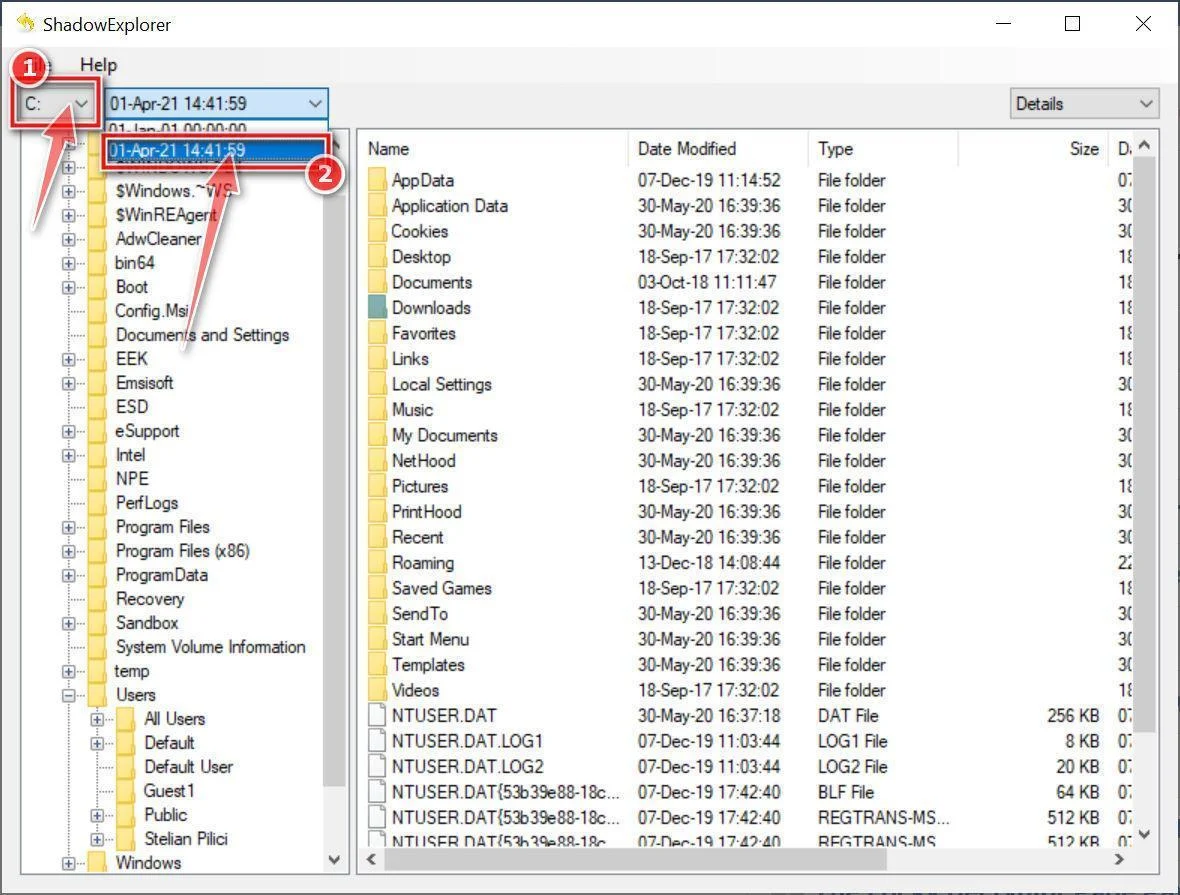
Select snapshot date.
Open ShadowExplorer and then from the top bar select the drive where the files that you want to save are located, then select from the snapshot available one previous to this infection.
-
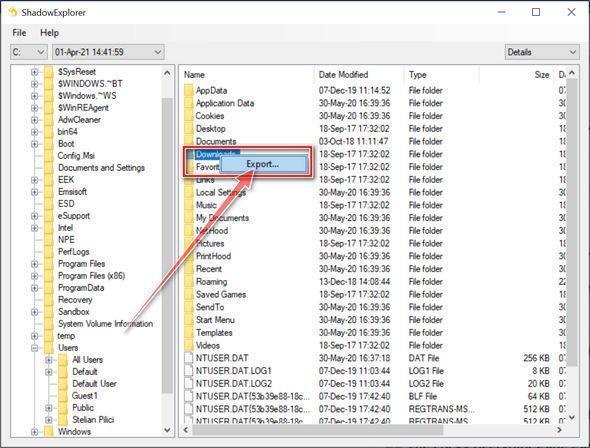
Export the files that you want to recover.
Once you have found a copy of the original file or folder, right-click on it and the select “Export”. A window will prompt you where you want to save the file or folder.
How to Reduce the Chance of a Repeat Attack
Keep at least one backup disconnected from ordinary user accounts. Test restoration before an emergency, not when the only remaining copy has failed.
Apply operating system and application updates promptly. Limit administrator rights and remove remote-access services that nobody uses.
Protect email and remote accounts with multifactor authentication. Review sign-in alerts, especially for accounts able to reach shared drives.
Train staff to report suspicious attachments without embarrassment. A quick report can protect the rest of the network before encryption spreads.
When There Is No Usable Backup
A missing backup is a painful discovery, but it does not make an attacker-controlled decryptor the only possible next step.
First preserve the encrypted files and note. A future public decryptor could become available if researchers find a flaw or keys are recovered.
Check whether the same documents exist in email attachments, shared drives, old laptops, collaboration platforms, or cloud version history.
Do not connect those sources to the infected machine. Copy them only after a clean recovery environment has been prepared.
Some applications keep their own export files or automatic versions. Accounting platforms, photo libraries, and office suites may have recovery paths outside Windows File History.
Professional data recovery cannot usually break sound encryption. A service promising guaranteed qTox decryption without explaining its method deserves skepticism.
Beware of a company that simply forwards your payment to the criminals and adds a fee. That can leave you with the same risk at greater expense.
Keep the original storage image when possible. Repeated writes and improvised repair utilities can destroy artifacts that might help a later investigation.
Why the Data-Theft Threat Needs Its Own Investigation
The note’s publication threat is designed to make even a well-backed-up victim feel trapped. Backups solve access, not confidentiality.
Review which accounts had permission to read sensitive folders. A shared drive may contain far more than the files visibly encrypted on one computer.
Check for unusual compression tools, archives, transfers, and cloud access near the attack time. A lack of such evidence may narrow the concern, but log gaps matter.
Do not base a notification decision only on the attacker’s claim or denial. Ask an incident-response professional and legal adviser to evaluate the available evidence.
For a household, exposure can include tax returns, identity documents, and saved passwords. For an organization, customer and employee records may be involved.
Change exposed credentials and watch for targeted follow-up messages. The attackers may use information they saw to make later phishing more credible.
If the note names a leak site, avoid visiting unfamiliar criminal infrastructure from the infected machine. Let responders collect any necessary evidence safely.
The goal is a defensible picture of what happened, not an instant yes-or-no answer produced by the ransom note.
Frequently Asked Questions
Can I open a file by removing .qtox from its name?
No. Renaming does not undo encryption. Keep the original file unchanged and investigate backups or trusted decryptors.
Does qTox ransomware mean the qTox messaging app infected me?
No. The name also appears in the attacker’s contact instructions. A messaging app is not the same thing as the ransomware sample.
Will antivirus restore my locked documents?
Security software can remove active malware, but it cannot ordinarily reverse encryption. File recovery is a separate step.
Is the note’s data-theft claim definitely true?
Not solely because the note says so. Investigate access and transfer evidence while treating the possibility as a serious incident.
Should I pay for a decryptor?
Payment provides no guarantee of a working key or deleted data. Consult responders and legal advisers before any decision, especially for a business.
Where can I check for a free decryptor?
Use a reputable project such as No More Ransom and confirm the variant first. Avoid search ads promising an instant universal fix.
The Bottom Line
qTox ransomware locks files with a .qtox extension and leaves readme.txt with a claimed data-theft threat. The note’s claims require investigation, not automatic acceptance.
Isolate the system, preserve evidence, remove the infection, and restore from a clean source. Handle any possible data exposure as a separate question.
If you are still having problems with your computer after completing these instructions, then please follow one of the steps:
- Run a computer scan with Emsisoft Emergency Kit
- Ask for help in our Malware Removal Assistance for Windows forum.

Join the discussion
0 commentsShare your experience or ask a question about this article.
Your progress
Did these steps help?
Let us know how the guide worked for you.
Describe what you see and the step you reached. Keep passwords and other private information out.
Discussion
Start the conversation
Have a question or something useful to share? Add the first comment.