


A Windows alert mentioning Mistic can leave you with more questions than answers, particularly when the files named in the warning sound like ordinary system components.
Before deleting anything or trusting a page offering instant repair, get a clear picture of the warning. A careful response starts with the details already available.
Overview
A Windows backdoor, not a normal verification tool
Mistic, also tracked as Backdoor.Mistic and MLTBackdoor, is malware associated with unauthorized access to Windows systems. Researchers observed deployments from April 2026 onward.
Its reported functions include file handling and running additional code in memory. An affected computer can therefore need investigation beyond deleting the first suspicious download.
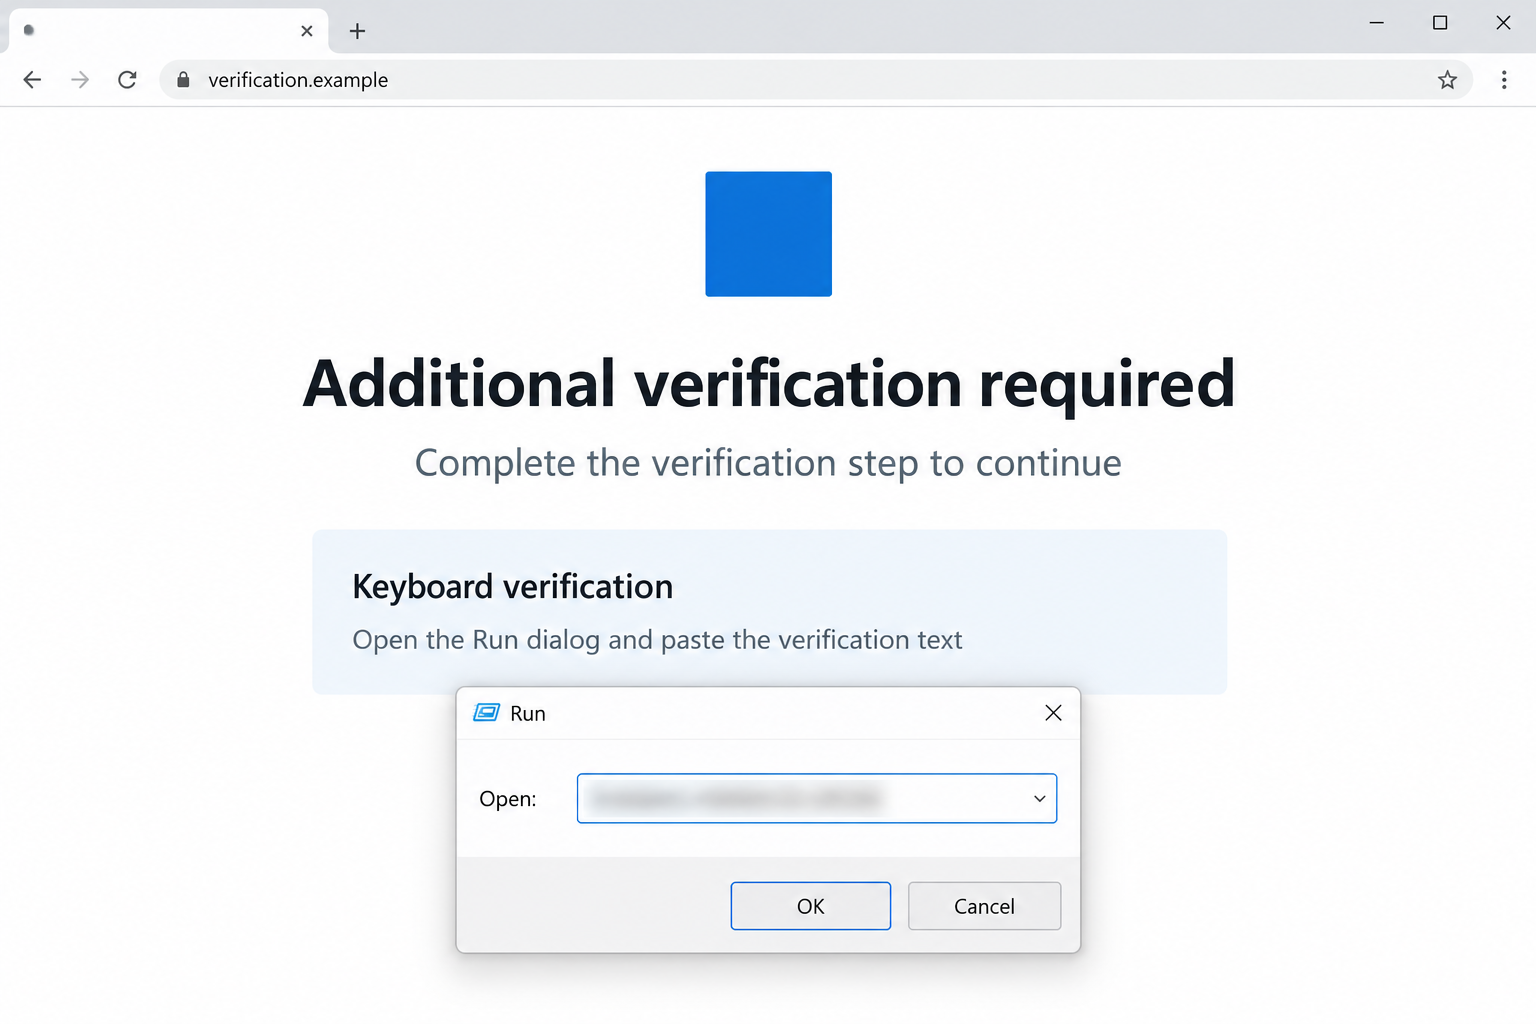
The opening image illustrates a fake verification pretext. It is not an actual Mistic campaign capture, and the obscured text is not a command to follow.
Why some filenames can mislead
In an investigated intrusion, attackers used the legitimate MpExtMs.exe program to load malicious DLLs. The reported components included a version.dll loader and malicious EndpointDlp.dll.
Those names are context, not a deletion checklist. A filename associated with legitimate Windows software cannot establish whether a particular copy on your computer is malicious.
- Keep the complete detection name, file location, timestamp, and security product’s action.
- Distinguish a blocked download from malware that ran and established access.
- Report a work-device alert to the security team before attempting an independent cleanup.
- Do not assume a backdoor detection means documents have already been encrypted.
The reported ransomware connection has limits
Researchers found Mistic near ModeloRAT in one intrusion and described a possible link to the Woodgnat, or KongTuke, access-broker operation.
That is not proof that every Mistic incident involves the same operator or ends in ransomware. Evaluate what happened on the affected system rather than importing another incident’s outcome.
What the Research Establishes, and What It Does Not
The observed backdoor could receive commands, manipulate files, execute payloads in memory, and remove itself. These features explain why investigators consider continued hidden access a serious concern.
A fake credential screen also appeared as a separate component in an investigated attack. Do not assume every password prompt on an affected computer came from Mistic itself.
Reported delivery included a ClickFix chain. However, a fake CAPTCHA on its own does not identify the payload, and other attacks use similar social engineering.
This distinction helps with an actual warning. The useful question is not whether the screen resembles an online example, but whether something executed and what the endpoint recorded.
A security team may combine file hashes, process history, network activity, and account events. No single unfamiliar filename replaces that surrounding evidence.
We have not executed a Mistic sample or tested an attacker’s control panel. The response guidance below addresses the reported Windows exposure without pretending to reproduce your incident.
The Fake Verification Request Is Where Many Readers Need to Stop
A CAPTCHA should not require an operating-system command
An ordinary browser verification does not need you to paste an unknown command into Windows Run, a terminal, or File Explorer’s address bar.
Attackers can make that request look like a quick repair: copy something, press a keyboard shortcut, paste it, and continue. The small number of actions hides their significance.
Typing or pasting a command can instruct the computer to act outside the webpage. That is a different permission boundary from reading text or clicking a normal checkbox.
Stop when a page crosses that boundary. You do not need to run the command to discover whether the verification was genuine.
Visiting, copying, and executing are different events
If you only viewed the page, close it and report the suspicious address where appropriate. Do not call the page’s support number for reassurance.
If you copied its text but did not execute it, avoid pasting that clipboard content into a command-capable field. Replace it with harmless text before continuing.
If you pasted and executed the command, tell the responder exactly that. A brief window that closed immediately can still matter; silence is not evidence that nothing ran.
Do not rerun the command to capture a better screenshot. Existing browser history, downloads, and endpoint records may provide safer evidence of the sequence.
A message from apparent IT support still needs verification
A familiar logo in a chat does not authenticate the sender. When someone unexpectedly requests a paste-and-run action, verify through your organization’s established helpdesk route.
Use contact details already known to you, not a number supplied in the same unexpected conversation. Explain the requested action rather than forwarding executable content widely.
This is a practical safeguard against several delivery methods, not proof that every support impersonation is connected with Mistic.
What to Do After a Mistic Backdoor Alert
A good response protects the affected system and the accounts reachable from it. On an organizational network, coordinate those actions rather than improvising independently.
- Identify who should lead the response.
For a company or school device, contact the designated security team immediately using a known channel. Include the alert and whether an unknown command ran.
Do not wipe the machine, clear logs, or install extra cleanup tools before receiving direction. Those actions can remove evidence needed to understand the intrusion.
- Contain the device without continuing sensitive work.
For a personal PC, disconnect its network access when practical and use a separate trusted device for account recovery.
For a managed endpoint, follow the team’s containment instructions. An endpoint isolation feature may be preferable to changes that disrupt monitoring or business systems.
- Save the details already available.
Record the detection name, affected path, time, quarantine result, suspicious page, and any command you remember executing. Do not execute it again.
Share executable text or potentially malicious files only through the responder’s approved method. Avoid posting private network details or credential-bearing logs publicly.
- Protect accounts that may have been exposed.
From a trusted device, prioritize email, remote access, financial services, and administrator accounts used on the suspect computer.
Change exposed credentials, review recovery settings, and revoke suspicious sessions through the provider’s legitimate controls. Coordinate workplace resets with the security team.
- Report financial or organizational consequences quickly.
Tell the bank about unauthorized payments through an independently verified contact. Give the organization a timeline of unusual logins, prompts, or missing files.
A malware removal program cannot dispute a payment or investigate every connected account. Those concerns need separate follow-up with the responsible provider.
- Use a case-appropriate cleanup plan.
The Windows steps below explain scanning and recovery choices. Malwarebytes can assist with detection, but a backdoor incident may require rebuilding the device and reviewing broader access.
Do not pay an unsolicited technician who promises that a remote session will guarantee complete removal or restore every stolen file.
- Keep the original entry point in view.
Preserve the suspicious message or website address, then remove unnecessary exposure after evidence collection. Do not return to the fake verification to finish its instructions.
AdGuard may reduce some unwanted advertising and malicious web content. It does not remove a running backdoor or repair account access already obtained.
Is Your Device Infected? Run a Free Malware Scan
Slow performance, constant pop-ups, or strange behavior? These are classic signs of a malware infection. A quick way to check is to scan your device with Malwarebytes Free, one of the most trusted malware removal tools available. If you only visited a scam page and didn’t download or install anything, this scan is optional.
The free version detects and removes the most common threats, including:
- Adware — the cause of those annoying pop-ups
- Browser hijackers — unwanted redirects and changed homepages
- Trojans and spyware — hidden programs stealing your data
- Potentially unwanted programs (PUPs) — software you never asked for
👉 Select your device below — Windows, Mac, or Android — then follow the simple steps to download Malwarebytes, scan your system, and remove any threats it finds. The scan usually takes 5 to 20 minutes.
Run a Malware Scan with Malwarebytes for Windows
Malwarebytes is one of the most popular and trusted anti-malware tools for Windows — and it’s completely free for removing infections. It catches threats that many antivirus programs miss, including adware, browser hijackers, and trojans. Follow the steps below to scan your PC and remove what Malwarebytes finds.
Download Malwarebytes
Click the button below to download the latest version of Malwarebytes for Windows from the official source. The free version is all you need — it will scan your computer and remove adware, browser hijackers, and other malicious software at no cost.
Download MalwarebytesOfficial installer for Windows 11 and 10. Your download starts right away.Want real-time protection? See Malwarebytes Premium Malwarebytes Free for WindowsScans and removes malware at no cost
-
Install Malwarebytes
When the download finishes, open your Downloads folder and double-click the MBSetup file. If Windows shows a User Account Control pop-up, click “Yes” to allow the installation.
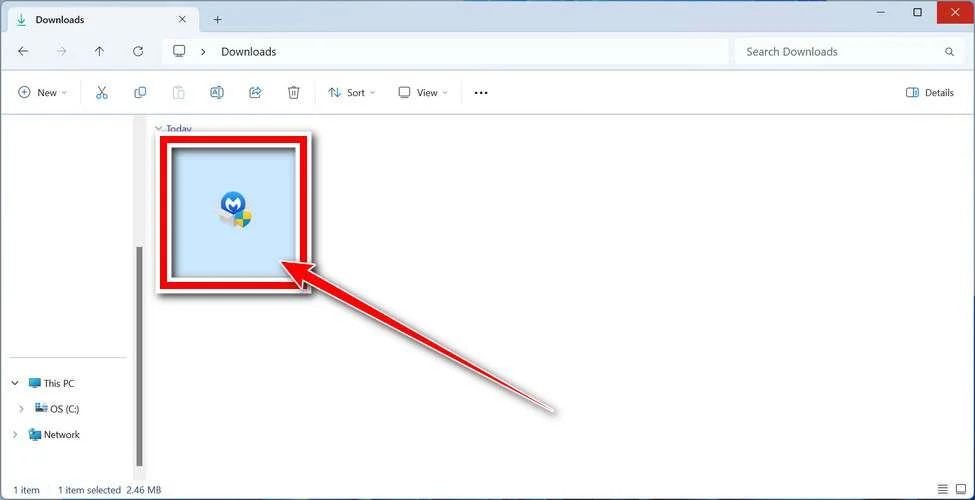
Follow the On-Screen Prompts to Install Malwarebytes
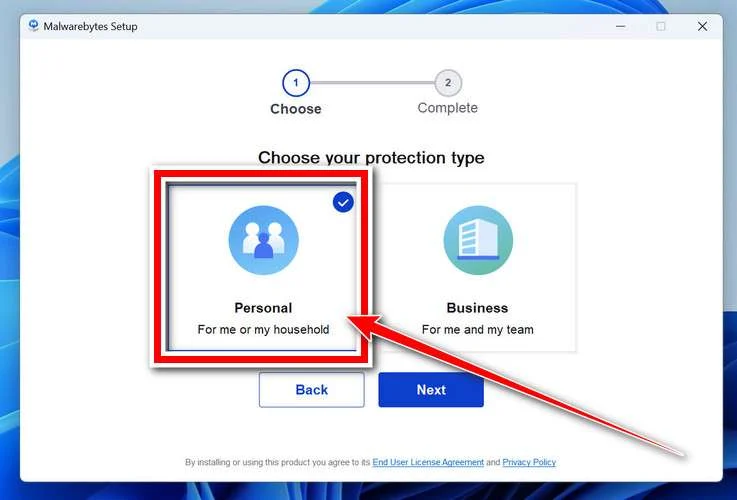
The setup wizard will walk you through a few quick screens:
-
Choose where you’re installing the program — “Personal Computer” or “Work Computer” — then click Next.
-
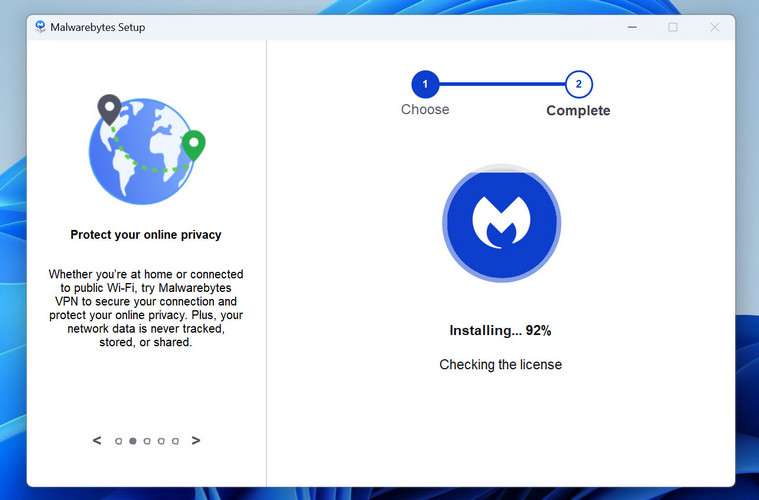
Malwarebytes will now install on your device. This usually takes under a minute.
-
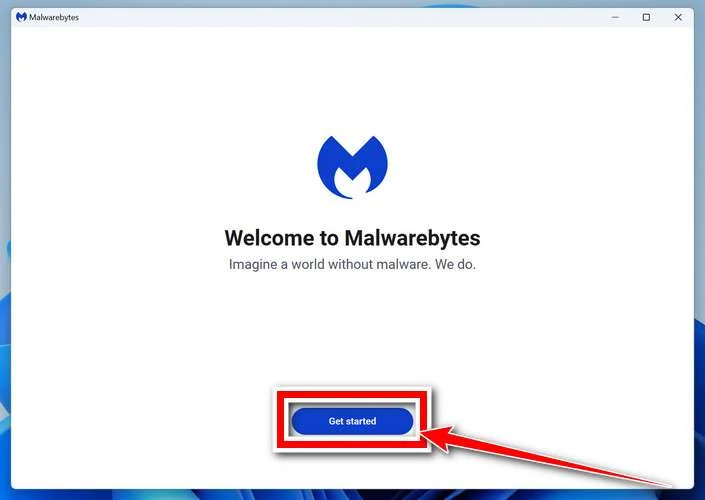
When installation is complete, the “Welcome to Malwarebytes” screen will open automatically.
-
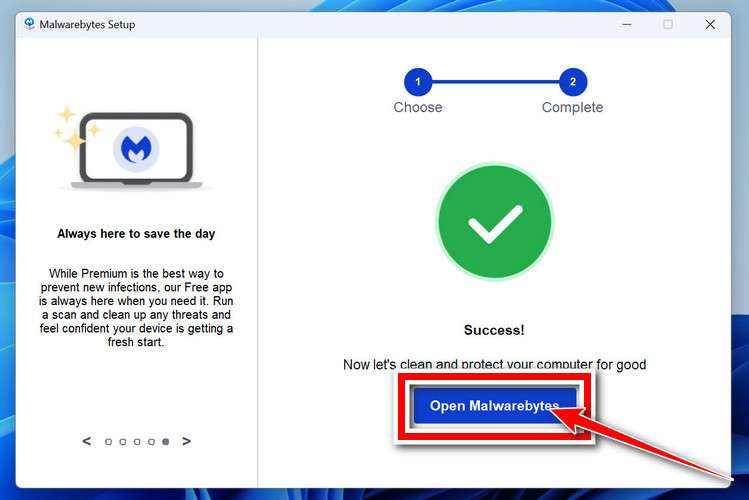
On the final screen, click Open Malwarebytes to launch the program.
-
Optional: Check for rootkits with a Custom Scan
You don’t need to change any settings for a normal scan. The standard Threat Scan in the next step is enough for most problems, so you can go straight to it.
If you also want to check for rootkits, use a Custom Scan. In current versions of Malwarebytes, rootkit scanning is only available there:
- On the Scanner tile, click the three-dot menu and select Advanced Scan.
- Choose Custom Scan. In its options, check Scan for rootkits.
- Select your system drive (usually C:\) as the location to scan, then start the scan. It takes longer than a Threat Scan.
- When it finishes, review and quarantine the results as described in the steps below.
Rootkit scanning isn’t available on Windows devices with ARM processors.
Start the Scan
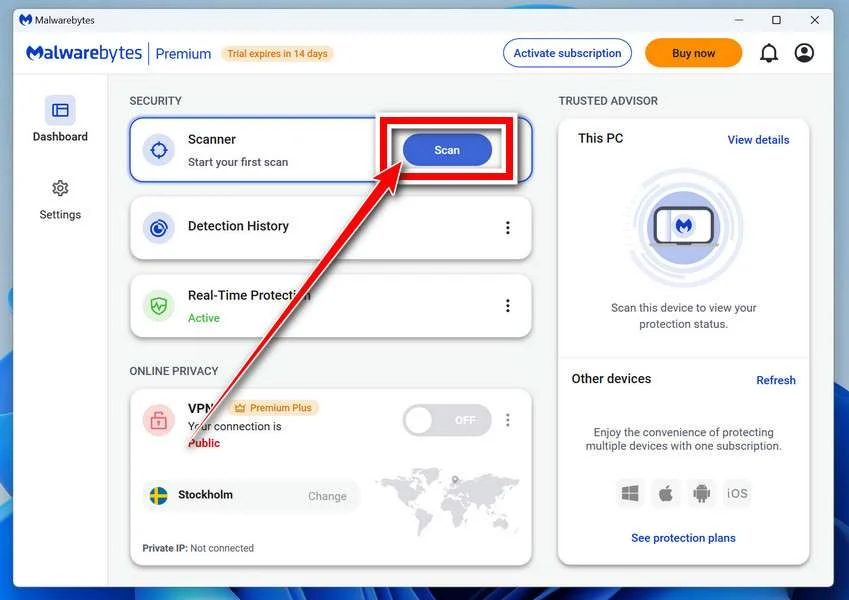
Click the blue Scan button. Malwarebytes will automatically update its virus database and start checking your computer for malware.
-
Wait for the Scan to Finish
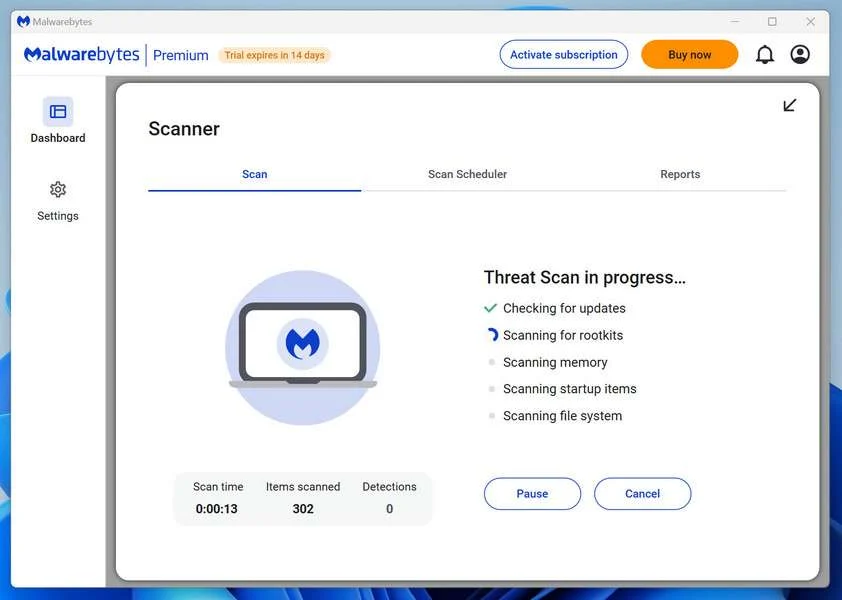
The scan checks your entire system for browser hijackers and other malicious programs, so it can take 5 to 20 minutes depending on your computer. Feel free to do something else — just check back occasionally to see the progress.
-
Quarantine the Detected Threats
When the scan is done, you’ll see a list of everything Malwarebytes found — malware, adware, and potentially unwanted programs. Click the “Quarantine” button to remove all of them at once.
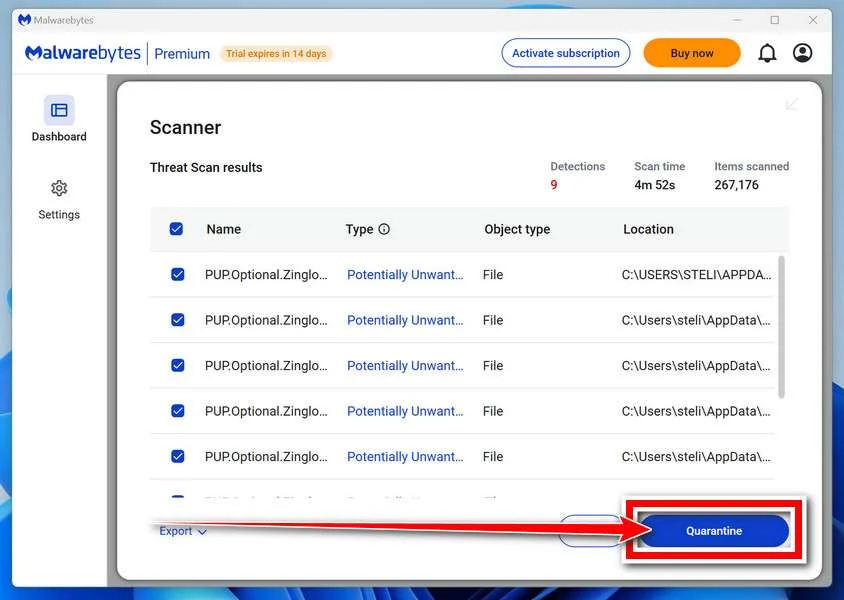
Malwarebytes will now remove the malicious files and registry entries and move them safely into quarantine.
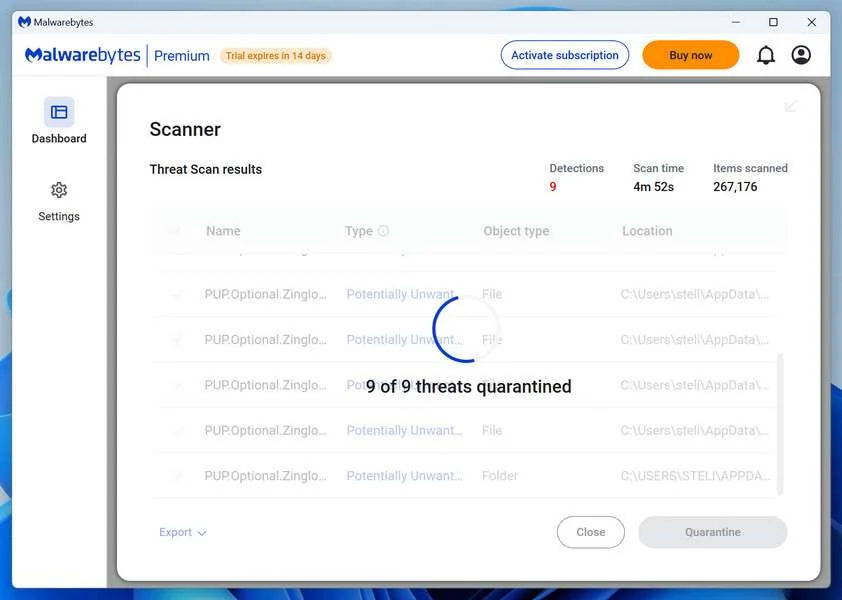
-
Restart Your Computer
Some threats can only be fully removed after a reboot. If Malwarebytes asks you to restart, click Yes. Once you’re logged back in, Malwarebytes has finished removing the threats it found.
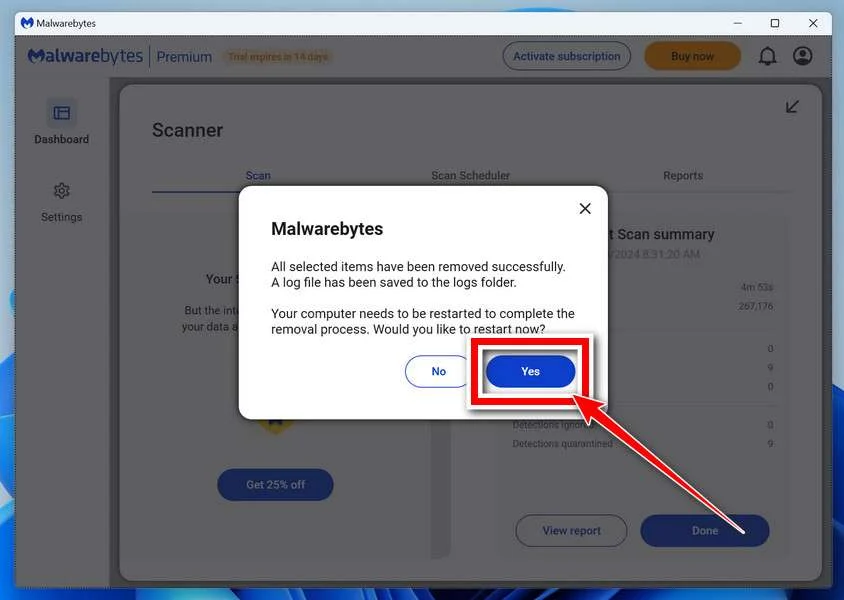
When the scan is done, check whether the problems you noticed have stopped. If they continue, see the options below.
If you are still having problems with your computer after completing these instructions, then please follow one of the steps:
- Run a computer scan with ESET Online Scanner
- Ask for help in our Windows Malware Removal Help & Support forum.
Run a Malware Scan with Malwarebytes for Mac
Malwarebytes for Mac is a free on-demand scanner that removes the malware other security software tends to miss — adware, browser hijackers, and unwanted programs included. Cleaning an infected Mac with Malwarebytes has always been completely free, and it’s our go-to recommendation. Follow the steps below to scan your Mac and remove what Malwarebytes finds.
-
Download Malwarebytes for Mac
Click the button below to download the latest version of Malwarebytes for Mac.
Download MalwarebytesOfficial installer for macOS. Your download starts right away.Want real-time protection? See Malwarebytes PremiumMalwarebytes Free for MacScans and removes malware at no cost -
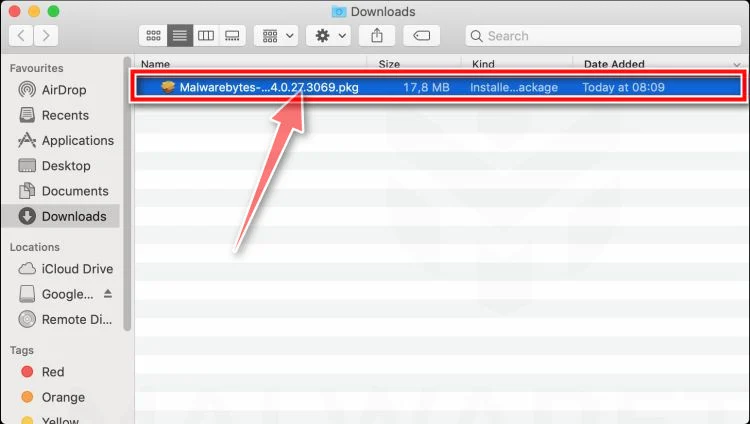
Open the Malwarebytes setup file
When the download finishes, open your Downloads folder and double-click the setup file to begin the installation.
-
Follow the On-Screen Prompts to Install Malwarebytes
The Malwarebytes for Mac Installer will guide you through a few quick screens. Click “Continue” and keep following the prompts until the installation completes.
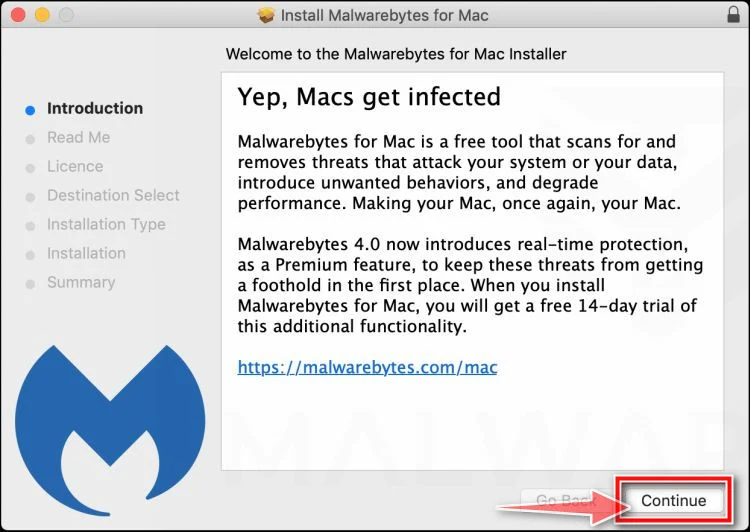
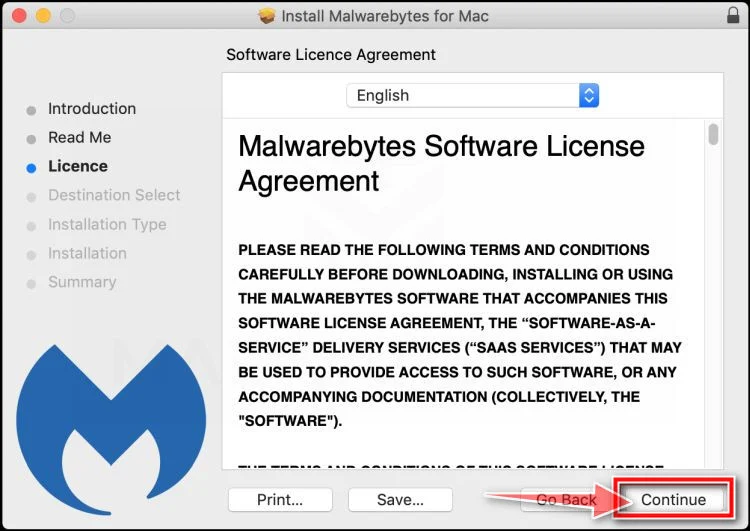
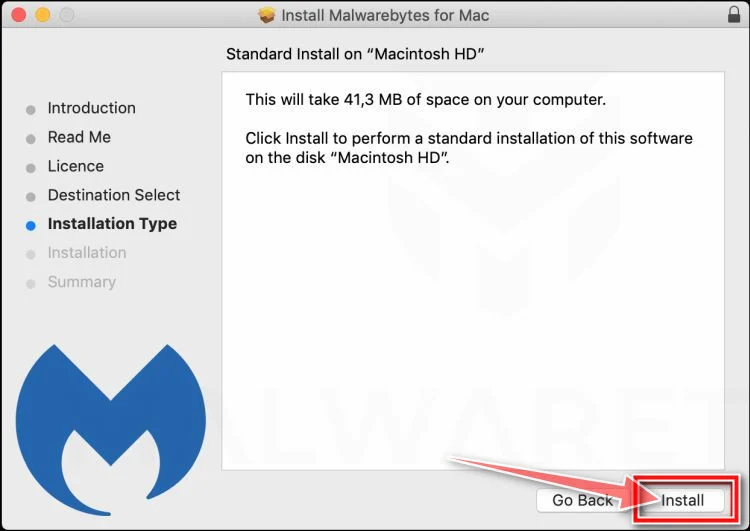
When the installation is complete, Malwarebytes opens to the Welcome to Malwarebytes screen. Click “Get started“.
Malwarebytes needs Full Disk Access to check your whole Mac. When it asks, open System Settings > Privacy & Security > Full Disk Access, turn on Malwarebytes (it may be listed as Malwarebytes Protection), and confirm with your password or Touch ID. Then return to Malwarebytes. On macOS Monterey and earlier, this setting is in System Preferences > Security & Privacy > Privacy.
-
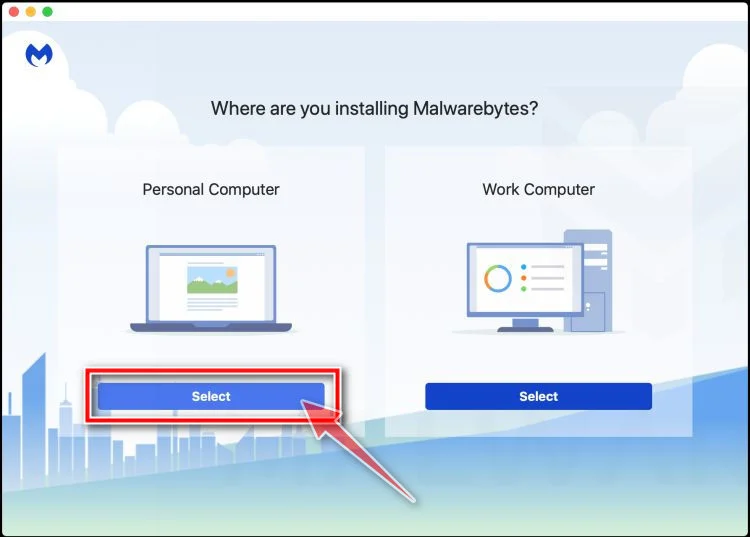
Select “Personal Computer” or “Work Computer”
Malwarebytes will ask what type of computer you’re installing it on. Click either Personal Computer or Work Computer, whichever applies.
-
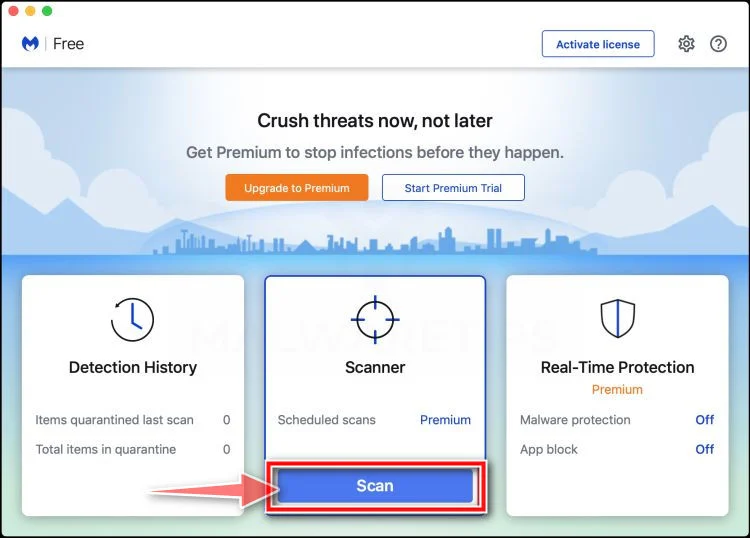
Start the Scan
Click the “Scan” button. Malwarebytes will automatically update its detection database and begin checking your Mac for malware.
-
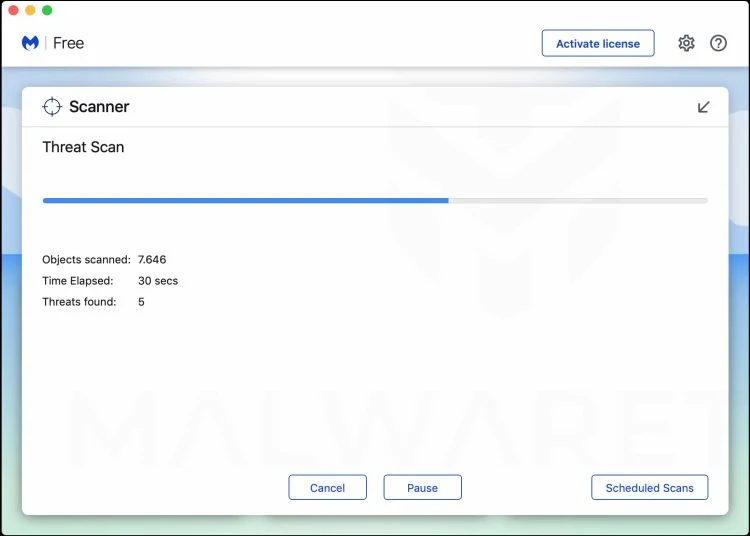
Wait for the Scan to Finish
Malwarebytes will scan your Mac for adware, browser hijackers, and other malicious programs. This can take a few minutes, so feel free to do something else — just check back occasionally to see the progress.
-
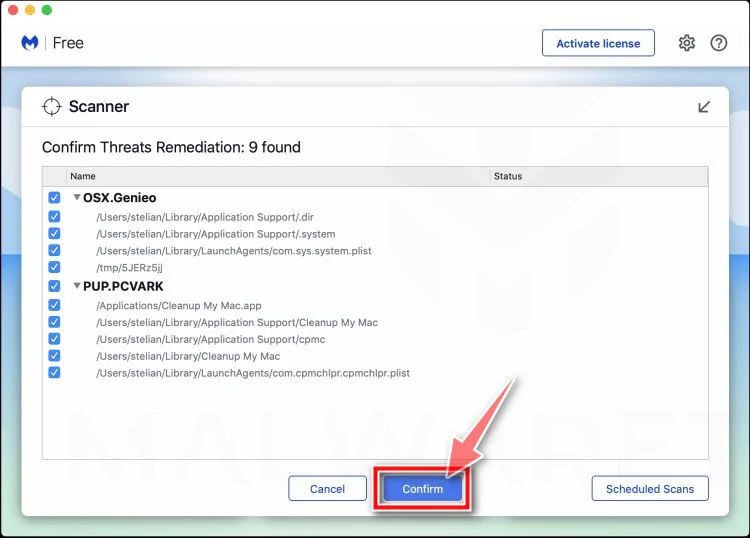
Quarantine the Detected Threats
When the scan is done, you’ll see a list of everything Malwarebytes found. Click the “Quarantine” button to remove all the threats at once.
-
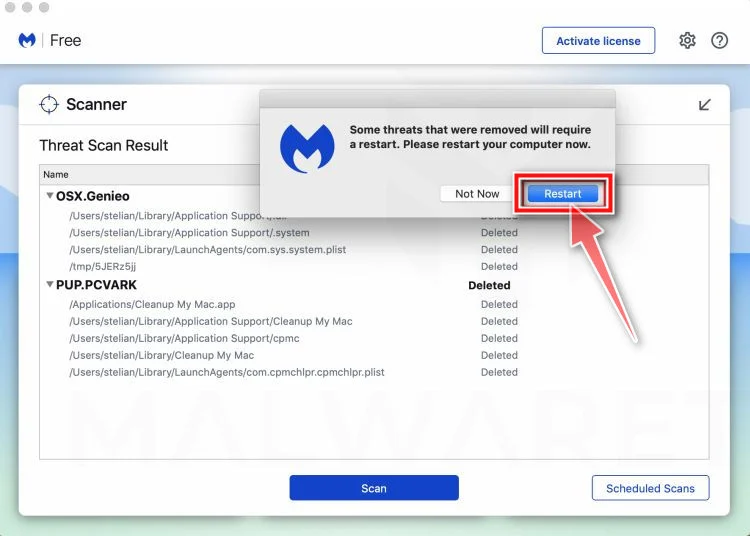
Restart Your Mac
Malwarebytes will now remove all the malicious files it found. Some threats can only be fully removed after a reboot — if Malwarebytes asks you to restart, allow it. Once you’re logged back in, check whether the problems you noticed have stopped. If they come back, save the scan report and ask for help in our forum.
If the problems you noticed continue after the scan, see the options below.
If you are still experiencing problems while trying to remove a malicious program from your computer, please ask for help in our Mac Malware Removal Help & Support forum.
Run a Malware Scan with Malwarebytes for Android
Malwarebytes for Android scans your phone or tablet for malware, adware, and potentially unwanted apps. The free version scans only when you start a scan. Real-time protection, which checks apps automatically, is part of the paid Premium version.
-
Download Malwarebytes for Android.
You can download Malwarebytes for Android by clicking the link below.
Get Malwarebytes for AndroidOpens Google Play in a new tab.Want real-time protection? See Malwarebytes Premium for AndroidMalwarebytes for AndroidScans your phone and removes malware at no cost -
Install Malwarebytes for Android on your phone.
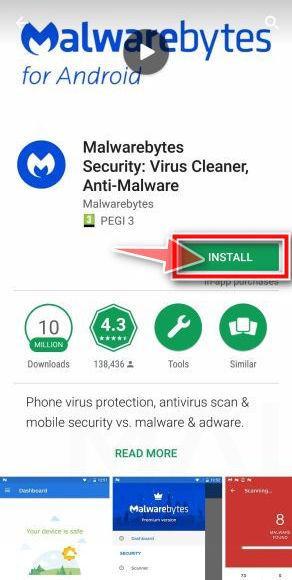
In the Google Play Store, tap “Install” to install Malwarebytes for Android on your device.
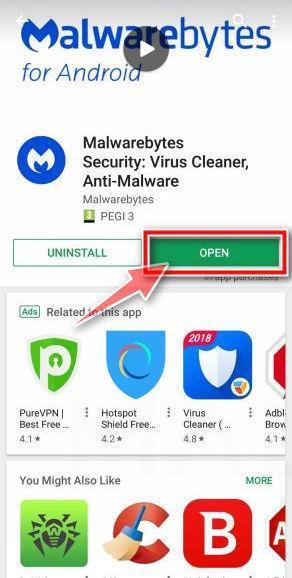
When the installation process has finished, tap “Open” to begin using Malwarebytes for Android. You can also open Malwarebytes by tapping on its icon in your phone menu or home screen.
-
Follow the on-screen prompts to complete the setup process
When Malwarebytes opens, it walks you through a short setup. Tap Get started and follow the prompts. If you see an offer for a trial or a paid plan, read it before you accept. You can skip it and keep using the free scanner.
Malwarebytes will ask for permission to access the files on your phone so it can scan them. Tap Allow, or turn on the permission in the Android screen that opens, then return to Malwarebytes.
-
Run a scan with Malwarebytes for Android
On the main screen, tap Scan now. In some versions, you open the menu, tap Scanner, and then tap Run a scan.
-
Wait for the Malwarebytes scan to complete.
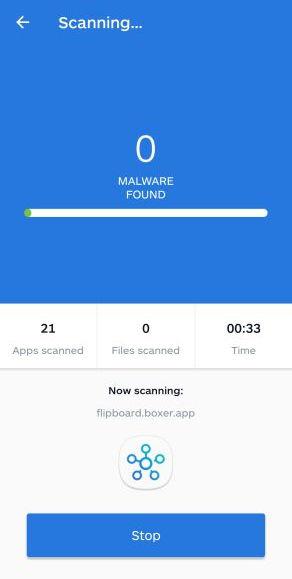
Malwarebytes will now start scanning your phone for adware and other malicious apps. This process can take a few minutes, so we suggest you do something else and periodically check on the status of the scan to see when it is finished.
-
Remove the detected apps.
When the scan has been completed, you will see a list of the threats that Malwarebytes for Android has detected. Next to each detected item, tap the menu icon (three dots), then choose to uninstall the app or delete the file. Android then asks you to confirm. Tap OK or Uninstall to remove the app.
-
Restart your phone.
When the detected apps are removed, restart your phone if Malwarebytes asks you to. Then check whether the problems you noticed have stopped.
If the problems you noticed continue after the scan, see the options below.
If you are still having problems with your phone after completing these instructions, then please follow one of the steps:
- Ask for help in our Mobile Malware Removal Help & Support forum.
- Only as a last resort, reset your phone to factory settings. Read the warning below first.
- Back up your photos, videos, files, and messages, for example to your Google account or a computer.
- Make sure you know your Google account email and password. The phone asks for them after the reset. If you changed the password recently, Google recommends waiting 24 hours before you reset.
- On a Samsung phone, also make sure you know your Samsung account password.
- If you use an authenticator app for two-step verification, move your accounts to another device or save your backup codes first.
Stay Protected: Block Ads and Malicious Sites
No scan can prove a device is completely clean, so it helps to block threats before they reach you. Most infections start with a malicious ad or a fake download button — so blocking them at the source is your best defense.
We recommend AdGuard, which blocks malicious ads, phishing pages, and dangerous redirects before they can reach you.
👉 Download AdGuard and browse safely
How to Remove Mistic Backdoor From Windows
Step 1: Decide whether scanning would interfere with an investigation
A home computer and a business endpoint do not always need the same first action. Follow an organization’s response plan before applying consumer cleanup instructions.
Quarantine, rebooting, or reinstalling can change evidence. If professional incident response is planned, ask which records or forensic images should be collected first.
For a personal PC without that support, retain available detection records and important account details. Do not keep an actively suspect computer online just to browse for advice.
If you are unsure whether the alert describes blocked or executed malware, ask the security vendor to interpret the result. That distinction affects the cleanup scope.
Step 2: Scan using current software, not the fake repair page
Obtain security software from its established provider. Ignore download buttons embedded in the verification page, unsolicited chat, or browser warning that started the incident.
The MalwareTips Malwarebytes Windows offer leads to a paid vendor offer. Purchasing it is not a prerequisite for every available manual scan.
Malwarebytes currently distinguishes free Quick and Custom scanning from the paid Threat Scan. Check the installed edition instead of assuming every scanning option is included.
For a Custom scan, use the Scanner tile’s menu, open Advanced Scan, and choose Custom Scan. Select the appropriate locations, then start the scan.
Allow the process to finish, inspect the results, and follow supported quarantine instructions. Restart if requested, then retain the result for the incident record.
A negative result is useful information, not a certificate that no code ever ran. A credible backdoor incident can require investigation beyond the scanner’s current findings.
Step 3: Investigate components without deleting Windows files by name
Do not search the drive for version.dll or EndpointDlp.dll and delete every match. Legitimate files can share those names, and removing them can damage software.
File location, signature, hash, process relationships, and detection context help distinguish a malicious copy. Get qualified help when those details are outside your experience.
Similarly, the presence of PowerShell, curl, or another normal utility does not prove compromise. What matters is how it was launched and what it did.
Keep any confirmed malicious startup or persistence findings with the incident record. Do not disable every scheduled task, service, or startup item as a blanket response.
Step 4: Review credentials and access beyond the original PC
Consider the accounts used during the suspected access period. An attacker does not need to remain on the computer if a stolen session still works elsewhere.
Review provider sign-in histories where available and end unfamiliar sessions. A password change does not necessarily revoke every existing session or connected application automatically.
Organizations should assess neighboring endpoints, remote-access changes, privileged accounts, and relevant logs through their incident-response process. One cleaned computer does not define the entire affected scope.
If a fake credential screen appeared, note which account received the input. That gives the responder a more useful starting point than assuming every account was equally exposed.
Check whether that account could reset other passwords or administer shared services. Its role may matter more than how often you personally use it.
Keep changes coordinated so that legitimate administrators do not mistake emergency resets for another attack. Record which sessions were ended and which credentials were replaced.
When working with a responder, agree on a trusted communication channel. Do not discuss new passwords or recovery links inside an account still suspected of being accessible.
Step 5: Rebuild when the device cannot be trusted
A verified backdoor can justify reinstalling Windows from trusted media rather than relying on repeated scans. The right choice depends on evidence and available recovery resources.
Back up necessary personal data before a reinstall and verify access to recovery keys and important accounts. Reinstallation can erase applications, settings, and local files.
Keep the backup separate while the incident is assessed. Do not automatically restore unknown executables, suspicious scripts, or an entire compromised configuration onto the rebuilt system.
Update Windows and applications, restore needed data cautiously, and complete account recovery from a trusted environment. Continue monitoring for unexplained access after normal work resumes.
Why This Is Not Automatically a Ransomware Recovery Case
The possible access-broker connection raises concern about what an intruder might do next. It does not establish that encryption happened on your device.
If files are encrypted or a ransom note exists, preserve those details and obtain ransomware-specific advice. Avoid running random decryptors against your only copies.
If there is no encryption evidence, focus on containment, backdoor removal, and exposed accounts. A recovery tool designed for one ransomware family is not a Mistic removal method.
Do not pay someone merely because they claim that every backdoor requires a decryption fee. Ask what damage they actually identified and how they established it.
Frequently Asked Questions
Are Mistic and MLTBackdoor the same reported threat?
The research identifies MLTBackdoor as another tracking name for this backdoor. Match the detection context carefully; similar spelling in an unrelated product name is not enough.
Does a Mistic warning mean Qilin ransomware encrypted my files?
No. The reported association concerns possible attacker access and related activity. Establish encryption independently from file behavior, ransom notes, and the incident findings.
Should I delete MpExtMs.exe immediately?
No. The investigation described abuse of a legitimate executable. Let the security product or responder assess the actual file, location, and loaded components.
Did I become infected simply by seeing a fake CAPTCHA?
That alone does not establish Mistic infection. Report whether you executed a command, installed anything, or received a credible endpoint detection.
Can Malwarebytes guarantee that all attacker access is gone?
No scanner can provide that universal guarantee. Review exposed sessions and credentials, and consider professional response or rebuilding when the incident warrants it.
What should I tell workplace IT first?
Give the alert, device identity, approximate time, and any command execution or credential entry. Use an established contact and avoid independently wiping evidence.
The Bottom Line
Treat a credible Mistic backdoor detection as an unauthorized-access incident, not a routine browser glitch. Stop sensitive work and contain the affected system through the appropriate response process.
Preserve evidence, secure exposed accounts, and use verified cleanup or rebuilding procedures. Do not delete legitimate files indiscriminately or assume that one scan resolves every consequence.

Join the discussion
0 commentsShare your experience or ask a question about this article.
Your progress
Did these steps help?
Let us know how the guide worked for you.
Describe what you see and the step you reached. Keep passwords and other private information out.
Discussion
Start the conversation
Have a question or something useful to share? Add the first comment.