


Have you received an email that appears to come from PayPal saying you successfully purchased a firearm or ammunition from Springfield Armory? The email includes an invoice and urges you to call a provided billing number. This is a scam aiming to steal your personal and financial information.
Springfield Armory is a reputable Illinois-based gun and ammunition company founded in 1794. Scammers are impersonating the brand to target gun enthusiasts with this sneaky phishing scam. But learning how to recognize the signs of this fraudulent invoice email can keep you from becoming the scammers’ next victim.

Overview of the Springfield Armory PayPal Scam
This scam starts with an email designed to look like it is from PayPal. The email claims you recently completed a purchase from Springfield Armory for a specific firearm or ammunition, sometimes worth hundreds of dollars.
An invoice is attached documenting the supposed transaction. The email urges you to call a provided billing department number immediately to address the charge.
However, if you call the number, you won’t reach PayPal’s real billing department. Instead, scammers posing as PayPal agents answer the phone. Their goal is to trick you into providing enough personal information to steal your identity and drain your bank account.
This scam preys on gun owners who may have a legitimate interest in Springfield Armory products. But recognizing a few red flags can help you avoid the trap.
Spotting the Springfield Armory PayPal Invoice Scam
While made to look official, a trained eye can identify indicators this PayPal email is a fraud:
- No real transaction – The supposed gun purchase does not show up in your PayPal account history.
- Grammatical errors – Real PayPal emails would not contain typos, poor grammar or awkward phrasing.
- Unofficial sender address – The “From” email does not come from an official @paypal.com or @springfield-armory.com address.
- Bogus billing number – The phone number has an unusual area code and clearly does not belong to PayPal’s real billing department.
- Threatening urgent tone – PayPal would not threaten account suspension or legal action if you did not call immediately. This scare tactic is designed to panic victims into calling.
How the Springfield Armory PayPal Scam Works
Here is exactly how scammers carry out this scam to try and steal your personal information:
1. You Receive the Fake PayPal Email
The scam starts with an email landing in your inbox claiming to be from PayPal Billing. The subject line often says something like “Your Order from Springfield Armory Has Shipped” or “Springfield Armory Invoice Attached.”
The email claims you recently completed a purchase from Springfield Armory for a specific gun or ammunition product.
An attached invoice includes bogus details like a fake order number, transaction ID, and the total supposedly charged to your PayPal account, often $300-$500.
2. Email Urges You to Call Immediately
The email stresses the importance of calling the included billing department number within 24 hours to address the charge.
A threatening urgent tone warns that failure to call could result in account limitation, suspension, or even legal action. This scare tactic aims to get victims to call right away out of fear.
3. You Call the Bogus Billing Number
Anxious about the supposed unauthorized charge, you call the billing number provided in the email. But it does not connect you to PayPal.
The number connects you to the scammers, who answer the phone posing as PayPal billing department agents.
4. Scammers “Verify Your Identity”
Once you are on the phone, the scammers claim they need to “verify your identity” before discussing the supposed Springfield Armory invoice.
This is when they start requesting personal information like your full name, date of birth, credit card number, bank account details, Social Security number, or a photo ID.
5. Scammers Steal Your Financial Information
Once you provide your private financial details, the scammers can drain your bank account, make unauthorized credit card charges in your name, steal your identity, and commit other forms of fraud.
The scammers may also try to get you to log into your real PayPal account through a fake site to steal your username and password.
6. Scammers Disappear with Your Information
Now armed with your financial information, the scammers disconnect the call and disappear with your private data. The contact information you called becomes inactive.
You are left with compromised accounts, stolen funds, and no recourse since you voluntarily provided the information to the scammers.
Avoiding the Springfield Armory PayPal Invoice Scam
If you receive a suspicious email about a Springfield Armory purchase from PayPal, do NOT call the included number, provide any information, or click any links. Instead, take these steps:
- Login directly to your real PayPal account to check recent activity and confirm there was no gun purchase.
- Forward the scam email to PayPal at spoof@paypal.com to investigate and shutdown the scam number.
- Report the phishing email to your email provider.
- Delete the scam email immediately and block the sender.
- Never call numbers provided in unexpected finance-related emails. Only call verified numbers listed on real company websites.
- Use strong unique passwords and enable two-factor authentication on your important accounts whenever possible.
With awareness of the techniques used in this scam, you can avoid becoming another victim. Remember, unexpected calls or emails requesting your private information are almost always a scam, even if they claim to be from trusted companies.
What to Do if You Already Called the Scammers
If you already called the billing number and provided any personal or financial information, take these steps right away:
- Contact PayPal to report any unauthorized account activity. Change your password immediately.
- Call your credit card company and bank to report any fraudulent charges or transactions. Cancel any cards that may have been compromised.
- Place fraud alerts on your credit reports to detect any signs of identity theft. Consider signing up for credit monitoring.
- Change passwords on all online accounts that use the same password that may have been compromised.
- File a report with the FTC at IdentityTheft.gov and your local police department. Provide any details about the scam available.
The sooner you take action, the better chance you have of limiting the damage from any stolen information. Never feel embarrassed or afraid to report falling victim to scammers – even savvy people sometimes get fooled.
Raising Awareness to Stop the Springfield Armory PayPal Scam
The more awareness raised about this scam, the harder it will be for scammers to fool victims. You can help fight back and stop this scam by:
- Reporting any scam emails to PayPal so they can be investigated. PayPal may be able to disable scam phone numbers being used as well.
- Making family, friends and contacts in the gun community aware of this scam’s techniques through social media and direct conversations. Knowledge is power against scams.
- Contacting your phone provider to inquire about identifying and blocking frequently spoofed scam numbers. This can disrupt scammers’ operations.
- Filing detailed complaints with the FTC and IC3 to ensure authorities are tracking and responding to the scam.
The Springfield Armory name lures gun enthusiasts in, but recognizing the signs of an invoice scam empowers potential victims to protect their identity and finances. Being vigilant and skeptical whenever asked for your private information will stop scammers in their tracks.
Is Your Device Infected? Run a Free Malware Scan
Slow performance, constant pop-ups, or strange behavior? These are classic signs of a malware infection. A quick way to check is to scan your device with Malwarebytes Free, one of the most trusted malware removal tools available. If you only visited a scam page and didn’t download or install anything, this scan is optional.
The free version detects and removes the most common threats, including:
- Adware — the cause of those annoying pop-ups
- Browser hijackers — unwanted redirects and changed homepages
- Trojans and spyware — hidden programs stealing your data
- Potentially unwanted programs (PUPs) — software you never asked for
👉 Select your device below — Windows, Mac, or Android — then follow the simple steps to download Malwarebytes, scan your system, and remove any threats it finds. The scan usually takes 5 to 20 minutes.
Run a Malware Scan with Malwarebytes for Windows
Malwarebytes is one of the most popular and trusted anti-malware tools for Windows — and it’s completely free for removing infections. It catches threats that many antivirus programs miss, including adware, browser hijackers, and trojans. Follow the steps below to scan your PC and remove what Malwarebytes finds.
Download Malwarebytes
Click the button below to download the latest version of Malwarebytes for Windows from the official source. The free version is all you need — it will scan your computer and remove adware, browser hijackers, and other malicious software at no cost.
Download MalwarebytesOfficial installer for Windows 11 and 10. Your download starts right away.Want real-time protection? See Malwarebytes Premium Malwarebytes Free for WindowsScans and removes malware at no cost
-
Install Malwarebytes
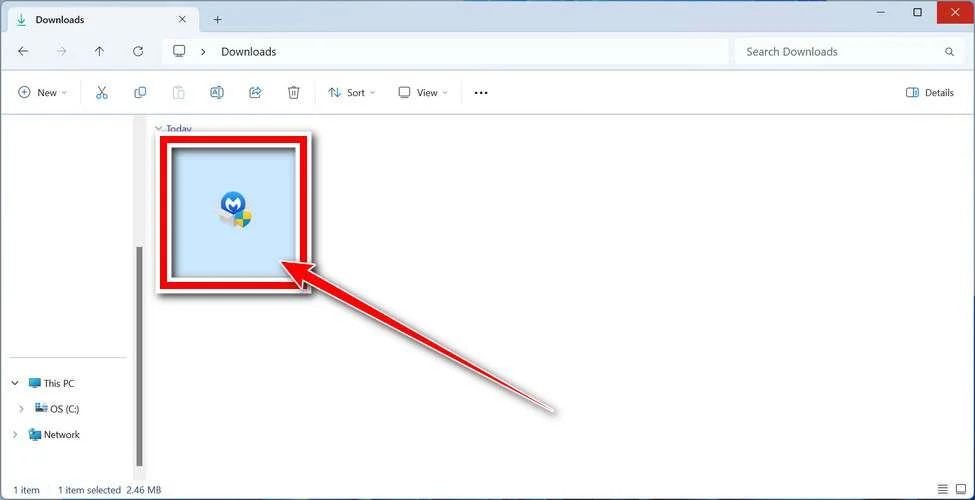
When the download finishes, open your Downloads folder and double-click the MBSetup file. If Windows shows a User Account Control pop-up, click “Yes” to allow the installation.
Follow the On-Screen Prompts to Install Malwarebytes
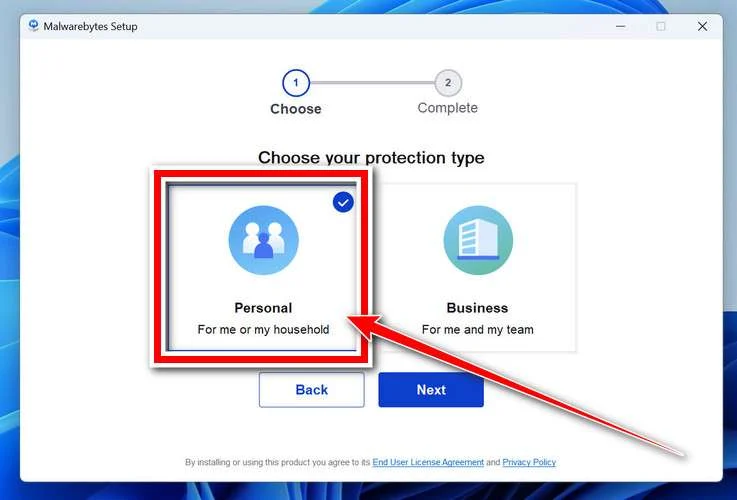
The setup wizard will walk you through a few quick screens:
-
Choose where you’re installing the program — “Personal Computer” or “Work Computer” — then click Next.
-
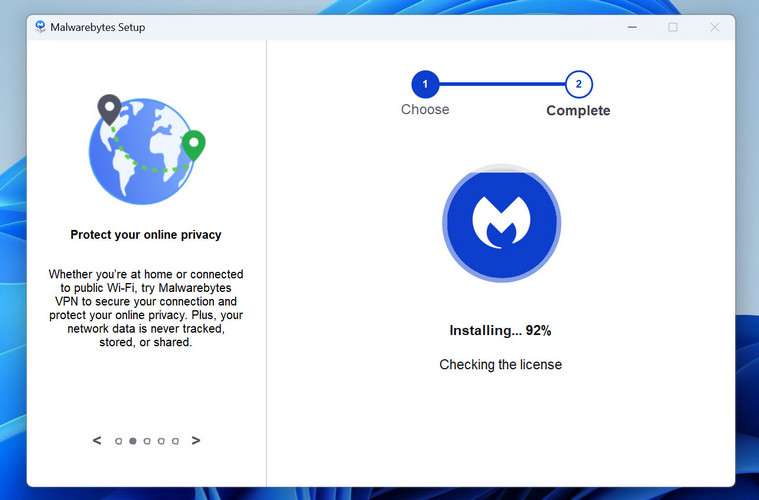
Malwarebytes will now install on your device. This usually takes under a minute.
-
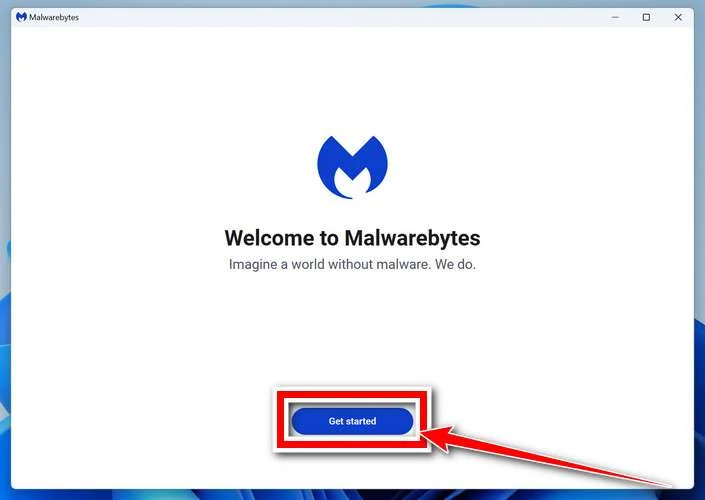
When installation is complete, the “Welcome to Malwarebytes” screen will open automatically.
-
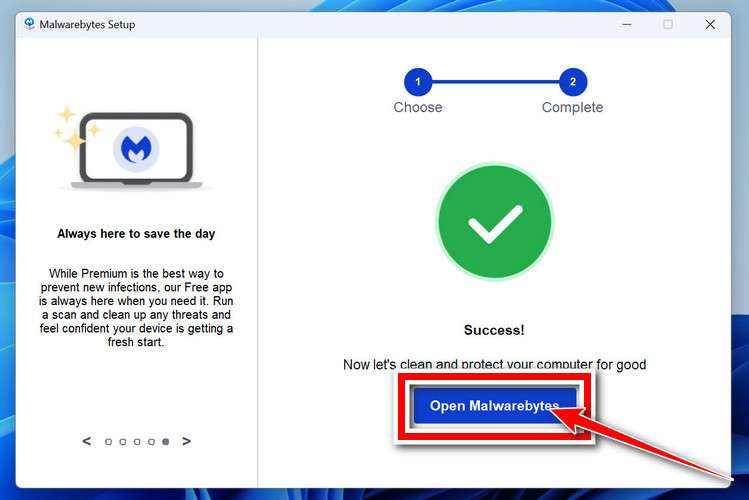
On the final screen, click Open Malwarebytes to launch the program.
-
Optional: Check for rootkits with a Custom Scan
You don’t need to change any settings for a normal scan. The standard Threat Scan in the next step is enough for most problems, so you can go straight to it.
If you also want to check for rootkits, use a Custom Scan. In current versions of Malwarebytes, rootkit scanning is only available there:
- On the Scanner tile, click the three-dot menu and select Advanced Scan.
- Choose Custom Scan. In its options, check Scan for rootkits.
- Select your system drive (usually C:\) as the location to scan, then start the scan. It takes longer than a Threat Scan.
- When it finishes, review and quarantine the results as described in the steps below.
Rootkit scanning isn’t available on Windows devices with ARM processors.
Start the Scan
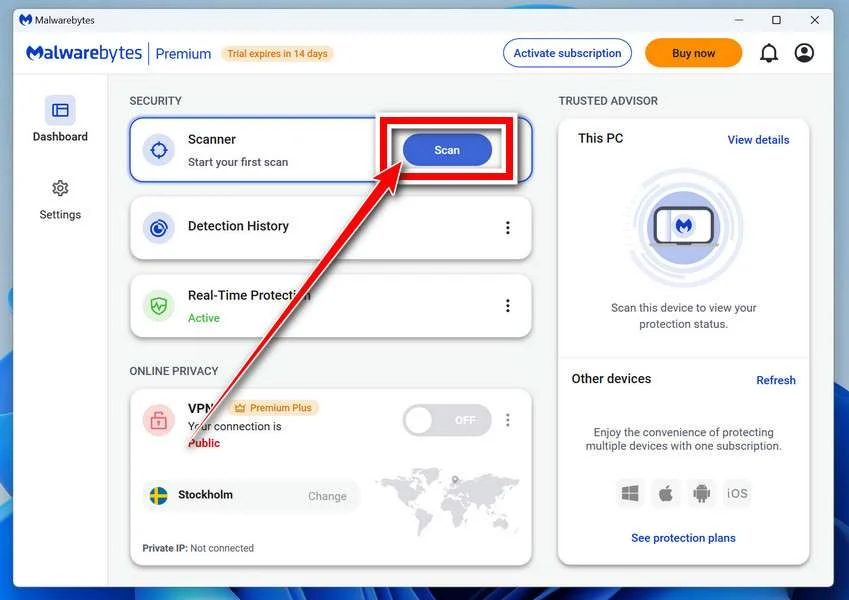
Click the blue Scan button. Malwarebytes will automatically update its virus database and start checking your computer for malware.
-
Wait for the Scan to Finish
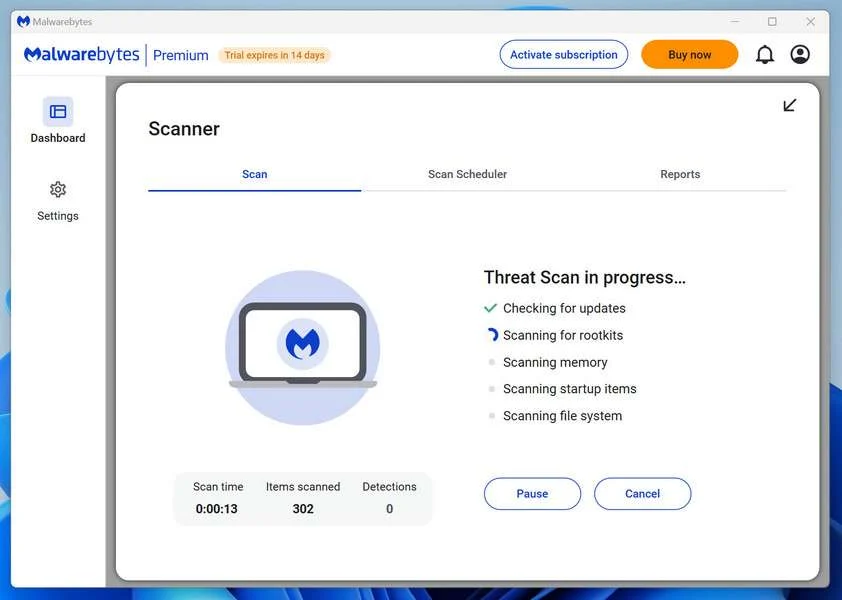
The scan checks your entire system for browser hijackers and other malicious programs, so it can take 5 to 20 minutes depending on your computer. Feel free to do something else — just check back occasionally to see the progress.
-
Quarantine the Detected Threats
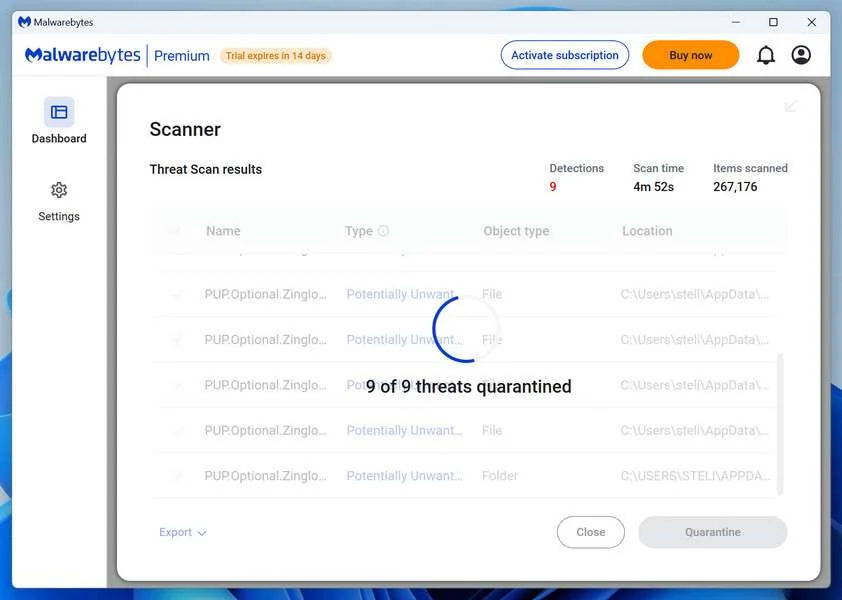
When the scan is done, you’ll see a list of everything Malwarebytes found — malware, adware, and potentially unwanted programs. Click the “Quarantine” button to remove all of them at once.
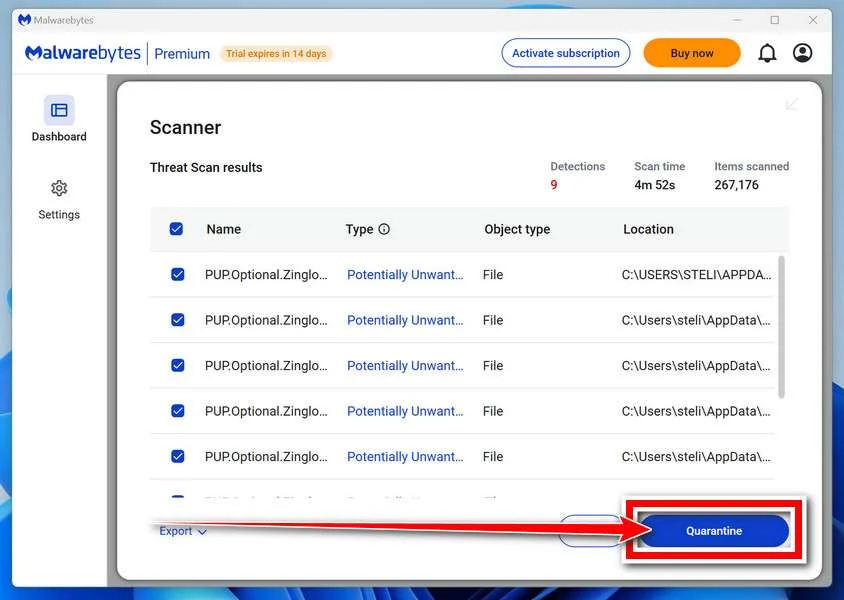
Malwarebytes will now remove the malicious files and registry entries and move them safely into quarantine.
-
Restart Your Computer
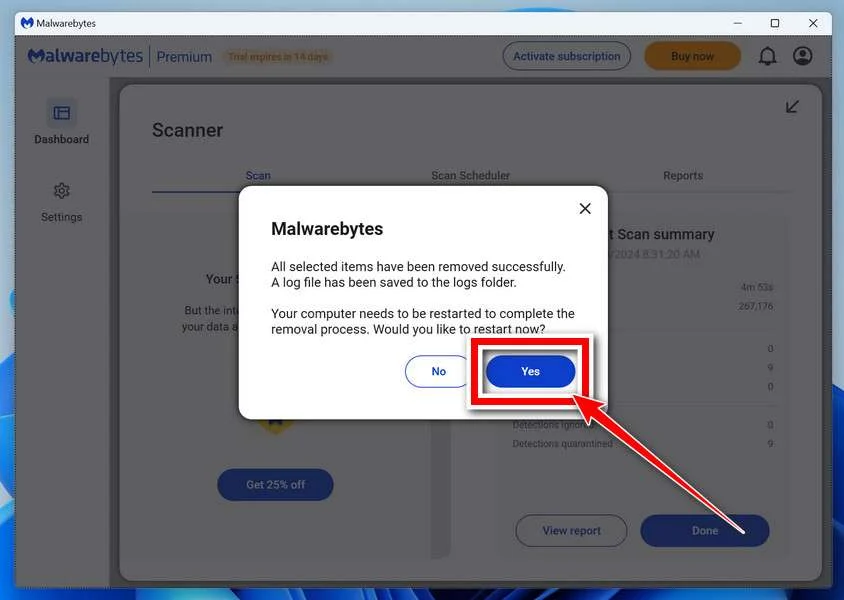
Some threats can only be fully removed after a reboot. If Malwarebytes asks you to restart, click Yes. Once you’re logged back in, Malwarebytes has finished removing the threats it found.
When the scan is done, check whether the problems you noticed have stopped. If they continue, see the options below.
If you are still having problems with your computer after completing these instructions, then please follow one of the steps:
- Run a computer scan with ESET Online Scanner
- Ask for help in our Windows Malware Removal Help & Support forum.
Run a Malware Scan with Malwarebytes for Mac
Malwarebytes for Mac is a free on-demand scanner that removes the malware other security software tends to miss — adware, browser hijackers, and unwanted programs included. Cleaning an infected Mac with Malwarebytes has always been completely free, and it’s our go-to recommendation. Follow the steps below to scan your Mac and remove what Malwarebytes finds.
-
Download Malwarebytes for Mac
Click the button below to download the latest version of Malwarebytes for Mac.
Download MalwarebytesOfficial installer for macOS. Your download starts right away.Want real-time protection? See Malwarebytes PremiumMalwarebytes Free for MacScans and removes malware at no cost -
Open the Malwarebytes setup file
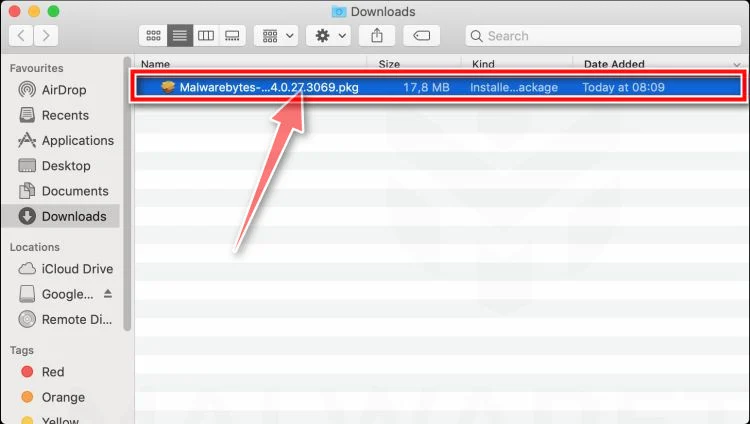
When the download finishes, open your Downloads folder and double-click the setup file to begin the installation.
-
Follow the On-Screen Prompts to Install Malwarebytes
The Malwarebytes for Mac Installer will guide you through a few quick screens. Click “Continue” and keep following the prompts until the installation completes.
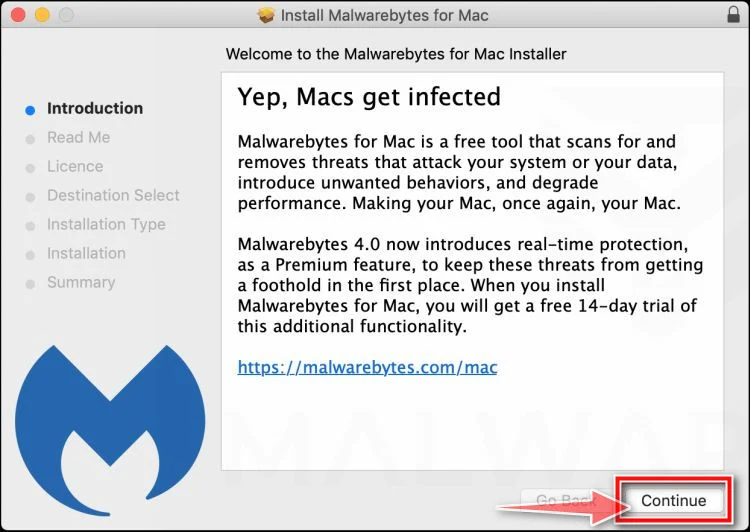
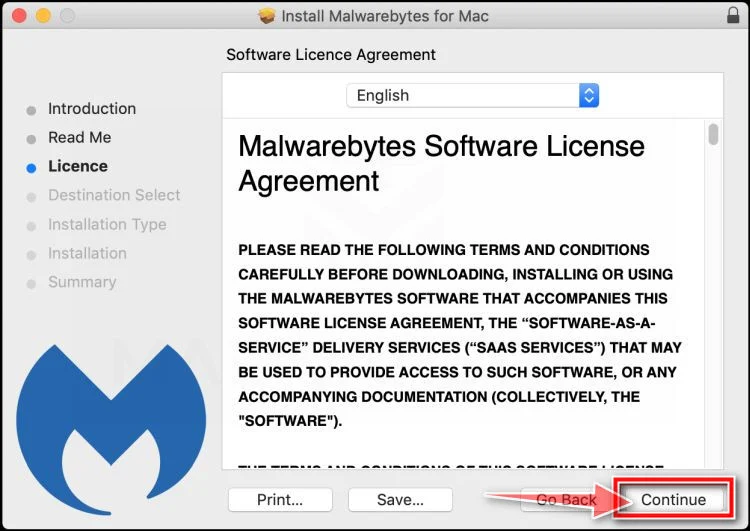
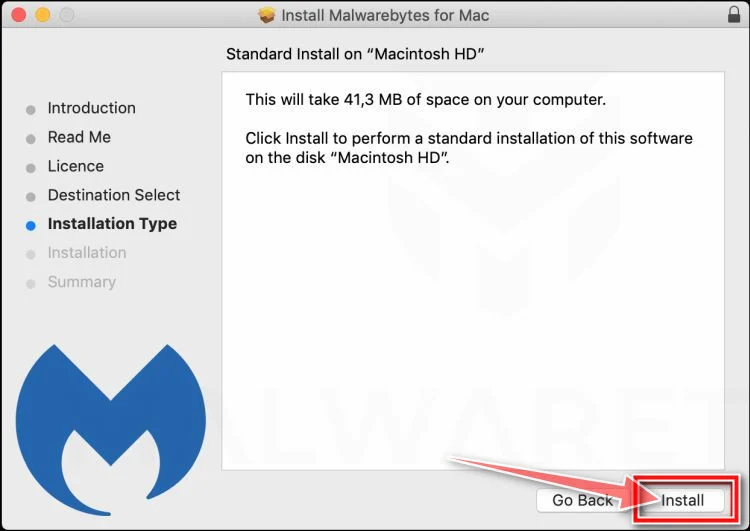
When the installation is complete, Malwarebytes opens to the Welcome to Malwarebytes screen. Click “Get started“.
Malwarebytes needs Full Disk Access to check your whole Mac. When it asks, open System Settings > Privacy & Security > Full Disk Access, turn on Malwarebytes (it may be listed as Malwarebytes Protection), and confirm with your password or Touch ID. Then return to Malwarebytes. On macOS Monterey and earlier, this setting is in System Preferences > Security & Privacy > Privacy.
-
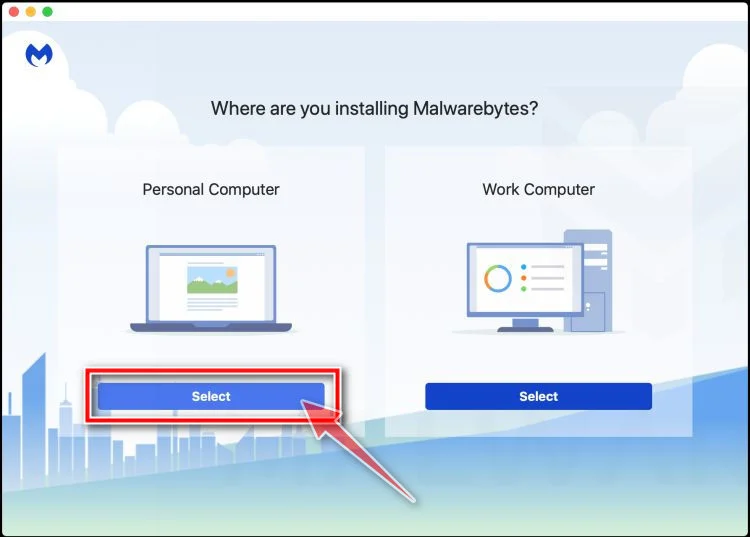
Select “Personal Computer” or “Work Computer”
Malwarebytes will ask what type of computer you’re installing it on. Click either Personal Computer or Work Computer, whichever applies.
-
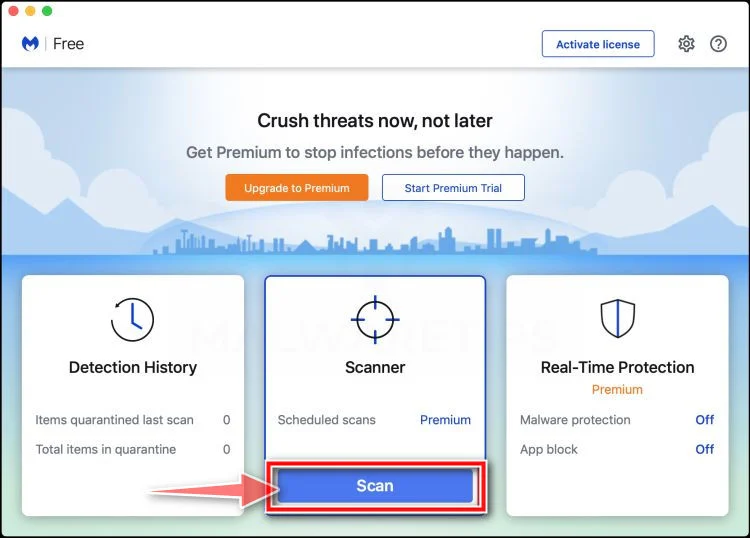
Start the Scan
Click the “Scan” button. Malwarebytes will automatically update its detection database and begin checking your Mac for malware.
-
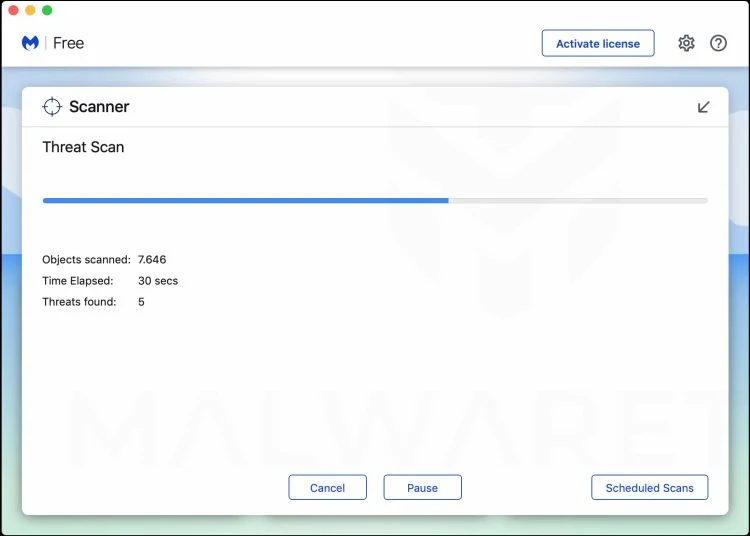
Wait for the Scan to Finish
Malwarebytes will scan your Mac for adware, browser hijackers, and other malicious programs. This can take a few minutes, so feel free to do something else — just check back occasionally to see the progress.
-
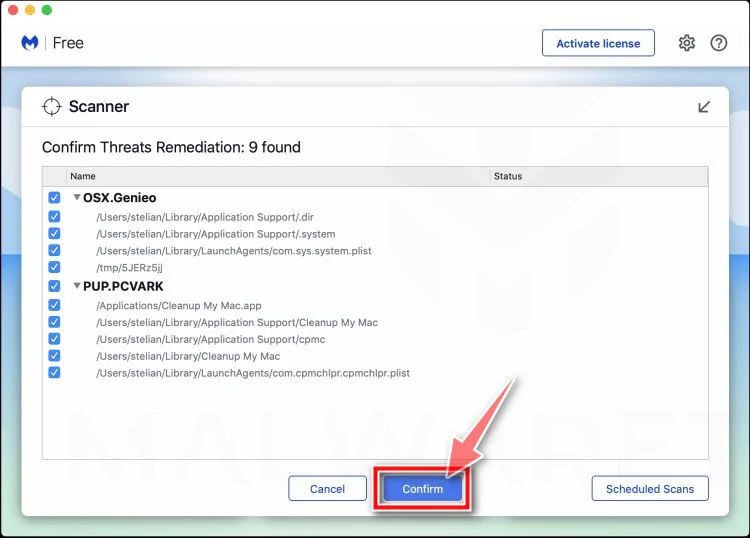
Quarantine the Detected Threats
When the scan is done, you’ll see a list of everything Malwarebytes found. Click the “Quarantine” button to remove all the threats at once.
-
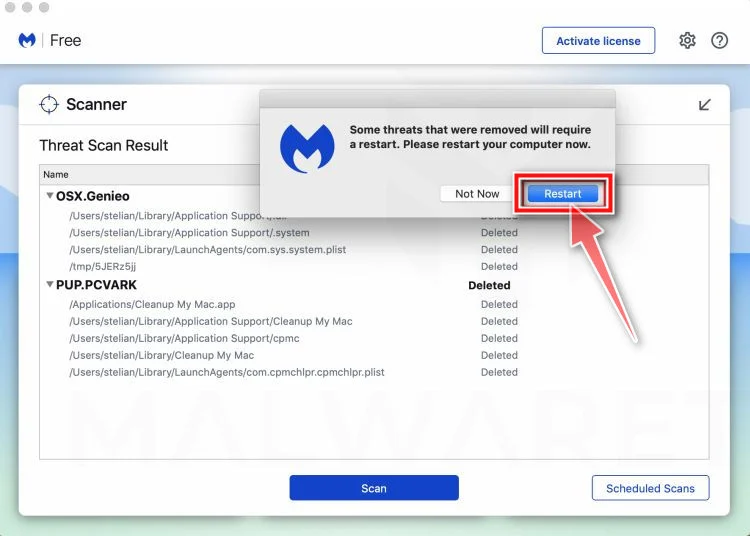
Restart Your Mac
Malwarebytes will now remove all the malicious files it found. Some threats can only be fully removed after a reboot — if Malwarebytes asks you to restart, allow it. Once you’re logged back in, check whether the problems you noticed have stopped. If they come back, save the scan report and ask for help in our forum.
If the problems you noticed continue after the scan, see the options below.
If you are still experiencing problems while trying to remove a malicious program from your computer, please ask for help in our Mac Malware Removal Help & Support forum.
Run a Malware Scan with Malwarebytes for Android
Malwarebytes for Android scans your phone or tablet for malware, adware, and potentially unwanted apps. The free version scans only when you start a scan. Real-time protection, which checks apps automatically, is part of the paid Premium version.
-
Download Malwarebytes for Android.
You can download Malwarebytes for Android by clicking the link below.
Get Malwarebytes for AndroidOpens Google Play in a new tab.Want real-time protection? See Malwarebytes Premium for AndroidMalwarebytes for AndroidScans your phone and removes malware at no cost -
Install Malwarebytes for Android on your phone.
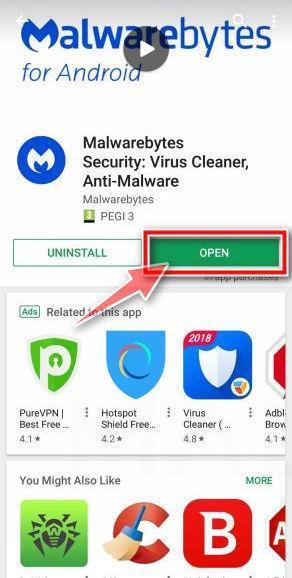
In the Google Play Store, tap “Install” to install Malwarebytes for Android on your device.
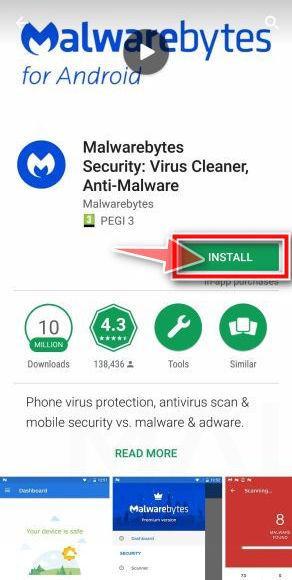
When the installation process has finished, tap “Open” to begin using Malwarebytes for Android. You can also open Malwarebytes by tapping on its icon in your phone menu or home screen.
-
Follow the on-screen prompts to complete the setup process
When Malwarebytes opens, it walks you through a short setup. Tap Get started and follow the prompts. If you see an offer for a trial or a paid plan, read it before you accept. You can skip it and keep using the free scanner.
Malwarebytes will ask for permission to access the files on your phone so it can scan them. Tap Allow, or turn on the permission in the Android screen that opens, then return to Malwarebytes.
-
Run a scan with Malwarebytes for Android
On the main screen, tap Scan now. In some versions, you open the menu, tap Scanner, and then tap Run a scan.
-
Wait for the Malwarebytes scan to complete.
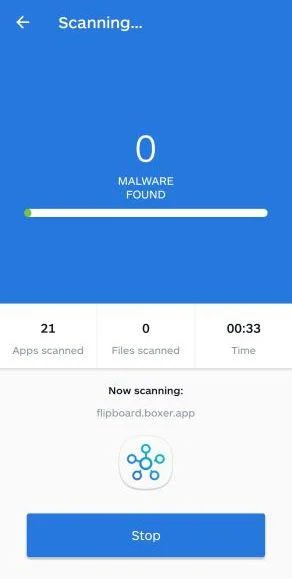
Malwarebytes will now start scanning your phone for adware and other malicious apps. This process can take a few minutes, so we suggest you do something else and periodically check on the status of the scan to see when it is finished.
-
Remove the detected apps.
When the scan has been completed, you will see a list of the threats that Malwarebytes for Android has detected. Next to each detected item, tap the menu icon (three dots), then choose to uninstall the app or delete the file. Android then asks you to confirm. Tap OK or Uninstall to remove the app.
-
Restart your phone.
When the detected apps are removed, restart your phone if Malwarebytes asks you to. Then check whether the problems you noticed have stopped.
If the problems you noticed continue after the scan, see the options below.
If you are still having problems with your phone after completing these instructions, then please follow one of the steps:
- Ask for help in our Mobile Malware Removal Help & Support forum.
- Only as a last resort, reset your phone to factory settings. Read the warning below first.
- Back up your photos, videos, files, and messages, for example to your Google account or a computer.
- Make sure you know your Google account email and password. The phone asks for them after the reset. If you changed the password recently, Google recommends waiting 24 hours before you reset.
- On a Samsung phone, also make sure you know your Samsung account password.
- If you use an authenticator app for two-step verification, move your accounts to another device or save your backup codes first.
Stay Protected: Block Ads and Malicious Sites
No scan can prove a device is completely clean, so it helps to block threats before they reach you. Most infections start with a malicious ad or a fake download button — so blocking them at the source is your best defense.
We recommend AdGuard, which blocks malicious ads, phishing pages, and dangerous redirects before they can reach you.
👉 Download AdGuard and browse safely
FAQ: The Springfield Armory PayPal Invoice Email Scam
1. What is the Springfield Armory PayPal invoice scam?
This scam sends a fake PayPal email claiming you purchased a gun or ammo from Springfield Armory. It includes an invoice and number to call about the charge. But it aims to steal your information.
2. How can I recognize the Springfield Armory PayPal scam email?
Look for an invoice for a gun/ammo purchase you didn’t make. Other red flags are grammatical errors, urgent threats to call, and a suspicious sender address.
3. What is the scammers’ goal with this scam?
They want you to call the number so they can pose as PayPal and trick you into giving personal info to steal your identity and drain your bank account.
4. What should I do if I receive this scam email?
Do not call the number or click any links. Log into your real PayPal account to confirm there is no invoice. Forward the email to PayPal and delete it.
5. Are Springfield Armory or PayPal really involved?
No, scammers are only pretending to be from PayPal and Springfield Armory. The real companies are not involved in the scam.
6. What steps should I take if I called the scammers?
Contact PayPal immediately about unauthorized account activity. Call your bank/credit card company about any fraudulent charges. Place fraud alerts with credit bureaus.
7. How can I avoid the Springfield Armory PayPal scam?
Use strong unique passwords everywhere and enable two-factor authentication when possible. Never call or provide information in response to suspicious emails.
8. How can I help stop this scam?
Report any scam emails to PayPal and your email provider. Warn other gun owners about this scam. File detailed complaints with the FTC and IC3.
9. Are there other fake PayPal invoice scams I should know about?
Yes, scams involving fake invoices from eBay, Walmart, Target, Apple, and other major retailers are also common. Always login to PayPal directly to verify any emailed invoices.
10. What should I do if I provided my information to the scammers?
Immediately contact PayPal about unauthorized account access, notify your bank/credit card company about any fraudulent activity, place fraud alerts with credit bureaus, and change any compromised account passwords.
The Bottom Line on the PayPal Springfield Armory Email Scam
This scam preys on fears of identity theft and bank account takeovers. But learning the common red flags of a phishing attempt enables you to recognize the scam before falling for it.
Unexpected finance-related emails and calls should always be met with skepticism. Only call verified contact information listed on real company websites – not numbers provided in random emails.
With caution and awareness, you have the power to outsmart these scammers. If we work together to report these fraudulent emails and numbers, we can eventually shutdown these operations for good.

Join the discussion
0 commentsShare your experience or ask a question about this article.
Discussion
Start the conversation
Have a question or something useful to share? Add the first comment.