

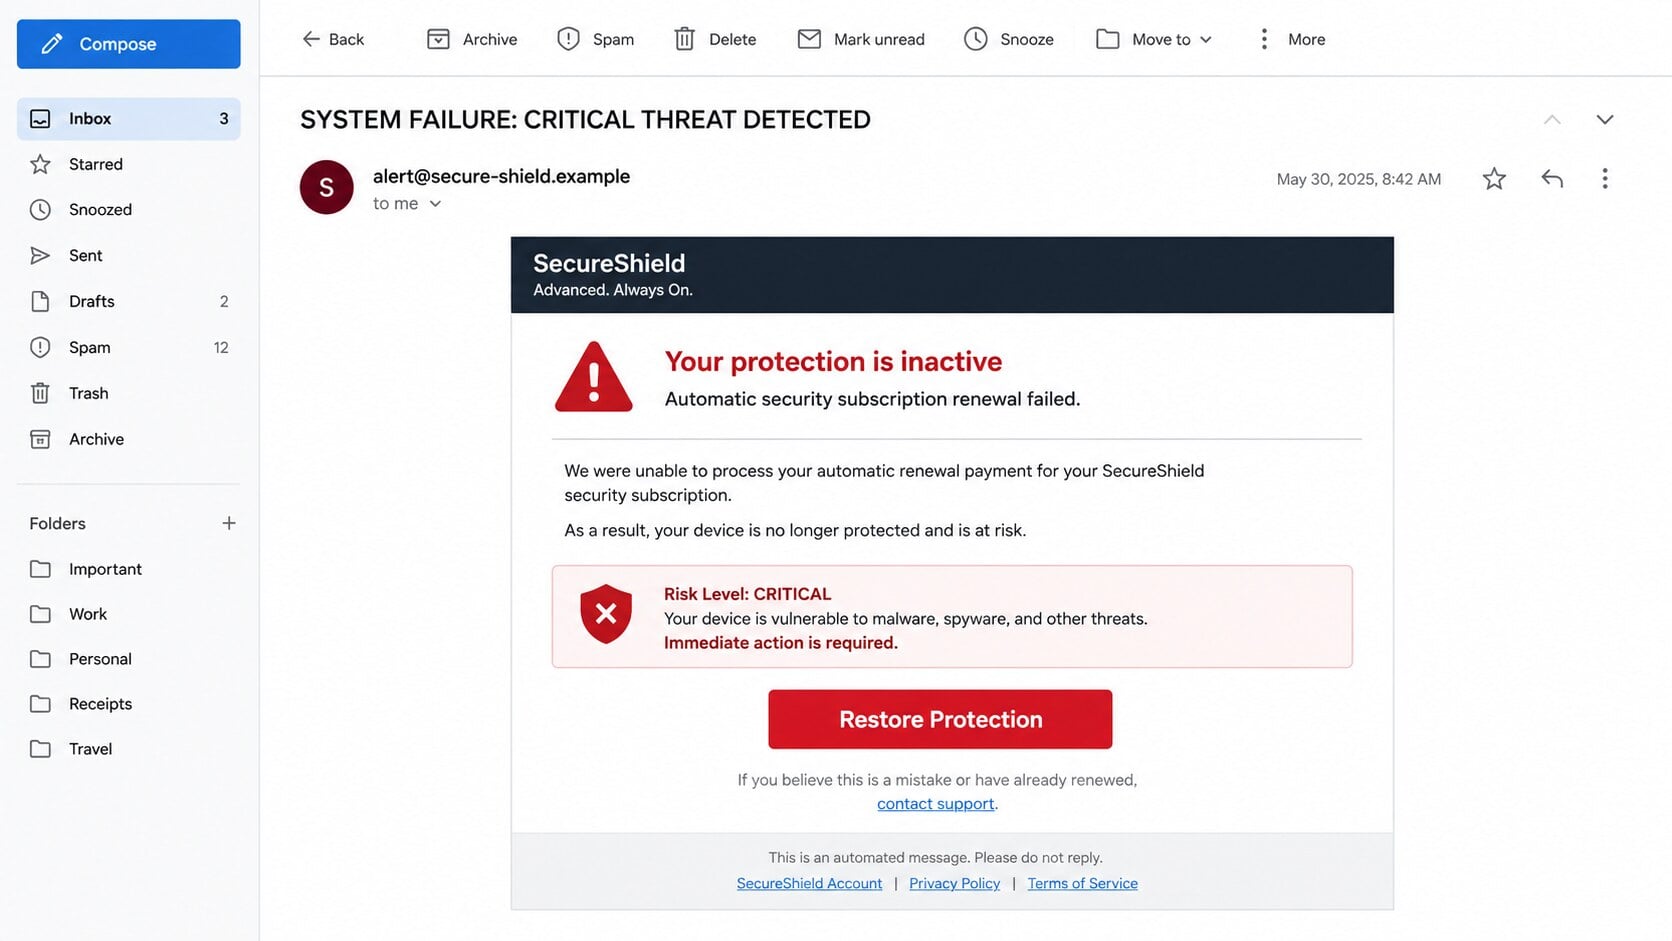
The subject line announces a system failure, the body says your antivirus renewal failed, and a red warning claims the computer is exposed right now.
It feels like an emergency created by software you already own. Before paying, the relationship between the email, the warning page, and the promoted product needs untangling.
Overview
The alert invents a failed security renewal
The email claims an automatic antivirus payment could not be processed. It says protection is inactive and the device is vulnerable to malware, ransomware, or identity theft.
This is not a genuine scan result. An email sender cannot inspect the recipient’s computer and determine that a critical system threat appeared because a payment failed.
The language merges two separate ideas: subscription billing and live infection status. A declined renewal would not prove that malware is currently running.
Different versions may avoid naming a security company until after the click. Others imitate a familiar product to make the supposed renewal feel recognizable.
The button leads into a fear-driven sales funnel
The “Restore Protection” button can route through tracking addresses and affiliate pages. The destination then presents another urgent warning and a purchase offer.
The campaign examined appears designed to generate a software sale through deceptive promotion. Similar lures can instead collect card details, install unwanted software, or open callback fraud.
That variation is important. The email establishes the deception, while the final product and merchant must be evaluated separately at the actual checkout.
- No verified subscription is identified.
- No local scan produced the warning.
- The message treats a payment issue as an active infection.
- The link may pass through affiliate tracking.
- The checkout may introduce renewal terms.
A real product does not legitimize a false warning
Some deceptive campaigns ultimately promote genuine commercial software. That does not make the fabricated expiry notice accurate or the marketing method acceptable.
An affiliate can earn money when a visitor buys after clicking a tracked link. Fear and urgency can improve conversions, giving dishonest promoters a financial incentive.
The security vendor may not have authored or approved the spam. Identify the sender, affiliate, checkout merchant, and software publisher as separate parties.
The correct conclusion follows the evidence: the email’s security claim is false, while the final offer requires its own price, renewal, support, and publisher checks.
Why an Email Cannot Diagnose Your Computer
A genuine antivirus program evaluates local files, processes, behavior, and network activity through software installed on the device. It reports findings inside its own application.
A bulk email normally knows only an address and tracking information. It cannot see whether protection is installed, active, expired, or detecting a threat.
The message may use invisible pixels to learn that it was opened. That tracking does not provide access to local security status.
Browser pages can display operating-system names, rough location, or device type. Those details come from routine connection information, not a malware scan.
A countdown timer is equally artificial. It is usually JavaScript that restarts for every visitor and does not measure a real deadline.
Claims such as “five threats detected” often appear before any permission or scan. Reloading the page may produce the same number or a newly randomized result.
To check protection, open Windows Security or the security product already installed. Review its subscription page and scan history without using the email link.
If no matching subscription exists in the official account or card history, there is no failed renewal to repair.
How the System Failure Critical Threat Email Scam Works
Step 1: Spam creates a security emergency
The campaign sends an alarming subject to large mailing lists. It does not need to know which antivirus product, if any, the recipient uses.
Words such as “critical,” “failure,” and “unprotected” encourage immediate action. The body often repeats the warning in red and displays a generic shield.
The message presents the renewal as automatic, allowing recipients to wonder whether they forgot an old trial, device bundle, or family subscription.
Step 2: The story combines billing fear with malware fear
A supposed declined payment creates familiarity because many services use subscriptions. The threat claim adds consequences that feel too serious to postpone.
The email may imply that security stopped at the exact moment the payment failed. Real products do not normally announce live infections through unrelated bulk mail.
No account number, original purchase date, device name, or verifiable invoice may appear. Vague details let one template fit every recipient.
Step 3: The main button routes through tracking
Clicking can open one or more redirect addresses before reaching the sales page. Each hop can record the campaign, visitor, geography, and potential commission.
Redirects also let promoters change the final offer while leaving the original emails active. One day the link may sell software; later it could lead elsewhere.
The displayed button text therefore says little about the destination. Hovering over it can expose an unrelated tracking or advertising domain.
Step 4: A landing page repeats the manufactured diagnosis
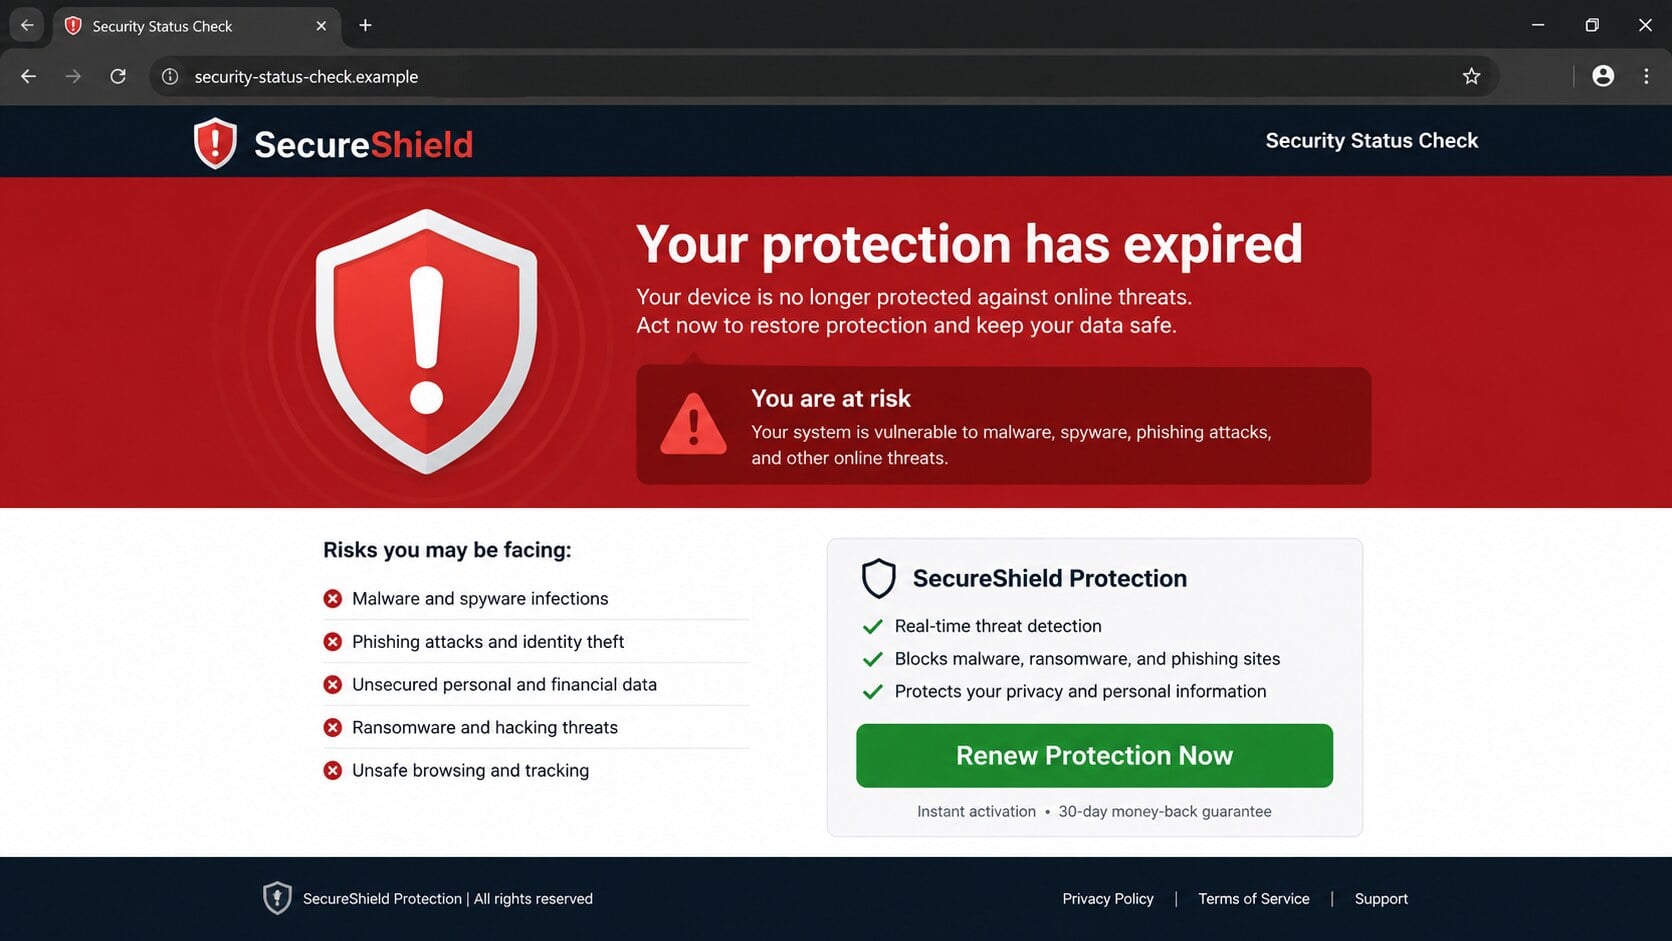
The next page often claims protection expired, data is at risk, or threats are waiting. Bright warnings crowd out neutral information about the actual product.
Some pages show fictional scan animations. Others present a discount timer or state that the offer is available only for the current device.
This repetition is deliberate. The page keeps the visitor thinking about immediate danger rather than comparing vendors, reading independent reviews, or checking existing coverage.
Step 5: The visitor reaches a purchase or data-collection page
The checkout may belong to a real vendor, an affiliate network, or an unknown merchant. Read the domain and legal terms before entering any information.
A displayed annual price may exclude taxes, additional devices, premium support, or later renewal pricing. Preselected options can change the total.
In more dangerous variants, the form itself is fraudulent and captures card details. Verify the merchant independently rather than trusting a polished payment page.
Step 6: Renewal terms can outlast the original scare
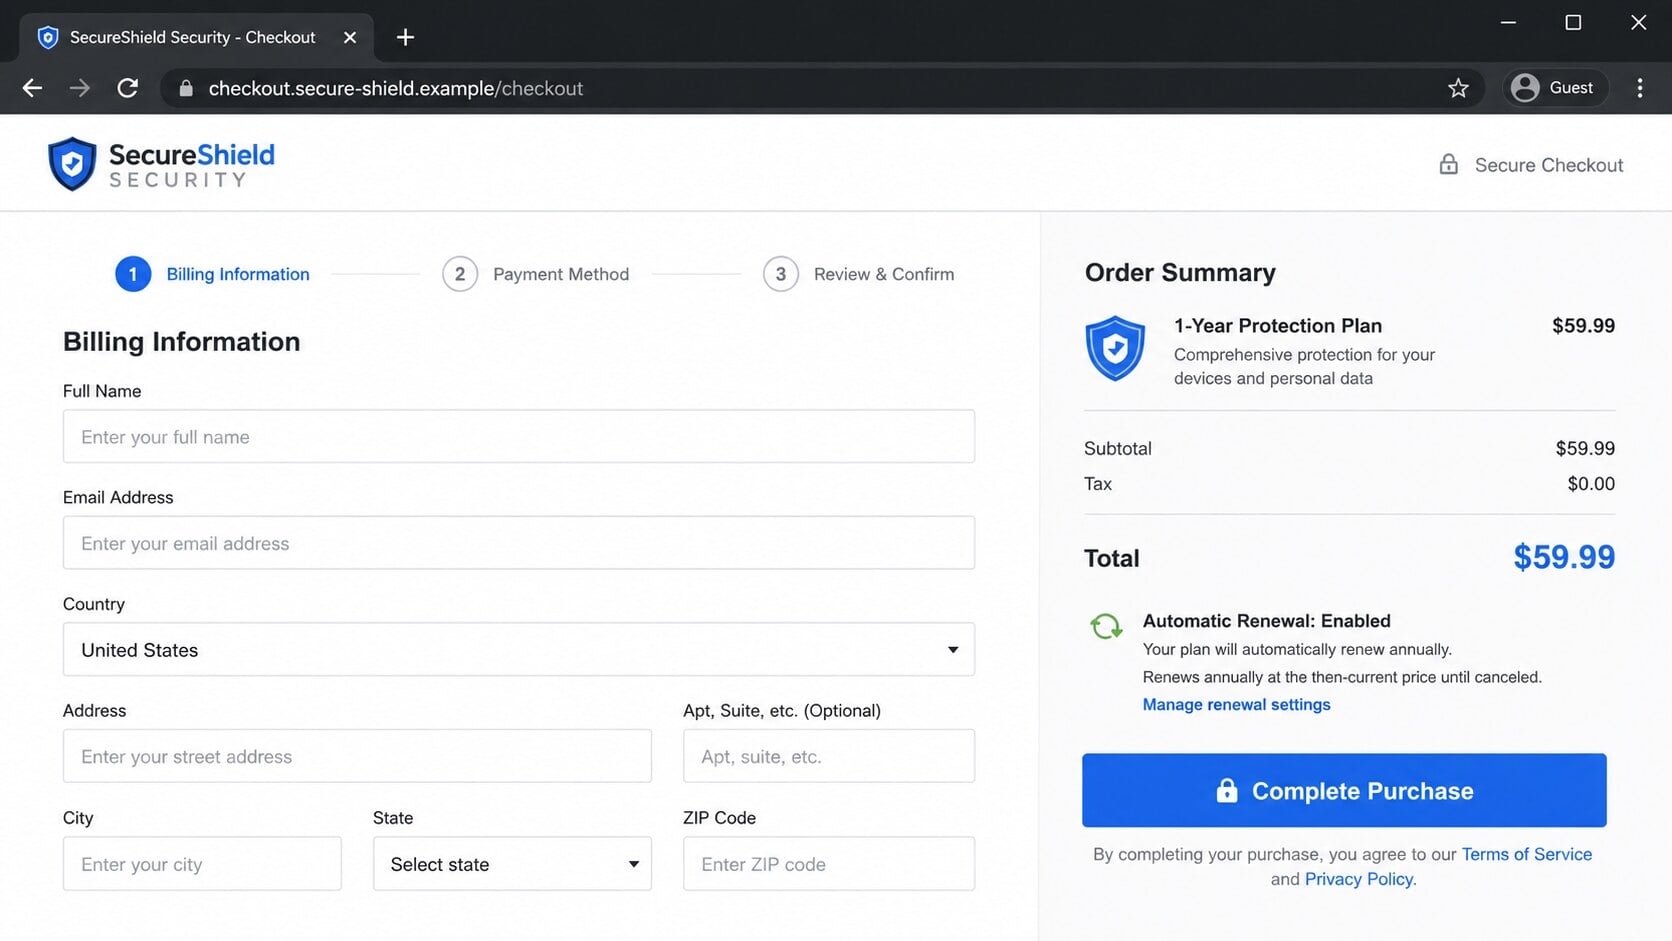
A legitimate subscription may automatically renew if the buyer accepts clear terms. Trouble begins when the email hides that commitment or misrepresents why the purchase is needed.
The first-year price can differ from the renewal price. Save the order confirmation and note where cancellation controls are located before completing any purchase.
If the merchant cannot identify the transaction, the buyer may have paid a reseller or unrelated operator. The card statement descriptor becomes important evidence.
Step 7: Follow-up messages create another chance to collect money
Submitting an address can trigger more “security” notices, cart reminders, renewal messages, or support calls. Each contact can use the original fear as context.
Callback versions may claim a charge already occurred and provide a cancellation number. The caller then requests remote access or manipulates online banking.
Never call a number from an unsolicited renewal notice. Use the vendor’s official website or the telephone number printed on the card statement.
Merchant, Billing, and Support Checks
The sender is not automatically the software company
Inspect the complete From and Reply-To addresses. A generic display name such as “Security Center” provides no legal or technical identity.
Search the actual domain separately. Compare it with the publisher named inside the installed application and the vendor listed on past receipts.
Do not assume the promoted vendor sent the message. Affiliate spam and brand impersonation can use a genuine product name without authorization.
The redirect chain reveals the commercial relationship
A link containing affiliate, partner, campaign, or tracking parameters can show that the message is a marketing funnel rather than an account notice.
Cloud services and redirect platforms may be abused without their knowledge. Hosting on a reputable service does not validate the security diagnosis.
Security teams should preserve the complete redirect chain. Ordinary users should avoid opening suspicious links merely to investigate them.
Support must recognize the exact order
Before buying, locate support independently through the publisher’s verified site. Ask whether the company uses the sender domain and whether any subscription exists.
After a purchase, use the receipt and card descriptor to identify the merchant. Generic agents handling many unrelated products deserve additional scrutiny.
A support number that demands remote desktop access, gift cards, cryptocurrency, or online-banking access is not processing an ordinary cancellation.
The price and renewal must be visible before payment
Review the total charge, billing interval, trial conversion, device count, refund period, and future renewal price. Capture the terms displayed at checkout.
An automatically renewing plan is not inherently fraudulent. The problem is whether consent was informed and whether cancellation works as the agreement promises.
If the page hides conditions behind tiny links or contradictory policies, leave. Buy security software through a verified publisher or established application store instead.
Warning Signs of a Fear-Based Antivirus Offer
The strongest clue is an impossible diagnosis. A remote email cannot know that one missed payment caused several live threats on a particular computer.
Look beyond design quality. Well-made graphics can accompany a false claim, while genuine service messages sometimes look plain.
- You cannot find the subscription in your official account.
- The email omits the original order date or account details.
- The sender uses an unrelated domain.
- The page begins “scanning” without access to the device.
- A timer or urgent discount discourages comparison.
- The checkout introduces automatic renewal unexpectedly.
- Cancellation requires a call to an unfamiliar number.
If protection truly expired, the installed application should say so when opened directly. Confirm the status there before spending money.
Windows Security provides built-in protection on supported Windows systems. Its dashboard offers a direct place to review active safeguards and scan results.
What to Do if You Have Fallen Victim to This Scam
A purchase does not automatically mean the software is malicious. Separate the deceptive email from the merchant, installer, card transaction, and renewal agreement.
- Stop using the email links. Save the message, headers, redirect addresses, checkout screenshots, receipt, and card descriptor before deleting anything.
- Verify the merchant independently. Visit the software publisher through a fresh search or trusted bookmark and ask whether it recognizes the order.
- Cancel renewal in writing. Use the verified account portal or support address, request confirmation, and retain the case number and cancellation date.
- Contact the card issuer when needed. Dispute unauthorized or misrepresented charges, replace the card if details reached an unknown form, and block recurring billing.
- Remove unwanted software safely. Uninstall unfamiliar programs through system settings. Do not run a removal tool offered by the same alarming email.
- Scan for additional threats. Malwarebytes can detect malicious installers, adware, and persistence that may have accompanied a deceptive download.
- Secure submitted accounts. Change reused passwords, enable multifactor authentication, and review email or shopping accounts entered during checkout.
- Reduce malicious redirects. AdGuard can block many deceptive advertisements and known scam destinations, although it cannot cancel a purchase or subscription.
- Report deceptive promotion. Notify the named vendor, email provider, payment processor, affiliate network, and consumer-protection authority with preserved evidence.
- Reject remote-access requests. A refund or cancellation never requires someone to watch your banking session or move money between accounts.
Is Your Device Infected? Run a Free Malware Scan
Slow performance, constant pop-ups, or strange behavior? These are classic signs of a malware infection. The fastest way to find out is to scan your device with Malwarebytes Free — one of the most trusted malware removal tools available.
The free version detects and removes the most common threats, including:
- Adware — the cause of those annoying pop-ups
- Browser hijackers — unwanted redirects and changed homepages
- Trojans and spyware — hidden programs stealing your data
- Potentially unwanted programs (PUPs) — software you never asked for
👉 Select your device below — Windows, Mac, or Android — then follow the simple steps to download Malwarebytes, scan your system, and remove any threats it finds. The scan usually takes 5 to 20 minutes.
Run a Malware Scan with Malwarebytes for Windows
Malwarebytes is one of the most popular and trusted anti-malware tools for Windows — and it’s completely free for removing infections. It catches threats that many antivirus programs miss, including adware, browser hijackers, and trojans. Follow the steps below to scan and clean your PC in just a few minutes.
Download Malwarebytes
Click the button below to download the latest version of Malwarebytes for Windows from the official source. The free version is all you need — it will scan your computer and remove adware, browser hijackers, and other malicious software at no cost.
Download MalwarebytesOfficial installer for Windows 11 and 10. Your download starts right away.Want real-time protection? See Malwarebytes Premium Malwarebytes Free for WindowsScans and removes malware at no cost
-
Install Malwarebytes
When the download finishes, open your Downloads folder and double-click the MBSetup file. If Windows shows a User Account Control pop-up, click “Yes” to allow the installation.

Follow the On-Screen Prompts to Install Malwarebytes
The setup wizard will walk you through a few quick screens:
-
Choose where you’re installing the program — “Personal Computer” or “Work Computer” — then click Next.

-
Malwarebytes will now install on your device. This usually takes under a minute.

-
When installation is complete, the “Welcome to Malwarebytes” screen will open automatically.

-
On the final screen, click Open Malwarebytes to launch the program.

-
Enable “Scan for Rootkits”
Before scanning, turn on rootkit detection so Malwarebytes can find even the most hidden threats. Click the Settings gear icon on the left side of the screen.

In the settings menu, find “Scan for rootkits” and click the toggle so it turns blue.

Done? Click “Dashboard” in the left pane to return to the main screen.
Start the Scan
Click the blue Scan button. Malwarebytes will automatically update its virus database and start checking your computer for malware.

-
Wait for the Scan to Finish
The scan checks your entire system for browser hijackers and other malicious programs, so it can take 5 to 20 minutes depending on your computer. Feel free to do something else — just check back occasionally to see the progress.

-
Quarantine the Detected Threats
When the scan is done, you’ll see a list of everything Malwarebytes found — malware, adware, and potentially unwanted programs. Click the “Quarantine” button to remove all of them at once.

Malwarebytes will now remove the malicious files and registry entries and move them safely into quarantine.

-
Restart Your Computer
Some threats can only be fully removed after a reboot. If Malwarebytes asks you to restart, click Yes. Once you’re logged back in, Malwarebytes has finished removing the threats it found.

That’s it — your Windows PC is now clean of trojans, adware, and other malware, and should be back to running smoothly.
If you are still having problems with your computer after completing these instructions, then please follow one of the steps:
- Run a computer scan with ESET Online Scanner
- Ask for help in our Windows Malware Removal Help & Support forum.
Run a Malware Scan with Malwarebytes for Mac
Malwarebytes for Mac is a free on-demand scanner that removes the malware other security software tends to miss — adware, browser hijackers, and unwanted programs included. Cleaning an infected Mac with Malwarebytes has always been completely free, and it’s our go-to recommendation. Follow the steps below to scan and clean your Mac in just a few minutes.
-
Download Malwarebytes for Mac
Click the button below to download the latest version of Malwarebytes for Mac.
Download MalwarebytesOfficial installer for macOS. Your download starts right away.Want real-time protection? See Malwarebytes PremiumMalwarebytes Free for MacScans and removes malware at no cost -
Open the Malwarebytes setup file
When the download finishes, open your Downloads folder and double-click the setup file to begin the installation.

-
Follow the On-Screen Prompts to Install Malwarebytes
The Malwarebytes for Mac Installer will guide you through a few quick screens. Click “Continue” and keep following the prompts until the installation completes.



When the installation is complete, Malwarebytes opens to the Welcome to Malwarebytes screen. Click “Get started“.
-
Select “Personal Computer” or “Work Computer”
Malwarebytes will ask what type of computer you’re installing it on. Click either Personal Computer or Work Computer, whichever applies.

-
Start the Scan
Click the “Scan” button. Malwarebytes will automatically update its detection database and begin checking your Mac for malware.

-
Wait for the Scan to Finish
Malwarebytes will scan your Mac for adware, browser hijackers, and other malicious programs. This can take a few minutes, so feel free to do something else — just check back occasionally to see the progress.

-
Quarantine the Detected Threats
When the scan is done, you’ll see a list of everything Malwarebytes found. Click the “Quarantine” button to remove all the threats at once.

-
Restart Your Mac
Malwarebytes will now remove all the malicious files it found. Some threats can only be fully removed after a reboot — if Malwarebytes asks you to restart, allow it. Once you’re logged back in, your Mac is clean.

That’s it — your Mac is now free of adware, rogue browser extensions, and other potentially harmful software.
If you are still experiencing problems while trying to remove a malicious program from your computer, please ask for help in our Mac Malware Removal Help & Support forum.
Run a Malware Scan with Malwarebytes for Android
Malwarebytes for Android automatically detects and removes dangerous threats like malware and ransomware so you don’t have to worry about your most-used device being compromised. Aggressive detection of adware and potentially unwanted programs keeps your Android phone or tablet running smooth.
-
Download Malwarebytes for Android.
You can download Malwarebytes for Android by clicking the link below.
Get Malwarebytes for AndroidOpens Google Play in a new tab.Want real-time protection? See Malwarebytes Premium for AndroidMalwarebytes for AndroidScans your phone and removes malware at no cost -
Install Malwarebytes for Android on your phone.
In the Google Play Store, tap “Install” to install Malwarebytes for Android on your device.

When the installation process has finished, tap “Open” to begin using Malwarebytes for Android. You can also open Malwarebytes by tapping on its icon in your phone menu or home screen.

-
Follow the on-screen prompts to complete the setup process
When Malwarebytes will open, you will see the Malwarebytes Setup Wizard which will guide you through a series of permissions and other setup options.
This is the first of two screens that explain the difference between the Premium and Free versions. Swipe this screen to continue.
Tap on “Got it” to proceed to the next step.
Malwarebytes for Android will now ask for a set of permissions that are required to scan your device and protect it from malware. Tap on “Give permission” to continue.
Tap on “Allow” to permit Malwarebytes to access the files on your phone.
-
Update database and run a scan with Malwarebytes for Android
You will now be prompted to update the Malwarebytes database and run a full system scan.

Click on “Update database” to update the Malwarebytes for Android definitions to the latest version, then click on “Run full scan” to perform a system scan.

-
Wait for the Malwarebytes scan to complete.
Malwarebytes will now start scanning your phone for adware and other malicious apps. This process can take a few minutes, so we suggest you do something else and periodically check on the status of the scan to see when it is finished.

-
Click on “Remove Selected”.
When the scan has been completed, you will be presented with a screen showing the malware infections that Malwarebytes for Android has detected. To remove the malicious apps that Malwarebytes has found, tap on the “Remove Selected” button.

-
Restart your phone.
Malwarebytes for Android will now remove all the malicious apps that it has found. To complete the malware removal process, Malwarebytes may ask you to restart your device.
That’s it — your Android phone is now clean — no more malicious apps, adware, or browser redirects.
If you are still having problems with your phone after completing these instructions, then please follow one of the steps:
- Restore your phone to factory settings by going to Settings > General management > Reset > Factory data reset.
- Ask for help in our Mobile Malware Removal Help & Support forum.
Stay Protected: Block Ads and Malicious Sites
Now that your device is clean, keep it that way. Most infections start with a malicious ad or a fake download button — so blocking them at the source is your best defense.
We recommend AdGuard, which blocks malicious ads, phishing pages, and dangerous redirects before they can reach you.
👉 Download AdGuard and browse safely
Monitor statements beyond the first refund period. Some merchants use descriptors that differ from the brand shown on the landing page.
If a caller gained remote access, treat the computer and every account used during that session as potentially compromised. Contact the bank immediately from another device.
Check the next several statements for changed descriptors, duplicate charges, or a renewal posted under an unfamiliar company name.
Keep cancellation emails and dispute records together. Clear documentation helps the card issuer distinguish a misleading purchase from a later unauthorized charge.
Continue watching the account through two billing cycles.
Frequently Asked Questions
Did the email really scan my computer?
No. The message cannot perform a local antivirus scan. Its threat language is a generic sales device unless your installed security application independently reports the same finding.
Does a real checkout mean the email is legitimate?
No. Deceptive affiliates can route false warnings to genuine products. Evaluate the email’s claim separately from the publisher and final merchant.
Is automatic antivirus renewal always a scam?
No. Many legitimate security subscriptions renew automatically after clear consent. Verify the agreement, future price, cancellation method, and actual merchant before purchasing.
Should I call the support number in the message?
No. Find the vendor’s contact details independently. Callback scams use fake cancellation numbers to obtain remote access, payment, or banking information.
What if I installed software from the linked page?
Disconnect if remote access appears, uninstall unknown programs, and run trusted scans. Verify the publisher and digital signature without relying on the original page.
Can an ad blocker prevent every renewal scam?
No. AdGuard can reduce exposure to malicious advertising and known destinations, but deceptive emails still require careful sender, link, and account verification.
The Bottom Line
The System Failure Critical Threat email manufactures an antivirus emergency to push the recipient into a tracked sales or payment funnel.
Check protection and billing inside applications and accounts you open directly. A real product cannot make an invented diagnosis or misleading promotion trustworthy.
If you paid, identify the merchant, cancel in writing, protect the card, and scan anything downloaded before the scare creates a second problem.

Join the discussion
0 commentsShare your experience or ask a question about this article.
Discussion
Start the conversation
Have a question or something useful to share? Add the first comment.