

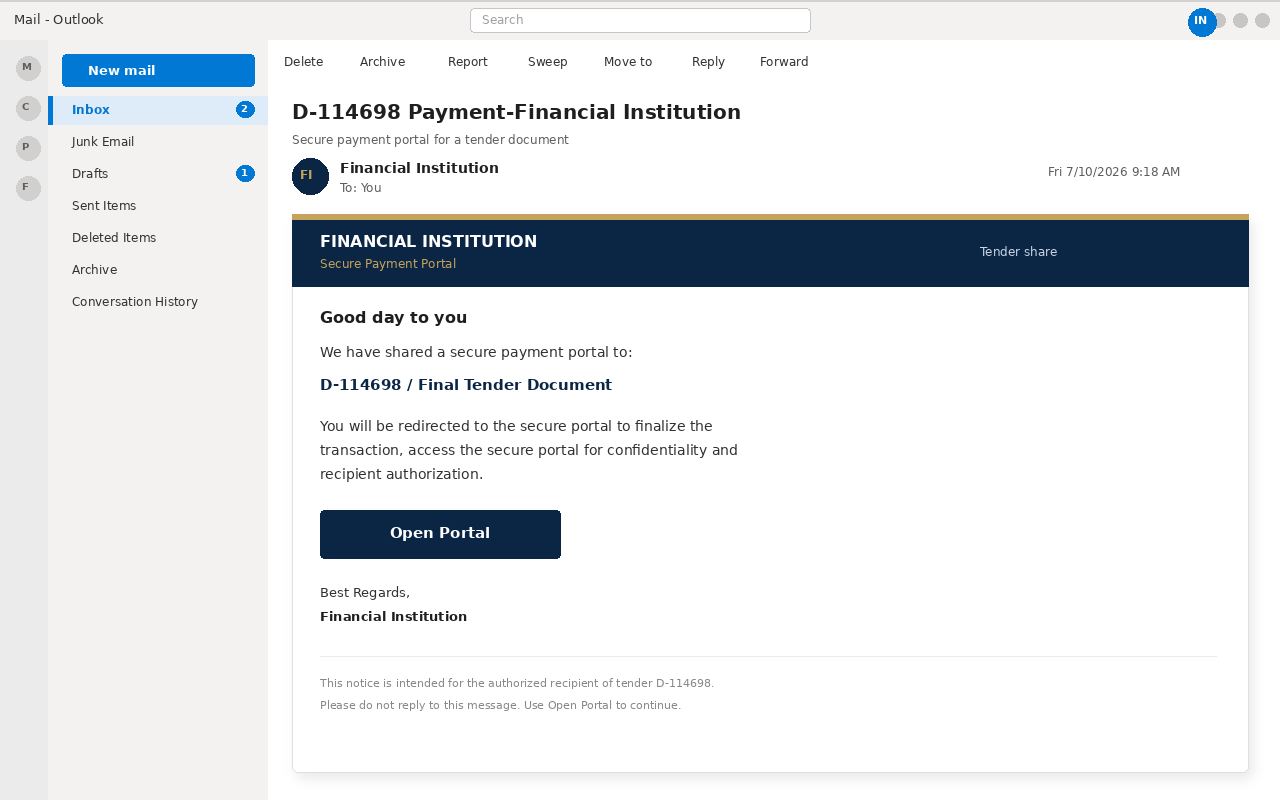
A tender document can feel time-sensitive to supplier and finance teams. This Secure Payment Portal email turns that normal pressure into a password theft attempt.
The message looks businesslike, but the requested action is not routine procurement. It leads to a counterfeit sign-in page that captures office credentials.
Overview
A tender reference supplies the urgency
The email uses a document label and a payment-related subject to sound like a confidential procurement notice. It depends on the recipient recognizing the workflow, not the sender.
The portal is a disguise for credential capture
The “Open Portal” button leads away from a known procurement system and toward a copied login experience. A familiar cloud-service appearance can make the handoff feel ordinary.
The target is often a business mailbox
A compromised office inbox can expose bids, invoices, vendor contacts, and password-reset links. It can also be used to send convincing follow-up messages from an account colleagues recognize.
Open Portal is not a bank door your tender already knows how to open, because the click takes you to a page that asks you to type,
the mailbox password into a form the letter chose for you.
The message poses as a notice from a generic Financial Institution, claims a secure payment portal has been shared for a final tender document, and treats a,
single navy button as the only way to keep the file confidential.
Once you press that button you are not opening a procurement console, because the next page is a Microsoft identity check copied from OneDrive and dressed as,
a verify-your-identity door for a secure file.
What they take first is the login for the inbox you are sitting in, and after that they take the inbox itself.
That includes the threads with buyers, the reset codes that land an hour later, and the people who already answer when your name is on the From line.
The tender story is costume for that harvest, because a final document that might stall a payment is the kind of errand a tired desk will finish,
before asking whether any bank actually sent the note.
Microsoft remains a real company with a real OneDrive product, and that fact is why the name is useful on the page that follows the button.
Anyone can type Financial Institution into a display name, which means a tidy heading does not prove that a tender was shared or that a bank asked,
you to authorize a recipient from this message.
People who steal inboxes borrow letterhead from platforms that already handle payments, tenders, and locked files, because they want you to treat the note as a chore,
you already meant to finish.
If you need the real product, type microsoft.com yourself, on a page you already use rather than on a page a cold letter chose for you.
A real bank does not collect a mailbox password through a surprise Open Portal button in a cold tender note.
If a later page also asks for a code from your phone, they will take that too, since the login is what they designed the payment portal around.
The address on that copied identity page often arrives already filled from the mailbox that received the letter, which is how a careful person finishes a login,
they never meant to start.
The Open Portal click used to open a page parked on Netlify, a site-building service that lets people stand up ordinary looking pages in a hurry.
While it was up, it carried Microsoft and OneDrive branding and told visitors they had received a secure link to a tender document that required identity verification,
before it would open.
Submitting an email address was only the first box, because the same kit then presented a password prompt dressed as the rest of a Microsoft sign-in.
A dead tab today does not make a password typed yesterday harmless, because a harvest page can finish collecting before it goes quiet.
Do not reopen the letter to see whether the tender then appears, and do not paste the button into a search so a coworker can try it.
account numbers, or Social Security numbers.
A common story, the Commission adds, is a problem with an account when there is no problem, or a document you must confirm when you do not.
It also tells people not to follow links sent in email when a message asks for that information.
Open Portal is the click
Read the button the way a tired bookkeeper reads it between two other alerts, because Open Portal already feels like a bank door you were supposed to,
watch and the tender line already made the file feel half locked.
The subject has already done the payment, the Financial Institution heading has already done the bank, and the final-document line has already done the homework, so by,
the time your eye hits the rectangle the errand feels mostly finished.
A real tender does not need that rectangle in a surprise email, because if a payment portal actually needed attention, it would already be visible after you,
open the product yourself.
What the button actually does is take you off the inbox and onto a page the sender controls.
On a phone, where hovering is awkward, many people never see the real destination before the next page fills the display.
The tender costume
asked to open a portal so authorization can finish.
The sentences inside the card are not random, because a payment subject makes you grateful that someone is watching, a final tender document turns that unease into,
a job you can finish before lunch, and an Open Portal label makes the job look like a bank door you already meant to click.
A bank name is cheap to copy
believable thing to put next to a payment.
Good day to you, a claim that a secure portal has been shared, and a note about confidentiality are doing the work a real desk usually does.
A finance person can picture a buyer waiting without checking whether anyone at a living bank issued that file.
Those details can be typed by anyone who has seen a procurement notice, and matching them to a real tender is work the letter hopes you will,
skip because the heading already looks official.
Display names are cheap, and anyone can set a From line to read Financial Institution, just as anyone can stamp an automated footer under a navy bar,
and date the whole thing on a Friday morning.
A footer that hurries you toward a vanishing payment file is that kind of immediate click, so do not reply to ask whether the tender is real,,
Confidentiality is the clock they added
An ordinary attachment can still lose to a busy morning, so a portal that redirects you to finalize a transaction for confidentiality is the extra clock the,
letter added on purpose.
A signature on paper can wait, and a bid in a bank portal can wait, which is why the letter does not lean on paper at all.
A file that might stall while you hesitate feels like a problem that grows, which is why the letter puts authorization next to the only button that works.
Accounts payable teams live on that kind of clock, because buyers send reminders, controllers ask for dates, and a tender that posted without a conversation is a,
real kind of afternoon.
The lure is borrowing that afternoon, and it does not need a long pitch when it can offer a file number, a final-document line, and a confidentiality,
warning that a tired person can already imagine matching to last week.
A hospital order, a local authority contract, a supplier payment, and a filing that legal already asked for are all stories the subject can invent in a few seconds.
How The Scam Works
Step 1: A portal share lands
The message arrives in the same Outlook or work webmail you already trust, wearing a subject that reads D-114698 Payment-Financial Institution, which is how a bank talks,
when it thinks you already know the file.
The display name presents itself as Financial Institution, the body greets you with good day to you, and the whole note is built to fit on a,
phone screen as a courtesy a careful person already expected rather than as a midnight threat to delete the mailbox.
enough to buy those seconds inside a finance folder that already lives on locked files.
There is no long story and no demand for a wire in the first line, which is on purpose because a short official notice is easier to,
the next page for you.
Step 2: The name copies a bank desk
Financial Institution is a display name anyone can type, and a payment subject plus a tender number are the furniture of a real desk that procurement teams already answer.
When you have ever opened a locked portal, tracked a bid, or seen a bank heading on a closing checklist, you fill in the rest yourself.
Even if you have never opened that product, the phrase final tender document still sounds like a packet that someone is waiting on.
The people who wrote the letter did not need to sit inside a living bank to borrow a secure payment portal heading.
They also borrowed a confidentiality line and an automated footer that would survive a five-second glance from a tired payable clerk.
The thief is only inside your inbox if the Open Portal click works, which is why the name on the letter is doing borrowed work rather than,
proving a file was shared.
A greeting that never uses your company name is a cheap leftover from the same kit, not proof that a clerk already knew who you were.
call a number you already have.
Step 3: A tender waiting is the hurry
A final tender document is doing the work a late payment usually does, because a packet that might stall is a Monday a finance person already fears.
A quiet attachment can wait until after lunch when it is only paper, which is why the letter does not lean on paper at all.
A portal that redirects you to finalize the transaction feels like a problem that grows while you hesitate, which is why the letter puts confidentiality next to,
the only button that works.
Payroll and payable teams live on that kind of clock, because vendors send reminders, controllers ask for dates, and a tender that posted without a conversation is,
a real kind of afternoon.
The lure is borrowing that afternoon, and it does not need a long pitch when it can offer a file number, a final-document line, and a window,
that a tired person can already imagine matching to last week.
Direct deposit, a hospital order, a supplier job, and a filing that legal already asked for are all stories the tender line can invent in a few seconds.
Authorization language is doing extra work that a quiet share cannot do, because a file can wait until after coffee while recipient authorization feels like a deal,
that is already slipping.
Nobody is asking you to investigate a stranger here, because the ask is to keep a payment from going late, which is a much softer request than,
a threat and a much harder one to ignore.
A real tender, when one exists, is still sitting in the envelope you already use after you open the bank portal yourself, and it will still be,
there after you leave Open Portal alone.
Step 4: Open Portal is the handoff
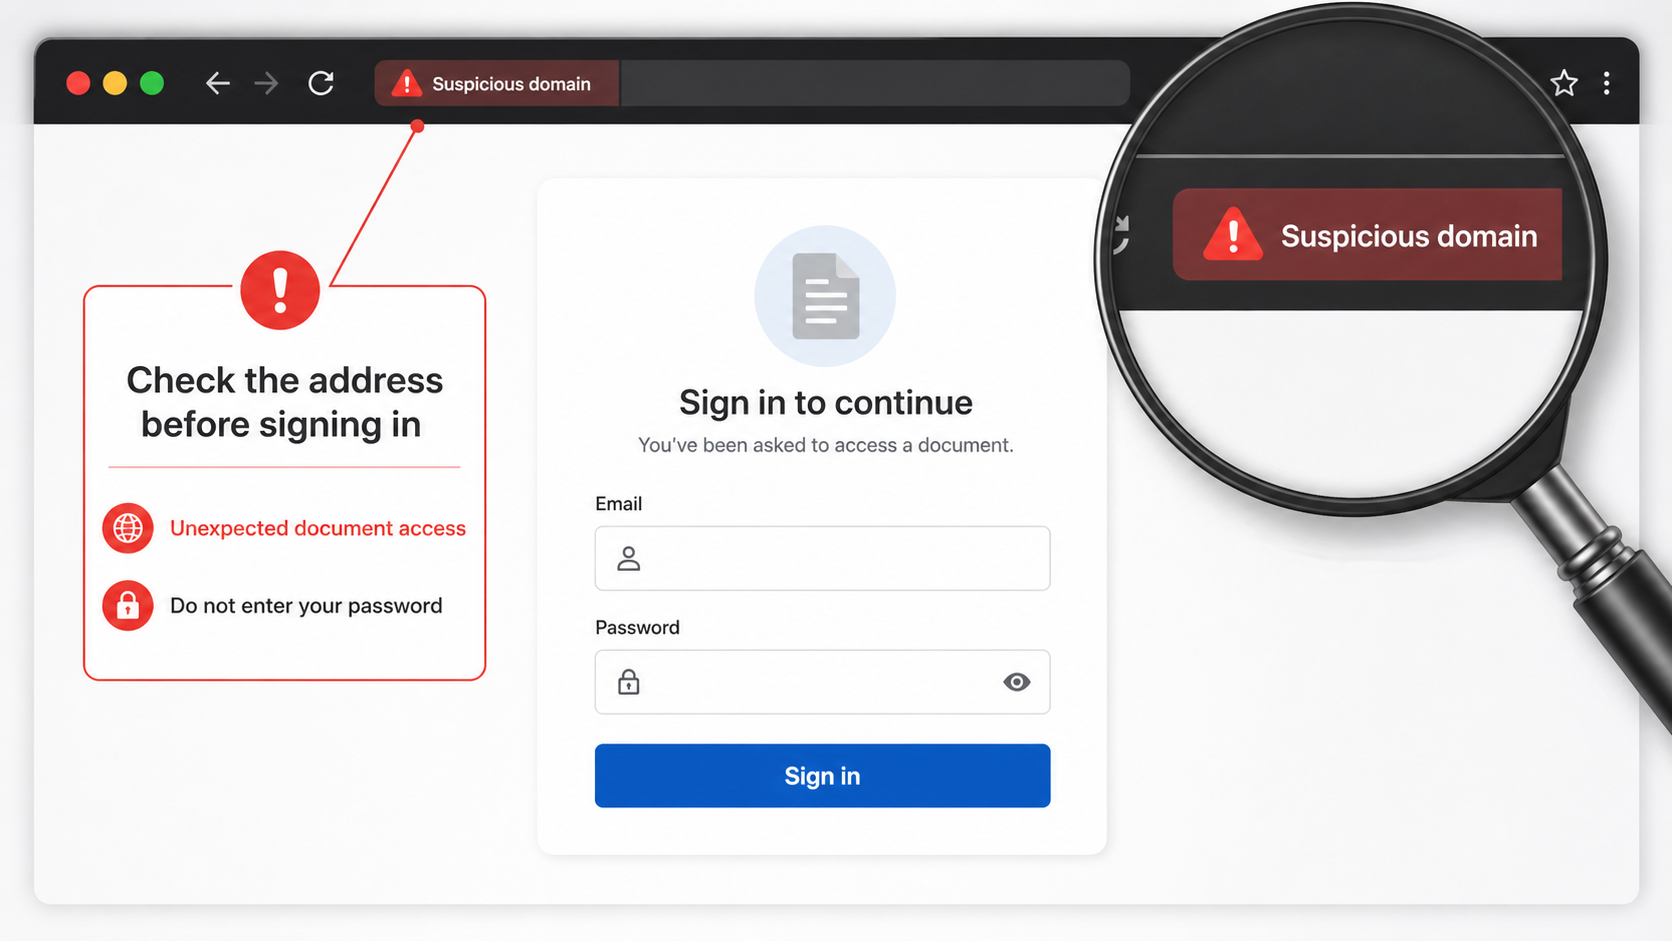
You click Open Portal, or whatever share label the card is using this week, because that is what a payment notice is for.
A file that needs confidentiality and recipient authorization makes a tender feel like an errand you should finish before lunch.
Then the next page asks you to prove your identity as if you were opening a secure Microsoft file instead of showing a bank portal with a,
tender number in the title bar.
On a phone, where hovering is awkward, many people never see the real destination before the next page fills the display.
There is no honest reason for a payment portal and a final tender document that need your review to live on a surprise page you reached from an unexpected letter.
If the files were real, they would already be sitting in the portal you already use, or in the thread with the buyer you already have, without,
a cold button carrying you somewhere else so the paper can continue.
Step 5: The page copies OneDrive
The page that follows is dressed as a Microsoft identity check, with OneDrive branding and a claim that a secure file is waiting once you verify who you are.
Your address may already be sitting in the box, the colors look familiar, and the language is the language you see every morning, which is how a,
Visitors are told they have received a secure link to the tender document and must enter an email address to proceed, after which the same kit typically,
presents a password prompt.
A padlock in the browser does not fix that, because encryption only means the path is private and does not mean the person at the other end,
is Microsoft, OneDrive, or any bank you already pay.
HTTPS can wrap a stolen password as neatly as a real one, and an accurate logo is not a certificate, so you trust the complete domain and,
the way you reached it rather than the artwork inside the page.
and if a portal click then presents a login, you should not type it.
Do not finish that form to see whether a tender then appears, because a copied identity page does not become safer when you only wanted to confirm a payment.
Open a new tab, type the product you already pay or open the app you already installed, and look at the account from the inside, since a,
mailbox that is truly yours will still be there and a fake portal will not.
If you already typed the password, treat it as burned even if the window now says the file cannot be opened, because a dead tab is not,
proof the letter was harmless.
Do not send the live button to a coworker so they can check the file; if you need a second pair of eyes, send a screenshot with,
the link unclicked, or send the raw message as an attachment to a person you already know.
A padlock, a bank name, and a confidentiality warning you already feared are not a reason to type the secret that opens the rest of the week.
Step 6: They want the mailbox password
not notice the swap.
on multifactor authentication if it is not already on.
Once they can open the account, the tender is no longer the hunt, because they are reading the last bill you sent, the last bill you received,,
Do not reuse the typed password on a screen that promises to unlock the tender or to finish authorization, because the file was never locked and it was never there.
a tab you type.
Step 7: A second crew sells recovery
a fresh email that already knows you opened a payment portal.
They will offer to lock the portal, pull the tender file, or stop a transaction you never approved, and then they will ask for a code, a,
Stolen passwords get bundled and sold, and a second crew buys the access or the address and comes back as help.
They may write as support, as a finance desk, or as a cleanup team that offers to restore the tender, freeze the account, or walk you through,
a refund for a payment that never existed.
they are still running.
keep you quiet long enough for the first crew mail to land.
Why Tender Messages Create Dangerous Pressure
Procurement and finance teams are used to documents with deadlines. A tender reference can make an unfamiliar notice feel urgent before the sender has earned trust.
The subject line borrows language from legitimate payment and supplier workflows. It aims to make the recipient focus on the attached opportunity rather than the route to it.
A confidential tone can discourage consultation with colleagues. That isolation helps the scammer because a quick team check would expose the message as unexpected.
Unexpected portal access should be treated as a request for verification, not as proof that a tender exists. The document must be confirmed outside the email chain.
The Document Button Is Really an Identity Test
The button appears to promise a file or payment portal. Instead, it moves the recipient into a page that asks for a work mailbox credential.
That request is not necessary for reading a normal tender notice. It is useful only if the page operator wants to capture access to the employee’s account.
An unfamiliar cloud-hosted page can copy logos and sign-in wording with little effort. The browser address remains more important than the colors on the screen.
If a document is real, procurement can normally locate it in the established portal or confirm it through a known contact. A surprise login is not the safe route.
Payment Threads Are a Valuable Secondary Target
A compromised office mailbox can reveal active tenders, account names, and supplier conversations. The attacker may wait until a payment is expected before sending a forged request.
A fake change of bank details can appear credible when it follows a genuine discussion. Teams should confirm payment changes using a number already held for the supplier.
The risk grows when the affected employee works alone. Finance, procurement, and IT should know quickly so they can check parallel conversations and invoices.
Security alerts, inbox filters, and forwarding settings deserve attention after credential exposure. They can be used to conceal the attacker’s activity while a fraud develops.
The Safest Check Happens Away From the Email
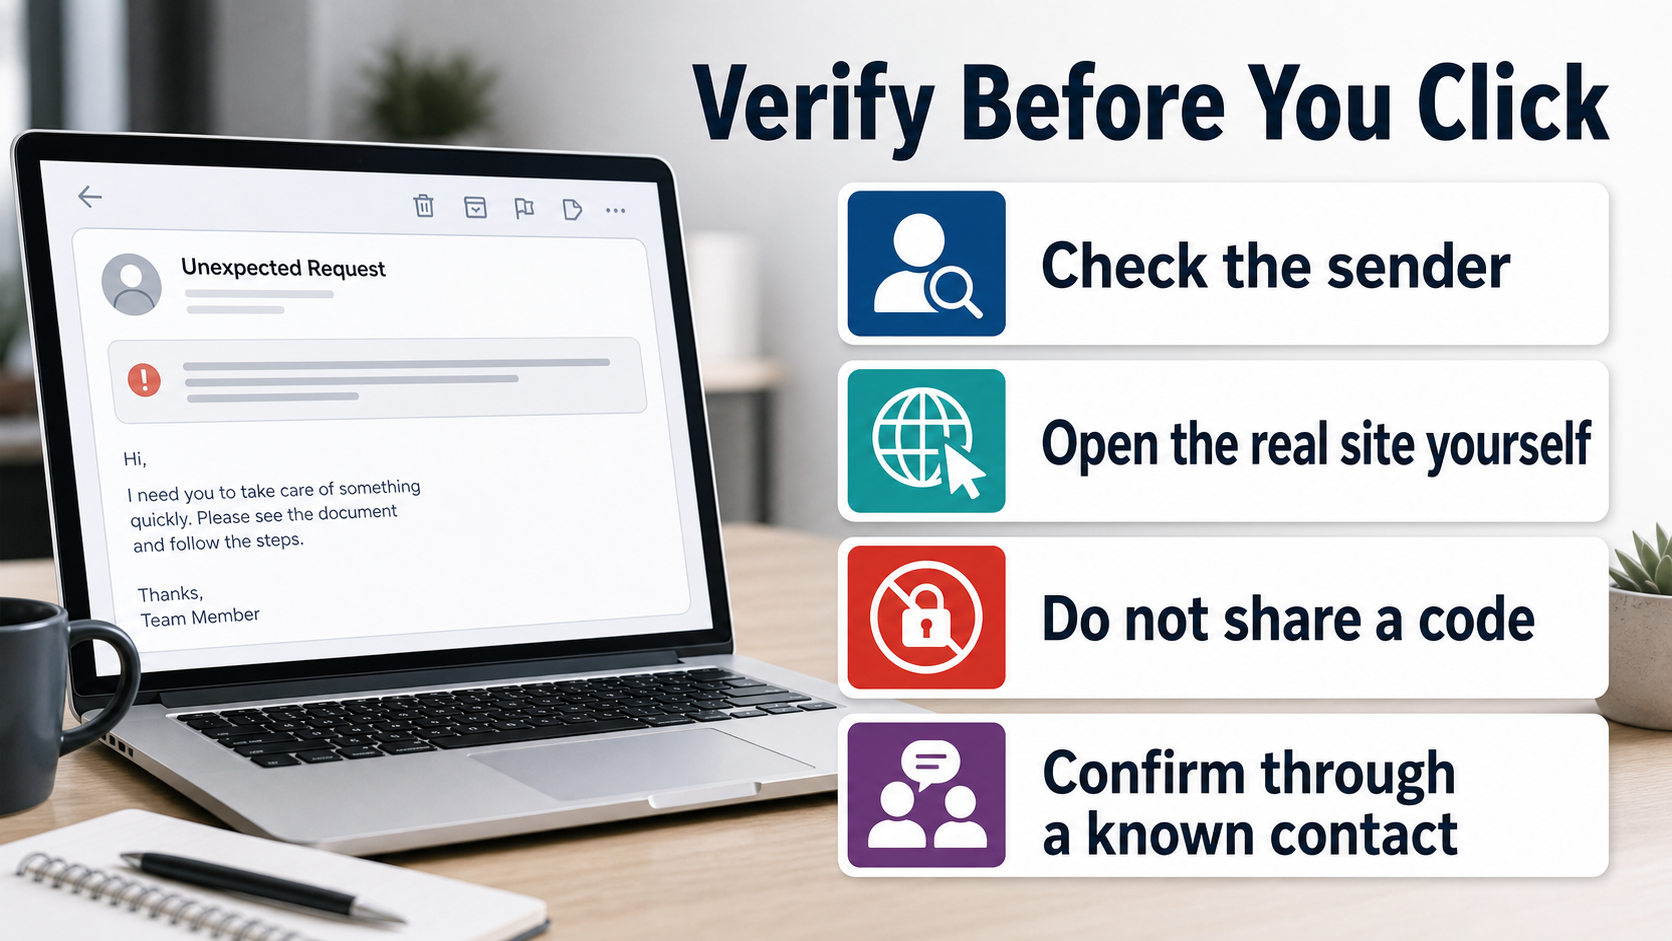
Open the procurement system through a saved address and search for the tender reference there. Do not use the message button as a shortcut.
Call the named organization through a published switchboard or a contact already verified by the business. Ask whether the document was actually sent.
Report the email internally even if no information was entered. One early report can prevent a wider credential theft attempt against the same team.
A professional-looking portal is not enough. The sender, route, and request must all fit a workflow that the organization can independently confirm.
Company, Address, and Fulfillment Checks
A generic financial signature is not a sender identity
A legitimate tender notice should identify the buyer, procurement owner, and trusted workflow. A vague “Financial Institution” label is not enough to establish any of those facts.
The document should exist in a known system
Open your regular procurement or vendor portal directly and search for the tender reference there. Do not accept an email button as proof that the document is real.
A real supplier can be reached through prior records
Call the buyer or vendor from a saved contact, contract, or directory. Avoid reply addresses and contact details that arrived inside the unexpected message.
The request for a login is the core risk
The scam does not need access to a tender file. It needs the user’s email password, and possibly a verification code, to enter the business environment behind it.
What to Do if You Have Fallen Victim to This Scam
- Do not open the portal again. Record the subject, tender number, destination, and anything you entered, then send that information to the legitimate procurement or IT contact.
- Change the affected mailbox password from the normal mail provider or company single sign-on page. Use a new credential that is not shared with any other account.
- Revoke suspicious sessions and review multifactor authentication activity. Check whether an attacker registered a device, changed recovery details, or connected a third-party application.
- Inspect the inbox for forwarding rules, deleted security alerts, and messages sent to vendors. A hijacked account can be used to redirect a real payment or request a new bank account.
- Warn finance and procurement teams about the event. They should verify payment instructions by voice or a known channel, especially for any tender or invoice that changed after the phishing email arrived.
- Use Malwarebytes for a full device scan if a file was downloaded or a web page pushed software. AdGuard can block malicious ads and reduce accidental access to deceptive portal pages.
- Report the message through your mail service and keep the evidence. Do not trust a later call that offers to “reopen” the tender or fix the document access for a payment.
Is Your Device Infected? Run a Free Malware Scan
Slow performance, constant pop-ups, or strange behavior? These are classic signs of a malware infection. The fastest way to find out is to scan your device with Malwarebytes Free — one of the most trusted malware removal tools available.
The free version detects and removes the most common threats, including:
- Adware — the cause of those annoying pop-ups
- Browser hijackers — unwanted redirects and changed homepages
- Trojans and spyware — hidden programs stealing your data
- Potentially unwanted programs (PUPs) — software you never asked for
👉 Select your device below — Windows, Mac, or Android — then follow the simple steps to download Malwarebytes, scan your system, and remove any threats it finds. The scan usually takes 5 to 20 minutes.
Run a Malware Scan with Malwarebytes for Windows
Malwarebytes is one of the most popular and trusted anti-malware tools for Windows — and it’s completely free for removing infections. It catches threats that many antivirus programs miss, including adware, browser hijackers, and trojans. Follow the steps below to scan and clean your PC in just a few minutes.
Download Malwarebytes
Click the button below to download the latest version of Malwarebytes for Windows from the official source. The free version is all you need — it will scan your computer and remove adware, browser hijackers, and other malicious software at no cost.
Download MalwarebytesOfficial installer for Windows 11 and 10. Your download starts right away.Want real-time protection? See Malwarebytes Premium Malwarebytes Free for WindowsScans and removes malware at no cost
-
Install Malwarebytes
When the download finishes, open your Downloads folder and double-click the MBSetup file. If Windows shows a User Account Control pop-up, click “Yes” to allow the installation.

Follow the On-Screen Prompts to Install Malwarebytes
The setup wizard will walk you through a few quick screens:
-
Choose where you’re installing the program — “Personal Computer” or “Work Computer” — then click Next.

-
Malwarebytes will now install on your device. This usually takes under a minute.

-
When installation is complete, the “Welcome to Malwarebytes” screen will open automatically.

-
On the final screen, click Open Malwarebytes to launch the program.

-
Enable “Scan for Rootkits”
Before scanning, turn on rootkit detection so Malwarebytes can find even the most hidden threats. Click the Settings gear icon on the left side of the screen.

In the settings menu, find “Scan for rootkits” and click the toggle so it turns blue.

Done? Click “Dashboard” in the left pane to return to the main screen.
Start the Scan
Click the blue Scan button. Malwarebytes will automatically update its virus database and start checking your computer for malware.

-
Wait for the Scan to Finish
The scan checks your entire system for browser hijackers and other malicious programs, so it can take 5 to 20 minutes depending on your computer. Feel free to do something else — just check back occasionally to see the progress.

-
Quarantine the Detected Threats
When the scan is done, you’ll see a list of everything Malwarebytes found — malware, adware, and potentially unwanted programs. Click the “Quarantine” button to remove all of them at once.

Malwarebytes will now remove the malicious files and registry entries and move them safely into quarantine.

-
Restart Your Computer
Some threats can only be fully removed after a reboot. If Malwarebytes asks you to restart, click Yes. Once you’re logged back in, Malwarebytes has finished removing the threats it found.

That’s it — your Windows PC is now clean of trojans, adware, and other malware, and should be back to running smoothly.
If you are still having problems with your computer after completing these instructions, then please follow one of the steps:
- Run a computer scan with ESET Online Scanner
- Ask for help in our Windows Malware Removal Help & Support forum.
Run a Malware Scan with Malwarebytes for Mac
Malwarebytes for Mac is a free on-demand scanner that removes the malware other security software tends to miss — adware, browser hijackers, and unwanted programs included. Cleaning an infected Mac with Malwarebytes has always been completely free, and it’s our go-to recommendation. Follow the steps below to scan and clean your Mac in just a few minutes.
-
Download Malwarebytes for Mac
Click the button below to download the latest version of Malwarebytes for Mac.
Download MalwarebytesOfficial installer for macOS. Your download starts right away.Want real-time protection? See Malwarebytes PremiumMalwarebytes Free for MacScans and removes malware at no cost -
Open the Malwarebytes setup file
When the download finishes, open your Downloads folder and double-click the setup file to begin the installation.

-
Follow the On-Screen Prompts to Install Malwarebytes
The Malwarebytes for Mac Installer will guide you through a few quick screens. Click “Continue” and keep following the prompts until the installation completes.



When the installation is complete, Malwarebytes opens to the Welcome to Malwarebytes screen. Click “Get started“.
-
Select “Personal Computer” or “Work Computer”
Malwarebytes will ask what type of computer you’re installing it on. Click either Personal Computer or Work Computer, whichever applies.

-
Start the Scan
Click the “Scan” button. Malwarebytes will automatically update its detection database and begin checking your Mac for malware.

-
Wait for the Scan to Finish
Malwarebytes will scan your Mac for adware, browser hijackers, and other malicious programs. This can take a few minutes, so feel free to do something else — just check back occasionally to see the progress.

-
Quarantine the Detected Threats
When the scan is done, you’ll see a list of everything Malwarebytes found. Click the “Quarantine” button to remove all the threats at once.

-
Restart Your Mac
Malwarebytes will now remove all the malicious files it found. Some threats can only be fully removed after a reboot — if Malwarebytes asks you to restart, allow it. Once you’re logged back in, your Mac is clean.

That’s it — your Mac is now free of adware, rogue browser extensions, and other potentially harmful software.
If you are still experiencing problems while trying to remove a malicious program from your computer, please ask for help in our Mac Malware Removal Help & Support forum.
Run a Malware Scan with Malwarebytes for Android
Malwarebytes for Android automatically detects and removes dangerous threats like malware and ransomware so you don’t have to worry about your most-used device being compromised. Aggressive detection of adware and potentially unwanted programs keeps your Android phone or tablet running smooth.
-
Download Malwarebytes for Android.
You can download Malwarebytes for Android by clicking the link below.
Get Malwarebytes for AndroidOpens Google Play in a new tab.Want real-time protection? See Malwarebytes Premium for AndroidMalwarebytes for AndroidScans your phone and removes malware at no cost -
Install Malwarebytes for Android on your phone.
In the Google Play Store, tap “Install” to install Malwarebytes for Android on your device.

When the installation process has finished, tap “Open” to begin using Malwarebytes for Android. You can also open Malwarebytes by tapping on its icon in your phone menu or home screen.

-
Follow the on-screen prompts to complete the setup process
When Malwarebytes will open, you will see the Malwarebytes Setup Wizard which will guide you through a series of permissions and other setup options.
This is the first of two screens that explain the difference between the Premium and Free versions. Swipe this screen to continue.
Tap on “Got it” to proceed to the next step.
Malwarebytes for Android will now ask for a set of permissions that are required to scan your device and protect it from malware. Tap on “Give permission” to continue.
Tap on “Allow” to permit Malwarebytes to access the files on your phone.
-
Update database and run a scan with Malwarebytes for Android
You will now be prompted to update the Malwarebytes database and run a full system scan.

Click on “Update database” to update the Malwarebytes for Android definitions to the latest version, then click on “Run full scan” to perform a system scan.

-
Wait for the Malwarebytes scan to complete.
Malwarebytes will now start scanning your phone for adware and other malicious apps. This process can take a few minutes, so we suggest you do something else and periodically check on the status of the scan to see when it is finished.

-
Click on “Remove Selected”.
When the scan has been completed, you will be presented with a screen showing the malware infections that Malwarebytes for Android has detected. To remove the malicious apps that Malwarebytes has found, tap on the “Remove Selected” button.

-
Restart your phone.
Malwarebytes for Android will now remove all the malicious apps that it has found. To complete the malware removal process, Malwarebytes may ask you to restart your device.
That’s it — your Android phone is now clean — no more malicious apps, adware, or browser redirects.
If you are still having problems with your phone after completing these instructions, then please follow one of the steps:
- Restore your phone to factory settings by going to Settings > General management > Reset > Factory data reset.
- Ask for help in our Mobile Malware Removal Help & Support forum.
Stay Protected: Block Ads and Malicious Sites
Now that your device is clean, keep it that way. Most infections start with a malicious ad or a fake download button — so blocking them at the source is your best defense.
We recommend AdGuard, which blocks malicious ads, phishing pages, and dangerous redirects before they can reach you.
👉 Download AdGuard and browse safely
Frequently Asked Questions
Does a tender email always include a login link?
No. Organizations use different workflows, but an unexpected login request should be verified through the portal and contact methods already known to the recipient.
What does an unrelated hosting domain indicate?
It can indicate that the page is not operated by the buyer or cloud service it imitates. The address must match the provider you intend to use.
Why does the page resemble a cloud service?
Criminals copy familiar cloud sign-in designs to make a new login request appear normal after the recipient clicks the document button.
Can a compromised mailbox affect vendor payments?
Yes. An attacker may read active conversations and impersonate the account owner to request a payment change or a new invoice.
Should I respond to confirm the tender?
No. Confirm with a known procurement contact or in the established portal. A reply can reveal that the mailbox is active.
What if I entered a verification code as well?
Treat the account as exposed, revoke sessions, reset multifactor enrollment, and alert the organization immediately. The code can help an attacker bypass a second-factor prompt.
The Bottom Line
A secure-looking payment portal is not safe merely because the email mentions a tender or uses cloud-service styling. The destination and the independent procurement check are what matter.
If credentials were submitted, contain the mailbox quickly and alert the teams responsible for payments. That prevents a document lure from becoming a much larger business-email compromise.

Join the discussion
0 commentsShare your experience or ask a question about this article.
Discussion
Start the conversation
Have a question or something useful to share? Add the first comment.