This thread is for posts related to Check Point Harmony.
Harmony Endpoint Trial:

 pages.checkpoint.com
What's included in Check Point Harmony Endpoint?
Check Point Harmony Endpoint comes in few editions. Features will be compared first and then we will have an overview of each one of them (what they do, how they do it, why they are even there).
1. Click Overview and then click Download on the top banner.
2. Click Download button under Windows or macOS, depending on the destination system.
To install the Initial Client:
 sc1.checkpoint.com
Harmony Endpoint Trial:
Start a Free Trial of Check Point Endpoint Security Now! | Check Point Software
Harmony Endpoint (formerly SandBlast Agent) is a complete EPP and EDR solution built to prevent the most imminent threats to the endpoint, while quickly minimizing breach impact with autonomous detection and response.
What's included in Check Point Harmony Endpoint?
Check Point Harmony Endpoint comes in few editions. Features will be compared first and then we will have an overview of each one of them (what they do, how they do it, why they are even there).
Harmony Endpoint Options and Specifications
| BASIC | ADVANCED | COMPLETE | |
Reduce Attack Surface
| ✓ | ✓ | ✓ |
NGAV: Prevent Attacks Before They Run
| ✓ | ✓ | ✓ |
NGAV: Runtime Detection and Protection
| ✓ | ✓ | ✓ |
Web Protection
| ✓ | ✓ | ✓ |
Attack Investigation and Response
| ✓ | ✓ | ✓ |
VPN Access
| ✓ | ✓ | ✓ |
Threat Intelligence
| ✓ | ✓ | ✓ |
Centralized Management
| ✓ | ✓ | ✓ |
Support
| ✓ | ✓ | ✓ |
Content Disarm & Reconstruction (CDR) across email and web
| ✓ | ✓ | |
Data Protection
| ✓ ** | ||
Mobile Protection
| + | + | |
| Incident Response Service | + | + | + |
Category 1:
Compliance blade:
Allows you to enforce endpoint compliance on multiple checks before users log into the network. You can check that the:
Firewall and Application Control blades:
Anti-Malware blade:
Category 3 (Runtime Protection)
Behavioural Guard, Forensics, Anti-Exploit, Anti-Bot, Anti-Ransomware: Constantly Monitor API Calls, memory, file, registry and network operations to classify, block and reverse behaviour that looks like malicious.
 , Behavioral Guard and Anti-Ransomware protections.
A bot is malicious software that can invade your computer. There are many infection methods. These include opening attachments that exploit a vulnerability and accessing a website that results in a malicious download.
When a bot infects a computer, it:
The Check Point Endpoint Anti-Bot component detects and prevents these bot threats
The Anti-Bot component:
The Anti-Ransomware creates honeypot files on client computers, and stops the attack immediately after it detects that the ransomware modified the files.
The Anti-Ransomware creates the honeypot files in these folders:
For example:

The file names include these strings, or similar:
There are three configuration options for the Anti-Exploit protection:
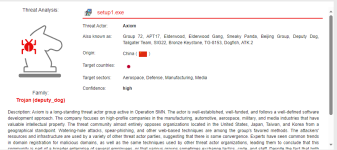
On detection of a malicious event or file, Forensics is informed and a Forensics analysis is automatically initiated. After the analysis is completed, the entire attack sequence is presented as a Forensics Analysis Report. If Endpoint Security Management Servers do not have internet connectivity, Forensics information is stored and sent for evaluation immediately when a server connects to the internet.
Use the Forensics Analysis Report to prevent future attacks and to make sure that all affected files and processes work correctly.
Protection mode - Define in which confidence level the incident is analyzed: Always, High, Medium & High, or Never. The confidence level is how sure Endpoint Security is that a file is malicious. High confidence means that it is almost certain that a file is malicious. Medium confidence means that it is very likely that a file is malicious. The default value is Always.
Enable Threat Hunting - Threat Hunting is enabled by default. To learn more about Threat Hunting, see Threat Hunting.
You can manually define the confidence level in which Remediation is performed: Always, High, Medium & High, or Never. The confidence level is how sure Endpoint Security is that a file is malicious. High confidence means that it is almost certain that a file is malicious. Medium confidence means that it is very likely that a file is malicious. The default value is Medium & High.
You can manually edit the treatment for each category of file: Malicious, Suspicious, or Unknown. For each category, you can select:
Category 4 Web Protection:
Blocks Malicious websites and displays icons next to search results.
Analyses sites in real time to detect brand impersonation and other forms of deception.
Blocks malicious scripts in websites such as scripts related to the Magecart malware.
rules define which sites you can access in your organization. The URL Filtering policy is composed of the selected sites and the mode of operation applied to them.
To create the URL Filtering policy:
The user can access any site which was not selected in one of the categories or which was not blacklisted.
You can Allow user to dismiss the URL Filtering alert and access the website - This option is selected by default. This lets you access a site determined as malicious, if you think that the verdict is wrong. To do this, go to Advanced Settings > URL Filtering.
To add a URL to the blacklist:
To search for a URL:
Category 5 (Remote Access VPN):
Provide users with secure, seamless remote access to corporate networks and resources when traveling or working remotely. Privacy and integrity of sensitive information is ensured through multi-factor authentication, endpoint system compliance scanning and encryption of all transmitted data.
By default, no VPN site is configured for a new package.
To add a new VPN site to an exported package:
Category 6 (Content Disarm & Reconstruction (CDR) across email and web)
Makes sure downloads are safe by emulating files from various formats and cleaning up documents from any executable content that may be harmful.
Threat Emulation detects zero-day and unknown attacks. Files on the endpoint computer are sent to a sandbox for emulation to detect evasive zero-day attacks. The following files types are supported:
�
Threat Extraction proactively protects users from malicious content. It quickly delivers safe files while the original files are inspected for potential threats.
To see the list of file types which are supported by Threat Emulation and Threat Extraction, go to Advanced Settings > Threat Emulation > Override Default File Actions > Edit.
These are the configuration options for supported file types:
To select the operating system images on which the emulation is run, go to Advanced Settings > Download Protection > Emulation Environments, and select one of these options:
In Override Default Files Actions, you can also see the current number of overrides.
Category 7 (Data Protection):
Includes Full Disk Encryption, Media and Ports Protection.
 gives you the highest level of data security for Endpoint Security client computers.
It combines boot protection and strong disk encryption to ensure that only authorized users can access data stored in desktop and laptop PCs.
Check Point's Full Disk Encryption has two main components:
The Full Disk Encryption policy contains a pre-defined Default Policy rule, which applies to the entire organization.
Each new rule you create, has pre-defined settings, which you can then edit in the right section of the screen.
The Policy Rule Base consists of these parts:
The Policy toolbar includes these options:
For Crypto-Shredding a computer, see sk179911.
protects data stored in the organization by encrypting removable media devices and allowing tight control over computer ports (USB, Bluetooth, and so on). Removable devices are for example: USB storage devices, SD cards, CD/DVD media and external disk drives.
On the client-side, Media Encryption & Port Protection protects sensitive information by encrypting data and requiring authorization for access to storage devices and other input/output devices.
Media Encryption lets users create encrypted storage on removable storage devices that contain business-related data. Encrypted media is displayed as two drives in Windows Explorer. One drive is encrypted for business data. The other drive is not encrypted and can be used for non-business data. Rules can apply different access permissions for business data and non-business data.
Port Protection controls, according to the policy, device access to all available ports including USB and Firewire (a method of transferring information between digital devices, especially audio and video equipment). Policy rules define access rights for each type of removable storage device and the ports that they can connect to. The policy also prevents users from connecting unauthorized devices to computers.
Media Encryption & Port Protection functionalities are available in both Windows and macOS clients (for macOS starting at client version E85.30).
For instructions on how to encrypt, see sk166110.
Category 8 (Mobile Protection)
Includes the necessary packages to secure and manage mobile devices.
Compliance blade:
Allows you to enforce endpoint compliance on multiple checks before users log into the network. You can check that the:
- appropriate endpoint security components are installed
- correct OS service pack are installed on the endpoint
- only approved applications are able to run on the endpoint
- appropriate anti-malware product and version is running on the endpoint.
Firewall and Application Control blades:
- Defines the topology of the organizational network, separating it into Trusted and Internet domains.
- Blocks or allows network traffic based on attributes of network connections.
- Controls network access on a per-application basis, letting you restrict application access by zone and direction.
Anti-Malware blade:
- This is standard, heuristics(mainly), signatures and generic detections provided by Sophos (Sophos AntiVirus Interface or SAVI) AV. This blade provides online and offline protection against known and unknown threats. Also detects malware targeting other platforms (Linux, MacOS and Android) and provides unarchiving abilities as well as True File Type parser that will insect fie properties such as Magic Bytes to determine the real format. The Sophos behavioural genotype by itself relies on Dynamic Analysis. Additional Link
Pre-execution: the behavior of code is analyzed before it runs and is prevented from running if it is considered to be suspicious or malicious (e.g. Behavioral Genotype ®, Suspicious File Detection)
- Next-Gen AV (Static Analysis) blade: This is an engine trained to look at the attributes of executable files. In harmony Endpoint (opposed to ZoneAlarm) the strictness of NGAV can be tweaked across three confidence levels: Low, Medium and High. An admin can configure what levels of confidence will trigger incident investigation and remediation. Handling even low and medium confidence detection will improve the identification of malicious files but may increase false positives. It is recommended an admin to leave the solution at least for 2 weeks on default policy until it creates the appropriate whitelist and then security can be boosted.
There are three configuration options for this protection:
- Prevent - Protects your files from malware threats.
- Detect - Detects the threats, so they appear in the logs, although the virus or malware are still executable. Use this mode with caution.
- Off - No protection from malware.
General
- Malware Treatment - The malware treatment options let you select what happens to malware that is detected on a client computer:
- Quarantine file if cure failed - If Endpoint Security cannot repair the file, it is deleted and put in a secure location from where it can be restored if necessary.
- Delete file if cure failed - If Endpoint Security cannot repair the file, it is deleted.
- Riskware Treatment - Riskware is a legal software that might be dangerous.
- Treat as malware - Use the option selected for Malware.
- Skip file - Do not treat riskware files.
- Detect unusual activity - Use behavior detection methods to protect computers from new threats whose information were not added to the databases yet. It does not monitor trusted processes.
- Enable reputation service for files, web resources & processes - Use cloud technologies to improve precision of scanning and monitoring functions. If you enable or disable this setting, it takes affect after the client computer restarts.
Connection timeout - Change the maximum time to get a response from Reputation Services (in milliseconds). Default is 600.

Note - If you decrease this value, it can improve the performance of the Anti-Malware component but reduces security, as clients might not get a reputation status that shows an item to be zero-day malware. - Enable web protection - Prevents access to suspicious sites and execution of malicious scripts Scans files, and packed executables transferred over HTTP, and alerts users if malicious content is.found.
- Mail Protection - Enable or disable scans of email messages when they are passed as files across the file system.
Signature
- Frequency
Anti-Malware gets malware signature updates at regular intervals to make sure that it can scan for the newest threats. These actions define the frequency of the signature updates and the source:- Update signatures every [x] hours - Signature updates occur every [x] hours from the Endpoint Policy Server and the External Check Point Signature Server.
- Signature update will fail after [x] seconds without server response - The connection timeout, after which the update source is considered unavailable.
- Update signatures every [x] hours - Signature updates occur every [x] hours from the Endpoint Policy Server
- Signature Sources
- External Check point Signature Server - Get updates from a dedicated, external Check Point server through the internet.
- Local Endpoint Servers - Get updates from the Endpoint Security Management Server or configured Endpoint Policy Server.
- Other External Source - Get updates from an external source through the internet. Enter the URL.
- Shared signature source - Get updates from a shared location on an Endpoint Security client that acts as a Shared Signature Server. This solution is curated for Virtual Desktop Infrastructure (VDI) environments, but can be leveraged for other scenarios as well. This makes it possible to protect non-persistent virtual desktops in Virtual Desktop Infrastructure (VDI) environments. Each non-persistent virtual desktop runs an Endpoint Security, and gets Anti-Malware and Threat Prevention signatures from a shared folder on the Shared Signature Server that is a persistent virtual machine.
- Second Priority - Set a fallback update source to use if the selected update source fails. Select a different option than the first signature source.
- Third Priority - Set a fallback update source to use if the other sources fail.
-
Note - If only update from local Endpoint Servers is selected, clients that are disconnected from an Endpoint Security server cannot get updates.
Scan
Anti-Malware scans computers for malware at regular intervals to make sure that suspicious files are treated, quarantined, or deleted.- Perform Periodic Scan - Select one of these options to define the frequency of the scans:
- Every Month- Select the day of the month on which the scan takes place and the Scan start hour.
- Every Week - Select the day of the week on which the scan takes place and the Scan start hour.
- Every Day - Select the scan start hour.
- Scan on Idle - Specify the idle time duration for the endpoint. The Harmony Endpoint Security client initiates the initial or periodic Anti-Malware scan only when the endpoint remains idle for the specified duration. If the device is not idle, the scan is postponed for 24 hours. After this 24-hour period, the Harmony Endpoint Security client initiates the initial or periodic Anti-Malware scan, irrespective of whether the device is idle or in use.
-
Note - Scan on Idle is not supported with the DHS compliant Anti-Malware blade.
- Randomize scan time - Mandatory for Virtual Desktop Infrastructure (VDI). Select this option to make sure that not all computers do a scan for malware at the same time. This makes sure that network performance is not affected by many simultaneous scans. In Start scan and End scan, specify the time range during which the scan can start and end.
- Run initial scan after the Anti-Malware blades installation.
- Allow user to cancel scan.
- Prohibit cancel scan if more than days passed since last successful scan.
- Scan Targets - Select the target for the Anti-Malware scan:
- Critical areas
- Optical drives
- Local drives
- Mail messages
- Removable drives
- Unrecognized devices
- Network devices
-
Note - Critical areas and Mail messages are not supported for macOS and with the DHS compliant Anti-Malware blade.
- Scan Target Exclusions - Select the checkboxes to skip scanning of certain files.
- Skip archives and non executables - Skips scanning of archive file formats (for example, .zip, 7zip, tar.gz, rar, and so on) and non-executable files (files without the execute permission).
Note - Skip archives and non executables are not supported with the DHS compliant Anti-Malware blade. - Do not scan files larger than - Specify the file size limit. If the file size is larger than the specified limit, then the system skips scanning the file. The default file size limit is 20 MB.
Note - The maximum supported file size for the Anti-Malware scan depends on the endpoint's system specifications, such as CPU, RAM and so on.
- Skip archives and non executables - Skips scanning of archive file formats (for example, .zip, 7zip, tar.gz, rar, and so on) and non-executable files (files without the execute permission).
Category 3 (Runtime Protection)
Behavioural Guard, Forensics, Anti-Exploit, Anti-Bot, Anti-Ransomware: Constantly Monitor API Calls, memory, file, registry and network operations to classify, block and reverse behaviour that looks like malicious.
Behavioral Protection
Behavioral protection includes Anti-Bot, Behavioral Guard and Anti-Ransomware protections.The Anti-Bot Component
There are two emerging trends in today's threat landscape:- A profit-driven cybercrime industry that uses different tools to meet its goals. This industry includes cyber-criminals, malware operators, tool providers, coders, and affiliate programs. Their "products" can be easily ordered online from numerous sites (for example, do-it-yourself malware kits, spam sending, data theft, and denial of service attacks) and organizations are finding it difficult to fight off these attacks.
- Ideological and state driven attacks that target people or organizations to promote a political cause or carry out a cyber-warfare campaign.
A bot is malicious software that can invade your computer. There are many infection methods. These include opening attachments that exploit a vulnerability and accessing a website that results in a malicious download.
When a bot infects a computer, it:
- Takes control over the computer and neutralizes its Anti-Virus defenses. Bots are difficult to detect because they hide within your computer and change the way they appear to the Anti-Virus software.
- Connects to a Command and Control (C&C) center for instructions from cyber criminals. The cyber criminals, or bot herders, can remotely control it and instruct it to execute illegal activities without your knowledge. These activities include:
- Data theft (personal, financial, intellectual property, organizational)
- Sending SPAM
- Attacking resources (Denial of Service Attacks)
- Bandwidth consumption that affects productivity
The Check Point Endpoint Anti-Bot component detects and prevents these bot threats
The Anti-Bot component:
- Uses the ThreatCloud repository to receive updates, and queries the repository for classification of unidentified IP, URL, and DNS resources.
- Prevents damage by blocking bot communication to C&C sites and makes sure that no sensitive information is stolen or sent out of the organization.
- Identify the C&C addresses used by criminals to control bots
- These web sites are constantly changing and new sites are added on an hourly basis. Bots can attempt to connect to thousands of potentially dangerous sites. It is a challenge to know which sites are legitimate and which are not.
Configuring Anti-Bot
There are three configuration options for the Anti-Bot protection:- Prevent - Blocks bots.
- Detect - Logs information about bots, but does not block them.
- Off - Ignores bots (does not prevent or detect them)
Advanced Anti-Bot Settings:
- Background Protection Mode:
- Background - This is the default mode. Connections are allowed while the bots are checked in the background.
- Hold - Connections are blocked until the bot check is complete.
- Hours to suppress logs for same bot protection - To minimize the size of the Anti-Bot logs, actions for the same bot are only logged one time per hour. The default value is 1 hour. To change the default log interval , select a number of hours.
- Days to remove bot reporting after - If a bot does not connect to its command and control server after the selected number of days, the client stops reporting that it is infected. The default value is 3 days.
- Confidence Level - The confidence level is how sure Endpoint Security is that an activity is malicious. High confidence means that it is almost certain that the activity is malicious. Medium confidence means that it is very likely that the activity is malicious. You can manually change the settings for each confidence level. Select the action for High confidence, medium confidence and low confidence bots:
- Prevent - Blocks bots
- Detect - Logs information about bots, but does not block them.
- Off - Ignores bots (does not prevent or detect them).
The Behavioral Guard & Anti-Ransomware Component
Behavioral Guard constantly monitors files and network activity for suspicious behavior.|
| Note - Behavioral Guard also parses the email (through an add-in to Microsoft Outlook) to include the details in the forensics report in the event of a malicious attack through an email. |
The Anti-Ransomware creates the honeypot files in these folders:
- C:\Users\Public\Music
- C:\Users\<User>\Music (MyMusic)
- C:\Users\Public\Documents
- C:\Users\<User>\Documents (MyDocuments)
- C:\Users\Public\Videos
- C:\Users\<User>\Videos (MyVideos)
- C:\Users\Public\Pictures
- C:\Users\<User>\Pictures (MyPictures)
- C:\Program Files (x86)
- C:\ProgramData
- C:\Users\<User>\AppData\Roaming
- C:\Users\<User>\AppData\Local
- C:\Users\<User>\Downloads
For example:
The file names include these strings, or similar:
- CP
- CheckPoint
- Check Point
- Check-Point
- Sandblast Agent
- Sandblast Zero-Day
- Endpoint
- Prevent - The attack is remediated. Logs, alerts and a forensic report are created.
- Detect - Logs, alerts and a forensic report are created.
- Off - Nothing is done on the detection, a log is not created
Advanced Behavioral Guard & Anti-Ransomware Settings
- Enable network share protection - Enables the protection of shared folders on the network. All shared folders are protected, regardless of the protocol. Remote devices are not protected.
- Block Volume Encryption tools (BitLocker and Similar Tools): As many ransomwares use volume encryption software, such as BitLocker to encrypt drives.
You can block such programs from:
Note - This feature is supported with the Harmony Endpoint Security Client version E86.30 with the default client mode as Detect. With the Harmony Endpoint Security Client version E86.50 and higher, the default client mode is Prevent.- Encrypting unencrypted drives
- Modifying the encryption of encrypted drives (such as changing password)
- If you want to encrypt your drive with BitLocker or a similar software:
- Encrypt the drive before you install the Harmony Endpoint Security Client, or
- Disable this protection, encrypt and resume this protection
- Low memory mode: Significantly reduces memory utilization by retaining only the most recently matched signatures. However, there is a slight drop in the detection rate. It is recommended to enable this setting only for system with low memory capacity. This is supported only with the Endpoint Security Client version E87.30 and higher.
Backup Settings
When Anti-Ransomware is enabled, it constantly monitors files and processes for unusual activity. Before a ransomware attack can encrypt files,Anti-Ransomware backs up your files to a safe location. After the attack is stopped, it deletes files involved in the attack and restores the original files from the backup location.- Restore to selected location - - By default, files are restored to their original location. To restore files to a different location, select this option and enter the location to which you want to restore the files in the Choose location field. Each time files are automatically restored, they will be put in the selected location.
- Anti-Ransomware maximum backup size on disk - Set the maximum amount of storage for Anti-Ransomware backups. The default value is 1 GB.
- Backup time interval - Within this time interval, each file is only backed up one time, even if it is changed multiple times. The default value is 60 minutes.
- Backup Settings - Change default types to be backed up - Click this to see a list of file types that are included in the Anti-Ransomware backup files. You can add or remove file types from the list and change the Maximum Size of files that are backed up.
- Disk Usage - By default, Forensics uses up to 1 GB of disk space on the client computer for data.
The Anti-Exploit Component
Harmony Endpoint Anti-Exploit detects zero-day and unknown attacks, and provides protection to vulnerable processes from exploitation. Files on your computer are sent to a testing area for emulation to detect malicious files and content.There are three configuration options for the Anti-Exploit protection:
- Prevent - Prevents the attack and suspends the application under attack.
- Detect - Detects and logs the attack information. Does not prevent the attack.
- Off - The Anti-Exploit protection is disabled.
Analysis & Remediation
Automated Attack Analysis (Forensics)
Harmony Endpoint Forensics analyzes attacks detected by other detection features like Anti-Ransomware or Behavioral Guard, and some third-party security products.On detection of a malicious event or file, Forensics is informed and a Forensics analysis is automatically initiated. After the analysis is completed, the entire attack sequence is presented as a Forensics Analysis Report. If Endpoint Security Management Servers do not have internet connectivity, Forensics information is stored and sent for evaluation immediately when a server connects to the internet.
Use the Forensics Analysis Report to prevent future attacks and to make sure that all affected files and processes work correctly.
Protection mode - Define in which confidence level the incident is analyzed: Always, High, Medium & High, or Never. The confidence level is how sure Endpoint Security is that a file is malicious. High confidence means that it is almost certain that a file is malicious. Medium confidence means that it is very likely that a file is malicious. The default value is Always.
Enable Threat Hunting - Threat Hunting is enabled by default. To learn more about Threat Hunting, see Threat Hunting.
Remediation & Response
The Harmony Endpoint File Remediation component applies Remediation to malicious files. When Harmony Endpoint components detect malicious files, they can quarantine those files automatically based on policy, and remediate them if necessary.You can manually define the confidence level in which Remediation is performed: Always, High, Medium & High, or Never. The confidence level is how sure Endpoint Security is that a file is malicious. High confidence means that it is almost certain that a file is malicious. Medium confidence means that it is very likely that a file is malicious. The default value is Medium & High.
Advanced Remediation & Response Settings
File Quarantine
Define the settings for files that are quarantined. By default, items are kept in quarantine for 90 days and users can delete items from quarantine.- File quarantine - Select the confidence level in which Remediation is performed: Always High, Medium & High, Never. The default value is Medium & HIgh.
- Allow users to delete items from quarantine - When selected, users can permanently delete items from the quarantine file on their computers.
- Allow users to restore items from quarantine - When selected, users can restore items from the quarantine file on their computers.
- Copy quarantine files to central location -Enter a central location to which the quarantined files from the client computers are copied.
File Remediation
Define what happens to the components of an attack that is detected by Forensics. When files are quarantined, they are deleted and put in a secure location from which they can be restored, if necessary.You can manually edit the treatment for each category of file: Malicious, Suspicious, or Unknown. For each category, you can select:
- Quarantine - Files are deleted and put in a secure location from which they can be restored, if necessary.
- Delete - Files are permanently deleted.
- Backup -- Delete the file and create an accessible duplicate.
- None -- No action is taken.
- Terminate - stop the suspicious process.
- Ignore - Do not terminate processes. Activity is monitored.
Blocks Malicious websites and displays icons next to search results.
Analyses sites in real time to detect brand impersonation and other forms of deception.
Blocks malicious scripts in websites such as scripts related to the Magecart malware.
Web & Files Protection
This category includes Download (web) Emulation & Extraction, Credential Protection and Files Protection.URL Filtering
URL Filtering rules define which sites you can access in your organization. The URL Filtering policy is composed of the selected sites and the mode of operation applied to them.|
| Note: SmartEndpoint does not support the new capability. It is only supported for web users. |
- Select the URL Filtering mode of operation:
- Prevent - Currently supported only in Hold mode. The request to enter a site is suspended until a verdict regarding the site is received.
- Detect - Allows access if a site is determined as malicious, but logs the traffic.
- Off -URL Filtering is disabled.
- Select the categories to which the URL Filtering policy applies:
- Go to Web & Files Protection > Advanced Settings > URL Filtering > Categories.
- Select the required categories:
Note - For each category, click Edit to see the sub-categories you can select. - Click OK.
- Optional: You can select specific URLs to which access is denied. See Blacklisting.
- If you want Harmony Endpoint to verify and filter all the URLs accessed by an application or a process, select the Enable Network URL Filtering checkbox. Otherwise, URL filtering is applied only to the URLs accessed through a browser.
The user can access any site which was not selected in one of the categories or which was not blacklisted.
You can Allow user to dismiss the URL Filtering alert and access the website - This option is selected by default. This lets you access a site determined as malicious, if you think that the verdict is wrong. To do this, go to Advanced Settings > URL Filtering.
Blacklisting
You can define specific URLs or domains as blacklisted. These URLs/domains will be blocked automatically, while other traffic will be inspected by the URL Filtering rules. You can add the URLs/domain names manually or upload a CSV file with the URLs/domain names you want to include in the blacklist.To add a URL to the blacklist:
- Go to Advanced Settings > URL Filtering > Blacklist > Edit.
- In the URLs pane, for each required URL, enter the URL and click the + sign
- click OK.
|
| Notes: You can use * and ? as wildcards for blacklisting.
|
- Go to Advanced Settings > URL Filtering > Blacklist > Edit.
- In the search box, enter the required URL.
The search results appear in the URLs pane.
You can edit or delete the URL.
- Go to Advanced Settings > URL Filtering > Blacklist > Edit.
- Next to the search box, click the sign (import domains list from a 'csv' file).

- Find the required file and click Open.
- Click OK.
- Go to Advanced Settings > URL Filtering > Blacklist > Edit.
- Next to the search box, click the sign (export domains list to a 'csv' file).

- Click OK.
Provide users with secure, seamless remote access to corporate networks and resources when traveling or working remotely. Privacy and integrity of sensitive information is ensured through multi-factor authentication, endpoint system compliance scanning and encryption of all transmitted data.
Adding a New VPN Site to an Exported Package
When you use an exported package, you can configure each package to connect to a default VPN site which you create.By default, no VPN site is configured for a new package.
To add a new VPN site to an exported package:
- Make sure the exported package includes Endpoint Connect VPN.
- You can add a new VPN site through these locations:
- The Create a Package wizard.
- The Manage VPN sites button.
- The package tile:
- If no VPN site is configured, then click New
If a VPN site is already configured, then click Edit > New
- Configure these settings:
- Name - Unique name for this VPN site.
- Site Address - Site IP address.
- Authentication Method - One of these:
- Username-password - Endpoint users authenticate using their VPN user name and password.
- CAPI certificate - Endpoint users authenticate using the applicable certificate.
- P12 certificate - Endpoint users authenticate using the applicable certificate.
- SecurID KeyFob - Endpoint users authenticate using a KeyFob hard token.
- SecurID PinPad -Endpoint users authenticate using the an SDTID token file and PIN.
- Challenge-response - Endpoint users authenticate using an administrator supplied response string in response to the challenge prompt.
- Click OK.
Makes sure downloads are safe by emulating files from various formats and cleaning up documents from any executable content that may be harmful.
Download (Web) Emulation & Extraction
Harmony Endpoint browser protects against malicious files that you download to your device. For the browsers supported with the Harmony Endpoint Browser extension, see Harmony Browse Administration Guide.Threat Emulation
detects zero-day and unknown attacks. Files on the endpoint computer are sent to a sandbox for emulation to detect evasive zero-day attacks. The following files types are supported:�
| Threat Emulation Supported File Types | ||
|---|---|---|
| 7z | lnk | tbz2 |
| arj | pif | tbz |
| bz2 | tb2 | |
| bat | ppt | tgz |
| CAB | pptx | udf |
| csv | pps | uue |
| com | pptm | wim |
| cpl | potx | xlt |
| dll | potm | xls |
| doc | ppam | xlsx |
| docx | ppsx | xlm |
| dot | ppsm | xltx |
| dotx | ps1 | xlsm |
| dotm | rar | xltm |
| docm | rtf | xlsb |
| exe | scr | xla |
| gz | sldx | xlam |
| hwp | sldm | xll |
| iso | slk | xlw |
| iqy | swf | xz |
| jar | tar | zip |
proactively protects users from malicious content. It quickly delivers safe files while the original files are inspected for potential threats.To see the list of file types which are supported by Threat Emulation and Threat Extraction, go to Advanced Settings > Threat Emulation > Override Default File Actions > Edit.
These are the configuration options for supported file types:
- Prevent - Send files for emulation and extraction. For further configuration for supported files, go to Advanced Settings > Supported Files:
- Get extracted copy before emulation completes - You can select one of these two options:
- Extract potential malicious elements - The file is sent in its original file type but without malicious elements. Select which malicious parts to extract. For example, macros, Java scripts and so on.
- Convert to PDF - Converts the file to PDF, and keeps text and formatting.

Best Practice - If you use PDFs in right-to-left languages or Asian fonts, preferably select Extract files from potential malicious parts to make sure that these files are processed correctly.
- Suspend download until emulation completes - The user waits for Threat Emulation to complete. If the file is benign, the gateway sends the original file to the user. If the file is malicious, the gateway presents a Block page and the user does not get access to the file. This option gives you more security, but may cause time delays in downloading files.
- Emulate original file without suspending access - The gateway sends the original file to the user (even if it turns out eventually that the file is malicious).
- Allow - All supported files are allowed without emulation. This setting overrides the Prevent setting selected in the main page.
- Get extracted copy before emulation completes - You can select one of these two options:
- Detect - Emulate original file without suspending access to the file and log the incident.
- Off - Allow file. No emulation or extraction is done. The download of all supported files is allowed.
Unsupported Files
File types which are not supported by Threat Emulation and Threat Extraction. Unsupported files types can be allowed or blocked. To configure, go to Advanced Settings > Download Protection > Unsupported Files. The settings selected here override the settings selected in the main page.Additional Emulation Settings:
Emulation Environments
To define the maximum size of files that are sent for emulation, go to Advanced Settings > Download Protection > Emulation Environments and specify the file size for Upload and emulate files under.|
| Note - Only the Endpoint Security Client version E86.40 and higher support a maximum file size up to 50 MB. Client versions lower than E86.40 support a maximum file size up to 15 MB. |
- Use Check Point recommended emulation environments
- Use the following emulation environments - Select other images for emulation, that are closest to the operating systems for the computers in your organization. This is supported only if configured from the SmartConsole. For more information, see Managing Endpoint Components in SmartEndpoint Management Console.
Override Default Files Actions
You can override the default actions for specific file types. Go to Advanced Settings > Threat Emulation > Override Default Files Actions > Edit.In Override Default Files Actions, you can also see the current number of overrides.
Includes Full Disk Encryption, Media and Ports Protection.
Configuring Full Disk Encryption
Full Disk Encryption gives you the highest level of data security for Endpoint Security client computers.It combines boot protection and strong disk encryption to ensure that only authorized users can access data stored in desktop and laptop PCs.
Check Point's Full Disk Encryption has two main components:
- Check Point Disk Encryption for Windows - Ensures that all volumes of the hard drive and hidden volumes are automatically fully encrypted. This includes system files, temporary files, and even deleted files. There is no user downtime because encryption occurs in the background without noticeable performance loss. The encrypted disk is inaccessible to all unauthorized people.
- Authentication before the Operating System Loads (Pre-boot) - Requires users to authenticate to their computers before the computer boots. This prevents unauthorized access to the operating system using authentication bypass tools at the operating system level or alternative boot media to bypass boot protection.
The Full Disk Encryption policy contains a pre-defined Default Policy rule
, which applies to the entire organization.Each new rule you create, has pre-defined settings, which you can then edit in the right section of the screen.
The Policy Rule Base consists of these parts:
| Column | Description |
|---|---|
| Rule Number | The sequence of the rules is important because the first rule that matches traffic according to the protected scope is applied. |
| Rule Name | Give the rule a descriptive name. |
| Applied to | The protected scope to which the rule applies. |
| Full Disk Encryption | The configurations that apply to data encryption. |
| To do this | Click this |
|---|---|
| Create a new rule | 
|
| Save, view, or discard changes | 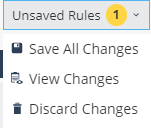
|
| Duplicate a rule | 

|
| Install Policy | 
|
| Search for entity | 
|
| Delete a rule | 
|
Configuring Media Encryption & Port Protection
Media Encryption & Port Protection protects data stored in the organization by encrypting removable media devices and allowing tight control over computer ports (USB, Bluetooth, and so on). Removable devices are for example: USB storage devices, SD cards, CD/DVD media and external disk drives.On the client-side, Media Encryption & Port Protection protects sensitive information by encrypting data and requiring authorization for access to storage devices and other input/output devices.
Media Encryption lets users create encrypted storage on removable storage devices that contain business-related data. Encrypted media is displayed as two drives in Windows Explorer. One drive is encrypted for business data. The other drive is not encrypted and can be used for non-business data. Rules can apply different access permissions for business data and non-business data.
Port Protection controls, according to the policy, device access to all available ports including USB and Firewire (a method of transferring information between digital devices, especially audio and video equipment). Policy rules define access rights for each type of removable storage device and the ports that they can connect to. The policy also prevents users from connecting unauthorized devices to computers.
Media Encryption & Port Protection functionalities are available in both Windows and macOS clients (for macOS starting at client version E85.30).
|
| Best Practice - We recommend to not encrypt non-computer external devices such as: digital cameras, smartphones, MP3 players, and the like. Do not encrypt removable media that can be inserted in or connected to such devices. |
Includes the necessary packages to secure and manage mobile devices.
Deploying Endpoint Clients
To deploy Harmony Endpoint clients to Windows devices:1. Click Overview and then click Download on the top banner.
2. Click Download button under Windows or macOS, depending on the destination system.
To install the Initial Client:
- Do any of these to download the Initial Client:
- From the left navigation panel, click Service Management and then in the Download Initial Client section, click on the Download button.
- From the left navigation panel, click Overview.and then click on the Download button on the top banner.
- Automatic - Use deployment rules to automatically download and install pre-configured packages on Endpoint devices (see Automatic Deployment of Endpoint Clients).
- Manual - Export component packages to the endpoint devices, using third party deployment software, a shared network path, email, or other method (see Manual Deployment).
|
| Note - Admins are recommended not to pre-install Harmony Endpoint when using cloning utilities like Acronis. It is recommended to install Harmony Endpoint after the clone is created, or at least to block the initial registration before creating the clone. |
Important Information
sc1.checkpoint.com


")