NodeRabbit RAT Exposed: Fake Coding Challenge Malware Removal and Recovery
Written by: Lapain Epuran
Published on:
A software project can look transparent because its source is visible. In practice, a busy developer may run thousands of unfamiliar dependency lines without reading them.
NodeRabbit exploits that gap. It arrives as part of a plausible hiring task, then uses the developer’s own tools to settle into the operating system.
Overview
NodeRabbit is a cross-platform remote-access trojan
NodeRabbit is a Node.js-based RAT documented on Windows, Linux, macOS, and Windows Subsystem for Linux environments.
It lets an operator inspect a host, run processes, read or modify files, and return results through encrypted command traffic.
Later variants added deeper persistence, Outlook address harvesting, repository discovery, malicious editor extensions, and Git-hook injection.
Fake technical assessments deliver the malware
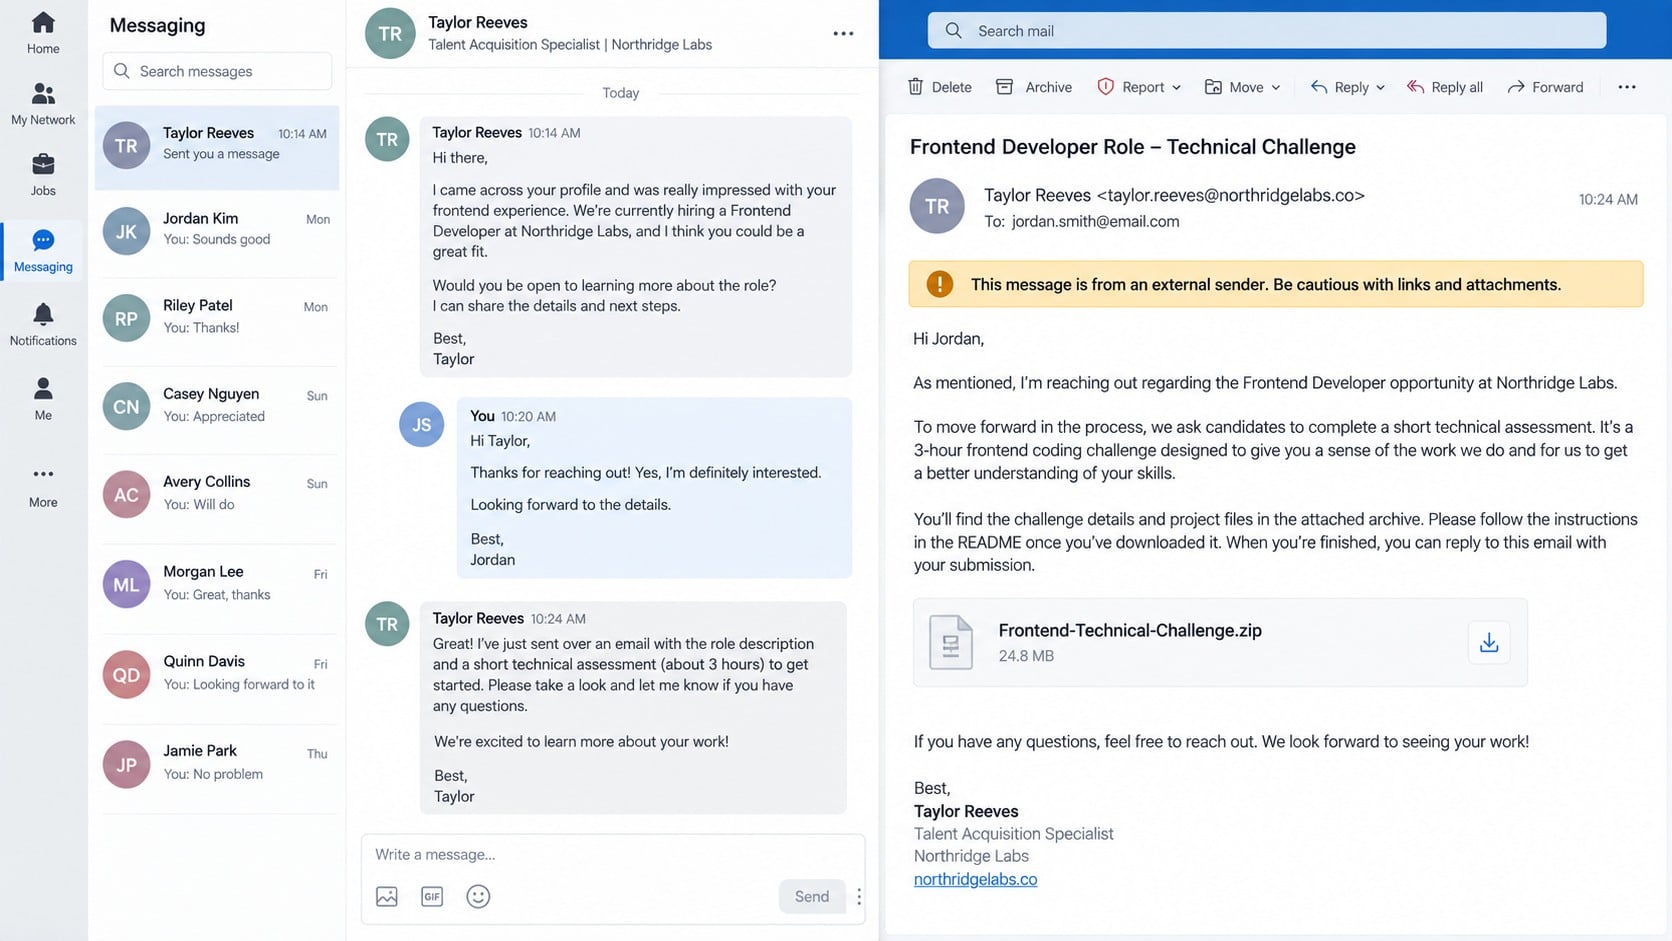
The observed campaign used bogus recruiter accounts on professional and employment platforms to contact developers about attractive engineering roles.
Targets received cloud-hosted archives containing genuine-looking Express, React, or Vite projects framed as coding exercises.
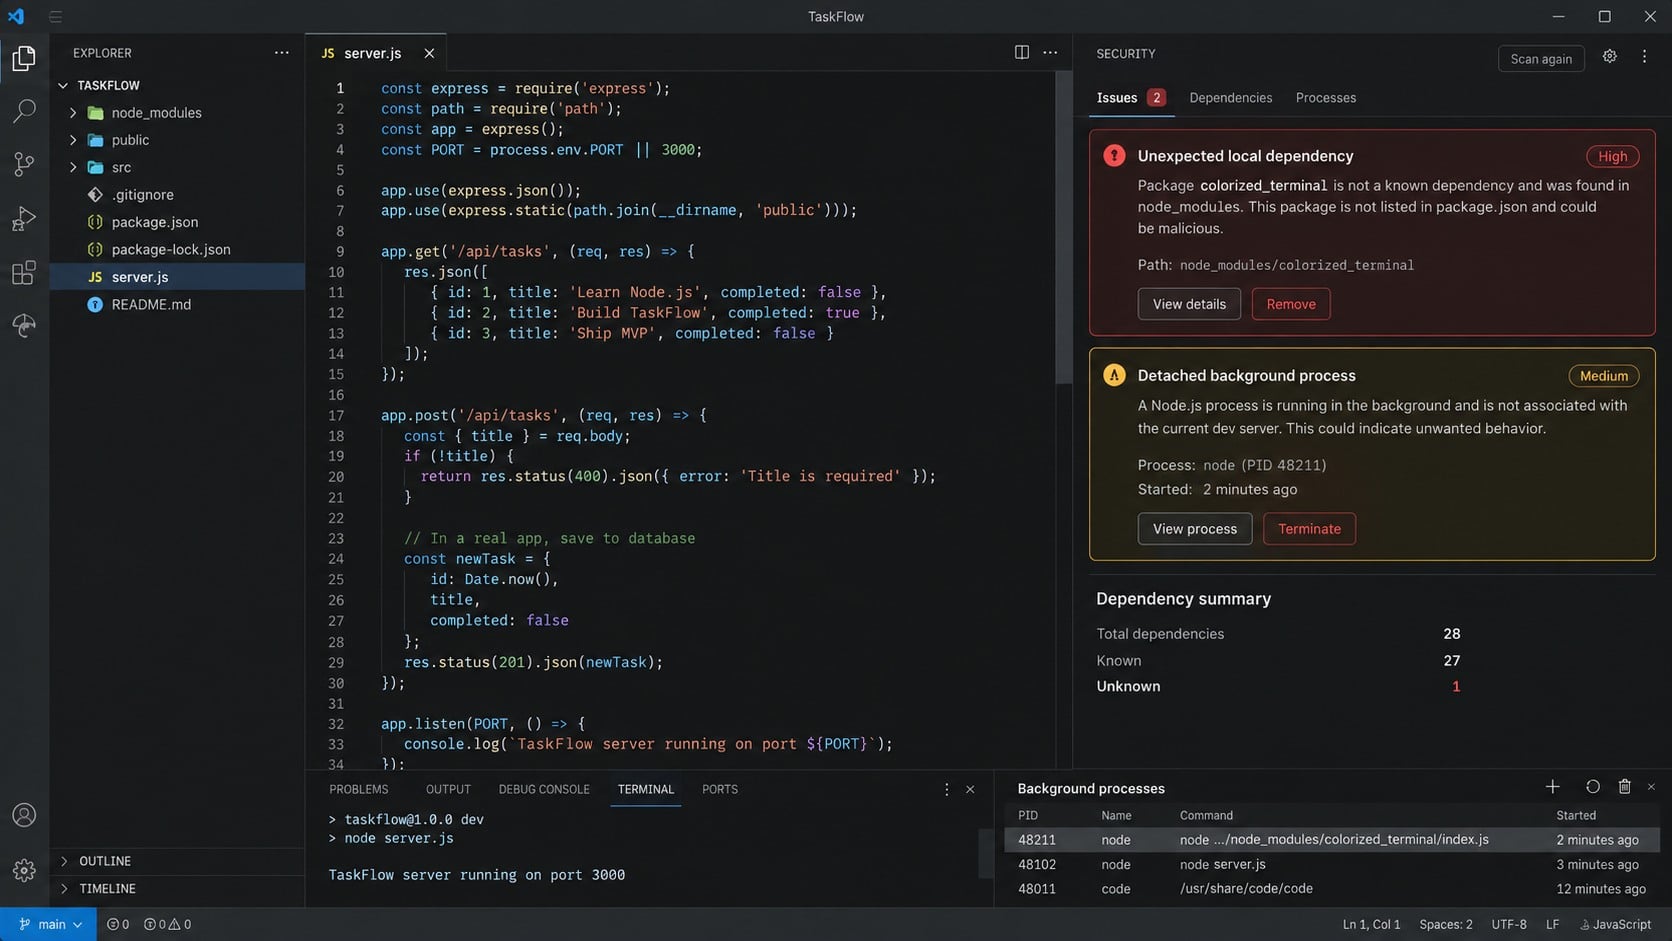
A hidden local package started NodeRabbit when the candidate launched the supplied server. The assignment itself provided cover for the resulting Node.js activity.
Several clues make these projects dangerous
The recruiter is not independently confirmed by the claimed employer.
The archive already contains a populated node_modules directory.
A bundled package is absent from the public dependency registry.
Documentation says one server file is bug-free and should be ignored.
Starting the project launches a detached Node.js worker.
New scheduled tasks, launch items, or cron entries appear afterward.
Editor extensions or repository hooks change without authorization.
No single clue proves infection. Their combination around an unsolicited assessment should stop execution and trigger a controlled review.
How the NodeRabbit RAT Attack Works
Step 1: A recruiter impersonation opens the conversation
The attacker creates a professional profile and approaches a developer whose public experience matches a believable vacancy.
The first messages can be friendly and specific, referencing frontend work, Node.js knowledge, a portfolio, or availability for remote employment.
After establishing rapport, the supposed recruiter introduces a technical assessment as the next ordinary stage of hiring.
This sequence avoids a cold attachment. The candidate has already exchanged messages and may feel socially committed to completing the task.
Attackers can copy a real company’s name, branding, and public job language. Verification must happen through a channel outside the conversation.
Contact the organization using its official website, then confirm both the vacancy and the recruiter’s identity before downloading code.
Step 2: A realistic project archive arrives from cloud storage
One recovered archive was called Front-Technical-Challenge.zip and contained a task-management application named TaskFlow.
The application included normal frontend and backend code. Its README asked the candidate to find defects and improve the interface.
The instructions imposed a three-hour limit and discouraged AI assistance, increasing pressure to begin manually and quickly.
They also claimed that server.js was already correct. That direction conveniently pulled attention away from the altered startup path.
Legitimate cloud hosting does not make archive contents trustworthy. Storage providers distribute uploaded bytes but do not endorse every project.
Open unknown assessments only inside a disposable analysis environment with no mounted secrets, shared clipboard, employer access, or personal sessions.
Step 3: A trojanized local dependency starts the implant
The altered server imported a package called colorized_terminal, pinned to version 2.1.0 and bundled directly inside the archive.
That package was not retrieved as an ordinary verified dependency. Its local copy contained code that launched NodeRabbit from a concealed cache path.
The implant started as a detached background process. The visible development server could keep working, giving the candidate no obvious failure to investigate.
Another observed project used a similarly trojanized package named pretty-log. Package names can change while the delivery idea remains stable.
A prefilled node_modules directory deserves careful review because it can override what a clean registry installation would have supplied.
Compare dependency declarations, lockfile entries, registry records, and actual disk contents before trusting an unfamiliar project.
Step 4: NodeRabbit identifies the host and establishes persistence
The first variant calculated an agent identifier from the host name, user, operating-system version, architecture, and network adapter address.
It used a local TCP listener to prevent duplicate instances. If the port was occupied, the new process exited quietly.
Windows persistence copied the script and a renamed Node executable into a browser-update-themed folder, then added a current-user Run entry.
Linux persistence placed the script under a hidden configuration path and created an @reboot cron entry.
On macOS, it used a user LaunchAgent with automatic loading and restart settings. Each platform received a familiar-looking update disguise.
Later variants changed paths and names, sometimes imitating a hardware-driver support utility and using daily scheduled execution.
Step 5: The RAT polls encrypted command infrastructure
NodeRabbit contacted several hosted controller addresses and switched to another when one connection failed.
Requests registered the agent, collected a task, and returned results. Payloads were wrapped using authenticated encryption before transmission.
The initial command set supported system information, process listing, command execution, directory browsing, file reading, writing, deletion, and creation.
Operators could alter the beacon interval or send a temporary Node.js script for execution and removal.
Newer samples understood corporate proxy settings, including automatic configuration and Windows authentication. That made them more capable inside managed networks.
Encrypted traffic hides content from casual inspection, but endpoint behavior and unusual destinations can still expose the communication pattern.
A third variant expanded the command set and introduced two persistence routes designed specifically around software development.
One command created a fake editor extension displayed as “GitHub Copilot Helper,” using a trusted-sounding publisher name borrowed from local metadata.
The extension launched the NodeRabbit payload after the editor finished starting. It did not inherit a genuine signature or actual trusted status.
Another command searched common development folders and recent editor workspaces for Git repositories.
For selected projects, it appended a launcher to post-checkout and post-merge hooks. A later Git action could restart the RAT.
This persistence can travel with daily work habits. The developer may trigger it while switching branches or updating code long after removing the original archive.
Step 7: Files, accounts, and business systems become reachable
The RAT can read and write accessible files, start programs, kill processes, inspect networks, and retrieve address information from Outlook data.
Developer hosts often contain environment files, repository tokens, package credentials, SSH keys, cloud sessions, database access, and build secrets.
An operator may use those assets for espionage, lateral movement, source theft, tampering, or access to customers and production environments.
Deleting one payload does not invalidate credentials already collected. Account and infrastructure response must proceed alongside endpoint remediation.
The campaign has been associated with an Iran-linked threat group and observed against aviation and financial-technology developers across several countries.
Victim location does not determine safety. Publicly shared tooling and copied tactics can place similar lures in any developer’s inbox.
How to Identify a NodeRabbit RAT Infection
Examine the downloaded assessment package
Preserve the original archive and calculate its hash without launching it. Inspect README claims, dependency folders, and unexpected imports.
Search for colorized_terminal, pretty-log, hidden cache paths, or bundled package version 2.1.0 where registry evidence does not match.
These names are useful indicators from known samples, but their absence cannot clear a differently packaged challenge.
Review cross-platform startup locations
On Windows, inspect Run keys and scheduled tasks that resemble browser updates or driver-support utilities and launch copied Node executables.
Linux users should review user cron entries and hidden configuration folders. macOS users should examine LaunchAgents and unexpected Node scripts.
WSL users need both sides checked because later persistence could bridge Linux files with a Windows task and script launcher.
Inspect editor extensions and repository hooks
List user-installed editor extensions and verify their identifier, publisher, signature, creation time, and underlying files.
A “helper” name that imitates a popular coding assistant is not enough. Genuine extensions must match the official publisher and expected signature.
Review .git/hooks across active repositories for unfamiliar lines that launch Node in the background after checkout or merge.
Correlate network, process, and account evidence
Look for detached Node processes running scripts outside the legitimate project, especially from hidden update-themed directories.
Investigate repeated controller polling, unexpected hosted-service domains, proxy-aware traffic, and new scheduled activity around challenge execution.
Check source-control, cloud, mail, and package-registry audit logs for new sessions, tokens, keys, or activity after that timestamp.
What to Do If NodeRabbit RAT Infected Your Computer
Isolate every suspected environment. Disconnect Windows, Linux, macOS, and WSL network paths without logging into additional services from those systems.
Escalate beyond the individual device. Notify the employer or client whose code and infrastructure were reachable, even if the assessment targeted a personal machine.
Preserve the recruiter evidence. Save profile details, messages, job descriptions, archive location, filenames, hashes, README instructions, and execution time.
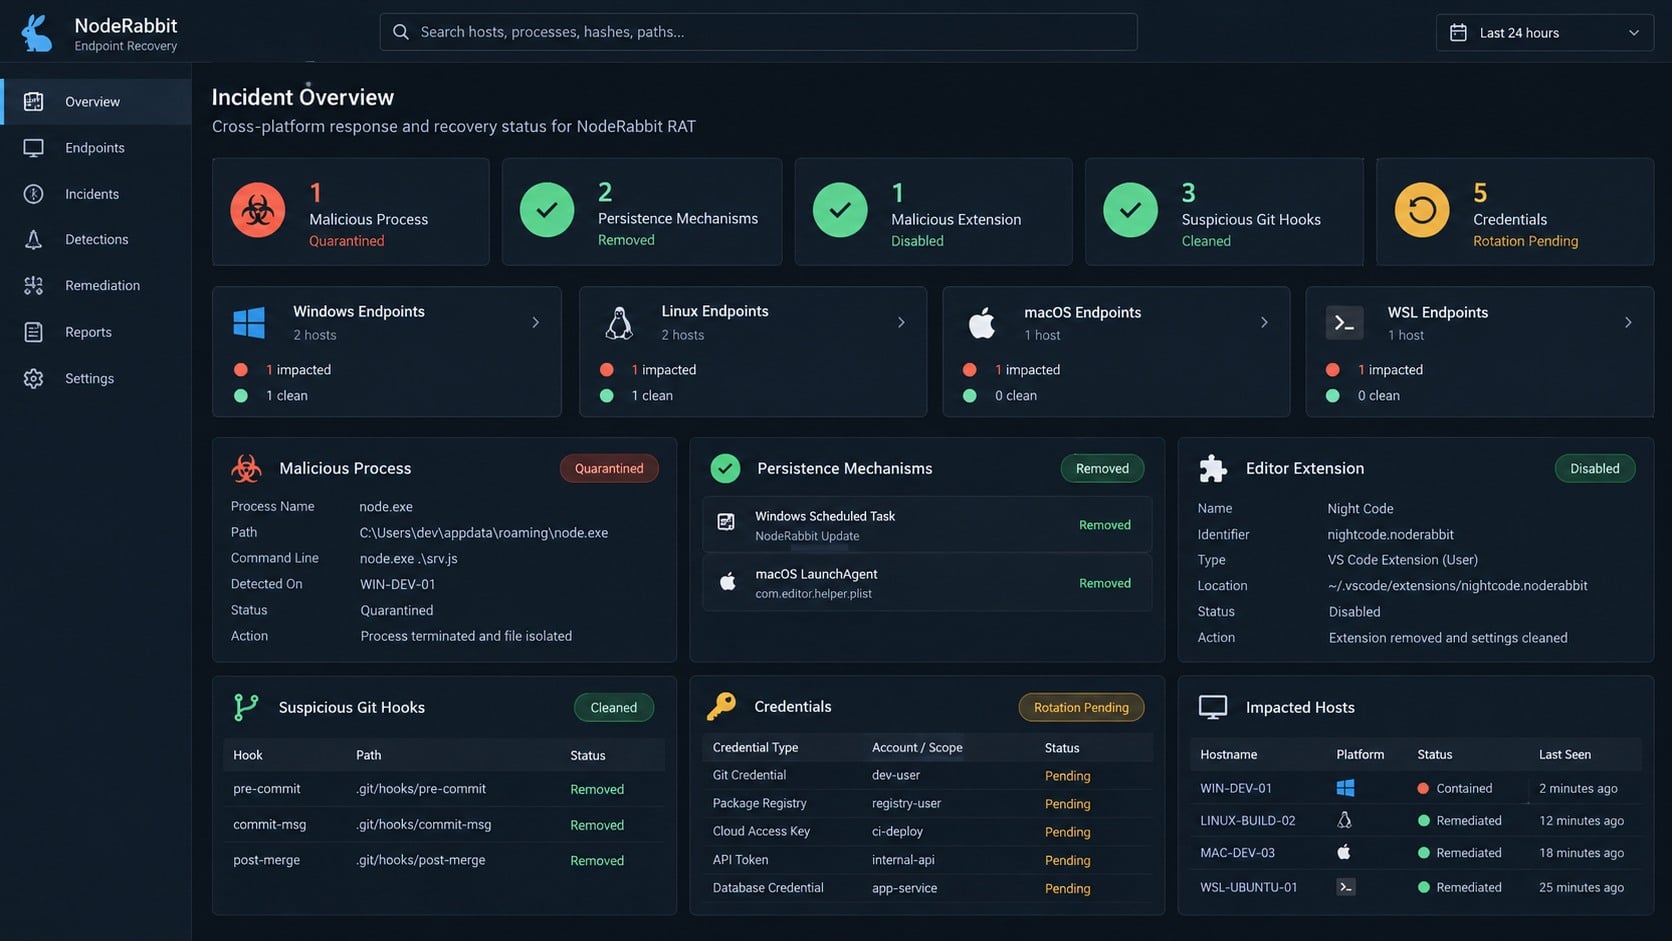
Terminate and quarantine the implant. Remove copied Node scripts and executables only after recording paths, processes, persistence, and controller indicators needed for investigation.
Clean every persistence route. Check Run keys, scheduled tasks, cron, LaunchAgents, WSL launchers, editor extensions, and repository hooks across all affected user profiles.
Run layered endpoint scans. Use an offline scanner first, then complete a Malwarebytes full scan for related payloads and remnants on each platform.
Rotate development secrets. Replace SSH keys, repository tokens, package credentials, cloud keys, database passwords, signing material, and active web sessions using clean hardware.
Reduce repeated web exposure. After trusted recovery, use AdGuard to help block malicious advertisements and known unsafe destinations used in supporting attack chains.
Audit code and deployment history. Inspect commits, branches, releases, CI changes, package publishing, webhooks, and production access following the suspected infection.
Rebuild high-value systems. Reinstall from trusted media when the endpoint held production credentials or defenders cannot verify complete removal.
Is Your Device Infected? Run a Free Malware Scan
Slow performance, constant pop-ups, or strange behavior? These are classic signs of a malware infection. The fastest way to find out is to scan your device with Malwarebytes Anti-Malware Free — one of the most trusted malware removal tools available.
The free version detects and removes the most common threats, including:
Adware — the cause of those annoying pop-ups
Browser hijackers — unwanted redirects and changed homepages
Trojans and spyware — hidden programs stealing your data
Potentially unwanted programs (PUPs) — software you never asked for
👉 Select your device below — Windows, Mac, or Android — then follow the simple steps to download Malwarebytes, scan your system, and remove any threats it finds. The whole process takes about 5 minutes.
Malwarebytes for WindowsMalwarebytes for MacMalwarebytes for Android
Run a Malware Scan with Malwarebytes for Windows
Malwarebytes is one of the most popular and trusted anti-malware tools for Windows — and it’s completely free for removing infections. It catches threats that many antivirus programs miss, including adware, browser hijackers, and trojans. Follow the steps below to scan and clean your PC in just a few minutes.
Download Malwarebytes
Click the button below to download the latest version of Malwarebytes for Windows from the official source. The free version is all you need — it will scan your computer and remove adware, browser hijackers, and other malicious software at no cost.
(The link opens in a new page where your download will start)
Install Malwarebytes
When the download finishes, open your Downloads folder and double-click the MBSetup file. If Windows shows a User Account Control pop-up, click “Yes” to allow the installation.
Follow the On-Screen Prompts to Install Malwarebytes
The setup wizard will walk you through a few quick screens:
Choose where you’re installing the program — “Personal Computer” or “Work Computer” — then click Next.
Malwarebytes will now install on your device. This usually takes under a minute.
When installation is complete, the “Welcome to Malwarebytes” screen will open automatically.
On the final screen, click Open Malwarebytes to launch the program.
Enable “Scan for Rootkits”
Before scanning, turn on rootkit detection so Malwarebytes can find even the most hidden threats. Click the Settings gear icon on the left side of the screen.
In the settings menu, find “Scan for rootkits” and click the toggle so it turns blue.
Done? Click “Dashboard” in the left pane to return to the main screen.
Start the Scan
Click the blue Scan button. Malwarebytes will automatically update its virus database and start checking your computer for malware.
Wait for the Scan to Finish
The scan checks your entire system for browser hijackers and other malicious programs, so it can take several minutes. Feel free to do something else — just check back occasionally to see the progress.
Quarantine the Detected Threats
When the scan is done, you’ll see a list of everything Malwarebytes found — malware, adware, and potentially unwanted programs. Click the “Quarantine” button to remove all of them at once.
Malwarebytes will now remove the malicious files and registry entries and move them safely into quarantine.
Restart Your Computer
Some threats can only be fully removed after a reboot. If Malwarebytes asks you to restart, click Yes. Once you’re logged back in, your PC is clean and you can continue with the next steps in this guide.
When the scan finishes, click Quarantine to remove everything Malwarebytes found. That’s it — your Windows PC is now clean of trojans, adware, and other malware, and should be back to running smoothly.
If your current antivirus allowed this malicious program on your computer, you may want to consider purchasing Malwarebytes Premium to protect against these types of threats in the future. If you are still having problems with your computer after completing these instructions, then please follow one of the steps:
Malwarebytes for Mac is a free on-demand scanner that removes the malware other security software tends to miss — adware, browser hijackers, and unwanted programs included. Cleaning an infected Mac with Malwarebytes has always been completely free, and it’s our go-to recommendation. Follow the steps below to scan and clean your Mac in just a few minutes.
Download Malwarebytes for Mac
Click the button below to download the latest version of Malwarebytes for Mac.
When the download finishes, open your Downloads folder and double-click the setup file to begin the installation.
Follow the On-Screen Prompts to Install Malwarebytes
The Malwarebytes for Mac Installer will guide you through a few quick screens. Click “Continue” and keep following the prompts until the installation completes.
When the installation is complete, Malwarebytes opens to the Welcome to Malwarebytes screen. Click “Get started“.
Select “Personal Computer” or “Work Computer”
Malwarebytes will ask what type of computer you’re installing it on. Click either Personal Computer or Work Computer, whichever applies.
Start the Scan
Click the “Scan” button. Malwarebytes will automatically update its detection database and begin checking your Mac for malware.
Wait for the Scan to Finish
Malwarebytes will scan your Mac for adware, browser hijackers, and other malicious programs. This can take a few minutes, so feel free to do something else — just check back occasionally to see the progress.
Quarantine the Detected Threats
When the scan is done, you’ll see a list of everything Malwarebytes found. Click the “Quarantine” button to remove all the threats at once.
Restart Your Mac
Malwarebytes will now remove all the malicious files it found. Some threats can only be fully removed after a reboot — if Malwarebytes asks you to restart, allow it. Once you’re logged back in, your Mac is clean.
Once the scan is done, remove every threat it detected. Your Mac is now free of adware, rogue browser extensions, and other potentially harmful software.
If your current antivirus allowed a malicious program on your computer, you might want to consider purchasing the full-featured version of Malwarebytes Anti-Malware to protect against these types of threats in the future. If you are still experiencing problems while trying to remove a malicious program from your computer, please ask for help in our Mac Malware Removal Help & Support forum.
Run a Malware Scan with Malwarebytes for Android
Malwarebytes for Android automatically detects and removes dangerous threats like malware and ransomware so you don’t have to worry about your most-used device being compromised. Aggressive detection of adware and potentially unwanted programs keeps your Android phone or tablet running smooth.
Download Malwarebytes for Android.
You can download Malwarebytes for Android by clicking the link below.
In the Google Play Store, tap “Install” to install Malwarebytes for Android on your device.
When the installation process has finished, tap “Open” to begin using Malwarebytes for Android. You can also open Malwarebytes by tapping on its icon in your phone menu or home screen.
Follow the on-screen prompts to complete the setup process
When Malwarebytes will open, you will see the Malwarebytes Setup Wizard which will guide you through a series of permissions and other setup options. This is the first of two screens that explain the difference between the Premium and Free versions. Swipe this screen to continue. Tap on “Got it” to proceed to the next step. Malwarebytes for Android will now ask for a set of permissions that are required to scan your device and protect it from malware. Tap on “Give permission” to continue. Tap on “Allow” to permit Malwarebytes to access the files on your phone.
Update database and run a scan with Malwarebytes for Android
You will now be prompted to update the Malwarebytes database and run a full system scan.
Click on “Update database” to update the Malwarebytes for Android definitions to the latest version, then click on “Run full scan” to perform a system scan.
Wait for the Malwarebytes scan to complete.
Malwarebytes will now start scanning your phone for adware and other malicious apps. This process can take a few minutes, so we suggest you do something else and periodically check on the status of the scan to see when it is finished.
Click on “Remove Selected”.
When the scan has been completed, you will be presented with a screen showing the malware infections that Malwarebytes for Android has detected. To remove the malicious apps that Malwarebytes has found, tap on the “Remove Selected” button.
Restart your phone.
Malwarebytes for Android will now remove all the malicious apps that it has found. To complete the malware removal process, Malwarebytes may ask you to restart your device.
After the scan, tap Remove Selected to delete all detected threats. Your Android phone is now clean — no more malicious apps, adware, or browser redirects.
If your current antivirus allowed a malicious app on your phone, you may want to consider purchasing the full-featured version of Malwarebytes to protect against these types of threats in the future. If you are still having problems with your phone after completing these instructions, then please follow one of the steps:
Restore your phone to factory settings by going to Settings > General management > Reset > Factory data reset.
Now that your device is clean, keep it that way. Most infections start with a malicious ad or a fake download button — so blocking them at the source is your best defense.
We recommend AdGuard, which blocks malicious ads, phishing pages, and dangerous redirects before they can reach you.
Begin with a documented inventory. Record every malicious path, scheduled object, extension, hook, and running process before deleting anything.
Windows cleanup should include user Run keys, daily scheduled tasks, copied scripts, renamed Node binaries, and update-themed folders under profile data.
Inspect task actions rather than task names. A familiar label can point to a script in an unexpected user-writable location.
Linux remediation must remove the copied script and both ordinary and reboot cron entries. Check every affected user, not only the current shell.
On macOS, unload and delete the malicious LaunchAgent, then remove its referenced payload and any companion cron entry.
WSL recovery requires checking Windows Task Scheduler, the Windows-side launcher, the Linux persistence copy, and every related distribution.
Editor cleanup should remove the fake extension directory and restore security settings. Re-enable Workspace Trust if it was disabled.
Repository owners should compare hook files with a known-clean baseline. Hooks are local and may not appear in ordinary commit history.
After removal, restart and scan again. Confirm that no Node process returns and no outbound controller polling resumes.
A clean rebuild remains the stronger choice when command execution was extensive or endpoint history is incomplete.
Securing Developer Accounts After NodeRabbit
Revoke existing sessions before issuing new credentials. Otherwise, a stolen browser token may remain active after a password change.
Generate replacement SSH keys on a clean computer and remove old keys everywhere they were authorized.
Rotate source-control personal tokens, deploy keys, package-registry credentials, cloud access keys, and CI service identities.
Search mailbox rules and Outlook account activity because later NodeRabbit variants can harvest addresses from local mail artifacts.
Review repository collaborators, webhooks, actions, secrets, and protected-branch settings for unauthorized changes.
Compare release artifacts with reproducible builds or trusted signatures. A clean repository view does not automatically prove distributed binaries are clean.
Invalidate database and API credentials stored in environment files, shell history, editor settings, or local documentation.
Monitor for re-use attempts after rotation. Failed access with old keys can reveal which external service the attacker reached.
Do not restore the original coding challenge into a rebuilt environment. Preserve it offline only for authorized analysis.
Share campaign indicators with trusted security contacts. Other developers may have received the same recruiter approach under a different identity.
Schedule a follow-up review after recovery. Delayed alerts, old token use, or new recruiter messages can reveal unfinished parts of the incident.
Frequently Asked Questions
What is NodeRabbit RAT?
It is cross-platform Node.js malware that gives operators file, process, system, and command access on compromised developer computers.
Does NodeRabbit affect only Windows?
No. Documented variants include persistence for Windows, Linux, macOS, and WSL-linked environments.
Is every local Node.js dependency suspicious?
No. Local packages have legitimate uses. Risk increases when an unsolicited archive bundles an unexplained dependency that launches a hidden process.
Can deleting the assessment stop NodeRabbit?
Not reliably. The RAT can copy itself elsewhere and establish startup, editor, cron, task, or repository-hook persistence.
Why inspect Git hooks after infection?
Advanced variants can append a Node launcher to post-checkout and post-merge hooks, causing later developer actions to restart malware.
Should a personal-device victim notify an employer?
Yes when company code, tokens, email, VPN, cloud, or repositories were accessible. Organizational logs and revocation can limit wider damage.
The Bottom Line
NodeRabbit turns an ordinary hiring exercise into cross-platform remote access, then buries persistence inside update folders, editor behavior, and developer workflows.
Isolate quickly, inspect every platform and repository, rotate all reachable secrets, and rebuild sensitive machines when complete removal cannot be demonstrated.
10 Rules to Avoid Online Scams
Here are 10 practical safety rules to help you avoid malware, online shopping scams, crypto scams, and other online fraud. Each tip includes a quick “if you already got hit” action.
Stop and verify before you click, log in, download, or pay.
Most scams win by creating urgency. Verify using a trusted method: type the website address yourself, use the official app, or call a known number (not the one in the message).
If you already clicked: close the page, do not enter passwords, and run a malware scan.
Keep your operating system, browser, and apps updated.
Updates patch security holes used by malware and malicious ads. Turn on automatic updates where possible.
If you saw a scary “update now” pop-up: close it and update only through your device settings or the official app store.
Use layered protection: antivirus plus an ad blocker.
Antivirus helps block malware. An ad blocker reduces scam redirects, phishing pages, and malvertising.
If your browser is acting weird: remove unknown extensions, reset the browser, then run a full scan.
Install apps, software, and extensions only from official sources.
Avoid cracked software, “keygens,” and random downloads. During installs, choose Custom/Advanced and decline bundled offers you do not recognize.
If you already installed something suspicious: uninstall it, restart, and scan again.
Treat links and attachments as untrusted by default.
Phishing often impersonates delivery services, banks, and popular brands. If it is unexpected, do not open attachments or log in through the message.
If you entered credentials: change the password immediately and enable 2FA.
Shop safely: research the store, then pay with protection.
Be cautious with brand-new stores, “closing sale” stories, and prices that make no sense. Prefer credit cards or PayPal for dispute options. Avoid wire transfers, gift cards, and crypto payments.
If you already paid: contact your card issuer or PayPal quickly to dispute the transaction.
Crypto rule: never pay a “fee” to withdraw or recover money.
Common patterns include fake profits, then “tax,” “gas,” or “verification” fees. Another is a “recovery agent” who demands upfront crypto.
If you already sent crypto: stop paying, save evidence (wallet addresses, TXIDs, chats), and report the scam to the platform used.
Secure your accounts with unique passwords and 2FA (start with email).
Use a password manager and unique passwords for every account. Enable 2FA using an authenticator app when possible.
If you suspect an account takeover: change passwords, sign out of all devices, and review recent logins and recovery settings.
Back up important files and keep one backup offline.
Backups protect you from ransomware and device failure. Keep at least one backup on an external drive that is not always connected.
If you suspect infection: do not connect backup drives until the system is clean.
If you think you are a victim: stop losses, document evidence, and escalate fast.
Move quickly. Speed matters for disputes, account recovery, and limiting damage.
Stop payments and contact: do not send more money or respond to the scammer.
Call your bank or card issuer: block transactions, replace the card if needed, and start a dispute or chargeback.
Secure your email first: change the email password, enable 2FA, and remove unfamiliar recovery options.
Secure other accounts: change passwords, enable 2FA, and log out of all sessions.
Scan your device: remove suspicious apps or extensions, then run a full malware scan.
Save evidence: screenshots, emails, order pages, tracking pages, wallet addresses, TXIDs, and chat logs.
Report it: to the payment provider, marketplace, social platform, exchange, or wallet service involved.
These rules are intentionally simple. Most online losses happen when decisions are rushed. Slow down, verify independently, and use payment methods and account controls that give you recourse.
Hello! I'm Lapain Epuran, your go-to source for detailed and honest product reviews. From tech gadgets to miracle cures, I provide insights to help you make informed choices. Join me as we discover what's truly worth your time and money.