


The subject line looks like something an office system might generate. There’s a reference number, a notice waiting for review, and very little explanation.
If that sounds familiar, take a second look at what arrived. There’s an important difference between getting a notice and being asked to open one.
Overview
A reference number without a recognizable department
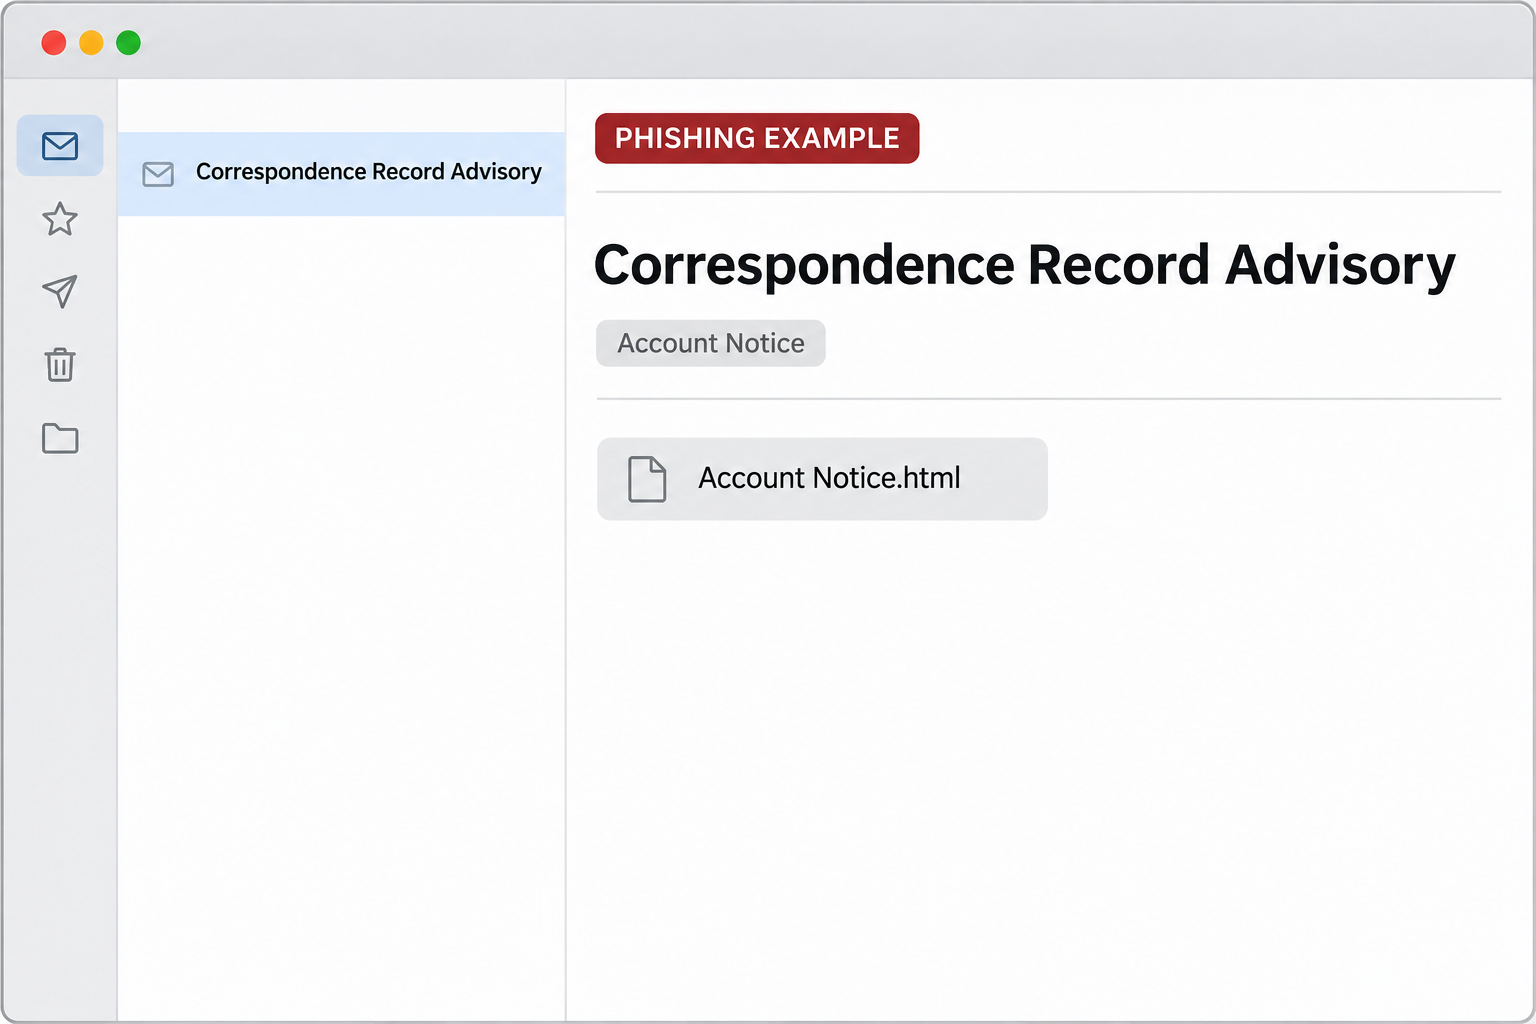
The Account Notice email scam presents itself as routine paperwork. Its subject calls the message a correspondence record advisory and includes a review reference, 1758 in the documented example.
Inside, the sender calls itself Message Center. The name doesn’t identify an email provider, a government office, or a particular part of your company.
That missing identity matters more than the reference number. If you don’t know who supposedly issued the notice, there’s no independent record to match the number against.
The email also says not to reply. That sounds like ordinary automated mail, but it leaves the attachment as the only route the message supplies for seeing the purported notice.
The attachment opens a page, not an account record
The attached file is HTML. Opening HTML typically hands it to a web browser, even when the file started in an email and lives in your Downloads folder.
In the example behind this warning, the page displays a login prompt. It does not display the account record the message said was ready for review.
A browser can show an official-looking screen without having opened your actual mailbox. The logo, spacing, fonts, and even a prefilled email address don’t authenticate a page.
Look at these differences before you do anything with an unexpected account notice:
- The email offers no independently recognizable issuer for its reference number.
- The supposed notice is delivered as a page file instead of appearing inside an established account portal.
- The page requests a mailbox password, which isn’t needed to tell you what kind of notice you received.
- The message doesn’t give you a trusted way to confirm that the record exists.
The immediate concern is what you entered or ran
The documented attachment shows credential phishing. It is built to make an email sign-in feel like a necessary step before reading a notice.
The sample doesn’t establish that opening it installed a program. It also doesn’t establish that every message with the words Account Notice contains the same file.
Entering a password is different from seeing the attachment and stopping. A third possibility is that your browser downloaded a file and you ran it.
Keep those scenarios separate. It tells you whether to spend your first few minutes reporting the email, securing your mailbox, or keeping a potentially affected device away from work systems.
How the Account Notice Email Scam Works
Step 1: A subject line borrows the sound of an internal system
A correspondence record advisory sounds less urgent than a final warning. That’s part of what makes it plausible. It resembles something a records system might send without human intervention.
The case number feels like a detail you can check later. The email depends on you taking that detail as evidence before you’ve actually checked it.
Compare it with a real help desk message. You can usually identify the system involved, find the matching ticket, or verify the sender through a known channel.
Here, the name Message Center asks you to supply the context yourself. A student might assume it means the school. An employee might assume it means central IT.
Step 2: The email moves the supposed notice into an attachment
A written notice could explain why it was sent. This one says the explanation is attached. That moves your attention from the sender’s identity to opening the file.
You may see an ordinary attachment tile, especially on a phone or in a narrow window. Some apps shorten long filenames or show an icon instead of the full extension.
There’s no need to open the file to learn its type. Where your mail client shows attachment details, inspect the displayed name without selecting its preview or download action.
If the message was unexpected and your client doesn’t make that distinction clear, leave the file alone. The attachment isn’t a required step in reporting the message.
Step 3: A browser window makes the form feel familiar
After the HTML opens, the browser looks like the place you usually sign in. But a page opened from a file isn’t your provider’s account page.
A local file may show a file location instead of your provider’s address. The address can change if the page redirects, so don’t rely on a particular prefix.
The better question is whether you reached the provider through a route you already trust. A sign-in that began inside an unsolicited attachment fails that check.
You don’t have to enter a dummy password to see what happens. Close the tab. Testing a suspicious form won’t verify the sender or prove how it handles other visitors.
Step 4: A mailbox password can create more than one problem
An email account often receives password reset links and notices about new sign-ins. Anyone who gets in may be able to read those messages before you do.
Work mail adds a second concern. Messages from your real account can look credible to suppliers and colleagues, even if someone else wrote them.
A password isn’t the only thing to disclose. If a sign-in code or approval request followed the form, tell your support team whether you shared or approved it.
An error message afterward doesn’t tell you whether your entry reached anyone. If you provided a real password, treat it as exposed even if the next screen looked broken.
Verify the Notice Without Touching Its Attachment
Use the place where genuine notices normally live
Go to your email provider or employee portal using a bookmark you already trust. If you normally open notices from a company support app, go there directly.
Check whether the portal shows a ticket, restriction, or request from your organization. Don’t pick a login site by searching for the generic name Message Center.
Real notices don’t appear in the same place on every service. If you can’t find one, ask the people who run your account through their ordinary support channel.
A concise question is enough: does the organization send correspondence record advisories, and does that reference belong to an open case for your account?
Use sender and timing together
The displayed sender is not necessarily the address that sent the message. Expand the sender details in your mail app if you can do so without opening the attachment.
Even a recognizable address isn’t the last word. A genuine account can be compromised, and a familiar display name can be shown with an unrelated sending address.
Think about the timing. Had you just requested an account change, opened a support ticket, or agreed to review a file? Check that activity in the original channel.
The email’s suggestion to contact your usual IT support can be sensible advice inside a deceptive message. Follow the independent support route without following the attachment instruction.
Keep the evidence where it can be handled safely
For a work account, the original email can help the security team search for copies and assess recipients. Use your organization’s phishing report button or designated help desk process.
Don’t send the HTML to a colleague to ask what they see. It creates another opportunity for the file to open and can spread the risk inside the organization.
On a personal account, use the mail provider’s report function. If you need to save a screenshot for support, keep the sender and subject visible without sharing passwords or codes.
A report can include what the browser displayed without reproducing the page. Describe the file type, rough time, and whether you entered anything. There’s no reason to reopen it.
If the attachment was already saved
Saving and opening are separate actions. If the file is sitting in Downloads and you never launched it, don’t double-click it to confirm its identity.
On a work computer, follow your organization’s instructions for handling it. They may want the original attachment preserved in the mail system, not copied between devices.
Check whether your mail app opened a preview automatically or you intentionally opened the file in a separate browser window. Tell support which happened if you remember.
If you aren’t sure what ran, say that plainly. A list of times, prompts, and files you noticed gives responders a better starting point than a guess about infection.
If the message reached a shared inbox, tell its owner which device opened the file. Other members may have seen the notice without taking the same action.
What to Do if You Have Fallen Victim to This Scam
If you only received it, report it and leave the attachment closed.
Viewing the message alone doesn’t mean you’ve lost control of the mailbox. A workplace security team can tell you whether to keep the original after reporting it.
If you opened the attachment, close the tab and note what happened.
Record whether the browser only displayed a form or also downloaded something. Don’t reopen the file to fill in gaps in your memory.
Replace any password you entered using a trusted device.
Open your provider through its known site or app. If this was a work mailbox, call your regular help desk from another device if necessary.
Start with the exposed mailbox. Then replace the same password anywhere else you used it, especially on accounts whose reset messages go to that mailbox.
Ask about revoking access as well as resetting the password.
Tell support if you approved a sign-in or entered a one-time code. Ask them to review active sessions, connected apps, and recent changes to recovery information.
If you can still sign in, look for unexpected forwarding rules, hidden filters, replies, or sent messages. Capture suspicious settings before removing them if support wants evidence.
Handle unexpected software separately.
If a second file ran, an extension was installed, or the device behaved unexpectedly, stop using it for sign-ins. Follow your employer’s incident procedure on work equipment.
On a personal device, a Malwarebytes scan can help check suspected downloads or execution. AdGuard can reduce exposure to some malicious web pages, but it won’t secure a stolen mailbox.
Protect the people and accounts connected to the inbox.
Tell support if the mailbox receives payroll, banking, or supplier instructions. Check for password resets you didn’t request and contact an affected service through its normal support channel.
If fraudulent replies went out, notify the relevant people separately. Include enough context to identify the false message without forwarding the original attachment.
Is Your Device Infected? Run a Free Malware Scan
Slow performance, constant pop-ups, or strange behavior? These are classic signs of a malware infection. A quick way to check is to scan your device with Malwarebytes Free, one of the most trusted malware removal tools available. If you only visited a scam page and didn’t download or install anything, this scan is optional.
The free version detects and removes the most common threats, including:
- Adware — the cause of those annoying pop-ups
- Browser hijackers — unwanted redirects and changed homepages
- Trojans and spyware — hidden programs stealing your data
- Potentially unwanted programs (PUPs) — software you never asked for
👉 Select your device below — Windows, Mac, or Android — then follow the simple steps to download Malwarebytes, scan your system, and remove any threats it finds. The scan usually takes 5 to 20 minutes.
Run a Malware Scan with Malwarebytes for Windows
Malwarebytes is one of the most popular and trusted anti-malware tools for Windows — and it’s completely free for removing infections. It catches threats that many antivirus programs miss, including adware, browser hijackers, and trojans. Follow the steps below to scan your PC and remove what Malwarebytes finds.
Download Malwarebytes
Click the button below to download the latest version of Malwarebytes for Windows from the official source. The free version is all you need — it will scan your computer and remove adware, browser hijackers, and other malicious software at no cost.
Download MalwarebytesOfficial installer for Windows 11 and 10. Your download starts right away.Want real-time protection? See Malwarebytes Premium Malwarebytes Free for WindowsScans and removes malware at no cost
-
Install Malwarebytes
When the download finishes, open your Downloads folder and double-click the MBSetup file. If Windows shows a User Account Control pop-up, click “Yes” to allow the installation.
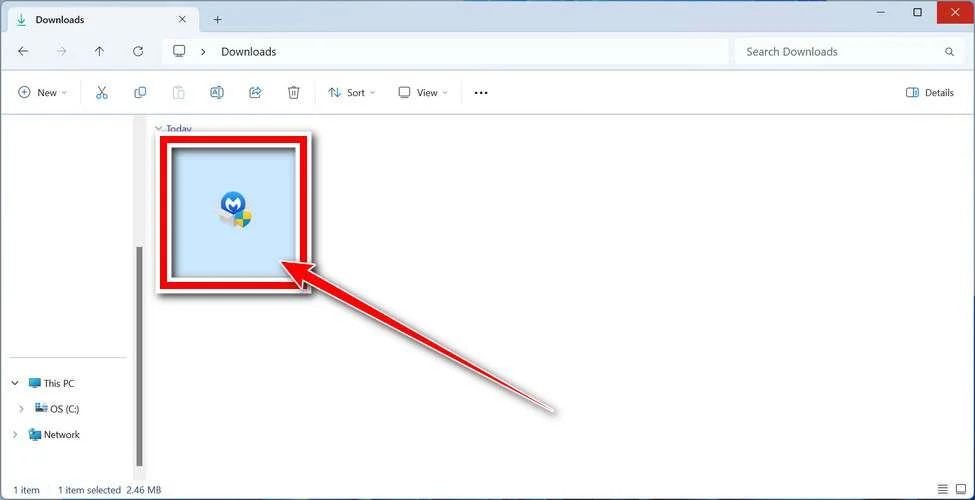
Follow the On-Screen Prompts to Install Malwarebytes
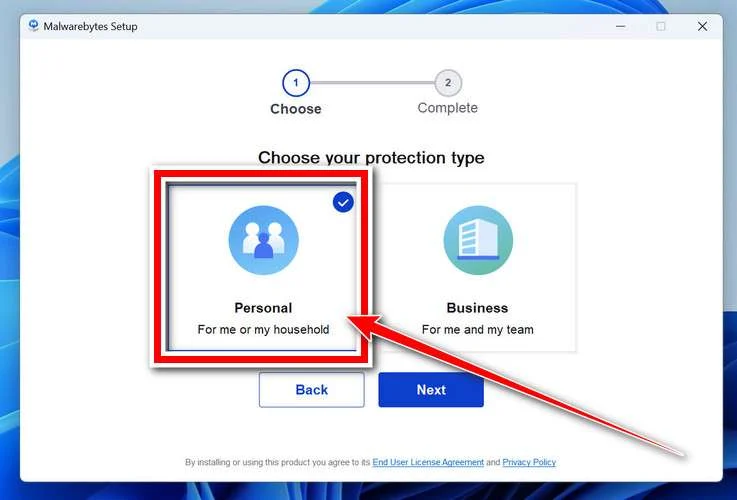
The setup wizard will walk you through a few quick screens:
-
Choose where you’re installing the program — “Personal Computer” or “Work Computer” — then click Next.
-
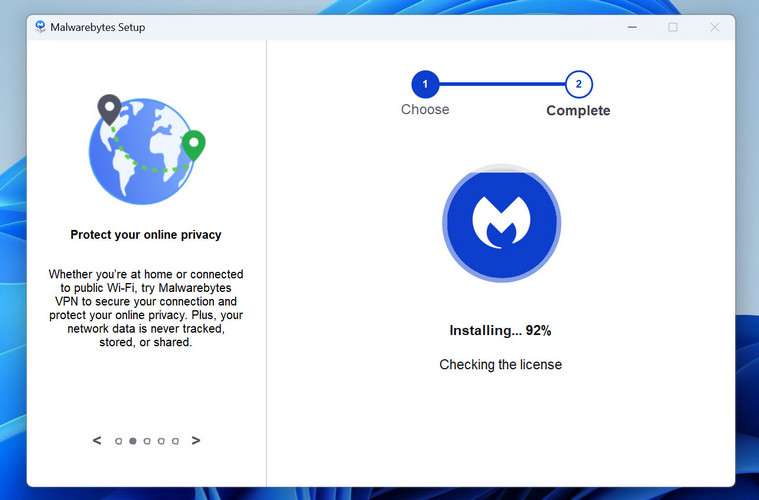
Malwarebytes will now install on your device. This usually takes under a minute.
-
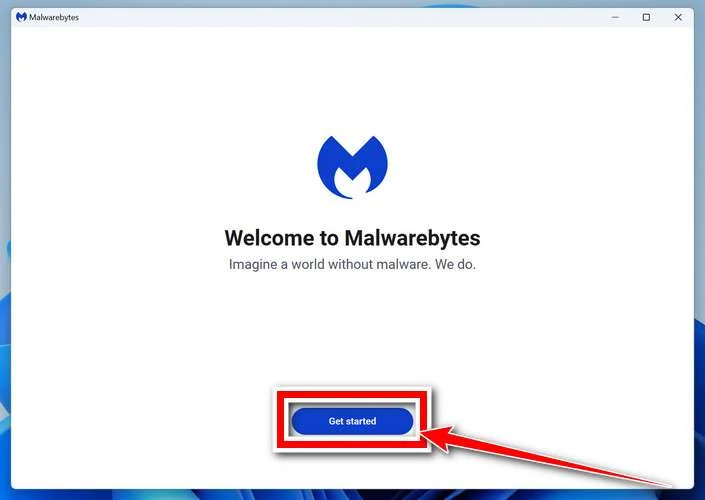
When installation is complete, the “Welcome to Malwarebytes” screen will open automatically.
-
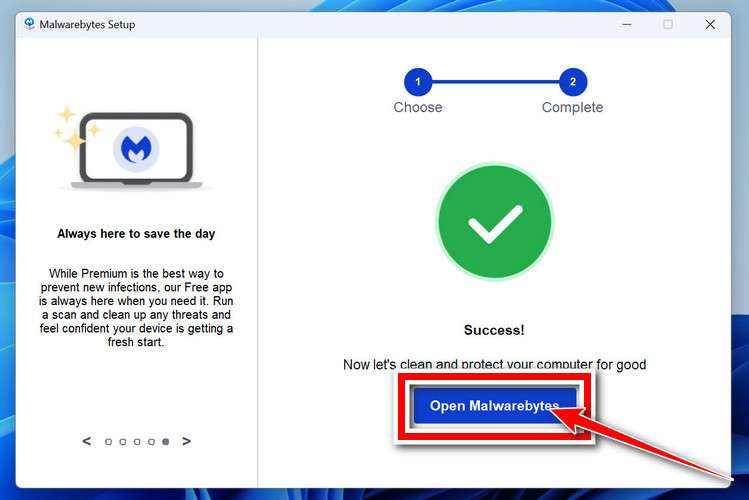
On the final screen, click Open Malwarebytes to launch the program.
-
Optional: Check for rootkits with a Custom Scan
You don’t need to change any settings for a normal scan. The standard Threat Scan in the next step is enough for most problems, so you can go straight to it.
If you also want to check for rootkits, use a Custom Scan. In current versions of Malwarebytes, rootkit scanning is only available there:
- On the Scanner tile, click the three-dot menu and select Advanced Scan.
- Choose Custom Scan. In its options, check Scan for rootkits.
- Select your system drive (usually C:\) as the location to scan, then start the scan. It takes longer than a Threat Scan.
- When it finishes, review and quarantine the results as described in the steps below.
Rootkit scanning isn’t available on Windows devices with ARM processors.
Start the Scan
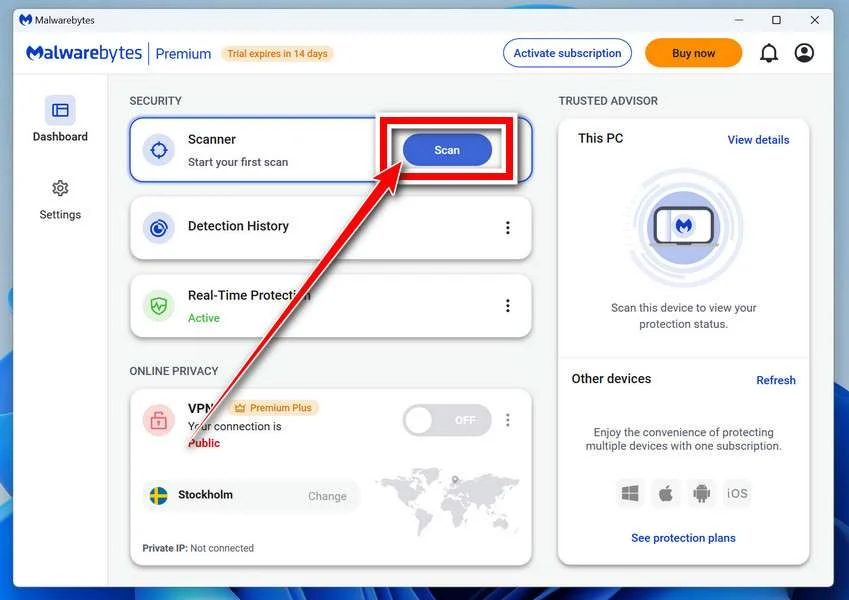
Click the blue Scan button. Malwarebytes will automatically update its virus database and start checking your computer for malware.
-
Wait for the Scan to Finish
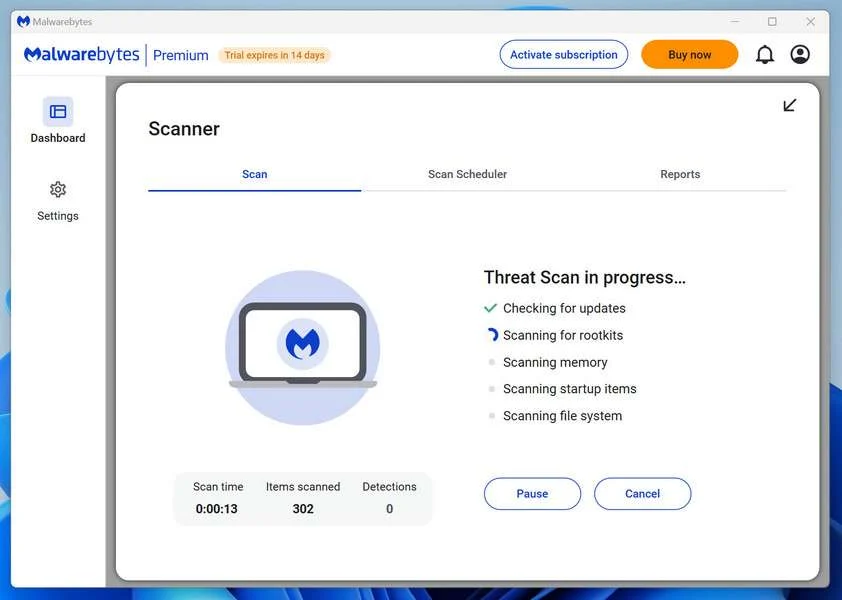
The scan checks your entire system for browser hijackers and other malicious programs, so it can take 5 to 20 minutes depending on your computer. Feel free to do something else — just check back occasionally to see the progress.
-
Quarantine the Detected Threats
When the scan is done, you’ll see a list of everything Malwarebytes found — malware, adware, and potentially unwanted programs. Click the “Quarantine” button to remove all of them at once.
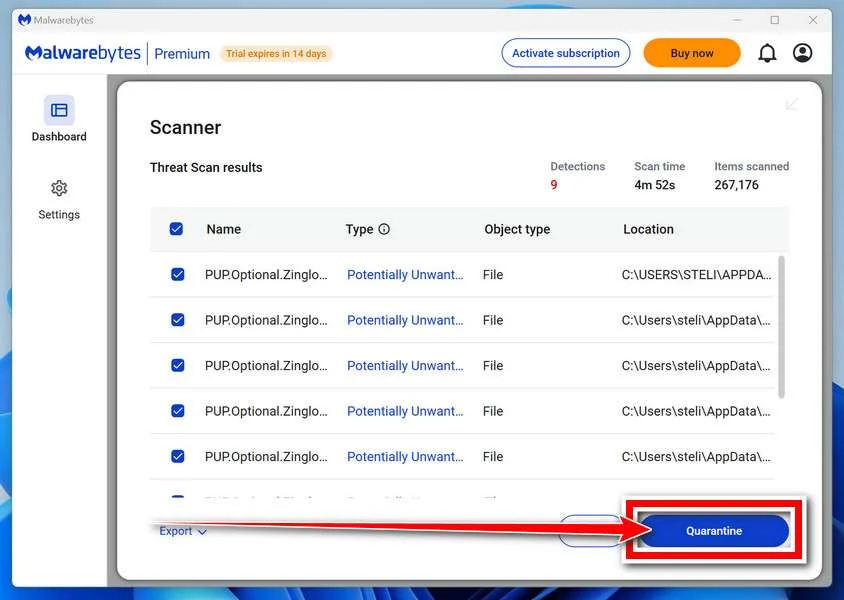
Malwarebytes will now remove the malicious files and registry entries and move them safely into quarantine.
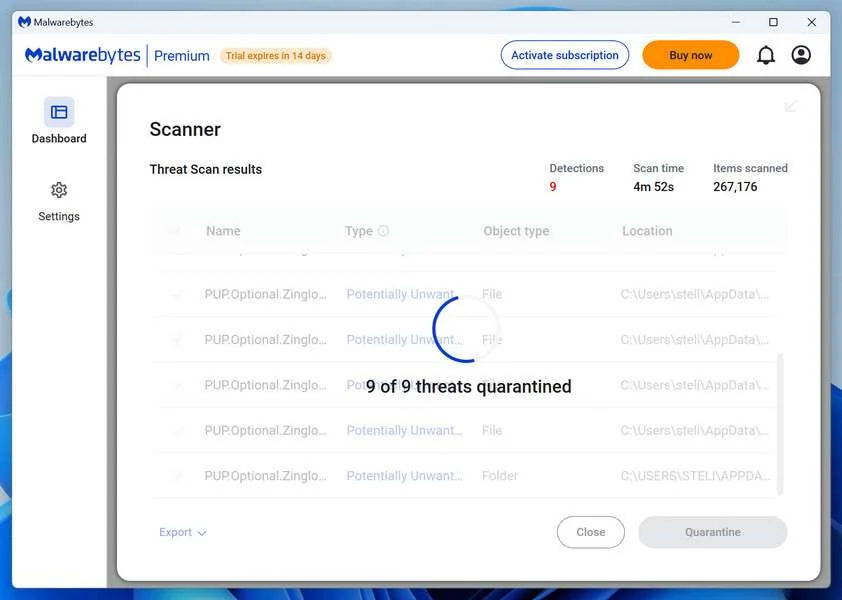
-
Restart Your Computer
Some threats can only be fully removed after a reboot. If Malwarebytes asks you to restart, click Yes. Once you’re logged back in, Malwarebytes has finished removing the threats it found.
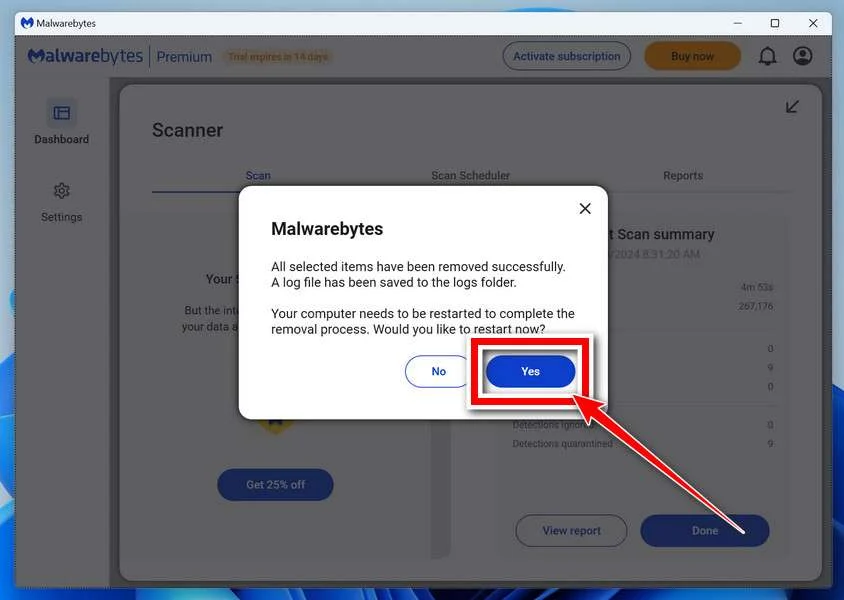
When the scan is done, check whether the problems you noticed have stopped. If they continue, see the options below.
If you are still having problems with your computer after completing these instructions, then please follow one of the steps:
- Run a computer scan with ESET Online Scanner
- Ask for help in our Windows Malware Removal Help & Support forum.
Run a Malware Scan with Malwarebytes for Mac
Malwarebytes for Mac is a free on-demand scanner that removes the malware other security software tends to miss — adware, browser hijackers, and unwanted programs included. Cleaning an infected Mac with Malwarebytes has always been completely free, and it’s our go-to recommendation. Follow the steps below to scan your Mac and remove what Malwarebytes finds.
-
Download Malwarebytes for Mac
Click the button below to download the latest version of Malwarebytes for Mac.
Download MalwarebytesOfficial installer for macOS. Your download starts right away.Want real-time protection? See Malwarebytes PremiumMalwarebytes Free for MacScans and removes malware at no cost -
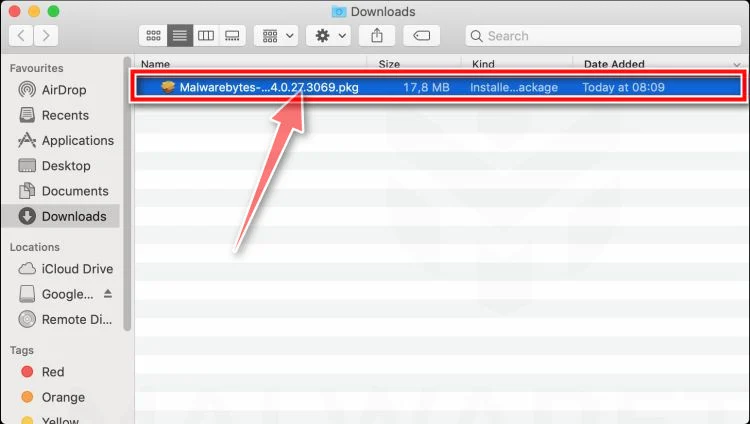
Open the Malwarebytes setup file
When the download finishes, open your Downloads folder and double-click the setup file to begin the installation.
-
Follow the On-Screen Prompts to Install Malwarebytes
The Malwarebytes for Mac Installer will guide you through a few quick screens. Click “Continue” and keep following the prompts until the installation completes.
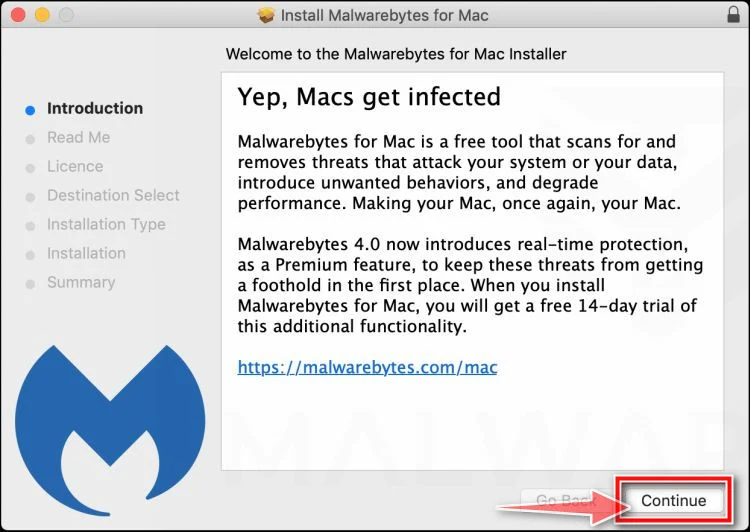
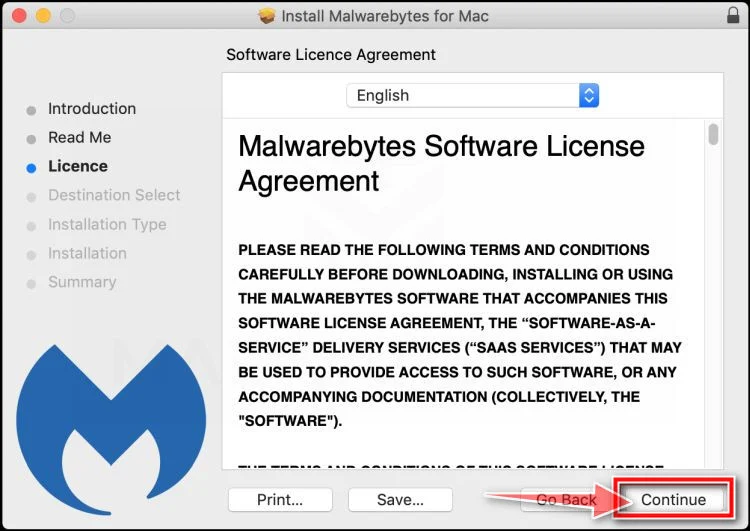
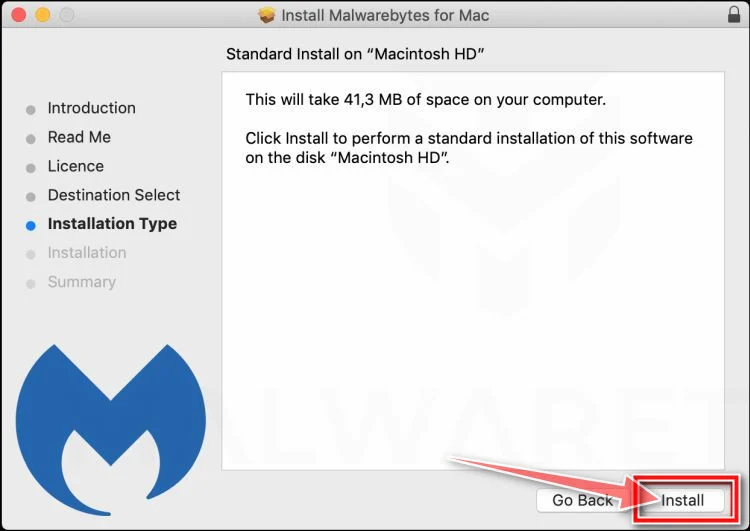
When the installation is complete, Malwarebytes opens to the Welcome to Malwarebytes screen. Click “Get started“.
Malwarebytes needs Full Disk Access to check your whole Mac. When it asks, open System Settings > Privacy & Security > Full Disk Access, turn on Malwarebytes (it may be listed as Malwarebytes Protection), and confirm with your password or Touch ID. Then return to Malwarebytes. On macOS Monterey and earlier, this setting is in System Preferences > Security & Privacy > Privacy.
-
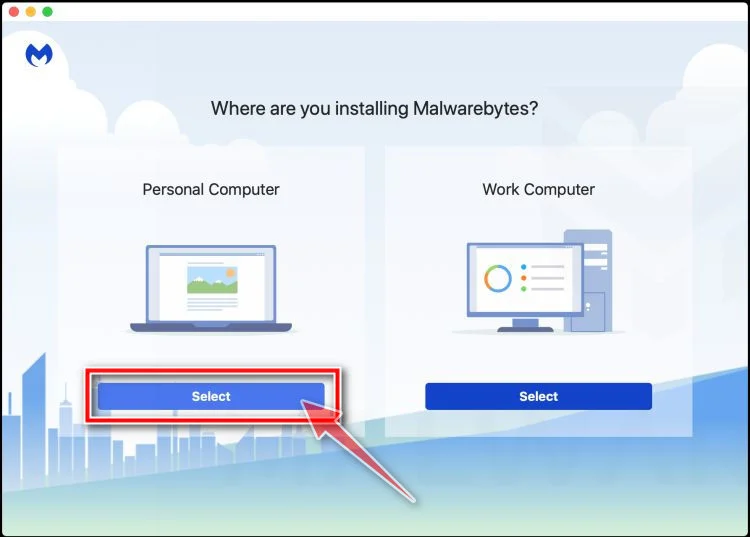
Select “Personal Computer” or “Work Computer”
Malwarebytes will ask what type of computer you’re installing it on. Click either Personal Computer or Work Computer, whichever applies.
-
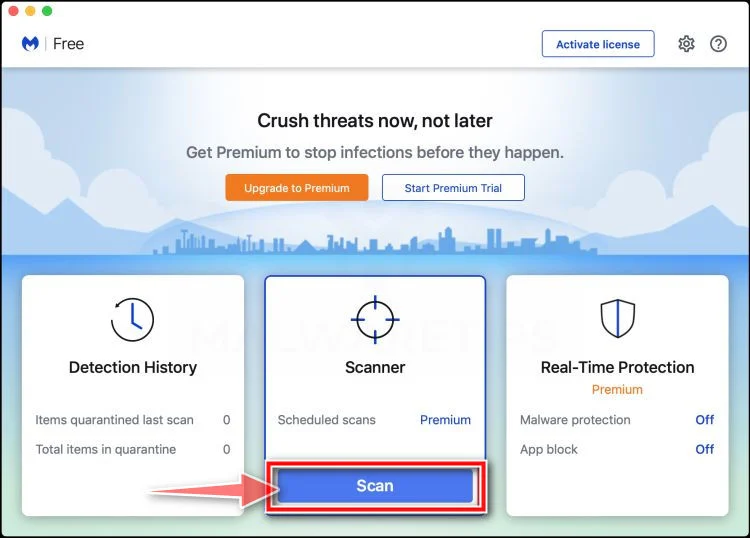
Start the Scan
Click the “Scan” button. Malwarebytes will automatically update its detection database and begin checking your Mac for malware.
-
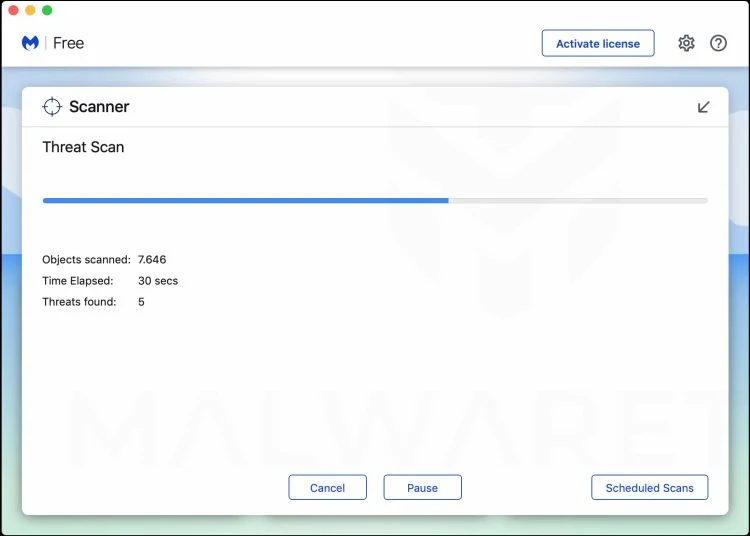
Wait for the Scan to Finish
Malwarebytes will scan your Mac for adware, browser hijackers, and other malicious programs. This can take a few minutes, so feel free to do something else — just check back occasionally to see the progress.
-
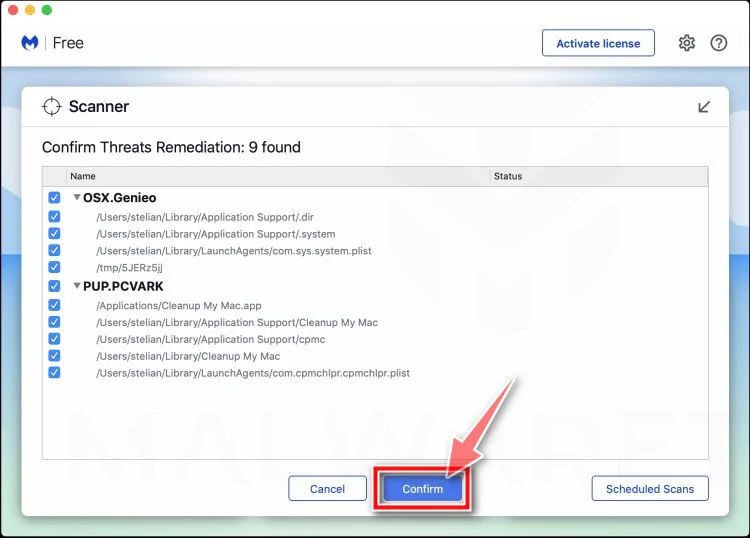
Quarantine the Detected Threats
When the scan is done, you’ll see a list of everything Malwarebytes found. Click the “Quarantine” button to remove all the threats at once.
-
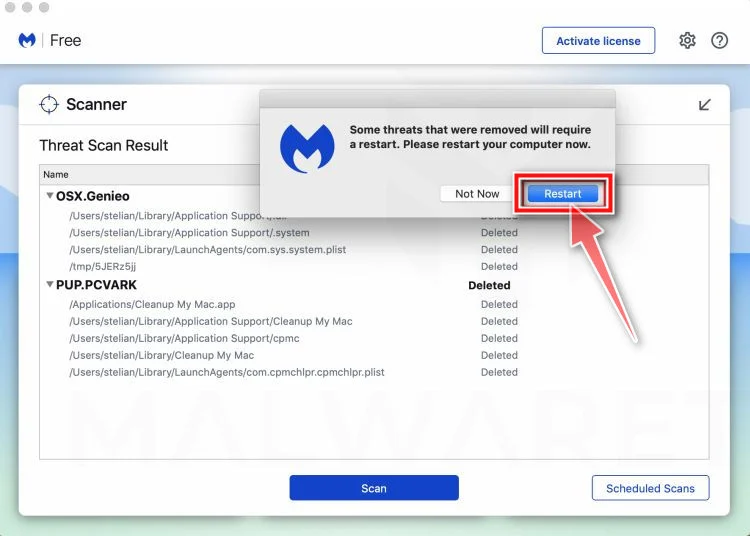
Restart Your Mac
Malwarebytes will now remove all the malicious files it found. Some threats can only be fully removed after a reboot — if Malwarebytes asks you to restart, allow it. Once you’re logged back in, check whether the problems you noticed have stopped. If they come back, save the scan report and ask for help in our forum.
If the problems you noticed continue after the scan, see the options below.
If you are still experiencing problems while trying to remove a malicious program from your computer, please ask for help in our Mac Malware Removal Help & Support forum.
Run a Malware Scan with Malwarebytes for Android
Malwarebytes for Android scans your phone or tablet for malware, adware, and potentially unwanted apps. The free version scans only when you start a scan. Real-time protection, which checks apps automatically, is part of the paid Premium version.
-
Download Malwarebytes for Android.
You can download Malwarebytes for Android by clicking the link below.
Get Malwarebytes for AndroidOpens Google Play in a new tab.Want real-time protection? See Malwarebytes Premium for AndroidMalwarebytes for AndroidScans your phone and removes malware at no cost -
Install Malwarebytes for Android on your phone.
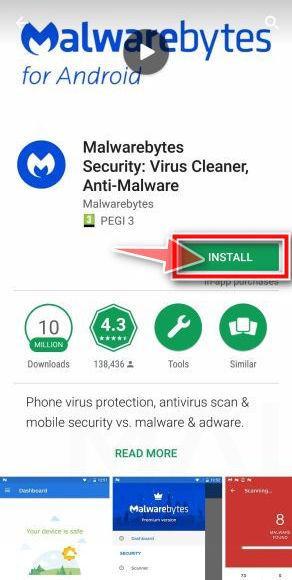
In the Google Play Store, tap “Install” to install Malwarebytes for Android on your device.
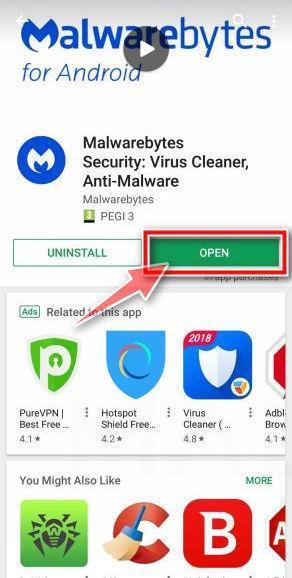
When the installation process has finished, tap “Open” to begin using Malwarebytes for Android. You can also open Malwarebytes by tapping on its icon in your phone menu or home screen.
-
Follow the on-screen prompts to complete the setup process
When Malwarebytes opens, it walks you through a short setup. Tap Get started and follow the prompts. If you see an offer for a trial or a paid plan, read it before you accept. You can skip it and keep using the free scanner.
Malwarebytes will ask for permission to access the files on your phone so it can scan them. Tap Allow, or turn on the permission in the Android screen that opens, then return to Malwarebytes.
-
Run a scan with Malwarebytes for Android
On the main screen, tap Scan now. In some versions, you open the menu, tap Scanner, and then tap Run a scan.
-
Wait for the Malwarebytes scan to complete.
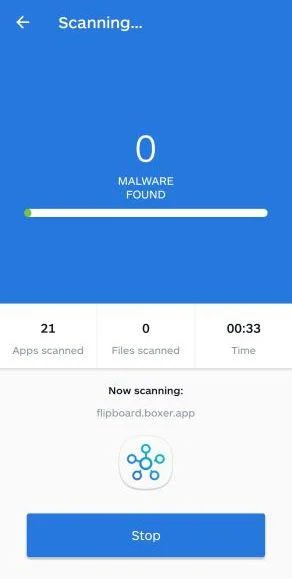
Malwarebytes will now start scanning your phone for adware and other malicious apps. This process can take a few minutes, so we suggest you do something else and periodically check on the status of the scan to see when it is finished.
-
Remove the detected apps.
When the scan has been completed, you will see a list of the threats that Malwarebytes for Android has detected. Next to each detected item, tap the menu icon (three dots), then choose to uninstall the app or delete the file. Android then asks you to confirm. Tap OK or Uninstall to remove the app.
-
Restart your phone.
When the detected apps are removed, restart your phone if Malwarebytes asks you to. Then check whether the problems you noticed have stopped.
If the problems you noticed continue after the scan, see the options below.
If you are still having problems with your phone after completing these instructions, then please follow one of the steps:
- Ask for help in our Mobile Malware Removal Help & Support forum.
- Only as a last resort, reset your phone to factory settings. Read the warning below first.
- Back up your photos, videos, files, and messages, for example to your Google account or a computer.
- Make sure you know your Google account email and password. The phone asks for them after the reset. If you changed the password recently, Google recommends waiting 24 hours before you reset.
- On a Samsung phone, also make sure you know your Samsung account password.
- If you use an authenticator app for two-step verification, move your accounts to another device or save your backup codes first.
Stay Protected: Block Ads and Malicious Sites
No scan can prove a device is completely clean, so it helps to block threats before they reach you. Most infections start with a malicious ad or a fake download button — so blocking them at the source is your best defense.
We recommend AdGuard, which blocks malicious ads, phishing pages, and dangerous redirects before they can reach you.
👉 Download AdGuard and browse safely
What a Password Change Won’t Tell You
A password reset is a priority after disclosure. It doesn’t show which messages were read, whether the account sent mail, or whether another application still has permission.
Start with security activity at the time you opened the attachment. Unfamiliar locations can be clues, but location alone isn’t reliable. Look for sessions and changes you can’t explain.
In a work setting, the help desk may have sign-in and mailbox audit records you can’t see. Microsoft’s phishing response playbook describes the broader investigation administrators can run.
For a personal Outlook account, Microsoft’s compromised account guidance calls out connected accounts, forwarding, and automatic replies. Those are useful checks once access is restored.
If your organization was expecting a record, ask for a clean copy through its ticket or document system. You can finish the legitimate task without trusting this email.
Frequently Asked Questions
Is the Correspondence Record Advisory email real?
The documented example uses a generic sender and an HTML attachment that opens a fake sign-in. Ask your provider or IT team directly about any genuine record you were expecting.
Does Ref. 1758 identify my mailbox or ticket?
Not by itself. It’s a number printed in the message. A genuine ticket reference should match a record your organization can look up without opening the attachment.
Is an HTML attachment the same as a PDF?
No. An HTML attachment is a webpage file your browser can display. A label in the email may describe it as a notice, but that doesn’t make it a PDF.
Is my computer infected if the attachment showed a form?
A displayed form isn’t evidence of installation. Close it and report what you saw. If a separate file ran or your browser changed unexpectedly, seek device help as well.
What if the fake form already showed my address?
The address may have come from the message or file. It doesn’t prove the sender can read your mailbox. Tell support if you also entered a password or approved access.
Can I trust the email because it says to contact regular IT support?
No. Use regular IT support, but do it independently. That sensible line doesn’t verify the sender or make the HTML safe to open.
The Bottom Line
Leave the Account Notice attachment closed. A reference number isn’t a reason to put your mailbox password into a page you reached through an unexpected file.
If the notice might be real, check through your regular portal or IT help desk. If you entered a password, secure the account now and tell support what you disclosed.

Join the discussion
0 commentsShare your experience or ask a question about this article.
Discussion
Start the conversation
Have a question or something useful to share? Add the first comment.