

A convincing Cloudflare security screen can appear without warning after a pop-up, advertisement, or redirect. The page may look familiar enough that its unusual instructions do not immediately feel dangerous.
This guide examines the fake “Human Verification” page that tells visitors to perform three steps on their keyboard, explains what those steps really do, and shows how to respond safely.
Overview
The Fake Cloudflare Human Verification scam is a malware-delivery operation that disguises a dangerous Windows command as a routine browser security check. It is commonly known as ClickFix because the victim is persuaded to “fix” or verify something by running the attacker’s code.
Visitors often reach the page through pop-up advertisements, malicious ad networks, compromised websites, piracy and streaming pages, fake download buttons, browser notification spam, or several redirects chained together. The page they originally visited may not be the page that finally displays the fake verification.
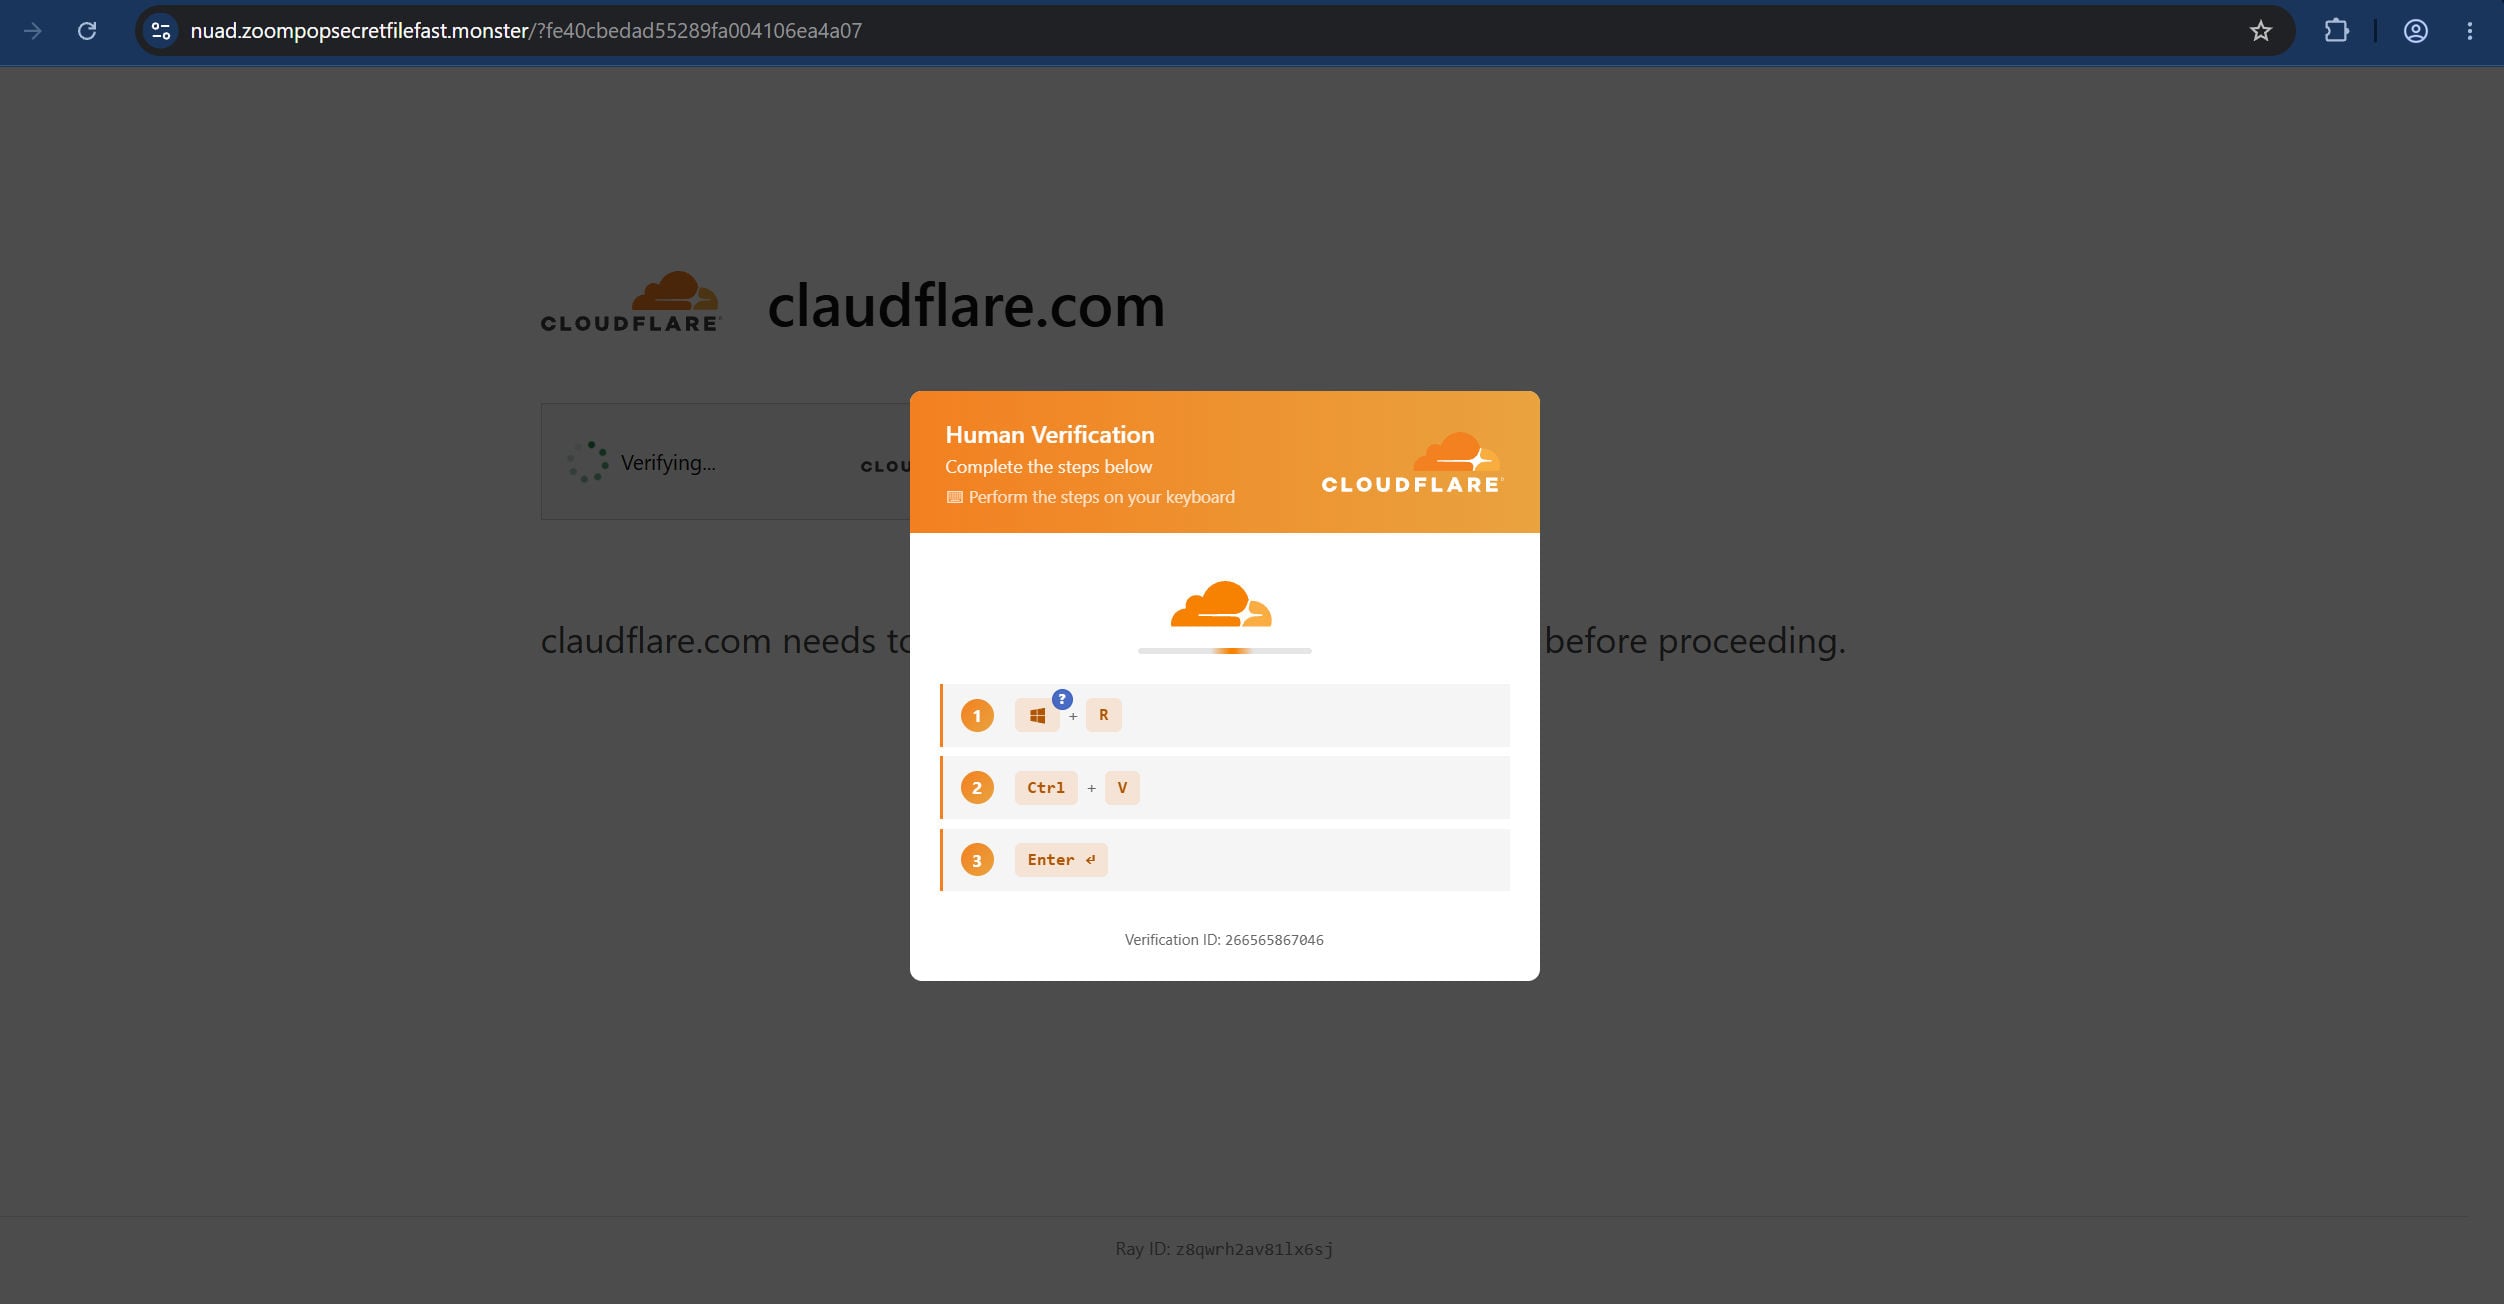
The example provided to MalwareTips was loaded from nuad.zoompopsecretfilefast[.]monster. That address has no connection to Cloudflare. The page simply copies Cloudflare’s name, orange logo, layout, security language, spinner, and Ray ID styling.
The address bar is the strongest clue. Large text inside a webpage can say “cloudflare.com,” but it cannot change the actual registered domain shown by the browser. Scammers depend on people looking at the branded page instead of the address bar.
This operation is more serious than an ordinary notification-spam page. The visitor is not merely asked to click Allow. The fake verification instructs the visitor to open the Windows Run dialog, paste text controlled by the website, and execute it.
If all three steps are completed, the computer may download and run an information stealer, remote-access trojan, loader, or another malicious payload. The exact malware can change from one domain or campaign to the next.
From the screenshot alone, it is not possible to identify the exact final payload delivered by this particular domain. It is accurate to say the page uses a known malware-installation technique, but it would be inaccurate to claim a specific trojan without obtaining and safely analyzing the clipboard command and subsequent files.
The complete text displayed by the fake pop-up
The dialog in the supplied screenshot presents the following message. Do not perform these steps if you see them on a website.
Complete the steps below
Perform the steps on your keyboard
1. Windows key + R
2. Ctrl + V
3. Enter
Verification ID: 266565867046
Behind the dialog, the page shows a fake Cloudflare verification screen with “Verifying…” and a message claiming that cloudflare.com needs to review the security of the connection before proceeding. A fake Ray ID appears at the bottom to make the imitation feel more authentic.
The verification ID and Ray ID are decorative. They do not prove that Cloudflare issued the challenge or that a real security check is taking place.
Real Cloudflare verification does not use the Windows Run dialog
Cloudflare’s genuine Turnstile system performs browser-based checks and produces a verification token for the protected website. According to the official Cloudflare Turnstile documentation, challenges can be managed, non-interactive, or invisible.
When interaction is required, a legitimate managed widget may ask the visitor to select a checkbox. Non-interactive and invisible modes require no visitor action at all.
A real Cloudflare verification will never need you to:
- Open the Windows Run dialog with Windows key + R.
- Paste a command from the clipboard.
- Open PowerShell, Command Prompt, Terminal, or another system console.
- Disable Microsoft Defender or another security product.
- Download a verification program, browser update, certificate, or codec.
- Execute a script to prove that you are human.
Cloudflare’s real verification is completed between the browser, the protected website, and Cloudflare’s validation service. It does not require a visitor to execute operating-system commands.
Why Windows key + R, Ctrl + V, and Enter are dangerous
Each key combination is a normal Windows feature. The attack becomes dangerous because the fake page combines them with clipboard manipulation and misleading instructions.
Windows key + R opens the Run dialog. Run is designed to launch programs, scripts, folders, management tools, and commands typed or pasted into it.
Ctrl + V pastes the current clipboard contents. The victim expects harmless verification text, but the website may have placed a PowerShell, command-line, script-host, or download command in the clipboard.
Enter executes the pasted content. At that moment, the user is no longer completing a web challenge. Windows is launching a command with the permissions of the signed-in account.
The page may append a harmless-looking comment or verification phrase so the visible end of the pasted line looks less suspicious. The operational command can be placed earlier in the same line and execute before the decoy text.
Microsoft Threat Intelligence reports that ClickFix campaigns frequently use human-verification and CAPTCHA lures to make people run commands through Run, PowerShell, or Terminal. The technique has been observed delivering information stealers, remote-access tools, loaders, and rootkits.
Microsoft tracks fake CAPTCHA pages under detections such as Trojan:HTML/FakeCaptcha. The defining behavior is social engineering that convinces the user to copy, paste, and execute malicious code.
The clipboard can contain much more than the victim sees
A webpage can prepare text for the clipboard after a click or apparent verification action. Because normal users rarely inspect raw clipboard data, they may never see the real instruction before pasting it into Run.
The command can be heavily obfuscated. It may use encoded text, reversed strings, environment variables, shortened URLs, or built-in Windows utilities to make the activity difficult to understand.
Common ClickFix chains abuse legitimate tools already present in Windows. PowerShell can retrieve and execute scripts. Other campaigns have used mshta.exe, rundll32.exe, script hosts, installers, or command interpreters to launch later stages.
These built-in programs are not malware by themselves. Attackers abuse them because they are trusted components that can download, decode, schedule, or run malicious content without requiring a conventional installer.
What malware can be installed through ClickFix
ClickFix is a delivery technique, not the name of one malware family. The fake Cloudflare design can be reused while the clipboard command and final payload change constantly.
Security researchers have observed ClickFix campaigns delivering:
- Information stealers that collect browser passwords, cookies, autofill data, and cryptocurrency wallets.
- Remote-access trojans that allow criminals to control the computer, browse files, and run commands.
- Loaders that install additional malware after the initial compromise.
- Banking malware designed to steal financial credentials or manipulate online sessions.
- Proxy malware that routes criminal traffic through the victim’s internet connection.
- Ransomware or tools that prepare access for a later ransomware attack.
Microsoft has reported payloads such as Lumma Stealer, XWorm, AsyncRAT, NetSupport, SectopRAT, Latrodectus, and MintsLoader in different ClickFix operations. Proofpoint researchers have documented fake CAPTCHA variants leading to Lumma Stealer and several other malware families.
These examples show what the technique is capable of delivering. They do not establish which payload was linked to the exact domain in the supplied screenshot.
What an information stealer can take
Many ClickFix campaigns prioritize credential theft because one successful command can expose far more than one website account.
A stealer may target:
- Saved usernames and passwords from Chrome, Edge, Firefox, and other browsers.
- Authentication cookies that keep accounts signed in.
- Credit-card and address information saved for browser autofill.
- Email, social media, shopping, gaming, and cloud-storage sessions.
- Cryptocurrency wallet extensions, wallet files, and copied wallet addresses.
- Password-manager data available to the infected session.
- Discord, Telegram, Steam, VPN, FTP, remote-access, and developer credentials.
- Documents, screenshots, desktop files, and information about the computer.
Changing only the Windows password does not invalidate stolen browser cookies or account sessions. Recovery must include cleaning the computer and securing the online accounts accessed from it.
How to recognize the fake Cloudflare page quickly
- The address bar shows an unrelated domain instead of the site you intended to visit.
- The page tells you to use Windows key + R, Ctrl + V, and Enter.
- The verification asks you to open Run, PowerShell, Terminal, or Command Prompt.
- The page claims that a keyboard command is required to prove you are human.
- Cloudflare branding is displayed inside the page, but the actual domain is unrelated.
- A verification ID or Ray ID is used as decoration without a genuine Cloudflare challenge.
- The page appeared after a pop-up, fake download button, streaming link, or redirect chain.
- Closing the tab triggers more pop-ups, full-screen prompts, or repeated redirects.
The keyboard instruction is decisive. No legitimate website needs you to paste an unknown command into Windows to complete a CAPTCHA.
How The Operation Works
The operation separates the initial redirect, the social-engineering page, and the final malware infrastructure. This allows criminals to replace domains or payloads without rebuilding the entire campaign.
1. A malicious advertisement or compromised page starts the redirect
The victim clicks a play button, download link, search result, advertisement, or ordinary-looking area of a website. A pop-under or hidden redirect sends the browser through one or more advertising and tracking domains.
Some victims may see the page after allowing notifications on an earlier scam site. A notification that looks like a system warning can open the fake verification in a new tab.
2. Traffic filters decide who sees the malware lure
The redirect system can check country, browser, operating system, IP reputation, time, and whether the visitor appears to be a security scanner. Windows users may receive the keyboard instructions while other visitors see harmless advertising or a blank page.
This filtering makes the operation harder to reproduce. A domain can appear harmless during one visit and deliver a dangerous page during another.
3. The landing page impersonates Cloudflare
The fake page copies trusted visual elements such as the orange cloud logo, a loading spinner, security language, a verification ID, and a Ray ID. The background is darkened so attention moves to the central instruction panel.
The page may display “cloudflare.com” in very large text even though the browser is visiting an unrelated domain. This is visual impersonation, not a genuine Cloudflare service.
4. The website prepares a malicious clipboard command
A click on the page, checkbox, or verification area can trigger JavaScript that copies a command to the clipboard. Some variants display a message saying the verification command has already been copied.
The command is usually obfuscated and can change for each visitor. It may include an identifier so the operators can record which advertisement, affiliate, or compromised website produced the infection.
5. Windows key + R moves the attack outside the browser
The first instruction opens the Windows Run dialog. Moving execution into Windows helps the operation bypass many protections that focus on downloaded files or suspicious browser pages.
The browser did not exploit Windows. The page convinced the user to open a trusted operating-system feature voluntarily.
6. Ctrl + V transfers the attacker’s code into Run
The victim pastes whatever the page placed on the clipboard. The command may be too long to display completely in the Run box, and the most recognizable part may be hidden beyond the visible area.
This is why reading only the end of the pasted text is not a reliable safety check. The correct action is to cancel and close the fake page without executing anything.
7. Enter launches the infection chain
Pressing Enter tells Windows to run the pasted command. The command may open PowerShell or another built-in utility in a hidden window, contact an attacker-controlled server, and retrieve the next component.
The screen may appear to do nothing. A brief flash, closed console window, or normal-looking browser redirect does not mean the command failed.
8. A loader retrieves or decodes the payload
The first command is often kept small. Its purpose is to fetch, decode, or launch a larger script or program from a separate server.
Additional stages can check security software, collect system information, create scheduled tasks, add startup entries, and decide which final malware is most profitable for that computer.
9. Stolen data is sent to the criminals
An information stealer can collect browser databases, cookies, wallets, and system data within minutes. A remote-access trojan may remain connected for longer and allow manual control.
The absence of visible symptoms does not protect accounts. Credential theft is designed to finish quietly before the victim realizes anything happened.
10. Domains and instructions are rotated
Once a landing domain is blocked, the operators replace it with another disposable address. The same fake Cloudflare design can appear across many unrelated domains and scam websites.
Blocking one address is useful, but user awareness and endpoint protection are needed because the next redirect may use a completely different name.
If You Followed The Keyboard Steps
Your response depends on how far you went. Simply seeing the page does not mean malware was installed. The critical event is executing the pasted command.
If you only saw the page
Close the tab. Do not click the verification panel and do not follow the keyboard instructions. If the tab resists closing, use the browser menu or Task Manager to close the browser.
Clear the suspicious site from browser notification permissions if you previously clicked Allow. Run a normal security scan if the redirects happen repeatedly, because adware, a malicious extension, or notification spam may be reopening the page.
If you opened Run but did not paste anything
Press Escape and close the fake page. Opening the Run dialog alone does not install malware.
Do not paste the clipboard contents somewhere else out of curiosity. A command is harmless as plain text, but a mistaken Enter press in a command-capable window can execute it.
If you pasted the command but did not press Enter
Press Escape or close the Run dialog without executing the text. Copy a harmless word afterward to replace the suspicious clipboard contents.
Because nothing should have executed, infection is less likely. A full security scan is still reasonable, especially if the fake page appeared repeatedly or another download was opened.
If you pressed Enter
Treat the device as potentially compromised even if no warning appeared. Do not wait for visible symptoms.
- Disconnect the computer from the internet immediately. Turn off Wi-Fi and unplug Ethernet. This can interrupt additional downloads, remote control, and data exfiltration.
- Stop using the computer for sensitive activity. Do not log in to email, banking, shopping, social media, work portals, cloud services, password managers, or cryptocurrency wallets.
- Record what happened. Photograph the fake page, write down the domain, time, browser, and actions performed, and preserve any security alerts. Do not revisit the malicious address.
- Notify workplace or school IT immediately. If the device or account belongs to an organization, report the incident before attempting independent cleanup. Stolen credentials can expose other systems.
- Run Microsoft Defender Offline. Open Windows Security, choose Virus & threat protection, select Scan options, then Microsoft Defender Antivirus (offline scan). The computer restarts and scans before normal Windows loads. Microsoft documents this process in its Windows Security guidance.
- Complete the full malware-removal sequence below. ClickFix infections can use several stages, so finding or deleting one file is not enough. Follow the tools in order and do not skip the second-opinion scans.
If you suspect your computer is infected with malware — slow performance, pop-ups, redirects, or programs you don’t recognize — follow the free step-by-step removal guide below to clean it completely.
Remove Malware from Windows [Step-by-Step Guide]
Please follow the steps in order. If you get stuck or have doubts at any point, stop and ask for help in our free support forum — our team will guide you personally.
- STEP 1: Uninstall malicious programs from Windows
- STEP 2: Reset browsers back to default settings
- STEP 3: Use Rkill to terminate suspicious programs
- STEP 4: Use Malwarebytes to remove Trojans and unwanted programs
- STEP 5: Use HitmanPro to remove rootkits and other malware
- STEP 6: Use AdwCleaner to remove malicious browser policies and adware
- STEP 7: Perform a final check with ESET Online Scanner
STEP 1: Uninstall malicious programs from Windows
First, we’ll manually check your computer for unknown or malicious programs. Adware and browser hijackers often have a working uninstall entry — removing them this way takes care of the easy part before we run the scanners.
-
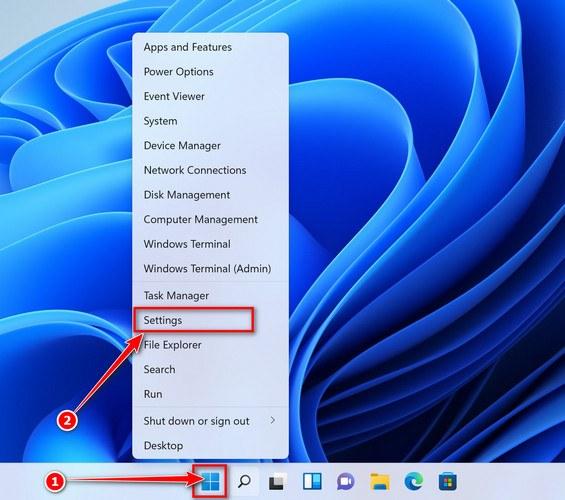
Open the Settings app
Press Windows + I on your keyboard to open Settings. Alternatively, right-click the Start button and select “Settings” from the menu.
-
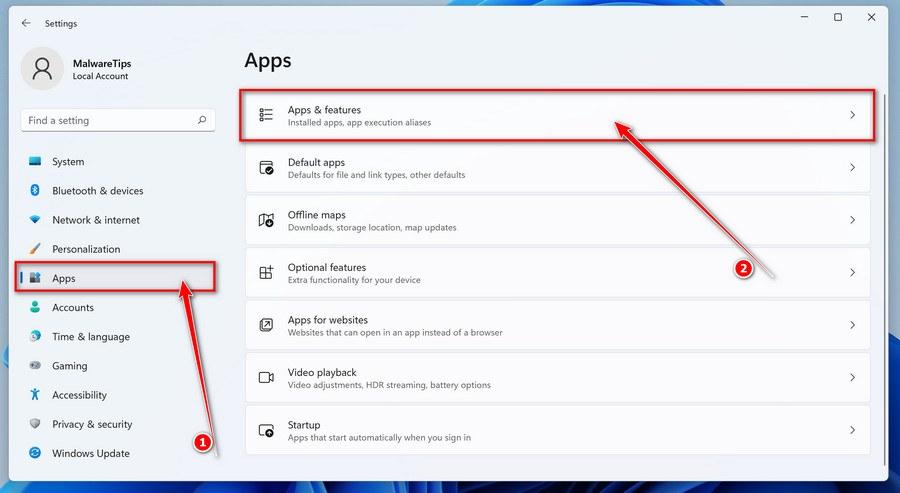
Go to “Apps & Features”
In the Settings window, click “Apps” in the sidebar, then select “Apps & Features“.
-
Find and uninstall the malicious program
Scroll through the list of installed apps and look for anything suspicious — a program you don’t remember installing, or one with a strange or generic name.
Quick tip: click “Sort by” and choose “Install date“. Malware is usually one of the most recently installed programs, so it will appear near the top.
When you find the malicious program, click the three dots next to it and select “Uninstall“.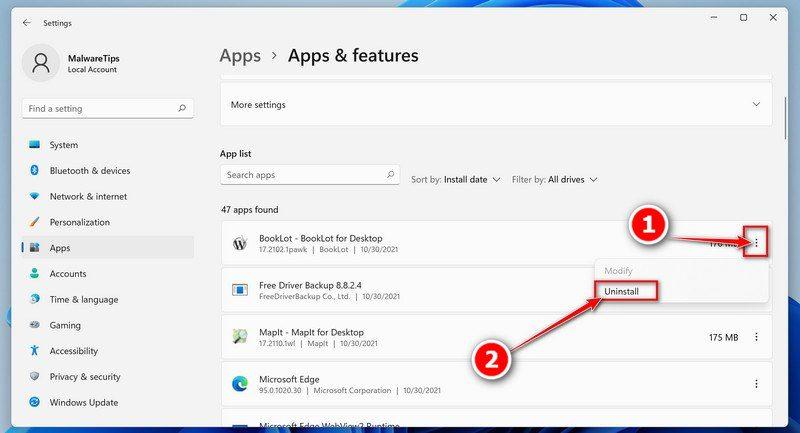 Didn’t find any suspicious programs? That’s fine — not all infections install visible apps. Just continue with the next step in this guide.
 -
Complete the uninstall
Confirm by clicking Uninstall in the message box, then follow the remaining prompts.
Read each prompt carefully — some malicious programs use confusing wording or pre-ticked boxes hoping you’ll click through without looking.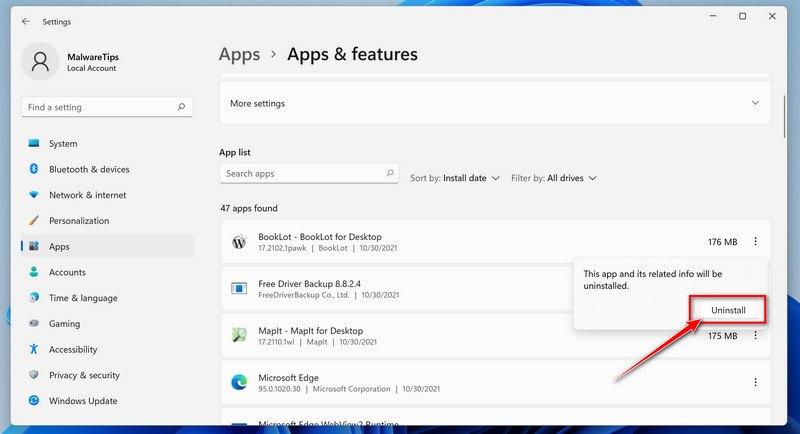
-
Open the Settings app
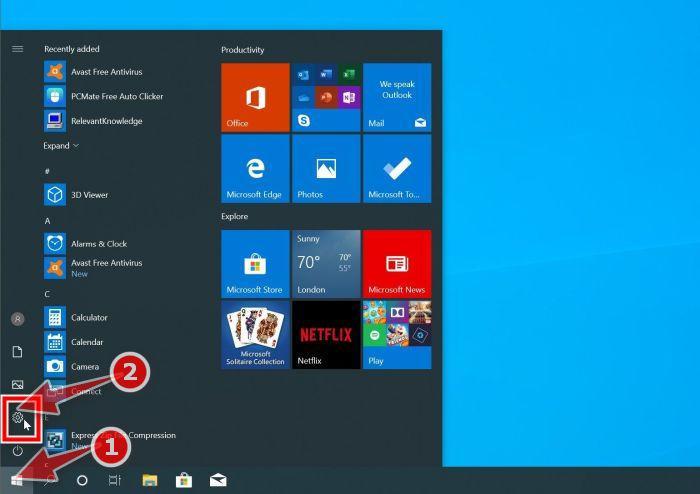
Press Windows + I on your keyboard to open Settings. Alternatively, click the Start button on the taskbar and select “Settings” (the gear icon).
-
Click on “Apps”
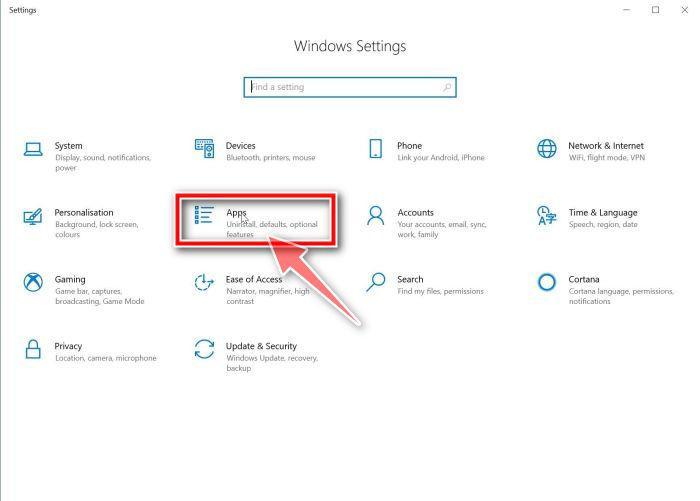
In the “Windows Settings” window, click “Apps“. The “Apps & Features” section should open by default — if it doesn’t, select it from the list on the left.
-
Find and uninstall the malicious program
Scroll through the list of installed apps and look for anything suspicious — a program you don’t remember installing, or one with a strange or generic name.
Quick tip: click “Sort by” and choose “Install date“. Malware is usually one of the most recently installed programs, so it will appear near the top.
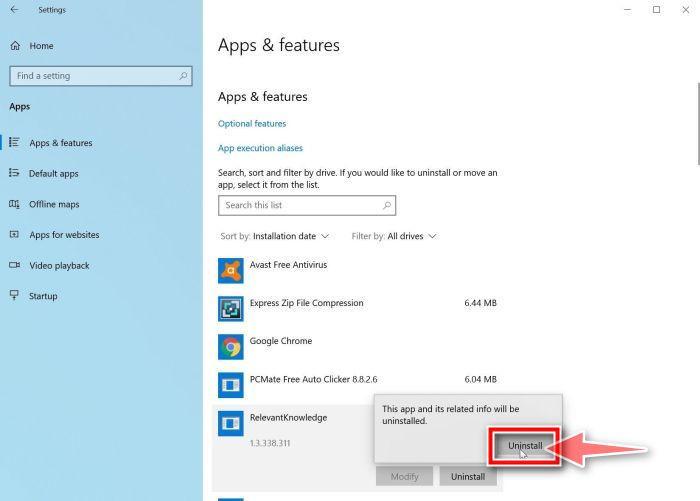
When you find the malicious program, click on it and select “Uninstall“.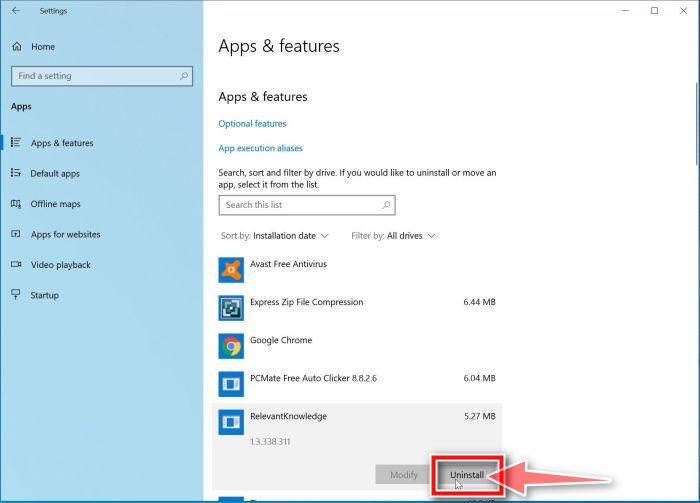 Didn’t find any suspicious programs? That’s fine — not all infections install visible apps. Just continue with the next step in this guide.
 -
Complete the uninstall
Confirm by clicking Uninstall in the message box, then follow the remaining prompts.
Read each prompt carefully — some malicious programs use confusing wording or pre-ticked boxes hoping you’ll click through without looking.
-
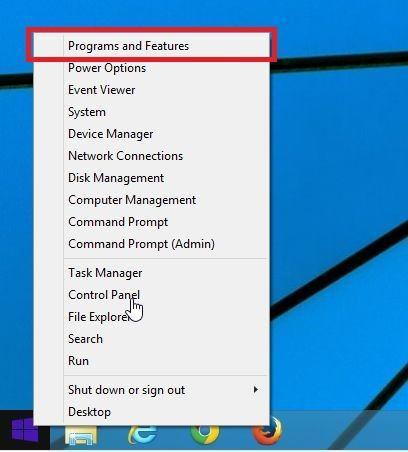
Open “Programs and Features”
Right-click the Start button in the taskbar, then select “Programs and Features“. This takes you straight to the list of installed programs.
-
Find and uninstall the malicious program
Scroll through the list of installed programs and look for anything suspicious — a program you don’t remember installing, or one with a strange or generic name. Click to highlight it, then click the “Uninstall” button.
Didn’t find any suspicious programs? That’s fine — not all infections install visible apps. Just continue with the next step in this guide.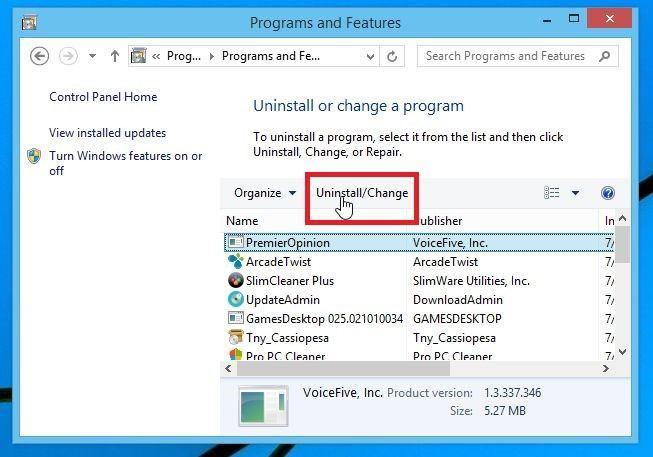
-
Complete the uninstall
Confirm by clicking Yes in the message box, then follow the remaining prompts. Read each prompt carefully — some malicious programs use confusing wording or pre-ticked boxes hoping you’ll click through without looking.
-
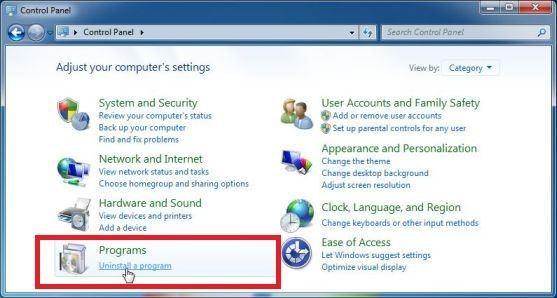
Open the Control Panel
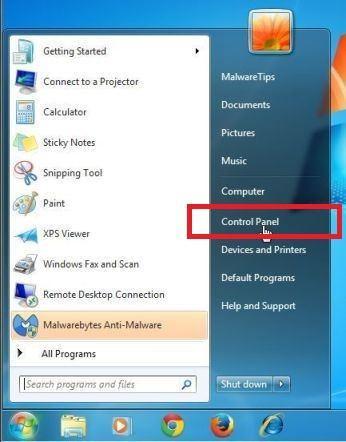
Click the “Start” button, then click “Control Panel“.
-
Click on “Uninstall a Program”
In the Control Panel, click “Uninstall a Program” under the Programs category.
-
Find and uninstall the malicious program
Scroll through the list of installed programs and look for anything suspicious — a program you don’t remember installing, or one with a strange or generic name. Click to highlight it, then click the “Uninstall” button.
Didn’t find any suspicious programs? That’s fine — not all infections install visible apps. Just continue with the next step in this guide.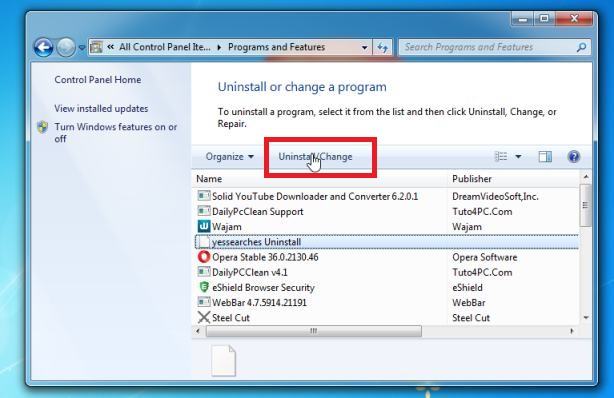
-
Complete the uninstall
Confirm by clicking Yes in the message box, then follow the remaining prompts. Read each prompt carefully — some malicious programs use confusing wording or pre-ticked boxes hoping you’ll click through without looking.
With the malicious programs removed, you’re ready for the next step in this guide.
STEP 2: Reset browsers back to default settings
In this step, we will remove spam notifications, malicious extensions, and change to default any settings that might have been changed by malware.
Please note that this method will remove all extensions, toolbars, and other customizations but will leave your bookmarks and favorites intact. For each browser that you have installed on your computer, please click on the browsers tab below and follow the displayed steps to reset that browser.
Reset Chrome for Windows to default settings
We will now reset your Chrome browser settings to their original defaults. This will reset your startup page, new tab page, search engine, and pinned tabs. It will also disable all extensions and clear temporary data like cookies. Your favorites, history, and saved passwords will not be cleared.
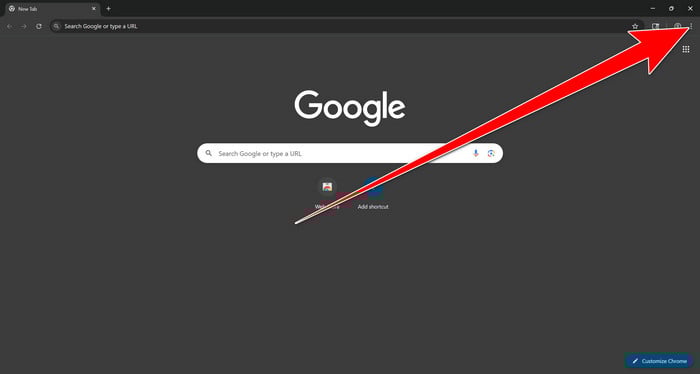
Open the Chrome menu
Open Google Chrome and click the three-dot (⋮) icon in the top-right corner.
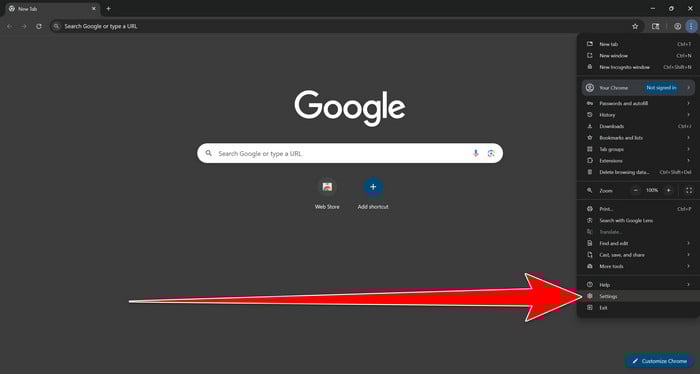
Open Chrome Settings
Select Settings from the Chrome menu.
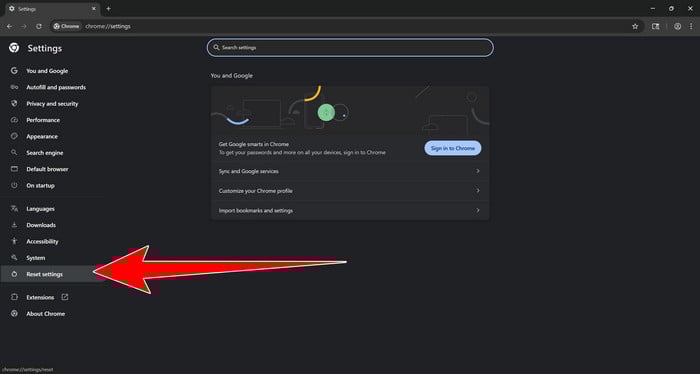
Select “Reset settings”
Look at the menu on the left side of the Settings page. Scroll down and click Reset settings.
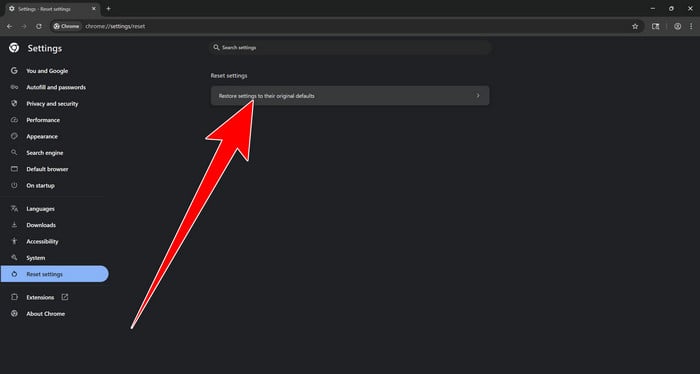
Restore Chrome’s original settings
Click Restore settings to their original defaults.
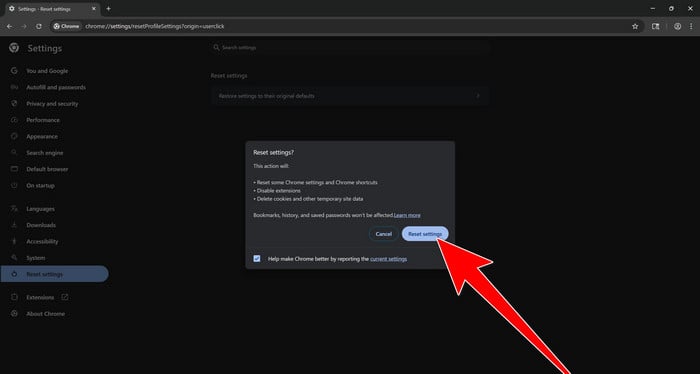
Confirm the Chrome reset
A confirmation window will appear. Click Reset settings.
This will:
- Restore the default search engine, homepage, and new tab page
- Reset startup pages and pinned tabs
- Disable installed extensions
- Clear temporary cookies and website data
Don’t worry: Chrome will not delete your bookmarks, browsing history, or saved passwords.
Restart Chrome and perform a test search. If your searches now open normally in Google, you can stop here.
If searches are still redirected through shady domains complete the additional step below.
Remove persistent search hijacker data
Only complete this step if the redirect continues after resetting Chrome.
Some browser hijackers hide inside Chrome’s local search-engine database. A standard Chrome reset may not remove this database, which is why searches can continue to pass through shady sites.
The following procedure creates a backup of the affected database and allows Chrome to build a new, clean version. This is safer and less disruptive than deleting the entire Chrome profile.
First, prevent Chrome Sync from restoring the hijacked settings:
- Open a new Chrome tab.
- Copy the following address, paste it into Chrome’s address bar, and press Enter:
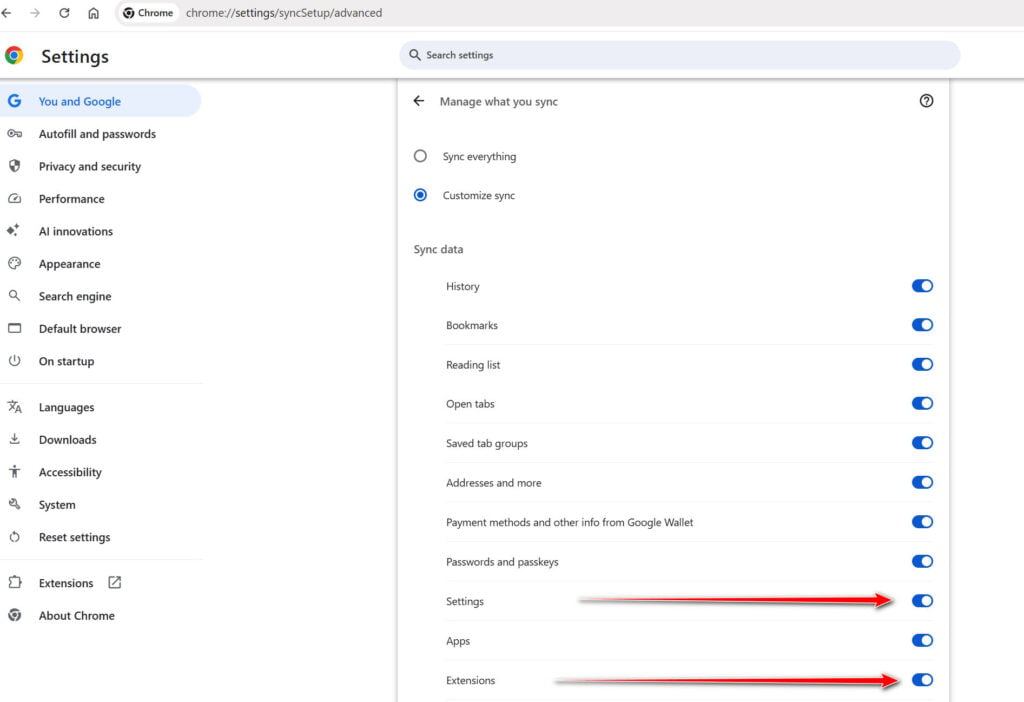
chrome://settings/syncSetup/advanced - Under Manage what you sync, select Customize sync.
- Turn off Settings and Extensions.
- You can leave Bookmarks and Passwords enabled so your important data remains synchronized.
Note: Some newer Chrome versions may automatically redirect this address to the Google Account settings page. If that happens, locate the list of synchronized Chrome data and turn off Settings and Extensions there.
Now save anything you are working on and close every Chrome window.
Run the cleanup command:
- Press the Windows key on your keyboard.
- Type PowerShell.
- Open Windows PowerShell. Administrator access is not required.
- Copy the entire command shown below.
- Right-click inside the PowerShell window to paste the command, then press Enter.
- If Windows warns you about pasting multiple lines, select the option to continue.
$stamp = Get-Date -Format "yyyyMMdd-HHmmss"

Get-Process chrome -ErrorAction SilentlyContinue |
 Stop-Process -Force

$root = "$env:LOCALAPPDATA\Google\Chrome\User Data"

if (Test-Path $root) {
 $profiles = Get-ChildItem $root -Directory |
 Where-Object {
 $_.Name -eq "Default" -or
 $_.Name -match "^Profile \d+$"
 }

 foreach ($profile in $profiles) {
 foreach ($name in @(
 "Web Data",
 "Web Data-journal",
 "Web Data-wal",
 "Web Data-shm"
 )) {
 $file = Join-Path $profile.FullName $name

 if (Test-Path $file) {
 $backup = "$file.search-hijacker-backup-$stamp"
 Move-Item -LiteralPath $file -Destination $backup
 Write-Host "Backup created: $backup"
 }
 }
 }
}

Write-Host ""
Write-Host "Chrome search data has been cleaned."
Write-Host "You can now reopen Chrome."
Wait until PowerShell displays the following message:
Chrome search data has been cleaned.
You can now reopen Chrome.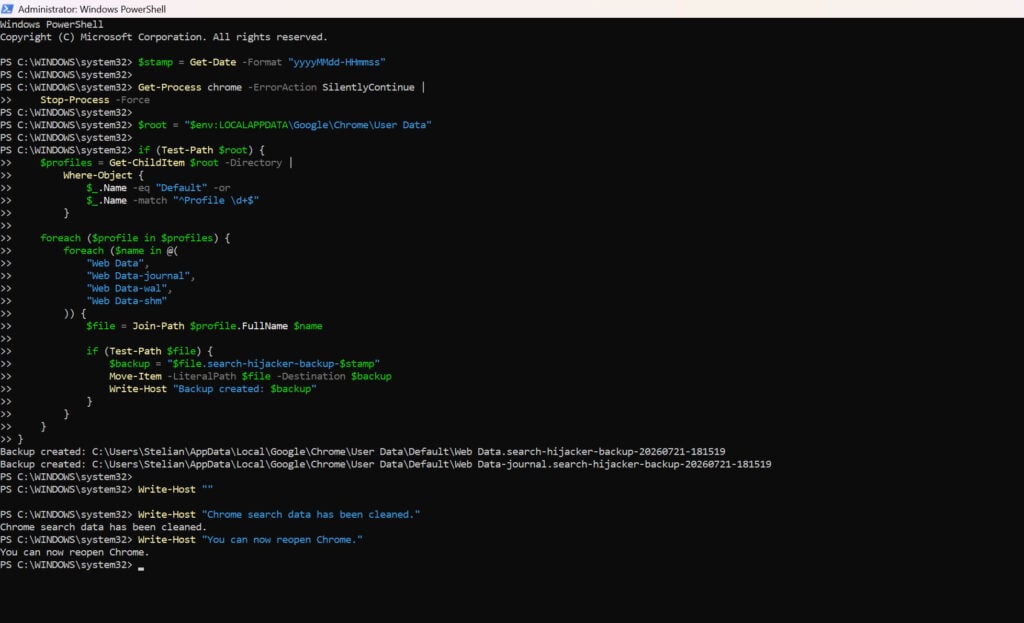
Close PowerShell and reopen Google Chrome. Chrome will automatically create a clean search database for every local profile.
Next, copy the following address, paste it into Chrome’s address bar, and press Enter:
chrome://settings/searchEnginesMake sure Google is selected as the default search engine. Test several searches from the address bar and confirm that they no longer pass through shady search engines.
Your important Chrome data is protected: the PowerShell cleanup does not remove bookmarks, saved passwords, browsing history, cookies, or installed extensions. However, it may reset locally stored Autofill addresses and form suggestions.
The original search database is not deleted. PowerShell renames it and adds
search-hijacker-backupto its filename so it can be recovered if necessary.Keep Settings and Extensions synchronization disabled while testing Chrome. Do not enable every extension at once. Enable only the extensions you recognize, one at a time, and test Chrome after each one.
If the redirect returns after enabling a particular extension, remove that extension immediately.
Reset Firefox for Windows to default settings
We will now reset your Firefox browser settings to their default. The reset feature fixes many issues by restoring Firefox to its factory default state while saving your essential information like bookmarks, passwords, web form auto-fill information, browsing history, and open tabs.
-
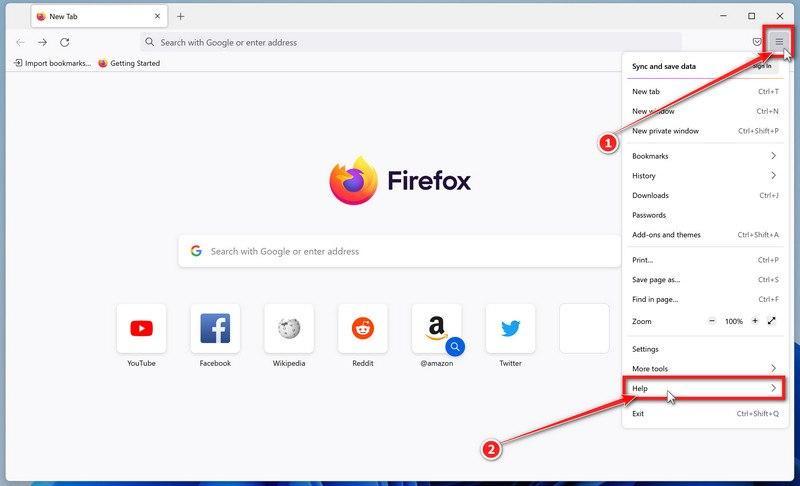
Open the Firefox menu and click “Help”
Click the three horizontal lines in the top-right corner of Firefox to open the main menu, then select “Help“.
-
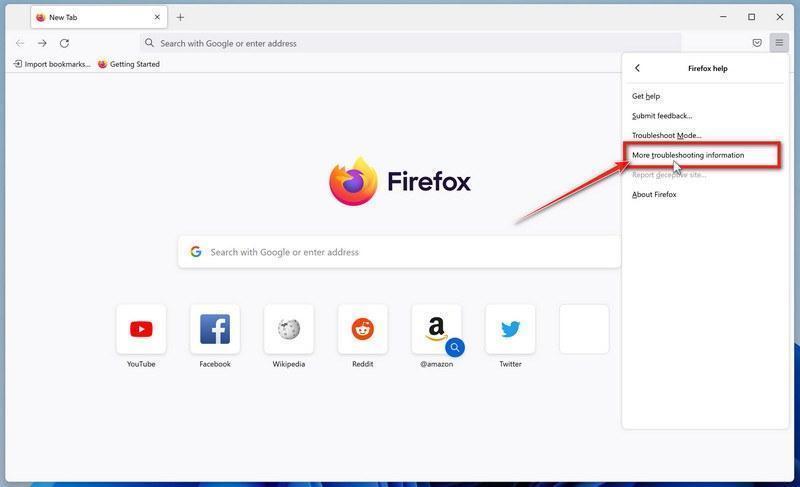
Click “More troubleshooting information”
In the Help menu, click “More troubleshooting information“.
-
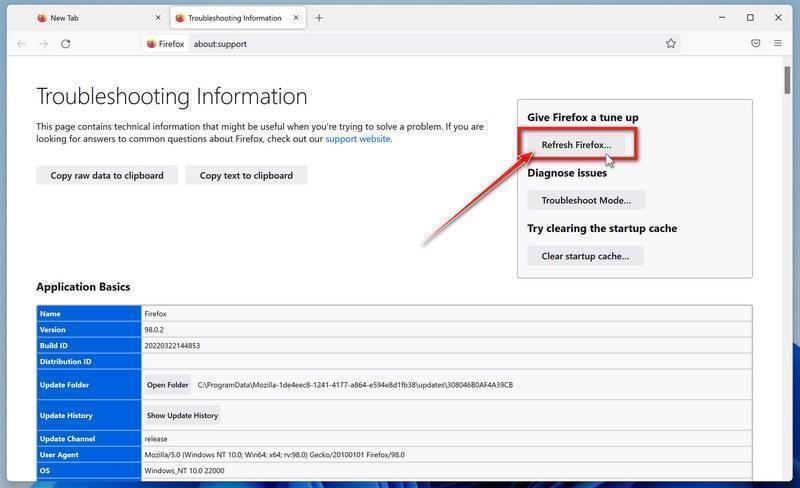
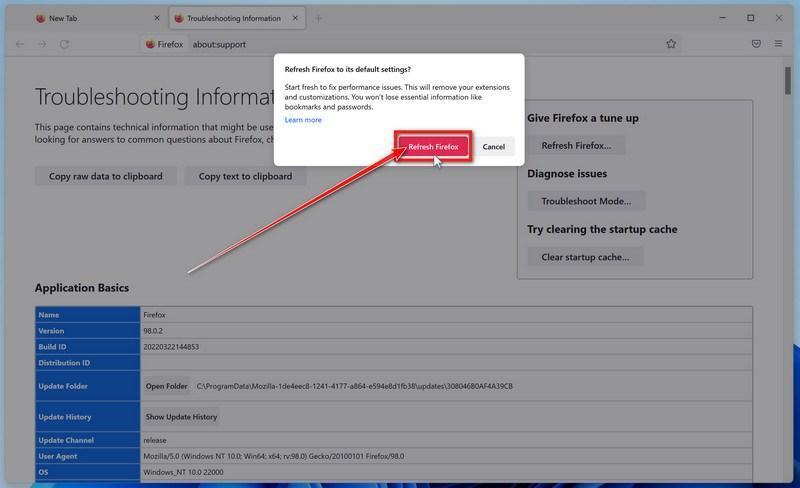
Click “Refresh Firefox”
On the “Troubleshooting Information” page, click the “Refresh Firefox” button in the top-right area of the page.
-
Confirm the refresh
In the confirmation window, click “Refresh Firefox” again. This removes extensions, themes, and customized settings — the usual hiding places for browser hijackers — while keeping your bookmarks, history, and saved passwords safe.
-
Click “Finish”
Firefox will close, reset itself to default settings, and reopen with a window listing the information that was restored. Click “Finish” — your Firefox is now clean.
About the “Old Firefox Data” folder: Firefox saves a copy of your old profile on your desktop. If something you need is missing after the reset, you can recover it from this folder. Otherwise, delete the folder — it contains sensitive data like passwords and cookies, and may also still hold the malicious files you just removed.
Reset Microsoft Edge to default settings
We will now reset your Microsoft Edge browser settings to their default. This will reset your startup page, new tab page, search engine, and pinned tabs. It will also disable all extensions and clear temporary data like cookies. Your favorites, history, and saved passwords will not be cleared.
Updated for Microsoft Edge on Windows 10 and Windows 11 — July 2026.
-
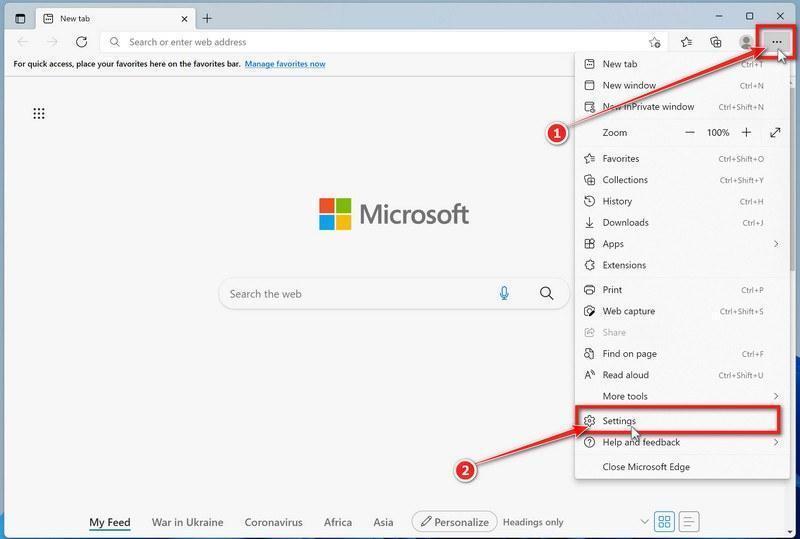
Open the Edge menu and click “Settings”
Open Microsoft Edge. In the top-right corner, click the three-dot (…) icon, then click Settings.
-
Prevent the unwanted settings from returning through Edge Sync
If you are signed in to Microsoft Edge, a bad setting or extension may be stored in your Microsoft account and return after the reset.
Copy the following address, paste it into the Edge address bar, and press Enter:
edge://settings/profiles/syncOn the Sync page, turn off these two options:
- Settings
- Extensions
You can leave Favorites and Passwords turned on.
If Edge says that sync is already off, simply continue to the next step.
Important: Edge Sync settings are separate for each profile. If you use more than one Edge profile, switch to each affected profile and repeat this step.
You do not need to sign out of your Microsoft account or delete the Edge profile.
-
Open “Reset settings”
In the left sidebar, click Reset settings.
You can also open the reset page directly. Copy the following address, paste it into the Edge address bar, and press Enter:
edge://settings/reset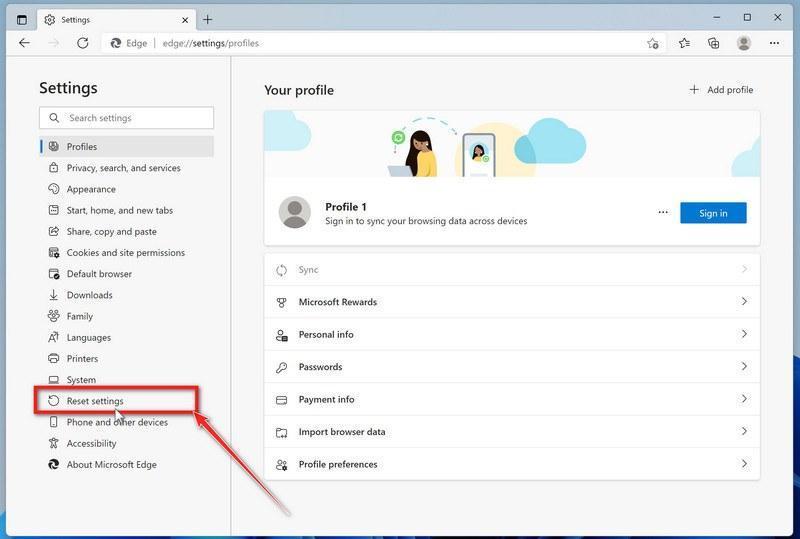
-
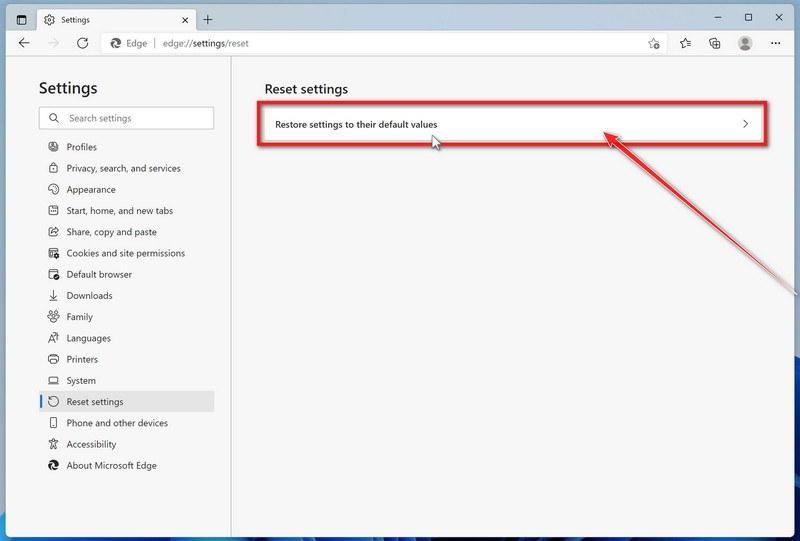
Click “Restore settings to their default values”
Click Restore settings to their default values.
-
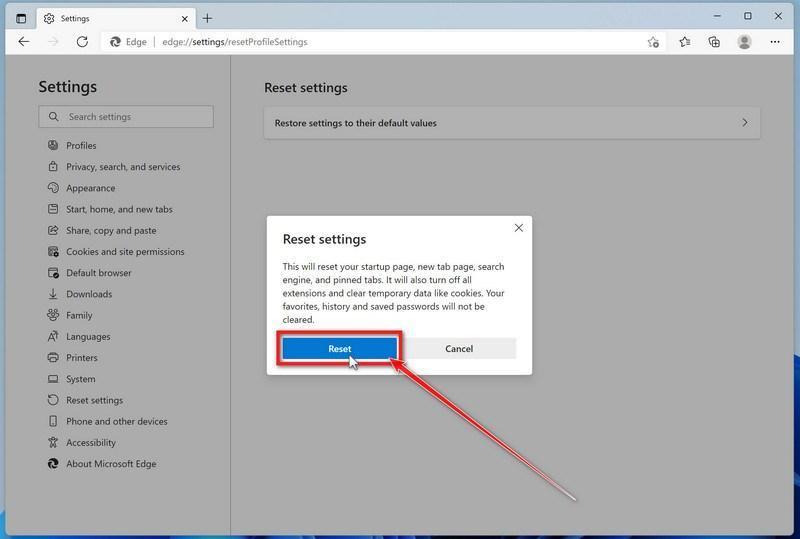
Confirm the reset
In the confirmation dialog, click Reset.
This resets the startup page, new tab page, search engine, and pinned tabs. It also disables all extensions and clears temporary site data, such as cookies.
Don’t worry: your favorites, browsing history, and saved passwords will not be deleted.
-
Check your extensions before turning them back on
Copy the following address, paste it into the Edge address bar, and press Enter:
edge://extensionsRemove any extension you do not recognize or no longer use. Pay particular attention to extensions related to search, coupons, shopping, PDF conversion, browser protection, new tabs, or video downloading.
Do not turn all extensions back on at the same time. Enable only the extensions you recognize and trust.
-
Select a trusted search engine
Copy the following address, paste it into the Edge address bar, and press Enter:
edge://settings/searchEnginesSelect Bing, Google, DuckDuckGo, or another search provider you trust and make it the default.
Remove any unknown search engines, especially providers with strange names or addresses that you did not add yourself.
Restart Edge and perform a search from the address bar. If searches are no longer redirected, you can stop here.
-
If the redirect remains, clean the corrupted search data without deleting the Edge profile
Use this additional step only if Edge continues to redirect searches after the normal reset.
This command cleans the search-engine database from every local Edge profile while keeping your favorites, saved passwords, browsing history, cookies, and profiles.
Before continuing: save anything you are working on because the command will close Microsoft Edge.
- Open the Windows Start menu.
- Type PowerShell.
- Open Windows PowerShell. Administrator access is not required.
- Copy the entire command below.
- Paste it into PowerShell and press Enter.
$stamp = Get-Date -Format "yyyyMMdd-HHmmss"
$root = Join-Path $env:LOCALAPPDATA "Microsoft\Edge\User Data"

Get-Process -Name msedge -ErrorAction SilentlyContinue |
    Stop-Process -Force -ErrorAction SilentlyContinue

Start-Sleep -Seconds 2

if (-not (Test-Path -LiteralPath $root)) {
    Write-Host "The Microsoft Edge profile folder was not found:"
    Write-Host $root
    return
}

$profiles = Get-ChildItem -LiteralPath $root -Directory |
    Where-Object {
        $_.Name -eq "Default" -or
        $_.Name -match "^Profile \d+$"
    }

$movedFiles = 0

foreach ($profile in $profiles) {
    foreach ($name in @(
        "Web Data",
        "Web Data-journal",
        "Web Data-wal",
        "Web Data-shm"
    )) {
        $file = Join-Path $profile.FullName $name

        if (Test-Path -LiteralPath $file) {
            $backup = "$file.search-reset-backup-$stamp"

            try {
                Move-Item -LiteralPath $file -Destination $backup -ErrorAction Stop
                Write-Host "Cleaned: $($profile.Name)\$name"
                $movedFiles++
            }
            catch {
                Write-Warning "Could not clean: $file"
            }
        }
    }
}

Write-Host ""

if ($movedFiles -gt 0) {
    Write-Host "Microsoft Edge search data has been cleaned." -ForegroundColor Green
    Write-Host "You can now reopen Microsoft Edge."
}
else {
    Write-Host "No Edge search database files were found." -ForegroundColor Yellow
}
The command does not permanently delete the original files. It renames them as backup files, and Edge creates a clean search database when it starts again.
Note: this additional cleanup may also reset saved form-fill suggestions, saved addresses, and manually added search engines. It does not delete favorites, passwords, or browsing history.
-
Reopen Edge and test the browser
Open Microsoft Edge again, visit edge://settings/searchEngines, and select your preferred search engine.
Perform several searches from the address bar to confirm that the redirect is gone.
Keep synchronization for Settings and Extensions turned off until you are certain that the computer and extensions are clean. If you enable them again, turn them on one at a time and test Edge after each change.
-
If Edge still redirects your searches
Open edge://policy. If this is your personal computer and Edge displays unknown policies such as ExtensionInstallForcelist or DefaultSearchProvider, the hijacker may be installed outside the browser profile.
In that situation, continue with the next malware-removal steps and run a complete antivirus scan. If the computer belongs to a company or school, contact its IT administrator before changing any policies.
Reset Internet Explorer to default settings
We will now reset your Internet Explorer browser settings to their default. You can reset Internet Explorer settings to return them to the state they were in when Internet Explorer was first installed on your computer.
-
Go to “Internet Options”.
Open Internet Explorer, click on the gear icon in the upper-right part of your browser, then select “Internet Options“.
-
Select the “Advanced” tab, then click “Reset”
In the “Internet Options” dialog box, select the “Advanced” tab, then click on the “Reset” button.
-
Click on “Reset”.
In the “Reset Internet Explorer settings” section, select the “Delete personal settings” checkbox, then click on the “Reset” button.
-
Click on “Close”.
When Internet Explorer has completed its task, click on the “Close” button in the confirmation dialogue box.
Close your browser and then you can open Internet Explorer again.
STEP 3: Use Rkill to terminate suspicious programs
Next, we’ll download and run Rkill to stop any suspicious processes running in the background. This prevents the malware from interfering with the removal tools in the following steps.
RKill is a program that was developed at BleepingComputer.com that attempts to terminate known malware processes so that your normal security software can then run and clean your computer of infections. When RKill runs it will kill malware processes and then removes incorrect executable associations and fixes policies that stop us from using certain tools.
-
Download Rkill.
You can download RKill to your computer from the below link. When at the download page, click on the Download Now button labeled iExplore.exe. We are downloading a renamed version of Rkill (iExplore.exe) because some malware will not allow processes to run unless they have a certain filename.
Download RKillOpens the BleepingComputer download page in a new tab. RKillStops malware processes so other tools can run
 -
Run RKill.
After downloading, double-click the iExplore.exe icon to kill malicious processes. In most cases, downloaded files are saved to the Downloads folder.
The program may take some time to search for and end various malware programs.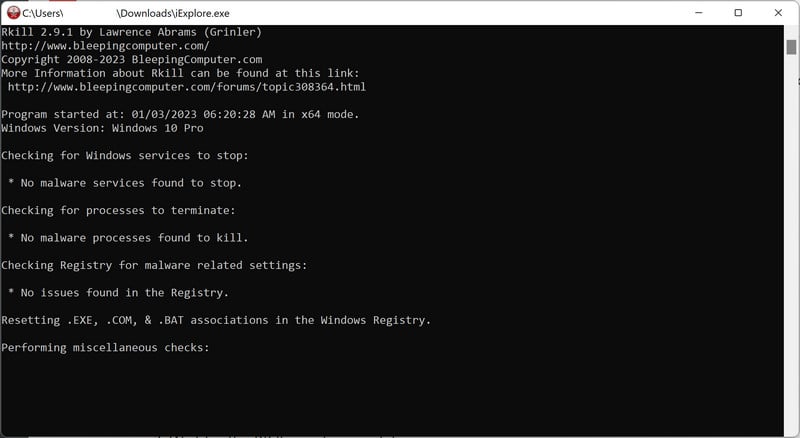
When it is finished, the black window will close automatically and a log file will open. Do not restart your computer. Proceed to the next step in this guide.
STEP 4: Use Malwarebytes to remove Trojans and unwanted programs
Now we’ll install Malwarebytes and run a full scan to detect and remove infections, adware, and potentially unwanted programs from your computer.
Malwarebytes is one of the most popular and trusted anti-malware tools for Windows — and it’s completely free for removing infections. It catches threats that many antivirus programs miss, including adware, browser hijackers, and trojans. Follow the steps below to scan and clean your PC in just a few minutes.
Download Malwarebytes
Click the button below to download the latest version of Malwarebytes for Windows from the official source. The free version is all you need — it will scan your computer and remove adware, browser hijackers, and other malicious software at no cost.
Download MalwarebytesOfficial installer for Windows 11 and 10. Your download starts right away.Want real-time protection? See Malwarebytes Premium Malwarebytes Free for WindowsScans and removes malware at no cost
-
Install Malwarebytes
When the download finishes, open your Downloads folder and double-click the MBSetup file. If Windows shows a User Account Control pop-up, click “Yes” to allow the installation.

Follow the On-Screen Prompts to Install Malwarebytes
The setup wizard will walk you through a few quick screens:
-
Choose where you’re installing the program — “Personal Computer” or “Work Computer” — then click Next.

-
Malwarebytes will now install on your device. This usually takes under a minute.

-
When installation is complete, the “Welcome to Malwarebytes” screen will open automatically.

-
On the final screen, click Open Malwarebytes to launch the program.

-
Enable “Scan for Rootkits”
Before scanning, turn on rootkit detection so Malwarebytes can find even the most hidden threats. Click the Settings gear icon on the left side of the screen.

In the settings menu, find “Scan for rootkits” and click the toggle so it turns blue.

Done? Click “Dashboard” in the left pane to return to the main screen.
Start the Scan
Click the blue Scan button. Malwarebytes will automatically update its virus database and start checking your computer for malware.

-
Wait for the Scan to Finish
The scan checks your entire system for browser hijackers and other malicious programs, so it can take 5 to 20 minutes depending on your computer. Feel free to do something else — just check back occasionally to see the progress.

-
Quarantine the Detected Threats
When the scan is done, you’ll see a list of everything Malwarebytes found — malware, adware, and potentially unwanted programs. Click the “Quarantine” button to remove all of them at once.

Malwarebytes will now remove the malicious files and registry entries and move them safely into quarantine.

-
Restart Your Computer
Some threats can only be fully removed after a reboot. If Malwarebytes asks you to restart, click Yes. Once you’re logged back in, Malwarebytes has finished removing the threats it found.

STEP 5: Use HitmanPro to remove rootkits and other malware
Next, we’ll run a second-opinion scan with HitmanPro to catch Trojans, rootkits, and other malicious programs that may have survived the previous step.
HitmanPro is a second-opinion scanner — it’s designed to catch what your main antivirus might have missed. Instead of relying on a single detection engine, it checks the behavior of files in the locations where malware usually hides. Anything suspicious gets sent to the cloud, where it’s analyzed by two of the best antivirus engines available: Bitdefender and Kaspersky.
Good news: scanning is completely free, with no limits. You only need a license when it’s time to remove what was found — and even then, you can activate a free one-time 30-day trial to clean your PC at no cost. (A full license is $24.95 per year for 1 PC.)
-
Download HitmanPro
Click the button below to download HitmanPro. Remember — the scan is free, so you have nothing to lose by checking your PC.
Download HitmanProFree scan. Removing threats needs the free 30-day trial. Opens the official HitmanPro page in a new tab. HitmanProSecond-opinion malware scanner from Sophos
 -
Install HitmanPro
When the download finishes, open your Downloads folder and double-click the file: “hitmanpro.exe” on 32-bit Windows, or “hitmanpro_x64.exe” on 64-bit Windows.
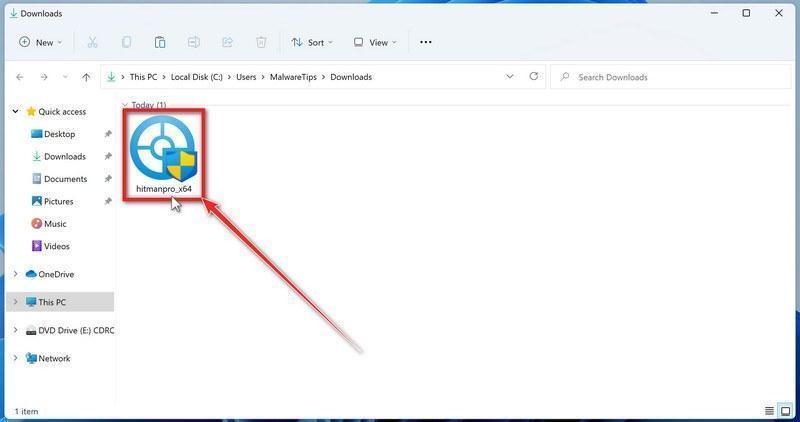
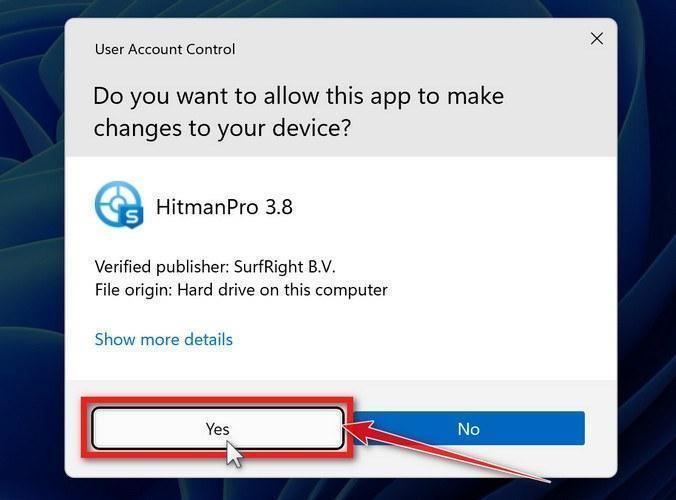
If a User Account Control pop-up asks whether HitmanPro can make changes to your device, click “Yes” to continue.
-
Follow the On-Screen Prompts
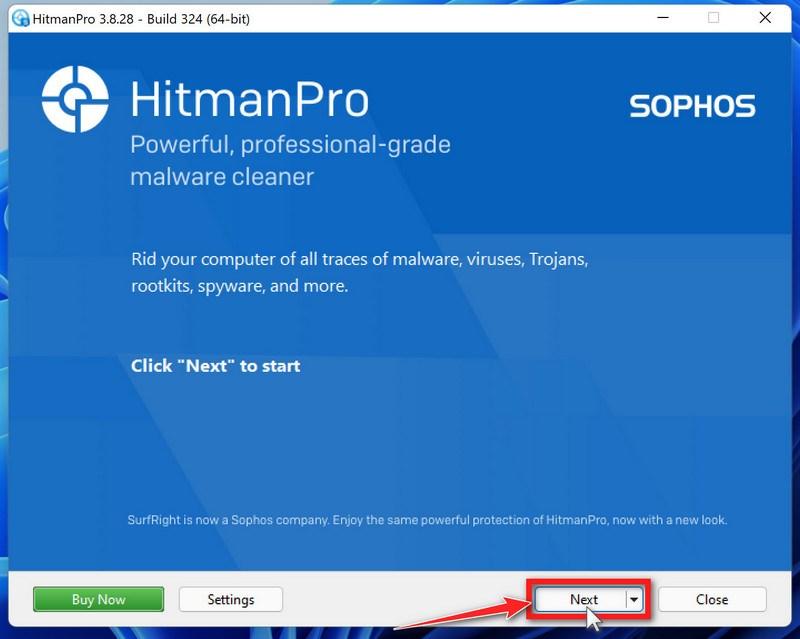
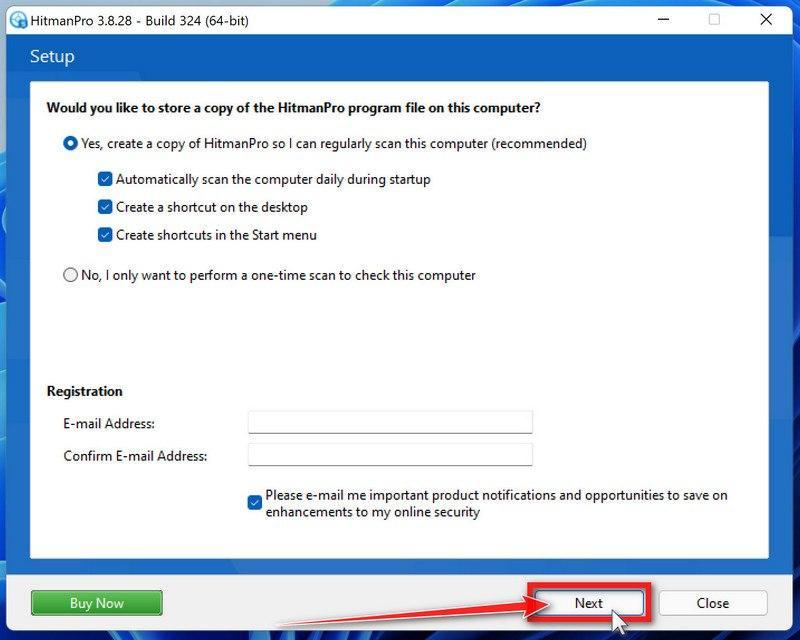
On the HitmanPro start screen, click “Next” to begin the system scan. No lengthy setup required — it goes straight to work.
-
Wait for the Scan to Finish
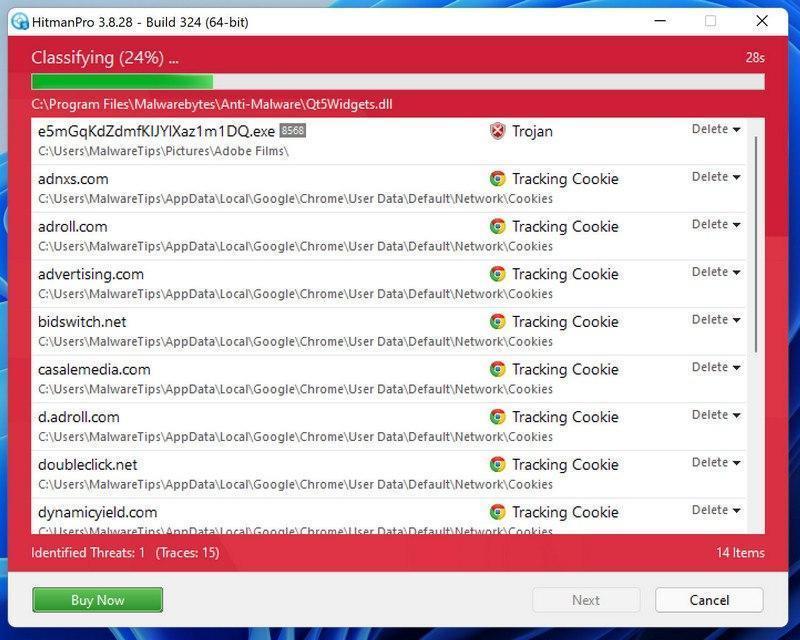
HitmanPro will now check your computer for malicious programs. This usually takes just a few minutes thanks to its cloud-based scanning.
-
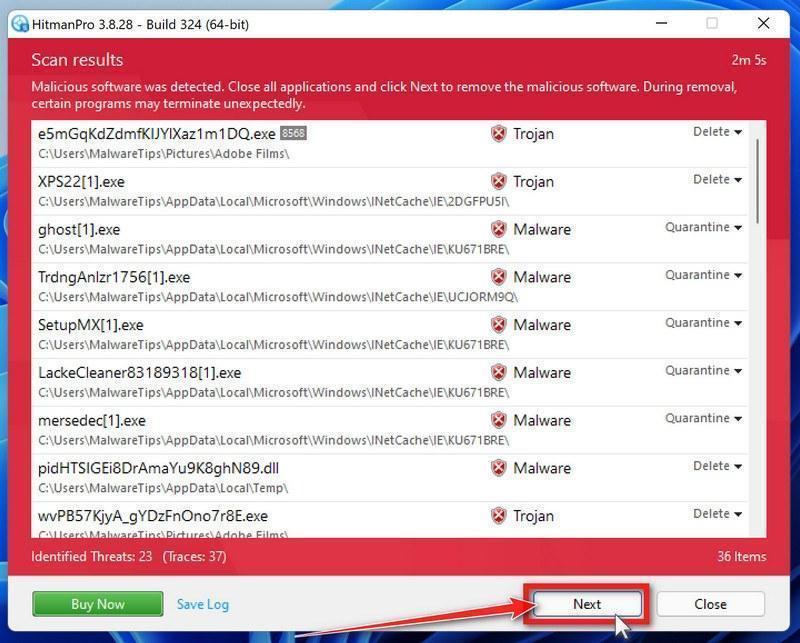
Review the Results and Click “Next”
When the scan is done, HitmanPro will show you everything it found. Click “Next” to remove the detected threats.
-
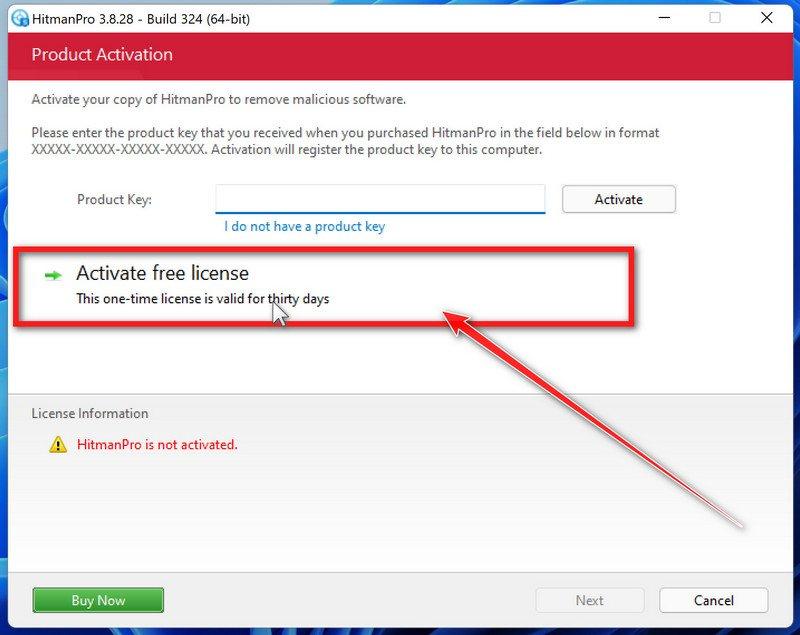
Click “Activate Free License”
To remove the malicious files, click the “Activate free license” button. This starts your free 30-day trial — no payment details needed — and unlocks the full cleanup.
When the removal is complete, HitmanPro will show a summary of everything it cleaned. Click Next, then click Reboot if prompted. If there’s no reboot prompt, just click Close — your PC is clean.
STEP 6: Use AdwCleaner to remove malicious browser policies and adware
We’ll now use AdwCleaner to remove malicious browser policies and unwanted browser extensions — the leftovers that keep hijacking your browser settings even after the malware itself is gone.
AdwCleaner is a free on-demand scanner that specializes in adware, browser hijackers, and unwanted toolbars — the exact threats that mainstream antivirus programs often miss. It also includes tools that repair the damage malware leaves behind, like hijacked browser settings and malicious policies. It’s a quick scan that’s well worth running.
-
Download AdwCleaner
Click the button below to download AdwCleaner — it’s free, portable, and requires no installation.
Download AdwCleanerOpens the official download page in a new tab. Malwarebytes AdwCleanerRemoves adware and unwanted programs at no cost
 -
Run AdwCleaner
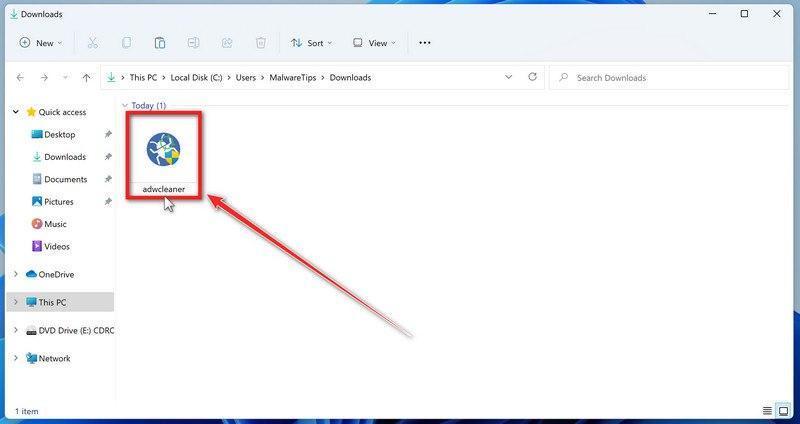
Open your Downloads folder and double-click the file named “adwcleaner.exe“. There’s no installation — the program starts right away.
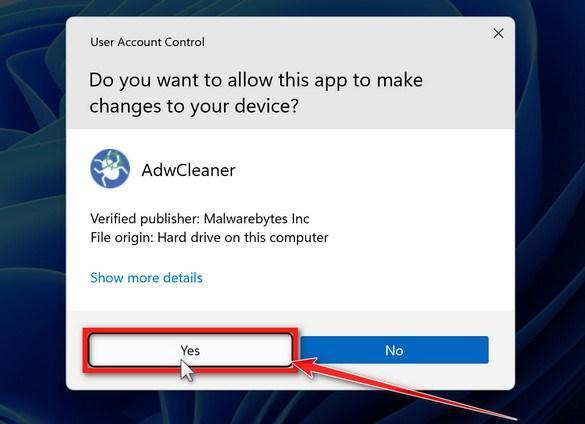
If Windows asks whether you want to allow AdwCleaner to run, click “Yes“. When the license agreement appears, click I agree to continue.
-
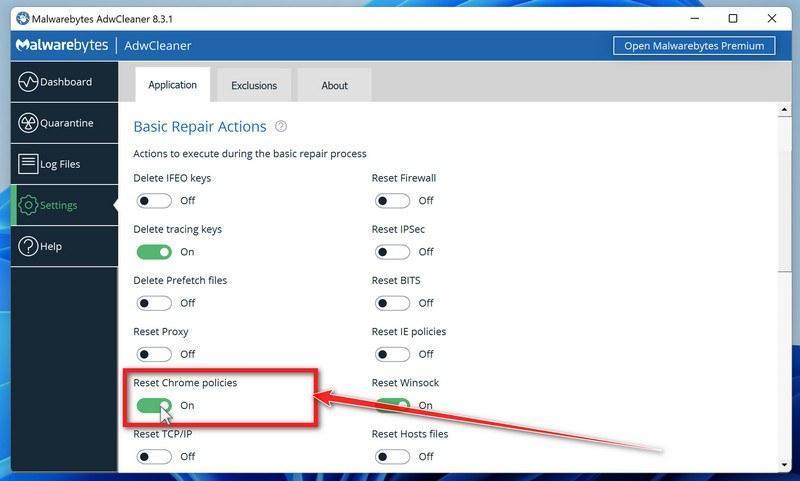
Enable “Reset Chrome policies”
This setting removes malicious browser policies — a trick malware uses to lock your browser settings so you can’t change them back. Click “Settings” on the left side of the window, then turn on “Reset Chrome policies“.
-
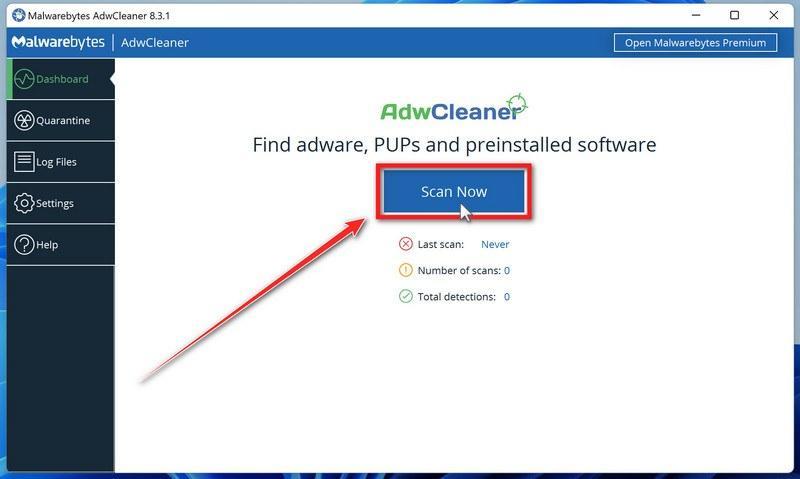
Start the Scan
Click “Dashboard” on the left side of the window, then click the “Scan” button.
-
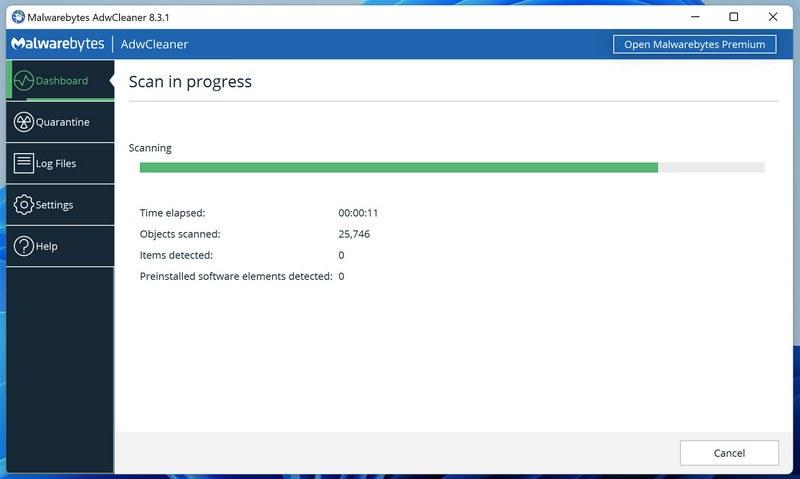
Wait for the Scan to Finish
AdwCleaner will now check your computer for adware and other malware. This usually takes only a few minutes — it’s one of the fastest scanners around.
-
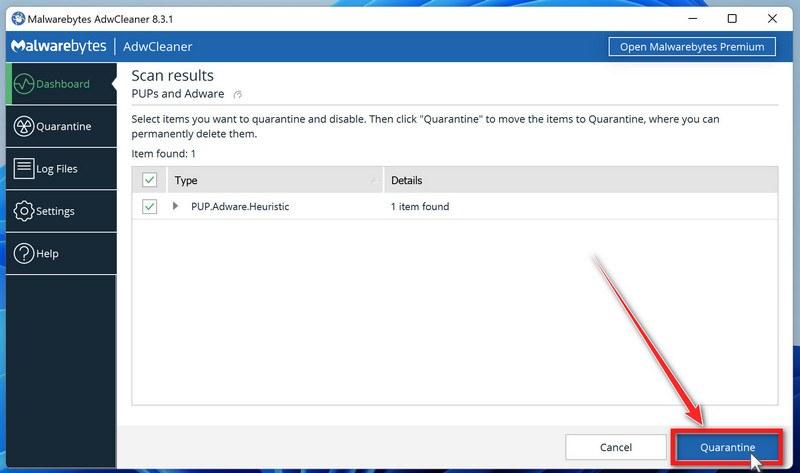
Quarantine the Detected Threats
When the scan finishes, AdwCleaner will list everything it found. Click the “Quarantine” button to remove all the malicious items at once.
-
Click “Continue” to Finish the Cleanup
Save any open work first — AdwCleaner needs to close your open programs before it can clean. When you’re ready, click the “Continue” button.
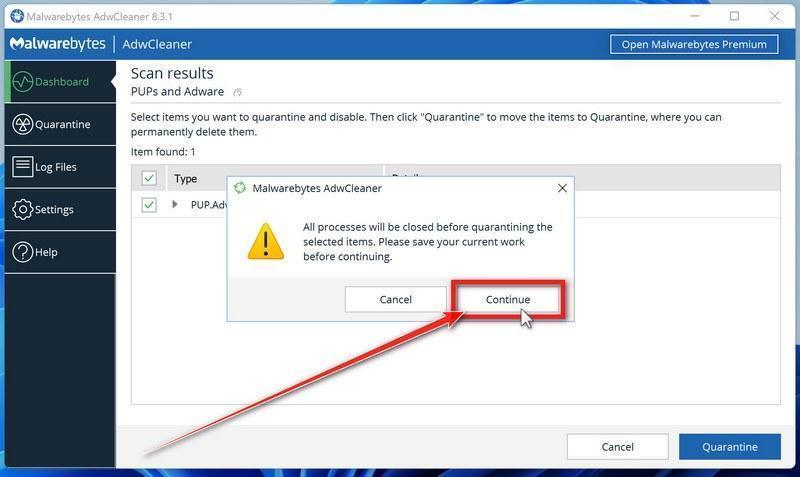
AdwCleaner will now delete all detected malware from your computer. If it asks you to restart your PC, allow it — your computer will be clean when you log back in.
STEP 7: Perform a final check with ESET Online Scanner
Finally, we’ll run ESET Online Scanner as a last sweep to confirm nothing was missed. If this scan comes back clean, your computer is malware-free.
ESET Online Scanner is a free second-opinion scanner that performs a deep, full-system check for viruses, trojans, rootkits, and other malware. We use it as the final step because it’s thorough — if anything slipped past the previous scans, ESET will find it. A clean result here means your computer is malware-free.
-
Download ESET Online Scanner
Click the button below to download ESET Online Scanner.
Download ESET Online ScannerOpens the official download page in a new tab. ESET Online ScannerFree one-time malware scan from ESET
 -
Run the Installer
When the download finishes, open your Downloads folder and double-click “esetonlinescanner.exe“.
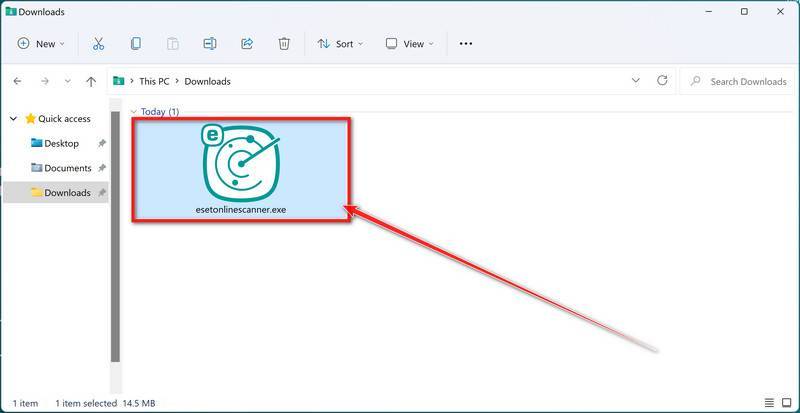
-
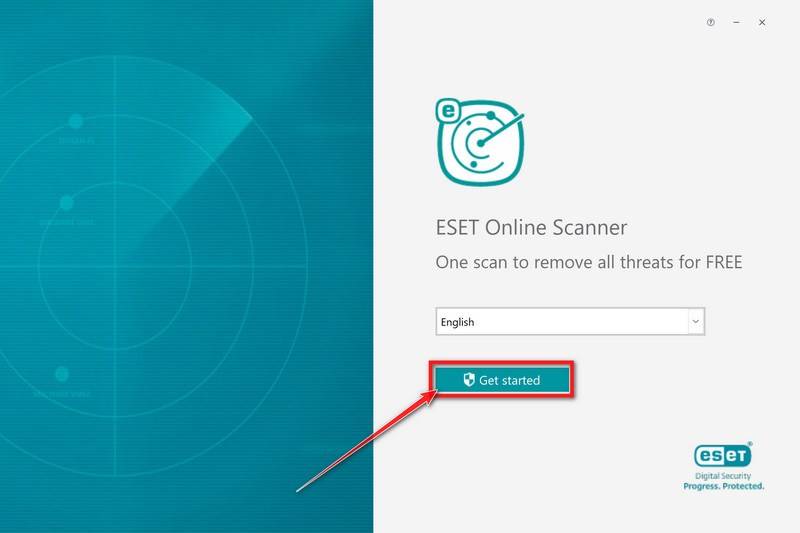
Install ESET Online Scanner
On the start screen, select your language from the drop-down menu and click Get started.
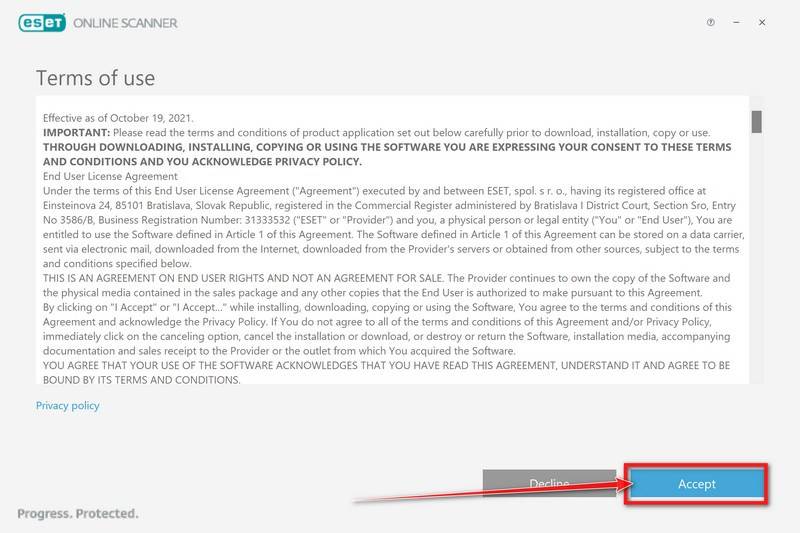
On the Terms of use screen, click Accept.
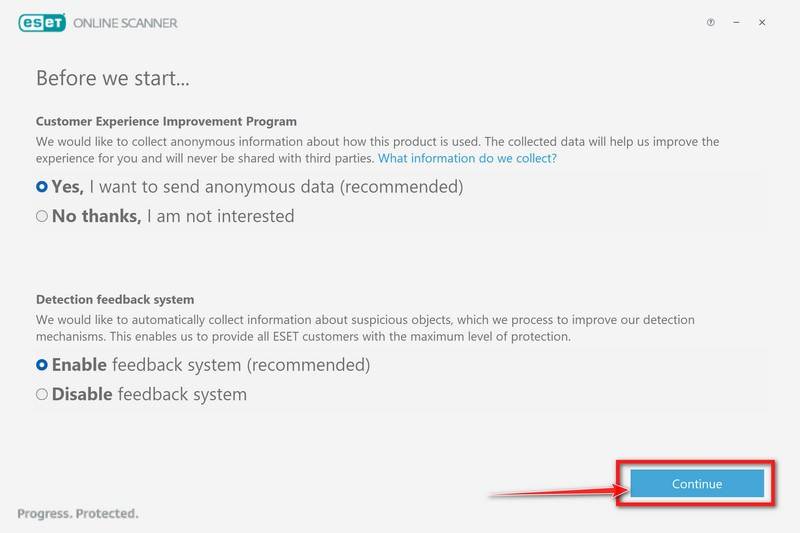
Choose your preferences for the Customer Experience Improvement Program and the Detection feedback system (either choice is fine), then click Continue.
-
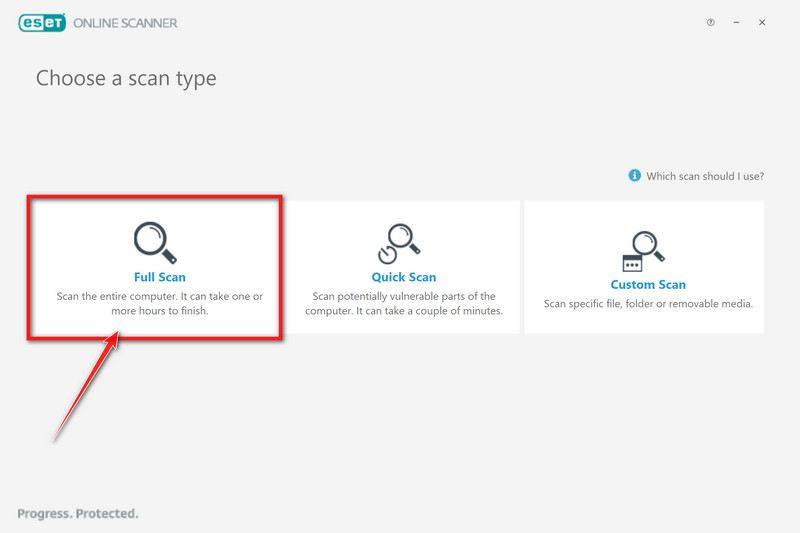
Start a Full Scan
Click Full Scan — this checks your entire computer, not just the common hiding spots.
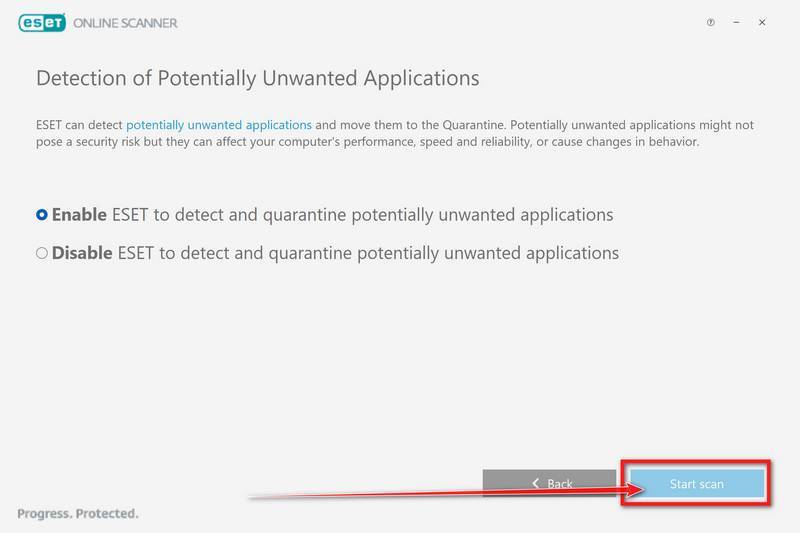
Select Enable for Detection of Potentially Unwanted Applications — this lets ESET catch adware and bundled junk programs, not just viruses. Then click Start scan.
-
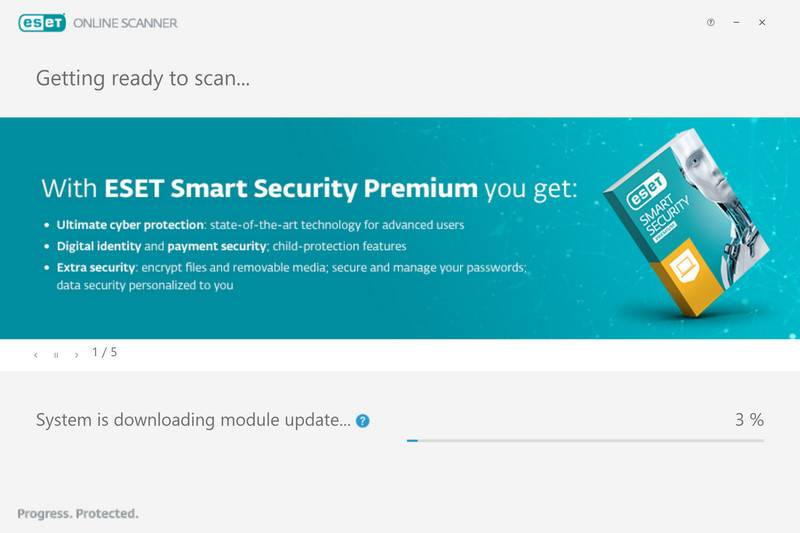
Wait for the Scan to Finish
ESET will now check every file on your computer. Because it’s a full scan, this can take a while — often an hour or more, depending on how much data you have. Leave it running in the background and check on it from time to time.
-
Review the Results
When the scan completes, the Found and resolved detections screen appears. Any threats found were automatically cleaned and quarantined — there’s nothing extra you need to do. Click View detailed results if you want to see exactly what was removed.
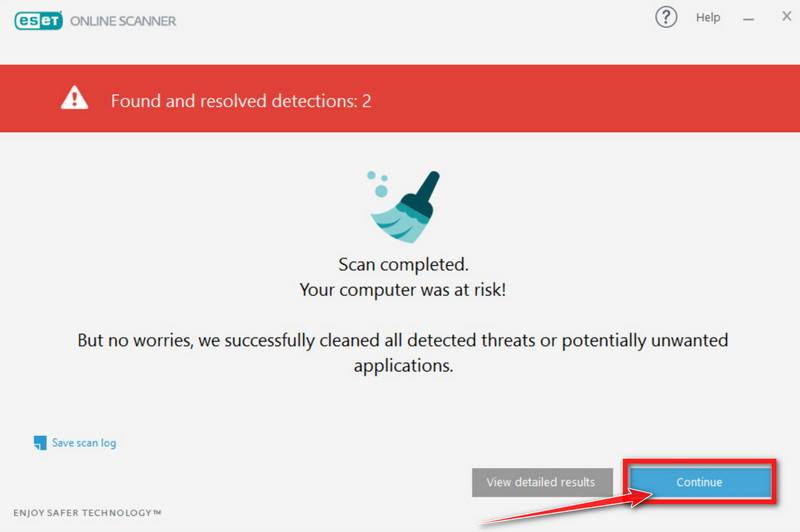
If ESET found nothing — congratulations, your computer has passed the final check and is malware-free.
That’s it — your Windows computer is now clean. The Trojans, adware, and any other malware have been removed.
If you are still having problems with your computer after completing these instructions, then please follow one of the steps:
- Run a computer scan with ESET Online Scanner
- Ask for help in our Windows Malware Removal Help & Support forum.
- Secure accounts from a separate clean device. Start with the primary email account because it can reset other passwords. Then secure banking, payment, work, cloud, shopping, social media, and gaming accounts.
- Sign out other sessions. Change passwords, revoke active sessions, remove unfamiliar devices, check recovery addresses and forwarding rules, and enable multi-factor authentication. Stolen cookies can remain useful even after a password change.
- Protect the password manager. Change its master password from a clean device, rotate important stored credentials, revoke remembered devices, and regenerate recovery codes if the vault may have been open.
- Check financial accounts. Review bank, card, payment-app, and shopping activity. Contact the provider immediately if you see an unfamiliar transaction or changed account detail.
- Move cryptocurrency if wallet data was exposed. Use a clean device or hardware wallet to create new addresses. A stolen seed phrase or private key cannot be made safe by changing an application password.
- Rotate work and developer secrets. Replace VPN credentials, SSH keys, API keys, cloud tokens, repository access, remote-desktop passwords, and secrets stored in local files. Review logs for use from unfamiliar locations.
- Inspect the source of the redirect. Remove unfamiliar browser extensions, revoke suspicious notification permissions, uninstall recently added unwanted programs, and reset modified browser settings.
- Consider reinstalling Windows. A clean installation is the safest choice when the computer held banking, administrator, work, developer, password-manager, or cryptocurrency access, or when scans cannot establish that every stage was removed.
- Report the malicious page. Submit the domain to your browser’s safe-browsing report system, Microsoft Security Intelligence, your security vendor, and the hosting or registrar abuse contact. Use a neutralized domain in public reports.
- Monitor for delayed misuse. Watch account alerts, password-reset emails, new forwarding rules, financial activity, cloud logs, and cryptocurrency transactions for several weeks.
Do not assume that clearing browser history removes the malware
The browser delivered the lure, but the Run command moved execution into Windows. Clearing cookies, cache, or history does not remove a trojan, scheduled task, malicious script, or stolen credentials.
Similarly, deleting the visible command from Run history does not undo what it launched. Cleanup must address the operating system and the online accounts that may have been exposed.
Do not return to the page to retrieve the command
Security teams may collect the command in an isolated analysis environment. Ordinary users should not revisit the site or paste the clipboard into a terminal for identification.
The campaign can change its payload between visits. Returning may expose the device to a new command or additional redirects.
The Bottom Line
The Fake Cloudflare Human Verification page is not a CAPTCHA. It is a ClickFix lure designed to make the visitor execute an attacker-controlled Windows command.
Real Cloudflare checks never require Windows key + R, Ctrl + V, PowerShell, Terminal, or pasted commands. Close any page that asks for those actions.
If you pressed Enter after pasting the command, disconnect the computer, run the full malware-removal process, and secure every important account from a clean device.








