

An email says your incoming messages are being copied to an address you don’t recognize. It offers a removal button, right beside an option to keep the change.
That is an unsettling thing to find in your inbox. Before deciding which button to press, check whether the warning comes from the account it claims to protect.
Overview
The warning describes a problem you naturally want to stop
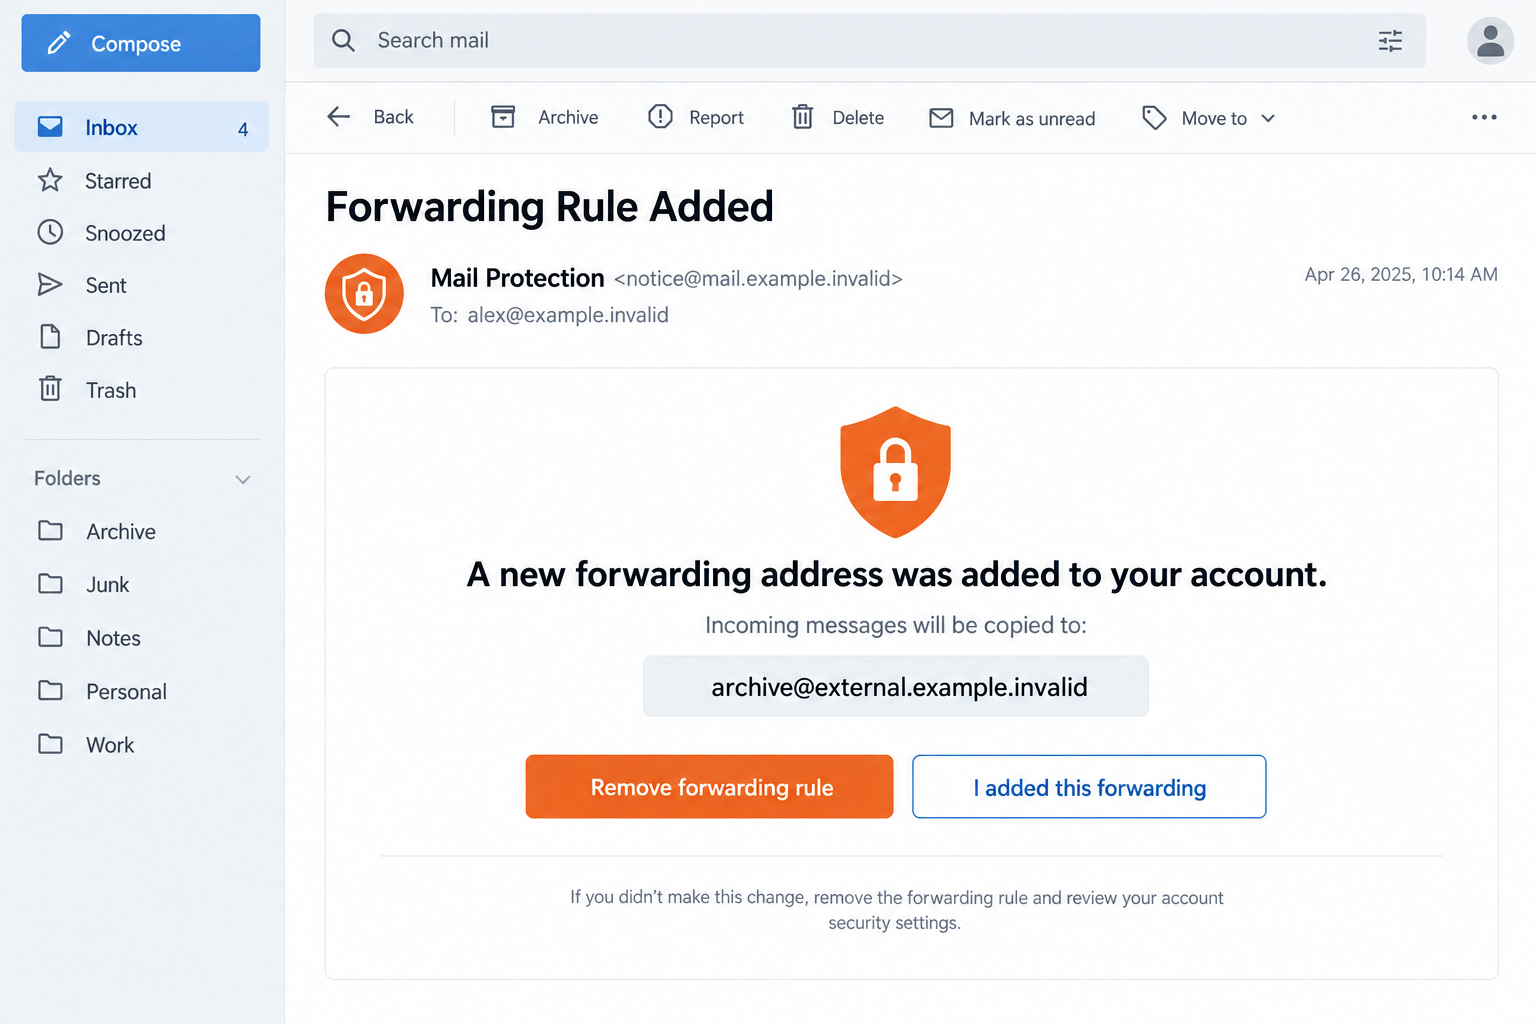
The Forwarding Rule Added email scam pretends that somebody has changed where your mail goes. Its central claim is that incoming correspondence will reach an outside address.
The published message offers two responses: remove the forwarding rule or confirm that you created it. Both choices keep your attention inside the sender’s proposed process.
The campaign leads toward a counterfeit cPanel-style webmail sign-in. Its apparent security intervention is a reason to ask for credentials, not verified evidence of a changed mailbox.
A real email feature gives the story credibility
Forwarding is legitimate. People use it to consolidate accounts, handle team mail, or keep receiving messages after an address changes.
Unauthorized forwarding is also worth investigating. The mistake would be allowing this unverified notice to choose the login route for that investigation.
cPanel and your genuine hosting provider are not responsible for the impersonation. Their actual account controls should be reached independently.
The safe response checks the mailbox, not the buttons
Open the email service you normally use and inspect its settings. An actual unfamiliar rule deserves action, even if the notice that prompted your check was fraudulent.
The illustration uses fictional addresses. The distinction throughout this guide is between a sender’s allegation and a setting you can see in your own trusted account.
- A forwarding destination printed in an email is not a live reading of your settings.
- A remove button is still a link whose destination needs verification.
- Mailbox access can be exposed while trying to prevent an alleged exposure.
- Changing a password doesn’t automatically replace every rule or permission.
The Clever Part Is Making Security Feel Like an Emergency
A fake prize asks you to want something. This notice asks you to protect something you already have: private correspondence.
Imagine thinking that appointment reminders, invoices, or family messages are leaving your account. Removing the rule seems like the obvious first move.
That instinct is understandable. The problem is the route presented as the solution.
The sender supplies an unfamiliar destination, then offers to fix it. You are encouraged to accept both the alleged problem and the proposed repair together.
You don’t have to accept that package. You can take the possibility seriously while investigating through a completely different route.
The second button adds another layer. A choice between removal and confirmation can make the message resemble an account-control panel.
Yet neither option establishes that the sender manages the account. A convincing set of choices can exist inside a fabricated email.
Even a timestamp can be invented. It gives the event a precise appearance without proving that the event happened.
Start with what you can independently check: the account, its current mail-handling settings, and its recent access activity.
How the Forwarding Rule Added Email Scam Works
Step 1: An account-change notice interrupts an ordinary day
The email is framed as a change notification, not a stranger’s request. It implies that an event has already occurred and now needs your response.
That framing can push verification into the background. The reader begins deciding how to reverse the event before asking who reported it.
Receiving the notice doesn’t establish that the sender can read your mailbox. An address and a plausible security story can be enough to target someone.
Keep the original message if you want your provider to investigate. Don’t click to prove to yourself that the warning is serious.
Step 2: The outside address makes the alleged change feel personal
The displayed forwarding address is meant to look unlike anything you would intentionally choose. That encourages the conclusion that another person changed your settings.
It may resemble an archive, an unfamiliar mailbox, or an external service. Its appearance matters emotionally, but it is still text chosen by the sender.
Don’t send a message to that address to ask who owns it. That wouldn’t confirm your account settings and could start another unwanted interaction.
Record it privately if it helps the report. The real service can determine whether any forwarding configuration matches the allegation.
For a shared business inbox, ask the administrator before removing established routing. An unfamiliar destination to one employee may be an approved team function.
Step 3: The removal action moves into an imitation login
The campaign’s removal route asks the reader to authenticate through a counterfeit webmail page. A cPanel-style appearance supplies familiarity.
Authentication is often part of managing settings, which makes the request sound plausible. But legitimacy depends on the destination, not merely the reason given for signing in.
Use your normal hosting or mail portal instead. A legitimate administrator can help you find it without requiring this email’s link.
Check the full domain before entering any secret. A logo, an address filled into a form, or an encrypted connection isn’t enough.
If the provider normally uses a separate workplace sign-in, an unexpected mailbox-password form is another mismatch to report.
Step 4: The supposed repair can expose the account credential
Information typed into the counterfeit form can be collected by its operator. That creates a real credential problem even if no forwarding rule existed beforehand.
The attacker may attempt to use the exposed password. Additional protections can affect whether access succeeds, but they don’t make a disclosed secret private again.
If the page rejects the password, stop rather than trying every secret you remember. Each new attempt could expose another account.
Do not treat a redirect to ordinary webmail as confirmation that a repair worked. Returning to a recognizable service says nothing about what the earlier page collected.
Step 5: Recovery must address actual settings and continuing access
Once a credential has been shared, investigate the real account. The incident is no longer only about whether the original alert was fabricated.
Check authentication activity, recovery methods, application access, and mail handling. Your provider may offer different controls for each.
If unauthorized forwarding is present, preserve its details before removing it through trusted settings. Work accounts may require administrators to assess the scope.
A person can lose account privacy while still receiving every expected message. A copied message may leave the original inbox looking completely normal.
That is why recovery should be based on verified access and settings, not just an absence of visible disruption.
How to Check Whether Mail Is Actually Being Forwarded
Identify the service responsible for routing
The app used to read messages may not be the service storing and routing them. A desktop mail program can display an account hosted somewhere else.
Use your account setup records or ask the known administrator. An unfamiliar security notice shouldn’t introduce a new provider to you.
For a small business, the hosting account and individual mailbox may expose different settings. Tell support which address the notice names.
Don’t reset an entire hosting account to investigate one email unless the actual provider determines broader access is involved.
Inspect forwarding and filters separately
Some services offer a general forwarding setting and filters that forward selected messages. Checking only one can leave an important question unanswered.
Google’s forwarding instructions describe both broad forwarding and filter-based forwarding for Gmail.
In supported cPanel accounts, the Forwarders interface lists configured destinations. Available features depend on the hosting provider.
Look for settings you didn’t create, not merely an address that seems unfamiliar. Shared mailboxes and older migrations may have legitimate routing arrangements.
Ask the responsible administrator what each unclear entry does. Avoid deleting useful configuration while trying to repair an unverified allegation.
Keep evidence of a genuine unauthorized change
If you find a suspicious rule, record its destination, conditions, and available creation details. Store those records somewhere the affected account cannot alter.
That can help responders determine which messages might have been copied. It also prevents the investigation from relying entirely on the phishing email’s claims.
A rule’s removal stops that particular configuration from operating. It cannot recall copies already delivered elsewhere.
For sensitive business correspondence, ask the incident team what further review is appropriate. The answer depends on actual messages and access, not a generic scare story.
What to Do if You Have Fallen Victim to This Scam
Leave the notice’s repair process. Stop using either button and close any unfamiliar sign-in window.
If you never interacted, report the email through your normal mail client. You can check real forwarding settings without giving the sender another opportunity.
Tell the actual provider or administrator. Explain that a forwarding warning sent you toward a questionable login.
Include the account address, interaction time, and whether you submitted a password or code. Use previously established contact information.
Replace credentials you disclosed. Make the change inside trusted settings, preferably from unaffected equipment if you ran a downloaded program.
Use a different secret for this account. Don’t send the replacement password to someone claiming to finish the forwarding repair.
End unauthorized account access. Review sessions, connected applications, and available sign-out controls.
Check recovery addresses and authentication methods too. A changed password and an unchanged access permission can coexist.
Remove genuine malicious routing. Inspect forwarding, filters, and other mailbox rules in the real service.
Preserve suspicious entries for the investigation, then remove them using verified controls or administrator assistance. Don’t trust the email’s claim that its button already removed anything.
Review correspondence that may have been exposed. Prioritize financial instructions, account-reset messages, and private records.
If contacts received fraudulent mail from your account, warn them through a separate channel. Independently confirm any changed payment destination before another transfer.
Check device changes if the interaction went beyond a login. Record any download, installed application, or remote-access request.
Use Malwarebytes for relevant personal-device scanning. AdGuard can reduce exposure to some malicious advertisements, but neither tool removes online forwarding settings.
Follow through on remaining consequences. Change reused passwords and notify your bank promptly about any resulting fraudulent payment.
Keep the incident timeline. Watch for follow-up messages claiming to restore stolen email, cancel the rule, or recover funds for an advance fee.
Is Your Device Infected? Run a Free Malware Scan
Slow performance, constant pop-ups, or strange behavior? These are classic signs of a malware infection. The fastest way to find out is to scan your device with Malwarebytes Free — one of the most trusted malware removal tools available.
The free version detects and removes the most common threats, including:
- Adware — the cause of those annoying pop-ups
- Browser hijackers — unwanted redirects and changed homepages
- Trojans and spyware — hidden programs stealing your data
- Potentially unwanted programs (PUPs) — software you never asked for
👉 Select your device below — Windows, Mac, or Android — then follow the simple steps to download Malwarebytes, scan your system, and remove any threats it finds. The scan usually takes 5 to 20 minutes.
Run a Malware Scan with Malwarebytes for Windows
Malwarebytes is one of the most popular and trusted anti-malware tools for Windows — and it’s completely free for removing infections. It catches threats that many antivirus programs miss, including adware, browser hijackers, and trojans. Follow the steps below to scan and clean your PC in just a few minutes.
Download Malwarebytes
Click the button below to download the latest version of Malwarebytes for Windows from the official source. The free version is all you need — it will scan your computer and remove adware, browser hijackers, and other malicious software at no cost.
Download MalwarebytesOfficial installer for Windows 11 and 10. Your download starts right away.Want real-time protection? See Malwarebytes Premium Malwarebytes Free for WindowsScans and removes malware at no cost
-
Install Malwarebytes
When the download finishes, open your Downloads folder and double-click the MBSetup file. If Windows shows a User Account Control pop-up, click “Yes” to allow the installation.

Follow the On-Screen Prompts to Install Malwarebytes
The setup wizard will walk you through a few quick screens:
-
Choose where you’re installing the program — “Personal Computer” or “Work Computer” — then click Next.

-
Malwarebytes will now install on your device. This usually takes under a minute.

-
When installation is complete, the “Welcome to Malwarebytes” screen will open automatically.

-
On the final screen, click Open Malwarebytes to launch the program.

-
Enable “Scan for Rootkits”
Before scanning, turn on rootkit detection so Malwarebytes can find even the most hidden threats. Click the Settings gear icon on the left side of the screen.

In the settings menu, find “Scan for rootkits” and click the toggle so it turns blue.

Done? Click “Dashboard” in the left pane to return to the main screen.
Start the Scan
Click the blue Scan button. Malwarebytes will automatically update its virus database and start checking your computer for malware.

-
Wait for the Scan to Finish
The scan checks your entire system for browser hijackers and other malicious programs, so it can take 5 to 20 minutes depending on your computer. Feel free to do something else — just check back occasionally to see the progress.

-
Quarantine the Detected Threats
When the scan is done, you’ll see a list of everything Malwarebytes found — malware, adware, and potentially unwanted programs. Click the “Quarantine” button to remove all of them at once.

Malwarebytes will now remove the malicious files and registry entries and move them safely into quarantine.

-
Restart Your Computer
Some threats can only be fully removed after a reboot. If Malwarebytes asks you to restart, click Yes. Once you’re logged back in, Malwarebytes has finished removing the threats it found.

That’s it — your Windows PC is now clean of trojans, adware, and other malware, and should be back to running smoothly.
If you are still having problems with your computer after completing these instructions, then please follow one of the steps:
- Run a computer scan with ESET Online Scanner
- Ask for help in our Windows Malware Removal Help & Support forum.
Run a Malware Scan with Malwarebytes for Mac
Malwarebytes for Mac is a free on-demand scanner that removes the malware other security software tends to miss — adware, browser hijackers, and unwanted programs included. Cleaning an infected Mac with Malwarebytes has always been completely free, and it’s our go-to recommendation. Follow the steps below to scan and clean your Mac in just a few minutes.
-
Download Malwarebytes for Mac
Click the button below to download the latest version of Malwarebytes for Mac.
Download MalwarebytesOfficial installer for macOS. Your download starts right away.Want real-time protection? See Malwarebytes PremiumMalwarebytes Free for MacScans and removes malware at no cost -
Open the Malwarebytes setup file
When the download finishes, open your Downloads folder and double-click the setup file to begin the installation.

-
Follow the On-Screen Prompts to Install Malwarebytes
The Malwarebytes for Mac Installer will guide you through a few quick screens. Click “Continue” and keep following the prompts until the installation completes.



When the installation is complete, Malwarebytes opens to the Welcome to Malwarebytes screen. Click “Get started“.
-
Select “Personal Computer” or “Work Computer”
Malwarebytes will ask what type of computer you’re installing it on. Click either Personal Computer or Work Computer, whichever applies.

-
Start the Scan
Click the “Scan” button. Malwarebytes will automatically update its detection database and begin checking your Mac for malware.

-
Wait for the Scan to Finish
Malwarebytes will scan your Mac for adware, browser hijackers, and other malicious programs. This can take a few minutes, so feel free to do something else — just check back occasionally to see the progress.

-
Quarantine the Detected Threats
When the scan is done, you’ll see a list of everything Malwarebytes found. Click the “Quarantine” button to remove all the threats at once.

-
Restart Your Mac
Malwarebytes will now remove all the malicious files it found. Some threats can only be fully removed after a reboot — if Malwarebytes asks you to restart, allow it. Once you’re logged back in, your Mac is clean.

That’s it — your Mac is now free of adware, rogue browser extensions, and other potentially harmful software.
If you are still experiencing problems while trying to remove a malicious program from your computer, please ask for help in our Mac Malware Removal Help & Support forum.
Run a Malware Scan with Malwarebytes for Android
Malwarebytes for Android automatically detects and removes dangerous threats like malware and ransomware so you don’t have to worry about your most-used device being compromised. Aggressive detection of adware and potentially unwanted programs keeps your Android phone or tablet running smooth.
-
Download Malwarebytes for Android.
You can download Malwarebytes for Android by clicking the link below.
Get Malwarebytes for AndroidOpens Google Play in a new tab.Want real-time protection? See Malwarebytes Premium for AndroidMalwarebytes for AndroidScans your phone and removes malware at no cost -
Install Malwarebytes for Android on your phone.
In the Google Play Store, tap “Install” to install Malwarebytes for Android on your device.

When the installation process has finished, tap “Open” to begin using Malwarebytes for Android. You can also open Malwarebytes by tapping on its icon in your phone menu or home screen.

-
Follow the on-screen prompts to complete the setup process
When Malwarebytes will open, you will see the Malwarebytes Setup Wizard which will guide you through a series of permissions and other setup options.
This is the first of two screens that explain the difference between the Premium and Free versions. Swipe this screen to continue.
Tap on “Got it” to proceed to the next step.
Malwarebytes for Android will now ask for a set of permissions that are required to scan your device and protect it from malware. Tap on “Give permission” to continue.
Tap on “Allow” to permit Malwarebytes to access the files on your phone.
-
Update database and run a scan with Malwarebytes for Android
You will now be prompted to update the Malwarebytes database and run a full system scan.

Click on “Update database” to update the Malwarebytes for Android definitions to the latest version, then click on “Run full scan” to perform a system scan.

-
Wait for the Malwarebytes scan to complete.
Malwarebytes will now start scanning your phone for adware and other malicious apps. This process can take a few minutes, so we suggest you do something else and periodically check on the status of the scan to see when it is finished.

-
Click on “Remove Selected”.
When the scan has been completed, you will be presented with a screen showing the malware infections that Malwarebytes for Android has detected. To remove the malicious apps that Malwarebytes has found, tap on the “Remove Selected” button.

-
Restart your phone.
Malwarebytes for Android will now remove all the malicious apps that it has found. To complete the malware removal process, Malwarebytes may ask you to restart your device.
That’s it — your Android phone is now clean — no more malicious apps, adware, or browser redirects.
If you are still having problems with your phone after completing these instructions, then please follow one of the steps:
- Restore your phone to factory settings by going to Settings > General management > Reset > Factory data reset.
- Ask for help in our Mobile Malware Removal Help & Support forum.
Stay Protected: Block Ads and Malicious Sites
Now that your device is clean, keep it that way. Most infections start with a malicious ad or a fake download button — so blocking them at the source is your best defense.
We recommend AdGuard, which blocks malicious ads, phishing pages, and dangerous redirects before they can reach you.
👉 Download AdGuard and browse safely
What to Tell People Who Share the Mailbox
Separate alerting a colleague from forwarding the lure
You can warn a teammate without sending a clickable copy of the original notice. Describe the subject and the two buttons in your usual communication channel.
If IT needs the original message, use its established reporting method. That preserves useful details without inviting every recipient to repeat the same risky interaction.
For a customer-service inbox, consider who handles replies during recovery. An attacker could exploit confusion while staff assume someone else is checking account activity.
Tell the coordinator which devices and applications use the mailbox. An old saved credential can explain a later connection error without making the phishing notice legitimate.
Finally, agree who confirms that routing is correct after cleanup. A clear owner prevents everyone from assuming another person already checked the important setting.
Coordinate the return to ordinary use
Account recovery becomes harder when several people use the same inbox. One person may change the password while another keeps signing in through an old configuration.
Choose a trusted coordinator and explain the approved access route. Ask everyone to stop using the questionable notice, including forwarded copies of it.
Collect the actions each person took. A colleague who only read the warning has a different exposure from someone who installed its proposed repair utility.
Keep the message calm and specific. People are more likely to report mistakes when the response focuses on recovery rather than blame.
Confirm any legitimate forwarding arrangements with the account owner. The purpose is to remove unauthorized routing without breaking approved workflows.
When access is restored, document the changes and responsibility for future account notices. A clear process reduces the next sender’s opportunity to impersonate your support team.
Frequently Asked Questions
Does this email prove someone added forwarding?
No. It describes a claimed event. Check the actual account’s settings through your normal service before accepting the allegation.
Should I click Remove forwarding rule to be safe?
No. In this campaign, the repair route leads toward credential phishing. Remove any real unauthorized rule inside independently opened account settings.
Can forwarding copy messages without making them disappear?
Yes, forwarding arrangements can retain the original message. An inbox that appears normal doesn’t settle whether another destination receives copies.
Is cPanel responsible for the fake login?
No. The campaign copies a recognizable interface. That appearance does not make the message or page an authorized cPanel communication.
What if I changed the password but forgot the rules?
Review mail-handling settings now. Password replacement and removing an unauthorized forwarding configuration are distinct recovery tasks.
Can a malware scanner remove online forwarding?
No. Scanning deals with device threats. Your mail provider’s controls or administrator must handle rules and access stored in the online account.
The Bottom Line
Don’t let a forwarding warning choose your sign-in page. Investigate the real mailbox directly and leave the message’s repair buttons unused.
If you already submitted credentials, restore account control and inspect the actual routing. Remove verified unauthorized changes, not merely the alarming email that described them.








