

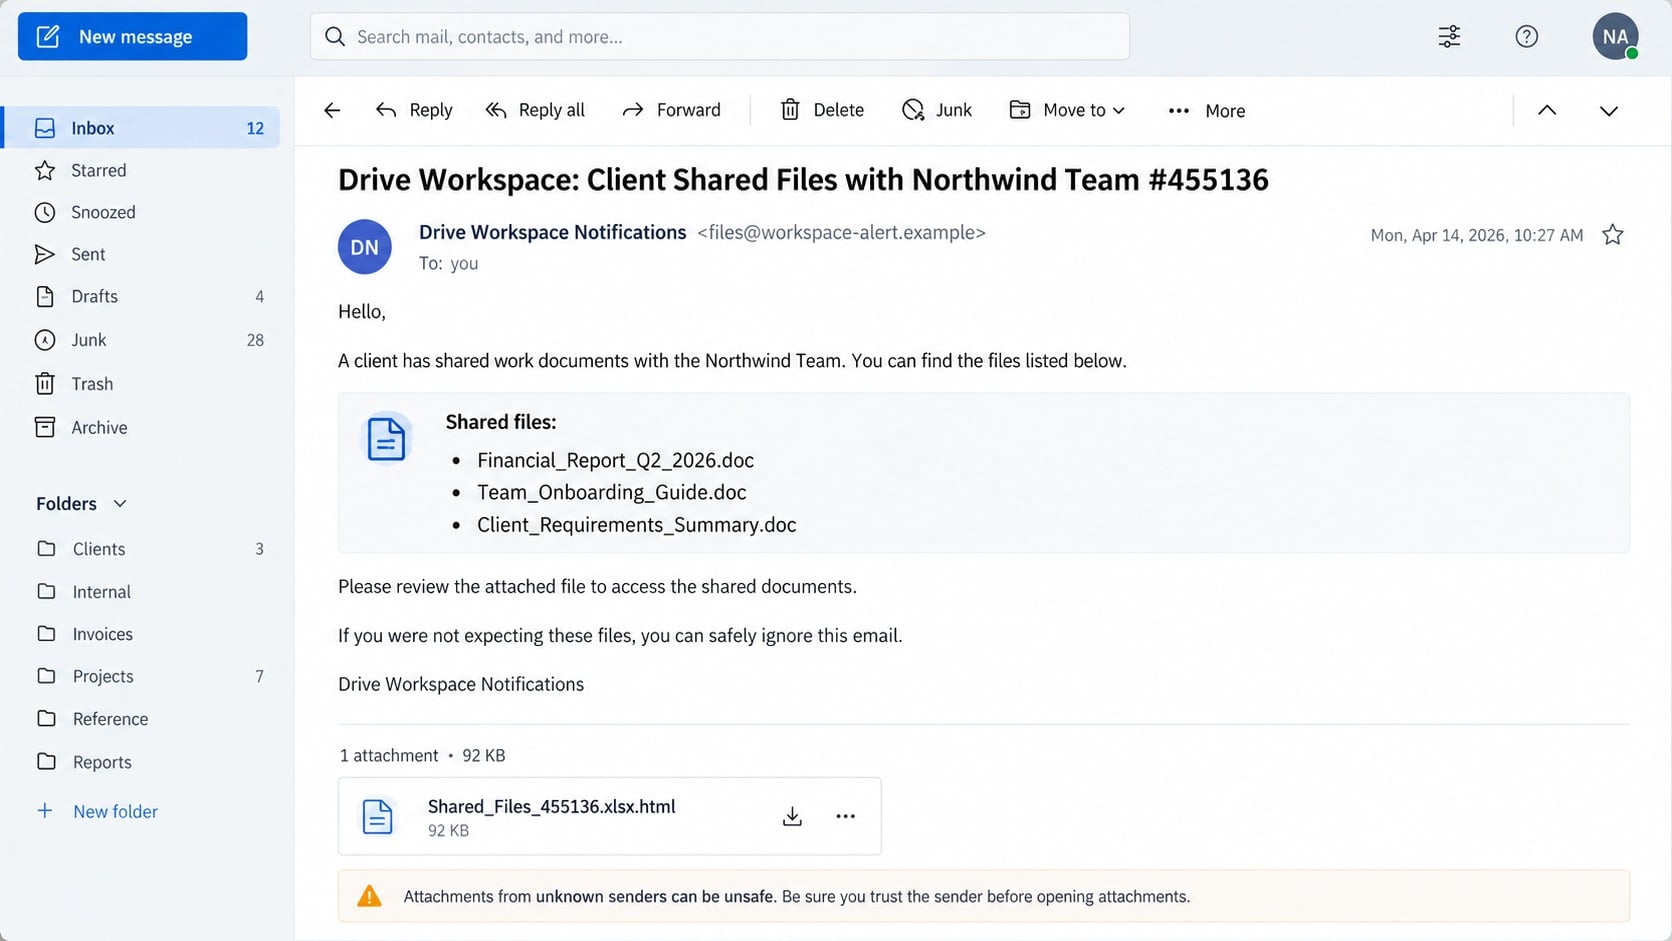
A client has shared several work files with your team, and the email appears to place everything conveniently inside one attachment.
The document names look ordinary enough to invite a quick review, but the attachment format tells a very different story.
Overview
The email imitates a routine collaboration notice
This phishing campaign claims a client shared documents through Google Drive Workspace with the recipient’s team.
It lists plausible filenames such as a financial report, onboarding guide, and client requirements summary.
The message says the requested files were attached directly for convenient access.
That convenience is the trap because the actual attachment is not one of the listed work documents.
The attachment is a webpage disguised as a file list
The delivered item is an HTML file crafted to resemble an Excel document or shared-file package.
Opening it launches a locally stored webpage inside the browser.
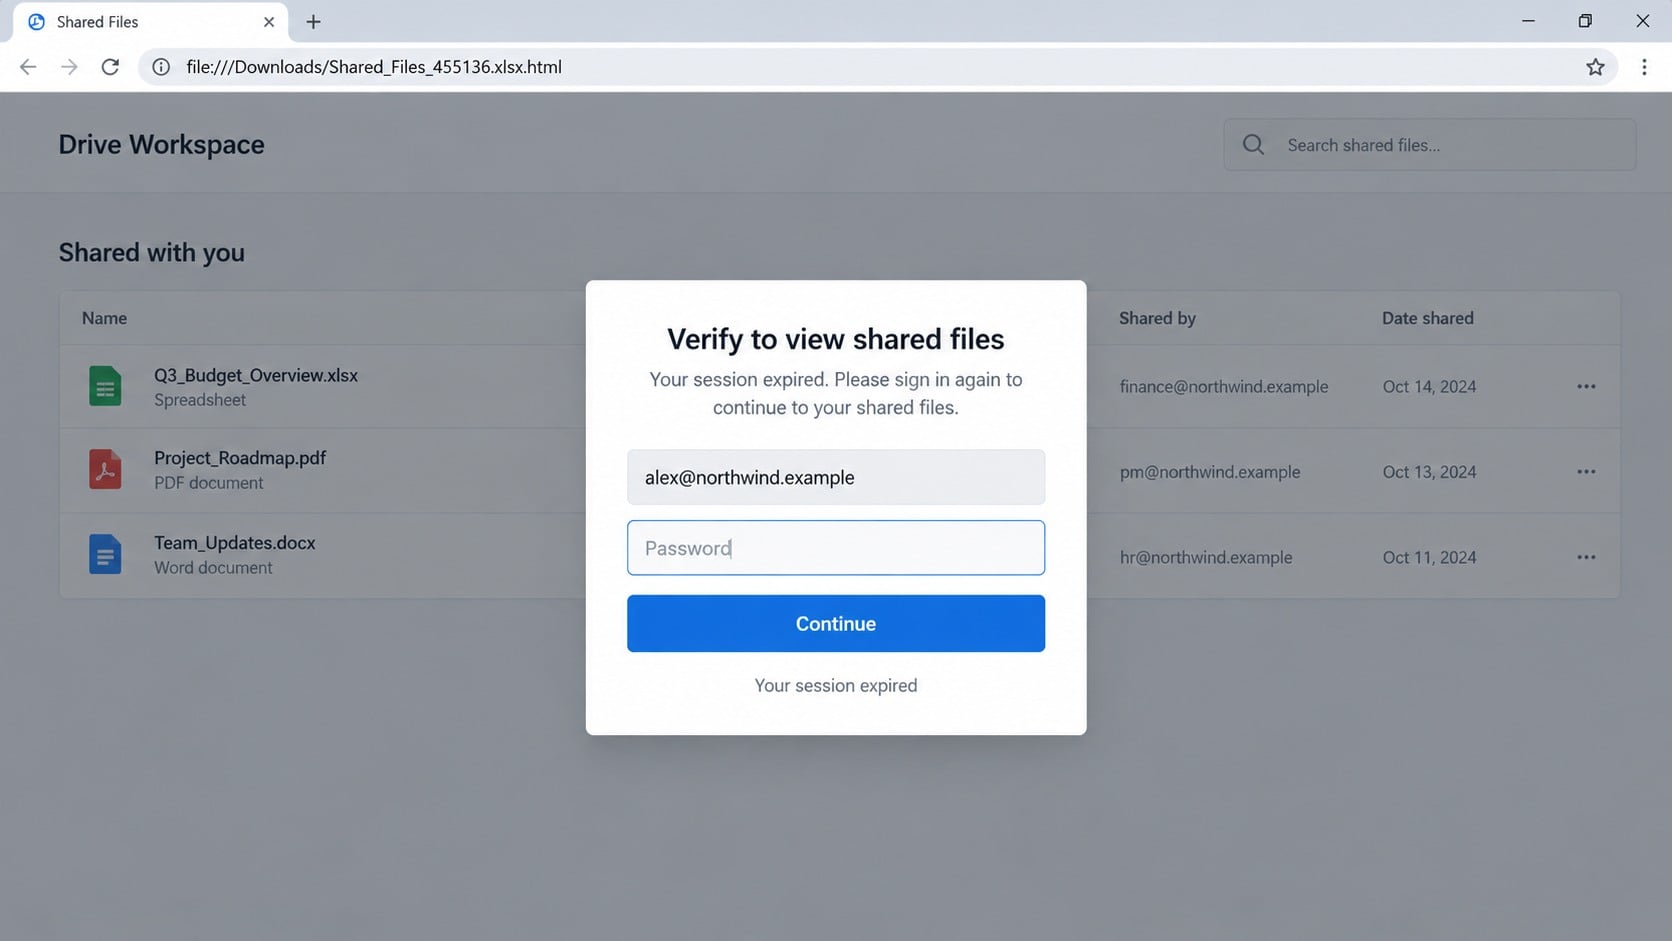
The page copies the appearance of a cloud drive and displays a password form over a fake document list.
Credentials entered there are transmitted to the phisher, even though the page initially opened from the Downloads folder.
The target is the entire Google account
A captured Google password can expose Gmail, Drive, Photos, contacts, saved information, and linked third-party applications.
Work accounts may also connect to calendars, shared drives, internal documents, and organization-managed services.
The page may collect a verification code after the password, allowing real-time attempts against accounts using multifactor authentication.
Watch for these campaign details:
- The subject claims a client shared files with a numbered team.
- The body lists several documents that are not individually attached.
- The real attachment ends in .html or .htm.
- A filename contains .xlsx.html or another misleading double extension.
- The opened page requests a password before showing anything useful.
- The address bar begins with file rather than a Google web address.
- The sender uses an unrelated notification domain.
- No corresponding share appears inside the genuine Drive account.
The Local HTML Trick Explained
HTML is the language used to build webpages, and a saved HTML file can open directly in a browser.
That capability is legitimate. Scammers abuse it to package a convincing phishing interface inside an email attachment.
The browser displays familiar forms and buttons, but the content did not come from Google’s servers.
The address bar can expose the difference before any password is entered.
A local page can still send data outward
The interface may load from a path beginning with file:///Downloads, yet its form can communicate with a remote server.
JavaScript inside the attachment can collect field values and submit them elsewhere.
It may also redirect the visitor after submission to conceal the theft.
A local origin does not make the form trustworthy.
The double extension hides the important suffix
A filename such as Shared_Files.xlsx.html is an HTML webpage, not an Excel workbook.
Windows may shorten long names or hide known extensions, leaving the spreadsheet term more visually prominent.
The icon can be styled to resemble an office document, adding another layer of misdirection.
Always evaluate the final extension and the listed file type before opening an unsolicited attachment.
The fake document list supplies context
Once opened, the attachment displays rows, filenames, sharing controls, and a verification dialog.
Those elements make the password request feel connected to the files described in the email.
A “session expired” message offers a familiar explanation for why another login is necessary.
The page is designed to answer doubts before the user has time to raise them.
How the Google Drive Workspace Shared Files Scam Works
Step 1: A workplace-themed message arrives
The phisher sends an email framed as a client collaboration notification.
Team wording makes the recipient wonder whether a colleague initiated the share.
Document names are broad enough to fit finance, human resources, project management, or sales departments.
The message does not need to know which documents the organization actually expects.
Step 2: The attachment pretends to be several files
The body names multiple documents while supplying one HTML attachment.
This mismatch is easy to miss because the email explains that everything was included for quick access.
The filename may contain spreadsheet wording before the true .html suffix.
Opening the attachment executes the attacker’s webpage code inside the default browser.
Step 3: A counterfeit Drive page appears locally
The local page creates a file-sharing dashboard with document rows and a central verification prompt.
Colors, spacing, icons, and familiar terminology encourage the victim to recognize the service without checking its origin.
Nothing shown proves that the files exist or were shared by a real client.
The page can be fully functional as a phishing form without connecting to Drive.
Step 4: The form collects account credentials
The dialog asks for an email address and password to continue.
Some versions can prefill the address taken from the original mailing list.
When the user submits, script code transfers the information to infrastructure controlled by the criminal.
The same form may ask again, pretending the first password was incorrect.
Step 5: Real-time login attempts follow
The attacker can test the stolen credentials against the actual Google sign-in service.
If a second factor is required, the victim may see approval prompts shortly after using the attachment.
A follow-up page can request the one-time code under the excuse of document verification.
Approving an unexpected prompt may complete the account takeover.
Step 6: Cloud data and recovery channels are explored
Successful access exposes email, shared documents, contacts, calendar entries, and services connected through the same identity.
The intruder may inspect recent files, download sensitive material, and search Gmail for password-reset opportunities.
New recovery details, application permissions, or forwarding arrangements can prolong access.
Business data may be used for invoice fraud or targeted attacks against partners.
Step 7: A convincing redirect closes the loop
After harvesting credentials, the page may open the real Drive website or display an unavailable-file message.
The victim concludes that the link expired or the client removed the documents.
That harmless-looking ending reduces the chance of an immediate password reset.
By the time suspicion develops, the criminal may already have entered the account.
Attachment, Account, and Sharing Verification Checks
The attachment should match the promised files
Compare the names listed in the message with the actual attachment count, type, and final extension.
Three shared documents should not unexpectedly become one webpage file requiring local execution.
If the sender intended a Drive share, confirm it inside Drive rather than through the attachment.
The address bar identifies where the page came from
A local file path, unrelated domain, or misspelled hostname is not a Google sign-in location.
Do not judge only the page artwork because HTML can reproduce familiar visual elements convincingly.
Close the file and access your account through a bookmark or manually typed official address.
The sender must be verified outside the message
Contact the supposed client using a known phone number or an existing conversation you started previously.
Do not reply to the suspicious email because Reply-To may be controlled by the attacker.
Ask for the exact document title and sharing method before opening anything else.
The real account records genuine shares
Open Drive’s shared-with-you area and review notification history from the trusted account session.
A legitimate collaboration invitation normally corresponds to an identifiable owner, item, and permission.
If the listed client and documents do not exist there, treat the email as phishing.
What a Stolen Google Account Can Expose
Gmail may reveal private conversations, purchase receipts, banking alerts, recovery links, and account registration messages.
Drive can contain contracts, scans, tax records, presentations, spreadsheets, backups, and personal identification documents.
Photos may disclose locations, family information, events, and document images captured for convenience.
Calendar entries can expose travel dates, meetings, conference links, and periods when the owner is unavailable.
Contacts give the attacker a trusted audience for follow-up impersonation.
Saved third-party sign-ins may extend the compromise beyond Google services.
Work accounts can include shared-drive access that belongs to an entire team rather than one person.
An intruder may delete or alter files, not merely read them.
Audit logs and version history can reveal some activity, but quick containment remains essential.
Account recovery must address every connected service and every active session.
Red Flags Inside the Email and Attachment
The most useful clue is often the inconsistency between what the email promises and what the file actually is.
Read the complete filename, sender address, and address bar before trusting any visual design.
- The message calls ordinary Google Drive “Google Drive Workspace.”
- Several documents are represented by one HTML attachment.
- The supposed spreadsheet ends with .html after .xlsx.
- The email uses generic client language without naming a known person.
- The opened file displays file:/// or an unrelated web domain.
- A password form appears inside a downloaded local page.
- The page claims the session expired before any real session began.
- The share is absent from the genuine account.
- An unexpected multifactor prompt follows the submitted password.
- The page redirects to a real service only after collecting information.
Any one of these details justifies closing the attachment and verifying the share separately.
What to Do if You Have Fallen Victim to This Scam
- Change the Google password from a trusted device. Use the official account security page and create a unique, unrelated replacement.
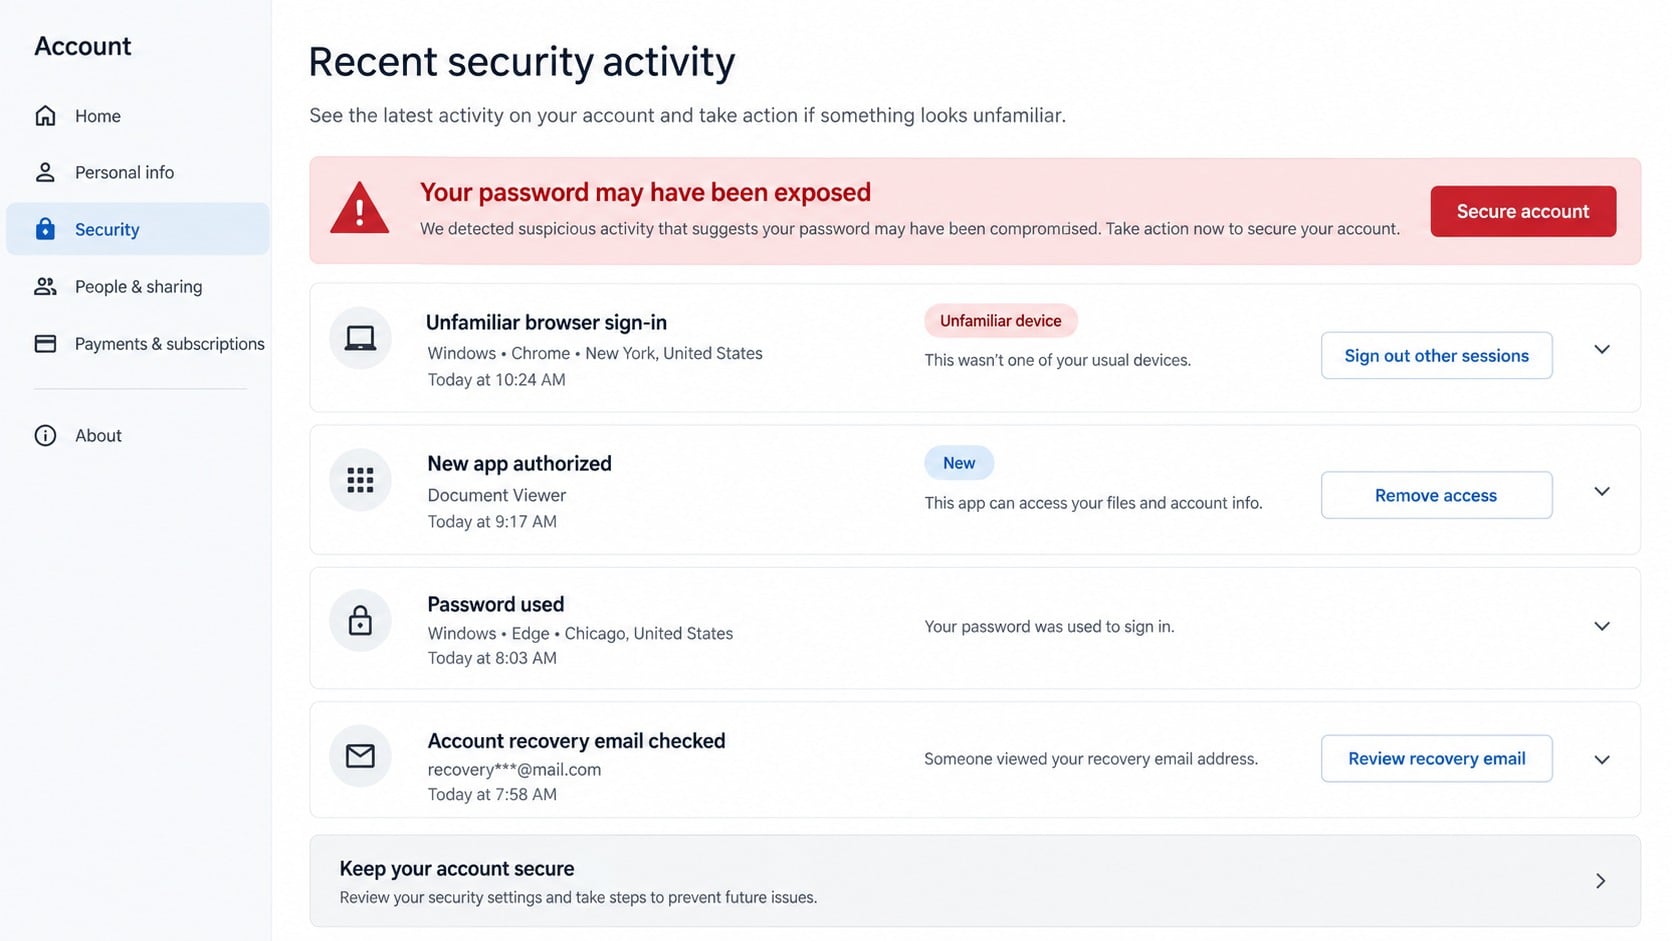
- End unfamiliar sessions. Review signed-in devices, browsers, application sessions, and recent security activity, then revoke anything unrecognized.
- Reset multifactor access. Remove unknown security keys, passkeys, authenticator enrollments, backup codes, and trusted devices.
- Inspect recovery information. Confirm the recovery phone, recovery email, personal details, and alternate addresses still belong to you.
- Remove connected applications. Revoke unfamiliar OAuth grants or document-viewing tools added around the phishing event.
- Check Gmail and Drive. Review forwarding, filters, sent mail, trash, shared files, downloads, deletions, and permission changes.
- Run Malwarebytes on the computer. Malwarebytes can check for downloads or additional threats, especially if the attachment launched unexpected scripts or files.
- Warn collaborators. Tell colleagues and clients to disregard unusual shares or requests sent from your account during the exposure window.
- Filter repeat delivery paths. AdGuard can reduce malicious advertisements, redirections, and known phishing pages encountered during future browsing.
- Report the campaign. Preserve the original email headers and attachment for administrators, then use the mail provider’s phishing-report control.
Is Your Device Infected? Run a Free Malware Scan
Slow performance, constant pop-ups, or strange behavior? These are classic signs of a malware infection. The fastest way to find out is to scan your device with Malwarebytes Free — one of the most trusted malware removal tools available.
The free version detects and removes the most common threats, including:
- Adware — the cause of those annoying pop-ups
- Browser hijackers — unwanted redirects and changed homepages
- Trojans and spyware — hidden programs stealing your data
- Potentially unwanted programs (PUPs) — software you never asked for
👉 Select your device below — Windows, Mac, or Android — then follow the simple steps to download Malwarebytes, scan your system, and remove any threats it finds. The scan usually takes 5 to 20 minutes.
Run a Malware Scan with Malwarebytes for Windows
Malwarebytes is one of the most popular and trusted anti-malware tools for Windows — and it’s completely free for removing infections. It catches threats that many antivirus programs miss, including adware, browser hijackers, and trojans. Follow the steps below to scan and clean your PC in just a few minutes.
Download Malwarebytes
Click the button below to download the latest version of Malwarebytes for Windows from the official source. The free version is all you need — it will scan your computer and remove adware, browser hijackers, and other malicious software at no cost.
Download MalwarebytesOfficial installer for Windows 11 and 10. Your download starts right away.Want real-time protection? See Malwarebytes Premium Malwarebytes Free for WindowsScans and removes malware at no cost
-
Install Malwarebytes
When the download finishes, open your Downloads folder and double-click the MBSetup file. If Windows shows a User Account Control pop-up, click “Yes” to allow the installation.

Follow the On-Screen Prompts to Install Malwarebytes
The setup wizard will walk you through a few quick screens:
-
Choose where you’re installing the program — “Personal Computer” or “Work Computer” — then click Next.

-
Malwarebytes will now install on your device. This usually takes under a minute.

-
When installation is complete, the “Welcome to Malwarebytes” screen will open automatically.

-
On the final screen, click Open Malwarebytes to launch the program.

-
Enable “Scan for Rootkits”
Before scanning, turn on rootkit detection so Malwarebytes can find even the most hidden threats. Click the Settings gear icon on the left side of the screen.

In the settings menu, find “Scan for rootkits” and click the toggle so it turns blue.

Done? Click “Dashboard” in the left pane to return to the main screen.
Start the Scan
Click the blue Scan button. Malwarebytes will automatically update its virus database and start checking your computer for malware.

-
Wait for the Scan to Finish
The scan checks your entire system for browser hijackers and other malicious programs, so it can take 5 to 20 minutes depending on your computer. Feel free to do something else — just check back occasionally to see the progress.

-
Quarantine the Detected Threats
When the scan is done, you’ll see a list of everything Malwarebytes found — malware, adware, and potentially unwanted programs. Click the “Quarantine” button to remove all of them at once.

Malwarebytes will now remove the malicious files and registry entries and move them safely into quarantine.

-
Restart Your Computer
Some threats can only be fully removed after a reboot. If Malwarebytes asks you to restart, click Yes. Once you’re logged back in, Malwarebytes has finished removing the threats it found.

That’s it — your Windows PC is now clean of trojans, adware, and other malware, and should be back to running smoothly.
If you are still having problems with your computer after completing these instructions, then please follow one of the steps:
- Run a computer scan with ESET Online Scanner
- Ask for help in our Windows Malware Removal Help & Support forum.
Run a Malware Scan with Malwarebytes for Mac
Malwarebytes for Mac is a free on-demand scanner that removes the malware other security software tends to miss — adware, browser hijackers, and unwanted programs included. Cleaning an infected Mac with Malwarebytes has always been completely free, and it’s our go-to recommendation. Follow the steps below to scan and clean your Mac in just a few minutes.
-
Download Malwarebytes for Mac
Click the button below to download the latest version of Malwarebytes for Mac.
Download MalwarebytesOfficial installer for macOS. Your download starts right away.Want real-time protection? See Malwarebytes PremiumMalwarebytes Free for MacScans and removes malware at no cost -
Open the Malwarebytes setup file
When the download finishes, open your Downloads folder and double-click the setup file to begin the installation.

-
Follow the On-Screen Prompts to Install Malwarebytes
The Malwarebytes for Mac Installer will guide you through a few quick screens. Click “Continue” and keep following the prompts until the installation completes.



When the installation is complete, Malwarebytes opens to the Welcome to Malwarebytes screen. Click “Get started“.
-
Select “Personal Computer” or “Work Computer”
Malwarebytes will ask what type of computer you’re installing it on. Click either Personal Computer or Work Computer, whichever applies.

-
Start the Scan
Click the “Scan” button. Malwarebytes will automatically update its detection database and begin checking your Mac for malware.

-
Wait for the Scan to Finish
Malwarebytes will scan your Mac for adware, browser hijackers, and other malicious programs. This can take a few minutes, so feel free to do something else — just check back occasionally to see the progress.

-
Quarantine the Detected Threats
When the scan is done, you’ll see a list of everything Malwarebytes found. Click the “Quarantine” button to remove all the threats at once.

-
Restart Your Mac
Malwarebytes will now remove all the malicious files it found. Some threats can only be fully removed after a reboot — if Malwarebytes asks you to restart, allow it. Once you’re logged back in, your Mac is clean.

That’s it — your Mac is now free of adware, rogue browser extensions, and other potentially harmful software.
If you are still experiencing problems while trying to remove a malicious program from your computer, please ask for help in our Mac Malware Removal Help & Support forum.
Run a Malware Scan with Malwarebytes for Android
Malwarebytes for Android automatically detects and removes dangerous threats like malware and ransomware so you don’t have to worry about your most-used device being compromised. Aggressive detection of adware and potentially unwanted programs keeps your Android phone or tablet running smooth.
-
Download Malwarebytes for Android.
You can download Malwarebytes for Android by clicking the link below.
Get Malwarebytes for AndroidOpens Google Play in a new tab.Want real-time protection? See Malwarebytes Premium for AndroidMalwarebytes for AndroidScans your phone and removes malware at no cost -
Install Malwarebytes for Android on your phone.
In the Google Play Store, tap “Install” to install Malwarebytes for Android on your device.

When the installation process has finished, tap “Open” to begin using Malwarebytes for Android. You can also open Malwarebytes by tapping on its icon in your phone menu or home screen.

-
Follow the on-screen prompts to complete the setup process
When Malwarebytes will open, you will see the Malwarebytes Setup Wizard which will guide you through a series of permissions and other setup options.
This is the first of two screens that explain the difference between the Premium and Free versions. Swipe this screen to continue.
Tap on “Got it” to proceed to the next step.
Malwarebytes for Android will now ask for a set of permissions that are required to scan your device and protect it from malware. Tap on “Give permission” to continue.
Tap on “Allow” to permit Malwarebytes to access the files on your phone.
-
Update database and run a scan with Malwarebytes for Android
You will now be prompted to update the Malwarebytes database and run a full system scan.

Click on “Update database” to update the Malwarebytes for Android definitions to the latest version, then click on “Run full scan” to perform a system scan.

-
Wait for the Malwarebytes scan to complete.
Malwarebytes will now start scanning your phone for adware and other malicious apps. This process can take a few minutes, so we suggest you do something else and periodically check on the status of the scan to see when it is finished.

-
Click on “Remove Selected”.
When the scan has been completed, you will be presented with a screen showing the malware infections that Malwarebytes for Android has detected. To remove the malicious apps that Malwarebytes has found, tap on the “Remove Selected” button.

-
Restart your phone.
Malwarebytes for Android will now remove all the malicious apps that it has found. To complete the malware removal process, Malwarebytes may ask you to restart your device.
That’s it — your Android phone is now clean — no more malicious apps, adware, or browser redirects.
If you are still having problems with your phone after completing these instructions, then please follow one of the steps:
- Restore your phone to factory settings by going to Settings > General management > Reset > Factory data reset.
- Ask for help in our Mobile Malware Removal Help & Support forum.
Stay Protected: Block Ads and Malicious Sites
Now that your device is clean, keep it that way. Most infections start with a malicious ad or a fake download button — so blocking them at the source is your best defense.
We recommend AdGuard, which blocks malicious ads, phishing pages, and dangerous redirects before they can reach you.
👉 Download AdGuard and browse safely
Safer Ways to Open Shared Documents
Navigate to Drive directly and use the shared-with-you view instead of opening unexpected email attachments.
Ask the sender to share the document again from a confirmed address when no matching item appears.
Keep visible file extensions enabled so deceptive double suffixes are easier to recognize.
Do not enable scripts, macros, active content, or browser permissions merely to preview a document.
Use organizational file-sharing controls that restrict external invitations and flag new owners.
Administrators can block HTML attachments from untrusted senders when business needs permit.
Security tools should inspect both the attachment content and any remote destinations embedded inside it.
Use a password manager because it will not normally autofill a Google password into a local file or unrelated domain.
Challenge surprise urgency even when filenames resemble work currently underway.
A real collaborator can confirm the share without demanding credentials through an attached webpage.
How Security Teams Can Examine the Attachment
Preserve the original message, headers, and attachment without opening it again on a production workstation.
Calculate a file hash and record the delivery time, recipients, sender path, and gateway verdict.
Analyze the HTML in an isolated environment to identify form actions, scripts, redirects, and remote resources.
Search mail logs for identical attachment names, hashes, subject patterns, and sender infrastructure across the organization.
Review identity logs for sign-ins following delivery, especially sessions that bypass expected user patterns.
Hunt for new OAuth grants, recovery changes, mailbox forwarding, and downloaded Drive files among affected users.
Block confirmed indicators while recognizing that domains and filenames can rotate quickly between campaign waves.
Share a concise warning internally so other recipients understand why the realistic local page cannot be trusted.
Frequently Asked Questions
Does Google Drive send shared documents as HTML attachments?
A legitimate share should be verified inside the actual Drive account. This campaign’s HTML attachment creates a counterfeit login interface.
Can an HTML file steal a password?
Yes. A locally opened page can run scripts and submit form entries to a remote server controlled by the phisher.
Why does the filename contain both xlsx and html?
The spreadsheet term creates familiarity, while the final .html extension identifies the file’s true webpage format.
What if I opened the attachment but entered nothing?
Close it, delete the file, and scan if anything downloaded or launched. Credential theft usually requires submitting the form.
Can multifactor authentication stop this scam?
It helps substantially, but real-time phishing may request codes or approval. Reject every prompt you did not initiate independently.
Should I trust the page after it redirects to Google?
No. A phisher can redirect victims after capture. The final legitimate page does not validate what happened beforehand.
The Bottom Line
The Google Drive Workspace shared-files email converts one deceptive HTML attachment into a convincing local document portal and credential form.
Check shares inside the genuine account, inspect the final file extension, and secure every session immediately after submitting information.

Join the discussion
0 commentsShare your experience or ask a question about this article.
Discussion
Start the conversation
Have a question or something useful to share? Add the first comment.