

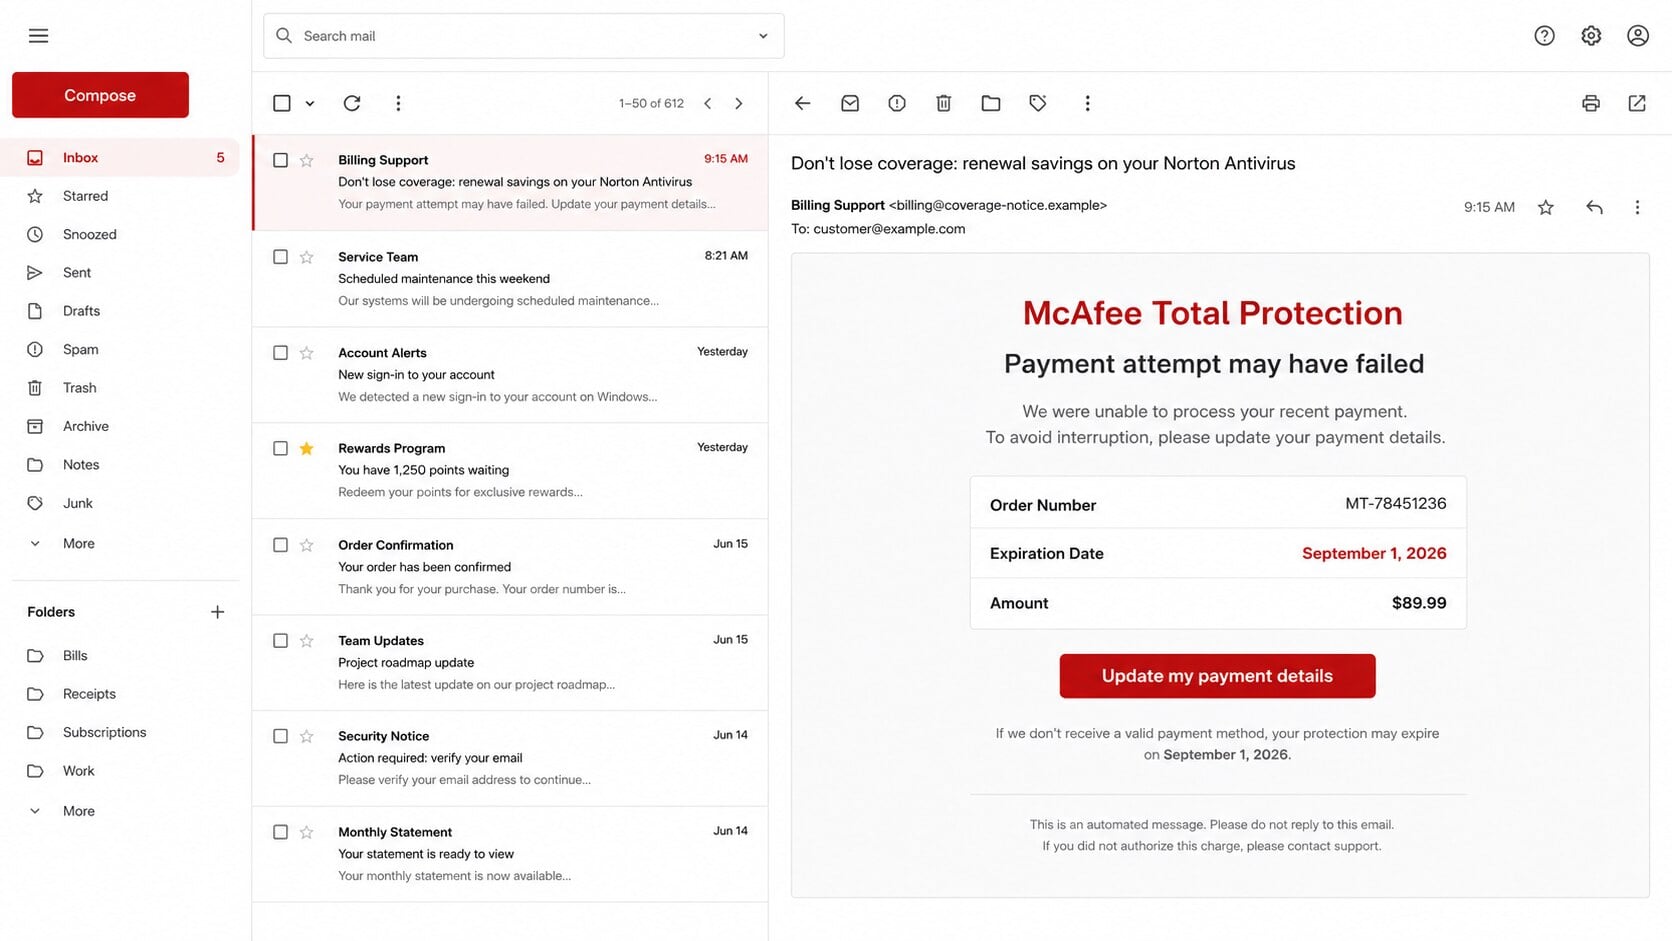
The subject promises Norton renewal savings, but the email body suddenly warns that a McAfee payment failed. That contradiction is easy to miss when protection seems endangered.
A red “Update my payment details” button offers a quick solution, yet the destination deserves far more attention than the alarming subscription story.
Overview
Two unrelated antivirus brands appear in one message
The McAfee Payment Method Expired email claims a renewal attempt for McAfee Total Protection failed because the recipient’s payment method may have expired.
However, the subject line refers to Norton Antivirus or “Norton Protection Services.” McAfee and Norton are separate companies, not interchangeable product names.
That mismatch suggests a recycled template assembled for bulk distribution. The sender changed some branding while leaving other parts of the previous lure intact.
The warning may lead to theft or deceptive affiliate marketing
The observed destination was unavailable during later review, so its final behavior cannot be treated as fully proven for every recipient.
A fraudulent checkout could collect card and personal data. Another variation may redirect through an affiliate link so the sender earns commission from a real purchase.
Both paths are deceptive because the initial payment failure was fabricated and the recipient did not knowingly choose that marketing journey.
McAfee is being impersonated, not implicated
Nothing in the message establishes that McAfee sent it, attempted a charge, or holds the recipient’s subscription.
Real account status should be checked by opening the installed application or typing the official account address independently.
- The subject and body name competing antivirus brands.
- The email assumes a subscription without proving one exists.
- Fear of losing protection pushes the recipient toward a payment button.
- The sender domain does not establish a relationship with McAfee.
- The final landing page may change between recipients or campaign runs.
The Brand Mismatch Is More Than a Typo
Scam templates are designed to be reused quickly
Bulk-email operators frequently rotate logos, product names, prices, and expiration dates while preserving the underlying layout and link system.
A rushed edit can leave the old brand in a subject line, footer, unsubscribe notice, or sender name.
Those leftovers reveal that the message was not generated from an actual customer record. It was adapted from a general security-renewal template.
The email cannot identify the supposed account
A real billing notice should correspond with an account the recipient recognizes, an order history, a masked payment method, and a subscription visible after direct sign-in.
The scam may include a random subscription number and product tier. Decorative identifiers are not proof that a transaction occurred.
If the recipient never purchased McAfee, the story collapses immediately. Even existing customers should verify outside the message.
Fear makes the payment request feel protective
The email says the computer could become exposed to malware, ransomware, or identity theft if coverage lapses.
That framing turns a purchase into an emergency safety decision. It discourages comparison, domain inspection, and a calm review of the real account.
Security software should reduce risk. A message that uses panic to obtain card details creates a new risk instead.
How the McAfee Payment Method Expired Scam Works
Step 1: A recycled renewal email reaches a broad audience
The sender distributes the same notice to people collected from marketing lists, data breaches, previous scams, and scraped addresses.
Many recipients do not use McAfee. The campaign relies on scale and the likelihood that some people recognize at least one antivirus brand.
The Norton wording in the subject may even increase opens among Norton customers before the McAfee body appears.
Step 2: The message invents a failed payment and approaching expiration
The body claims a recent renewal could not be processed. An expiration date and order reference make the warning resemble a customer-specific billing event.
The email does not demonstrate an attempted charge. Its numbers can be generated automatically for every recipient.
A deadline adds pressure by suggesting protection will end before the user has time to investigate.
Step 3: The button routes traffic through an attacker-controlled path
The visible label says “Update my payment details,” but the underlying link determines where the user actually goes.
It may pass through tracking domains, compromised websites, redirects, or affiliate networks before reaching the final page.
That chain can vary by country, device, browser, or time. A safe-looking result for one visitor does not validate the email.
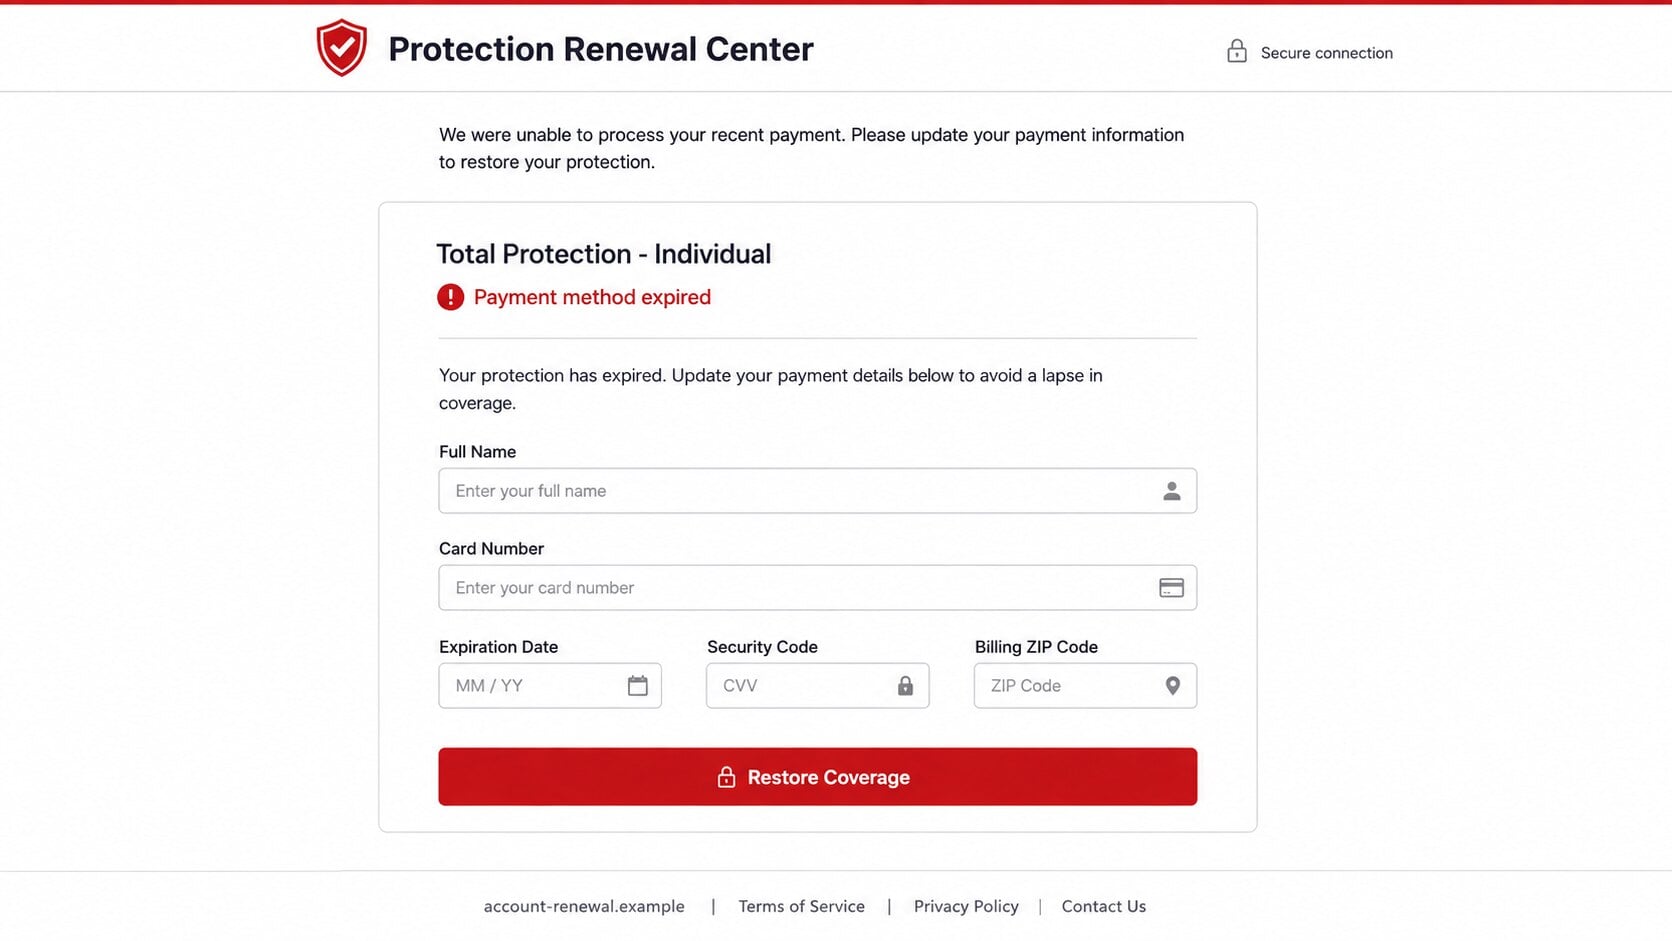
Step 4: One route presents a counterfeit billing form
A fake renewal page may request the cardholder’s name, card number, expiration date, security code, billing address, phone number, and email.
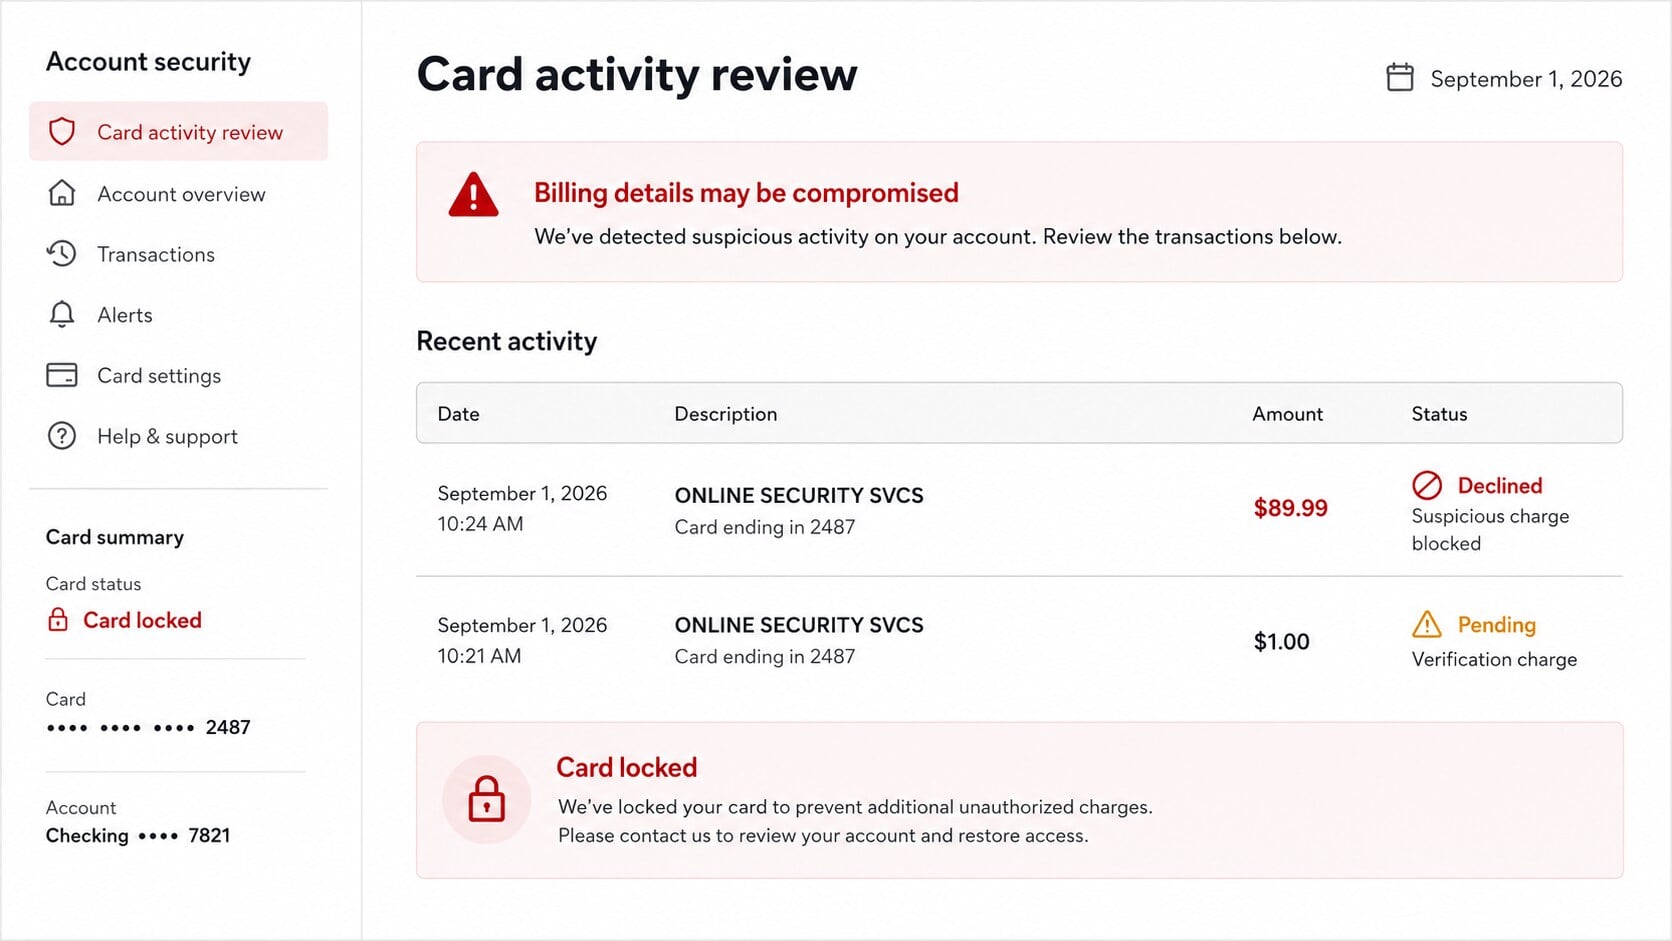
That information can support unauthorized purchases and identity abuse. A small verification charge may appear before larger attempts.
The page may display a secure-connection icon, countdown, or discount. None identifies the merchant receiving the data.
Step 5: Another route may deliver deceptive affiliate traffic
Some security-renewal spam sends recipients toward a genuine product through a commission-bearing affiliate link.
A legitimate destination does not excuse the fabricated billing problem. The recipient was pressured into a purchase using a false account claim.
Affiliate destinations can also change after filters, geographic checks, or campaign updates. Review the exact path seen on the affected device.
Step 6: Submitted details can trigger financial follow-up
If card data reached a fraudulent form, criminals may test it with small purchases, sell it, or combine it with other personal information.
Email and phone details can generate more targeted calls claiming to help with cancellation, refunds, security, or disputed transactions.
Victims may then be asked to install remote-access software or disclose a banking code. That is a separate escalation requiring immediate refusal.
Step 7: The campaign changes brands while keeping the same pressure
Future messages may mention different antivirus companies, device protection, cloud storage, or identity monitoring.
The recognizable pattern is more durable than the product name: an invented billing issue, urgent loss of protection, and a link demanding payment action.
Learning that sequence helps recipients recognize later versions even after the logos and prices change.
What the Available Evidence Does and Does Not Establish
The email’s internal contradiction, unsupported renewal story, and unverified sender are strong evidence that the message itself is deceptive.
The inaccessible destination limits claims about what every visitor saw. It would be inaccurate to state that all versions collected cards without observing the final form.
The safe conclusion is narrower and stronger: do not trust the email, do not use its link, and verify the account through McAfee directly.
If a recipient entered information, respond according to the data supplied rather than waiting to discover which route the campaign used.
Sender, Subscription, Destination, and Merchant Checks
The sender must be verified beyond its display name
Expand the headers and examine From, Reply-To, return path, and authentication results. A “Billing Support” label can be typed by anyone.
An unrelated sender domain has no authority to report a McAfee payment failure.
The subscription should exist inside the real account
Open the application or manually visit the official account page. Check the product, renewal date, billing status, and saved payment method there.
If the notice is genuine, the same issue should appear after a clean login that did not begin with the email.
The entire redirect chain deserves inspection
Hover over the button and note the first hostname. Security teams can examine redirects safely using controlled tools and preserved message headers.
Consumers should not explore the chain themselves. A changing or concealed destination is sufficient reason to abandon it.
The merchant name must be clear before payment
A legitimate checkout identifies the seller, total price, renewal terms, refund policy, contact details, and card-statement descriptor before submission.
A form that hides those facts should not receive payment information, even when it ultimately advertises a real security product.
How to Verify a Real McAfee Renewal Safely
Start inside the McAfee application already installed on the device. Open its account or subscription area and read the displayed status.
Alternatively, type McAfee’s official address yourself. Do not copy a domain from the email, a sponsored search result, or a pop-up warning.
Check bank activity independently. An email claiming a failed payment should not be treated as evidence of either a charge or an attempted charge.
If support is needed, locate contact options through the official account. Never call a telephone number introduced by an unsolicited renewal message.
- Confirm that the named product appears in the real account.
- Compare the genuine renewal date with the email’s date.
- Check whether the displayed card ending matches without revealing full details.
- Inspect the sender and link domains for brand mismatches.
- Read the total, renewal interval, cancellation process, and merchant identity.
- Leave immediately if the page requests remote access or banking credentials.
Possible Outcomes After Pressing the Renewal Button
A credential or card-harvesting page
The clearest high-risk route is a counterfeit checkout that records account credentials, card data, address information, and telephone details.
The form may deliberately fail after submission, leaving the visitor uncertain whether payment occurred.
That uncertainty is not protection. Treat every completed field as exposed, even when no confirmation page appeared.
A commission-generating sales page
A redirect may end at a real antivirus offer after passing through affiliate tracking.
The product can be genuine while the acquisition message remains deceptive. The recipient was falsely told that an existing payment failed.
Send the originating email and redirect information to the brand so it can investigate the promoter.
A second-stage telephone or remote-support approach
The page may request a phone number, display a support number, or trigger follow-up calls about the supposed billing problem.
A caller can ask for remote access, claim a refund error, or instruct the victim to move money between accounts.
End the call. A legitimate renewal correction does not require control of the computer or access to online banking.
Each outcome needs a different response, which is why preserving the exact path and information entered is important.
Check browser downloads and installed applications as well. A supposed invoice viewer or support utility may create risk beyond the payment form.
When uncertain, contact both the card issuer and the genuine security vendor through independently located channels.
What to Do if You Have Fallen Victim to This Scam
Your next move depends on whether you only clicked, entered an account password, supplied card information, completed a purchase, or installed software.
- Save the evidence. Keep the email, headers, URLs, receipts, merchant name, screenshots, and any transaction record before deleting the message.
- Contact the card issuer immediately. Use the number printed on the card, report the form, lock or replace the card, and dispute unauthorized charges.
- Ask about recurring authorization. Tell the issuer to block unauthorized subscription or card-on-file attempts connected with the merchant descriptor.
- Change exposed passwords. If the page requested McAfee, email, or other credentials, replace them through the official service and end active sessions.
- Review the real subscription. Confirm whether any legitimate renewal occurred and cancel only through the official account or verified support channel.
- Remove remote-access tools. If someone guided you by phone, disconnect the device and uninstall software they asked you to run.
- Scan the system. Use Malwarebytes after downloads or remote access. AdGuard can help block known phishing destinations and malicious advertising.
- Watch for test transactions. Small charges may precede larger fraud, so monitor statements and alerts closely over the following weeks.
- Report deceptive affiliate activity. If the link ended on a genuine seller, provide the original email and redirect details to that company.
- Reject recovery offers. Anyone demanding fees, gift cards, cryptocurrency, or banking access to recover losses is likely attempting another scam.
Is Your Device Infected? Run a Free Malware Scan
Slow performance, constant pop-ups, or strange behavior? These are classic signs of a malware infection. The fastest way to find out is to scan your device with Malwarebytes Free — one of the most trusted malware removal tools available.
The free version detects and removes the most common threats, including:
- Adware — the cause of those annoying pop-ups
- Browser hijackers — unwanted redirects and changed homepages
- Trojans and spyware — hidden programs stealing your data
- Potentially unwanted programs (PUPs) — software you never asked for
👉 Select your device below — Windows, Mac, or Android — then follow the simple steps to download Malwarebytes, scan your system, and remove any threats it finds. The scan usually takes 5 to 20 minutes.
Run a Malware Scan with Malwarebytes for Windows
Malwarebytes is one of the most popular and trusted anti-malware tools for Windows — and it’s completely free for removing infections. It catches threats that many antivirus programs miss, including adware, browser hijackers, and trojans. Follow the steps below to scan and clean your PC in just a few minutes.
Download Malwarebytes
Click the button below to download the latest version of Malwarebytes for Windows from the official source. The free version is all you need — it will scan your computer and remove adware, browser hijackers, and other malicious software at no cost.
Download MalwarebytesOfficial installer for Windows 11 and 10. Your download starts right away.Want real-time protection? See Malwarebytes Premium Malwarebytes Free for WindowsScans and removes malware at no cost
-
Install Malwarebytes
When the download finishes, open your Downloads folder and double-click the MBSetup file. If Windows shows a User Account Control pop-up, click “Yes” to allow the installation.

Follow the On-Screen Prompts to Install Malwarebytes
The setup wizard will walk you through a few quick screens:
-
Choose where you’re installing the program — “Personal Computer” or “Work Computer” — then click Next.

-
Malwarebytes will now install on your device. This usually takes under a minute.

-
When installation is complete, the “Welcome to Malwarebytes” screen will open automatically.

-
On the final screen, click Open Malwarebytes to launch the program.

-
Enable “Scan for Rootkits”
Before scanning, turn on rootkit detection so Malwarebytes can find even the most hidden threats. Click the Settings gear icon on the left side of the screen.

In the settings menu, find “Scan for rootkits” and click the toggle so it turns blue.

Done? Click “Dashboard” in the left pane to return to the main screen.
Start the Scan
Click the blue Scan button. Malwarebytes will automatically update its virus database and start checking your computer for malware.

-
Wait for the Scan to Finish
The scan checks your entire system for browser hijackers and other malicious programs, so it can take 5 to 20 minutes depending on your computer. Feel free to do something else — just check back occasionally to see the progress.

-
Quarantine the Detected Threats
When the scan is done, you’ll see a list of everything Malwarebytes found — malware, adware, and potentially unwanted programs. Click the “Quarantine” button to remove all of them at once.

Malwarebytes will now remove the malicious files and registry entries and move them safely into quarantine.

-
Restart Your Computer
Some threats can only be fully removed after a reboot. If Malwarebytes asks you to restart, click Yes. Once you’re logged back in, Malwarebytes has finished removing the threats it found.

That’s it — your Windows PC is now clean of trojans, adware, and other malware, and should be back to running smoothly.
If you are still having problems with your computer after completing these instructions, then please follow one of the steps:
- Run a computer scan with ESET Online Scanner
- Ask for help in our Windows Malware Removal Help & Support forum.
Run a Malware Scan with Malwarebytes for Mac
Malwarebytes for Mac is a free on-demand scanner that removes the malware other security software tends to miss — adware, browser hijackers, and unwanted programs included. Cleaning an infected Mac with Malwarebytes has always been completely free, and it’s our go-to recommendation. Follow the steps below to scan and clean your Mac in just a few minutes.
-
Download Malwarebytes for Mac
Click the button below to download the latest version of Malwarebytes for Mac.
Download MalwarebytesOfficial installer for macOS. Your download starts right away.Want real-time protection? See Malwarebytes PremiumMalwarebytes Free for MacScans and removes malware at no cost -
Open the Malwarebytes setup file
When the download finishes, open your Downloads folder and double-click the setup file to begin the installation.

-
Follow the On-Screen Prompts to Install Malwarebytes
The Malwarebytes for Mac Installer will guide you through a few quick screens. Click “Continue” and keep following the prompts until the installation completes.



When the installation is complete, Malwarebytes opens to the Welcome to Malwarebytes screen. Click “Get started“.
-
Select “Personal Computer” or “Work Computer”
Malwarebytes will ask what type of computer you’re installing it on. Click either Personal Computer or Work Computer, whichever applies.

-
Start the Scan
Click the “Scan” button. Malwarebytes will automatically update its detection database and begin checking your Mac for malware.

-
Wait for the Scan to Finish
Malwarebytes will scan your Mac for adware, browser hijackers, and other malicious programs. This can take a few minutes, so feel free to do something else — just check back occasionally to see the progress.

-
Quarantine the Detected Threats
When the scan is done, you’ll see a list of everything Malwarebytes found. Click the “Quarantine” button to remove all the threats at once.

-
Restart Your Mac
Malwarebytes will now remove all the malicious files it found. Some threats can only be fully removed after a reboot — if Malwarebytes asks you to restart, allow it. Once you’re logged back in, your Mac is clean.

That’s it — your Mac is now free of adware, rogue browser extensions, and other potentially harmful software.
If you are still experiencing problems while trying to remove a malicious program from your computer, please ask for help in our Mac Malware Removal Help & Support forum.
Run a Malware Scan with Malwarebytes for Android
Malwarebytes for Android automatically detects and removes dangerous threats like malware and ransomware so you don’t have to worry about your most-used device being compromised. Aggressive detection of adware and potentially unwanted programs keeps your Android phone or tablet running smooth.
-
Download Malwarebytes for Android.
You can download Malwarebytes for Android by clicking the link below.
Get Malwarebytes for AndroidOpens Google Play in a new tab.Want real-time protection? See Malwarebytes Premium for AndroidMalwarebytes for AndroidScans your phone and removes malware at no cost -
Install Malwarebytes for Android on your phone.
In the Google Play Store, tap “Install” to install Malwarebytes for Android on your device.

When the installation process has finished, tap “Open” to begin using Malwarebytes for Android. You can also open Malwarebytes by tapping on its icon in your phone menu or home screen.

-
Follow the on-screen prompts to complete the setup process
When Malwarebytes will open, you will see the Malwarebytes Setup Wizard which will guide you through a series of permissions and other setup options.
This is the first of two screens that explain the difference between the Premium and Free versions. Swipe this screen to continue.
Tap on “Got it” to proceed to the next step.
Malwarebytes for Android will now ask for a set of permissions that are required to scan your device and protect it from malware. Tap on “Give permission” to continue.
Tap on “Allow” to permit Malwarebytes to access the files on your phone.
-
Update database and run a scan with Malwarebytes for Android
You will now be prompted to update the Malwarebytes database and run a full system scan.

Click on “Update database” to update the Malwarebytes for Android definitions to the latest version, then click on “Run full scan” to perform a system scan.

-
Wait for the Malwarebytes scan to complete.
Malwarebytes will now start scanning your phone for adware and other malicious apps. This process can take a few minutes, so we suggest you do something else and periodically check on the status of the scan to see when it is finished.

-
Click on “Remove Selected”.
When the scan has been completed, you will be presented with a screen showing the malware infections that Malwarebytes for Android has detected. To remove the malicious apps that Malwarebytes has found, tap on the “Remove Selected” button.

-
Restart your phone.
Malwarebytes for Android will now remove all the malicious apps that it has found. To complete the malware removal process, Malwarebytes may ask you to restart your device.
That’s it — your Android phone is now clean — no more malicious apps, adware, or browser redirects.
If you are still having problems with your phone after completing these instructions, then please follow one of the steps:
- Restore your phone to factory settings by going to Settings > General management > Reset > Factory data reset.
- Ask for help in our Mobile Malware Removal Help & Support forum.
Stay Protected: Block Ads and Malicious Sites
Now that your device is clean, keep it that way. Most infections start with a malicious ad or a fake download button — so blocking them at the source is your best defense.
We recommend AdGuard, which blocks malicious ads, phishing pages, and dangerous redirects before they can reach you.
👉 Download AdGuard and browse safely
Reading the message alone does not create a subscription or charge. Financial risk begins when payment data is entered or a transaction is authorized.
If a charge is legitimate but the promotion was misleading, document that distinction when requesting cancellation, a refund, or an affiliate investigation.
Frequently Asked Questions
Did McAfee send the Payment Method Expired email?
The version examined uses unsupported account claims and conflicting Norton wording. Verify genuine McAfee billing only through the official application or account.
Why does the subject mention Norton?
The mismatch likely reflects a recycled template. It indicates the message was not carefully generated from a real McAfee customer record.
Does the email prove my card payment failed?
No. Check the real account and bank activity independently. A random subscription number or date inside an email is not transactional evidence.
Could the link lead to a genuine antivirus purchase?
Some deceptive campaigns use affiliate redirects. Even then, the invented payment problem remains misleading and the full redirect path should be reported.
What if I entered my card but saw no charge?
Contact the issuer anyway. Stolen card information may be tested later, sold, or used with additional data gathered from the form.
Should I cancel antivirus protection because of this message?
No. Ignore the email and inspect the real subscription separately. Keep legitimate protection active while correcting only verified billing or account issues.
The Bottom Line
The McAfee Payment Method Expired email uses a fabricated renewal emergency, and its Norton reference exposes the recycled script behind the warning.
Do not follow its payment link. Verify subscriptions directly, and contact the card issuer promptly if any financial details were submitted.

Join the discussion
0 commentsShare your experience or ask a question about this article.
Discussion
Start the conversation
Have a question or something useful to share? Add the first comment.