


It usually arrives at a bad time.
You are clearing your inbox between meetings, putting kids to bed, or taking five minutes on your phone before sleep. Then you see a subject line that sounds urgent and official: your iCloud payment method was declined.
The email warns you that your storage plan is about to stop, your backups may fail, and your photos could be at risk if you do not “fix billing” right now.
That pressure is not an accident.
The iCloud Payment Method Declined Email Scam is a phishing attack designed to hijack your attention, rush your decision-making, and funnel you into a fake page where scammers steal your credit card details, your Apple ID login, or both. Once they have that, the damage can spread fast.
This guide will walk you through what the scam looks like, why it feels believable, how it works step by step, and exactly what to do if you clicked or entered information.
Scam Overview
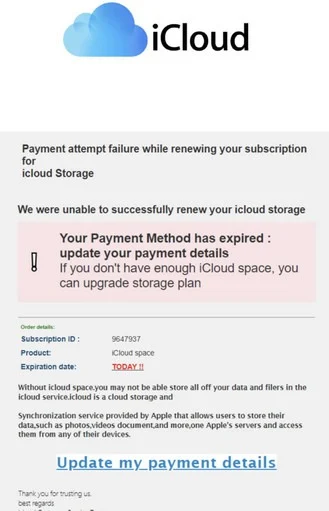
What the “Payment Method Declined” scam email claims
Most versions of this phishing email tell a simple story:
- Your iCloud payment method was declined
- Your iCloud storage subscription could not renew
- You need to update your billing details immediately
- If you do not act quickly, your storage plan may be canceled or limited
The message is written to feel like an automated billing notice. It often mentions a “renewal attempt,” an “expired card,” or a “declined payment method,” because those are common real-life problems. People change cards, banks block charges, and subscriptions do fail sometimes.
Scammers take that everyday reality and twist it into a trap.
Why this scam triggers such a strong reaction
Cloud storage is not just another subscription.
For many people, it is where their life lives:
- photos and videos
- phone backups
- notes and documents
- contacts and calendars
- app data and settings
So when an email says your payment was declined, your brain does not read it as a normal billing issue. It reads it as a threat to your memories, your device, and your ability to recover data if something goes wrong.
That emotional jolt is the scam’s engine.
The goal is to get you to click first and verify later.
What the scam actually wants from you
Under the hood, there are two main theft targets.
1) Credit card information
Many phishing pages push victims toward a “billing update” form that asks for:
- card number
- expiration date
- CVV
- billing address
- phone number
That is enough for criminals to attempt fraudulent purchases, run test charges, or sell the card data to other scammers.
2) Apple ID login credentials
Other versions start with a fake sign-in page, asking you to “log in to confirm billing.” If you type your Apple ID email and password, the scammer can attempt:
- account takeover
- password resets on other accounts
- targeted social engineering using details inside your account
Some campaigns try to collect both. They might ask you to sign in first, then “update payment” as a second step. That flow feels natural, which is why it works.
Common subject lines and wording variations
Even when the design changes, the language follows predictable patterns. You might see subject lines like:
- iCloud Payment Method Declined
- Payment Failed: iCloud Storage
- Your iCloud+ Subscription Could Not Be Renewed
- iCloud Billing Issue: Action Required
- Storage Renewal Failed, Update Payment Now
- Your iCloud Plan Will Be Canceled
- Account Notice: Payment Problem Detected
- Subscription Renewal Unsuccessful
Inside the email, the phrases often include:
- “We were unable to process your payment”
- “Your payment method was declined”
- “Your subscription will be suspended”
- “Update your payment details”
- “Avoid interruption”
- “Prevent data loss”
This wording is chosen for one reason: it creates urgency without giving you time to think.
Why scammers love the word “declined”
“Declined” sounds routine and plausible.
If an email screams “fraud” or “hack,” many people get suspicious. But “payment declined” feels like something that could happen to anyone. It also nudges you into self-blame:
Maybe my card expired. Maybe my bank blocked it. Maybe I forgot to update something.
That subtle self-doubt is powerful. It makes you more likely to click, because you think you are fixing your mistake.
The biggest red flags that give it away
Even polished phishing emails usually contain tells. Here are the most common ones for the iCloud payment declined scam.
1) A generic greeting instead of your name
Many scam emails start with “Dear user” or nothing at all. Real billing notices often include:
- your name
- part of your account email
- a reference to your account settings
Scammers send these emails in bulk. They usually do not personalize them.
2) Over-the-top urgency and fear language
Phrases like “immediately,” “today,” “final notice,” and “avoid deletion now” are meant to short-circuit rational thinking.
Legitimate billing issues usually come with calmer language and more than one notification. Real companies want to keep you subscribed, not frighten you into panic clicks.
3) A big button that solves everything
Most phishing emails rely on one bold button:
- “Update Payment”
- “Fix Billing”
- “Renew Now”
- “Keep My Storage”
- “Prevent Cancellation”
The button is designed to hide the real destination link, especially on mobile. It is also designed to feel like the only path forward.
4) A sender name that does not match the message
Sometimes the sender display name looks unrelated to Apple or iCloud. That can happen when scammers use:
- compromised email accounts
- spoofed sender names
- mass-mailing infrastructure that rotates identities
Always check the actual sender address, not just the display name.
5) The link goes to a non-Apple domain
This is the most important test.
If you preview the link and it does not clearly belong to Apple, do not click. Many phishing pages use:
- lookalike domains
- random domains with long paths
- hacked websites hosting phishing forms
- redirect chains that hide the final destination
A real billing update should be done through official account settings, not through a random link in an email.
6) Odd grammar or “almost right” branding
Phishing templates are often written quickly and reused. Watch for:
- awkward phrases like “payment attempt failure”
- inconsistent capitalization (icloud instead of iCloud)
- strange spacing and punctuation
- generic labels like “iCloud space” without a clear plan name
These small mistakes are common in scams.
How the fake pages are designed to trick you
Once you click, the scam often becomes harder to spot, because the fake page can look extremely convincing.
Modern phishing kits copy real design elements:
- logos and layout
- sign-in boxes
- “billing update” forms
- fake security icons and reassuring text
Some even include a padlock icon in the browser, because they use HTTPS.
That padlock does not mean the site is legitimate. It only means the connection is encrypted. Scammers can get HTTPS certificates easily. The domain name is what matters.
What makes this scam different from other phishing emails
Many phishing scams promise something good, like a gift card, a refund, or a prize.
This one threatens something you already value.
It does not say “win.” It says “lose.”
That is why it feels so intense.
When the email claims your payment was declined, it pushes your mind into an emergency mode where you want to “fix it” before anything bad happens. The scam’s success depends on that emotional momentum.
Who gets targeted
Anyone can receive this scam, but attackers often aim at:
- iPhone users who rely on backups
- people with large photo libraries
- users who have seen real “storage almost full” warnings
- older adults who may be less comfortable inspecting links
- busy professionals who handle email quickly on mobile
This is not about intelligence. It is about timing and pressure. Even careful people click sometimes when the message hits the right nerve at the wrong moment.
What is actually at risk if someone falls for it
The risk depends on what the victim enters.
If you enter card details, you risk:
- unauthorized charges
- subscription fraud
- card data being sold and reused
If you enter Apple ID credentials, you risk:
- attempted account takeover
- exposure of synced data
- password resets for other accounts tied to your email
If you enter both, the attacker has multiple ways to keep attacking even after you fix one piece.
That is why the cleanup steps matter, and why doing them in the right order helps.
How The Scam Works
Step 1: The scam email arrives and creates urgency
The first step is a high-volume email blast. Attackers send the same template to huge lists, hoping a small percentage clicks.
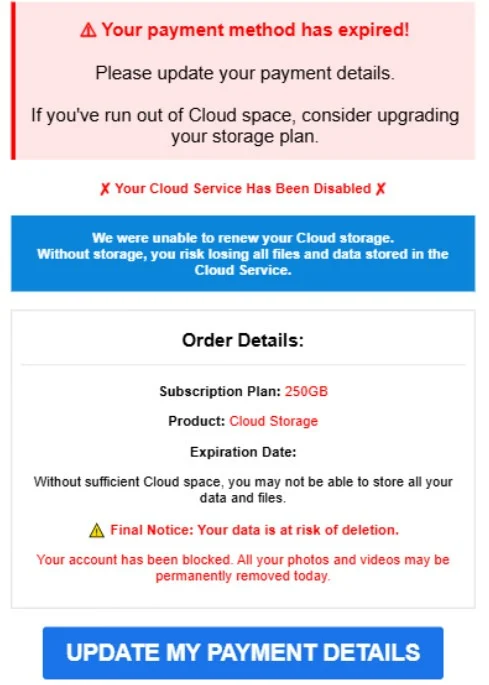
The email is short on purpose. It does not want to explain. It wants to move you.
Most versions include:
- a “payment declined” claim
- a warning about interruption
- a deadline or urgency cue
- a big button to update billing
The emotional hook is the suggestion that your storage will stop working. Many people immediately picture failed backups, missing photos, or a device warning that will not go away.
That mental picture is what pushes the click.
Step 2: The victim clicks a button like “Update Payment”
The button is the pivot point.
It often hides a long URL that leads away from Apple and toward a phishing infrastructure controlled by the attacker.
On desktop, hovering over the button may reveal the true link. On mobile, scammers rely on the fact that most people do not preview links.
This is why the scam is so effective on phones.
Step 3: The victim is redirected through one or more tracking pages
Many phishing campaigns do not send you directly to the final fake page.
Instead, they route you through redirects to:
- hide the final destination domain
- track who clicked
- adjust the page based on device type or location
- rotate domains quickly when one gets blocked
To the user, it feels like one click. Behind the scenes, it can be a chain.
Step 4: The fake page imitates a billing or sign-in flow
Once on the phishing site, the attacker wants to reduce suspicion. The page usually follows one of these scripts.
Script A: “Sign in to continue”
The page shows a login box and asks for:
- Apple ID email
- password
It may claim you must “confirm your identity” before updating billing, which sounds reasonable. After all, real sites often require login.
If you enter your credentials, they are sent to the attacker immediately.
Script B: “Update billing details”
The page shows a payment form and asks for:
- card number
- expiration date
- CVV
- billing address
This is the direct credit card theft route. It often includes reassuring text like “secure payment” or “encrypted,” because scammers know people look for safety signals.
Script C: Combined flow
This is common and very effective:
- sign in
- update payment
It feels like the normal sequence of managing a subscription, so victims are less likely to question it.
Step 5: In some cases, the scam attempts real-time account access
If the attacker gets a valid Apple ID and password, they may try to log in immediately.
If the account uses two-factor authentication, the victim might receive:
- a login prompt on their device
- a verification code
Scammers sometimes build phishing pages that ask you to enter that code.
This is a dangerous moment.
If you enter the code, you may be handing the attacker the final key they need to complete the login in real time. Not every scam does this well, but enough do that it is worth taking seriously.
A simple rule protects you here:
If you did not initiate a login, do not approve a login prompt and do not share a code.
Step 6: The phishing site shows a fake “success” message
After you submit information, the site often displays something like:
- “Payment updated successfully”
- “Your subscription is now active”
- “Thank you, your account is secured”
This is theater. It is designed to reduce suspicion while your data is already gone.
Some pages will even redirect you to a legitimate site afterward to make you think everything worked.
Step 7: The attacker uses the stolen data
What happens next depends on what the attacker captured.
If they got credit card details
Common outcomes include:
- small test charges
- larger purchases
- subscription sign-ups
- card data being sold to other criminals
Fraud is not always immediate. Sometimes it appears days later, which is why monitoring matters.
If they got Apple ID credentials
The attacker may attempt:
- login from another device
- password changes
- recovery setting changes
- access to synced data
Even if they cannot get full access because of security prompts, the password can still be used for other attacks, especially if it is reused on other services.
Step 8: Follow-up attempts increase after the first interaction
Once you click, the attacker learns something important: your email is active, and you respond to urgent messages.
Many victims then receive additional messages that escalate the fear:
- “Your update failed, try again”
- “Final notice before suspension”
- “Your storage will be deleted today”
- “Call support to restore service”
Some versions shift to text messages because SMS can feel more urgent and direct.
That is why it helps to report and filter these emails aggressively, even if you did not fall for the first one.
Step 9: The scam spreads into “support” and recovery traps
Another pattern is the fake support angle.
The email or landing page includes a phone number, claiming you should call to fix the payment issue. The call center then tries to extract:
- card details again
- remote access to your computer
- personal information for identity fraud
This turns a simple phishing email into a multi-step scam.
What makes the scam “sticky” once it starts
The reason this scam can spiral is simple: cloud accounts are connected to everything.
Your email controls password resets. Your Apple ID connects to devices. Billing connects to cards.
When one piece is compromised, attackers try to pivot to the next.
That is why the cleanup steps are structured the way they are. You want to regain control of accounts first, then lock down payment methods, then harden everything around it.
Variants people may see in real life
Subject lines
- iCloud Payment Method Declined
- Payment Failed: iCloud Storage Renewal
- Your iCloud+ Subscription Could Not Be Renewed
- Action Required: Update Your Payment Method
- Billing Issue Detected for Your Storage Plan
- Final Notice: Payment Declined
Common email wording
- “We were unable to process your payment for your storage subscription.”
- “Your plan is on hold due to a declined payment method.”
- “Update billing to avoid interruption of backups and photos.”
- “Service may be limited until payment details are confirmed.”
Typical buttons
- Update Payment Method
- Fix Billing Issue
- Renew Subscription
- Restore Storage
- Confirm Payment Details
Text message versions (SMS)
- “iCloud: Payment declined. Update now to avoid interruption: [link]”
- “Your storage plan is on hold. Fix billing here: [link]”
- “Renewal failed. Confirm payment details: [link]”
Quick red flag
If the sender claims to be Apple but the link is not an official Apple domain, it’s a phishing attempt.
What To Do If You Have Fallen Victim to This Scam
If you clicked or entered information, you can still fix this. The key is calm, fast action.
Use the steps below that match what happened to you. You do not need to do everything if you did not share everything.
- If you only opened the email, do this and stop
Delete the email and mark it as phishing or spam. Then search your inbox for similar subjects like “payment declined” or “iCloud billing” and delete those too. - If you clicked the link but did not type anything
Close the page immediately. Do not go back to “double-check” it.
Then clear your browser’s site data (cookies and cache) for peace of mind, and update your browser. - If you entered your Apple ID email and password
Treat your password as compromised.
Do this immediately, using official account settings, not the email link:
- change your Apple ID password
- enable two-factor authentication if it is not enabled
- review trusted devices and remove anything you do not recognize
- review account recovery phone numbers and emails
Then do this next:
- change the password anywhere else you reused it
- turn on login alerts if available
- If you received an unexpected login prompt or code
If you see a device prompt you did not initiate, do not approve it.
If you entered a code into a page, change your password immediately and review trusted devices right away. - If you entered credit card information
Assume the card details were captured.
Do this:
- call the number on the back of your card
- report fraud and request a replacement card with a new number
- review recent transactions for small test charges and larger purchases
- dispute unauthorized charges as soon as you see them
If you entered a bank one-time code, tell your bank that specifically. It can change how they respond.
- If you entered both password and card details
Handle this in order:
- secure your Apple ID first (password change, trusted devices, recovery info)
- secure your email account next (password change, two-factor, check forwarding rules)
- secure your card last (cancel, replace, monitor)
The reason is practical: if your email is compromised, attackers can intercept password resets and alerts while you are trying to fix things.
- Check your email for hidden forwarding rules and filters
This is a common post-phishing trick.
Look for:
- forwarding to an unknown address
- filters that archive or delete security alerts
- rules that mark messages as read automatically
Remove anything you did not create.
- Monitor for follow-up scams
For at least a couple of weeks, be extra cautious with messages that mention:
- subscription renewals
- billing failures
- storage deletion
- “support” phone numbers
Scammers often reuse the same victim list with new templates.
- If you downloaded anything, treat it as high risk
Most iCloud billing scams are phishing, not malware. But if you downloaded a file:
- do not open it
- delete it
- run a reputable antivirus scan
- update your operating system and browser
- Report the phishing email
Reporting helps protect others and improves filtering.
- use your email provider’s “Report phishing” option
- if it happened at work, forward it to your IT or security team
- if money was stolen, report it to your bank and follow local fraud reporting options
Is Your Device Infected? Run a Free Malware Scan
Slow performance, constant pop-ups, or strange behavior? These are classic signs of a malware infection. A quick way to check is to scan your device with Malwarebytes Free, one of the most trusted malware removal tools available. If you only visited a scam page and didn’t download or install anything, this scan is optional.
The free version detects and removes the most common threats, including:
- Adware — the cause of those annoying pop-ups
- Browser hijackers — unwanted redirects and changed homepages
- Trojans and spyware — hidden programs stealing your data
- Potentially unwanted programs (PUPs) — software you never asked for
👉 Select your device below — Windows, Mac, or Android — then follow the simple steps to download Malwarebytes, scan your system, and remove any threats it finds. The scan usually takes 5 to 20 minutes.
Run a Malware Scan with Malwarebytes for Windows
Malwarebytes is one of the most popular and trusted anti-malware tools for Windows — and it’s completely free for removing infections. It catches threats that many antivirus programs miss, including adware, browser hijackers, and trojans. Follow the steps below to scan your PC and remove what Malwarebytes finds.
Download Malwarebytes
Click the button below to download the latest version of Malwarebytes for Windows from the official source. The free version is all you need — it will scan your computer and remove adware, browser hijackers, and other malicious software at no cost.
Download MalwarebytesOfficial installer for Windows 11 and 10. Your download starts right away.Want real-time protection? See Malwarebytes Premium Malwarebytes Free for WindowsScans and removes malware at no cost
-
Install Malwarebytes
When the download finishes, open your Downloads folder and double-click the MBSetup file. If Windows shows a User Account Control pop-up, click “Yes” to allow the installation.
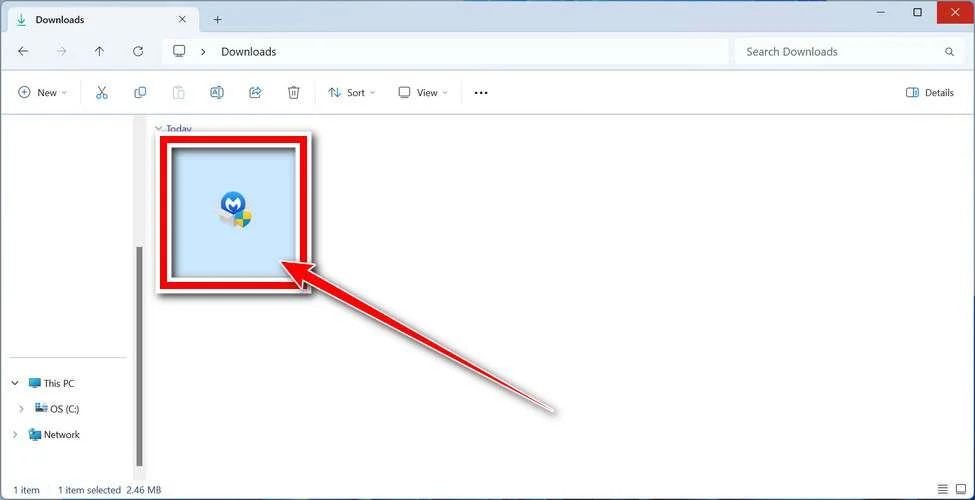
Follow the On-Screen Prompts to Install Malwarebytes
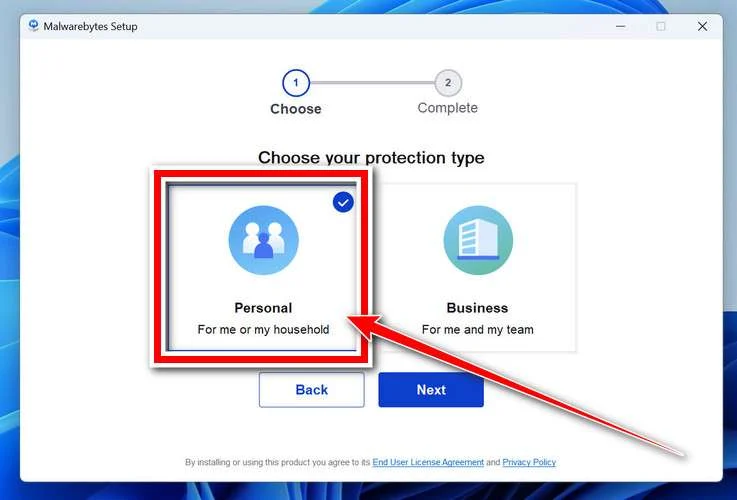
The setup wizard will walk you through a few quick screens:
-
Choose where you’re installing the program — “Personal Computer” or “Work Computer” — then click Next.
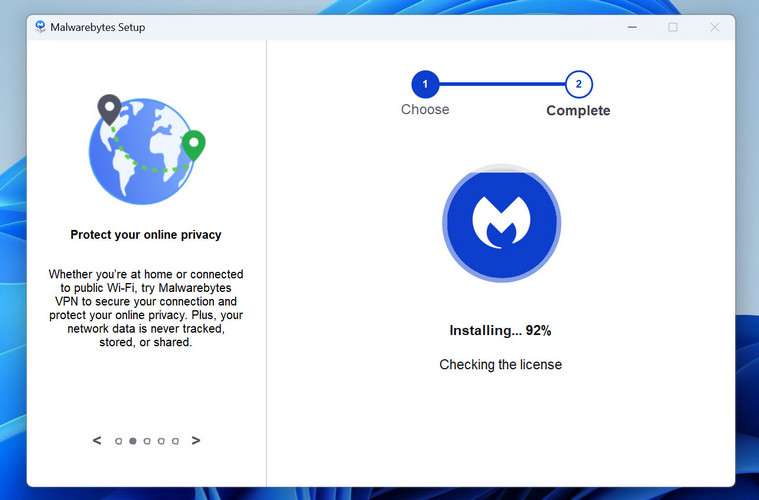
-
Malwarebytes will now install on your device. This usually takes under a minute.
-
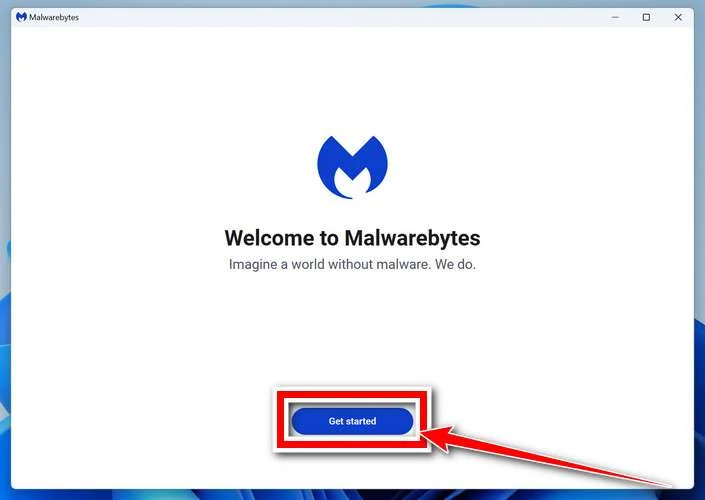
When installation is complete, the “Welcome to Malwarebytes” screen will open automatically.
-
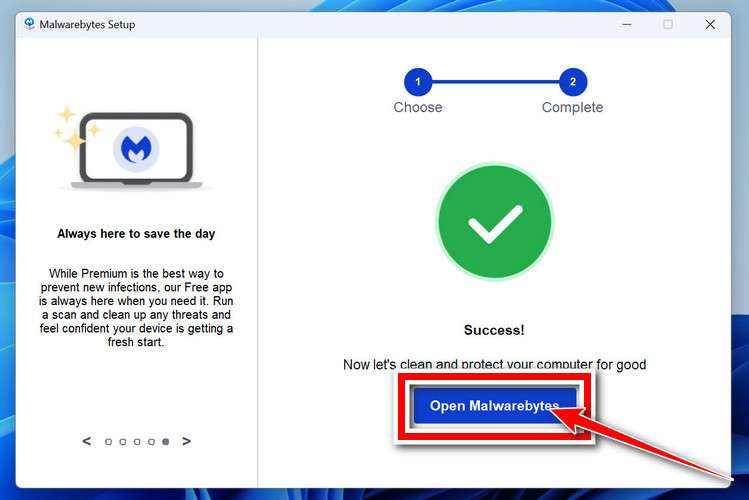
On the final screen, click Open Malwarebytes to launch the program.
-
Optional: Check for rootkits with a Custom Scan
You don’t need to change any settings for a normal scan. The standard Threat Scan in the next step is enough for most problems, so you can go straight to it.
If you also want to check for rootkits, use a Custom Scan. In current versions of Malwarebytes, rootkit scanning is only available there:
- On the Scanner tile, click the three-dot menu and select Advanced Scan.
- Choose Custom Scan. In its options, check Scan for rootkits.
- Select your system drive (usually C:\) as the location to scan, then start the scan. It takes longer than a Threat Scan.
- When it finishes, review and quarantine the results as described in the steps below.
Rootkit scanning isn’t available on Windows devices with ARM processors.
Start the Scan
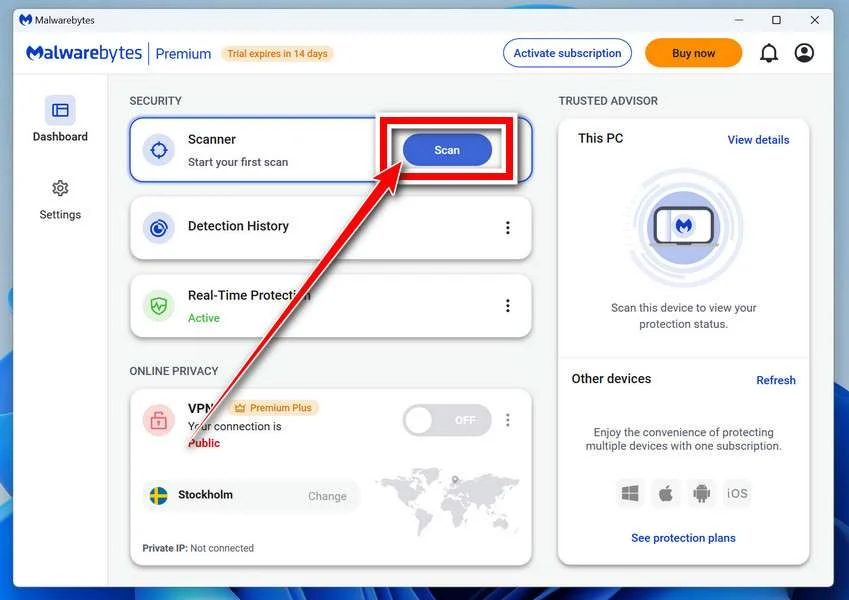
Click the blue Scan button. Malwarebytes will automatically update its virus database and start checking your computer for malware.
-
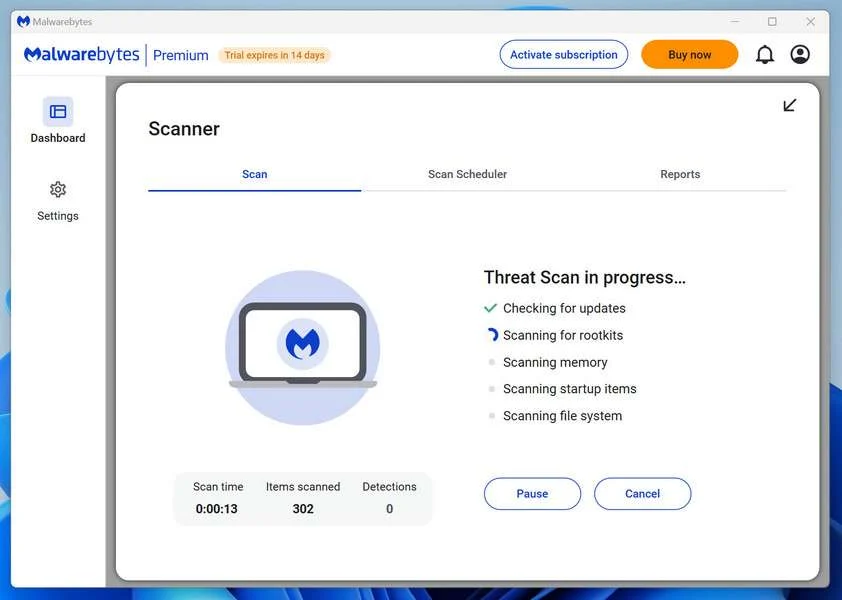
Wait for the Scan to Finish
The scan checks your entire system for browser hijackers and other malicious programs, so it can take 5 to 20 minutes depending on your computer. Feel free to do something else — just check back occasionally to see the progress.
-
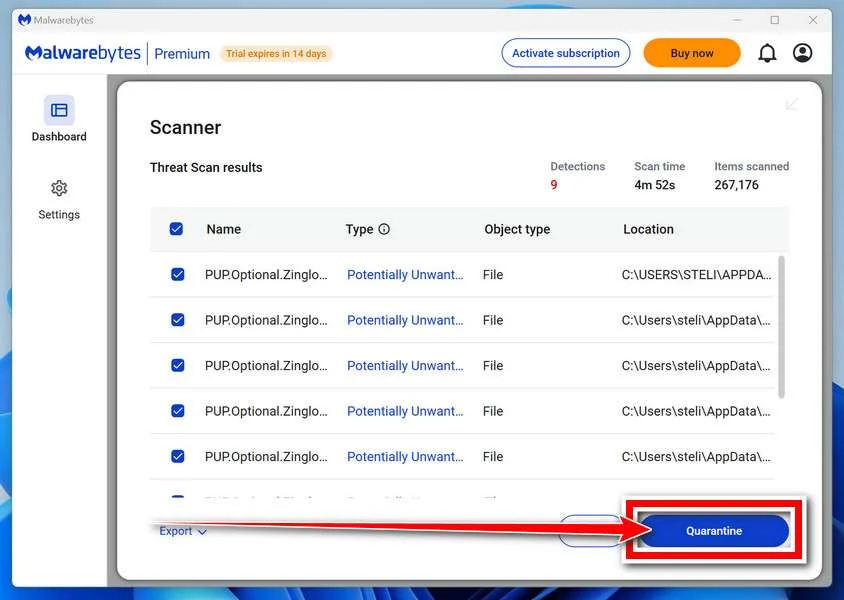
Quarantine the Detected Threats
When the scan is done, you’ll see a list of everything Malwarebytes found — malware, adware, and potentially unwanted programs. Click the “Quarantine” button to remove all of them at once.
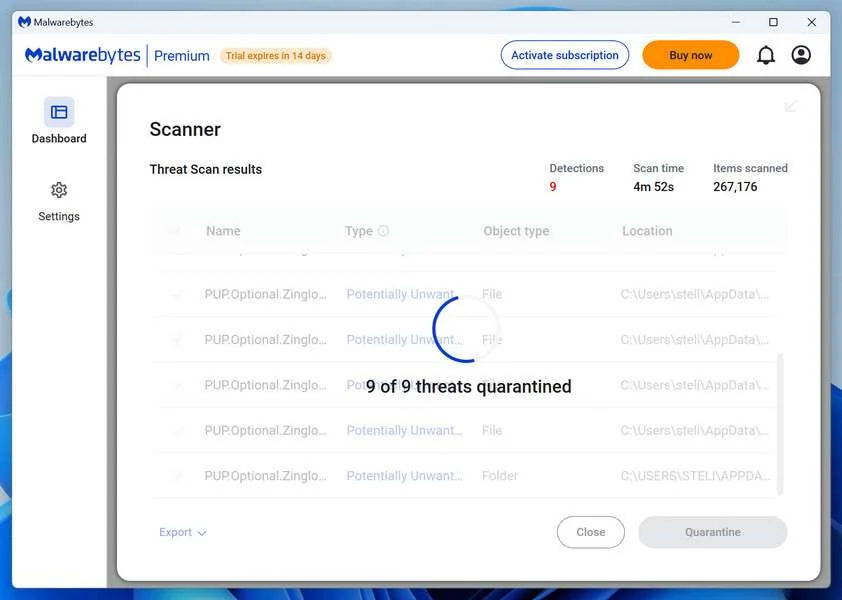
Malwarebytes will now remove the malicious files and registry entries and move them safely into quarantine.
-
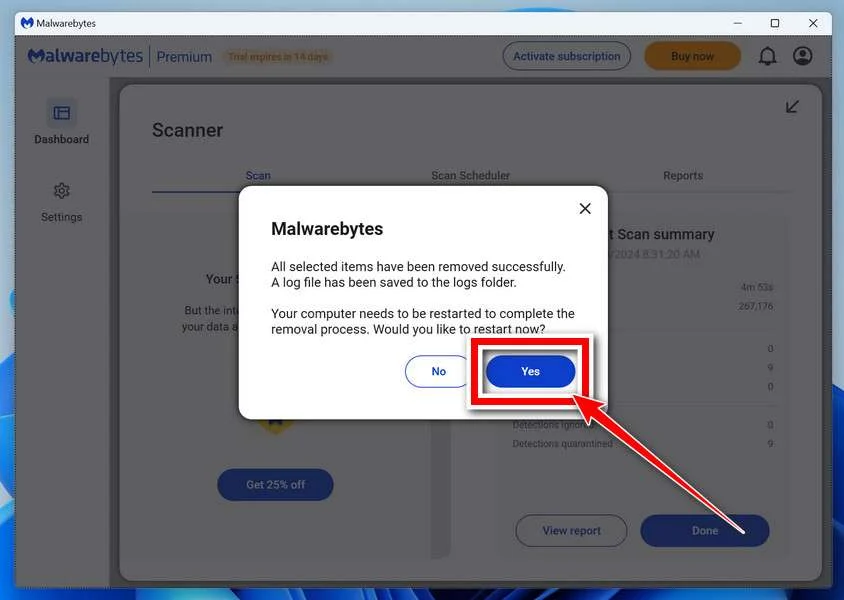
Restart Your Computer
Some threats can only be fully removed after a reboot. If Malwarebytes asks you to restart, click Yes. Once you’re logged back in, Malwarebytes has finished removing the threats it found.
When the scan is done, check whether the problems you noticed have stopped. If they continue, see the options below.
If you are still having problems with your computer after completing these instructions, then please follow one of the steps:
- Run a computer scan with ESET Online Scanner
- Ask for help in our Windows Malware Removal Help & Support forum.
Run a Malware Scan with Malwarebytes for Mac
Malwarebytes for Mac is a free on-demand scanner that removes the malware other security software tends to miss — adware, browser hijackers, and unwanted programs included. Cleaning an infected Mac with Malwarebytes has always been completely free, and it’s our go-to recommendation. Follow the steps below to scan your Mac and remove what Malwarebytes finds.
-
Download Malwarebytes for Mac
Click the button below to download the latest version of Malwarebytes for Mac.
Download MalwarebytesOfficial installer for macOS. Your download starts right away.Want real-time protection? See Malwarebytes PremiumMalwarebytes Free for MacScans and removes malware at no cost -
Open the Malwarebytes setup file
When the download finishes, open your Downloads folder and double-click the setup file to begin the installation.
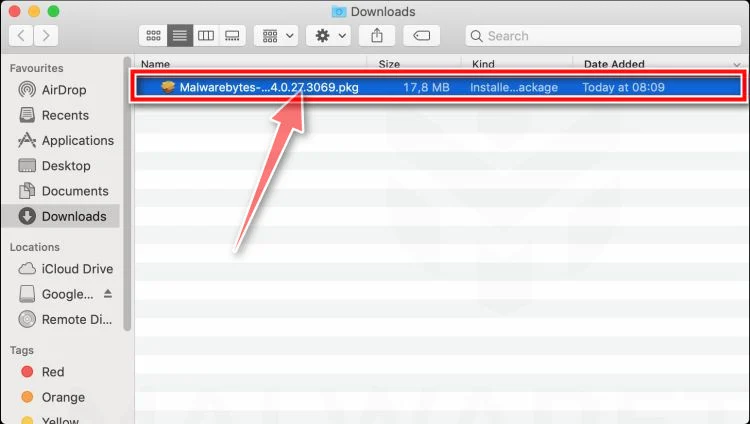
-
Follow the On-Screen Prompts to Install Malwarebytes
The Malwarebytes for Mac Installer will guide you through a few quick screens. Click “Continue” and keep following the prompts until the installation completes.
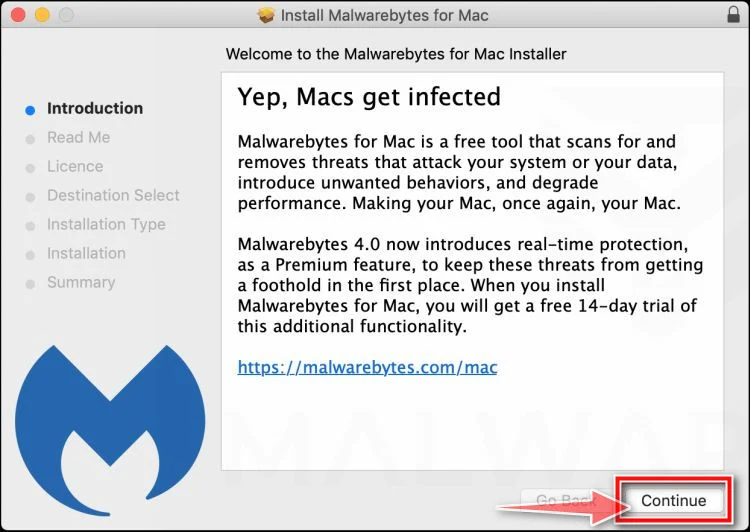
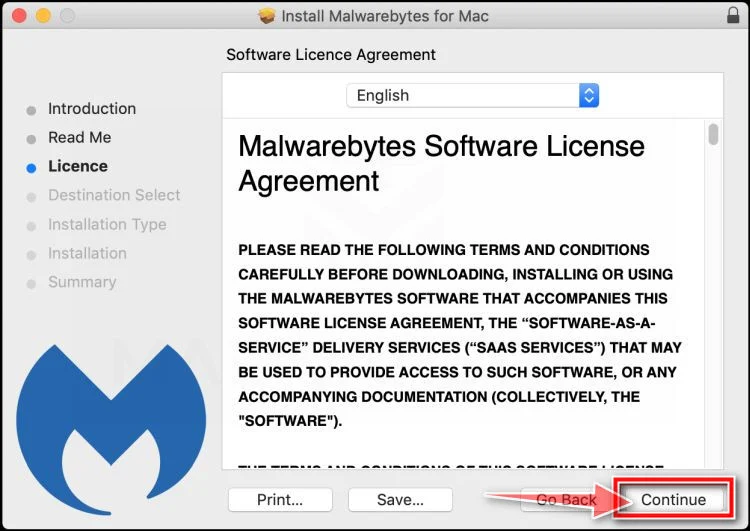
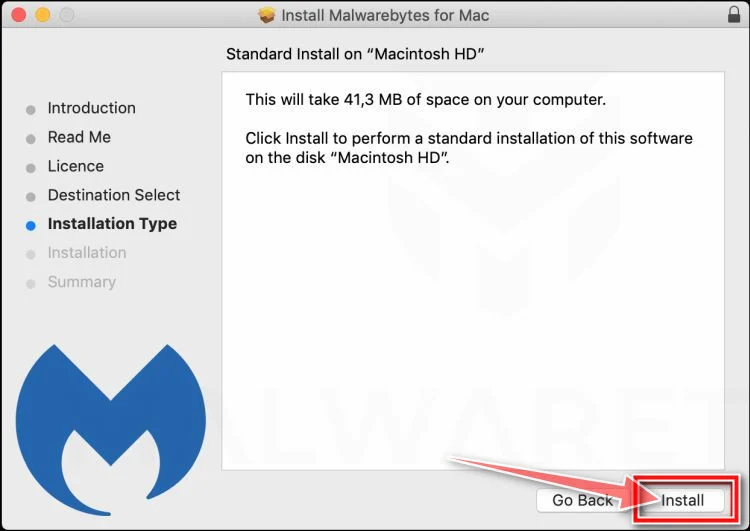
When the installation is complete, Malwarebytes opens to the Welcome to Malwarebytes screen. Click “Get started“.
Malwarebytes needs Full Disk Access to check your whole Mac. When it asks, open System Settings > Privacy & Security > Full Disk Access, turn on Malwarebytes (it may be listed as Malwarebytes Protection), and confirm with your password or Touch ID. Then return to Malwarebytes. On macOS Monterey and earlier, this setting is in System Preferences > Security & Privacy > Privacy.
-
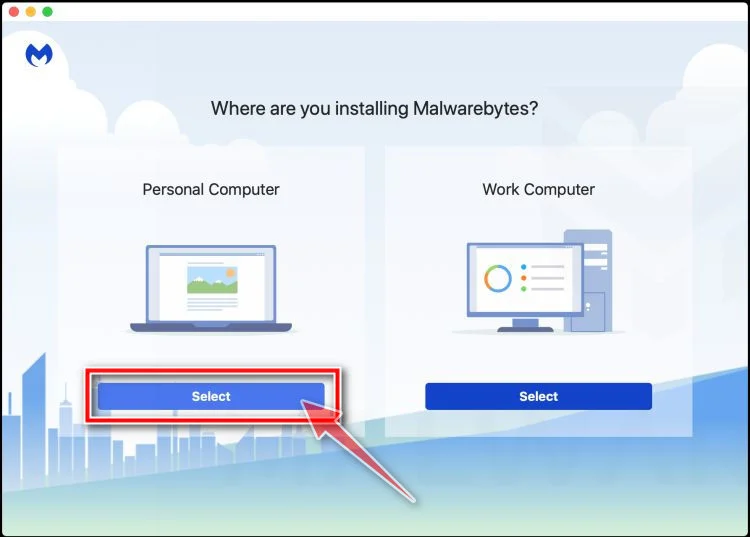
Select “Personal Computer” or “Work Computer”
Malwarebytes will ask what type of computer you’re installing it on. Click either Personal Computer or Work Computer, whichever applies.
-
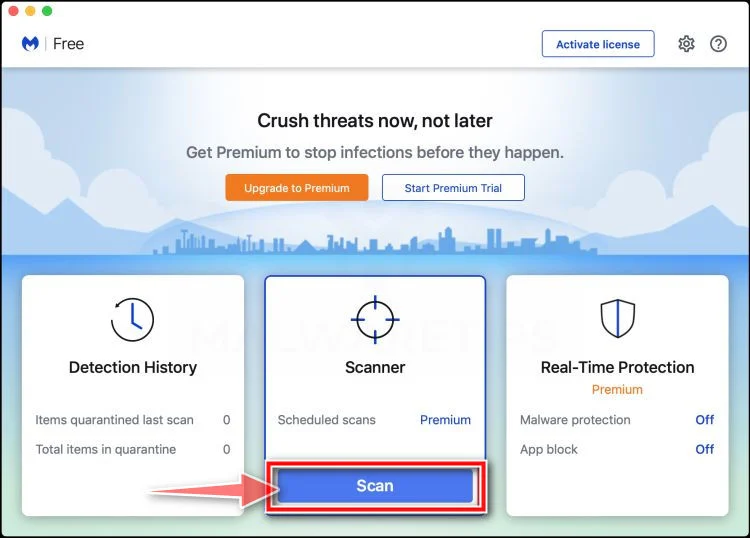
Start the Scan
Click the “Scan” button. Malwarebytes will automatically update its detection database and begin checking your Mac for malware.
-
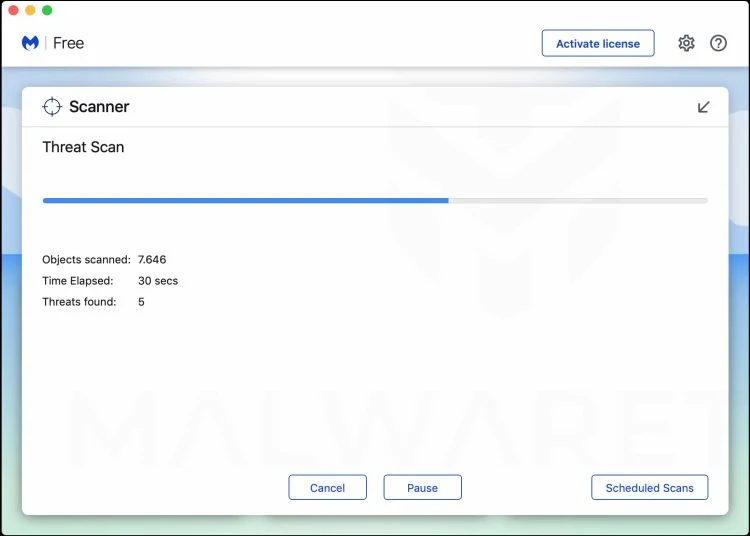
Wait for the Scan to Finish
Malwarebytes will scan your Mac for adware, browser hijackers, and other malicious programs. This can take a few minutes, so feel free to do something else — just check back occasionally to see the progress.
-
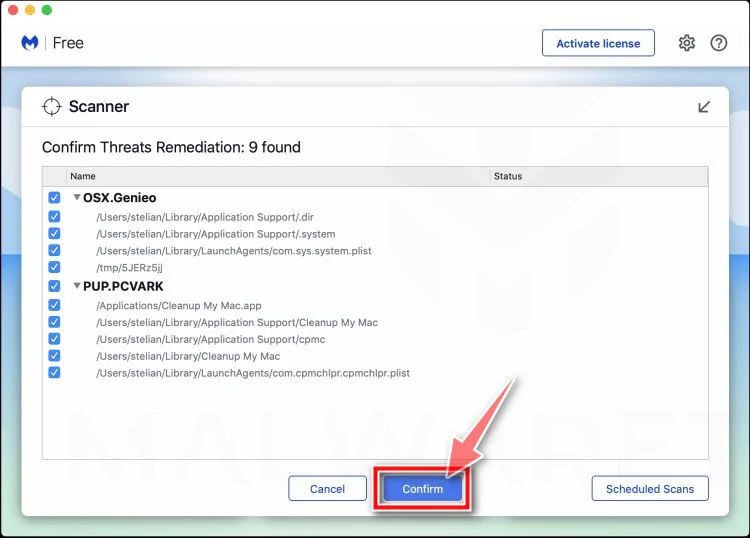
Quarantine the Detected Threats
When the scan is done, you’ll see a list of everything Malwarebytes found. Click the “Quarantine” button to remove all the threats at once.
-
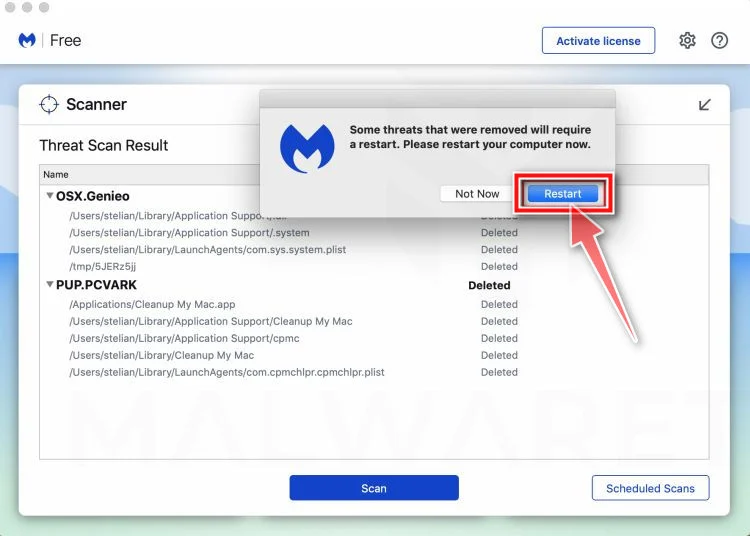
Restart Your Mac
Malwarebytes will now remove all the malicious files it found. Some threats can only be fully removed after a reboot — if Malwarebytes asks you to restart, allow it. Once you’re logged back in, check whether the problems you noticed have stopped. If they come back, save the scan report and ask for help in our forum.
If the problems you noticed continue after the scan, see the options below.
If you are still experiencing problems while trying to remove a malicious program from your computer, please ask for help in our Mac Malware Removal Help & Support forum.
Run a Malware Scan with Malwarebytes for Android
Malwarebytes for Android scans your phone or tablet for malware, adware, and potentially unwanted apps. The free version scans only when you start a scan. Real-time protection, which checks apps automatically, is part of the paid Premium version.
-
Download Malwarebytes for Android.
You can download Malwarebytes for Android by clicking the link below.
Get Malwarebytes for AndroidOpens Google Play in a new tab.Want real-time protection? See Malwarebytes Premium for AndroidMalwarebytes for AndroidScans your phone and removes malware at no cost -
Install Malwarebytes for Android on your phone.
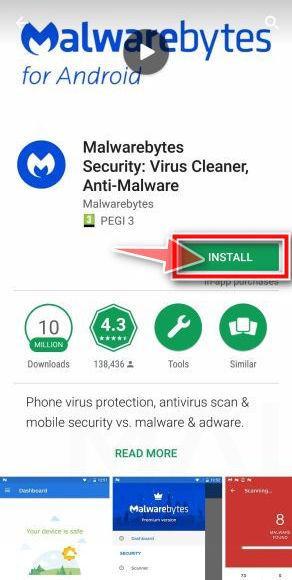
In the Google Play Store, tap “Install” to install Malwarebytes for Android on your device.
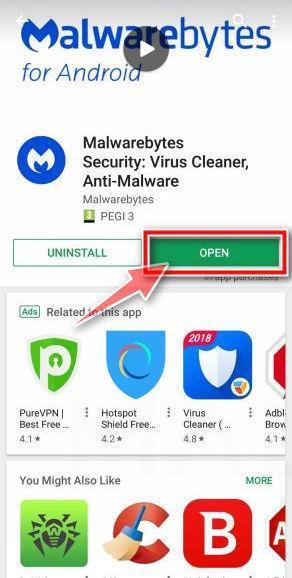
When the installation process has finished, tap “Open” to begin using Malwarebytes for Android. You can also open Malwarebytes by tapping on its icon in your phone menu or home screen.
-
Follow the on-screen prompts to complete the setup process
When Malwarebytes opens, it walks you through a short setup. Tap Get started and follow the prompts. If you see an offer for a trial or a paid plan, read it before you accept. You can skip it and keep using the free scanner.
Malwarebytes will ask for permission to access the files on your phone so it can scan them. Tap Allow, or turn on the permission in the Android screen that opens, then return to Malwarebytes.
-
Run a scan with Malwarebytes for Android
On the main screen, tap Scan now. In some versions, you open the menu, tap Scanner, and then tap Run a scan.
-
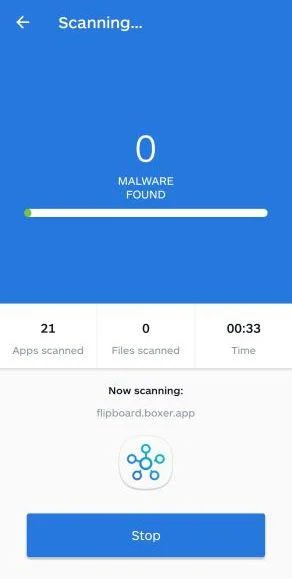
Wait for the Malwarebytes scan to complete.
Malwarebytes will now start scanning your phone for adware and other malicious apps. This process can take a few minutes, so we suggest you do something else and periodically check on the status of the scan to see when it is finished.
-
Remove the detected apps.
When the scan has been completed, you will see a list of the threats that Malwarebytes for Android has detected. Next to each detected item, tap the menu icon (three dots), then choose to uninstall the app or delete the file. Android then asks you to confirm. Tap OK or Uninstall to remove the app.
-
Restart your phone.
When the detected apps are removed, restart your phone if Malwarebytes asks you to. Then check whether the problems you noticed have stopped.
If the problems you noticed continue after the scan, see the options below.
If you are still having problems with your phone after completing these instructions, then please follow one of the steps:
- Ask for help in our Mobile Malware Removal Help & Support forum.
- Only as a last resort, reset your phone to factory settings. Read the warning below first.
- Back up your photos, videos, files, and messages, for example to your Google account or a computer.
- Make sure you know your Google account email and password. The phone asks for them after the reset. If you changed the password recently, Google recommends waiting 24 hours before you reset.
- On a Samsung phone, also make sure you know your Samsung account password.
- If you use an authenticator app for two-step verification, move your accounts to another device or save your backup codes first.
Stay Protected: Block Ads and Malicious Sites
No scan can prove a device is completely clean, so it helps to block threats before they reach you. Most infections start with a malicious ad or a fake download button — so blocking them at the source is your best defense.
We recommend AdGuard, which blocks malicious ads, phishing pages, and dangerous redirects before they can reach you.
👉 Download AdGuard and browse safely
The Bottom Line
The iCloud Payment Method Declined Email Scam is built to make you panic about losing storage, backups, and photos. The email looks like a routine billing problem, but the link leads to a fake page designed to steal your credit card details, your Apple ID login, or both.
If you receive one of these emails, do not click the button. Verify your billing status through official account settings instead.
If you already clicked or entered information, you still have a strong path forward. Change passwords, enable two-factor authentication, remove unknown devices, contact your bank if you entered card details, and check your email for sneaky forwarding rules. Fast, calm steps can stop this scam before it becomes a bigger mess.
FAQ
What is the iCloud Payment Method Declined email scam?
It’s a phishing email that pretends your iCloud storage subscription renewal failed because your payment method was declined. The email pressures you to click a button such as “Update Payment” or “Fix Billing.”
The real goal is to steal your credit card information, your Apple ID login credentials, or both.
Is the iCloud “Payment Method Declined” email real?
In most cases, no. Scammers copy iCloud branding and use urgent, fear-based language to push a fast click.
A legitimate billing notice will not rely on panic wording, vague threats, or a single external link as the only way to resolve the issue.
Why does this scam feel so believable?
Because payment issues do happen in real life.
Cards expire, banks block charges, and subscriptions fail. Scammers exploit that normal experience, then add urgency and fear about losing storage, backups, and photos to override careful thinking.
Will iCloud delete my photos if my payment is declined?
Not instantly.
A payment decline does not usually mean your photos disappear “today.” Real services typically have a grace period and show status changes inside your account settings.
The bigger danger is not deletion. The danger is entering your Apple ID password or card details into a fake page.
What happens if I click the “Update Payment” button?
You are usually redirected to a scam site designed to capture information. The fake page may ask for:
- Apple ID email and password
- Credit card number, expiration date, and CVV
- Billing address and phone number
- Sometimes a one-time code from your bank or a login verification code
Once you submit it, the data goes to scammers, not Apple.
Can the phishing page look exactly like a real iCloud page?
Yes.
Many phishing kits closely copy real layouts, fonts, and logos. Some even use HTTPS, so you may see a padlock icon.
A padlock does not prove a page is legitimate. What matters is the domain and how you got there. Always verify through official settings, not email links.
Does the padlock icon mean the site is safe?
No.
HTTPS only means the connection is encrypted. Scam sites can also use HTTPS. Always inspect the domain and avoid logging in through email links.
How can I quickly tell if the email is a scam?
Look for red flags like these:
- Generic greeting like “Dear user”
- Very urgent language like “immediate action” or “today”
- Threats of deletion or suspension with little detail
- A large button urging you to update payment or verify
- Sender name or address that does not clearly match Apple
- Link preview shows a domain that is not an Apple domain
- Awkward grammar or inconsistent branding (icloud instead of iCloud)
If you see more than one, treat it as phishing.
Why do scammers include random invoice numbers or subscription IDs?
It’s a credibility trick.
Fake “Subscription ID” or “Invoice ID” numbers make the email feel official and technical. In most cases, these numbers do not match anything in your real account.
What should I do if I opened the email but did not click anything?
You are likely fine.
- Delete the email
- Report it as phishing or spam
- Search for similar emails and delete them too
What if I clicked the link but did not enter any information?
Close the page and do not return to it.
Then:
- Clear browser site data for peace of mind
- Update your browser and device
- Watch for follow-up phishing emails and texts
Most harm occurs when you submit your details.
What should I do if I entered my Apple ID password?
Act immediately.
- Change your Apple ID password using official account settings, not the email link.
- Enable two-factor authentication if it is not enabled.
- Check trusted devices and remove anything you do not recognize.
- Review account recovery phone numbers and emails for changes.
If you reused that password elsewhere, change it everywhere.
What if I entered credit card information on the page?
Treat your card details as compromised.
- Call the number on the back of your card and report fraud.
- Ask for a replacement card with a new number.
- Monitor transactions for test charges and larger purchases.
- Dispute unauthorized charges quickly.
If you also typed a bank one-time code, tell your bank immediately.
What if the scam asked for a verification code and I entered it?
That can indicate a real-time phishing attempt.
Change your Apple ID password immediately and review your account security, including trusted devices and recent sign-in activity. If you see any unknown device, remove it right away.
How can I check if my Apple ID was accessed by someone else?
Use official settings or the official Apple account security page.
Look for:
- unknown devices signed into your account
- security alerts you did not trigger
- changes to recovery phone numbers or emails
- sign-in attempts from unfamiliar locations
If anything looks wrong, change the password again and sign out of other sessions if the option exists.
How do I safely verify if my iCloud payment really failed?
Do not use the link in the email.
Instead:
- check your storage plan and billing status inside device settings
- verify subscription status inside your account settings
- type the official site address manually if you need to sign in
If the payment truly failed, you will see it reflected there.
Should I reply to the email or click “unsubscribe”?
No.
Replying confirms your email address is active. Clicking “unsubscribe” can also lead to more phishing pages. Delete and report it instead.
Can this scam lead to identity theft?
It can, depending on what you shared.
Credit card details can lead to fraudulent charges. Apple ID access can expose personal data and allow attackers to target other accounts through password reset flows. If you shared your address or phone number, you may also receive more targeted scams later.

Join the discussion
0 commentsShare your experience or ask a question about this article.
Community experiences
Did this happen to you?
Your experience could help someone recognize the same scam. Submit a private report for our team to review.
I experienced this tooReports are reviewed before publication. Sharing publicly is always your choice.
Discussion
Start the conversation
Have a question or something useful to share? Add the first comment.