

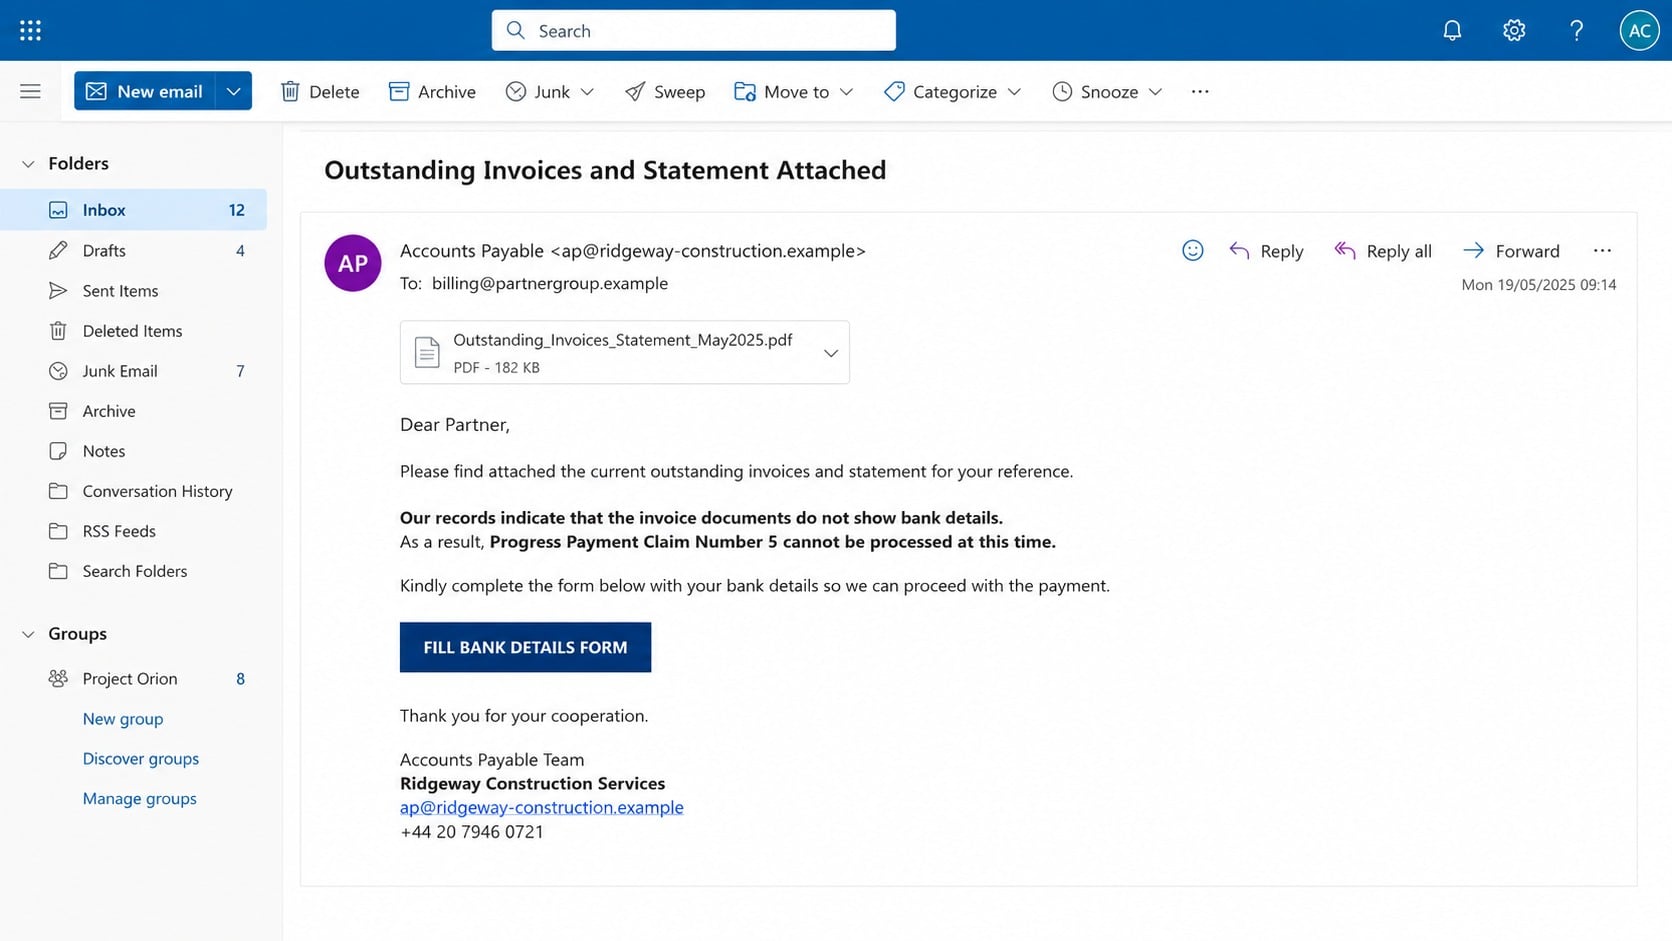
An accounts-payable message says a progress payment cannot move forward because the invoice lacks your company’s bank details. The request sounds like ordinary project administration.
Its business context is exactly what makes the email dangerous. A careful review shows how a believable document problem can hide credential theft and payment fraud.
Overview
The payment problem described by the sender
The email claims someone tried to telephone your office about outstanding invoices. It says the documents do not display the company’s banking information.
One version refers to progress payment certificate claim number five. The recipient supposedly must complete a bank-details form before processing can continue.
The wording resembles communication between contractors, consultants, and finance teams. References to statements, certificates, and progress claims add convincing workplace detail.
A prominent button replaces an ordinary attachment. Clicking it leads away from the email and toward a file-sharing themed sign-in page.
Why the names and documents do not prove legitimacy
Fraudsters can copy the names of real companies from websites, tenders, signatures, or earlier correspondence. A recognizable business name may itself be impersonated.
The message can also use a plausible attachment label without delivering a genuine document. File icons and filenames are simple visual elements.
In the observed campaign, the landing page borrowed the appearance of a popular transfer service. The actual destination belonged to unrelated infrastructure.
The named companies and file-sharing provider were not shown to be participants. Their identities and visual cues were used to create borrowed trust.
The two layers of financial risk
The first objective is usually the recipient’s work email password. The fake download page claims that authentication is necessary to retrieve invoice files.
The second danger emerges after access. A criminal inside a mailbox can study real invoices, alter bank details, and redirect a future payment.
Warning signs commonly appear together:
- An unexpected invoice problem from an unverified sender.
- A request to supply or confirm bank information through a link.
- A file-sharing page that asks for the email account password.
- Company names that do not match the actual sending domain.
- Pressure to unblock a pending certificate or scheduled payment.
Even if no money moves immediately, a stolen business login can support convincing invoice fraud weeks later.
How the Missing Bank Details Invoice Scam Works
Step 1: A realistic finance issue reaches the right pressure point
Instead of promising a prize, this lure invents an administrative blockage. The recipient is told that an expected business payment cannot be processed.
Finance teams regularly handle incomplete invoices, bank confirmations, and supporting certificates. The subject therefore fits work people already perform.
Attackers may send the same wording broadly or target industries where progress claims are common. Construction and engineering language can increase credibility.
The alleged telephone attempt provides another subtle push. It suggests the sender already tried normal contact and now needs a prompt response.
Step 2: Specific-looking details create borrowed authority
A numbered claim, attachment name, or company signature makes the email feel connected to a real project. Those details remain easy to invent or copy.
The recipient may search one company name and find a genuine business. That search proves the business exists, not that it sent this message.
Displayed names can differ from underlying addresses. Reply-to fields may also route responses somewhere other than the visible sender.
The safest comparison is with established vendor records, known contacts, purchase orders, and previous correspondence, not the email’s signature block.
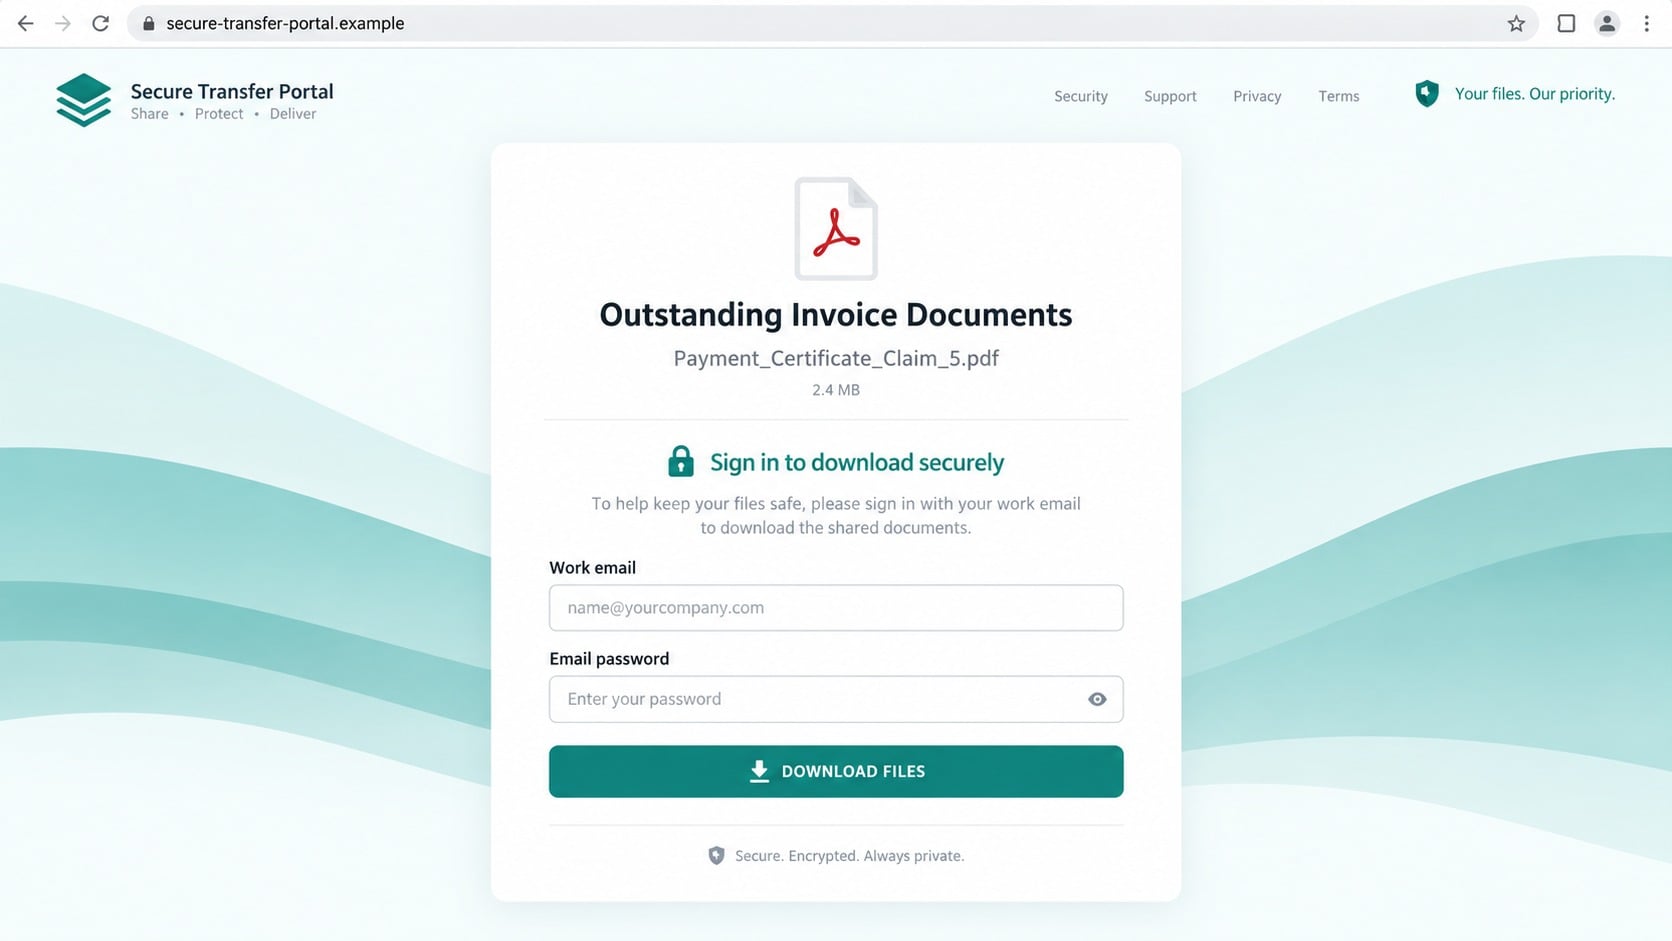
Step 3: The bank-details button becomes a document download
The email says the recipient must complete a banking form, yet the destination may present a shared invoice or transfer portal instead.
That shift is a critical inconsistency. A legitimate workflow should explain what document is being opened and why a particular identity system is required.
The page may display a convincing filename and expiration notice. It can claim the transfer is encrypted or privately shared.
Those assurances are written by the page owner. They do not establish that the file exists or that the service is genuine.
Step 4: The false download form harvests business credentials
The page requests a work address and email password, supposedly to authorize the download. A real external file transfer should not collect your mailbox password.
Entering the credentials sends them to the phishing operation. The visible button may then produce an error, repeat the form, or redirect elsewhere.
The operator can test the credentials against common business mail platforms. Multifactor prompts may follow if the organization has additional protection.
An attacker may contact the victim immediately and pose as support, asking them to read out a code or approve a notification.
Step 5: Mailbox reconnaissance maps the payment process
Business email compromise often begins quietly. The intruder searches for invoice, payment, remittance, purchase order, bank, and approval conversations.
They identify who requests changes, who approves transfers, which vendors are active, and when large payments are expected.
Message rules can hide replies from a real supplier. The attacker may create folders or delete alerts to keep the owner unaware.
Historical signatures and writing style help produce believable messages. Existing threads provide context that a cold email could never match.
Step 6: A later request redirects real funds
Once timing is favorable, the criminal can announce that a supplier changed banks. The request may arrive inside a genuine conversation.
Altered invoices can preserve company branding while replacing account information. An urgent deadline discourages telephone confirmation.
If the organization accepts the change by email alone, a legitimate payment goes to an account controlled by the fraud network.
Recovery becomes harder after funds move through additional accounts. Early banking notification offers the best chance of freezing a transfer.
How a Routine Invoice Question Becomes Business Email Compromise
The opening request tests process as much as technology
Even an unsuccessful login page can reveal whether staff answer quickly, who handles invoices, and which wording reaches the finance team.
A reply may expose signatures, direct numbers, job titles, and internal routing. That information improves the next attempt.
Organizations should therefore treat suspicious invoice messages as intelligence-gathering efforts, not merely isolated nuisance mail.
Existing conversation threads carry greater authority
After compromising either participant, an attacker can reply within a real exchange. Correct subject lines and quoted history reduce suspicion.
The criminal can wait for an expected certificate, then insert a payment change at the moment it appears most plausible.
Thread continuity is not independent proof. Sensitive changes still require confirmation through a separate, previously established route.
Small wording differences may reveal template reuse
Singular invoices may become plural, attachments may be mentioned but absent, or a bank form may transform into a download login.
Company names can appear in one section while the signature uses another. Grammar may shift between formal contract language and generic phishing instructions.
Each inconsistency deserves attention. Together, they show a borrowed business scenario that was not built around the actual transaction.
Payment controls must survive a compromised mailbox
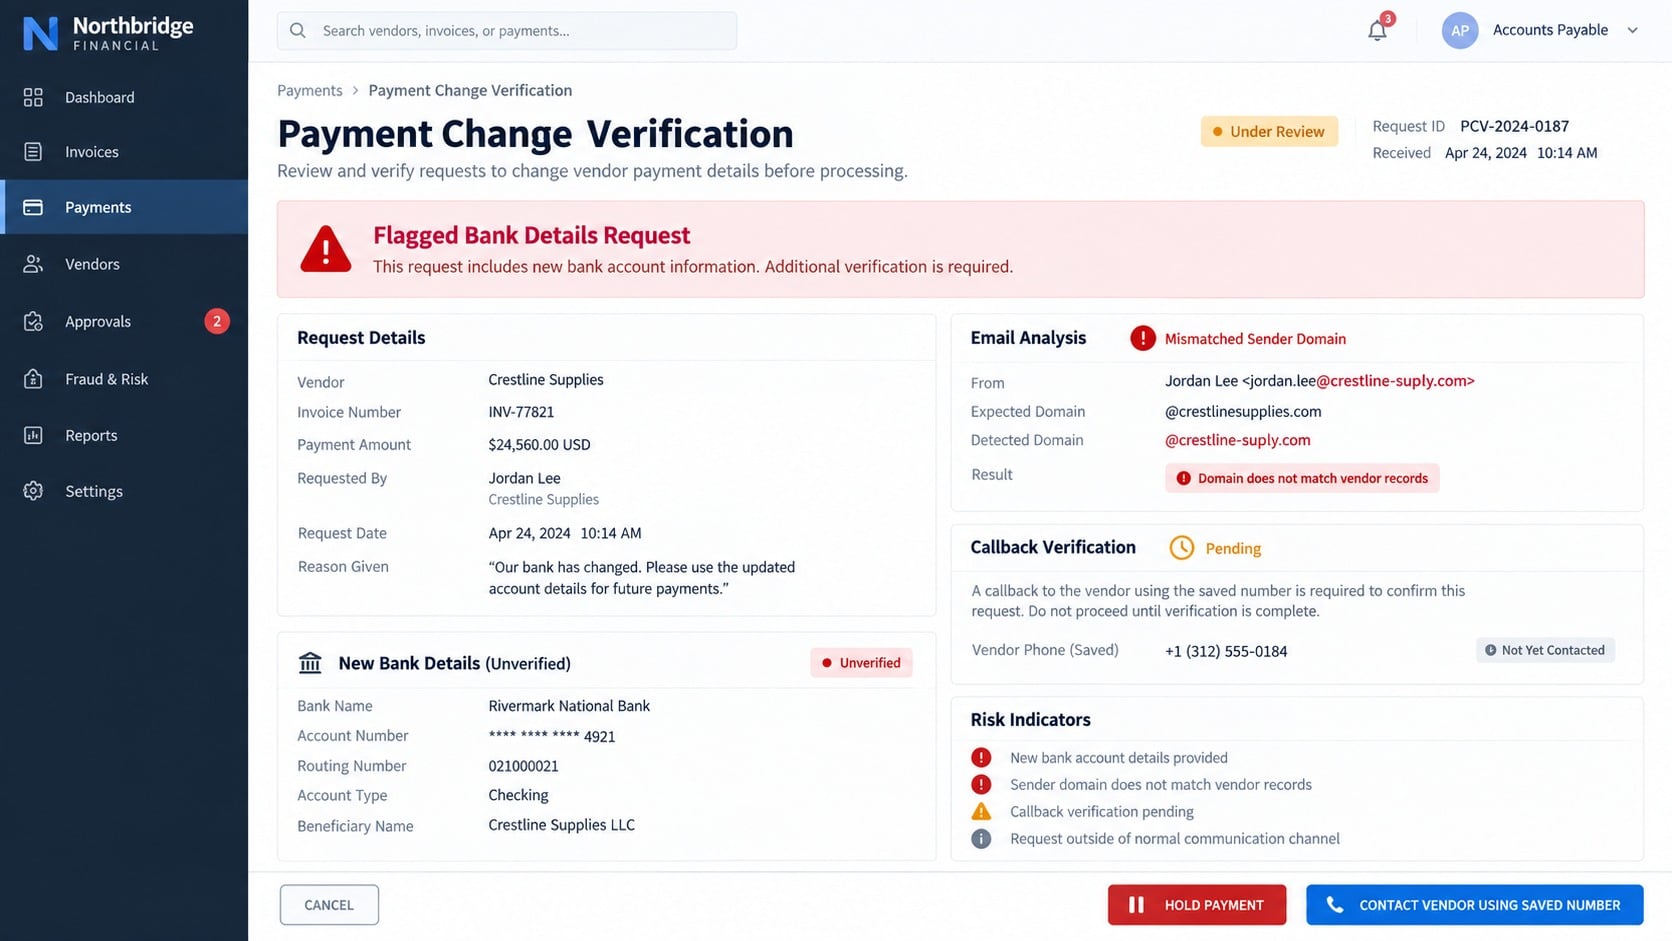
Email alone should never authorize new beneficiary details. Dual approval and an outbound call to a saved number create independent barriers.
Finance systems can flag first payments, unusual countries, changed routing information, and requests arriving near cut-off times.
Training works best when paired with those controls. A busy employee can make a mistake, while a resilient process prevents one mistake from moving funds.
Company, Invoice, and Payment Verification Checks
Match the request to real records
Locate the purchase order, contract, project number, invoice register, and earlier payment certificate. Confirm that claim number five actually exists.
Compare amounts, dates, contact names, and attachment conventions. A vague match is insufficient when the request affects access or payment instructions.
Do not create a new vendor record using details supplied only by the suspicious message. Existing records provide the independent reference point.
Call a known contact outside the email thread
Use the telephone number stored in your accounting system, contract, or verified company directory. Do not call the number in the new signature.
Ask the contact to describe the request before you reveal its contents. That approach prevents a caller from simply agreeing with information you provide.
For bank changes, require the organization’s established dual-verification process. A reply from the same mailbox is not an independent check.
Examine the sender, reply path, and file destination
Expand the full sender and reply-to addresses. Look for substituted letters, extra hyphens, recently introduced domains, or unrelated hosting.
Inspect the button destination without opening it. A transfer service should use its known domain and should identify the actual sender clearly.
Legitimate file-transfer notifications can also be abused by compromised accounts. Confirm the shared file with the purported sender through another channel.
Challenge any request for an email password
Your organization’s single sign-on page may authenticate access, but the destination should be a known identity domain approved by the company.
An external download page should never ask you to type a mailbox password into a form it controls.
Report suspicious pages to the file-hosting or domain provider. Preserve the complete address and message headers for your security team.
Finance teams should document the verification outcome beside the invoice. A visible audit trail prevents another employee from processing the same fraudulent request later.
Also compare beneficiary ownership with contractual records. A matching bank name does not prove the account belongs to the supplier.
Record who performed each confirmation and when.
What to Do If You Fell for the Missing Bank Details Invoice Scam
Treat exposed business credentials and altered payment instructions as urgent incidents. They can affect colleagues, vendors, customers, and funds beyond your own account.
Follow your organization’s incident plan when one exists. Coordinated action is more effective than quietly repairing only the visible problem.
- Notify security and finance immediately. Explain which email, page, credentials, documents, and payment details were involved. Provide the approximate time without deleting evidence.
- Secure the mailbox through approved channels. Change the password, revoke active sessions, inspect connected apps, and reset multifactor enrollment if instructed by administrators.
- Review mailbox manipulation. Search for forwarding rules, deleted messages, hidden folders, delegates, unusual sent mail, and changes to recovery information.
- Place affected payments on hold. Finance staff should pause transfers involving the named vendor until bank details are confirmed independently.
- Contact the bank quickly. If money was sent, request a recall or freeze and provide beneficiary information. Speed can determine whether recovery remains possible.
- Warn the impersonated parties. Call suppliers and project partners using saved numbers. Ask them to reject unusual requests from the compromised address.
- Inspect the endpoint. Run Malwarebytes and review downloads, browser extensions, and recently installed software, particularly if a file was opened.
- Strengthen web filtering. AdGuard can block many known phishing destinations and malicious redirects. Business networks should also update secure email and DNS controls.
- Change every reused password. Prioritize accounting, document storage, project management, payroll, banking, and customer systems accessible to the affected employee.
- Document and report the incident. Preserve headers, addresses, screenshots, payment records, and correspondence for the bank, insurer, law enforcement, and affected organizations.
Is Your Device Infected? Run a Free Malware Scan
Slow performance, constant pop-ups, or strange behavior? These are classic signs of a malware infection. The fastest way to find out is to scan your device with Malwarebytes Free — one of the most trusted malware removal tools available.
The free version detects and removes the most common threats, including:
- Adware — the cause of those annoying pop-ups
- Browser hijackers — unwanted redirects and changed homepages
- Trojans and spyware — hidden programs stealing your data
- Potentially unwanted programs (PUPs) — software you never asked for
👉 Select your device below — Windows, Mac, or Android — then follow the simple steps to download Malwarebytes, scan your system, and remove any threats it finds. The scan usually takes 5 to 20 minutes.
Run a Malware Scan with Malwarebytes for Windows
Malwarebytes is one of the most popular and trusted anti-malware tools for Windows — and it’s completely free for removing infections. It catches threats that many antivirus programs miss, including adware, browser hijackers, and trojans. Follow the steps below to scan and clean your PC in just a few minutes.
Download Malwarebytes
Click the button below to download the latest version of Malwarebytes for Windows from the official source. The free version is all you need — it will scan your computer and remove adware, browser hijackers, and other malicious software at no cost.
Download MalwarebytesOfficial installer for Windows 11 and 10. Your download starts right away.Want real-time protection? See Malwarebytes Premium Malwarebytes Free for WindowsScans and removes malware at no cost
-
Install Malwarebytes
When the download finishes, open your Downloads folder and double-click the MBSetup file. If Windows shows a User Account Control pop-up, click “Yes” to allow the installation.

Follow the On-Screen Prompts to Install Malwarebytes
The setup wizard will walk you through a few quick screens:
-
Choose where you’re installing the program — “Personal Computer” or “Work Computer” — then click Next.

-
Malwarebytes will now install on your device. This usually takes under a minute.

-
When installation is complete, the “Welcome to Malwarebytes” screen will open automatically.

-
On the final screen, click Open Malwarebytes to launch the program.

-
Enable “Scan for Rootkits”
Before scanning, turn on rootkit detection so Malwarebytes can find even the most hidden threats. Click the Settings gear icon on the left side of the screen.

In the settings menu, find “Scan for rootkits” and click the toggle so it turns blue.

Done? Click “Dashboard” in the left pane to return to the main screen.
Start the Scan
Click the blue Scan button. Malwarebytes will automatically update its virus database and start checking your computer for malware.

-
Wait for the Scan to Finish
The scan checks your entire system for browser hijackers and other malicious programs, so it can take 5 to 20 minutes depending on your computer. Feel free to do something else — just check back occasionally to see the progress.

-
Quarantine the Detected Threats
When the scan is done, you’ll see a list of everything Malwarebytes found — malware, adware, and potentially unwanted programs. Click the “Quarantine” button to remove all of them at once.

Malwarebytes will now remove the malicious files and registry entries and move them safely into quarantine.

-
Restart Your Computer
Some threats can only be fully removed after a reboot. If Malwarebytes asks you to restart, click Yes. Once you’re logged back in, Malwarebytes has finished removing the threats it found.

That’s it — your Windows PC is now clean of trojans, adware, and other malware, and should be back to running smoothly.
If you are still having problems with your computer after completing these instructions, then please follow one of the steps:
- Run a computer scan with ESET Online Scanner
- Ask for help in our Windows Malware Removal Help & Support forum.
Run a Malware Scan with Malwarebytes for Mac
Malwarebytes for Mac is a free on-demand scanner that removes the malware other security software tends to miss — adware, browser hijackers, and unwanted programs included. Cleaning an infected Mac with Malwarebytes has always been completely free, and it’s our go-to recommendation. Follow the steps below to scan and clean your Mac in just a few minutes.
-
Download Malwarebytes for Mac
Click the button below to download the latest version of Malwarebytes for Mac.
Download MalwarebytesOfficial installer for macOS. Your download starts right away.Want real-time protection? See Malwarebytes PremiumMalwarebytes Free for MacScans and removes malware at no cost -
Open the Malwarebytes setup file
When the download finishes, open your Downloads folder and double-click the setup file to begin the installation.

-
Follow the On-Screen Prompts to Install Malwarebytes
The Malwarebytes for Mac Installer will guide you through a few quick screens. Click “Continue” and keep following the prompts until the installation completes.



When the installation is complete, Malwarebytes opens to the Welcome to Malwarebytes screen. Click “Get started“.
-
Select “Personal Computer” or “Work Computer”
Malwarebytes will ask what type of computer you’re installing it on. Click either Personal Computer or Work Computer, whichever applies.

-
Start the Scan
Click the “Scan” button. Malwarebytes will automatically update its detection database and begin checking your Mac for malware.

-
Wait for the Scan to Finish
Malwarebytes will scan your Mac for adware, browser hijackers, and other malicious programs. This can take a few minutes, so feel free to do something else — just check back occasionally to see the progress.

-
Quarantine the Detected Threats
When the scan is done, you’ll see a list of everything Malwarebytes found. Click the “Quarantine” button to remove all the threats at once.

-
Restart Your Mac
Malwarebytes will now remove all the malicious files it found. Some threats can only be fully removed after a reboot — if Malwarebytes asks you to restart, allow it. Once you’re logged back in, your Mac is clean.

That’s it — your Mac is now free of adware, rogue browser extensions, and other potentially harmful software.
If you are still experiencing problems while trying to remove a malicious program from your computer, please ask for help in our Mac Malware Removal Help & Support forum.
Run a Malware Scan with Malwarebytes for Android
Malwarebytes for Android automatically detects and removes dangerous threats like malware and ransomware so you don’t have to worry about your most-used device being compromised. Aggressive detection of adware and potentially unwanted programs keeps your Android phone or tablet running smooth.
-
Download Malwarebytes for Android.
You can download Malwarebytes for Android by clicking the link below.
Get Malwarebytes for AndroidOpens Google Play in a new tab.Want real-time protection? See Malwarebytes Premium for AndroidMalwarebytes for AndroidScans your phone and removes malware at no cost -
Install Malwarebytes for Android on your phone.
In the Google Play Store, tap “Install” to install Malwarebytes for Android on your device.

When the installation process has finished, tap “Open” to begin using Malwarebytes for Android. You can also open Malwarebytes by tapping on its icon in your phone menu or home screen.

-
Follow the on-screen prompts to complete the setup process
When Malwarebytes will open, you will see the Malwarebytes Setup Wizard which will guide you through a series of permissions and other setup options.
This is the first of two screens that explain the difference between the Premium and Free versions. Swipe this screen to continue.
Tap on “Got it” to proceed to the next step.
Malwarebytes for Android will now ask for a set of permissions that are required to scan your device and protect it from malware. Tap on “Give permission” to continue.
Tap on “Allow” to permit Malwarebytes to access the files on your phone.
-
Update database and run a scan with Malwarebytes for Android
You will now be prompted to update the Malwarebytes database and run a full system scan.

Click on “Update database” to update the Malwarebytes for Android definitions to the latest version, then click on “Run full scan” to perform a system scan.

-
Wait for the Malwarebytes scan to complete.
Malwarebytes will now start scanning your phone for adware and other malicious apps. This process can take a few minutes, so we suggest you do something else and periodically check on the status of the scan to see when it is finished.

-
Click on “Remove Selected”.
When the scan has been completed, you will be presented with a screen showing the malware infections that Malwarebytes for Android has detected. To remove the malicious apps that Malwarebytes has found, tap on the “Remove Selected” button.

-
Restart your phone.
Malwarebytes for Android will now remove all the malicious apps that it has found. To complete the malware removal process, Malwarebytes may ask you to restart your device.
That’s it — your Android phone is now clean — no more malicious apps, adware, or browser redirects.
If you are still having problems with your phone after completing these instructions, then please follow one of the steps:
- Restore your phone to factory settings by going to Settings > General management > Reset > Factory data reset.
- Ask for help in our Mobile Malware Removal Help & Support forum.
Stay Protected: Block Ads and Malicious Sites
Now that your device is clean, keep it that way. Most infections start with a malicious ad or a fake download button — so blocking them at the source is your best defense.
We recommend AdGuard, which blocks malicious ads, phishing pages, and dangerous redirects before they can reach you.
👉 Download AdGuard and browse safely
Frequently Asked Questions
Is an outstanding invoice email automatically fraudulent?
No. Businesses routinely send statements and request missing information. The risk comes from an unverified sender, inconsistent workflow, and credential request on an unrelated page.
Confirm the underlying invoice through existing records and a known contact before opening files or changing payment information.
Can a genuine company name appear in a phishing email?
Yes. Public business names, addresses, and staff details can be copied without the company’s knowledge. A real identity does not authenticate a message.
Judge the sending domain, context, records, and independent confirmation. Avoid accusing the named company unless evidence connects it to the campaign.
Would a file-transfer service ask for my work email password?
A third-party page should not collect the password that unlocks your mailbox. That request is a strong sign of credential phishing.
Organization-approved single sign-on should occur only on a recognized identity domain. Ask your security team when the route is unfamiliar.
Why do attackers mention bank details if they want a password?
Payment language attracts the right audience and provides urgency. Mailbox access then offers the context needed for a more valuable financial request later.
The initial bank form is bait. The stolen inbox can become the platform for invoice redirection and supplier impersonation.
What should I do if a transfer was already sent?
Call the sending bank’s fraud department immediately and request a recall. Provide the transfer reference, beneficiary account, amount, and fraud timeline.
Notify law enforcement and the receiving institution through official channels. Do not pay anyone promising guaranteed private recovery.
How can a company prevent this type of loss?
Require independent call-back verification for bank changes, separate request and approval roles, and train staff to recognize external credential forms.
Strong multifactor authentication, mail-rule monitoring, payment holds, and rehearsed incident procedures reduce both access and financial impact.
The Bottom Line
The missing bank details email disguises a password trap as routine accounts-payable work. Its copied business names and transfer page do not establish legitimacy.
Verify invoices and bank changes through saved records and separate contact. If anyone entered credentials or sent money, involve security, finance, and the bank immediately.

Join the discussion
0 commentsShare your experience or ask a question about this article.
Discussion
Start the conversation
Have a question or something useful to share? Add the first comment.