


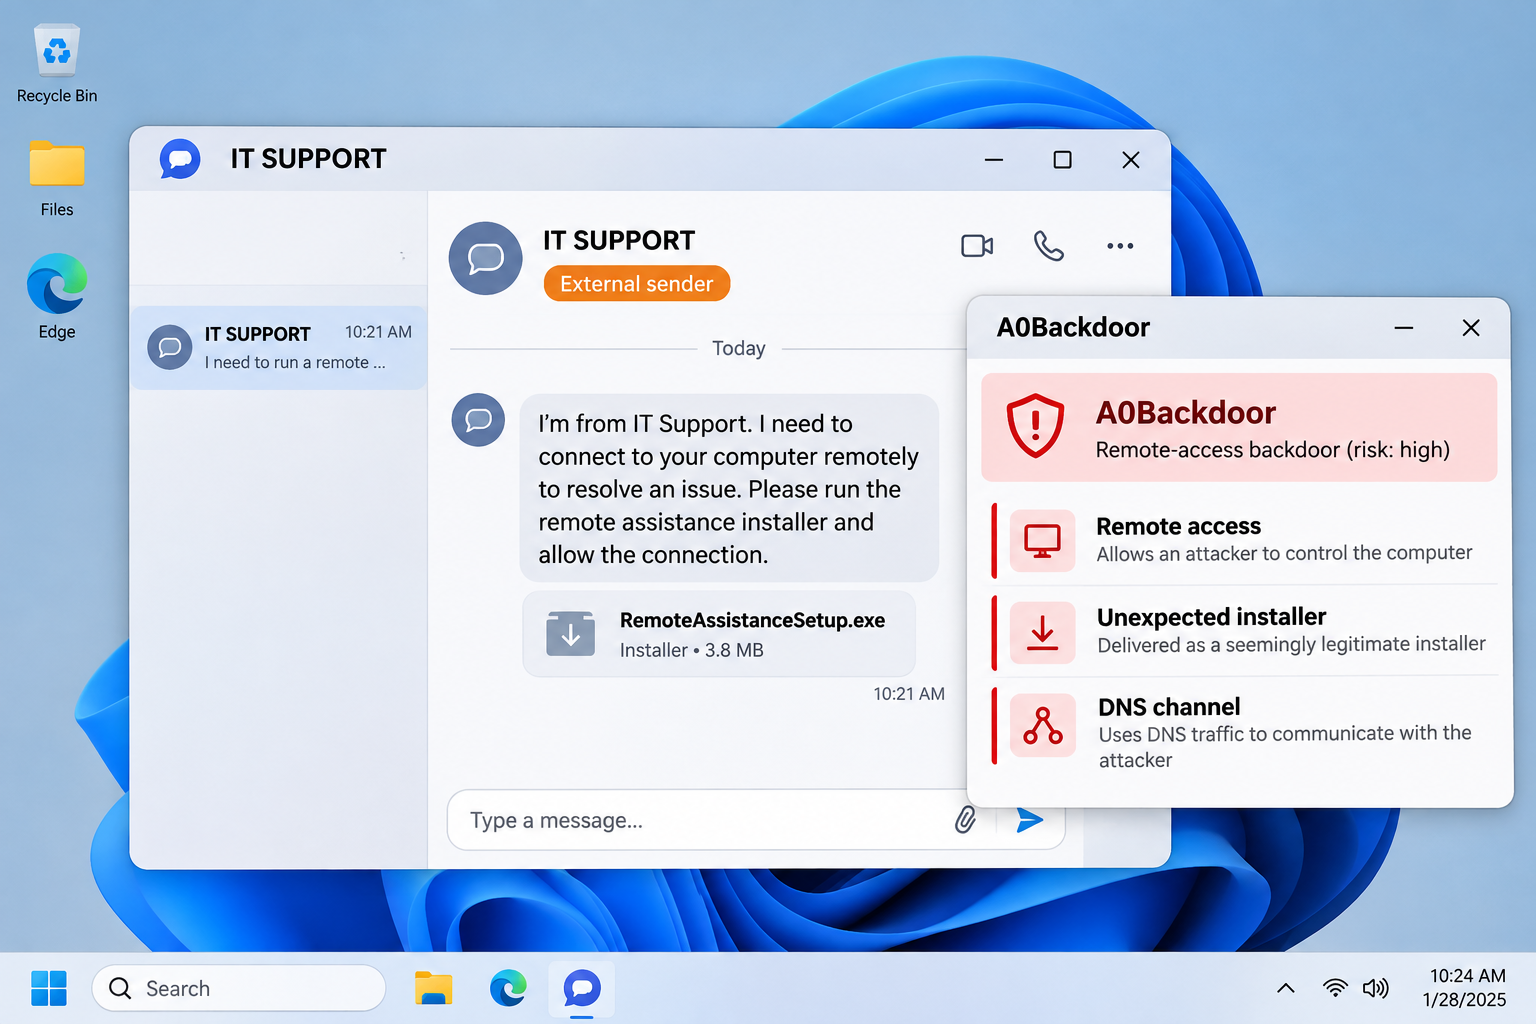
Your inbox fills with junk, and someone in Teams offers to fix it. The name says IT Support, which makes the interruption seem explainable.
The caller’s next request may be a remote session or an installer. What you allowed determines which computer and account protections need attention.
Overview
A0Backdoor gives an attacker access to Windows
A0Backdoor is malicious software that lets an attacker communicate with a Windows computer, collect information about it, and send instructions.
The infection can remain useful to the intruder after the original conversation ends. Stop using the affected PC for sensitive accounts while it is investigated.
The attack begins with an impersonated help desk
The documented campaign flooded inboxes, then approached targets through Microsoft Teams. The supposed technician persuaded them to use Quick Assist and install familiar-looking software.
The malicious package placed an attacker-controlled DLL beside a genuine program. Running that program loaded the backdoor.
Start with the access you actually allowed
- Only received the message: end the conversation and verify it through your established help desk.
- Granted remote control or ran the installer: disconnect the PC and record when it happened.
- Work or school computer: contact security before installing cleanup tools or restarting.
- Exposed email, banking, or work accounts: use another trusted device to protect them.
Tell the real help desk whether you approved remote control, administrator permissions, or an installation. Keep the original conversation and security alert.
How to Remove A0Backdoor From Windows
For your personal Windows PC, follow the removal steps below. Keep the computer disconnected until a step requires an approved update or download.
For a work or school computer, contact its IT or security team before installing tools or restarting. Its investigation may need evidence from the running system.
If remote access is suspected, disconnect Wi-Fi or Ethernet and stop using this PC for sensitive accounts. Arrange trusted downloads and updates before proceeding with cleanup.
Start with Malwarebytes. HitmanPro and ESET are optional second opinions for unresolved findings or continuing symptoms. Run one scanner at a time.
- STEP 1: Use RKill only if malware blocks your scanner
- STEP 2: Scan and quarantine threats with Malwarebytes
- STEP 3: Optional: Check unresolved threats with HitmanPro
- STEP 4: Optional: Run a second-opinion scan with ESET
Step 1: Use RKill only if malware blocks your scanner
RKill attempts to stop known malware processes so your security software can run. It does not remove the infection.
Use it only on a personal Windows PC when malware is blocking your scanner. Otherwise, skip directly to Malwarebytes.
-
Download Rkill.
Download RKill using the button below. On the download page, choose the iExplore.exe version.
This is a renamed copy of RKill, provided for infections that block security tools by filename.
RKillStops malware processes so other tools can runDownload RKillOpens the BleepingComputer download page in a new tab.
-
Run RKill.
Open your Downloads folder and double-click iExplore.exe. Allow the program time to finish checking for processes that interfere with cleanup.
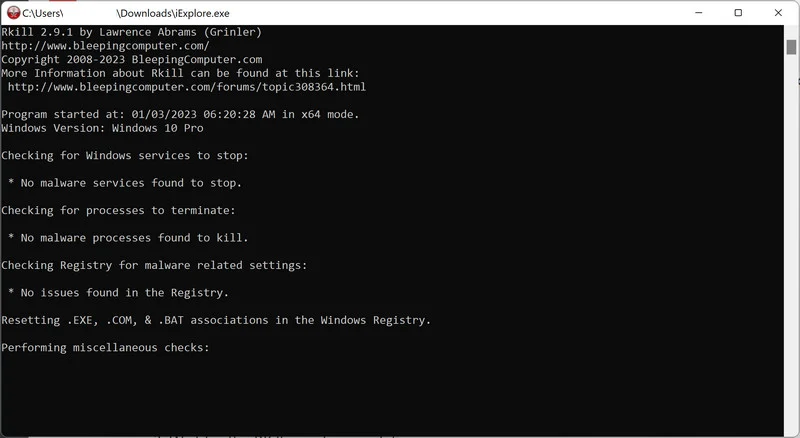
When the black window closes, a log opens. Keep the log, do not restart yet, and continue directly to Malwarebytes.
Step 2: Scan and quarantine threats with Malwarebytes
Malwarebytes for Windows can scan for malware and quarantine detected threats. Use the free Custom Scan below; a paid plan is not required for this cleanup.
-
Download Malwarebytes
Click the button below to download Malwarebytes for Windows. Paid real-time protection is optional.
Malwarebytes Free for WindowsScans and removes malware at no costDownload MalwarebytesMalwarebytes free scanner informationOfficial installer for Windows 11 and 10. Your download starts right away.Want real-time protection? See Malwarebytes Premium
-
Install Malwarebytes
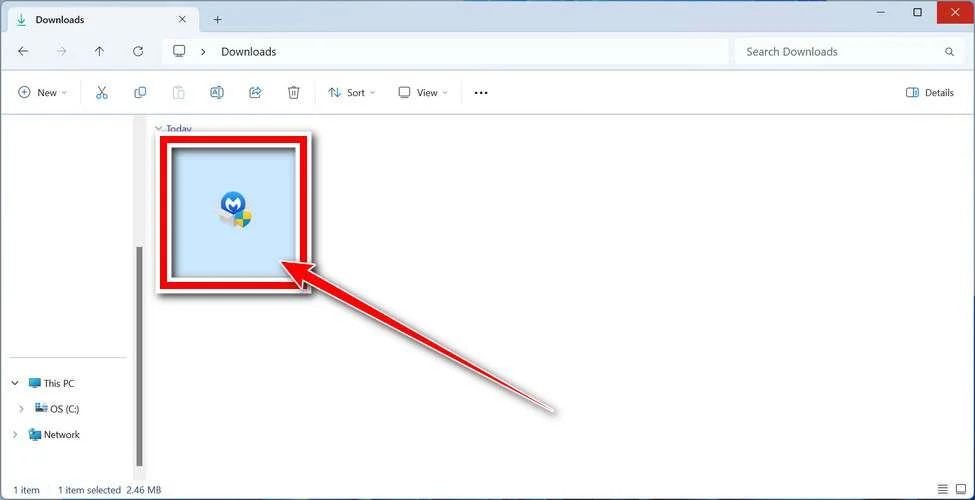
When the download finishes, open Downloads and double-click MBSetup. If Windows asks for permission, check that the prompt identifies Malwarebytes, then click Yes.
-
Follow the On-Screen Prompts to Install Malwarebytes
The setup wizard will walk you through a few quick screens:
Installer screens and optional offers vary. Skip unwanted Browser Guard, trial, or paid-plan offers. The free Custom Scan remains available; Threat Scan may require a paid plan.
-
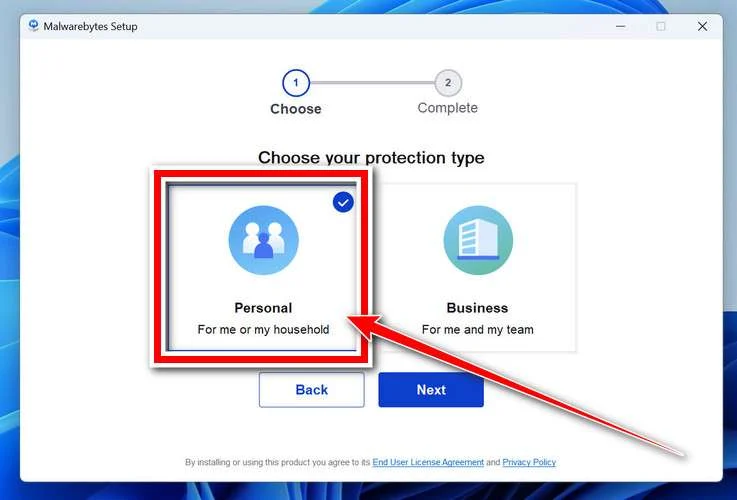
Choose Personal for your own computer, then click Next. For a work-managed device, use your organization’s approved response instead.
-
Wait for installation to finish.
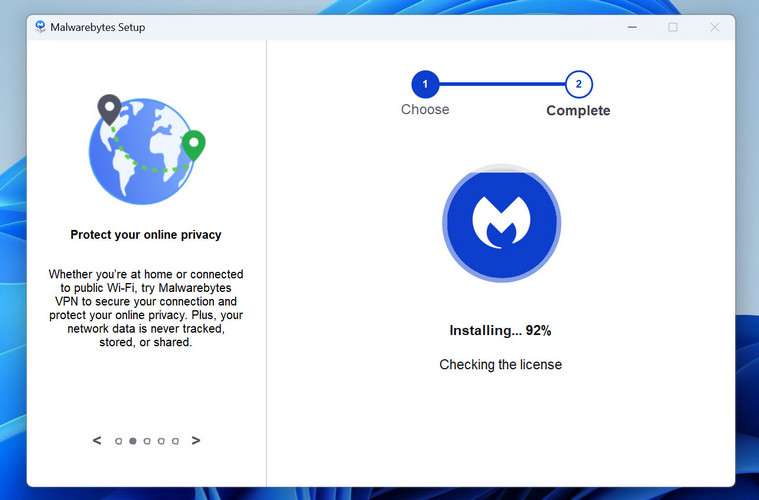
-
If the Welcome to Malwarebytes screen appears, click Get started and follow the remaining prompts.
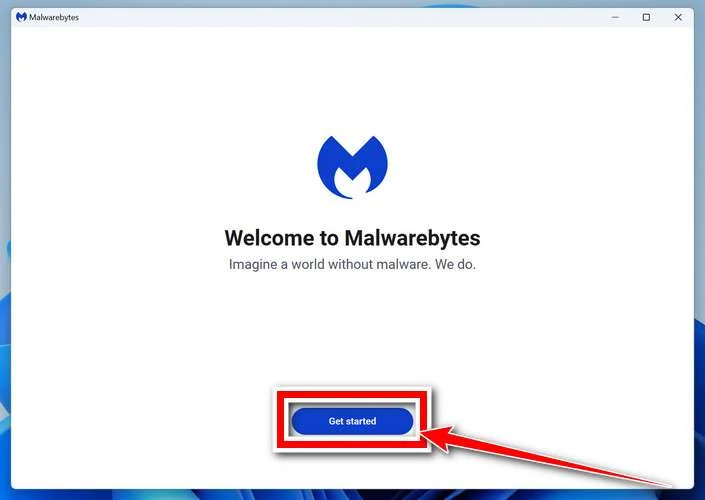
-
On the final screen, click Open Malwarebytes to launch the program.
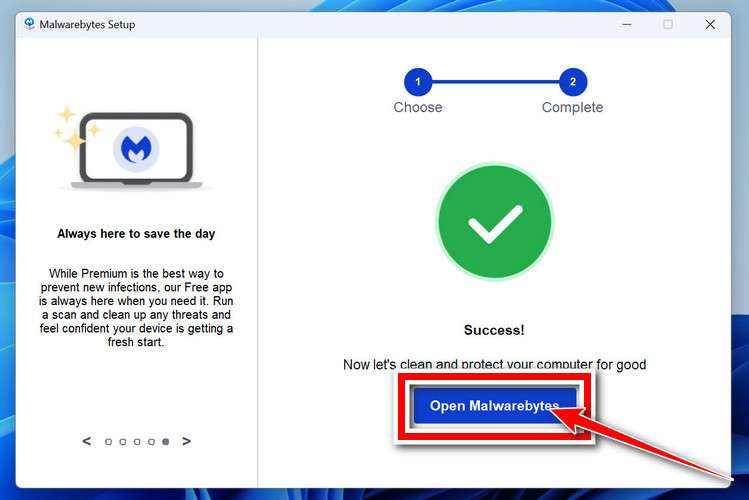
-
-
Choose the scan type and optional rootkit check
On the Scanner tile, click the three dots, choose Advanced Scan, then Custom Scan.
Expand the folder selector and select the C:\ system drive. Include any other drive where the suspicious files were stored.
If Scan for rootkits is available, you can enable it. This setting is unavailable on Windows ARM devices; leave Windows security protections enabled.
Review how potentially unwanted programs and modifications will be handled. Keep detection enabled rather than automatically ignoring these items.
-
Start the Scan
Click Start Custom Scan. Allow Malwarebytes to update its detection information if prompted.
-
Wait for the Scan to Finish
Wait for the Custom Scan to finish. The time required depends on the selected locations and the amount of data.
-
Quarantine the Detected Threats
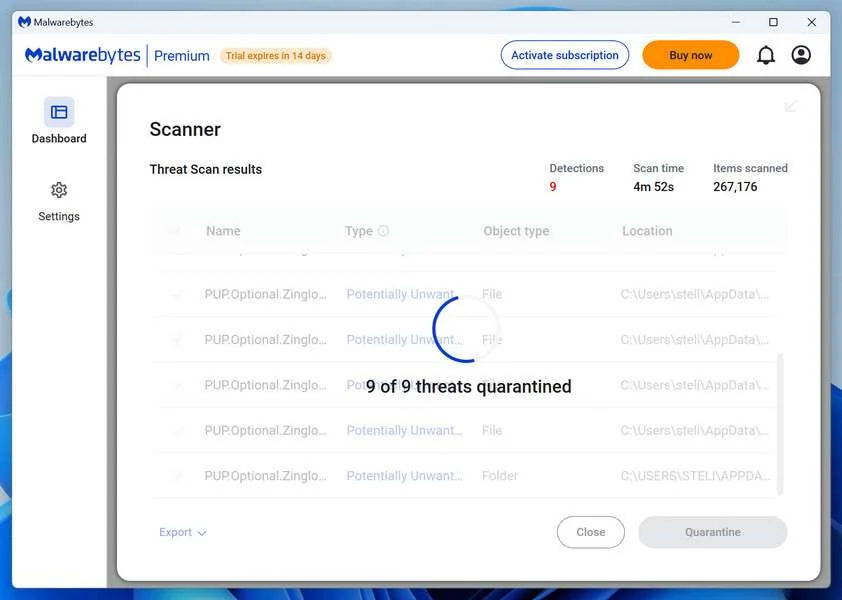
When the scan finishes, review the detections and keep the threats you want removed selected. Click Quarantine.
If a detection is unclear, save the report and ask for help before excluding or restoring it.
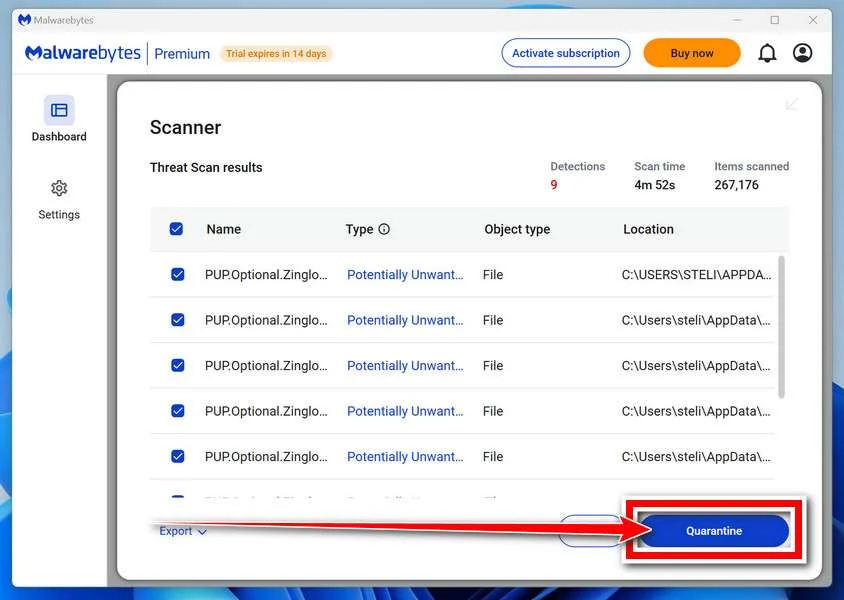
Wait while Malwarebytes quarantines the selected items. Do not restore a file merely because an unfamiliar name appears in the results.
-
Restart Your Computer
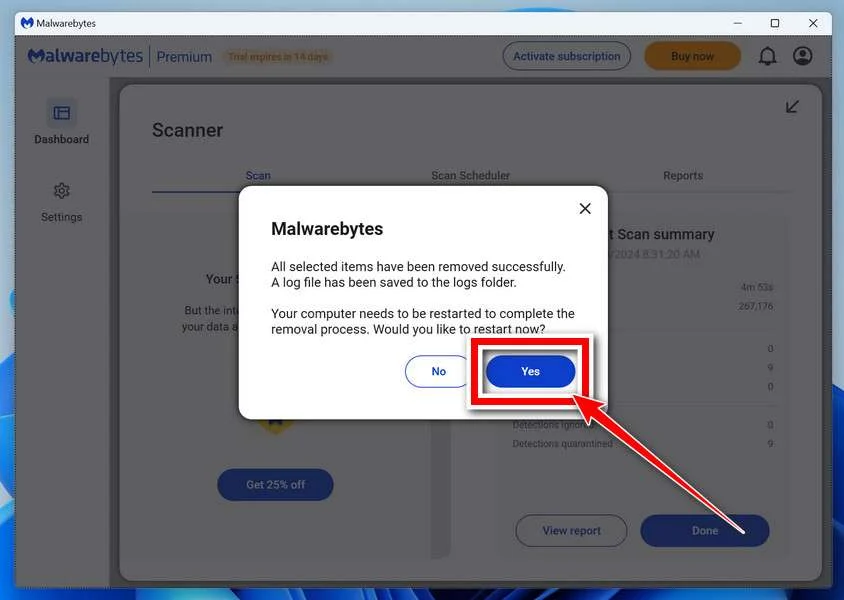
If Malwarebytes asks for a restart, save your work and click Yes. After signing back in, reopen Malwarebytes and check the report for unresolved detections.
Step 3: Optional: Check unresolved threats with HitmanPro
HitmanPro is a second-opinion scanner for Windows. It examines suspicious files using cloud analysis, including SophosLabs. An internet connection is needed for that check.
Scanning is free. Removing detections requires an eligible one-time 30-day trial or a paid license.
A computer that already used its trial may not qualify again. You do not have to buy HitmanPro to follow the Malwarebytes cleanup above.
-
Download HitmanPro
Click the button below to download HitmanPro if you want a second opinion on unresolved symptoms or detections.
HitmanProSecond-opinion malware scanner from SophosDownload HitmanProFree scan. Removal requires an eligible 30-day trial or a paid license. Opens the official HitmanPro page in a new tab.
-
Install HitmanPro
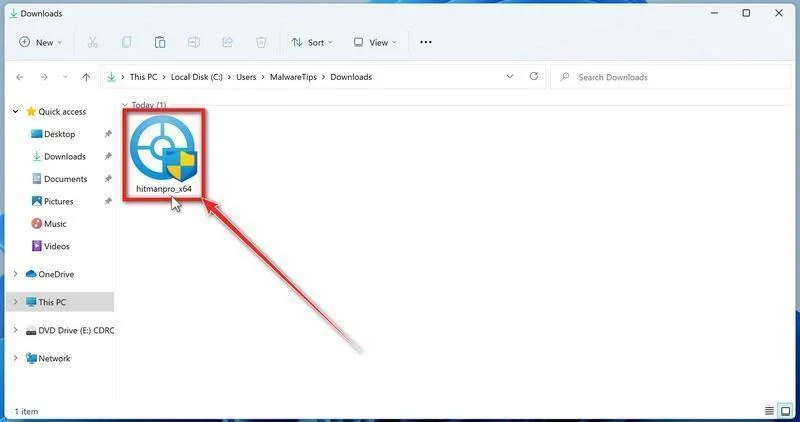
When the download finishes, open your Downloads folder and double-click the file: “hitmanpro.exe” on 32-bit Windows, or “hitmanpro_x64.exe” on 64-bit Windows.
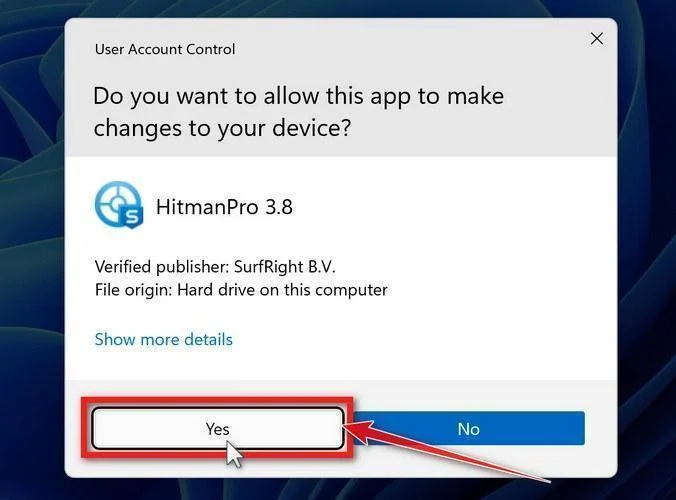
If a User Account Control pop-up asks whether HitmanPro can make changes to your device, click “Yes” to continue.
-
Follow the On-Screen Prompts
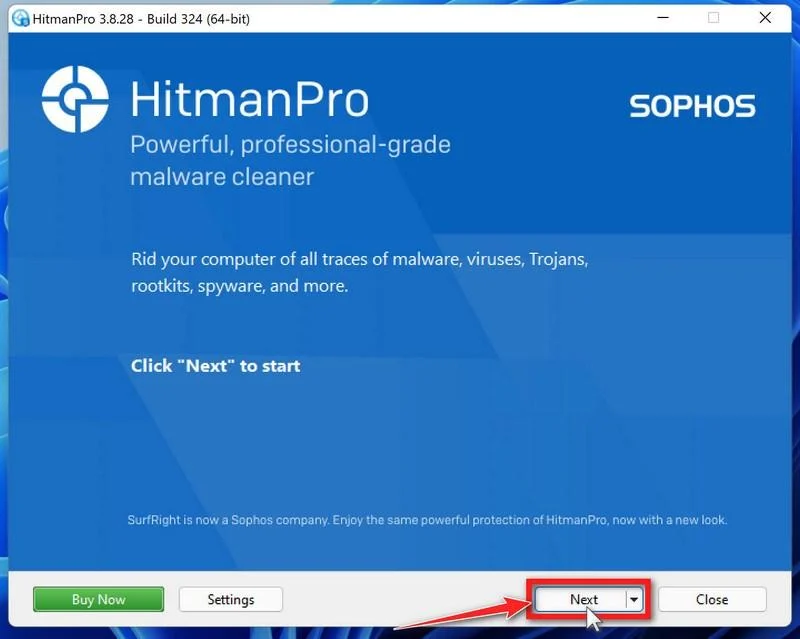
On the HitmanPro start screen, click Next. Read and accept the terms if you agree, then continue.
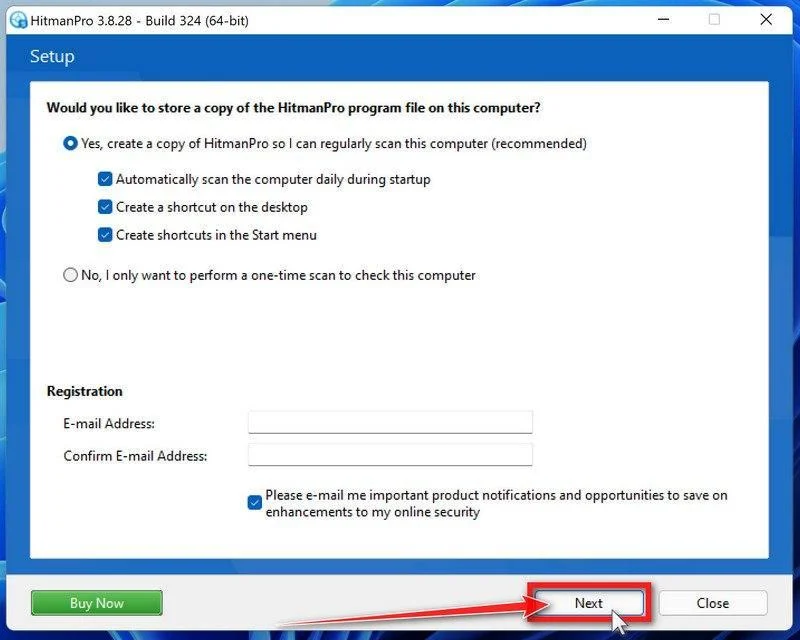
Choose whether to keep a copy for later use or run a one-time scan. Review optional startup and email preferences, then click Next.
-
Wait for the Scan to Finish
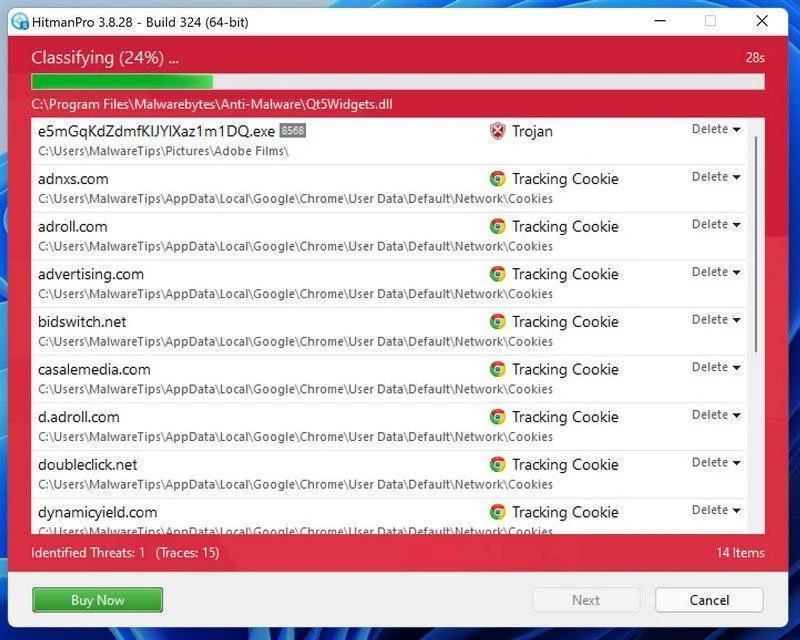
Let HitmanPro finish scanning. Review its findings once the scan has completed.
-
Review the Results and Click “Next”
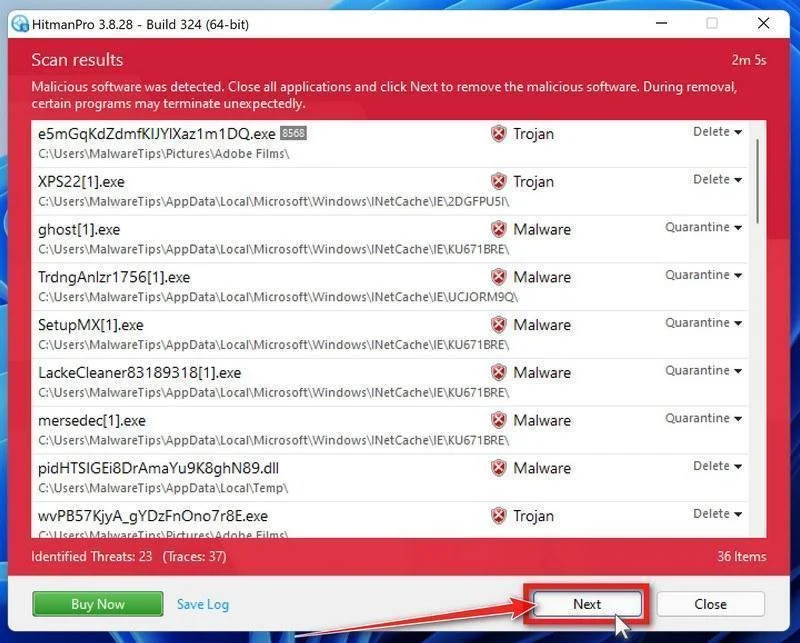
Review the detected items and their proposed actions. Save the log if you need help with an unfamiliar detection, then click Next to proceed.
-
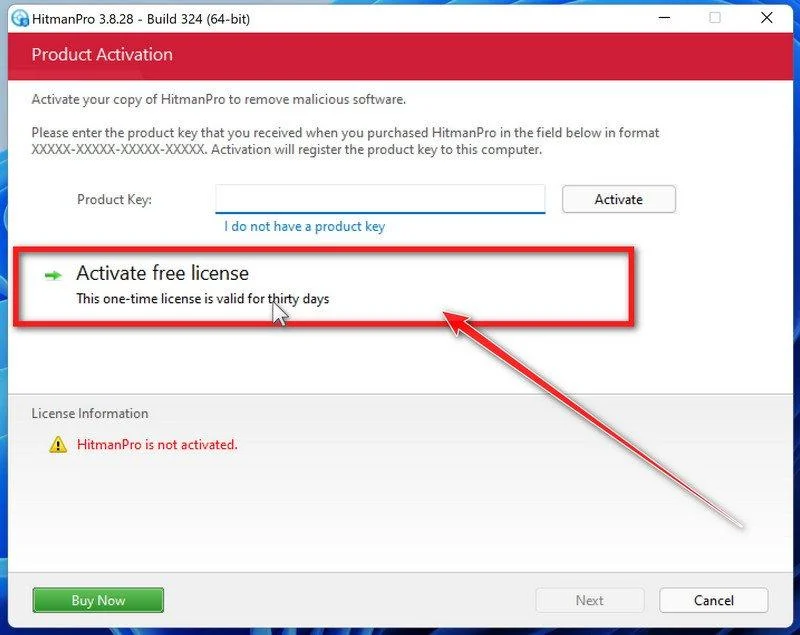
Click “Activate Free License”
If this computer qualifies, click Activate free license and follow the activation prompts.
If no trial is available, use an existing license or save the report for assistance. Do not assume a purchase is necessary to continue cleanup.
After removal, review the summary and click Next. Choose Reboot if requested, or Close if no restart is needed.
If detections return or the original symptoms persist, keep the reports and ask for help. A clean scan cannot rule out every threat.
Step 4: Optional: Run a second-opinion scan with ESET
ESET Online Scanner is a free second-opinion scanner for Windows. Use it if you need another check after cleanup, rather than running several scanners together.
-
Download ESET Online Scanner
Click the button below to download ESET Online Scanner.
ESET Online ScannerFree one-time malware scan from ESETDownload ESET Online ScannerOpens the official download page in a new tab.
-
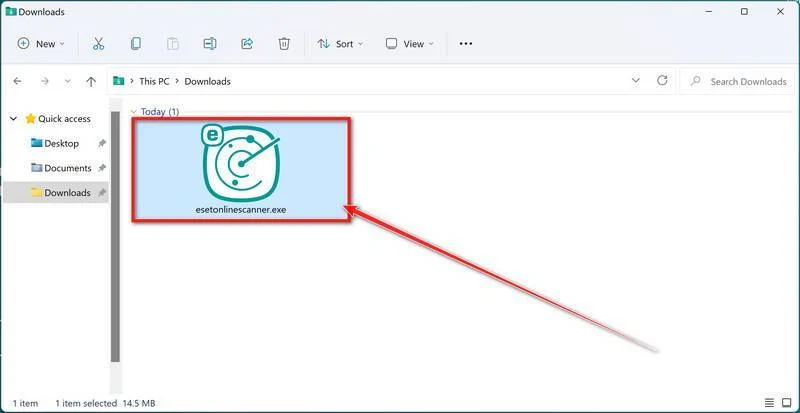
Run the Installer
When the download finishes, open Downloads and double-click esetonlinescanner.exe. Approve the Windows permission prompt after checking that it identifies ESET.
-
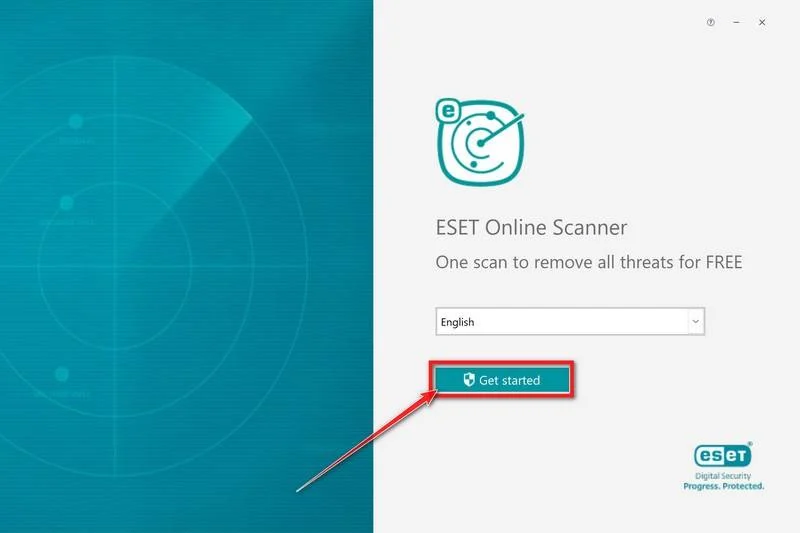
Install ESET Online Scanner
On the start screen, select your language from the drop-down menu and click Get started.
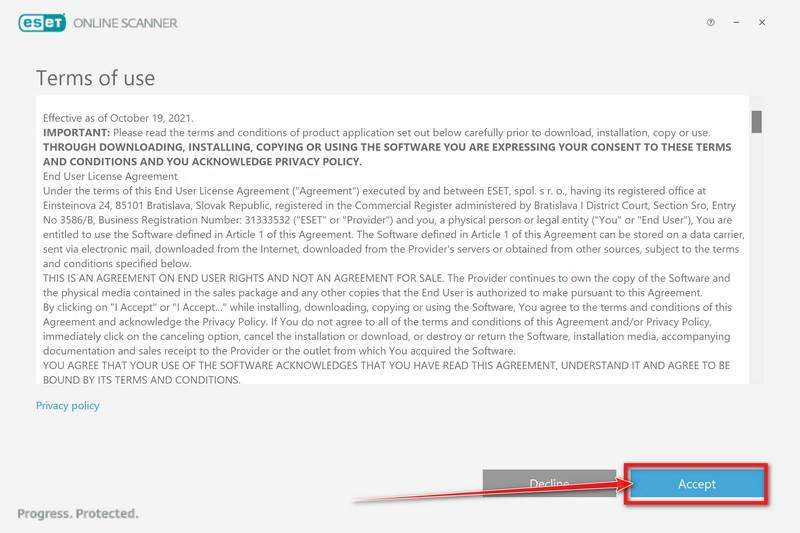
Read the Terms of use. Click Accept if you agree, then Get started if that screen appears again.
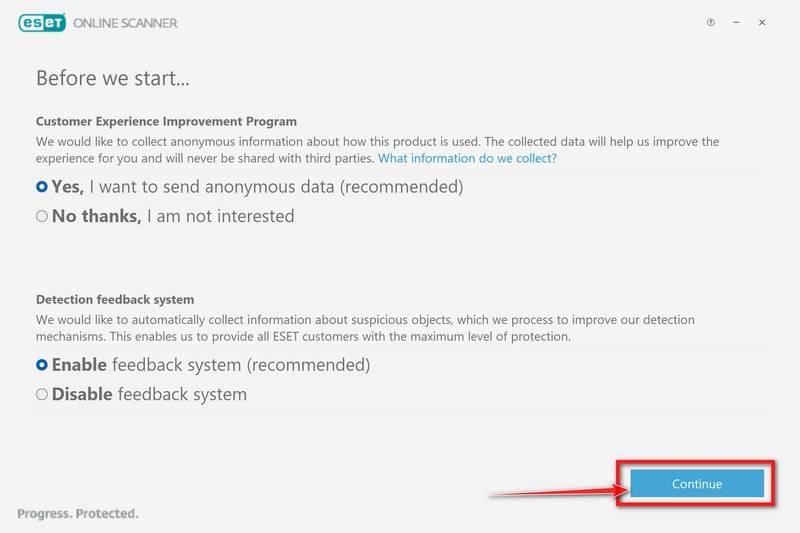
Choose your preferences for the Customer Experience Improvement Program and the Detection feedback system (either choice is fine), then click Continue.
-
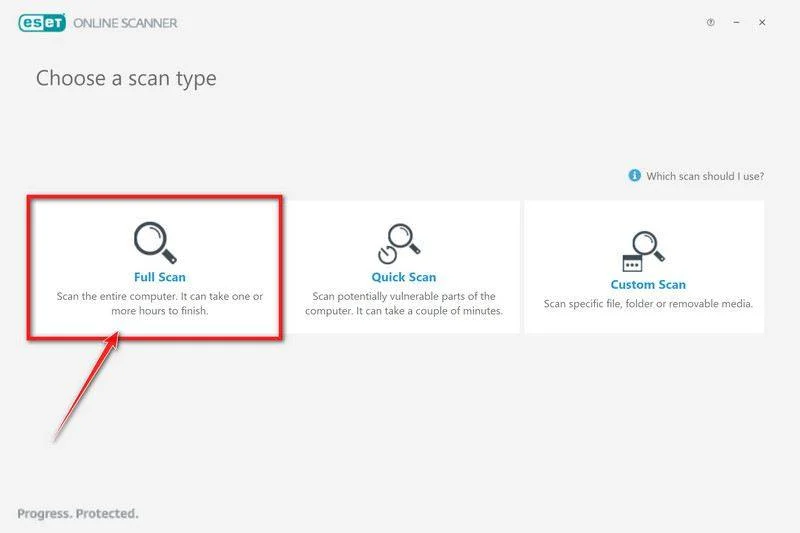
Start a Full Scan
Click Full Scan for a broader check than the quick-scan option.
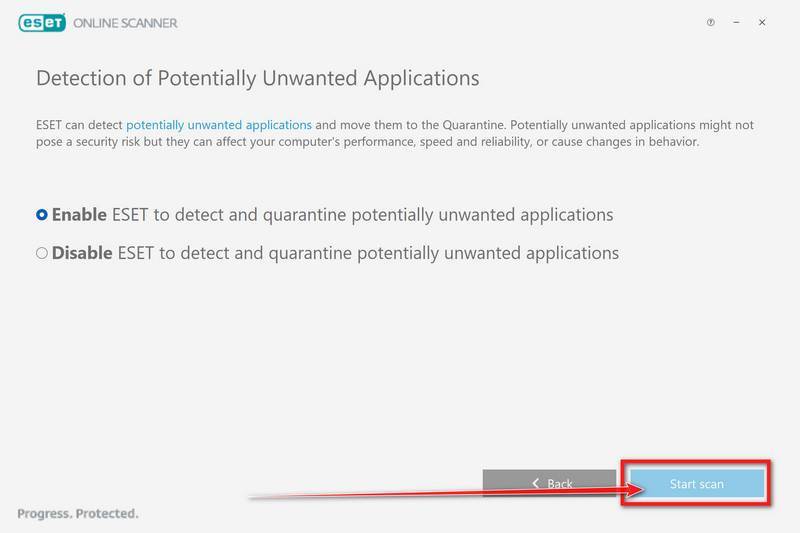
Select Enable for Detection of Potentially Unwanted Applications. Then click Start scan.
-
Wait for the Scan to Finish
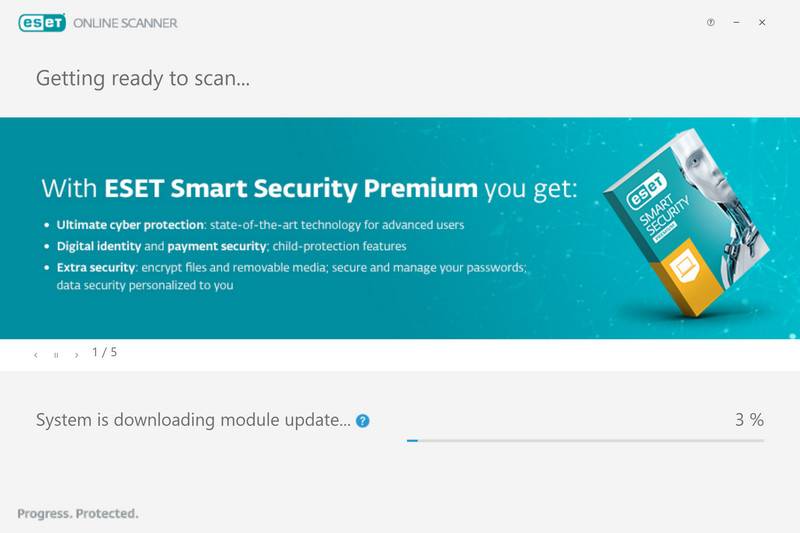
Allow the detection modules to download and update. The file scan begins afterward.
Leave the scan running until it finishes. A full scan can take an hour or longer, depending on your computer and the data being checked.
-
Review the Results
When the scan finishes, open View detailed results and check the action recorded for each detection.
ESET attempts to clean and quarantine detected threats. If an item remains unresolved, keep its details for assistance.
Click Save scan log to keep the results. Then click Continue.
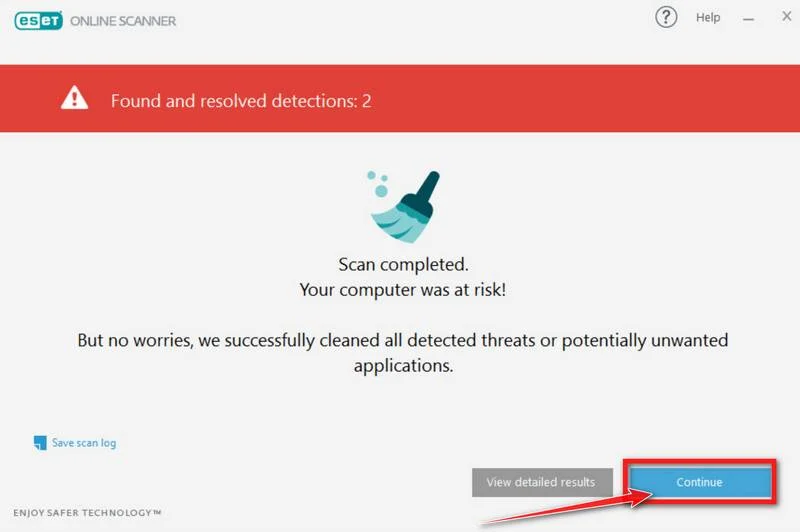
Restart if ESET requests it. Afterward, check whether detections or the original symptoms return.
If problems continue, keep the scan reports and ask for help in the MalwareTips removal forum. Do not repeatedly restore quarantined files.
What to Do After Removing A0Backdoor
-
From a trusted device, review the accounts available during the remote session. Start with email, work access, password managers, and financial services.
-
Change exposed passwords and ask the provider or administrator to revoke suspicious sessions. Review recovery contacts, multifactor methods, mailbox forwarding, and unfamiliar application permissions.
-
If you approved an unexpected payment or see unauthorized activity, call the institution through a known number. Give it the transaction reference and incident time.
-
Get further help through your real support team or a removal-help channel you open yourself. Reject unsolicited callers offering to reconnect and finish the cleanup.
Reconstruct the Quick Assist session
Write a short timeline beginning with the inbox flooding, followed by the Teams contact, remote connection, and any installation. Approximate times are still useful.
Include the sender’s account details and the support ticket they claimed to represent. Let your real help desk compare those details with its records.
List the applications open during remote control. Mention email, saved documents, company systems, and payment pages so responders can prioritize their access checks.
Record any administrator prompt you approved and anything the caller asked you to download. Keep the original filename and source without launching it again.
If the caller installed another remote-access program, give its name to the responder. Do not reconnect with the caller to ask which software they used.
Keep screenshots and logs in your incident file rather than posting private conversations or company information publicly. Share executable attachments only as your responder directs.
For an affected work account, ask IT which services you may resume from a trusted device. Follow its instructions for resetting credentials and restoring access.
A0Backdoor Details Worth Giving Your Responder
BlueVoyant’s analysis documents the Teams impersonation, malicious MSI packages, DLL loading, and DNS-based communication.
The backdoor carried instructions in DNS MX queries. Ordinary DNS traffic is not an infection alert, and changing a resolver does not remove the payload.
The analyzed bundle included hostfxr.dll, a name also used by legitimate .NET software. Quarantine the detected component rather than deleting every matching DLL.
Save the complete affected path, installer source, approximate execution time, and scanner report. IT can compare them with deployment records and endpoint activity.
If the same component returns after quarantine, keep the new alert and escalate. A planned rebuild may be appropriate after evidence and essential files are preserved.
Frequently Asked Questions
Should I uninstall Microsoft Teams?
Keep legitimate software unless your responder identifies it as part of the problem. The documented attack impersonated support and delivered a separate malicious package.
What should I tell the real help desk?
Give the caller’s account, conversation time, remote-access tool, installer name, and any permissions you approved. Include the antivirus alert and its recorded action.
Can I keep using the PC for banking during cleanup?
Use another trusted device. Wait until the Windows response and relevant account checks are complete before returning to sensitive activity.
Do I need to buy protection before starting?
No. Follow the available free scan options and their current instructions. Review trial or subscription choices rather than accepting a purchase under pressure.
What if the alert returns after a restart?
Disconnect again, save the new detection report, and seek removal help. Have the recurring component and its persistence checked before normal use resumes.
When should I consider rebuilding Windows?
Ask a qualified responder if unauthorized control continues or the installation cannot be trusted. Preserve essential files first; rebuilding can erase applications and data.
The Bottom Line
Do not let an unsolicited Teams technician control your computer. Verify support requests through the help desk you already know.
If access or execution already happened, isolate Windows, complete the removal process, and protect exposed accounts from a trusted device.

Join the discussion
0 commentsShare your experience or ask a question about this article.
Your progress
Did these steps help?
Let us know how the guide worked for you.
Describe what you see and the step you reached. Keep passwords and other private information out.
Discussion
Start the conversation
Have a question or something useful to share? Add the first comment.