


A security alert keeps showing up even after you close the page you were reading. It looks as though the computer wants you to do something.
Before you open it, check where the message came from. The small line under the warning may matter more than the warning itself.
Overview
A website can put an alert on your desktop
Vertexlinkkit.co.in has been documented using a fake verification prompt to seek notification permission. The browser permission is real; the reason the page gives you for granting it is not.
You might hear these called pop-ups, but website notifications are different from a new tab or browser window. They can appear alongside messages from apps you deliberately installed.
That’s why an alert can look like part of Windows while still coming from a website. On some systems, it can arrive after you’ve closed the original tab.
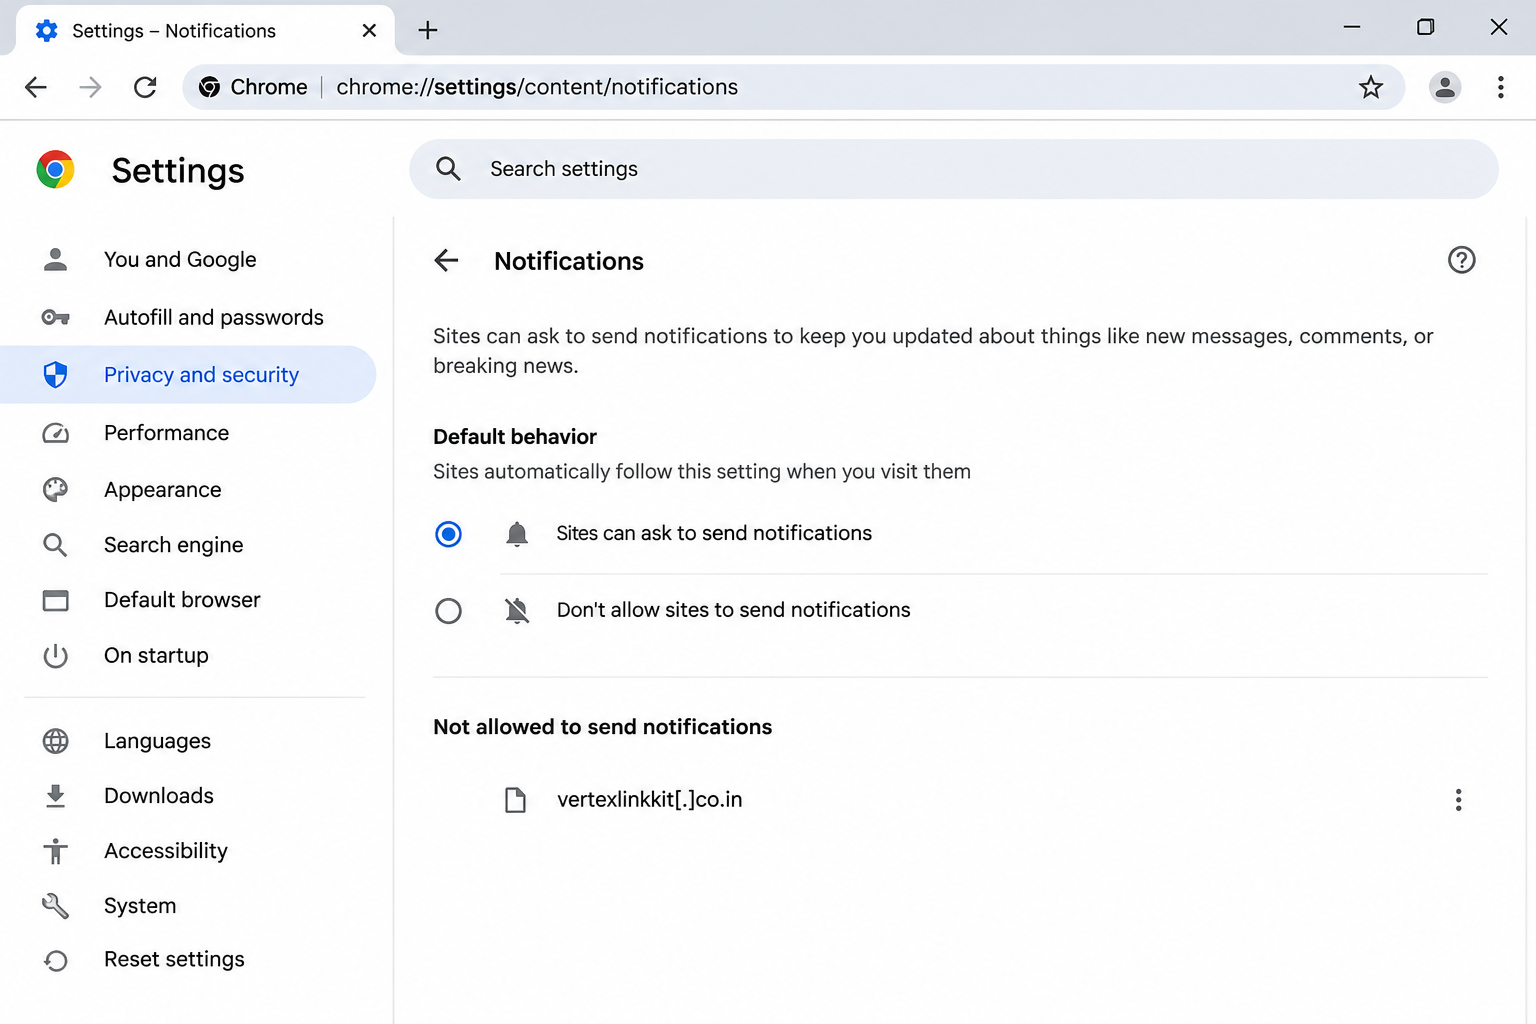
The image above depicts a browser’s notification list, not the suspect page itself. You can reach that list from Settings without visiting the website.
A security message isn’t a security result
The site has been associated with fake security notifications. Different paths or visits can show different wording, so there’s no single alarm message you have to match.
A warning in one of those messages isn’t proof that your antivirus detected anything. Open your installed security app directly if you want to see its real history.
The reported destination can lead elsewhere. Don’t assume that a familiar security brand in the alert confirms who sent it or what the next page will do.
Identify the permission before changing the whole computer
The quickest test is to find which browser and which profile produced the notification.
If you use a separate profile for work, check that one as well as your personal profile.
Use these details to separate the browser problem from other exposure:
- A website listed as allowed can send notifications even after you close its tab.
- An unfamiliar entry can be blocked without loading that site again.
- Closing one message isn’t the same as revoking permission.
- Downloading software, sharing a password, or accepting remote access requires a different response.
If the alerts persist after blocking the site, don’t jump straight to reinstalling Windows. Identify the remaining sender first; it may be another domain, browser, profile, or app.
How the Vertexlinkkit.co.in Notification Scam Works
Step 1: An unrelated visit lands you on a verification page
You don’t need to search for this domain for it to show up. The documented site was encountered during investigation of suspicious pages, and redirect chains are a common route.
If a page appears while you’re looking for something else, don’t assume the original website asked for the action. The new address may belong to a completely different operator.
You can leave without proving you’re human. Close the tab or use the browser’s window close control, rather than following directions inside the page.
Step 2: The page asks for a permission it doesn’t need
The fake check makes allowing notifications sound like part of identity verification. A request to send you alerts isn’t how an ordinary website proves you’re human.
There may be two layers on the screen: the webpage’s own directions and a permission prompt from the browser. Only the second controls whether the site can notify you afterward.
Decline or dismiss the request. You don’t have to keep the tab open just because the browser asked a question at the same time the page did.
Step 3: Messages show up outside the original tab
If permission was granted, the site can later send messages through the browser. That shifts the problem from an unexpected page to repeated interruptions in your notification area.
A message might use alarming language and point somewhere else. Don’t respond by opening the alert to see which app it claims to represent.
The browser’s notification settings are the safer place to identify and block the originating permission. There’s no need to learn whether another link in the chain still works.
Step 4: The next action determines the bigger risk
Clicking an alert can open an unrelated page. The risk changes if that page asks you to install something, sign in, call for help, or enter a payment method.
Just getting the notification doesn’t establish that any of that happened.
Keep track of what you actually did so you don’t reset a device that only needs a browser setting changed.
If you went past that stage, preserve enough information for the affected service or technician to act. Don’t return to the destination for another look.
How to Stop the Vertexlinkkit.co.in Notifications
Start with Chrome and Edge on a computer
In Chrome, open Settings. Select Privacy and security, then Site settings, then Notifications. Use the browser’s menu rather than clicking the notification.
Find the list of sites allowed to send notifications. If the site appears, open the menu on its row and choose Block. Check for any unfamiliar related entries separately.
Google’s notification instructions show how to find the permission list. If a site’s name is unfamiliar, don’t open it to identify it.
In Edge, open Settings and search for Notifications. Open the site-permissions result, find the allowed entry, and choose Block. Microsoft’s Edge instructions cover the same task.
Some browser versions rename groups of settings. Search within Settings if the menu labels aren’t identical, and make sure you’re changing website permissions rather than all desktop notifications.
Use Firefox, Safari, or Android if that’s where it appeared
In Firefox, open Settings, then Privacy & Security. Find Notifications under Permissions and open Settings beside it. Select Block for the unwanted site, then save your changes.
Mozilla’s Web Push guide explains the difference between blocking an entry and simply removing its old permission.
On a Mac using Safari, choose Safari, Settings, Websites, then Notifications. Change the unwanted entry to Deny. Apple’s notification guide shows where it lives.
For Chrome on Android, open the browser’s menu and check its site notification settings. Use the affected profile’s allowed-site list and block the sender from there.
If Android only identifies Chrome as the app that showed the message, that’s a useful clue. Check Chrome’s per-site permissions before turning off notification delivery for the whole app.
Check the result without revisiting the page
Dismiss already displayed messages without opening them. Confirm the same site no longer appears among allowed senders for the browser profile you were using.
Watch for new messages after the change. Old items in a desktop notification center don’t necessarily tell you that the blocked origin can still deliver new ones.
If a fresh message appears, note the listed app and site. Look for a second browser, work profile, or domain before changing anything broader.
When the source isn’t a browser, review recently installed apps or ask IT to identify the notification. Don’t remove unfamiliar system entries just because you haven’t seen their names before.
What to Do if You Have Fallen Victim to This Scam
The malware scan after these steps is for people who ran an installer or may have granted remote access. For notifications alone, start with the browser permission.
If you only saw the page, close it. Decline any request that would let it send notifications. You don’t owe the site a security check.
If you didn’t grant permission and nothing downloaded, don’t go back to see if the notice was genuine.
If you allowed notifications, block the website in your browser.
Use the settings for the exact profile that shows the alerts. Keep ordinary app notifications enabled if you still need them.
Remember to dismiss old messages without following them. Revisit the permission list, not the page, to make sure the entry changed.
If you clicked an alert, check for downloads and new permissions. Note what appeared and close it.
Don’t keep an installer or accept remote support to see what the warning meant.
If you ran unfamiliar software or allowed remote access, disconnect if safe and get help from an unaffected system.
If you gave up a password or approved an unexpected login, secure that account. Start at the provider’s website or app, opened separately. Report the event and review sessions.
For workplace credentials, tell IT which address you entered and what kind of approval appeared. Don’t send your password or authentication codes in the report.
If you paid, call the real payment provider. Use your card, app, or statement to find its number. Explain how you reached the payment page and save your receipt privately.
If anyone claims they can reverse the payment for an upfront fee, don’t pay a second time. Confirm recovery options with the original provider.
Is Your Device Infected? Run a Free Malware Scan
Slow performance, constant pop-ups, or strange behavior? These are classic signs of a malware infection. A quick way to check is to scan your device with Malwarebytes Free, one of the most trusted malware removal tools available. If you only visited a scam page and didn’t download or install anything, this scan is optional.
The free version detects and removes the most common threats, including:
- Adware — the cause of those annoying pop-ups
- Browser hijackers — unwanted redirects and changed homepages
- Trojans and spyware — hidden programs stealing your data
- Potentially unwanted programs (PUPs) — software you never asked for
👉 Select your device below — Windows, Mac, or Android — then follow the simple steps to download Malwarebytes, scan your system, and remove any threats it finds. The scan usually takes 5 to 20 minutes.
Run a Malware Scan with Malwarebytes for Windows
Malwarebytes is one of the most popular and trusted anti-malware tools for Windows — and it’s completely free for removing infections. It catches threats that many antivirus programs miss, including adware, browser hijackers, and trojans. Follow the steps below to scan your PC and remove what Malwarebytes finds.
Download Malwarebytes
Click the button below to download the latest version of Malwarebytes for Windows from the official source. The free version is all you need — it will scan your computer and remove adware, browser hijackers, and other malicious software at no cost.
Download MalwarebytesOfficial installer for Windows 11 and 10. Your download starts right away.Want real-time protection? See Malwarebytes Premium Malwarebytes Free for WindowsScans and removes malware at no cost
-
Install Malwarebytes
When the download finishes, open your Downloads folder and double-click the MBSetup file. If Windows shows a User Account Control pop-up, click “Yes” to allow the installation.
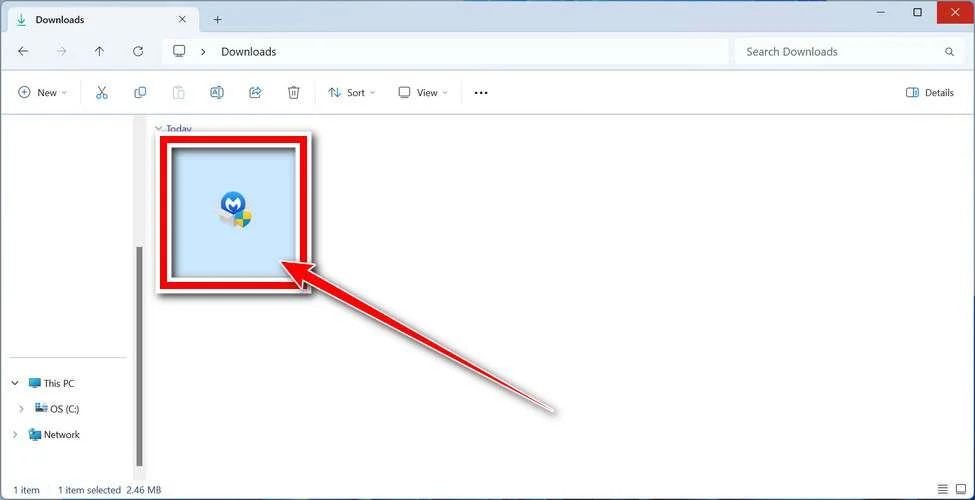
Follow the On-Screen Prompts to Install Malwarebytes
The setup wizard will walk you through a few quick screens:
-
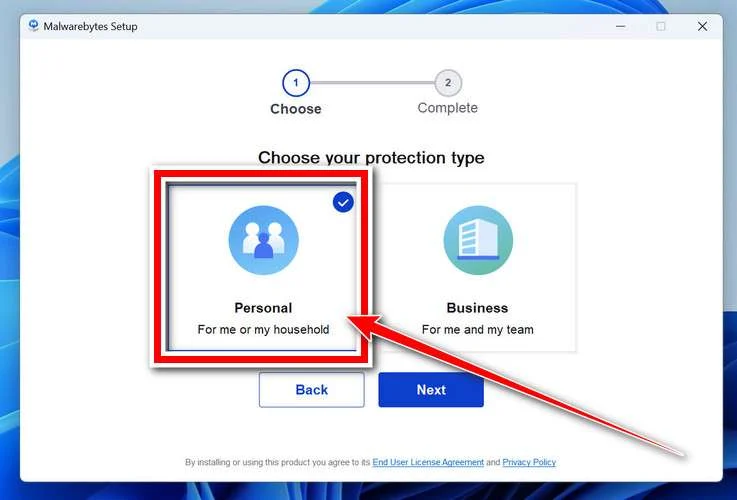
Choose where you’re installing the program — “Personal Computer” or “Work Computer” — then click Next.
-
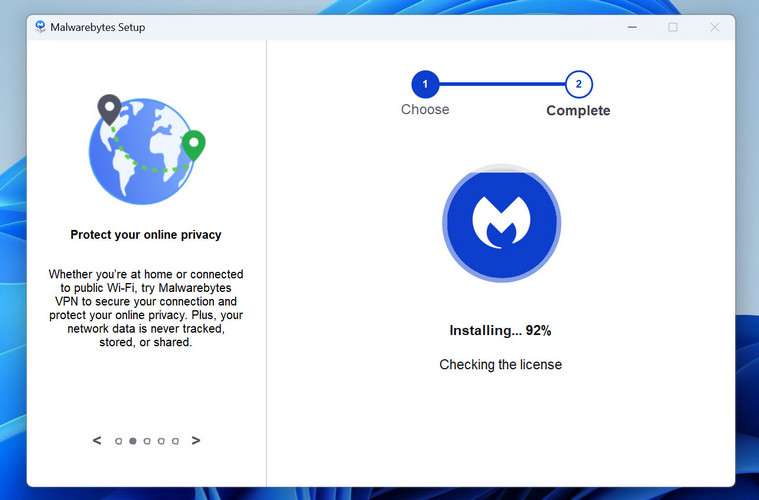
Malwarebytes will now install on your device. This usually takes under a minute.
-
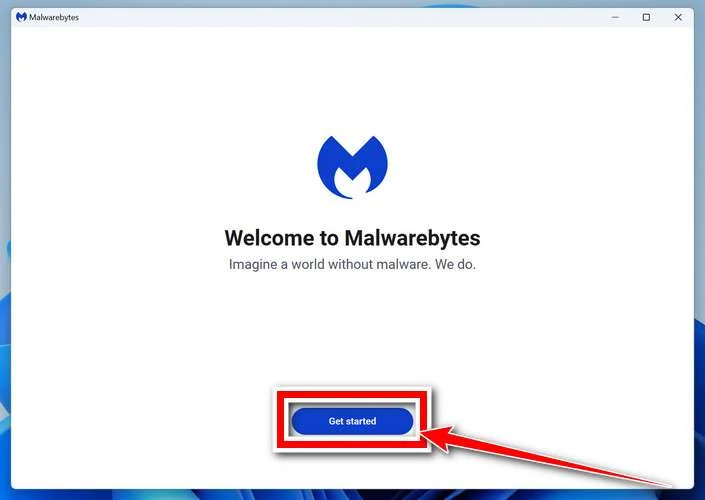
When installation is complete, the “Welcome to Malwarebytes” screen will open automatically.
-
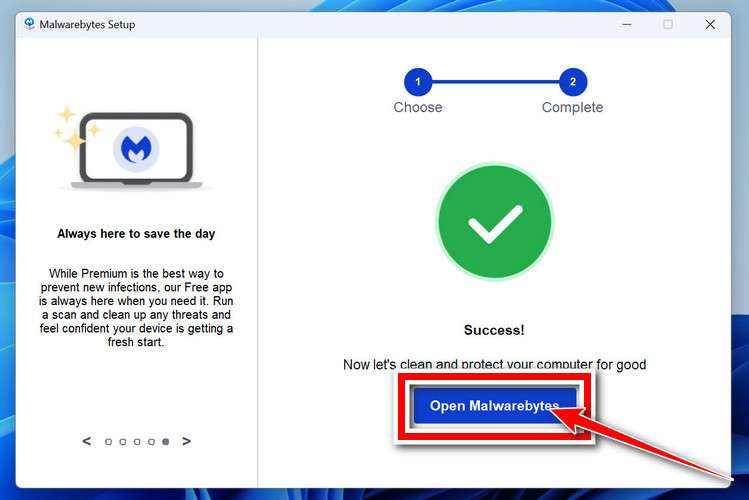
On the final screen, click Open Malwarebytes to launch the program.
-
Optional: Check for rootkits with a Custom Scan
You don’t need to change any settings for a normal scan. The standard Threat Scan in the next step is enough for most problems, so you can go straight to it.
If you also want to check for rootkits, use a Custom Scan. In current versions of Malwarebytes, rootkit scanning is only available there:
- On the Scanner tile, click the three-dot menu and select Advanced Scan.
- Choose Custom Scan. In its options, check Scan for rootkits.
- Select your system drive (usually C:\) as the location to scan, then start the scan. It takes longer than a Threat Scan.
- When it finishes, review and quarantine the results as described in the steps below.
Rootkit scanning isn’t available on Windows devices with ARM processors.
Start the Scan
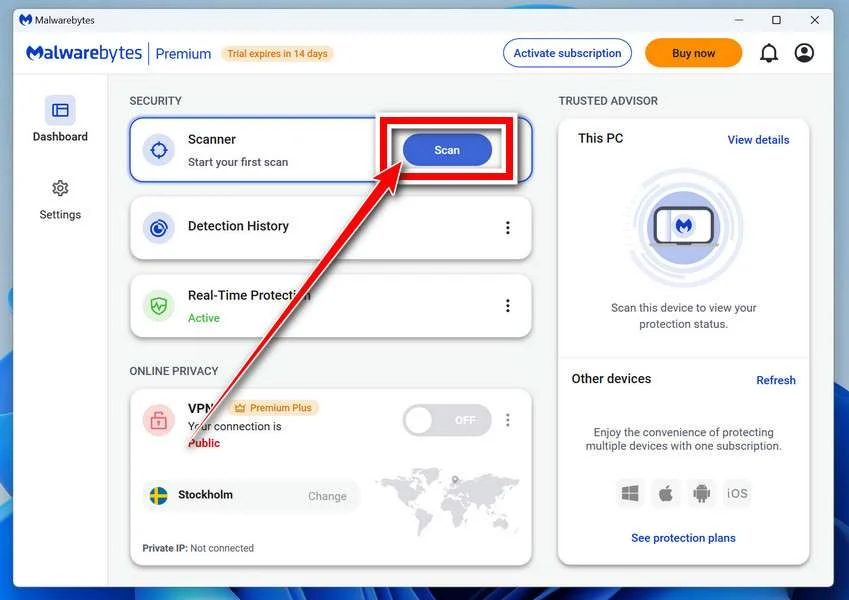
Click the blue Scan button. Malwarebytes will automatically update its virus database and start checking your computer for malware.
-
Wait for the Scan to Finish
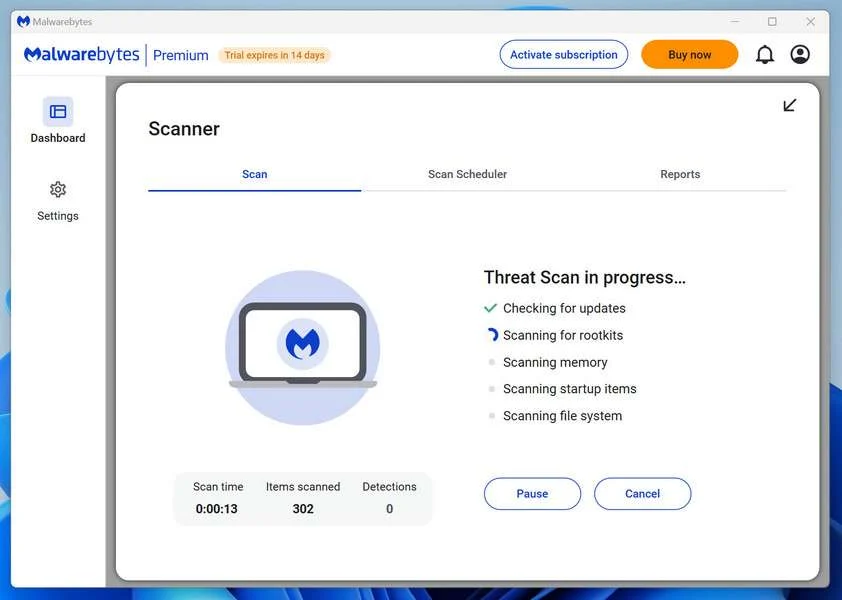
The scan checks your entire system for browser hijackers and other malicious programs, so it can take 5 to 20 minutes depending on your computer. Feel free to do something else — just check back occasionally to see the progress.
-
Quarantine the Detected Threats
When the scan is done, you’ll see a list of everything Malwarebytes found — malware, adware, and potentially unwanted programs. Click the “Quarantine” button to remove all of them at once.
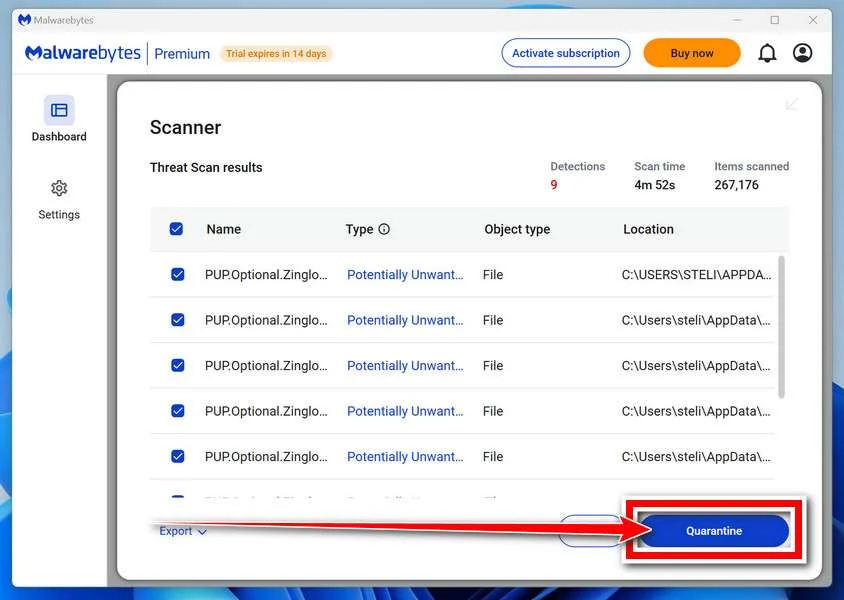
Malwarebytes will now remove the malicious files and registry entries and move them safely into quarantine.
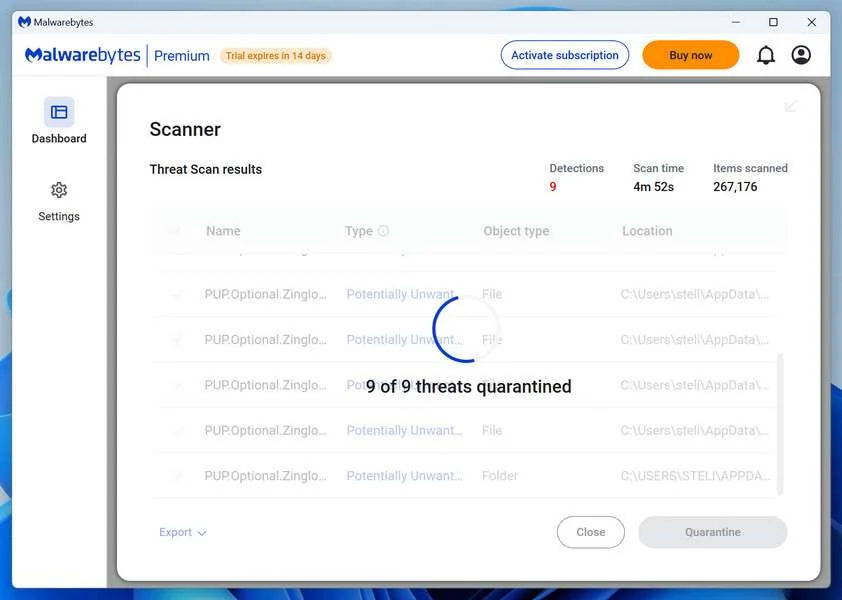
-
Restart Your Computer
Some threats can only be fully removed after a reboot. If Malwarebytes asks you to restart, click Yes. Once you’re logged back in, Malwarebytes has finished removing the threats it found.
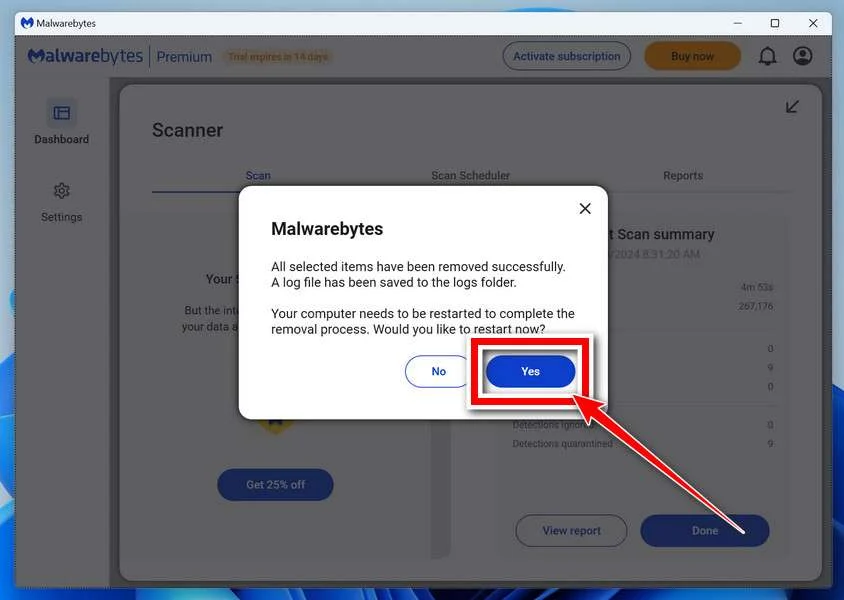
When the scan is done, check whether the problems you noticed have stopped. If they continue, see the options below.
If you are still having problems with your computer after completing these instructions, then please follow one of the steps:
- Run a computer scan with ESET Online Scanner
- Ask for help in our Windows Malware Removal Help & Support forum.
Run a Malware Scan with Malwarebytes for Mac
Malwarebytes for Mac is a free on-demand scanner that removes the malware other security software tends to miss — adware, browser hijackers, and unwanted programs included. Cleaning an infected Mac with Malwarebytes has always been completely free, and it’s our go-to recommendation. Follow the steps below to scan your Mac and remove what Malwarebytes finds.
-
Download Malwarebytes for Mac
Click the button below to download the latest version of Malwarebytes for Mac.
Download MalwarebytesOfficial installer for macOS. Your download starts right away.Want real-time protection? See Malwarebytes PremiumMalwarebytes Free for MacScans and removes malware at no cost -
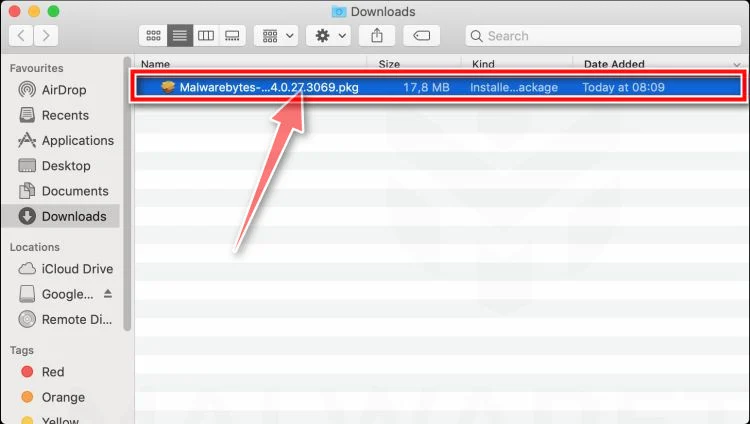
Open the Malwarebytes setup file
When the download finishes, open your Downloads folder and double-click the setup file to begin the installation.
-
Follow the On-Screen Prompts to Install Malwarebytes
The Malwarebytes for Mac Installer will guide you through a few quick screens. Click “Continue” and keep following the prompts until the installation completes.
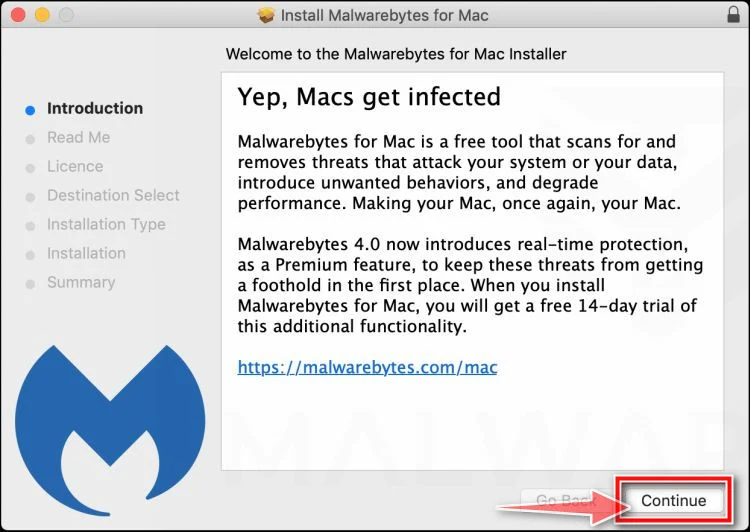
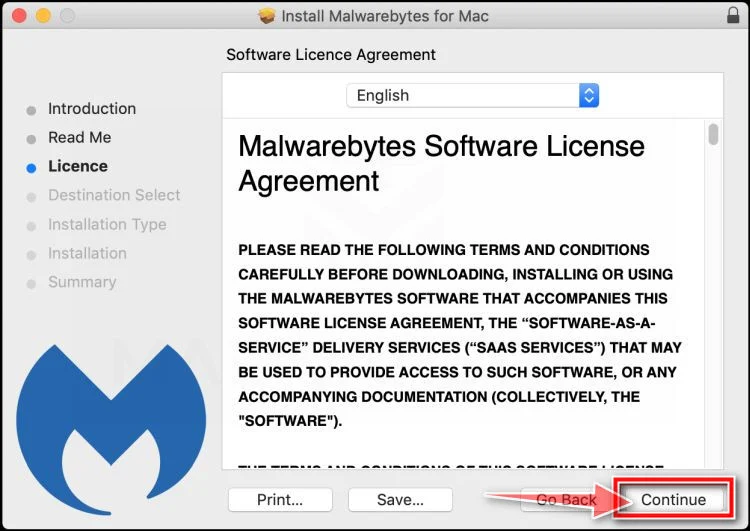
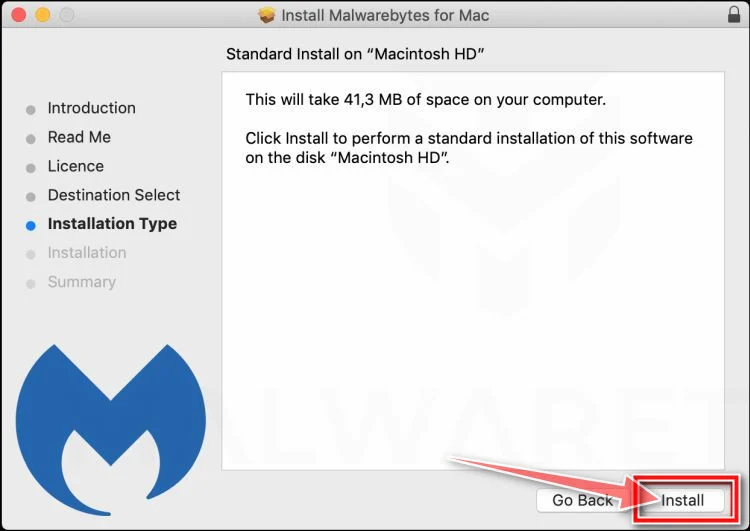
When the installation is complete, Malwarebytes opens to the Welcome to Malwarebytes screen. Click “Get started“.
Malwarebytes needs Full Disk Access to check your whole Mac. When it asks, open System Settings > Privacy & Security > Full Disk Access, turn on Malwarebytes (it may be listed as Malwarebytes Protection), and confirm with your password or Touch ID. Then return to Malwarebytes. On macOS Monterey and earlier, this setting is in System Preferences > Security & Privacy > Privacy.
-
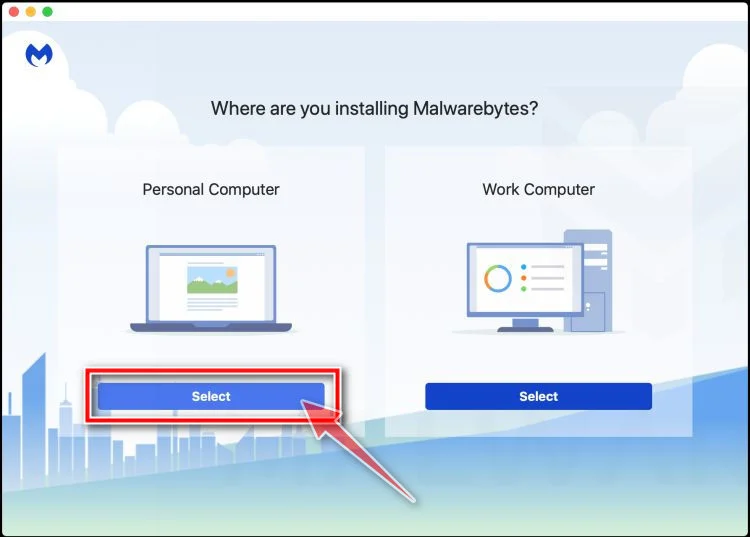
Select “Personal Computer” or “Work Computer”
Malwarebytes will ask what type of computer you’re installing it on. Click either Personal Computer or Work Computer, whichever applies.
-
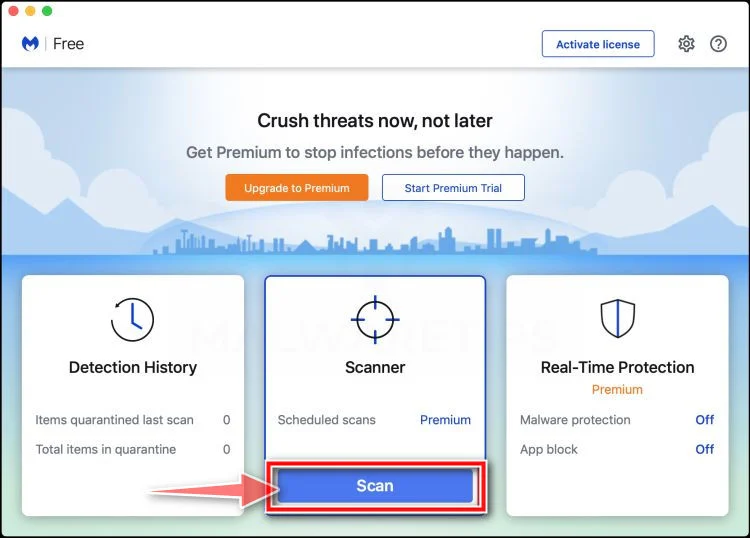
Start the Scan
Click the “Scan” button. Malwarebytes will automatically update its detection database and begin checking your Mac for malware.
-
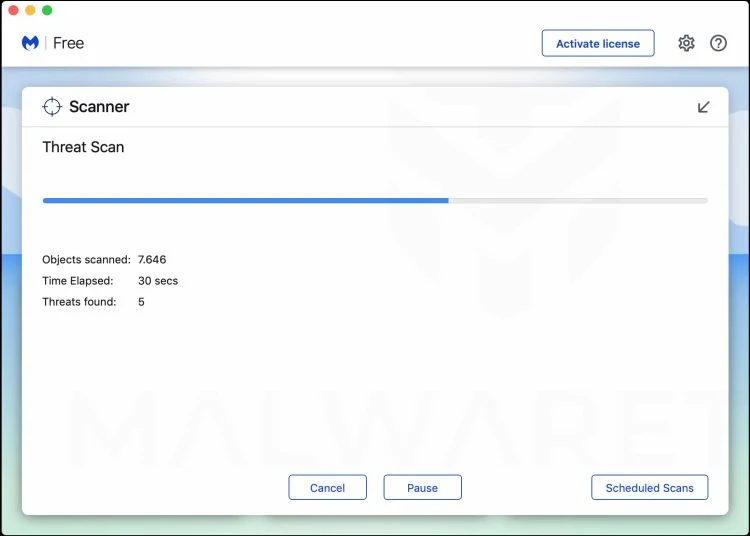
Wait for the Scan to Finish
Malwarebytes will scan your Mac for adware, browser hijackers, and other malicious programs. This can take a few minutes, so feel free to do something else — just check back occasionally to see the progress.
-
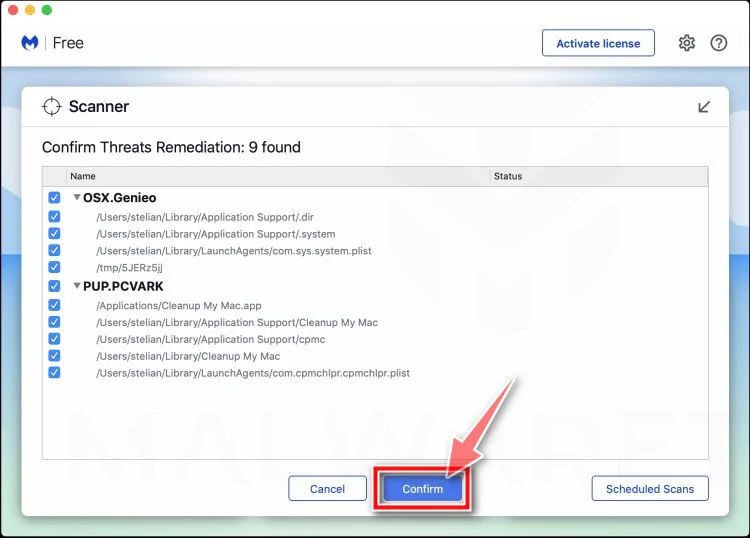
Quarantine the Detected Threats
When the scan is done, you’ll see a list of everything Malwarebytes found. Click the “Quarantine” button to remove all the threats at once.
-
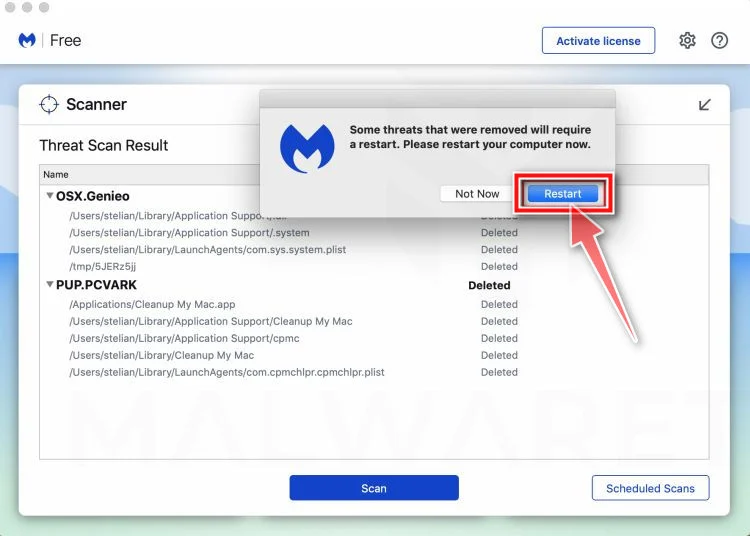
Restart Your Mac
Malwarebytes will now remove all the malicious files it found. Some threats can only be fully removed after a reboot — if Malwarebytes asks you to restart, allow it. Once you’re logged back in, check whether the problems you noticed have stopped. If they come back, save the scan report and ask for help in our forum.
If the problems you noticed continue after the scan, see the options below.
If you are still experiencing problems while trying to remove a malicious program from your computer, please ask for help in our Mac Malware Removal Help & Support forum.
Run a Malware Scan with Malwarebytes for Android
Malwarebytes for Android scans your phone or tablet for malware, adware, and potentially unwanted apps. The free version scans only when you start a scan. Real-time protection, which checks apps automatically, is part of the paid Premium version.
-
Download Malwarebytes for Android.
You can download Malwarebytes for Android by clicking the link below.
Get Malwarebytes for AndroidOpens Google Play in a new tab.Want real-time protection? See Malwarebytes Premium for AndroidMalwarebytes for AndroidScans your phone and removes malware at no cost -
Install Malwarebytes for Android on your phone.
In the Google Play Store, tap “Install” to install Malwarebytes for Android on your device.
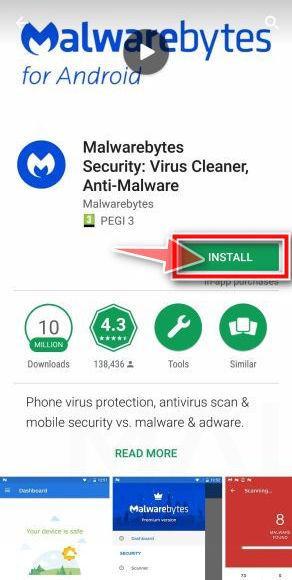
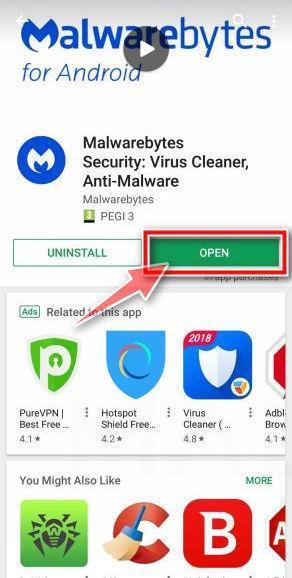
When the installation process has finished, tap “Open” to begin using Malwarebytes for Android. You can also open Malwarebytes by tapping on its icon in your phone menu or home screen.
-
Follow the on-screen prompts to complete the setup process
When Malwarebytes opens, it walks you through a short setup. Tap Get started and follow the prompts. If you see an offer for a trial or a paid plan, read it before you accept. You can skip it and keep using the free scanner.
Malwarebytes will ask for permission to access the files on your phone so it can scan them. Tap Allow, or turn on the permission in the Android screen that opens, then return to Malwarebytes.
-
Run a scan with Malwarebytes for Android
On the main screen, tap Scan now. In some versions, you open the menu, tap Scanner, and then tap Run a scan.
-
Wait for the Malwarebytes scan to complete.
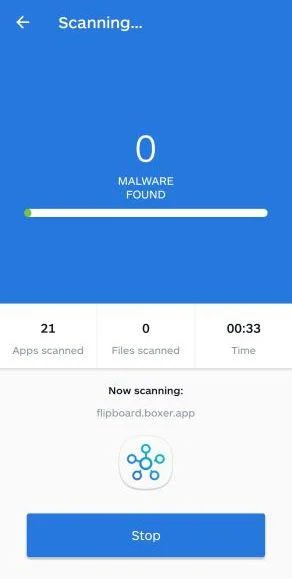
Malwarebytes will now start scanning your phone for adware and other malicious apps. This process can take a few minutes, so we suggest you do something else and periodically check on the status of the scan to see when it is finished.
-
Remove the detected apps.
When the scan has been completed, you will see a list of the threats that Malwarebytes for Android has detected. Next to each detected item, tap the menu icon (three dots), then choose to uninstall the app or delete the file. Android then asks you to confirm. Tap OK or Uninstall to remove the app.
-
Restart your phone.
When the detected apps are removed, restart your phone if Malwarebytes asks you to. Then check whether the problems you noticed have stopped.
If the problems you noticed continue after the scan, see the options below.
If you are still having problems with your phone after completing these instructions, then please follow one of the steps:
- Ask for help in our Mobile Malware Removal Help & Support forum.
- Only as a last resort, reset your phone to factory settings. Read the warning below first.
- Back up your photos, videos, files, and messages, for example to your Google account or a computer.
- Make sure you know your Google account email and password. The phone asks for them after the reset. If you changed the password recently, Google recommends waiting 24 hours before you reset.
- On a Samsung phone, also make sure you know your Samsung account password.
- If you use an authenticator app for two-step verification, move your accounts to another device or save your backup codes first.
Stay Protected: Block Ads and Malicious Sites
No scan can prove a device is completely clean, so it helps to block threats before they reach you. Most infections start with a malicious ad or a fake download button — so blocking them at the source is your best defense.
We recommend AdGuard, which blocks malicious ads, phishing pages, and dangerous redirects before they can reach you.
👉 Download AdGuard and browse safely
If a file ran or someone accessed your device remotely, consider Malwarebytes only after preserving what your response team needs. The browser notification by itself doesn’t establish infection.
AdGuard can limit some malicious advertising and redirects. It doesn’t withdraw notification permission you’ve already granted, so make that change in your browser first.
What to Check If the Alerts Keep Coming
Look for a second source
A browser can have more than one permitted sender, even if only one name appeared in the first alert.
Compare the source shown on a new message against your revised permissions.
An alert could also be an ordinary app notification or an ad inside one website. Revoking a browser permission won’t prevent every message that looks similar.
If your organization manages browser settings, you might not be able to change the permission locally. Send IT the origin, time, and profile rather than trying to override policy.
Check for unexpected browser changes before resetting
Look at extensions if you also see a new search engine, repeated navigation to unfamiliar pages, or permissions you didn’t set.
Record suspicious items on a managed browser before removing them.
If you need to reset settings, review what your browser will change first. A broad reset can undo useful settings or make legitimate extensions unavailable.
A verified site block is a smaller and more direct fix. Try it before taking a disruptive action that may not affect the actual notification sender.
When the Alert Appears on Someone Else’s Computer
Record the source line, not just the scary headline
If you’re helping a relative or coworker, ask them to read the browser or site name attached to the alert. They don’t need to open it or describe every icon.
Have them check whether the same browser is signed into more than one profile.
A permission you revoke in a personal profile won’t necessarily fix the work profile they use later.
They may remember the notification arriving while another program was open. That’s compatible with browser delivery and doesn’t identify which page originally obtained the permission.
Watch for a second kind of incident
If somebody called a number from an alert, ask what they agreed to before changing settings.
Getting a callback is different from granting remote control or reading out a verification code.
If they did share access, end it and get trusted help. Avoid using that computer to sign into a bank while somebody else may still be able to see it.
A payment issue and a notification issue can happen in the same visit.
Keep separate records for the payment provider and the technician so each can focus on the right action.
Preserve alerts you actually want to receive
Start with a narrow site block so you don’t mute real calendar reminders or other browser notifications. Denying requests from all sites is optional if you never use them.
If you inadvertently block a trusted site, check the verified site name in your settings before restoring its permission. Don’t grant permission from an unrelated page to repair the mistake.
Make sure the person you’re helping knows how to get back to the settings. The next suspicious alert may use a different origin and a different security brand.
Frequently Asked Questions
Does a Vertexlinkkit.co.in alert mean my antivirus found a virus?
No. A website notification can say almost anything. Check the source in the notification list and open your security app independently to see its genuine detection history.
Why did the warning appear after I closed the page?
A browser can receive website notifications after the tab is gone. Once you’ve granted permission, closing the website isn’t necessarily enough to stop messages.
Can I block the site without visiting it?
Yes. Open your browser’s Settings and use its notification permission list. Look up the saved entry there and choose Block or Deny.
Is removing the browser’s permission enough?
It’s the right fix for notification-only exposure. If you installed something, shared access, or entered account details, take the separate steps that address those actions.
Does Edge’s pop-up blocker revoke the permission?
No. Blocking pop-up windows and refusing notifications are different settings. Open the website notification permissions to change which sites can send alerts.
Why do I still see messages after blocking the site?
Old messages might still be in the notification center. If new ones arrive, check their sender and look for another browser profile, app, or allowed website.
The Bottom Line
Don’t open warnings sent by Vertexlinkkit.co.in. Go straight to your browser’s notification settings and block the site’s permission, then check the sender if a new alert appears.
If you went further and installed software, paid, or entered a password, get help for that specific exposure. Blocking messages won’t undo what happened on the next page.

Join the discussion
0 commentsShare your experience or ask a question about this article.
Your progress
Did these steps help?
Let us know how the guide worked for you.
Describe what you see and the step you reached. Keep passwords and other private information out.
Discussion
Start the conversation
Have a question or something useful to share? Add the first comment.