


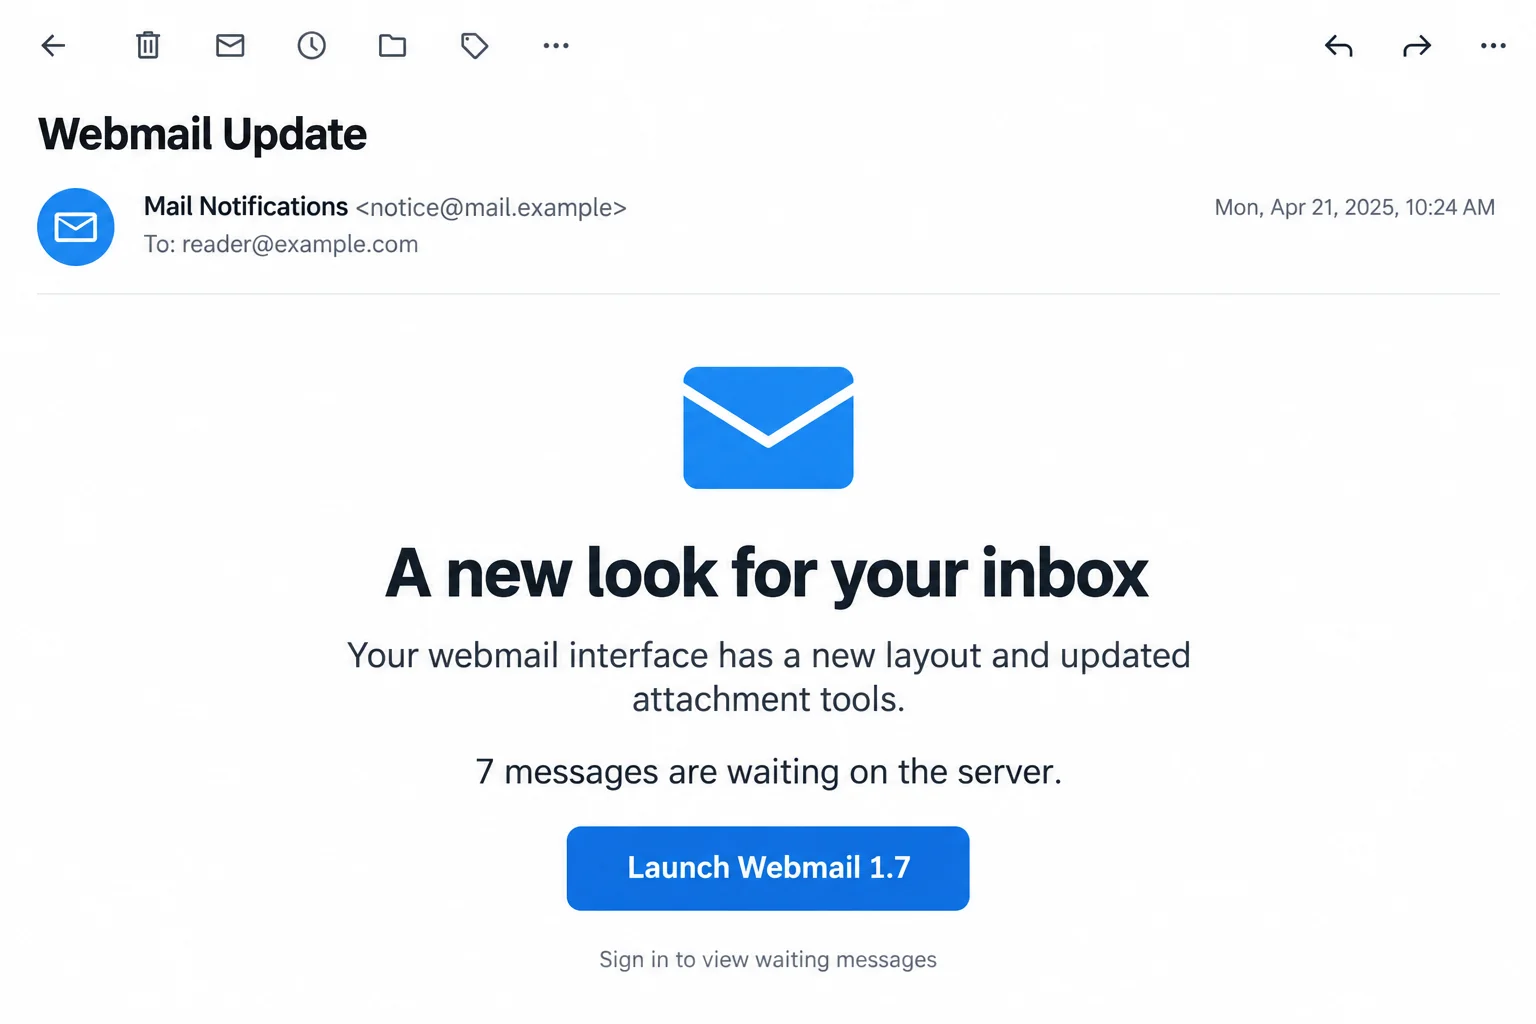
An email announces a redesigned inbox and says seven messages are waiting for you. A launch button makes catching up look like a routine task.
If you are already expecting a reply, that small number can feel surprisingly convincing. Take a moment before letting the notice choose your next login.
Overview
A redesign announcement doubles as a missing-mail warning
The Webmail Redesigned email scam claims that a new interface improves layout, attachments, and themes. It adds that seven emails are waiting on the server.
A reported version directs recipients to Launch Webmail 1.7 and promises delivery after sign-in. The destination imitates a Roundcube login rather than establishing a genuine mailbox update.
The objective is to collect email credentials. The message does not prove that your real provider has seven messages withheld or needs this action.
Roundcube is software, not the administrator of every mailbox
Roundcube supplies webmail software that hosting providers can install. Seeing its familiar login design does not mean the Roundcube project sent an account notice.
The project’s phishing warning specifically explains this confusion. Your hosting provider operates your mailbox, not a universal Roundcube account department.
A host may legitimately change the interface or update its software. Verify the announcement through that host instead of assuming every update notice is fraudulent.
The useful clues are the request and the route
- A small pending-message count supplies a reason to act before checking the sender.
- A version number makes the button resemble an ordinary software release.
- The requested sign-in moves away from the provider route you already use.
- A copied mail interface can collect the same credentials as a visibly crude phishing page.
- Receiving the notice does not, by itself, establish malware infection or account access.
The inbox illustration uses fictional sender details and a demonstration date. It does not reproduce the original recipient message or an available historical login form.
Why Seven Waiting Messages Can Be More Persuasive Than a Threat
Many phishing emails threaten deletion. This one offers something attractive instead: a better interface and access to mail you might already be wondering about.
Seven sounds like a manageable backlog. It is specific enough to resemble a server measurement, but anyone composing an email can type that number.
You may mentally supply the contents yourself: a customer response, an appointment, an invoice, or a message from someone whose silence has been bothering you.
The sender does not need to know which of those applies. The pitch works by letting an ordinary uncertainty become an explanation supplied by the email.
A temporary delivery delay can be real. That does not establish that this message diagnosed it, or that a password entered on its linked page will resolve it.
Likewise, a redesign can be real while a notice about it is fake. Criminals can borrow a genuine change without controlling the service undergoing that change.
Separate those questions before acting. Is there an actual provider announcement? Are messages missing? Is the button part of the provider’s authenticated account route?
You can investigate each question without using the unsolicited login. The email should not become the only source of evidence for the problem it describes.
How the Webmail Redesigned Email Scam Works
Step 1: A product update gives the message an ordinary reason to exist
The notice leads with usability improvements. New layouts and easier attachments are familiar changes, so the message initially resembles a feature announcement rather than a security emergency.
A recipient may skim those details and focus on the button. That is enough for the email to establish a plausible task before its authority is examined.
The subject may include a domain or address. Those details can be inserted into bulk mail and are not proof that the sender administers the account.
Compare the full sender information with notices you already trust. A display name such as Webmail or Support does not identify an organization.
If this is a work mailbox, send the notice to your normal help desk. You should not have to determine the software upgrade process from an unknown email.
Step 2: Supposedly pending emails make the launch button feel necessary
The message connects access to waiting mail with signing into a new version. That changes a cosmetic update into something the reader feels they should complete.
A reported sample says the messages arrive after a short wait following login. The delay provides a reason not to question the missing mail immediately.
Do not spend that waiting period assuming the password submission was harmless. If you used the false form, protect the real account instead.
Before clicking anything, open the mailbox through its usual address or installed application. Check the inbox, junk folder, and any genuine provider alerts.
For a particular missing message, contact the sender independently. Ask when it was sent and whether they received a delivery failure, without forwarding the suspicious login.
Step 3: A familiar sign-in screen replaces verification of the website
The reported destination uses Roundcube styling, with email and password fields. Familiarity encourages the reader to treat it like the sign-in they have used before.
But a logo and two fields are easy to reproduce. The page’s operator and relationship to your host matter more than its visual resemblance.
The campaign has been described as using Firebase Storage for the false page. Cloud hosting does not turn customer-created content into an official mailbox service.
That is not an allegation that Google or Roundcube sent the message. A legitimate infrastructure provider and the person using its service are different parties.
No working historical form was tested here. Do not hunt for it to compare designs; your known hosting portal is the safer verification route.
Step 4: A disclosed password can turn a fictional mail problem into real access
Information entered on the imitation may give the operator a credential to try against the actual mailbox. Further access depends on the account and its protections.
Once inside, an attacker could read correspondence, change forwarding, impersonate the user, or target recovery messages for other services. Those are risks, not confirmed outcomes for every recipient.
A false error or repeated prompt does not undo the first disclosure. Do not keep trying passwords until the imitation accepts one.
Also consider what else you entered. A second-factor code, an approved sign-in notification, or an installed utility changes the response beyond replacing a password.
Tell support exactly which actions occurred. Accurate detail helps them close the relevant access without assuming that every device or service has been compromised.
Check a Real Webmail Upgrade Without Using the Button
Locate the organization that actually hosts your mail
It might be your workplace, a hosting reseller, or the company managing your website. The application name alone will not always identify that organization.
Use an existing invoice, account bookmark, or internal directory. Do not rely on a support address or telephone number supplied by the suspicious message.
Ask whether an interface change is planned and whether any user action is required. A real administrator can explain where the announcement appears independently.
Some changes require a fresh login. That can be legitimate when you reach the known service yourself; it does not authenticate a login chosen by an unsolicited sender.
Do not mistake a version number for a trust signal
Software projects have genuine releases, including interfaces with similar-looking version numbers. A real release can be mentioned inside a fraudulent message.
The number on this button is not a digital signature. Nor does a release announcement establish that your particular host installed that release.
Check the host’s guidance for the service you actually use. Avoid downloading a separate webmail launcher unless its purpose and source are verified.
Webmail normally describes using a browser to reach mail. An unexpected program presented as the necessary gateway to existing messages deserves particular scrutiny.
Keep delivery troubleshooting separate from account verification
Missing email can result from filtering, addressing errors, sender delays, mailbox rules, or a genuine service problem. A phishing message cannot establish which explanation applies.
Do not delete mail or change storage settings merely because the notice says messages are stuck. Check a real usage meter before attempting a storage repair.
If your host confirms a delivery problem, follow its instructions through the established support channel. The suspicious email still does not need your password.
What to Do if You Responded to the Webmail Redesign Notice
If you only received it, report the message. Use your mail service’s phishing-report option and your organization’s normal reporting route where applicable.
You do not need to launch the linked page to collect proof. Retain the original message if an administrator needs its headers or destination information.
If you visited the page, identify any additional action. Close it and check whether a download, extension installation, notification permission, or authentication approval occurred.
A visit is not the same as typing a password. Do not invent an infection, but do not overlook a file you actually opened.
If you entered credentials, protect the genuine mailbox. Navigate independently to the real account and replace the exposed password with a unique one.
Review sign-in activity, active access, recovery methods, and connected apps. Google users can follow the official compromised-account guide; other providers have their own controls.
Inspect what the account may now do automatically. Check forwarding, filters, delegates, and unexpected messages. Remove unauthorized changes through the real settings.
A hidden forwarding rule can matter even when the inbox looks normal. Ask your administrator for assistance when those settings are centrally managed.
Address any genuine software exposure. If you ran a download or installed a browser add-on, use trusted cleanup guidance. Malwarebytes can help inspect the device.
AdGuard can reduce some harmful advertising and redirects during later browsing. Neither tool replaces account recovery or retrieves a password submitted to the imitation.
Protect related conversations and report concrete harm. Warn contacts if the mailbox sent suspicious messages. Verify unexpected payment-detail changes through a separate known channel.
If money moved or identity documents were exposed, contact the relevant institution promptly. Keep the original evidence and case references rather than negotiating through the fake notice.
Is Your Device Infected? Run a Free Malware Scan
Slow performance, constant pop-ups, or strange behavior? These are classic signs of a malware infection. A quick way to check is to scan your device with Malwarebytes Free, one of the most trusted malware removal tools available. If you only visited a scam page and didn’t download or install anything, this scan is optional.
The free version detects and removes the most common threats, including:
- Adware — the cause of those annoying pop-ups
- Browser hijackers — unwanted redirects and changed homepages
- Trojans and spyware — hidden programs stealing your data
- Potentially unwanted programs (PUPs) — software you never asked for
👉 Select your device below — Windows, Mac, or Android — then follow the simple steps to download Malwarebytes, scan your system, and remove any threats it finds. The scan usually takes 5 to 20 minutes.
Run a Malware Scan with Malwarebytes for Windows
Malwarebytes is one of the most popular and trusted anti-malware tools for Windows — and it’s completely free for removing infections. It catches threats that many antivirus programs miss, including adware, browser hijackers, and trojans. Follow the steps below to scan your PC and remove what Malwarebytes finds.
Download Malwarebytes
Click the button below to download the latest version of Malwarebytes for Windows from the official source. The free version is all you need — it will scan your computer and remove adware, browser hijackers, and other malicious software at no cost.
Download MalwarebytesOfficial installer for Windows 11 and 10. Your download starts right away.Want real-time protection? See Malwarebytes Premium Malwarebytes Free for WindowsScans and removes malware at no cost
-
Install Malwarebytes
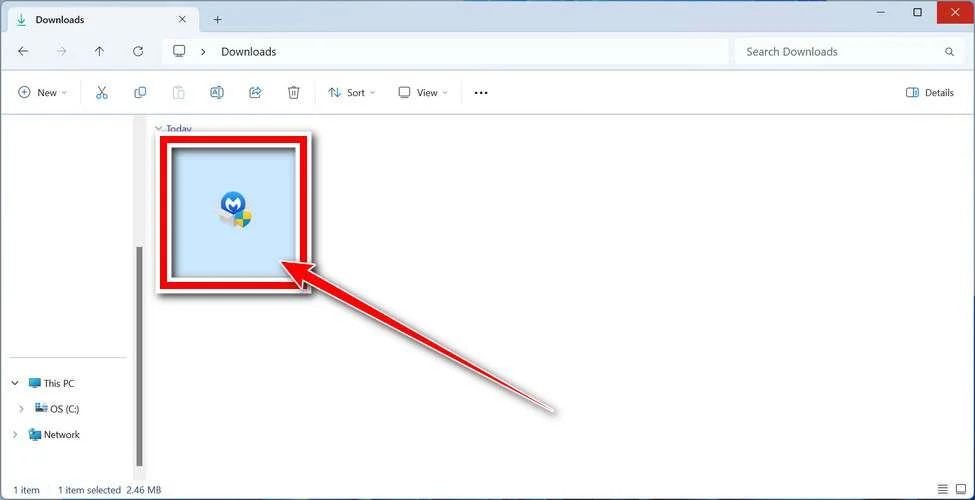
When the download finishes, open your Downloads folder and double-click the MBSetup file. If Windows shows a User Account Control pop-up, click “Yes” to allow the installation.
Follow the On-Screen Prompts to Install Malwarebytes
The setup wizard will walk you through a few quick screens:
-
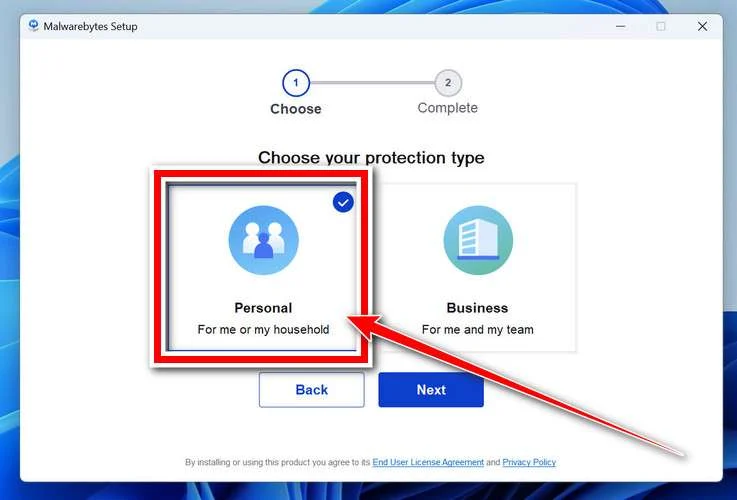
Choose where you’re installing the program — “Personal Computer” or “Work Computer” — then click Next.
-
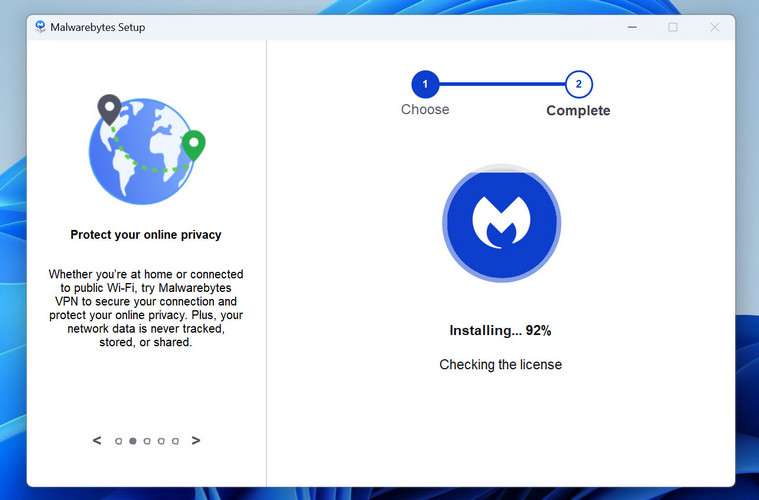
Malwarebytes will now install on your device. This usually takes under a minute.
-
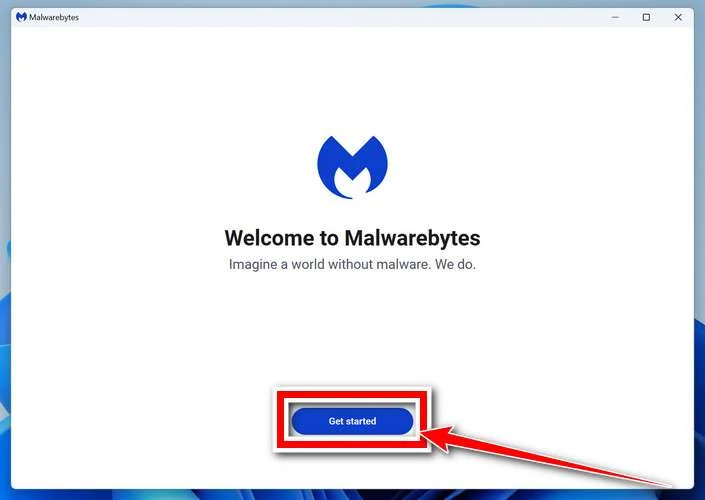
When installation is complete, the “Welcome to Malwarebytes” screen will open automatically.
-
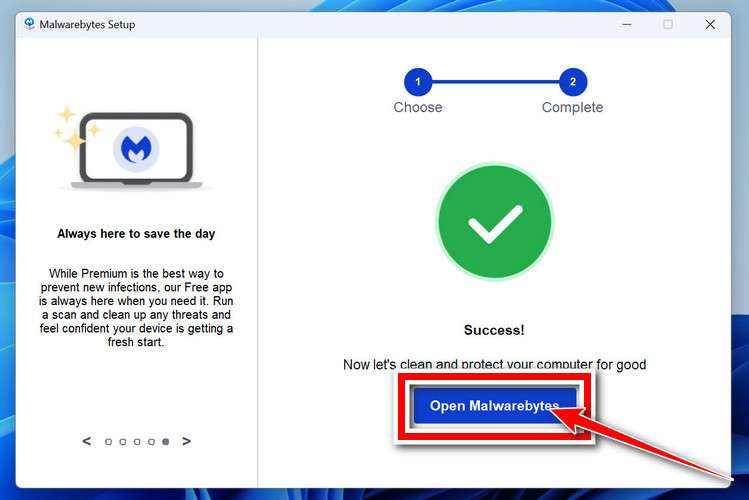
On the final screen, click Open Malwarebytes to launch the program.
-
Optional: Check for rootkits with a Custom Scan
You don’t need to change any settings for a normal scan. The standard Threat Scan in the next step is enough for most problems, so you can go straight to it.
If you also want to check for rootkits, use a Custom Scan. In current versions of Malwarebytes, rootkit scanning is only available there:
- On the Scanner tile, click the three-dot menu and select Advanced Scan.
- Choose Custom Scan. In its options, check Scan for rootkits.
- Select your system drive (usually C:\) as the location to scan, then start the scan. It takes longer than a Threat Scan.
- When it finishes, review and quarantine the results as described in the steps below.
Rootkit scanning isn’t available on Windows devices with ARM processors.
Start the Scan
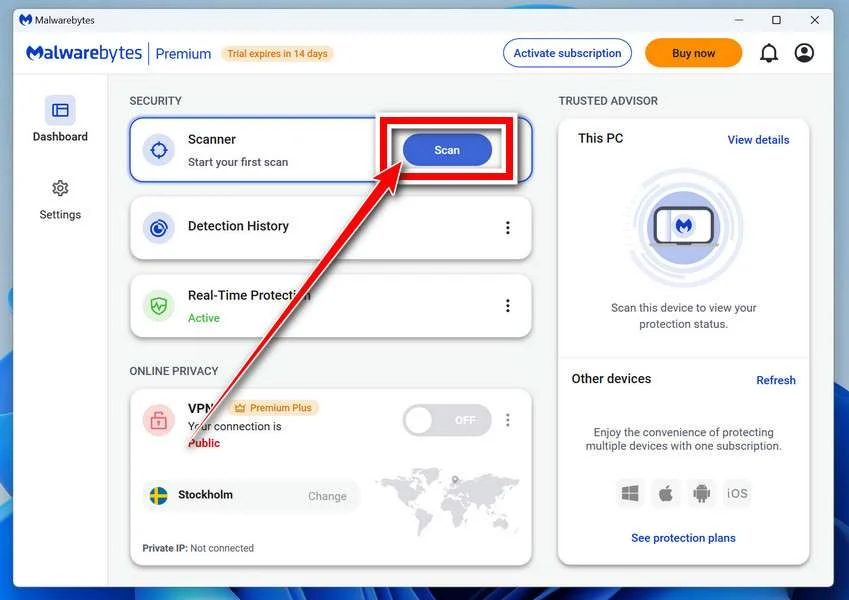
Click the blue Scan button. Malwarebytes will automatically update its virus database and start checking your computer for malware.
-
Wait for the Scan to Finish
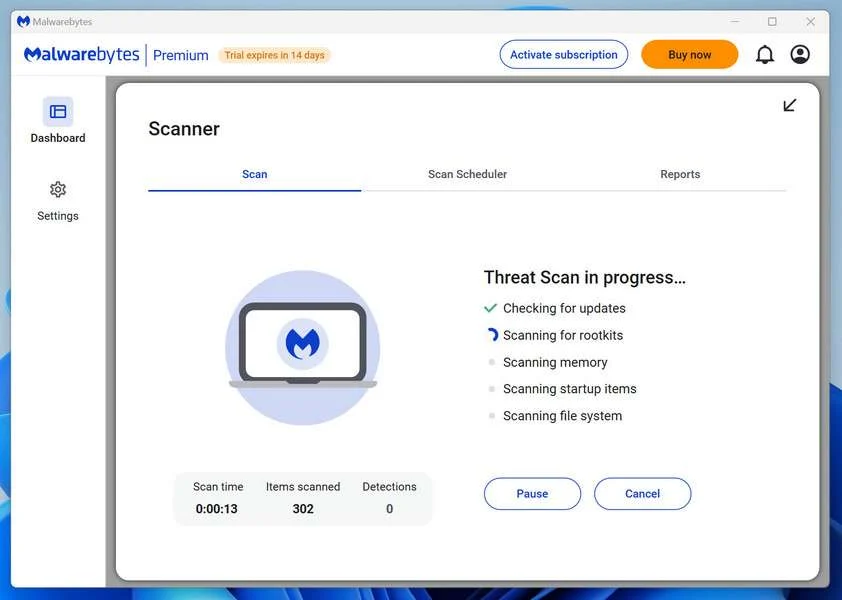
The scan checks your entire system for browser hijackers and other malicious programs, so it can take 5 to 20 minutes depending on your computer. Feel free to do something else — just check back occasionally to see the progress.
-
Quarantine the Detected Threats
When the scan is done, you’ll see a list of everything Malwarebytes found — malware, adware, and potentially unwanted programs. Click the “Quarantine” button to remove all of them at once.
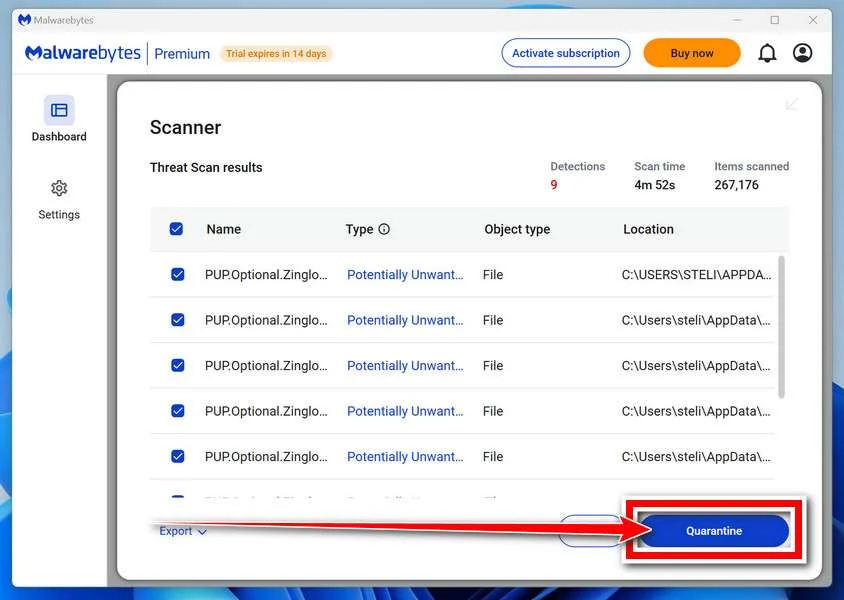
Malwarebytes will now remove the malicious files and registry entries and move them safely into quarantine.
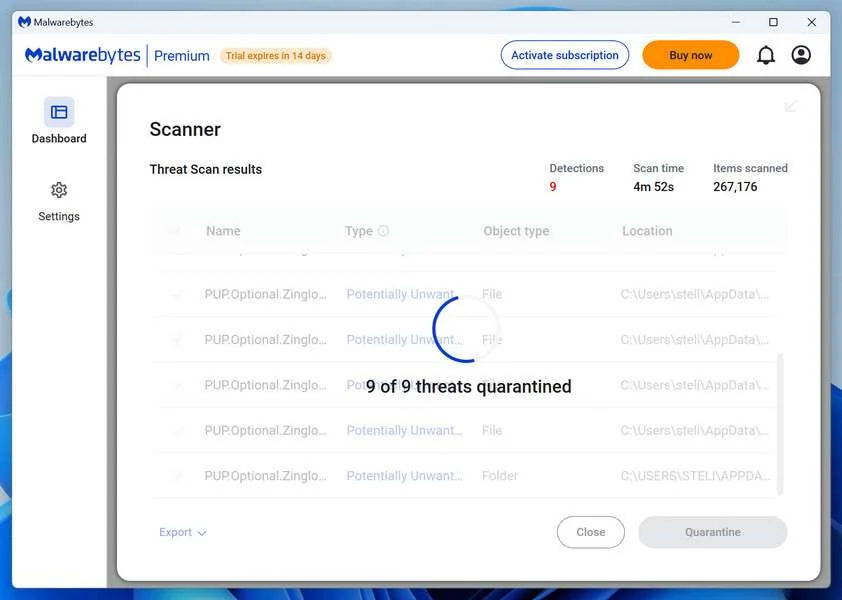
-
Restart Your Computer
Some threats can only be fully removed after a reboot. If Malwarebytes asks you to restart, click Yes. Once you’re logged back in, Malwarebytes has finished removing the threats it found.
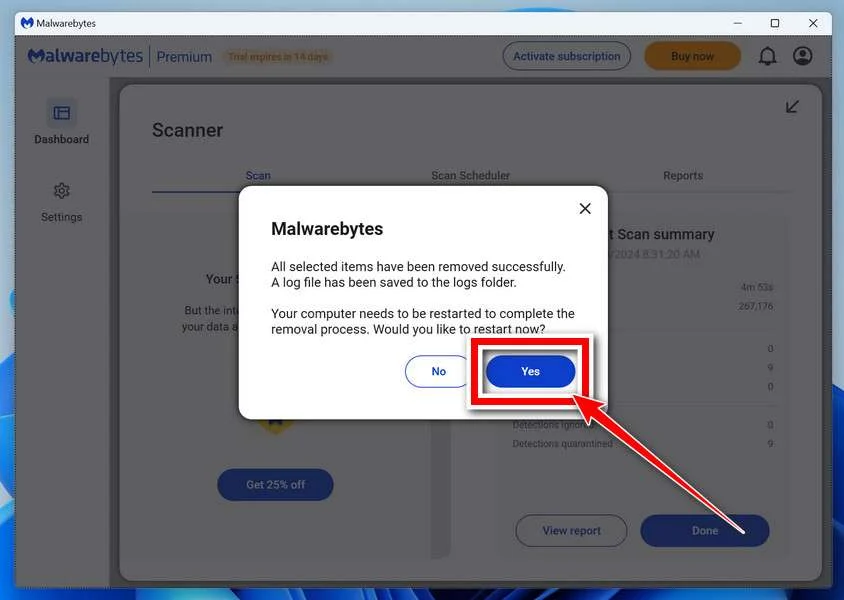
When the scan is done, check whether the problems you noticed have stopped. If they continue, see the options below.
If you are still having problems with your computer after completing these instructions, then please follow one of the steps:
- Run a computer scan with ESET Online Scanner
- Ask for help in our Windows Malware Removal Help & Support forum.
Run a Malware Scan with Malwarebytes for Mac
Malwarebytes for Mac is a free on-demand scanner that removes the malware other security software tends to miss — adware, browser hijackers, and unwanted programs included. Cleaning an infected Mac with Malwarebytes has always been completely free, and it’s our go-to recommendation. Follow the steps below to scan your Mac and remove what Malwarebytes finds.
-
Download Malwarebytes for Mac
Click the button below to download the latest version of Malwarebytes for Mac.
Download MalwarebytesOfficial installer for macOS. Your download starts right away.Want real-time protection? See Malwarebytes PremiumMalwarebytes Free for MacScans and removes malware at no cost -
Open the Malwarebytes setup file
When the download finishes, open your Downloads folder and double-click the setup file to begin the installation.
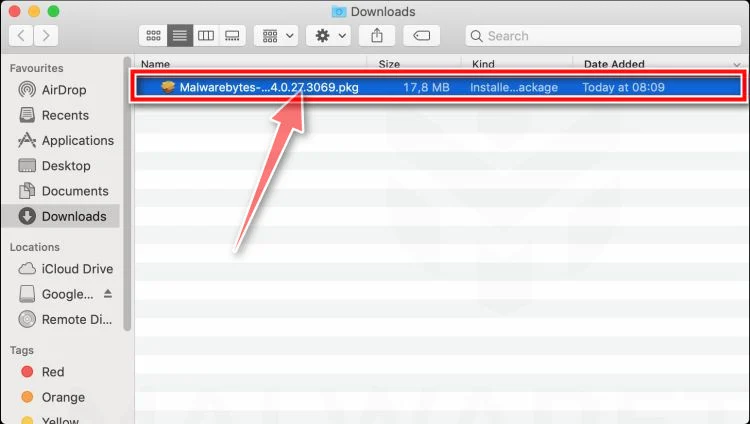
-
Follow the On-Screen Prompts to Install Malwarebytes
The Malwarebytes for Mac Installer will guide you through a few quick screens. Click “Continue” and keep following the prompts until the installation completes.
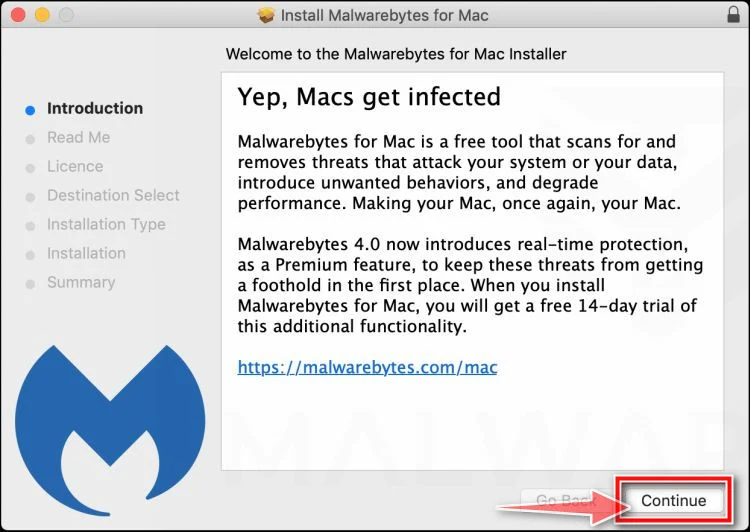
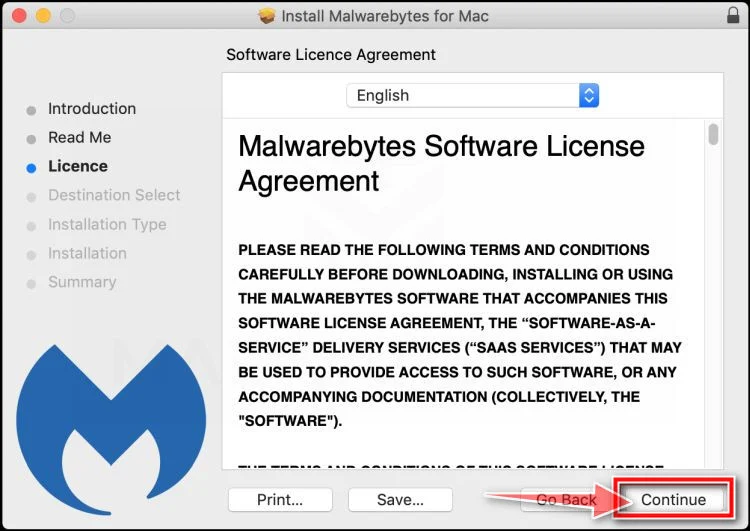
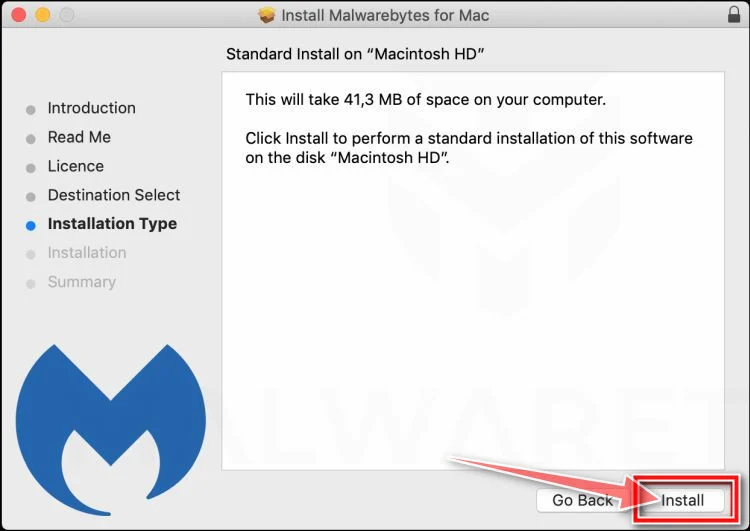
When the installation is complete, Malwarebytes opens to the Welcome to Malwarebytes screen. Click “Get started“.
Malwarebytes needs Full Disk Access to check your whole Mac. When it asks, open System Settings > Privacy & Security > Full Disk Access, turn on Malwarebytes (it may be listed as Malwarebytes Protection), and confirm with your password or Touch ID. Then return to Malwarebytes. On macOS Monterey and earlier, this setting is in System Preferences > Security & Privacy > Privacy.
-
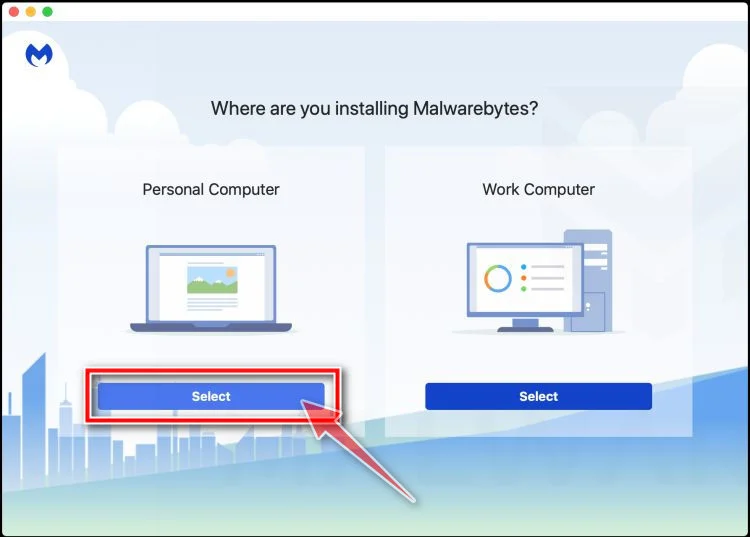
Select “Personal Computer” or “Work Computer”
Malwarebytes will ask what type of computer you’re installing it on. Click either Personal Computer or Work Computer, whichever applies.
-
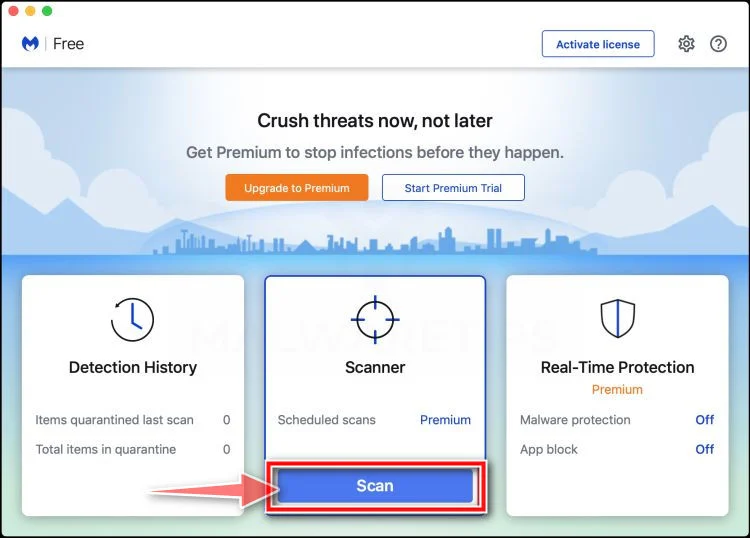
Start the Scan
Click the “Scan” button. Malwarebytes will automatically update its detection database and begin checking your Mac for malware.
-
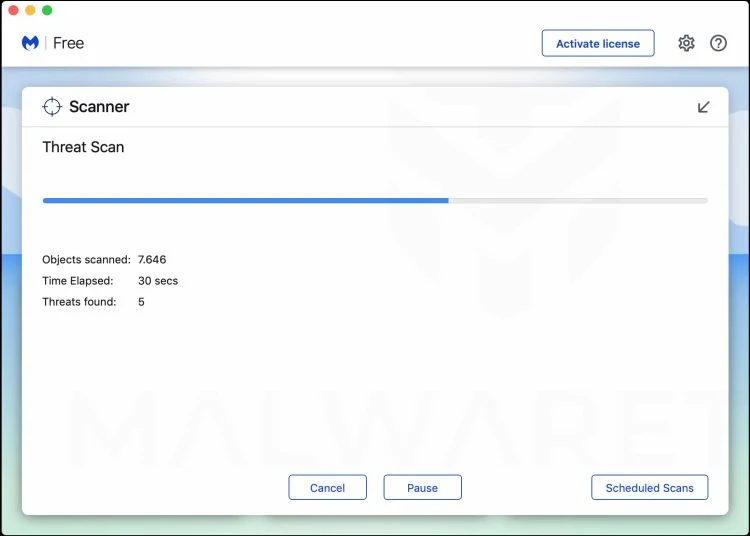
Wait for the Scan to Finish
Malwarebytes will scan your Mac for adware, browser hijackers, and other malicious programs. This can take a few minutes, so feel free to do something else — just check back occasionally to see the progress.
-
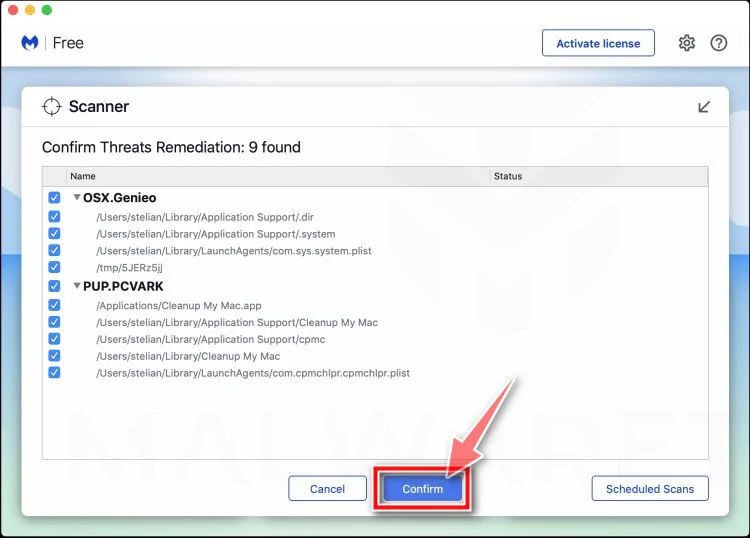
Quarantine the Detected Threats
When the scan is done, you’ll see a list of everything Malwarebytes found. Click the “Quarantine” button to remove all the threats at once.
-
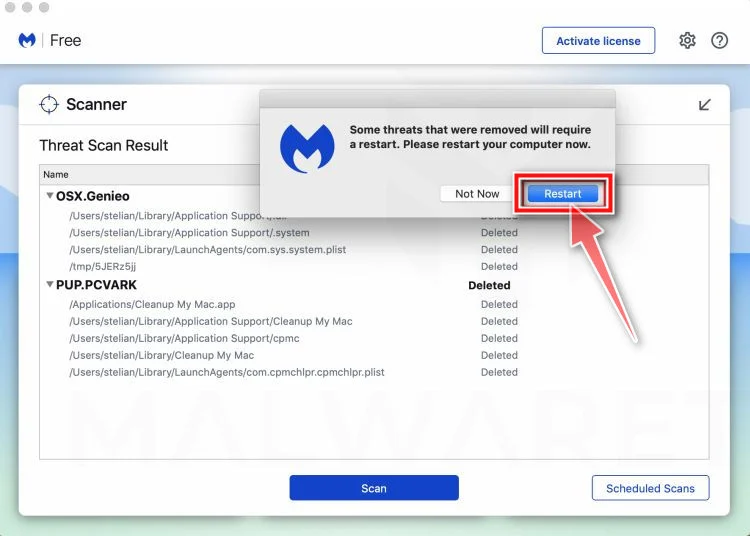
Restart Your Mac
Malwarebytes will now remove all the malicious files it found. Some threats can only be fully removed after a reboot — if Malwarebytes asks you to restart, allow it. Once you’re logged back in, check whether the problems you noticed have stopped. If they come back, save the scan report and ask for help in our forum.
If the problems you noticed continue after the scan, see the options below.
If you are still experiencing problems while trying to remove a malicious program from your computer, please ask for help in our Mac Malware Removal Help & Support forum.
Run a Malware Scan with Malwarebytes for Android
Malwarebytes for Android scans your phone or tablet for malware, adware, and potentially unwanted apps. The free version scans only when you start a scan. Real-time protection, which checks apps automatically, is part of the paid Premium version.
-
Download Malwarebytes for Android.
You can download Malwarebytes for Android by clicking the link below.
Get Malwarebytes for AndroidOpens Google Play in a new tab.Want real-time protection? See Malwarebytes Premium for AndroidMalwarebytes for AndroidScans your phone and removes malware at no cost -
Install Malwarebytes for Android on your phone.
In the Google Play Store, tap “Install” to install Malwarebytes for Android on your device.
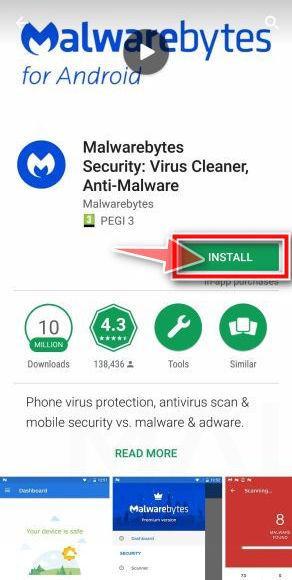
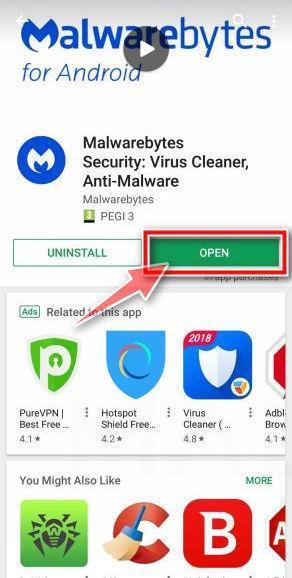
When the installation process has finished, tap “Open” to begin using Malwarebytes for Android. You can also open Malwarebytes by tapping on its icon in your phone menu or home screen.
-
Follow the on-screen prompts to complete the setup process
When Malwarebytes opens, it walks you through a short setup. Tap Get started and follow the prompts. If you see an offer for a trial or a paid plan, read it before you accept. You can skip it and keep using the free scanner.
Malwarebytes will ask for permission to access the files on your phone so it can scan them. Tap Allow, or turn on the permission in the Android screen that opens, then return to Malwarebytes.
-
Run a scan with Malwarebytes for Android
On the main screen, tap Scan now. In some versions, you open the menu, tap Scanner, and then tap Run a scan.
-
Wait for the Malwarebytes scan to complete.
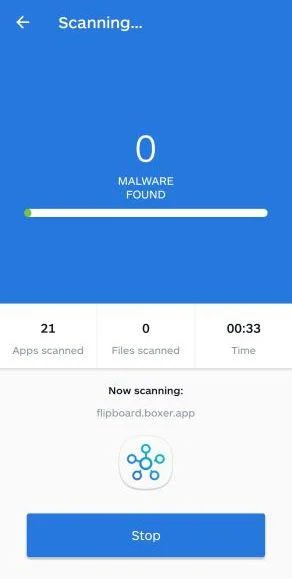
Malwarebytes will now start scanning your phone for adware and other malicious apps. This process can take a few minutes, so we suggest you do something else and periodically check on the status of the scan to see when it is finished.
-
Remove the detected apps.
When the scan has been completed, you will see a list of the threats that Malwarebytes for Android has detected. Next to each detected item, tap the menu icon (three dots), then choose to uninstall the app or delete the file. Android then asks you to confirm. Tap OK or Uninstall to remove the app.
-
Restart your phone.
When the detected apps are removed, restart your phone if Malwarebytes asks you to. Then check whether the problems you noticed have stopped.
If the problems you noticed continue after the scan, see the options below.
If you are still having problems with your phone after completing these instructions, then please follow one of the steps:
- Ask for help in our Mobile Malware Removal Help & Support forum.
- Only as a last resort, reset your phone to factory settings. Read the warning below first.
- Back up your photos, videos, files, and messages, for example to your Google account or a computer.
- Make sure you know your Google account email and password. The phone asks for them after the reset. If you changed the password recently, Google recommends waiting 24 hours before you reset.
- On a Samsung phone, also make sure you know your Samsung account password.
- If you use an authenticator app for two-step verification, move your accounts to another device or save your backup codes first.
Stay Protected: Block Ads and Malicious Sites
No scan can prove a device is completely clean, so it helps to block threats before they reach you. Most infections start with a malicious ad or a fake download button — so blocking them at the source is your best defense.
We recommend AdGuard, which blocks malicious ads, phishing pages, and dangerous redirects before they can reach you.
👉 Download AdGuard and browse safely
After the First Password Change
Return to the real inbox and look for a coherent picture. Which activity belongs to you, which settings changed, and what questions remain unanswered?
Review sent and deleted folders as well as visible incoming mail. An attacker may have contacted someone without leaving an obvious message in the inbox.
If the password was reused, replace it on those other services too. Use different new credentials rather than moving the same replacement password everywhere.
Keep multifactor authentication enabled. Review recovery methods and codes through the provider’s instructions, especially if you approved a sign-in while using the false page.
Businesses should also consider who depended on the account. A customer awaiting a corrected invoice may need a direct warning about an intercepted conversation.
Use facts when warning people. State which account and message were affected, what action to avoid, and how to confirm legitimate instructions.
Do not promise that no data was read merely because access has been restored. Account recovery and understanding past activity are related but separate jobs.
Save a concise incident record. If a later login alert appears, it will help support compare a new event with the original exposure.
For genuine delivery troubleshooting, record the expected sender, approximate sending time, and destination address. Your host can use those facts more effectively than an invented seven-message count.
State the time zone when reporting a delay. A timestamp without context can send support looking at the wrong part of the delivery history.
Do not attach confidential messages unless the provider’s verified support process requires them. Begin with routing details and a description of what failed.
Ask the original sender whether a resend is appropriate after the real issue is resolved. Do not promise that a phishing button will retrieve an existing copy.
Frequently Asked Questions
Are there really seven emails waiting for me?
The notice does not prove that count. Check your actual mailbox and ask the real provider about delivery problems through a known route.
Does Roundcube operate the account in this email?
Not simply because its design appears. Roundcube is webmail software, while a host or organization operates the mailbox using that software.
Is every webmail redesign announcement fake?
No. Providers update interfaces legitimately. Confirm the change independently and use the account address you already trust, not an unsolicited credential-collection route.
Does a cloud-hosting address make a login official?
No. Cloud services can host content created by others. Identify who operates the specific page and whether your provider authorized that sign-in route.
What if the page rejected my password?
Treat the submitted credential as exposed anyway. A false error does not mean the page failed to receive what you typed.
Can a scan release the supposedly pending messages?
No. Scanning addresses relevant device exposure. Real delivery problems belong with your mail provider, and disclosed credentials need account-security action.
The Bottom Line
Do not use Launch Webmail 1.7 to retrieve messages promised by this notice. Verify any redesign or missing mail through your existing provider.
If you submitted a password, secure the genuine account now. Investigate sessions and mailbox rules instead of waiting for the promised messages to arrive.

Join the discussion
0 commentsShare your experience or ask a question about this article.
Discussion
Start the conversation
Have a question or something useful to share? Add the first comment.