

A workstation alert lands in your inbox just as you’re starting work. It says network access has been restricted and gives you two hours to respond.
There is no link to inspect, only an emergency phone number. That detail may feel reassuring, but it deserves a closer look before you call.
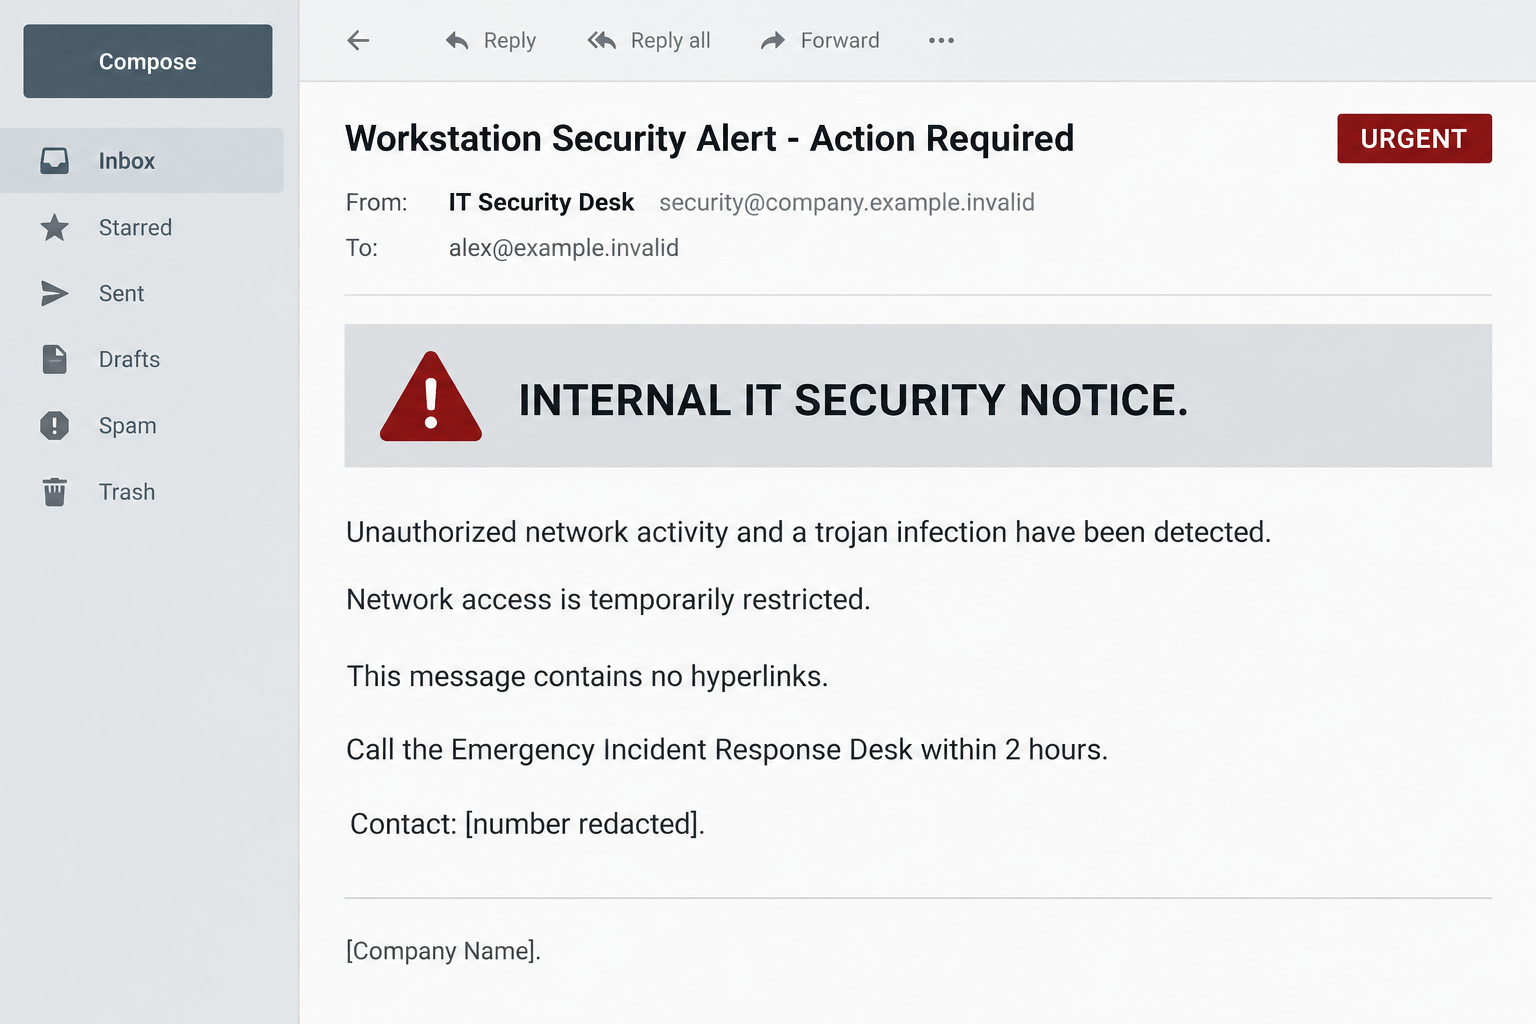
Overview
The email borrows the authority of your workplace
The Unauthorized Network Activity and Trojan Infection email scam poses as an internal security notice. It claims your workstation is infected and your access has been restricted.
The reported message names a high-severity threat and orders a call to an emergency incident-response desk. It adds a two-hour deadline and disciplinary pressure.
A company placeholder remains in the template. That is a useful warning sign, but the more important issue is the unverified support route.
The illustration shows this kind of notice with fictional recipient details and a redacted number. It is not a genuine endpoint alert or an infection diagnosis.
The absence of links is part of the persuasion
This campaign explicitly presents its lack of hyperlinks as an anti-phishing measure. The recipient is encouraged to trust the telephone instead.
But a phone number can send you to an impersonator just as a web address can. Changing the communication channel does not establish identity.
The supplied number is +1 (833) 735-4121. Treat it as a reported campaign indicator, not a support recommendation or a number to test.
The callback creates the opportunity for a larger fraud
The deceptive message is the established starting point. Remote access, bogus repair fees, and requests for financial information are possible follow-on tactics in this scam category.
No call was placed for this guide. We cannot describe a particular operator’s conversation, location, or software choice as an observed event.
- The email’s infection claim is not a substitute for a real security-tool detection.
- An emergency label does not authenticate the desk answering the phone.
- Corporate accounts should be checked through the employer’s existing help desk.
- Recovery depends on whether you only called, shared information, paid, or allowed computer access.
A No-Link Email Can Still Be a Trap
Many people have learned to avoid strange links. This message tries to use that good habit against them.
It repeats the language of caution while prescribing a different action: call the number it supplies. The destination remains controlled by the sender.
Imagine a visitor at your office saying, “Don’t trust strangers, follow me to the security desk.” The warning sounds sensible; the proposed escort still needs verification.
The same principle applies here. A safety instruction should not be allowed to authenticate the person issuing it.
There is another pressure point: workplace responsibility. References to compliance can make an employee worry that asking questions will look careless.
A real organization benefits when staff verify an unusual request. Use its established contact route rather than treating the email’s deadline as your only option.
Internal IT teams may genuinely contact employees about incidents. Some may also use telephone support. Neither fact makes this specific unsolicited callback trustworthy.
Do not rely on the opposite blanket rule, that every urgent IT call is fake. Instead, authenticate the desk independently and let it check the reported problem.
A detailed case number can be made up. So can an asset label. Those items organize a story; they do not establish that your employer generated it.
If your computer actually shows a verified security alert, report that too. A real technical problem and an impersonation attempt can occur at the same time.
How the Workstation Trojan Alert Scam Works
Step 1: A fabricated incident turns an ordinary inbox into an emergency
The message wants to interrupt your normal workflow. Instead of continuing your tasks, you are supposed to start dealing with a critical security event.
Technical language makes the claim seem specific. A reader might not know whether the named threat is a meaningful detection or just convincing text.
A genuine detection should be traceable to the organization’s security systems. A threat name printed in an email is not that trace.
Do not install a new scanner from an unsolicited message to validate its story. Ask the real security team to check the workstation.
At home, consult your existing protection software through its normal interface. Keep the sender out of the process you use to assess the machine.
Step 2: The deadline makes independent verification feel risky
A short response window leaves little room for thought. The recipient may fear losing access, missing work, or being blamed for an avoidable incident.
That emotional pressure is useful to the impersonator. It encourages obedience before the support identity has been established.
The safest immediate action is not to race toward the supplied number. Contact the legitimate desk and say that you received a questionable incident notice.
If the desk confirms a real problem, follow its verified procedure. If it does not, the suspicious email can be investigated without giving the sender access.
Do not hide the notice because its wording sounds disciplinary. Reporting a concern early is more useful than quietly following an unknown technician’s instructions.
Step 3: A phone conversation can replace visible evidence with authority
If someone calls the supplied number, the conversation moves away from the email interface. The person answering can steer what happens next.
A calm voice, department name, or ticket reference can make that person seem credible. None of them ties the call to your employer.
The impersonator may ask for an account identifier or claim to see your workstation. Be particularly cautious when their knowledge comes from details you just provided.
A legitimate support identity should be verifiable through a separate route. Ending the call and contacting your established desk is a reasonable safety measure.
Do not let the caller tell you which independent number to use. That would simply extend the original, unverified chain.
Step 4: A supposed repair can become a request for control
Remote-support software can be useful when you know who is assisting you. With an impersonator, it can expose the screen, files, and settings.
The program itself may be a genuine product. The danger is granting an unknown person access under a false explanation.
In common tech-support fraud, ordinary system messages are presented as evidence of infection. Windows warnings alone do not establish the caller’s diagnosis.
A command window full of text can look impressive. Ask what specific finding is being shown and have the real IT team evaluate it.
Refuse instructions to disable protection, disclose authentication codes, or open financial accounts during the session. None becomes safe because it is called remediation.
These are category-level escalation risks, not a verified recording of this campaign’s calls. The original email does not identify the exact remote tool used.
Step 5: The invented emergency may expand into a payment or account demand
A fake technician may introduce a repair charge or claim that financial accounts also need protection. That changes the risk from support impersonation to possible loss.
Moving money to a supposed safe account is not a computer-cleanup procedure. Neither is purchasing gift cards or paying a stranger with cryptocurrency.
The FTC’s tech-support scam guidance explains how bogus diagnoses can lead to remote access and payment demands. Those demands should trigger an immediate stop.
Do not complete a transfer while the caller watches. If funds have already moved, contact the payment institution using independently located details.
What happens afterward depends on the access and information granted. Keep an accurate record rather than assuming every callback produces the same outcome.
How to Verify the Alleged IT Incident
Start with your organization’s existing support route
Use the help-desk details in your internal directory, staff onboarding records, or established ticketing system. Avoid any contact information newly introduced by the notice.
If you cannot access the directory, ask a known manager or colleague through a separate channel. Explain that the email claims an urgent workstation problem.
Give the legitimate desk the subject, sender address, and reported number. Ask whether it recognizes the ticket and the alleged access restriction.
The support team may want the full email rather than a screenshot. Follow its safe reporting method and do not circulate a clickable copy widely.
Check symptoms without trusting the caller’s interpretation
Record any actual errors your computer displays. Distinguish a message in your mail from a notification generated by the security software installed on the machine.
An inability to reach a network resource can have several causes. It is not automatically evidence that the email’s named trojan is present.
Conversely, a computer that seems normal is not enough to dismiss credible detections. Let qualified support interpret the relevant logs and security findings.
You do not need to become a malware analyst. Your job is to avoid supplying authority to a stranger while the real team determines what happened.
Do not infer an operator’s location from a number
A North American toll-free number does not establish where a call center operates. Telephone routing can cross borders, and numbers can later change hands.
The reported number is useful for recognizing this message. It is not evidence that a particular country, company, or individual runs the operation.
A caller’s accent is also not reliable attribution. Describe what the caller requested rather than guessing who they are.
That makes a report more actionable: the access tool, payment destination, time, and statements are stronger evidence than a location assumption.
What to Do if You Have Fallen Victim to This Scam
End the contact. Hang up and stop responding to instructions. Do not let the caller persuade you that disconnecting will damage the machine.
If you only read the notice, report it to your employer or email provider. The message itself does not establish infection.
Tell trusted IT immediately if this involved work. Disclose whether you called, shared codes, ran commands, installed software, or permitted a remote session.
Use an unaffected device or another established channel if you suspect the computer is still accessible. Let the team coordinate containment.
Cut off unauthorized computer access. If an unknown operator still controls the device, disconnect its network connection while arranging trusted assistance.
Record the remote-support program’s name and any session information. A session ending does not establish that unattended access or added accounts were removed.
Protect credentials from a different trusted device. Replace disclosed or exposed secrets, revoke suspicious sessions, and review recovery methods.
Prioritize work accounts, email, password-management services, and financial access. Ask IT which actions it needs to perform on managed systems.
Contact the bank if financial information or funds were involved. Use the number on your card or an established banking channel.
Describe the remote session and any transfer instructions. Ask about blocking access, disputing charges, or recalling payments where possible.
Assess the device with genuine tools. For a personal computer, Malwarebytes can help detect malicious software after unauthorized downloads or access.
For a work computer, use the approved response process. A clean scan alone cannot prove that every setting, account, or copied file is safe.
Keep the evidence and report the attempt. Save the email, call times, receipts, remote-access details, and any communications without reopening risky material.
Report financial or account fraud to the appropriate authorities. In the U.S., the FTC and Internet Crime Complaint Center accept relevant reports.
Be ready for a second impersonation. Someone may later offer a refund, recovery service, or follow-up security check.
Verify each contact independently. AdGuard may reduce some malicious advertising, but it cannot authenticate a caller or recover money already sent.
Is Your Device Infected? Run a Free Malware Scan
Slow performance, constant pop-ups, or strange behavior? These are classic signs of a malware infection. The fastest way to find out is to scan your device with Malwarebytes Free — one of the most trusted malware removal tools available.
The free version detects and removes the most common threats, including:
- Adware — the cause of those annoying pop-ups
- Browser hijackers — unwanted redirects and changed homepages
- Trojans and spyware — hidden programs stealing your data
- Potentially unwanted programs (PUPs) — software you never asked for
👉 Select your device below — Windows, Mac, or Android — then follow the simple steps to download Malwarebytes, scan your system, and remove any threats it finds. The scan usually takes 5 to 20 minutes.
Run a Malware Scan with Malwarebytes for Windows
Malwarebytes is one of the most popular and trusted anti-malware tools for Windows — and it’s completely free for removing infections. It catches threats that many antivirus programs miss, including adware, browser hijackers, and trojans. Follow the steps below to scan and clean your PC in just a few minutes.
Download Malwarebytes
Click the button below to download the latest version of Malwarebytes for Windows from the official source. The free version is all you need — it will scan your computer and remove adware, browser hijackers, and other malicious software at no cost.
Download MalwarebytesOfficial installer for Windows 11 and 10. Your download starts right away.Want real-time protection? See Malwarebytes Premium Malwarebytes Free for WindowsScans and removes malware at no cost
-
Install Malwarebytes
When the download finishes, open your Downloads folder and double-click the MBSetup file. If Windows shows a User Account Control pop-up, click “Yes” to allow the installation.

Follow the On-Screen Prompts to Install Malwarebytes
The setup wizard will walk you through a few quick screens:
-
Choose where you’re installing the program — “Personal Computer” or “Work Computer” — then click Next.

-
Malwarebytes will now install on your device. This usually takes under a minute.

-
When installation is complete, the “Welcome to Malwarebytes” screen will open automatically.

-
On the final screen, click Open Malwarebytes to launch the program.

-
Enable “Scan for Rootkits”
Before scanning, turn on rootkit detection so Malwarebytes can find even the most hidden threats. Click the Settings gear icon on the left side of the screen.

In the settings menu, find “Scan for rootkits” and click the toggle so it turns blue.

Done? Click “Dashboard” in the left pane to return to the main screen.
Start the Scan
Click the blue Scan button. Malwarebytes will automatically update its virus database and start checking your computer for malware.

-
Wait for the Scan to Finish
The scan checks your entire system for browser hijackers and other malicious programs, so it can take 5 to 20 minutes depending on your computer. Feel free to do something else — just check back occasionally to see the progress.

-
Quarantine the Detected Threats
When the scan is done, you’ll see a list of everything Malwarebytes found — malware, adware, and potentially unwanted programs. Click the “Quarantine” button to remove all of them at once.

Malwarebytes will now remove the malicious files and registry entries and move them safely into quarantine.

-
Restart Your Computer
Some threats can only be fully removed after a reboot. If Malwarebytes asks you to restart, click Yes. Once you’re logged back in, Malwarebytes has finished removing the threats it found.

That’s it — your Windows PC is now clean of trojans, adware, and other malware, and should be back to running smoothly.
If you are still having problems with your computer after completing these instructions, then please follow one of the steps:
- Run a computer scan with ESET Online Scanner
- Ask for help in our Windows Malware Removal Help & Support forum.
Run a Malware Scan with Malwarebytes for Mac
Malwarebytes for Mac is a free on-demand scanner that removes the malware other security software tends to miss — adware, browser hijackers, and unwanted programs included. Cleaning an infected Mac with Malwarebytes has always been completely free, and it’s our go-to recommendation. Follow the steps below to scan and clean your Mac in just a few minutes.
-
Download Malwarebytes for Mac
Click the button below to download the latest version of Malwarebytes for Mac.
Download MalwarebytesOfficial installer for macOS. Your download starts right away.Want real-time protection? See Malwarebytes PremiumMalwarebytes Free for MacScans and removes malware at no cost -
Open the Malwarebytes setup file
When the download finishes, open your Downloads folder and double-click the setup file to begin the installation.

-
Follow the On-Screen Prompts to Install Malwarebytes
The Malwarebytes for Mac Installer will guide you through a few quick screens. Click “Continue” and keep following the prompts until the installation completes.



When the installation is complete, Malwarebytes opens to the Welcome to Malwarebytes screen. Click “Get started“.
-
Select “Personal Computer” or “Work Computer”
Malwarebytes will ask what type of computer you’re installing it on. Click either Personal Computer or Work Computer, whichever applies.

-
Start the Scan
Click the “Scan” button. Malwarebytes will automatically update its detection database and begin checking your Mac for malware.

-
Wait for the Scan to Finish
Malwarebytes will scan your Mac for adware, browser hijackers, and other malicious programs. This can take a few minutes, so feel free to do something else — just check back occasionally to see the progress.

-
Quarantine the Detected Threats
When the scan is done, you’ll see a list of everything Malwarebytes found. Click the “Quarantine” button to remove all the threats at once.

-
Restart Your Mac
Malwarebytes will now remove all the malicious files it found. Some threats can only be fully removed after a reboot — if Malwarebytes asks you to restart, allow it. Once you’re logged back in, your Mac is clean.

That’s it — your Mac is now free of adware, rogue browser extensions, and other potentially harmful software.
If you are still experiencing problems while trying to remove a malicious program from your computer, please ask for help in our Mac Malware Removal Help & Support forum.
Run a Malware Scan with Malwarebytes for Android
Malwarebytes for Android automatically detects and removes dangerous threats like malware and ransomware so you don’t have to worry about your most-used device being compromised. Aggressive detection of adware and potentially unwanted programs keeps your Android phone or tablet running smooth.
-
Download Malwarebytes for Android.
You can download Malwarebytes for Android by clicking the link below.
Get Malwarebytes for AndroidOpens Google Play in a new tab.Want real-time protection? See Malwarebytes Premium for AndroidMalwarebytes for AndroidScans your phone and removes malware at no cost -
Install Malwarebytes for Android on your phone.
In the Google Play Store, tap “Install” to install Malwarebytes for Android on your device.

When the installation process has finished, tap “Open” to begin using Malwarebytes for Android. You can also open Malwarebytes by tapping on its icon in your phone menu or home screen.

-
Follow the on-screen prompts to complete the setup process
When Malwarebytes will open, you will see the Malwarebytes Setup Wizard which will guide you through a series of permissions and other setup options.
This is the first of two screens that explain the difference between the Premium and Free versions. Swipe this screen to continue.
Tap on “Got it” to proceed to the next step.
Malwarebytes for Android will now ask for a set of permissions that are required to scan your device and protect it from malware. Tap on “Give permission” to continue.
Tap on “Allow” to permit Malwarebytes to access the files on your phone.
-
Update database and run a scan with Malwarebytes for Android
You will now be prompted to update the Malwarebytes database and run a full system scan.

Click on “Update database” to update the Malwarebytes for Android definitions to the latest version, then click on “Run full scan” to perform a system scan.

-
Wait for the Malwarebytes scan to complete.
Malwarebytes will now start scanning your phone for adware and other malicious apps. This process can take a few minutes, so we suggest you do something else and periodically check on the status of the scan to see when it is finished.

-
Click on “Remove Selected”.
When the scan has been completed, you will be presented with a screen showing the malware infections that Malwarebytes for Android has detected. To remove the malicious apps that Malwarebytes has found, tap on the “Remove Selected” button.

-
Restart your phone.
Malwarebytes for Android will now remove all the malicious apps that it has found. To complete the malware removal process, Malwarebytes may ask you to restart your device.
That’s it — your Android phone is now clean — no more malicious apps, adware, or browser redirects.
If you are still having problems with your phone after completing these instructions, then please follow one of the steps:
- Restore your phone to factory settings by going to Settings > General management > Reset > Factory data reset.
- Ask for help in our Mobile Malware Removal Help & Support forum.
Stay Protected: Block Ads and Malicious Sites
Now that your device is clean, keep it that way. Most infections start with a malicious ad or a fake download button — so blocking them at the source is your best defense.
We recommend AdGuard, which blocks malicious ads, phishing pages, and dangerous redirects before they can reach you.
👉 Download AdGuard and browse safely
What a Real Repair Should Leave You Knowing
After trusted assistance, you should understand what was found, which changes were made, and whether additional account recovery is needed.
A vague statement that the computer is “fixed” is not enough after remote access. Ask whether persistent access, added users, and relevant security settings were checked.
For business equipment, follow the incident team’s decision about returning to service. Do not reconnect company resources merely because a home scanner finished.
If the machine cannot be trusted, a controlled rebuild may be appropriate. Preserve needed evidence and recoverable data before making that decision with qualified help.
Separately review information shown on-screen during the call. An operator may have seen secrets or financial details without leaving malware behind.
Changing passwords addresses one part of that exposure. Payment review and warnings to affected colleagues may still be necessary.
There is no need to pay the original caller for a closure certificate or cancellation confirmation. That would keep the recovery process inside the impersonator’s control.
Frequently Asked Questions
Can an email with no hyperlinks still be fraudulent?
Yes. This message uses a callback instead. A phone destination requires independent verification just as a web destination does.
Does the Trojan.Win32.Spyware label prove my computer is infected?
No. A threat name printed in unsolicited mail is not a diagnostic result. Have your existing security team or genuine software assess actual evidence.
Should I call +1 (833) 735-4121 to check the alert?
No. That is the reported callback in this campaign. Ask your known IT help desk to verify the incident through its normal records.
Am I compromised if I called but shared nothing?
A call alone is not the same as computer access. Review what you disclosed or followed, and be cautious about later calls using those details.
What if the technician used a legitimate remote-support application?
A genuine application can still be abused. The operator’s identity and the access you granted matter more than the software’s brand.
Will deleting the email remove a remote-access program?
No. Deleting a message does not undo software installation or account exposure. Address those changes through trusted support and relevant account recovery.
The Bottom Line
Do not call the emergency desk in this workstation alert. Its anti-phishing language cannot authenticate its own phone number.
Verify the claim with your actual IT team. If you already allowed access or paid, stop the session and protect the affected computer, accounts, and funds separately.








