- Aug 13, 2012
- 186
You can use a stronger protection level with Windows Defender Antivirus, and in this guide, we'll tell you how to do it on the Windows 10 Creators Update.
Windows 10 offers the Windows Defender Antivirus as the default security and anti-malware solution to protect your computer and files against the ongoing growth of threats, including viruses, rootkits, spyware, and other types of malware -- and even those nasty ransomware.
Alongside the new features and improvements included with the Windows Defender Security Center, on the Windows 10 Creators Update (version 1703), the antivirus continues to evolve with new enhancements, such as the ability to manually change the cloud-protection level for your devices.
While out-of-the-box, the antivirus already offers robust threat detection, you can now select a higher level of protection to allow Windows Defender Antivirus to be more proactive scanning and detecting suspicious files, which helps Windows 10 users and organizations to keep their PCs more secure.
In this Windows 10 guide, we'll walk you through the steps to change the cloud-protection level that Windows Defender Antivirus uses to scan and block suspicious files using Local Group Policy and the Registry.
Important: Using these instructions, you'll be joining your device to the Microsoft MAPS community program, which allows the company to collect various pieces of information about threats detected on your system to create new definition updates, and sometime it'll even collect some of your personal information. Although Microsoft ensures that they won't use the information to identify or contact you, if you're not comfortable with that then this guide isn't for you.
Changing antivirus cloud-protection level
Once you configured the membership to report potential threats to Microsoft, you can then change the protection level of the Windows Defender Antivirus using the following steps:
You can always revert all the changes by following the same steps on the both set of instructions, but on step No. 5 for the Join Microsoft MAPS policy, select the Not Configured option. Also, on step No. 5 for the Select cloud protection level policy, select the Not Configured option.
full backup of your PC before proceeding.
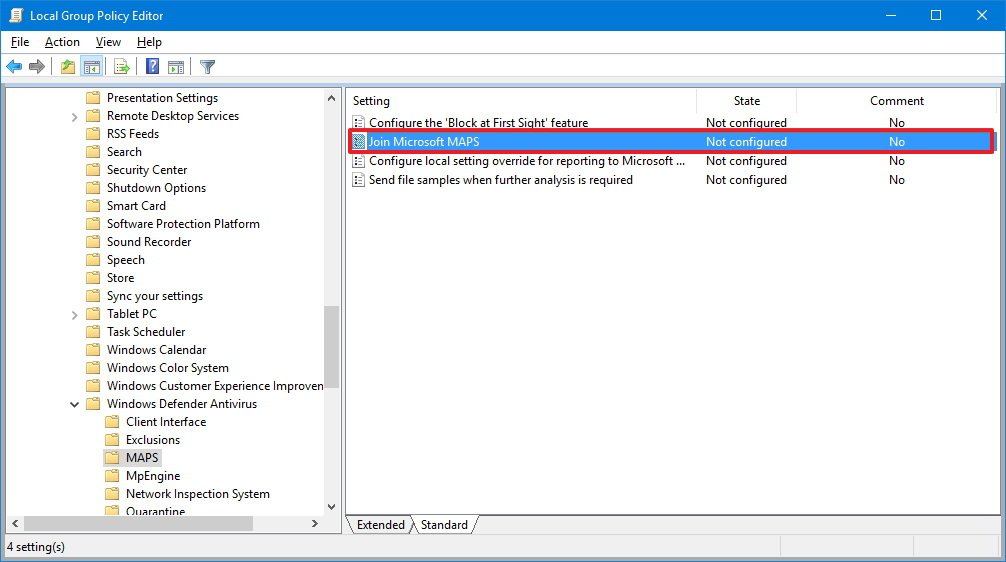
Enabling 'Join Microsoft MAPS'
In order to switch antivirus protection levels on your device, you must first modify the Registry to join Microsoft MAPS to allow the company to collect information about threats and create new definition updates.
To become a member of Microsoft MAPS using the Registry, do the following:
Once you configured the Microsoft MAPS membership, you can configure the "High blocking level" for Windows Defender Antivirus using the following steps:
If you want to revert the changes, you can follow the same steps mentioned above on the both set of instructions, but on step No. 4 for "Enabling Join Microsoft MAPS," right-click the Spynet key and click Delete to opt-out.
Then to opt-out of the "High blocking level" protection level, follow the same steps, but on step No. 4, right-click the MpEngine and click Delete.
Source

Windows 10 offers the Windows Defender Antivirus as the default security and anti-malware solution to protect your computer and files against the ongoing growth of threats, including viruses, rootkits, spyware, and other types of malware -- and even those nasty ransomware.
Alongside the new features and improvements included with the Windows Defender Security Center, on the Windows 10 Creators Update (version 1703), the antivirus continues to evolve with new enhancements, such as the ability to manually change the cloud-protection level for your devices.
While out-of-the-box, the antivirus already offers robust threat detection, you can now select a higher level of protection to allow Windows Defender Antivirus to be more proactive scanning and detecting suspicious files, which helps Windows 10 users and organizations to keep their PCs more secure.
In this Windows 10 guide, we'll walk you through the steps to change the cloud-protection level that Windows Defender Antivirus uses to scan and block suspicious files using Local Group Policy and the Registry.
Important: Using these instructions, you'll be joining your device to the Microsoft MAPS community program, which allows the company to collect various pieces of information about threats detected on your system to create new definition updates, and sometime it'll even collect some of your personal information. Although Microsoft ensures that they won't use the information to identify or contact you, if you're not comfortable with that then this guide isn't for you.
- How to change the Windows Defender protection level using Group Policy
- How to change the Windows Defender protection level using Registry

- Select the Enabled option.
- Under "Options," select the Advanced MAPS option.
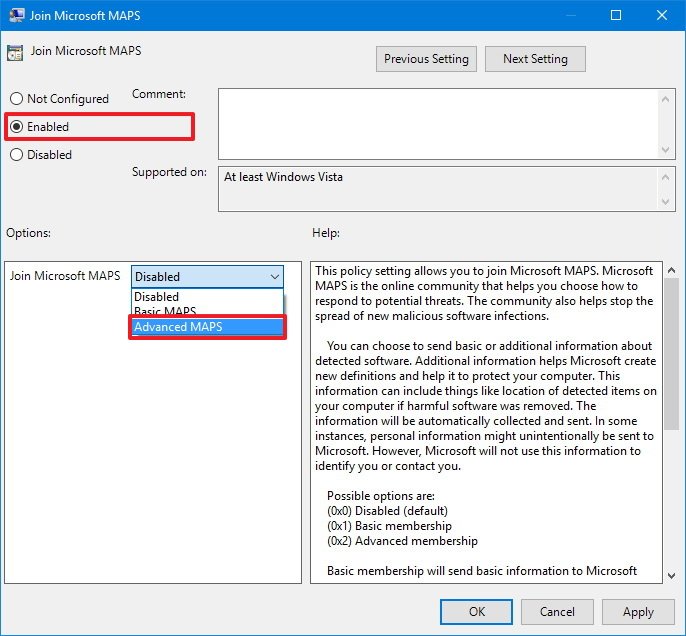

- Click Apply.
- Click OK.
Changing antivirus cloud-protection level
Once you configured the membership to report potential threats to Microsoft, you can then change the protection level of the Windows Defender Antivirus using the following steps:
- Use the Windows key + R keyboard shortcut to open the Run command.
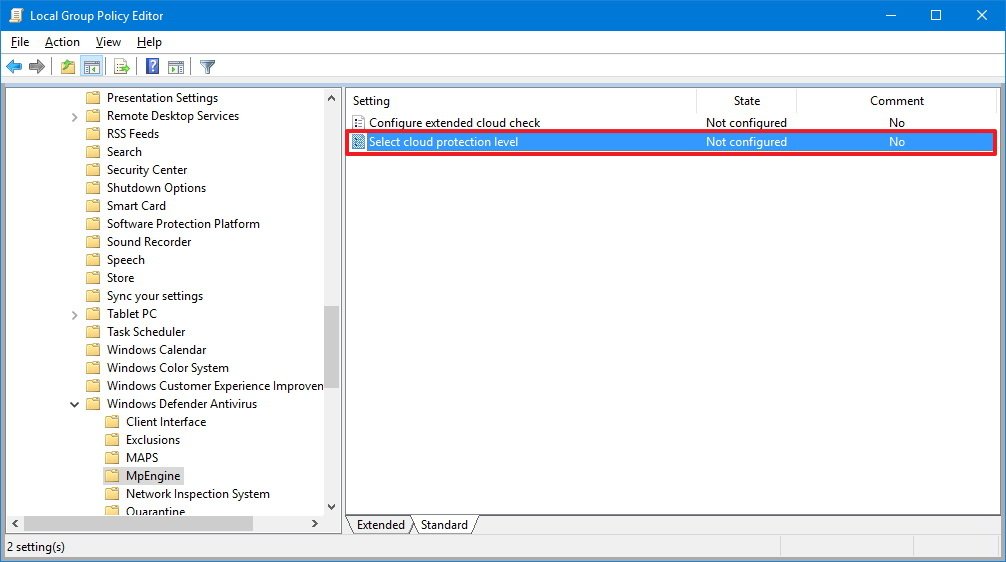
- Type gpedit.msc and click OK to open the Local Group Policy Editor.
- Browse the following path:
Computer Configuration > Administrative Templates > Windows Components > Windows Defender Antivirus > MpEngine
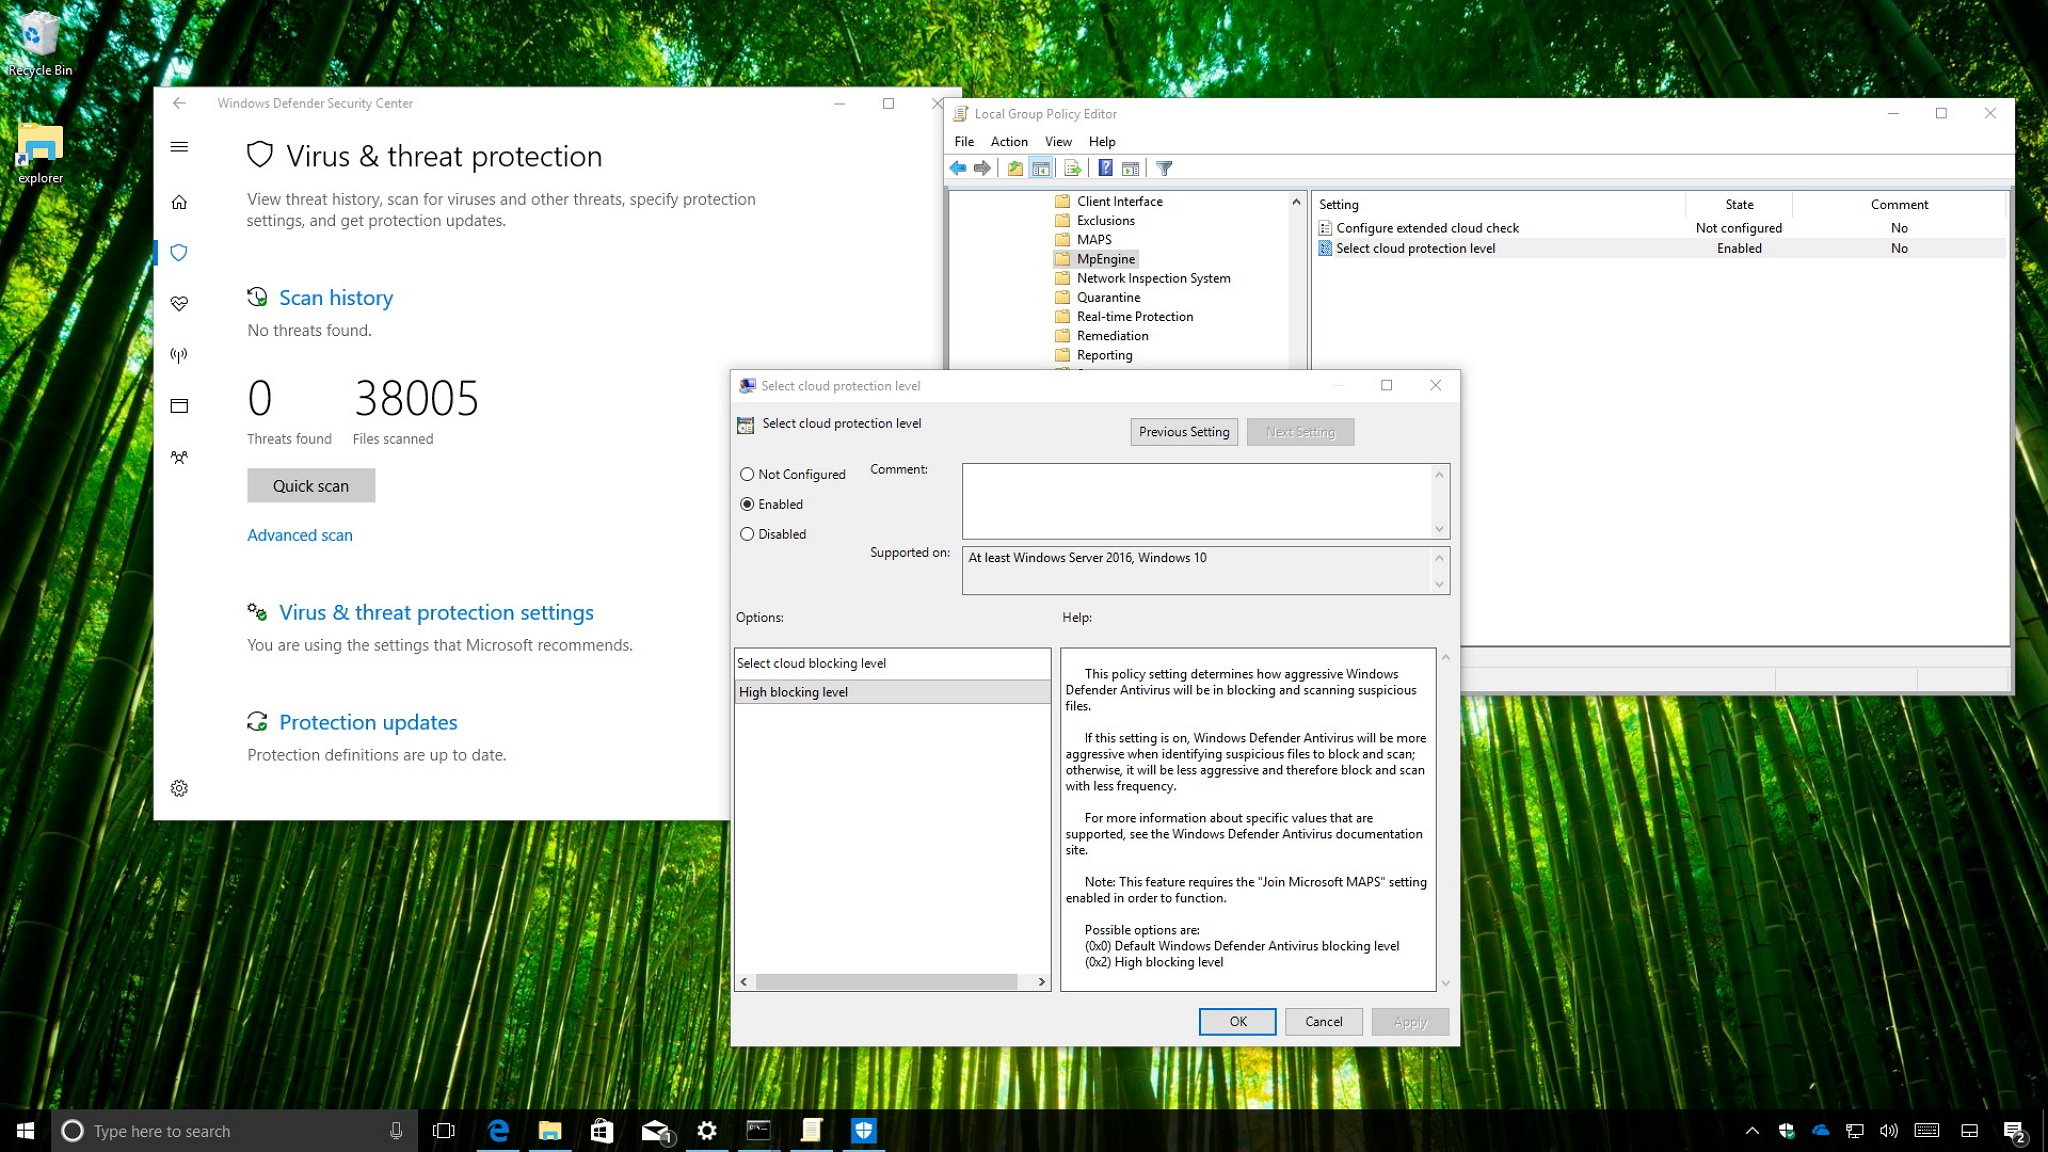
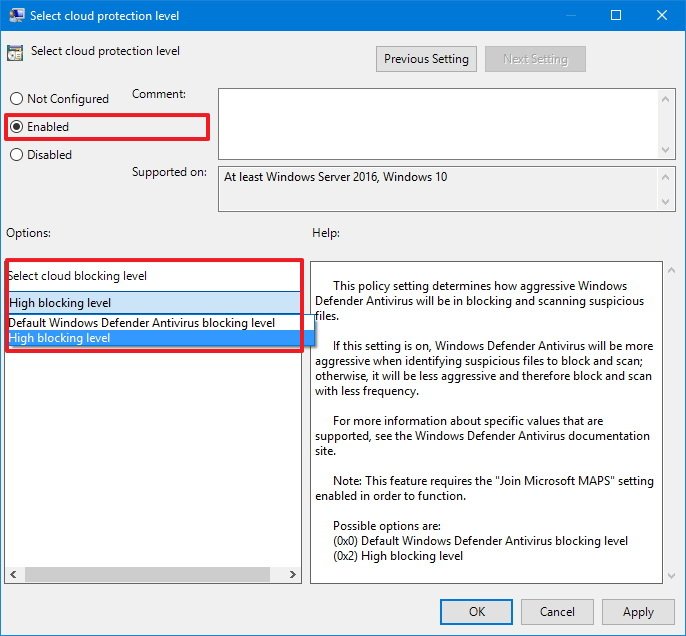
- On the right side, double-click the Select cloud protection level policy.

- Select the Enabled option.
- Under "Options," select the High blocking level option to increase the protection level on your device.

Here's a brief description of the available protection levels for the Windows 10 antivirus:
- Default Windows Defender Antivirus blocking level: Everyone by default has this level of protection. It offers good threat detection, and false positive detections are kept to a minimum.
- High blocking level: This option provides the strongest level of protection that Windows Defender Antivirus can offer. Using this level, the antivirus will block and scan files more frequently, which translates into a higher rate of false positives on legitimate files, when compared to the default option. However, you have the option to unblock detected files as needed.
- Click Apply.
- Click OK.
You can always revert all the changes by following the same steps on the both set of instructions, but on step No. 5 for the Join Microsoft MAPS policy, select the Not Configured option. Also, on step No. 5 for the Select cloud protection level policy, select the Not Configured option.
full backup of your PC before proceeding.
Enabling 'Join Microsoft MAPS'
In order to switch antivirus protection levels on your device, you must first modify the Registry to join Microsoft MAPS to allow the company to collect information about threats and create new definition updates.
To become a member of Microsoft MAPS using the Registry, do the following:
- Use the Windows key + R keyboard shortcut to open the Run command.
- Type regedit, and click OK to open the registry.
- Browse the following path:
HKEY_LOCAL_MACHINE\Software\Policies\Microsoft\Windows Defender
- Right-click the Windows Defender (folder) key, select New, and click on Key.
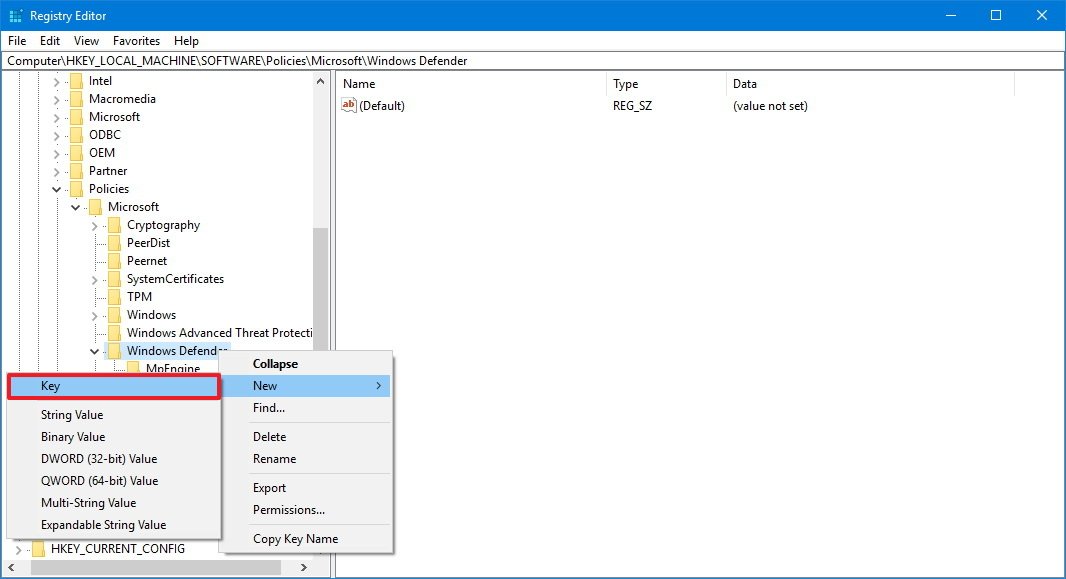
- Name the key Spynet and press Enter.
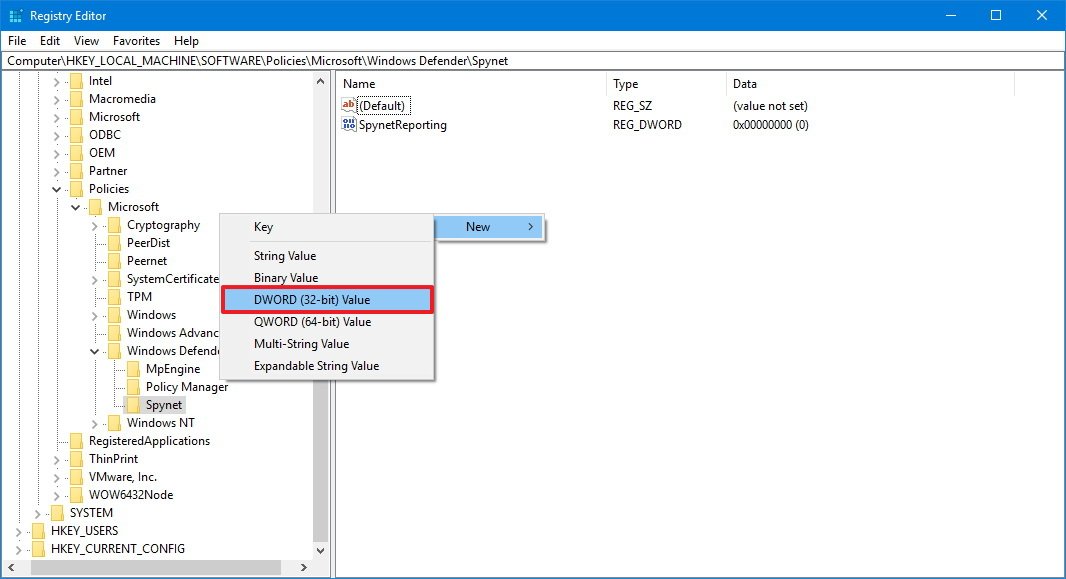
- Right-click on the right side of "Spynet," select New and click on DWORD (32-bit) Value.

- Name the key SpynetReporting and press Enter.
- Double-click the newly created DWORD and set the value from 0 to 2.
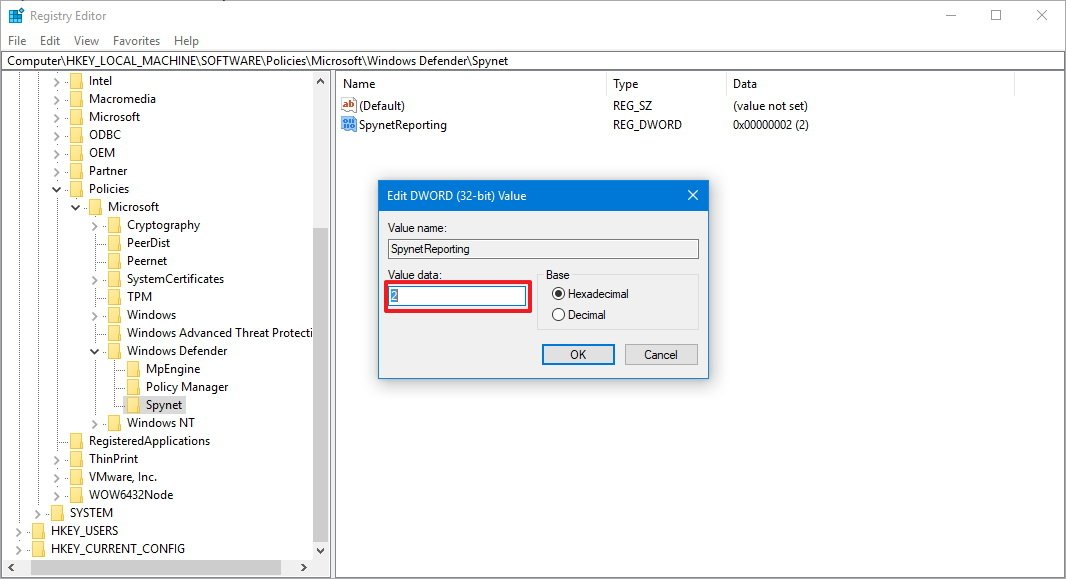
- Click OK.


Once you configured the Microsoft MAPS membership, you can configure the "High blocking level" for Windows Defender Antivirus using the following steps:
- Use the Windows key + R keyboard shortcut to open the Run command.
- Type regedit, and click OK to open the registry.
- Browse the following path:
HKEY_LOCAL_MACHINE\Software\Policies\Microsoft\Windows Defender
- Right-click the Windows Defender (folder) key, select New, and click on Key.

- Name the key MpEngine and press Enter.
- Right-click on the right side of "MpEngine," select New and click on DWORD (32-bit) Value.
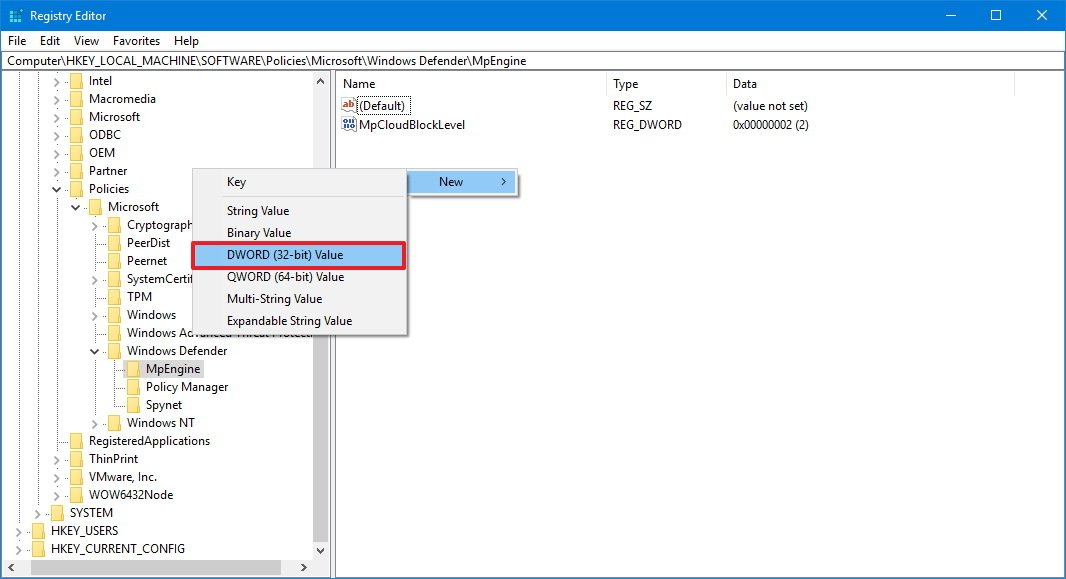
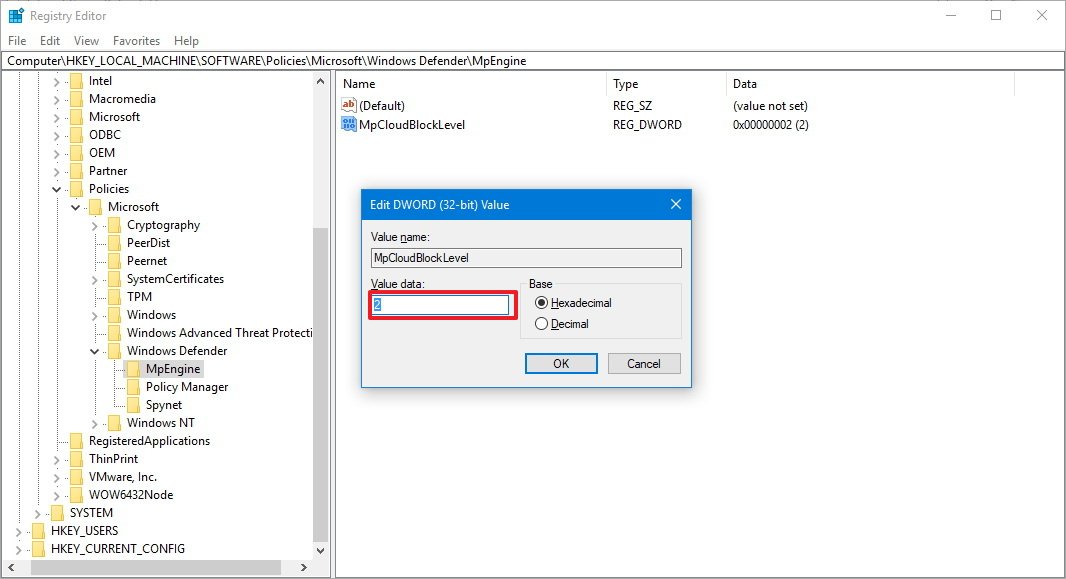
- Name the key MpCloudBlockLevel and press Enter.
- Double-click the newly created DWORD and set the value from 0 to 2.
- Click OK.

If you want to revert the changes, you can follow the same steps mentioned above on the both set of instructions, but on step No. 4 for "Enabling Join Microsoft MAPS," right-click the Spynet key and click Delete to opt-out.
Then to opt-out of the "High blocking level" protection level, follow the same steps, but on step No. 4, right-click the MpEngine and click Delete.
Source
