

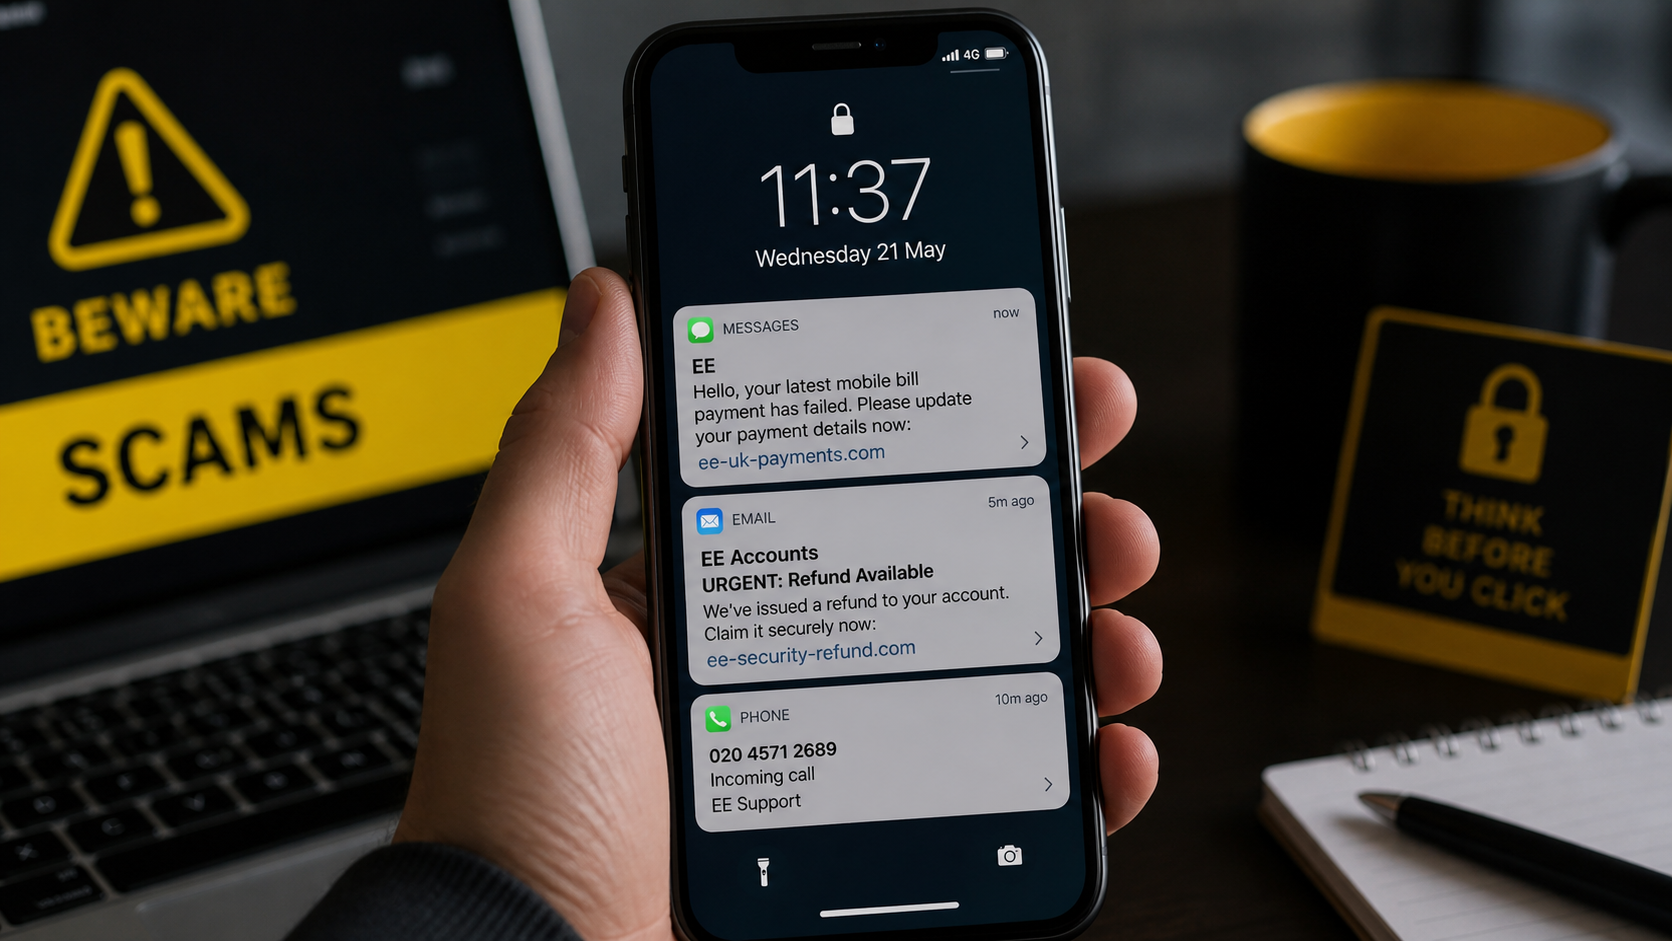
A text says your EE bill failed. An email offers a refund, or a caller claims your account qualifies for a cheaper plan. Each message gives you one urgent action that appears to protect your mobile service.
The danger is not receiving the message. It begins when the scammer chooses where you click, call, or enter your details.
Overview
EE impersonation scams arrive through several channels
EE scam emails, texts, and calls imitate the UK mobile provider to steal passwords, payment-card details, security codes, or money. The message may claim a bill failed, service will be suspended, a refund is ready, or a loyalty upgrade is available.
Text phishing is called smishing, while telephone impersonation is often called vishing. Criminals can combine both, sending a link first and calling later as the supposed fraud or customer-service team.
A message can appear in an existing EE conversation or display a familiar caller name. Sender details and caller ID can be spoofed, so the position on the screen is not reliable proof.
The link or caller moves you into a controlled process
A fake page copies EE account colors and asks for a mobile number, password, address, and card. A caller may request the same information while sounding helpful and familiar with common account procedures.
Warning signs include:
- An unexpected payment failure or refund
- A threat that service will end today
- A link whose domain is not EE’s official address
- A request for a PIN or password by text or email
- A caller seeking bank details or remote access
- A one-time code the caller asks you to read aloud
- A deal that disappears unless accepted immediately
The theft can extend beyond the mobile account
Stolen EE credentials may expose bills, addresses, telephone numbers, and account changes. A criminal may order devices, add a line, attempt a SIM swap, or use the mobile number to reset other accounts.
Card details entered into a phishing page can fund unauthorized purchases. Reused passwords may give the attacker access to email, shopping, social-media, and financial services.
EE says it will never ask for a PIN or password by text or email. When in doubt, close the message and inspect the account through the official app or website.
Common Stories Used in EE Impersonation Messages
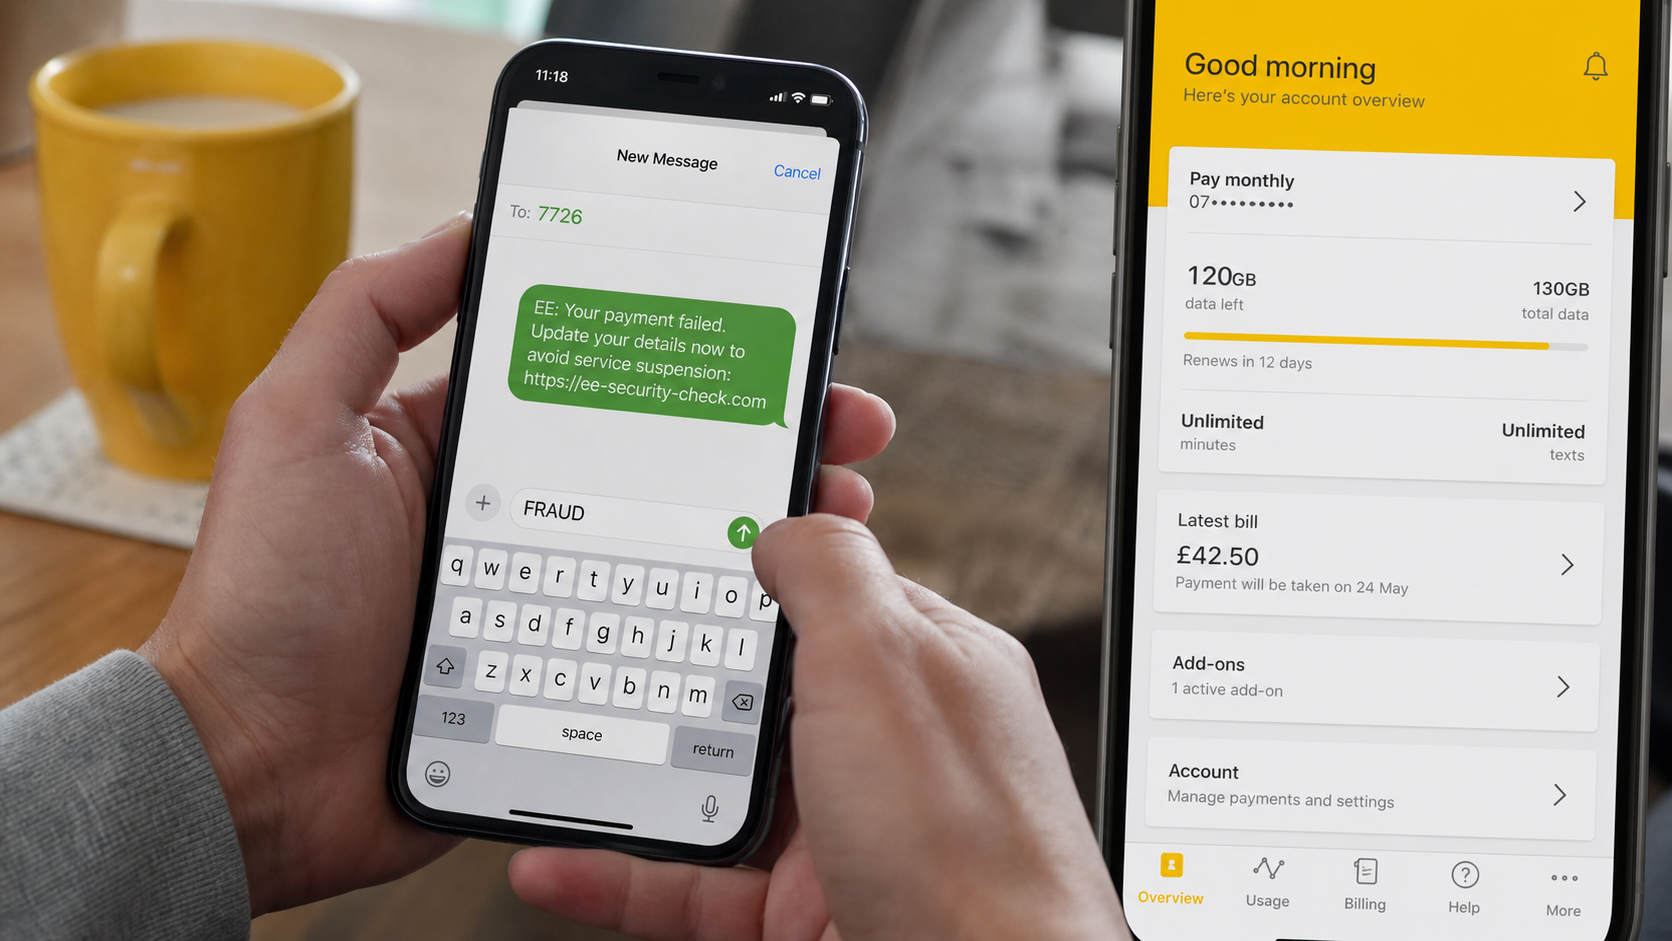
A failed direct debit is effective because losing mobile service feels disruptive. The link supposedly updates payment details, but it sends the victim to a cloned billing page.
A refund story uses the opposite emotion. The recipient is told that EE overcharged the account and needs a card or bank information to return money.
Upgrade calls offer a new handset or unusually cheap plan. The operator collects identity and account details, then may order a genuine device and redirect it through a false return.
Security alerts claim an account login, SIM request, or purchase needs confirmation. The scammer may trigger a genuine code and falsely describe it as a cancellation code.
How the Scam Works
Step 1: A familiar problem or reward gets attention
The campaign begins with a billing failure, refund, prize, loyalty discount, account warning, or device offer. Messages are sent widely and do not prove the sender knows the recipient uses EE.
Some campaigns use leaked data to include a name, number, or address. Accurate personal information can come from earlier breaches and does not authenticate the contact.
Step 2: Urgency discourages independent checking
The recipient is told to act before service stops, a refund expires, or a suspicious order ships. A short deadline makes opening the EE app feel slower than following the supplied instruction.
Legitimate account issues remain visible after you close a message. A genuine company does not need you to ignore safer verification.
Step 3: A fake page or operator collects account details
The link opens a site styled like EE login or billing. Its address may add words such as secure, account, payment, or UK around the brand name.
On a call, the operator asks questions under the label of security. Both routes collect information the criminal can use elsewhere.
Step 4: A genuine code is used for an unauthorized action
The attacker tries to sign in, reset a password, change a SIM, or place an order. EE’s real system sends the customer a one-time code.
The scammer asks for that code, claiming it rejects the charge or verifies eligibility. Sharing it may approve the action the victim intends to stop.
Step 5: The mobile account becomes a gateway
With account access, the criminal may change contact information, order hardware, view personal details, or seek control of the phone number.
A compromised number can weaken text-based authentication on email, banking, and other services. Sudden loss of mobile signal is a reason to contact the carrier immediately.
Step 6: Money or a device is taken
Card details may be charged directly. Another version convinces the victim to send money, install remote software, or return a genuine phone to an address controlled by the scammer.
The exact ending depends on what the victim reveals. An operator can change from a billing script to an account-security story during the same call.
Step 7: Follow-up contact targets the confirmed victim
A person who responds may receive calls from a fake bank, police officer, fraud investigator, or recovery service. Details from the first exchange make the next approach more convincing.
Block the contact and verify every later warning independently. Never pay someone who promises guaranteed recovery for an upfront fee.
How to Check an EE Message Safely
Do not tap the link. Open the My EE app from its normal icon or type EE’s official address yourself. Review bills, payments, orders, plan changes, messages, and account details.
For a call, hang up and contact EE through the official website, app, or number on your statement. Do not let the caller transfer you to another department.
EE’s official scam guidance says urgent requests for personal or financial details, unknown callback numbers, and links for transactions are warning signs.
If the account shows no matching failure, refund, order, or case, the message is not supported by the service’s own records.
How to Report Suspicious EE Contact
Forward suspicious texts to 7726, free of charge, so the mobile provider can investigate the sender. Include the telephone number or displayed company name when the reporting process requests it.
Forward phishing emails referring to EE to phishing@ee.co.uk. In the UK, suspicious emails can also be sent to report@phishing.gov.uk for analysis.
Report scam calls through EE’s available reporting route. Save a screenshot, call time, number, voicemail, and link before deleting the contact.
Receiving a message alone does not compromise the phone. Reporting and deleting it is enough when you did not click, reply, call, download, or disclose information.
How to Read the Link Without Opening It
On many phones, pressing and holding a link shows a preview of its destination. Do not continue if the domain differs from the official provider address.
Read from the end of the registered domain, immediately before the final suffix. A long address can place “ee” in a subdomain while the real owner appears later.
Shortened links hide the destination and should not be used for an unexpected account warning. Open the app independently instead of expanding the link.
Spelling is only one test. A criminal can register a clean-looking domain with words such as mobile, billing, secure, refund, or support.
Do not paste the suspicious address into a work browser or another account session. Reporting a screenshot and the original message preserves evidence without visiting the page.
What Scammers Can Do With Mobile Account Access
An attacker can view personal information and learn which services may use the telephone number for recovery. That knowledge supports attacks beyond the carrier.
A new SIM or eSIM can redirect calls and texts. The victim may notice loss of signal, unexpected activation emails, or verification messages for actions not requested.
Financed devices and new lines can create charges that continue after the original phishing page disappears. Review the complete account, not only the latest card transaction.
Changes to the billing address or authorized users may help the criminal retain access. Ask EE to compare current settings with the account’s earlier state.
Stolen email access makes recovery more difficult because password resets and warnings can be deleted. Secure the mailbox before relying on it for other account changes.
Advice for Families and Small Businesses
Shared or company mobile plans deserve a clear reporting route. Every user should know who manages the account and how to contact that person without replying to a suspicious message.
Teach users that one-time codes authorize actions rather than identify callers. No support story should override the instruction printed in the code message.
For business numbers, require approval before SIM changes, device upgrades, and new authorized users. Ask the carrier which additional account protections are available.
Keep backup contact methods for important accounts. A separate authenticator can reduce dependence on a mobile number that may be targeted.
Why a Realistic Message Can Still Be Fake
Correct spelling and branding are no longer strong safety signals. Templates, copied emails, and writing tools let criminals produce polished messages quickly.
A message may know the last digits of a number or the recipient’s address because those details appeared in an unrelated breach. Private-looking information is not necessarily current carrier data.
Real urgency is visible through official systems. If service, billing, or an order genuinely needs attention, the independently opened account should show what happened and offer a safe route to resolution.
Do not search only the telephone number. Numbers are spoofed, reassigned, and replaced, while a new malicious domain may have no public reports yet.
Judge the requested action. Passwords, one-time codes, remote access, unusual payment, and secrecy remain unsafe even when every visual detail looks correct.
Pause before responding, because the official account will still be available after the message’s artificial deadline has passed.
Company, Address, and Fulfillment Checks
The real domain should be reached independently
Do not trust a domain because it contains “ee.” Open the known EE website or app rather than correcting a suspicious address.
The caller number must match a verified channel
Caller ID can be spoofed. End the call and contact EE using details from its website or your bill.
The account must show the claimed event
A failed payment, refund, device order, or plan change should be visible inside the authenticated account. The message alone is not evidence.
Device returns must use EE’s confirmed process
Never send a delivered phone to an address supplied by an unsolicited caller. Ask official support to document the return and destination.
What to Do if You Have Fallen Victim to This Scam
- Contact EE immediately. Report account takeover, unauthorized SIM changes, device orders, and exposed codes through an official channel.
- Secure the email account first. Change its password, review sessions and forwarding rules, then update EE and every account using the same credentials.
- Call the bank or card issuer. Replace exposed cards, report unauthorized payments, and ask about disputes or transfer recalls.
- Watch for a SIM swap. If service disappears unexpectedly, contact EE from another phone and ask whether the SIM or account was changed.
- Remove unauthorized account changes. Review lines, devices, addresses, plans, users, and payment methods with the carrier.
- Scan affected devices. If you installed an app or opened a download, run a full Malwarebytes scan for remote access and credential-stealing malware.
- Block malicious sites. AdGuard can reduce access to known phishing pages and deceptive redirects, but account recovery still requires EE and the bank.
- Preserve and report evidence. Forward texts to 7726, send emails to the appropriate reporting addresses, and keep screenshots and transaction records.
- Protect your identity. If identity documents were shared, monitor credit and report the exposure to relevant UK fraud and financial services.
Is Your Device Infected? Run a Free Malware Scan
Slow performance, constant pop-ups, or strange behavior? These are classic signs of a malware infection. The fastest way to find out is to scan your device with Malwarebytes Free — one of the most trusted malware removal tools available.
The free version detects and removes the most common threats, including:
- Adware — the cause of those annoying pop-ups
- Browser hijackers — unwanted redirects and changed homepages
- Trojans and spyware — hidden programs stealing your data
- Potentially unwanted programs (PUPs) — software you never asked for
👉 Select your device below — Windows, Mac, or Android — then follow the simple steps to download Malwarebytes, scan your system, and remove any threats it finds. The scan usually takes 5 to 20 minutes.
Run a Malware Scan with Malwarebytes for Windows
Malwarebytes is one of the most popular and trusted anti-malware tools for Windows — and it’s completely free for removing infections. It catches threats that many antivirus programs miss, including adware, browser hijackers, and trojans. Follow the steps below to scan and clean your PC in just a few minutes.
Download Malwarebytes
Click the button below to download the latest version of Malwarebytes for Windows from the official source. The free version is all you need — it will scan your computer and remove adware, browser hijackers, and other malicious software at no cost.
Download MalwarebytesOfficial installer for Windows 11 and 10. Your download starts right away.Want real-time protection? See Malwarebytes Premium Malwarebytes Free for WindowsScans and removes malware at no cost
-
Install Malwarebytes
When the download finishes, open your Downloads folder and double-click the MBSetup file. If Windows shows a User Account Control pop-up, click “Yes” to allow the installation.

Follow the On-Screen Prompts to Install Malwarebytes
The setup wizard will walk you through a few quick screens:
-
Choose where you’re installing the program — “Personal Computer” or “Work Computer” — then click Next.

-
Malwarebytes will now install on your device. This usually takes under a minute.

-
When installation is complete, the “Welcome to Malwarebytes” screen will open automatically.

-
On the final screen, click Open Malwarebytes to launch the program.

-
Enable “Scan for Rootkits”
Before scanning, turn on rootkit detection so Malwarebytes can find even the most hidden threats. Click the Settings gear icon on the left side of the screen.

In the settings menu, find “Scan for rootkits” and click the toggle so it turns blue.

Done? Click “Dashboard” in the left pane to return to the main screen.
Start the Scan
Click the blue Scan button. Malwarebytes will automatically update its virus database and start checking your computer for malware.

-
Wait for the Scan to Finish
The scan checks your entire system for browser hijackers and other malicious programs, so it can take 5 to 20 minutes depending on your computer. Feel free to do something else — just check back occasionally to see the progress.

-
Quarantine the Detected Threats
When the scan is done, you’ll see a list of everything Malwarebytes found — malware, adware, and potentially unwanted programs. Click the “Quarantine” button to remove all of them at once.

Malwarebytes will now remove the malicious files and registry entries and move them safely into quarantine.

-
Restart Your Computer
Some threats can only be fully removed after a reboot. If Malwarebytes asks you to restart, click Yes. Once you’re logged back in, Malwarebytes has finished removing the threats it found.

That’s it — your Windows PC is now clean of trojans, adware, and other malware, and should be back to running smoothly.
If you are still having problems with your computer after completing these instructions, then please follow one of the steps:
- Run a computer scan with ESET Online Scanner
- Ask for help in our Windows Malware Removal Help & Support forum.
Run a Malware Scan with Malwarebytes for Mac
Malwarebytes for Mac is a free on-demand scanner that removes the malware other security software tends to miss — adware, browser hijackers, and unwanted programs included. Cleaning an infected Mac with Malwarebytes has always been completely free, and it’s our go-to recommendation. Follow the steps below to scan and clean your Mac in just a few minutes.
-
Download Malwarebytes for Mac
Click the button below to download the latest version of Malwarebytes for Mac.
Download MalwarebytesOfficial installer for macOS. Your download starts right away.Want real-time protection? See Malwarebytes PremiumMalwarebytes Free for MacScans and removes malware at no cost -
Open the Malwarebytes setup file
When the download finishes, open your Downloads folder and double-click the setup file to begin the installation.

-
Follow the On-Screen Prompts to Install Malwarebytes
The Malwarebytes for Mac Installer will guide you through a few quick screens. Click “Continue” and keep following the prompts until the installation completes.



When the installation is complete, Malwarebytes opens to the Welcome to Malwarebytes screen. Click “Get started“.
-
Select “Personal Computer” or “Work Computer”
Malwarebytes will ask what type of computer you’re installing it on. Click either Personal Computer or Work Computer, whichever applies.

-
Start the Scan
Click the “Scan” button. Malwarebytes will automatically update its detection database and begin checking your Mac for malware.

-
Wait for the Scan to Finish
Malwarebytes will scan your Mac for adware, browser hijackers, and other malicious programs. This can take a few minutes, so feel free to do something else — just check back occasionally to see the progress.

-
Quarantine the Detected Threats
When the scan is done, you’ll see a list of everything Malwarebytes found. Click the “Quarantine” button to remove all the threats at once.

-
Restart Your Mac
Malwarebytes will now remove all the malicious files it found. Some threats can only be fully removed after a reboot — if Malwarebytes asks you to restart, allow it. Once you’re logged back in, your Mac is clean.

That’s it — your Mac is now free of adware, rogue browser extensions, and other potentially harmful software.
If you are still experiencing problems while trying to remove a malicious program from your computer, please ask for help in our Mac Malware Removal Help & Support forum.
Run a Malware Scan with Malwarebytes for Android
Malwarebytes for Android automatically detects and removes dangerous threats like malware and ransomware so you don’t have to worry about your most-used device being compromised. Aggressive detection of adware and potentially unwanted programs keeps your Android phone or tablet running smooth.
-
Download Malwarebytes for Android.
You can download Malwarebytes for Android by clicking the link below.
Get Malwarebytes for AndroidOpens Google Play in a new tab.Want real-time protection? See Malwarebytes Premium for AndroidMalwarebytes for AndroidScans your phone and removes malware at no cost -
Install Malwarebytes for Android on your phone.
In the Google Play Store, tap “Install” to install Malwarebytes for Android on your device.

When the installation process has finished, tap “Open” to begin using Malwarebytes for Android. You can also open Malwarebytes by tapping on its icon in your phone menu or home screen.

-
Follow the on-screen prompts to complete the setup process
When Malwarebytes will open, you will see the Malwarebytes Setup Wizard which will guide you through a series of permissions and other setup options.
This is the first of two screens that explain the difference between the Premium and Free versions. Swipe this screen to continue.
Tap on “Got it” to proceed to the next step.
Malwarebytes for Android will now ask for a set of permissions that are required to scan your device and protect it from malware. Tap on “Give permission” to continue.
Tap on “Allow” to permit Malwarebytes to access the files on your phone.
-
Update database and run a scan with Malwarebytes for Android
You will now be prompted to update the Malwarebytes database and run a full system scan.

Click on “Update database” to update the Malwarebytes for Android definitions to the latest version, then click on “Run full scan” to perform a system scan.

-
Wait for the Malwarebytes scan to complete.
Malwarebytes will now start scanning your phone for adware and other malicious apps. This process can take a few minutes, so we suggest you do something else and periodically check on the status of the scan to see when it is finished.

-
Click on “Remove Selected”.
When the scan has been completed, you will be presented with a screen showing the malware infections that Malwarebytes for Android has detected. To remove the malicious apps that Malwarebytes has found, tap on the “Remove Selected” button.

-
Restart your phone.
Malwarebytes for Android will now remove all the malicious apps that it has found. To complete the malware removal process, Malwarebytes may ask you to restart your device.
That’s it — your Android phone is now clean — no more malicious apps, adware, or browser redirects.
If you are still having problems with your phone after completing these instructions, then please follow one of the steps:
- Restore your phone to factory settings by going to Settings > General management > Reset > Factory data reset.
- Ask for help in our Mobile Malware Removal Help & Support forum.
Stay Protected: Block Ads and Malicious Sites
Now that your device is clean, keep it that way. Most infections start with a malicious ad or a fake download button — so blocking them at the source is your best defense.
We recommend AdGuard, which blocks malicious ads, phishing pages, and dangerous redirects before they can reach you.
👉 Download AdGuard and browse safely
Frequently Asked Questions
Will EE ask for my PIN or password by text?
EE says it will never ask for your PIN or password by text or email. Do not reply with either credential.
Can a scam text appear in a genuine EE thread?
Yes. Sender information can be manipulated, and phones may group messages by displayed sender. Verify through the app.
What is 7726 used for?
UK mobile customers can forward suspicious texts to 7726 so the provider can investigate the sender.
What if I clicked but entered nothing?
Close the page, clear the download if one started, and scan the device. Monitor the account and report the link.
Can a real EE code be part of a scam?
Yes. The attacker may trigger the code by attempting a real action. Never read it to an unsolicited caller.
Does blocking one number stop the campaign?
It stops that route, but scammers rotate or spoof numbers. Continue screening unexpected calls and messages.
The Bottom Line
EE scam emails, texts, and calls use billing problems, refunds, upgrades, and security warnings to move customers into a fake process.
Do not click or share a code. Open My EE independently, report texts to 7726, and contact the carrier and bank quickly if information was exposed.

Join the discussion
0 commentsShare your experience or ask a question about this article.
Discussion
Start the conversation
Have a question or something useful to share? Add the first comment.