


A buyer says they found your business on LinkedIn. They aren’t asking for a brochure or a price list. They say they’ve already signed a contract for 12,000 units.
That’s a big enough order to make you open the message twice. Before opening the attachment, check whether there’s a real order to discuss.
Overview
A buyer with a contract but no prior negotiation
The LinkedIn collaboration email scam arrives as a business inquiry. The person writing claims to be a buyer who found the recipient through LinkedIn.
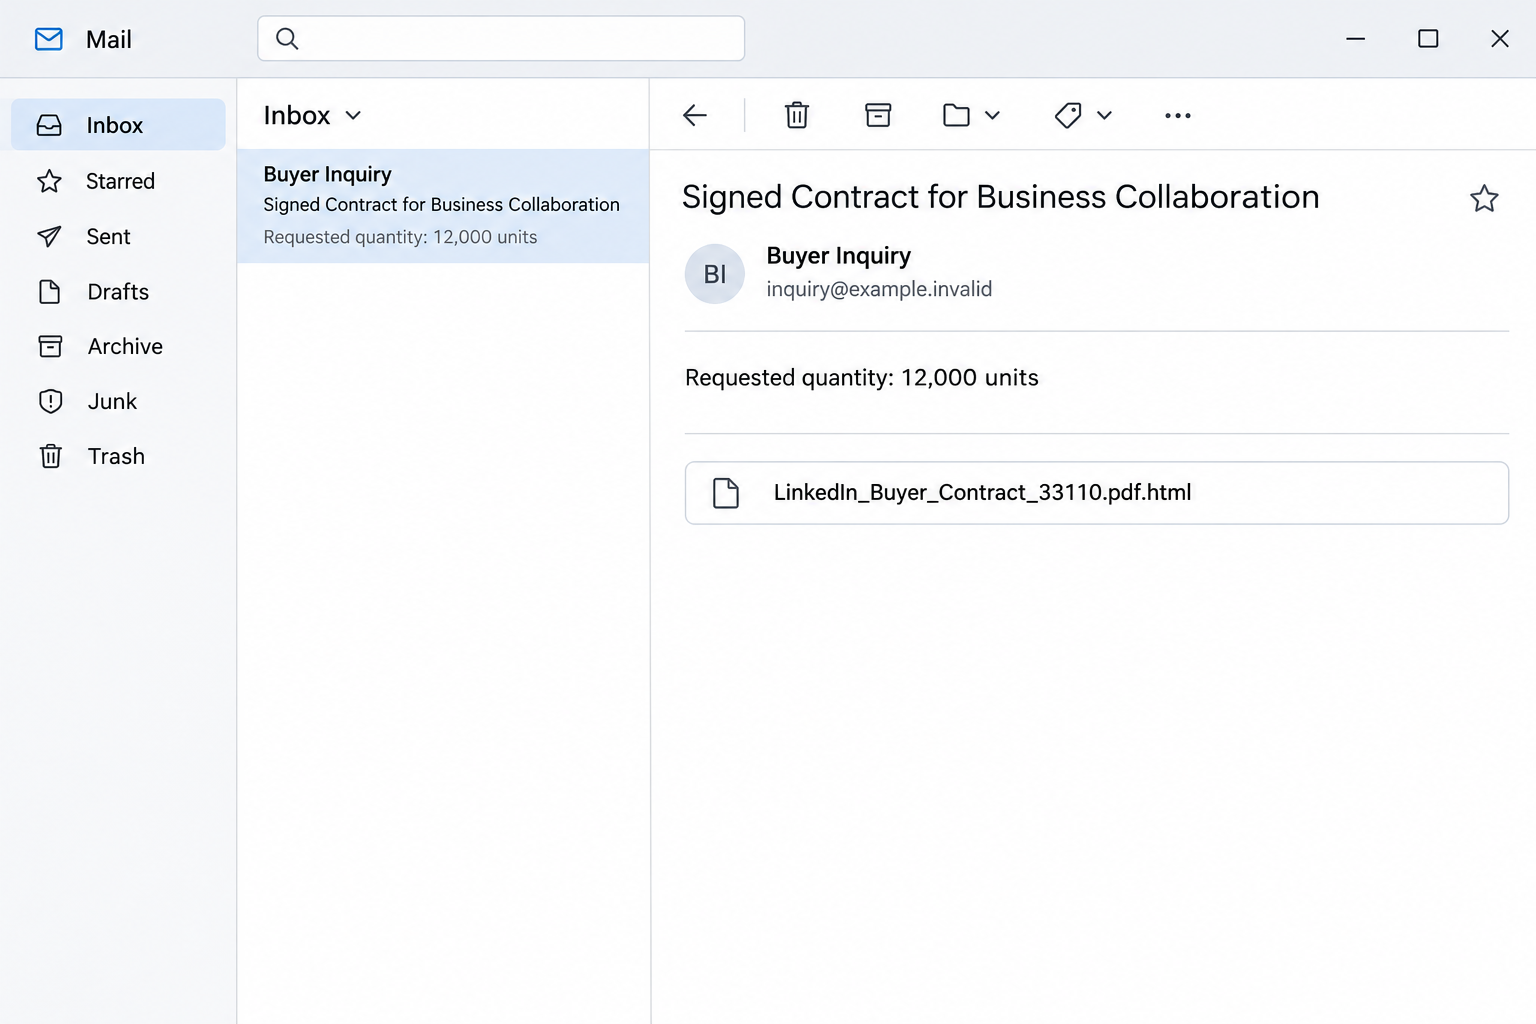
The email refers to contract 33110 and an order for 12,000 units. It says the paperwork is already signed, even though the recipient may never have negotiated the terms.
The sender supplies a person’s name and a company name. Those are claims in the email, not verification of the sender or evidence that any real company participated.
The image above reconstructs the subject, quantity and attachment name. It is not a file you can open or evidence of a genuine order.
The filename looks familiar until you read the last extension
The reported attachment is named LinkedIn_Buyer_Contract_33110.pdf.html. It has “pdf” in the name, but the last extension is HTML.
That matters because an HTML file can open in a browser as a webpage. The reported file showed a counterfeit LinkedIn sign-in rather than a signed contract.
A page opened from a file can still present a form or interact with the network. Seeing it begin on your own computer doesn’t make its request trustworthy.
The reported behavior was a credential prompt. There is no verified signed agreement, malware installation or confirmed account theft in the sample.
An ordinary buyer shouldn’t need your LinkedIn password
LinkedIn can be a place where a genuine buyer finds a supplier. That doesn’t give the buyer authority to ask for a social account password inside a document.
A signed order should be verifiable through the people and systems involved in the deal. A copy of a sign-in screen doesn’t substitute for the commercial terms.
Look at the business request and the file separately:
- Check whether your sales team has a conversation, quote or purchase record for the buyer.
- Verify the organization and the sender using contact information you found independently.
- Read the full filename without opening the attachment, including the last extension.
- If it asks for a social sign-in, stop the review and go to LinkedIn only from your established app or bookmark.
How the LinkedIn Collaboration Email Scam Works
Step 1: The order sounds like a lead you don’t want to lose
An unexpected buyer inquiry isn’t inherently unusual. Businesses work hard to get discovered, and a message referencing LinkedIn can sound like evidence that it worked.
The quantity adds pressure without a threatening deadline. Missing a sale for 12,000 units may feel more consequential than opening one unfamiliar document.
A large order also raises basic questions about the goods, price, delivery and decision-maker. A serious buyer should be able to discuss those without requiring you to open unsolicited paperwork.
Don’t let the sender decide how those questions are answered. Check your quote history and tell the person who normally approves incoming purchase orders.
Step 2: A contract reference makes an unfinished conversation look complete
The email presents the agreement as already signed. That can make the attachment sound like the record of a completed decision rather than something new to evaluate.
The reference number makes the deal easier to talk about, but it is still only a number supplied by the sender. Check whether it appears anywhere in your established records.
An order may be new to one employee and familiar to someone else. Ask privately through your own sales system or team directory before assuming it has been approved.
If nobody knows the order, return to basic verification. Who is buying, what are they buying, and how did they agree on the terms?
Step 3: The filename borrows the appearance of a PDF
The name contains a contract reference and the letters PDF. A narrow attachment preview may not make the final extension easy to see.
The rightmost extension identifies the reported file as HTML, not a PDF. An attachment name can contain several dots without making it several file types.
A browser window is normal for web content.
It isn’t a reason to trust a file attached by an unexpected sender, especially if it changes the task from reading to login.
If your system hides extensions, ask IT how to inspect the original safely. Don’t open the attachment just to determine what kind of file it is.
Step 4: The document review becomes a LinkedIn sign-in
Instead of a signed agreement, the file displays a page imitating LinkedIn and asks for an email address and password. It presents sign-in as necessary to see the contract.
That is the point at which a sales inquiry becomes a credential request. It shouldn’t make sense for a buyer to know the password for your networking account.
If you want to check whether a buyer contacted you on LinkedIn, open LinkedIn yourself. Look for a conversation in the real account rather than using the attachment.
You don’t need to submit a dummy password or confirm how the form sends information. Close the page and let security staff handle any examination of the file.
Step 5: Access to a professional account can affect other people
A stolen LinkedIn account may be used to contact clients, recruiters or coworkers from an identity they already know.
It could also affect any pages or business tools associated with it.
If you reuse the same password for your email, a social account incident can become a mailbox incident. Prioritize the services that control recovery.
The case does not show which accounts, if any, were compromised. Check your actual account records and tell your security team what you did.
If you stopped at the file or at the first screen, report that accurately. It prompts a different response from typing a password or approving a new sign-in.
How to Verify a New Buyer Without Opening the File
Confirm the company, then confirm the person
Use a registry, the company’s established website or business data you already trust. A genuine company can still be impersonated by a person who uses its name.
Call or message a verified company contact if your normal procurement process permits it.
Ask for the department or person responsible for purchasing, not for a new link to the document.
A LinkedIn profile is another clue, not the last word. The profile might be fabricated, copied or accessed by someone who isn’t authorized to place an order.
If a buyer really wants to proceed, it can use your intake system, send a clean document through an agreed channel, or discuss a quote before paperwork changes hands.
Compare the order with how your company actually sells
A verified buyer should be able to describe the product, delivery location and terms. The number of units is not enough to confirm any of them.
Review credit, shipping and contract authority through your normal process. Don’t accept payment changes, a new bank account or a freight request from an unverified person.
For a small business, even a short checklist helps. Record who confirmed the purchase and how, so the next employee doesn’t have to rely on the same email.
If you have no secure intake route, agree on one independently with a verified buyer. It’s reasonable to ask for a fresh copy instead of opening a suspicious attachment.
Give your team a safe way to handle the next inquiry
Employees who might get real leads shouldn’t have to decide alone whether an attachment is safe. Tell them how to report a file without passing it around.
Keep the original record available to the security or mail administrator if requested. A screenshot or a filename can help triage what happened without everyone opening a copy.
When there is a real order behind a suspicious message, verify it from scratch. Don’t continue the deal in the same conversation merely because part of the story was accurate.
Keep the conversation in a channel you can verify
If a purported prospect says you already spoke on LinkedIn, open the platform yourself and look for that exchange. Ask a known teammate if another person handled the inquiry.
A genuine past conversation does not make a later attachment safe. If a new file arrives unexpectedly, confirm that the verified contact meant to send it.
If you run a company page, check which employees can post, message or use recruiting tools. A compromised personal account can matter differently depending on its permissions.
Ask employees to record the request rather than the secret they entered. The incident report can say a platform password was used without naming or repeating that password.
Train the team to recognize the mismatch between a document and a sign-in demand. It’s more useful than memorizing one exact reference number or order size.
If the prospect can’t explain what it is ordering without the file, stop. A fallback through sales or procurement is safer than trying another attachment from the same sender.
What to Do If You Fell Victim
Stop handling the attachment and report it.
If you only read the email, mark it as phishing or report it through your organization. Don’t open the file for a closer look.
If you downloaded it but didn’t view it, tell security where it was saved. Don’t send it around. Follow the reporting process before deleting evidence it needs.
If you opened it, note the file name and time. Tell support whether a credential page, a new download or another prompt appeared.
If you entered LinkedIn details, recover access through LinkedIn.
Open the real app or account directly. Change the password to something unique and check any alternate email addresses or phone numbers.
If you’re locked out or can no longer use the recovery details, follow LinkedIn’s compromised account instructions.
Change a reused password on other services, especially your primary email. Tell support if you also gave out a code or approved a sign-in.
Review the account after changing the password.
Check active sessions, contact details and recent messages through LinkedIn. Look for changes to company pages, job posts or tools you manage if those access rights apply.
If an unfamiliar message went to a customer or coworker, warn them through another channel. Explain which request not to trust without forwarding the attachment.
For a work-managed account, ask the administrator to preserve the relevant records and handle any organization-wide checks. Don’t assume a working password means the incident is over.
Handle the opened file separately from account recovery.
On a managed device, let IT decide whether to isolate and inspect it. Say whether you opened the HTML, ran anything else or saw unexpected behavior.
On a personal device, a scan is a precaution if you opened the unknown file or ran another download. It isn’t necessary merely for seeing the email.
Use the Malwarebytes instructions below if a scan fits what happened. A clean result won’t undo a submitted password or prove the device is entirely safe.
AdGuard can help block known phishing sites in the browser. It won’t authenticate a local HTML attachment or recover a stolen account.
Keep the buyer claim and the security report separate.
Use LinkedIn’s guidance on suspicious messages and attachments if you need reporting details.
If the conversation supposedly involved a real company, contact its established sales or procurement office only if you need to verify it. Don’t use details from the email.
Log what happened for your team. The claimed quantity, reference and attachment name are useful markers, but only independently verified records can establish a real order.
Is Your Device Infected? Run a Free Malware Scan
Slow performance, constant pop-ups, or strange behavior? These are classic signs of a malware infection. A quick way to check is to scan your device with Malwarebytes Free, one of the most trusted malware removal tools available. If you only visited a scam page and didn’t download or install anything, this scan is optional.
The free version detects and removes the most common threats, including:
- Adware — the cause of those annoying pop-ups
- Browser hijackers — unwanted redirects and changed homepages
- Trojans and spyware — hidden programs stealing your data
- Potentially unwanted programs (PUPs) — software you never asked for
👉 Select your device below — Windows, Mac, or Android — then follow the simple steps to download Malwarebytes, scan your system, and remove any threats it finds. The scan usually takes 5 to 20 minutes.
Run a Malware Scan with Malwarebytes for Windows
Malwarebytes is one of the most popular and trusted anti-malware tools for Windows — and it’s completely free for removing infections. It catches threats that many antivirus programs miss, including adware, browser hijackers, and trojans. Follow the steps below to scan your PC and remove what Malwarebytes finds.
Download Malwarebytes
Click the button below to download the latest version of Malwarebytes for Windows from the official source. The free version is all you need — it will scan your computer and remove adware, browser hijackers, and other malicious software at no cost.
Download MalwarebytesOfficial installer for Windows 11 and 10. Your download starts right away.Want real-time protection? See Malwarebytes Premium Malwarebytes Free for WindowsScans and removes malware at no cost
-
Install Malwarebytes
When the download finishes, open your Downloads folder and double-click the MBSetup file. If Windows shows a User Account Control pop-up, click “Yes” to allow the installation.
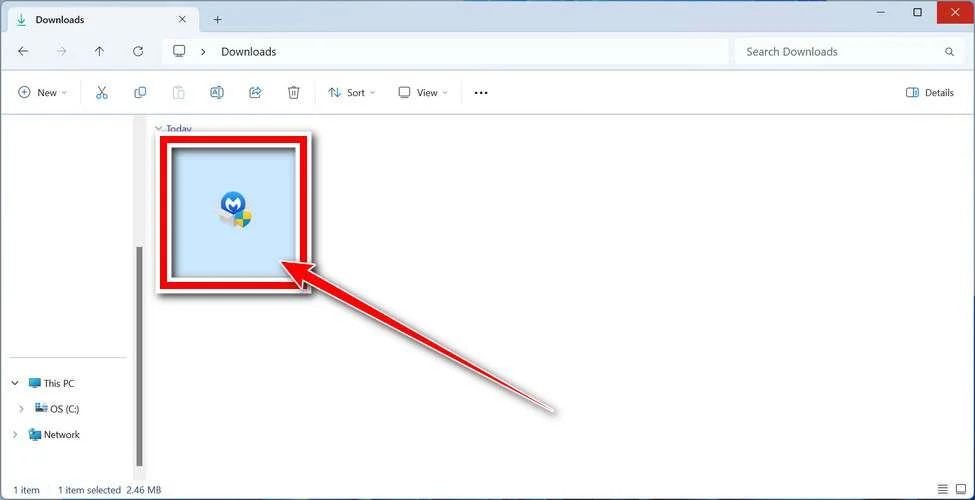
Follow the On-Screen Prompts to Install Malwarebytes
The setup wizard will walk you through a few quick screens:
-
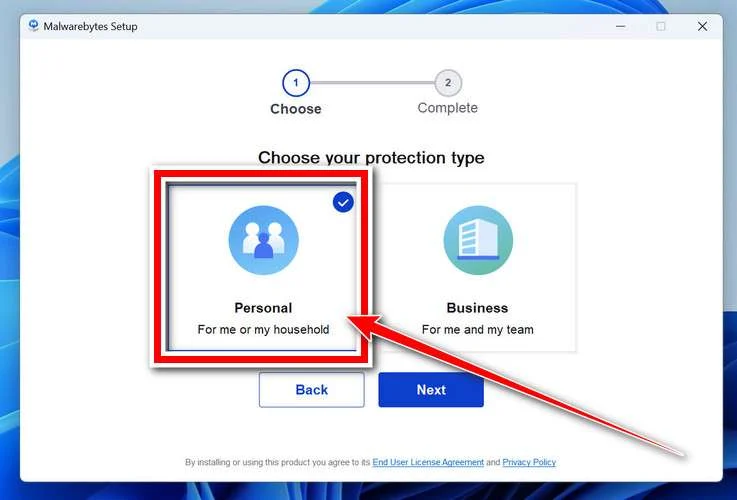
Choose where you’re installing the program — “Personal Computer” or “Work Computer” — then click Next.
-
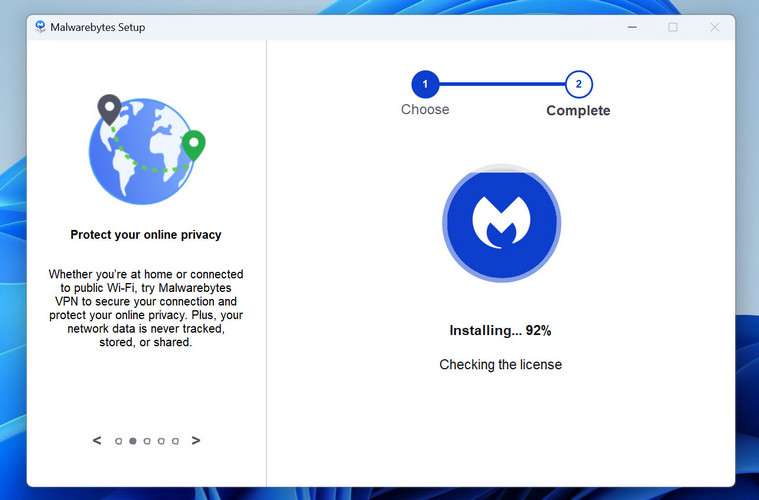
Malwarebytes will now install on your device. This usually takes under a minute.
-
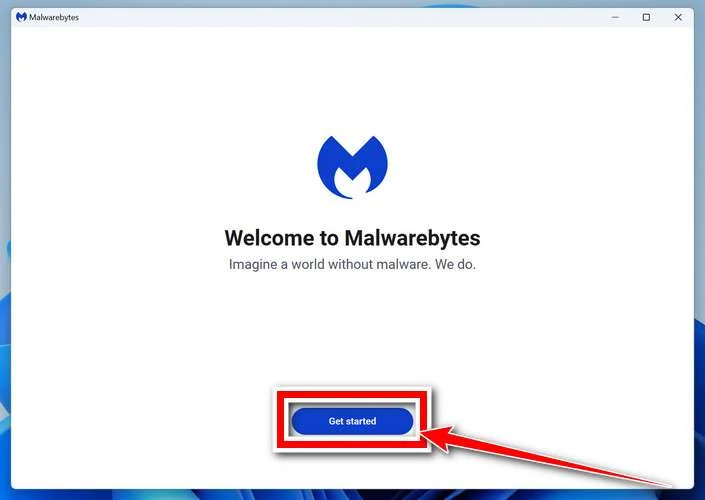
When installation is complete, the “Welcome to Malwarebytes” screen will open automatically.
-
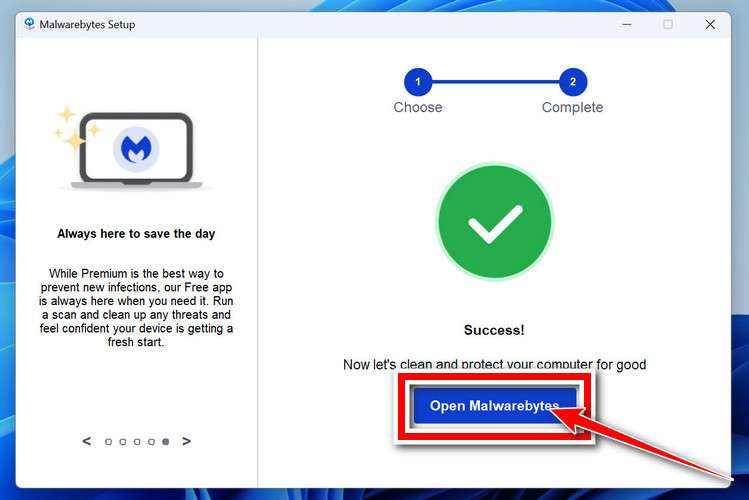
On the final screen, click Open Malwarebytes to launch the program.
-
Optional: Check for rootkits with a Custom Scan
You don’t need to change any settings for a normal scan. The standard Threat Scan in the next step is enough for most problems, so you can go straight to it.
If you also want to check for rootkits, use a Custom Scan. In current versions of Malwarebytes, rootkit scanning is only available there:
- On the Scanner tile, click the three-dot menu and select Advanced Scan.
- Choose Custom Scan. In its options, check Scan for rootkits.
- Select your system drive (usually C:\) as the location to scan, then start the scan. It takes longer than a Threat Scan.
- When it finishes, review and quarantine the results as described in the steps below.
Rootkit scanning isn’t available on Windows devices with ARM processors.
Start the Scan
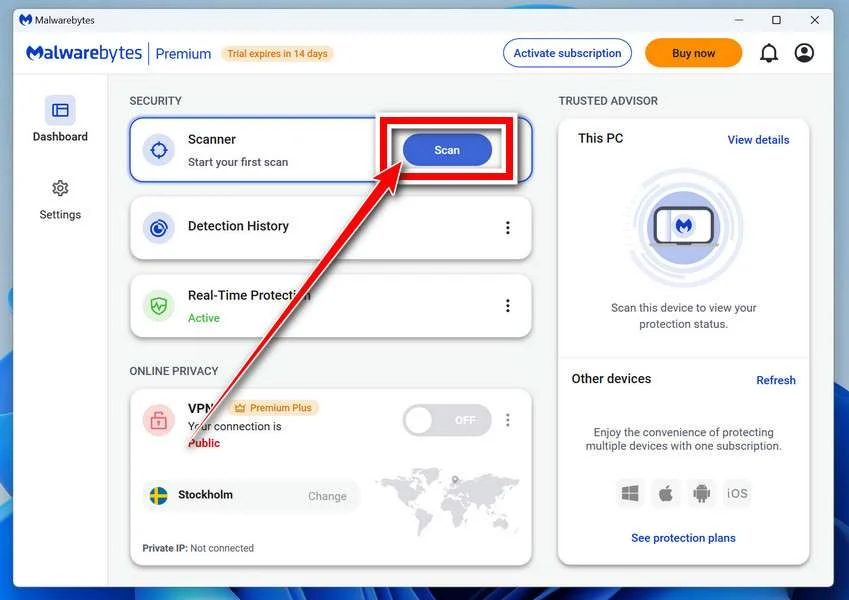
Click the blue Scan button. Malwarebytes will automatically update its virus database and start checking your computer for malware.
-
Wait for the Scan to Finish
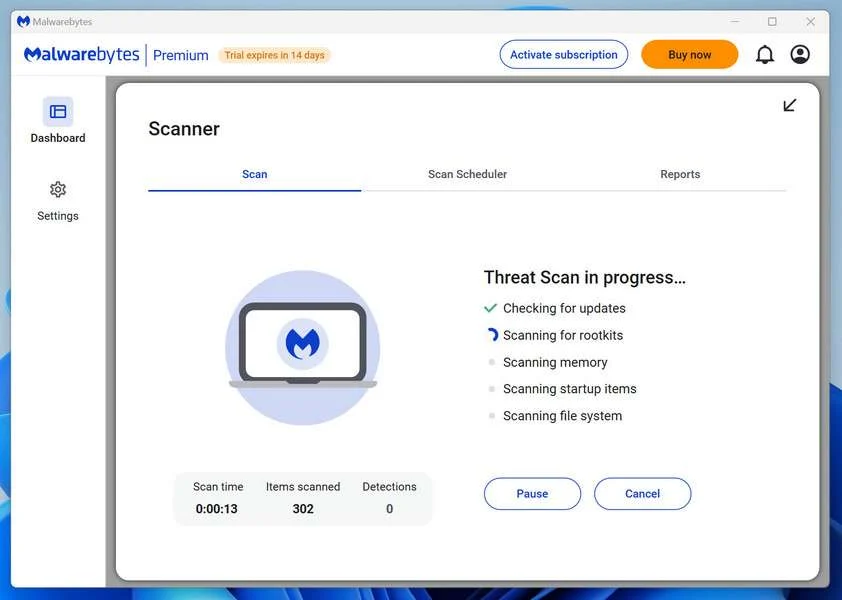
The scan checks your entire system for browser hijackers and other malicious programs, so it can take 5 to 20 minutes depending on your computer. Feel free to do something else — just check back occasionally to see the progress.
-
Quarantine the Detected Threats
When the scan is done, you’ll see a list of everything Malwarebytes found — malware, adware, and potentially unwanted programs. Click the “Quarantine” button to remove all of them at once.
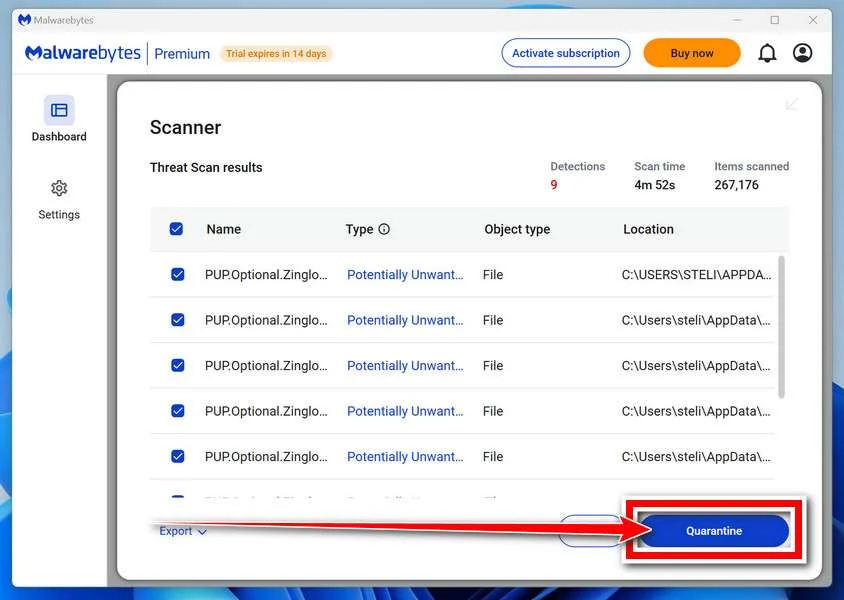
Malwarebytes will now remove the malicious files and registry entries and move them safely into quarantine.
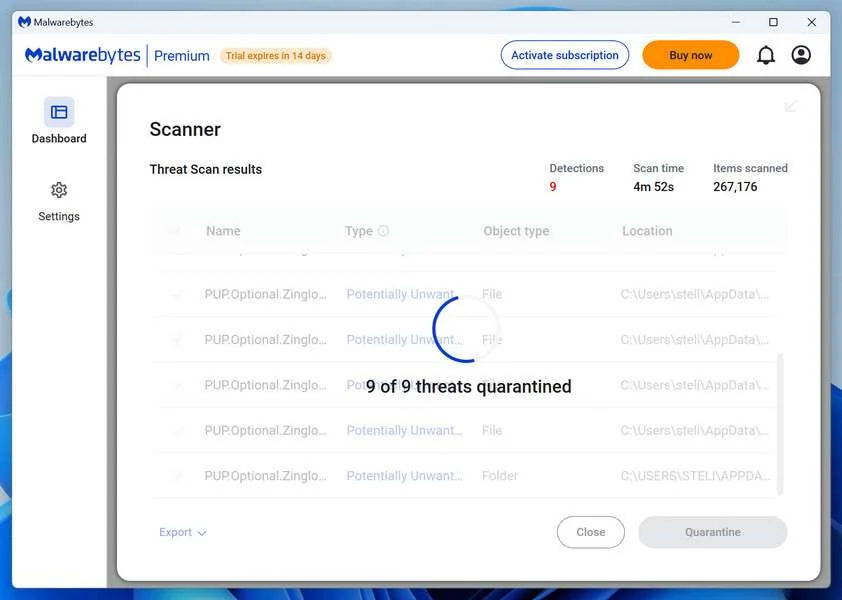
-
Restart Your Computer
Some threats can only be fully removed after a reboot. If Malwarebytes asks you to restart, click Yes. Once you’re logged back in, Malwarebytes has finished removing the threats it found.
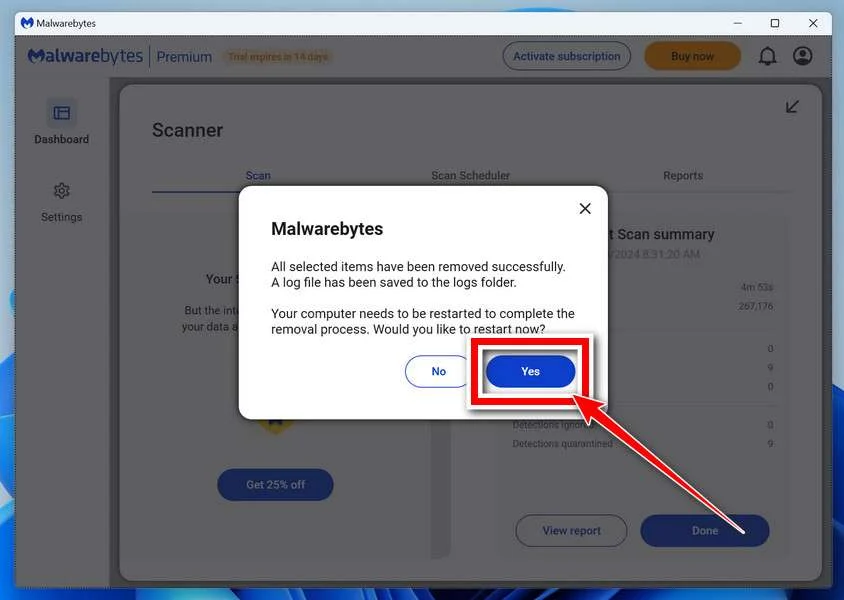
When the scan is done, check whether the problems you noticed have stopped. If they continue, see the options below.
If you are still having problems with your computer after completing these instructions, then please follow one of the steps:
- Run a computer scan with ESET Online Scanner
- Ask for help in our Windows Malware Removal Help & Support forum.
Run a Malware Scan with Malwarebytes for Mac
Malwarebytes for Mac is a free on-demand scanner that removes the malware other security software tends to miss — adware, browser hijackers, and unwanted programs included. Cleaning an infected Mac with Malwarebytes has always been completely free, and it’s our go-to recommendation. Follow the steps below to scan your Mac and remove what Malwarebytes finds.
-
Download Malwarebytes for Mac
Click the button below to download the latest version of Malwarebytes for Mac.
Download MalwarebytesOfficial installer for macOS. Your download starts right away.Want real-time protection? See Malwarebytes PremiumMalwarebytes Free for MacScans and removes malware at no cost -
Open the Malwarebytes setup file
When the download finishes, open your Downloads folder and double-click the setup file to begin the installation.
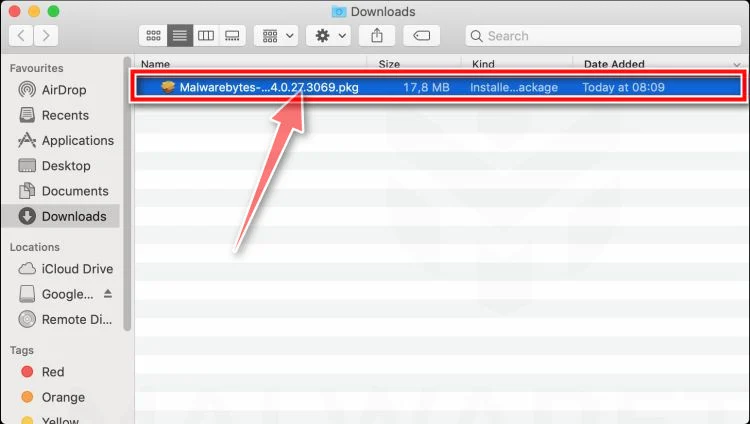
-
Follow the On-Screen Prompts to Install Malwarebytes
The Malwarebytes for Mac Installer will guide you through a few quick screens. Click “Continue” and keep following the prompts until the installation completes.
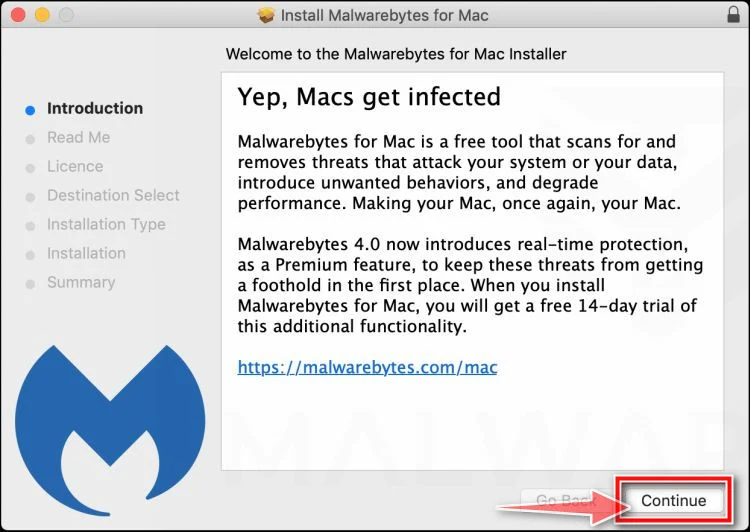
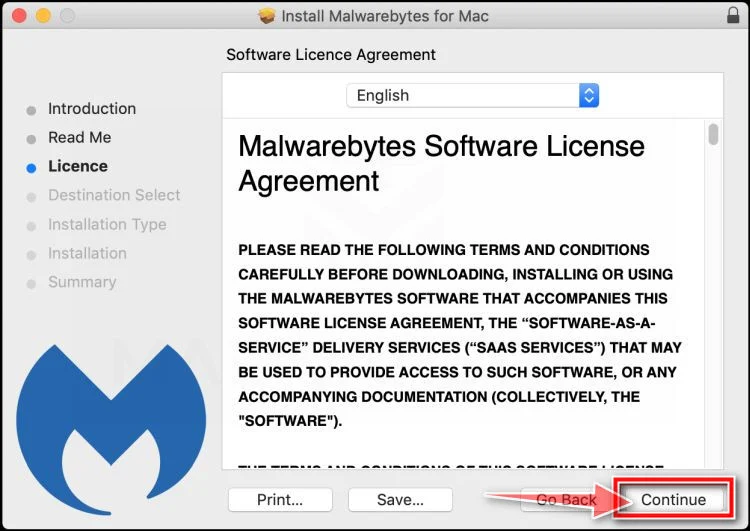
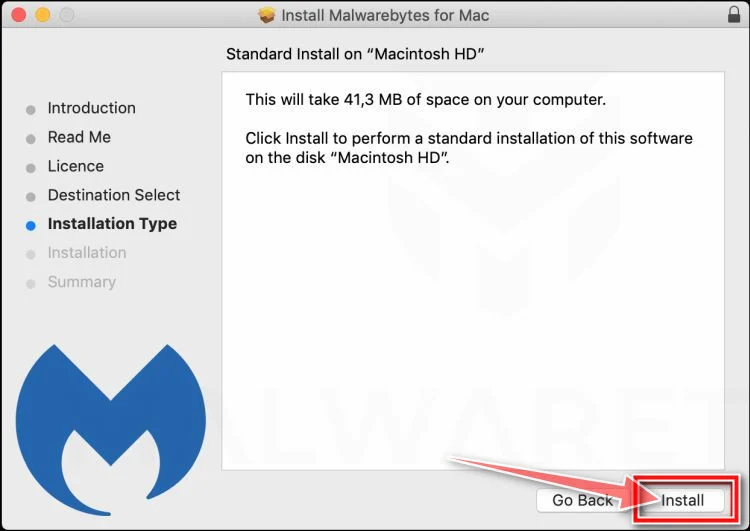
When the installation is complete, Malwarebytes opens to the Welcome to Malwarebytes screen. Click “Get started“.
Malwarebytes needs Full Disk Access to check your whole Mac. When it asks, open System Settings > Privacy & Security > Full Disk Access, turn on Malwarebytes (it may be listed as Malwarebytes Protection), and confirm with your password or Touch ID. Then return to Malwarebytes. On macOS Monterey and earlier, this setting is in System Preferences > Security & Privacy > Privacy.
-
Select “Personal Computer” or “Work Computer”
Malwarebytes will ask what type of computer you’re installing it on. Click either Personal Computer or Work Computer, whichever applies.
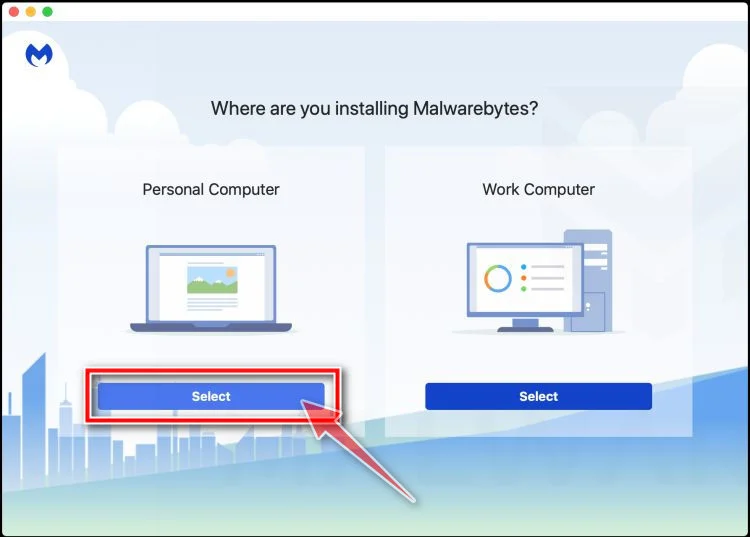
-
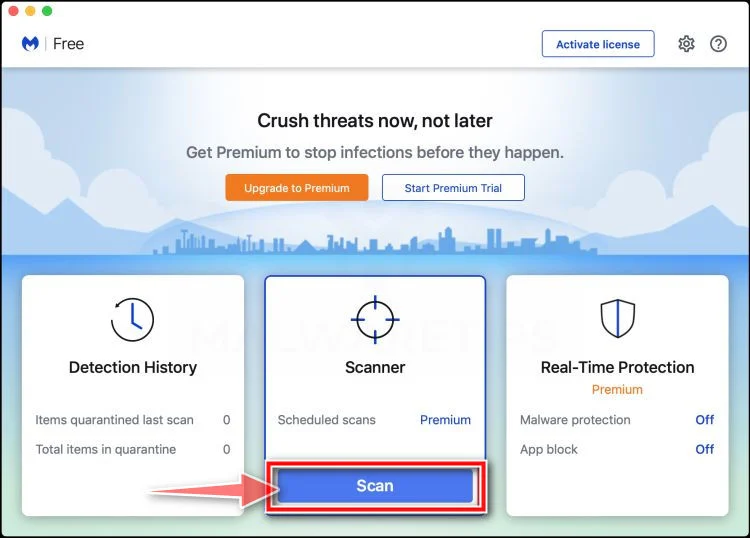
Start the Scan
Click the “Scan” button. Malwarebytes will automatically update its detection database and begin checking your Mac for malware.
-
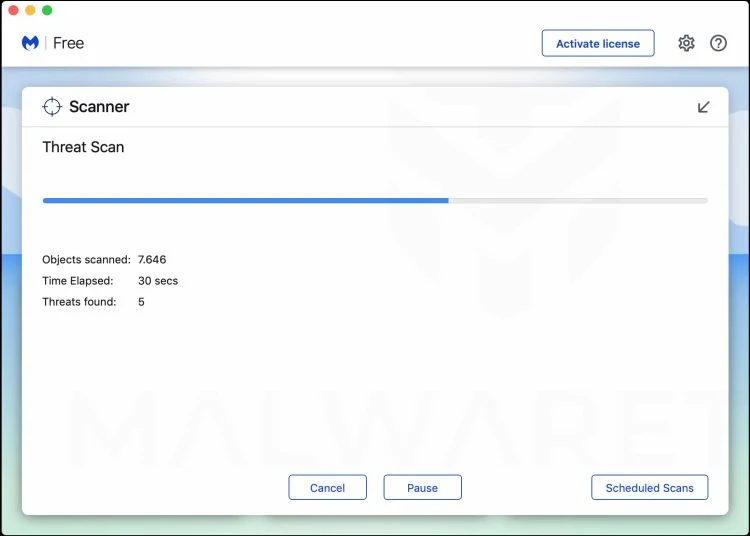
Wait for the Scan to Finish
Malwarebytes will scan your Mac for adware, browser hijackers, and other malicious programs. This can take a few minutes, so feel free to do something else — just check back occasionally to see the progress.
-
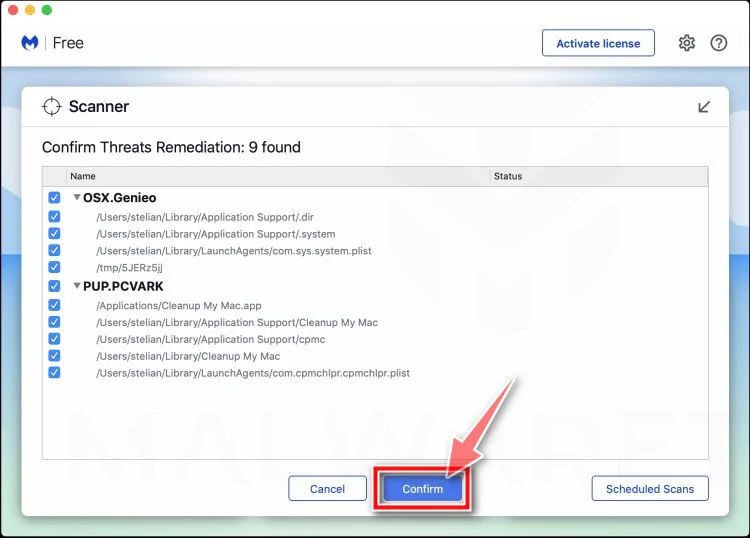
Quarantine the Detected Threats
When the scan is done, you’ll see a list of everything Malwarebytes found. Click the “Quarantine” button to remove all the threats at once.
-
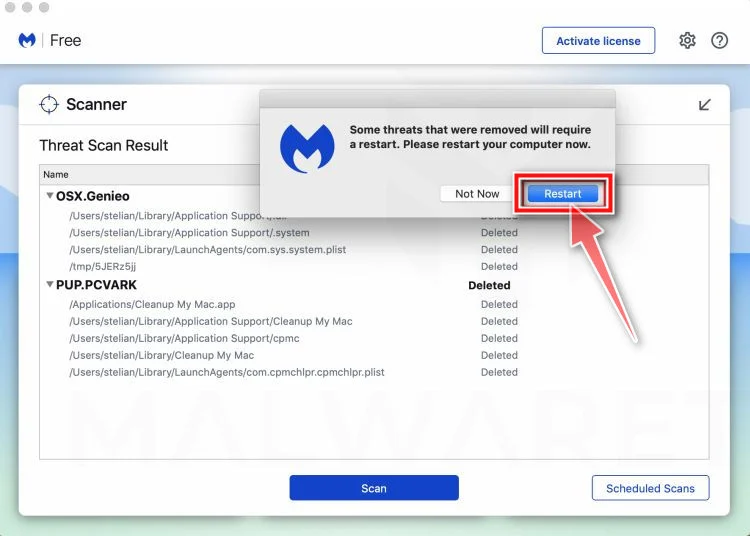
Restart Your Mac
Malwarebytes will now remove all the malicious files it found. Some threats can only be fully removed after a reboot — if Malwarebytes asks you to restart, allow it. Once you’re logged back in, check whether the problems you noticed have stopped. If they come back, save the scan report and ask for help in our forum.
If the problems you noticed continue after the scan, see the options below.
If you are still experiencing problems while trying to remove a malicious program from your computer, please ask for help in our Mac Malware Removal Help & Support forum.
Run a Malware Scan with Malwarebytes for Android
Malwarebytes for Android scans your phone or tablet for malware, adware, and potentially unwanted apps. The free version scans only when you start a scan. Real-time protection, which checks apps automatically, is part of the paid Premium version.
-
Download Malwarebytes for Android.
You can download Malwarebytes for Android by clicking the link below.
Get Malwarebytes for AndroidOpens Google Play in a new tab.Want real-time protection? See Malwarebytes Premium for AndroidMalwarebytes for AndroidScans your phone and removes malware at no cost -
Install Malwarebytes for Android on your phone.
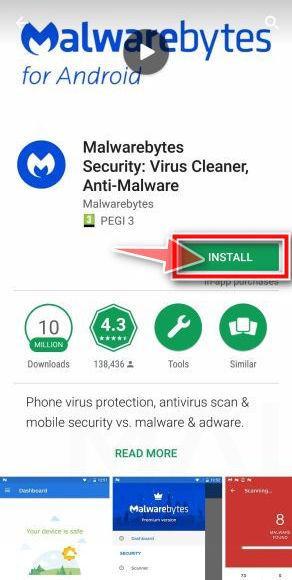
In the Google Play Store, tap “Install” to install Malwarebytes for Android on your device.
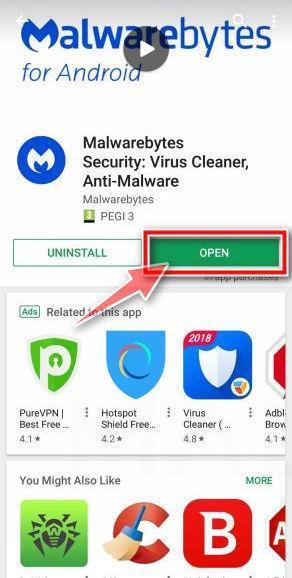
When the installation process has finished, tap “Open” to begin using Malwarebytes for Android. You can also open Malwarebytes by tapping on its icon in your phone menu or home screen.
-
Follow the on-screen prompts to complete the setup process
When Malwarebytes opens, it walks you through a short setup. Tap Get started and follow the prompts. If you see an offer for a trial or a paid plan, read it before you accept. You can skip it and keep using the free scanner.
Malwarebytes will ask for permission to access the files on your phone so it can scan them. Tap Allow, or turn on the permission in the Android screen that opens, then return to Malwarebytes.
-
Run a scan with Malwarebytes for Android
On the main screen, tap Scan now. In some versions, you open the menu, tap Scanner, and then tap Run a scan.
-
Wait for the Malwarebytes scan to complete.
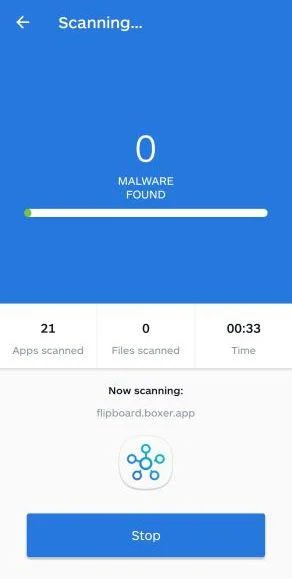
Malwarebytes will now start scanning your phone for adware and other malicious apps. This process can take a few minutes, so we suggest you do something else and periodically check on the status of the scan to see when it is finished.
-
Remove the detected apps.
When the scan has been completed, you will see a list of the threats that Malwarebytes for Android has detected. Next to each detected item, tap the menu icon (three dots), then choose to uninstall the app or delete the file. Android then asks you to confirm. Tap OK or Uninstall to remove the app.
-
Restart your phone.
When the detected apps are removed, restart your phone if Malwarebytes asks you to. Then check whether the problems you noticed have stopped.
If the problems you noticed continue after the scan, see the options below.
If you are still having problems with your phone after completing these instructions, then please follow one of the steps:
- Ask for help in our Mobile Malware Removal Help & Support forum.
- Only as a last resort, reset your phone to factory settings. Read the warning below first.
- Back up your photos, videos, files, and messages, for example to your Google account or a computer.
- Make sure you know your Google account email and password. The phone asks for them after the reset. If you changed the password recently, Google recommends waiting 24 hours before you reset.
- On a Samsung phone, also make sure you know your Samsung account password.
- If you use an authenticator app for two-step verification, move your accounts to another device or save your backup codes first.
Stay Protected: Block Ads and Malicious Sites
No scan can prove a device is completely clean, so it helps to block threats before they reach you. Most infections start with a malicious ad or a fake download button — so blocking them at the source is your best defense.
We recommend AdGuard, which blocks malicious ads, phishing pages, and dangerous redirects before they can reach you.
👉 Download AdGuard and browse safely
Frequently Asked Questions
Is “Signed Contract for Business Collaboration” a real LinkedIn email?
The documented message came as a buyer inquiry with an HTML attachment. It is not proof of a LinkedIn contract or a verified order.
Is a file ending in .pdf.html a PDF?
No. In the recorded filename, the final extension is HTML. It can open in a browser and should not be treated as a signed PDF.
Why did the file ask me to log in to LinkedIn?
The copied page uses an alleged security check to request credentials. Open your actual LinkedIn account yourself if you want to check for a genuine message.
Does opening the file mean my computer is infected?
Not automatically. The recorded behavior was a fake login. If you opened the file or ran anything else, tell IT or use trusted device security help as appropriate.
What if the buyer name belongs to a real person?
A real name is not authentication. Confirm the sender and order through independent business contacts. Your own LinkedIn login should not be part of that verification.
What if I entered my password but I can still sign in?
Change the password promptly and check sessions, recovery settings and messages. Being able to sign in doesn’t rule out access by someone else.
The Bottom Line
Don’t open the supposed contract or enter a password to see the order. Verify the buyer through an independent business channel.
If you entered a password, secure LinkedIn and any accounts that reuse it. If you opened the unknown file, report that separately and check the device as appropriate.

Join the discussion
0 commentsShare your experience or ask a question about this article.
Discussion
Start the conversation
Have a question or something useful to share? Add the first comment.