


Your backup drive has years of photos, old projects, and the files you kept just in case. Then your antivirus flags something inside it.
Deleting everything feels drastic, but restoring everything feels risky. Before choosing either, take a closer look at what the warning is actually pointing toward.
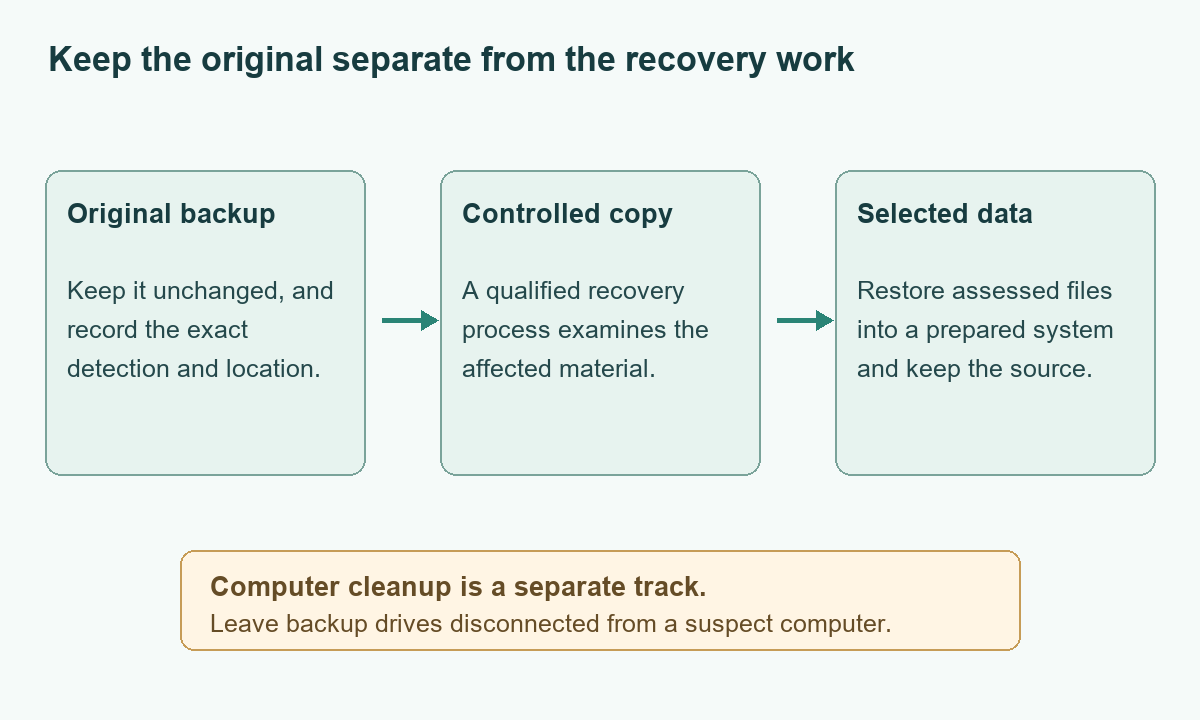
Overview
The location matters before the detection label
An antivirus report can identify a malicious file stored on a backup drive. That finding deserves attention, but its location changes the next decision.
A dangerous installer saved years ago is different from a program currently running on your computer. Both matter, but they call for different investigations.
Start with the report’s full location, recorded action, and time. A threat name alone cannot tell you which recovery copy you should keep.
A backup may contain more than ordinary documents
One external disk might hold loose photos, compressed archives, email stores, and a complete system image. Those items cannot all be handled the same way.
Quarantining a single unwanted installer may leave the remaining files available. An action against one large container can affect access to much more data.
- Keep the original report and identify the exact object it names.
- Find out whether another independent recovery copy exists before making changes.
- Separate cleaning the computer from choosing which backed-up data to restore.
The most important question is what you can replace
A replaceable download and the only surviving copy of family photographs deserve different handling. Do not let a bulk-selection button make that choice for you.
When a finding involves irreplaceable data, leave the backup isolated and get qualified preservation advice before another automated scan or recovery attempt changes it.
This guide focuses on that decision. It does not assume that every file on the disk is infected or that any particular recovery method will succeed.
Read the Report Before Touching the Backup
Keep the drive disconnected from a computer that may still be compromised. Do not reconnect it repeatedly just to see whether the warning returns.
Use the report already available to record the drive label, full path, detection name, timestamp, and action. Preserve the original export where your scanner permits it.
A path ending in an installer identifies a different object from a path ending in a backup image. Some reports also show members inside an archive.
If the displayed path is truncated, expand the report or export its details. Do not guess which similarly named folder contains the detected item.
| Reported location | What to establish next | Avoid this shortcut |
|---|---|---|
|
A standalone file inside an old downloads backup. |
Check whether this is the only flagged item and whether the download can simply remain unused. |
Do not run it to determine whether the antivirus warning is genuine. |
|
A member inside a compressed archive or backup container. |
Determine whether the proposed action affects the member, the container, or an entire backup set. |
Do not accept bulk deletion before understanding which other files would become unavailable. |
|
A location on the current Windows system drive. |
Investigate the computer separately and keep the recovery disk away from that investigation. |
Do not assume that removing the backup’s copy removes a running program elsewhere. |
Keep detection history separate from quarantine. Deleting a report is not the same action as removing the file, and neither decision should be made accidentally.
Malwarebytes explains its quarantine controls separately. Restoring returns the item, while deleting the quarantined item removes that recovery option.
Three Backup Situations That Need Different Decisions
An old download sits beside otherwise useful photographs
Consider a worked example with three folders: family photographs, a school project, and downloaded installers from an older laptop. The report names one unwanted downloaded installer.
The family still has copies of the photographs on another independent disk. They do not need the installer, and no one reports opening it recently.
The sensible goal is to preserve the useful recovery copies and leave the unwanted program unused. Wiping the entire disk would sacrifice information unnecessarily.
The report still cannot certify every neighboring file. It gives the person handling recovery a specific finding to assess, rather than a reason to erase everything.
The warning names the only large backup file
Now consider a different backup: one large image contains the only copies of several projects. The antivirus proposes an action against that container.
This is where convenience becomes dangerous. Deleting the one visible file could also remove the person’s only route to the projects they wanted to recover.
Stop using the disk and explain the situation to a qualified recovery specialist. Ask about preserving the original and examining a controlled working copy.
Do not mount the suspect image on another everyday computer, disable protection, or create an exclusion so the recovery program can open it.
A fresh copy appears after every normal backup
In a third example, a newly created backup contains a file with the same name each week. Removing the old backup copy does not explain that pattern.
The source computer or backup job may be copying it again. Compare the recorded paths and dates before deciding that a protected backup somehow recreated malware.
Keep the affected source out of ordinary use while its state is assessed. Do not expose another good backup to the same machine to test a theory.
A recovery plan must address the source as well as the stored copies. Otherwise, a successfully restored file can return to an unsafe environment.
What to Do When Your Backup Triggers an Alert
-
Preserve the warning and the current situation. Save the report, note which drive was connected, and record any action the antivirus already performed.
Do not empty quarantine, format the disk, or run a disk-cleanup utility. Those actions can make the recovery decision harder to reverse.
-
Identify the backup’s owner and purpose. Find the backup program, approximate date, and whether this is a file collection or a system image.
For work, school, shared business records, or regulated information, contact the responsible administrator. Do not copy those records into a personal cloud account for convenience.
-
List independent alternatives without reconnecting the suspect disk. Check existing backup records, another disconnected copy, or the provider’s independently accessed version history.
Two folders on the same physical disk are not independent recovery copies. Record which copy would survive if that disk failed completely.
-
Protect an irreplaceable original before attempting recovery. If a container holds your only copies, seek specialist help with preservation and controlled examination.
Do not start another automatic scan simply because it promises a quick answer. Depending on the product and finding, scanning can trigger quarantine or another change.
-
Prepare the recovery destination separately before restoring. Resolve active infection first, and obtain replacement applications through their genuine publishers rather than old backed-up installers.
Use the illustrated Windows procedure below only when the computer itself needs investigation. It does not require attaching the affected backup drive.
-
Restore selectively through a verified recovery route. Keep recovered files separate from current work and retain the source until recovery has been checked.
If the same warning follows a recovered item, stop using that item and preserve the new report. Repeatedly restoring it is not troubleshooting.
Keep the only surviving recovery copy intact. A scan result is not permission to discard the rest of a backup. An urgent deadline does not make an unsafe restore safer.
Choose a Recovery Route That Matches the Backup
File versions are different from a complete system image
A file-level backup lets you choose particular documents or versions. A system image can return operating-system files, installed software, and settings as well.
Do not choose an old image merely because its date comes before the alert. The first warning is not necessarily the first day of compromise.
The NCSC’s backup guidance warns that malicious content can reach backups before an incident is discovered. A date needs context, not automatic trust.
File History can preserve the current version too
For an already assessed backup, Microsoft’s File History instructions explain choosing a previous version and using Restore to for a different destination.
That destination choice avoids immediately replacing the current file. It is a recovery control, not a way to make an untrusted version safe.
Do not preview or open a suspicious document merely to compare its contents. Have the recovery route and the candidate assessed before bringing them into normal use.
A cloud copy can follow the same damaged files
Synchronization can carry unwanted changes between locations. A cloud folder showing the latest file is not automatically an independent, earlier recovery version.
Microsoft’s OneDrive ransomware workflow puts connected-device cleanup before file restoration. Otherwise, restored files may encounter the same unresolved problem.
Check the provider’s actual version availability and account recovery options. Do not assume every plan keeps unlimited history, and let administrators handle shared workplace storage.
Check the recovery result without sacrificing the source
A recovery can finish without returning the version you need. Before declaring success, compare the recovered inventory with the list made before work began.
For example, a school project might include a report, source photographs, and a separate spreadsheet. Recovering the report alone leaves the project incomplete.
Ask whoever handled recovery to identify missing items, renamed files, and unresolved detections. Keep those exceptions with the original antivirus report instead of losing them.
Do not confuse checking a filename with checking its safety. Opening every recovered document to see what happens is not an appropriate malware assessment.
Where files have been assessed for normal use, confirm the needed versions in the prepared environment. Keep these checks separate from evaluating unresolved suspicious items.
If a recovered folder is empty, do not immediately repeat the same operation against the original. Record the result and have the recovery plan reassessed.
Do not reuse the source disk as the destination for new recovered files. Keeping recovery output separate prevents ordinary saving from changing the material still under examination.
Once the required files have been assessed and checked, create a new independent backup. Keep the earlier source until its unresolved recovery questions are settled.
If the Windows Computer Also Needs Cleanup
This procedure is for the computer, with backup media disconnected. A report naming only stored backup content does not automatically require treating the computer as infected.
Pause here if an uncertain or irreplaceable local store could be changed by automatic quarantine. Arrange preservation help before scanning that machine.
Step 1: Separate the affected computer from recovery storage
For an active suspected compromise, disconnect Wi-Fi and unplug Ethernet. Stop sensitive account use, and leave recovery drives disconnected while you assess the host.
Keep its existing alerts and report what you observed. On a managed device, wait for the security team’s instructions before cleanup, installation, or restarting.
Obtain the verified installer and updates through a trusted route when appropriate. If you cannot do that safely, use qualified assistance rather than experimenting.
Step 2: Download the legitimate Windows scanner
Use one of the download routes below. Keep the earlier suspicious file closed instead of returning to its download page for another installer.
Download the Malwarebytes Installer for Your Windows Computer
Open the Free Malwarebytes Scanner Download Page Instead
You can use manual scanning and quarantine without buying ongoing protection. A paid prevention plan is optional, not a requirement for this cleanup.
Compare Optional Malwarebytes Premium Protection for Windows Devices
MalwareTips may receive a commission through the affiliate links. You can still follow the free scanning procedure without purchasing the paid plan.
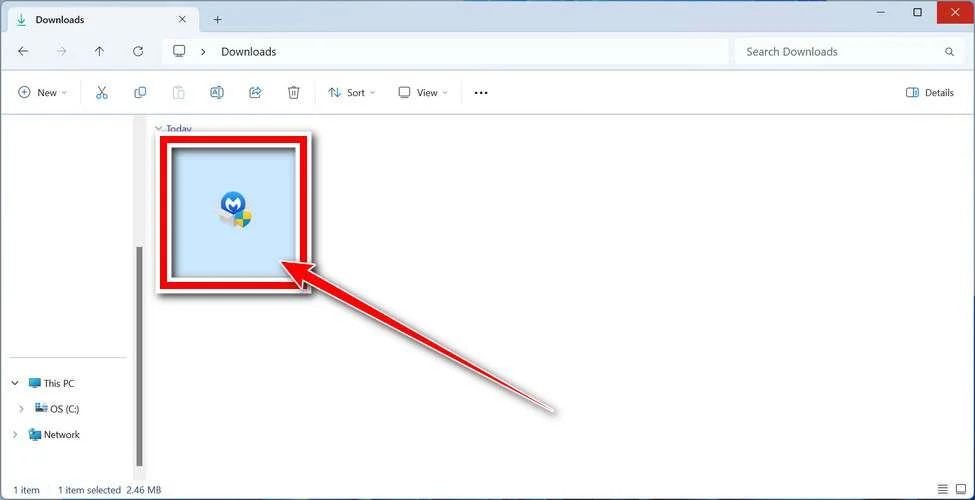
Open your Downloads folder and locate the MBSetup file obtained through the verified route. Do not select a similarly named file from an earlier download.
Step 3: Install the scanner and let it update
Open MBSetup and check the expected publisher before approving Windows’ permission prompt. Follow the setup screens to install the application on your personal computer.
Setup may offer additional products, a trial, or a subscription. Decline optional offers you do not want, using Skip where that choice appears.
Open Malwarebytes when installation finishes and allow available updates. If setup is blocked or fails, keep the error details and seek help.
Do not disable existing protection or obtain a replacement installer from an advertisement. On an organization-managed computer, let your security team choose the tools.
Step 4: Choose the free Custom Scan
On the Scanner tile, open the three-dot menu and choose Advanced Scan.
Expand the file finder and select your local Windows system drive, usually C:\. Include relevant local folders, but leave backup drives disconnected.
Set detections of PUPs and PUMs to be treated as malware. Choose Start Custom Scan and let the examination finish before reviewing its report.
Custom Scan is available without purchasing protection. If the dashboard offers a paid Threat Scan, return to the Custom Scan route instead of purchasing protection.
Use this menu path: Scanner tile menu > Advanced Scan > Custom Scan. This avoids the separate dashboard Scan button.
Step 5: Review the locations before taking action
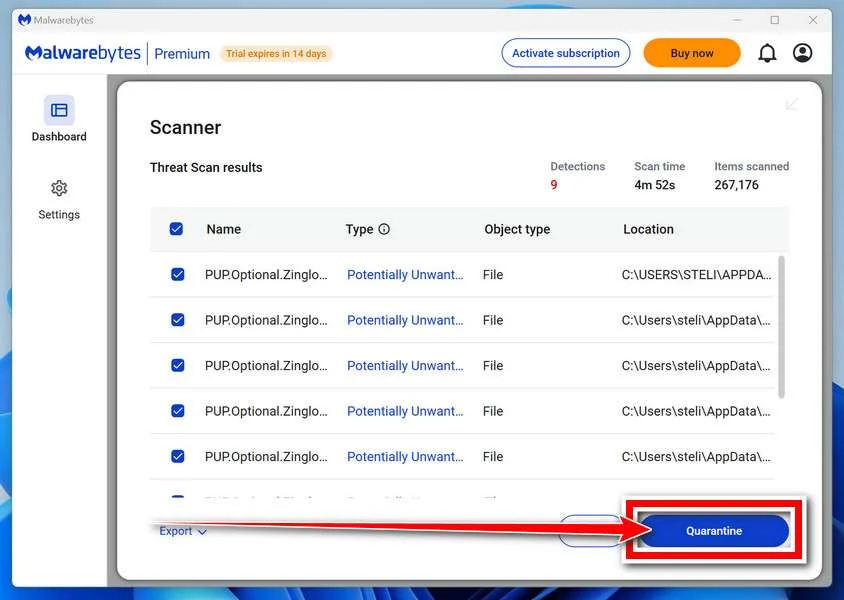
Read each detection’s name and file location. Keep confirmed malicious files selected for Quarantine, then save the report so you can compare later results.
If a finding affects irreplaceable data or remains uncertain, seek qualified help before changing it. Never restore an untrusted item merely to make an application work.
Step 6: Complete a requested restart and check again
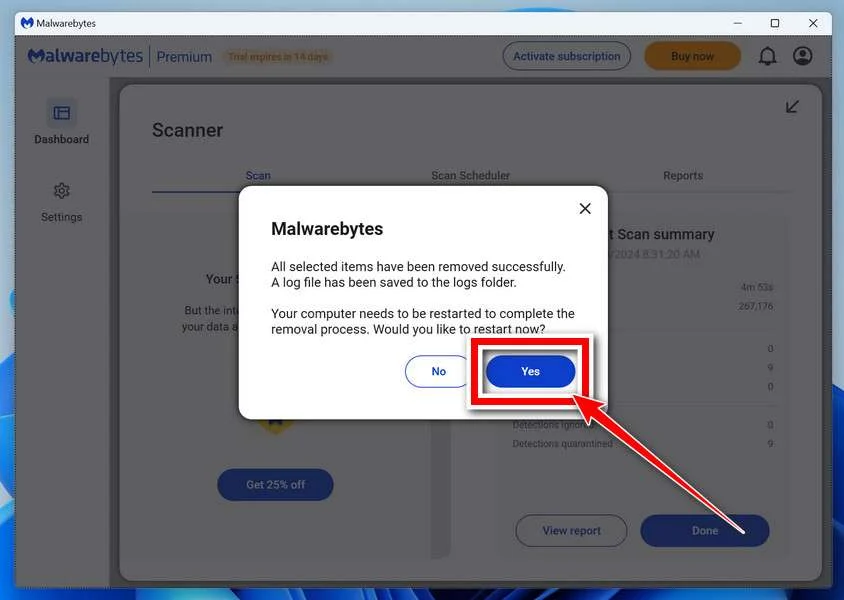
If Malwarebytes requests a restart, save open work and accept it. Reopen the application afterward and check whether any removal action still needs attention.
Run another updated scan and compare its findings with the saved report. New or recurring detections deserve investigation instead of repeated blind deletion.
A clean report cannot settle every account or recovery question. Continue the case-specific checks in this article, even when the original warning stops appearing.
Step 7: Resolve persistence before returning to recovery
If tools cannot run, detections return, or unfamiliar activity continues, keep the computer separate. Share the saved findings with a qualified responder before reconnecting backups.
The MalwareTips malware removal assistance forum can help interpret a report. Remove private identifiers from shared copies and never upload the backup itself.
Computer cleanup and account recovery remain separate. If sensitive credentials were exposed, protect the affected accounts from another trusted device rather than using the suspect computer.
Prepare a Useful Handoff Without Sharing Your Files
A clear summary helps a technician protect the right material. You do not need to disclose the contents of personal documents to explain the initial problem.
- Identify the backup program, disk label, and the detection’s recorded file location.
- State whether another independent copy exists and which files are irreplaceable.
- List the scanner’s completed actions, including any quarantine or deletion already accepted.
- Explain whether a suspicious file was opened, or only found during storage scanning.
Keep the original report privately and share a redacted copy through the support channel. Paths can reveal account names, customer information, or sensitive project titles.
Do not post recovery keys, passwords, full mail archives, or the backup image in a forum. Ask the responder which limited diagnostic details are actually needed.
Frequently Asked Questions
Does a backup detection mean every file is infected?
No, the report identifies particular findings within the scanner’s scope. Other files still require an appropriate recovery assessment; neither blanket deletion nor blanket trust follows.
Can I restore a backup from before the warning?
An earlier date is useful context, not a clean certificate. Check the incident timeline, backup contents, and destination before relying on that version.
Should I delete the entire infected archive?
Not before understanding what it contains and whether another copy exists. For an irreplaceable container, preserve the original and obtain qualified help first.
What if the antivirus already quarantined my backup?
Leave it quarantined while you record the finding and seek recovery advice. Do not restore an untrusted container or empty quarantine in a hurry.
Will scanning decrypt ransomware-damaged backup files?
Malware removal and decryption are different tasks. Recovery depends on usable earlier copies or a genuinely applicable decryptor, not simply on buying an antivirus plan.
When can I reuse the backup drive normally?
Only after the findings and recovery needs have been resolved. Keep the original available until restored data and a new independent backup have been checked.
The Bottom Line
Do not erase or restore an entire backup because one detection appears. Identify the affected object, preserve irreplaceable copies, and separate computer cleanup from data recovery.
If the only copy is uncertain, leave it isolated and get preservation help. Recover selected assessed data into a prepared environment instead of gambling with everything.

Join the discussion
0 commentsShare your experience or ask a question about this article.
Community experiences
Did this happen to you?
Your experience could help someone recognize the same scam. Submit a private report for our team to review.
I experienced this tooReports are reviewed before publication. Sharing publicly is always your choice.
Discussion
Start the conversation
Have a question or something useful to share? Add the first comment.