


A document that opened yesterday now has an unfamiliar ending. Beside it sits a text file with a name you don’t remember creating.
Then a countdown appears, and every decision starts to feel urgent. Before touching the files or following the note, take stock of what has changed.
Overview
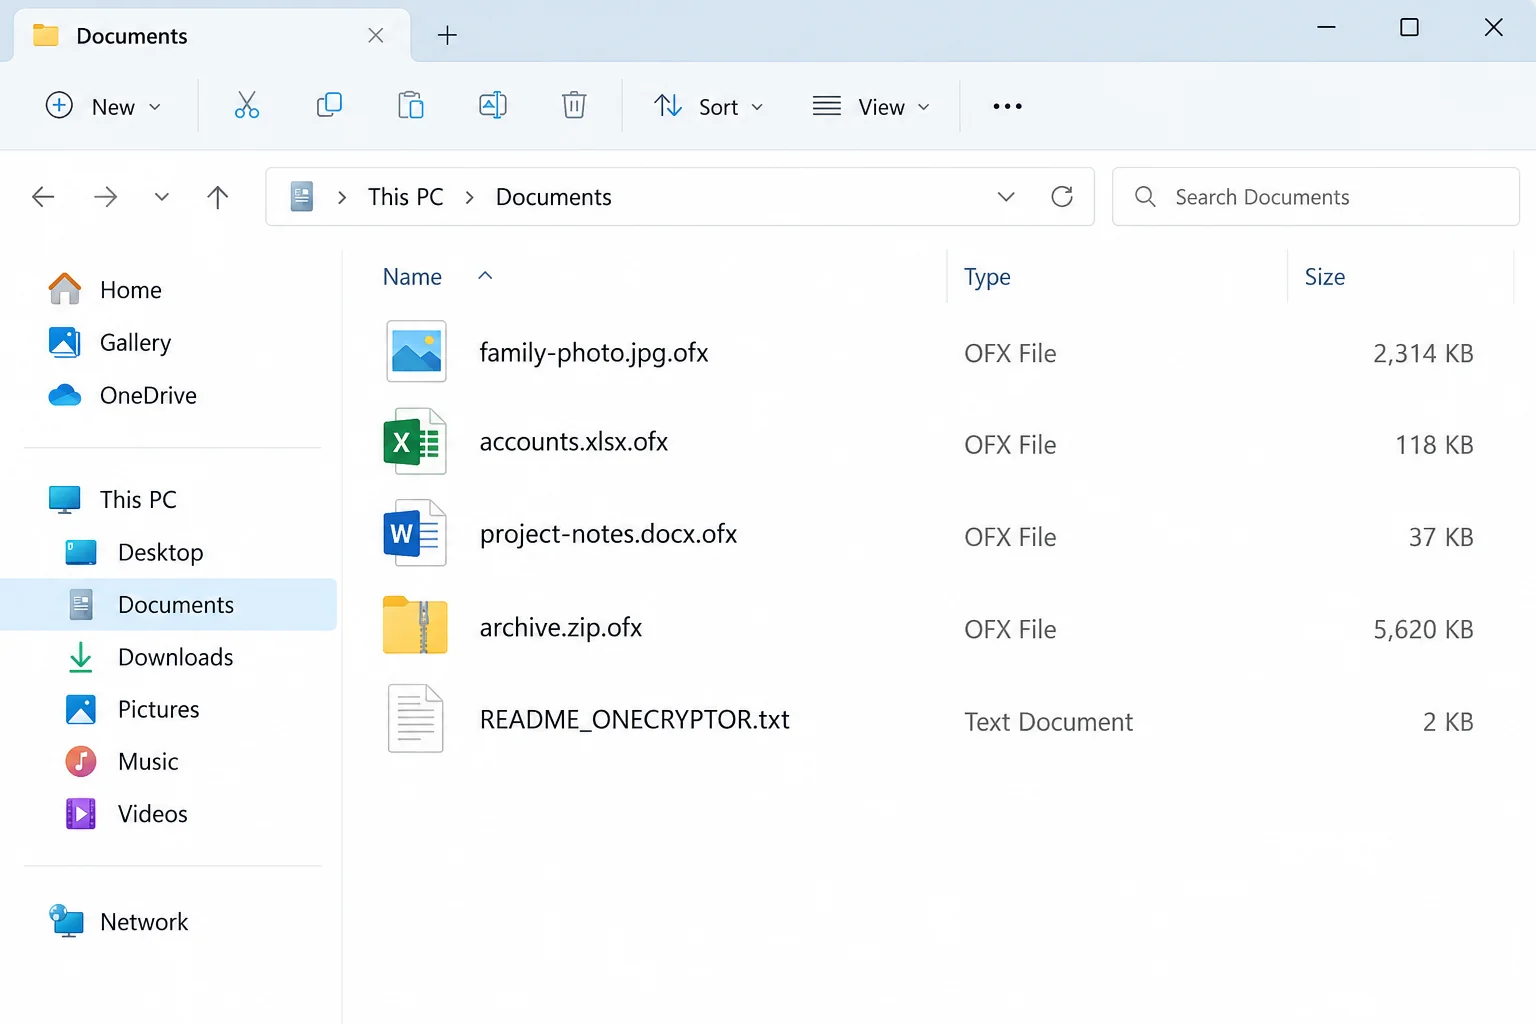
The .ofx filenames and OneCryptor note are the identifying clues
One Decryptor ransomware is reported to append .ofx to encrypted filenames and create README_ONECRYPTOR.txt. A popup accompanies the note.
The OneCryptor name also appears in the attacker’s material. These details help distinguish the incident from an ordinary application error or a damaged single document.
There is an important exception: .ofx is also used legitimately for financial-data files. A file extension alone is not a malware diagnosis.
The payment clock is an extortion demand, not a recovery guarantee
The reported demand starts at 0.42 BNB and threatens to double after 72 hours. The attacker claims payment will produce a decryptor.
Those are the criminal’s terms, not instructions to follow. A convincing timer cannot demonstrate that a working recovery tool will be delivered.
Claims about encryption and deleted recovery data should be checked against the affected machine. Do not assume that every statement in a ransom note is independently verified.
Containment, removal, and recovery are three different jobs
First stop further exposure. Then address the infection and investigate how it arrived. Only afterward should restored data return to a trusted environment.
- Disconnect affected systems and keep clean backups away from them.
- Preserve the ransom note and untouched encrypted files.
- Use qualified incident help for business systems or irreplaceable data.
- Remove malware or rebuild the affected environment before restoration.
- Check matching recovery options without experimenting on your only copies.
The image is a fictional file-list illustration. The filenames and sizes explain the visible pattern, not the contents of an actual infected computer.
Recognizing Encryption Without Making the Damage Worse
Start with the change you can observe. Were many previously usable files renamed around the same time, and did a ransom message appear with them?
A spreadsheet named accounts.xlsx.ofx is different from a bank statement that was always an OFX file. Its earlier name and behavior provide necessary context.
Do not repeatedly open every document to test the damage. Once a wider encryption pattern is apparent, isolation matters more than producing a complete list manually.
Do not remove the appended extension as a repair attempt. Renaming a file changes its label, not the encrypted contents inside it.
Keep the original folder structure where possible. It can help compare encrypted material with backups and prevent restored files from being confused with damaged ones.
If the computer belongs to an employer, stop troubleshooting alone. The machine may be only one affected part of a larger environment.
Use a separate, clean communication device to tell the response team what you saw. Avoid using the suspect computer to open password managers or business accounts.
Keep original, encrypted, and restored copies clearly separated
Give each recovery destination a clear purpose. Mixing restored files back into the damaged folder can make later comparisons unnecessarily difficult.
Record which backup date supplied a restored folder and when the restoration occurred. That helps explain missing recent work without mistaking it for another encryption event.
For shared projects, ask users to avoid replacing each other’s copies while recovery is underway. One apparently newer document may contain less usable work than an older backup.
Preserve application-specific records too. A collection of database files is not necessarily a consistent backup that the application can safely reopen.
When handing the incident to another technician, include the recovery history. They need to know which files remain untouched and which tools have already changed copies.
What One Decryptor’s Ransom Message Is Trying to Achieve
It presents the attacker as the only route back
The note’s encryption language is intended to make the files appear dependent on a key controlled by the criminal. It discourages attempts at independent recovery.
Strong encryption can indeed prevent ordinary file repair. But the note cannot tell you whether a separate backup, surviving version, or suitable specialist tool exists.
Do not confuse those possibilities. A backup restores another copy; a decryptor reverses supported encryption; deleted-file recovery looks for originals that may still remain.
None is interchangeable with buying antivirus software. A scanner may detect malicious components without recovering a single encrypted photograph or database.
It uses a deadline to crowd out careful decisions
The doubling threat turns time into another source of distress. People may believe every minute spent seeking help reduces their chance of recovering important work.
That pressure favors the attacker. A rushed payment can leave the victim poorer while the underlying infection and recovery problem remain unresolved.
Do not let the countdown determine whether evidence is preserved or whether backups are safely assessed. Those actions can matter regardless of what the attacker later does.
The reported material also discourages restarting. Do not treat the criminal as your incident-response adviser; isolation and evidence-preservation decisions belong to the person handling recovery.
What to Do If Your Files Have Been Encrypted
-
Isolate the affected computer. Unplug its network cable and disconnect Wi-Fi. Leave backup drives disconnected and do not attach another clean storage device casually.
For a workplace, contact the incident team immediately. Coordinate isolation of affected systems without shutting down unrelated critical services on your own.
-
Preserve the incident before cleanup. Record the note, changed filenames, approximate discovery time, and any recent suspicious activity. Do not delete encrypted files to clear space.
A specialist may need a disk image or volatile evidence. Avoid improvised restarts, registry edits, or multiple repair utilities before they decide what should be retained.
-
Keep money and account decisions separate. Do not send the demanded cryptocurrency or contact the extortionist to test whether they respond.
Use a clean device for sensitive accounts. If there is evidence that credentials or business information were exposed, address that with the responsible provider or administrator.
-
Choose the right level of recovery help. A home computer and a production server need different responses. Tell your technician which files and systems are irreplaceable.
The CISA ransomware guide emphasizes coordinated isolation and evidence preservation. An antivirus scan alone is not a complete organizational incident response.
One Decryptor Removal and File Recovery
Step 1: Protect backups and preserve a recoverable starting point
Keep the affected machine isolated while a plan is established. Do not sign it into cloud storage or reconnect a backup just to see whether files open.
From a clean device, identify backups that existed before the incident. Record their dates and keep the original backup unchanged while its integrity is assessed.
For valuable or business data, have a qualified responder preserve the affected disk before cleanup changes it. Copying random files is not equivalent to a forensic image.
If isolation is impossible and damage is continuing, obtain urgent incident advice about stopping the device. Powering off can lose volatile evidence, so explain the circumstances.
A repaired desktop is not enough if the only usable backup was overwritten along the way. Preserve the data before prioritizing convenience.
Step 2: Install Malwarebytes and remove detected malicious software
Use this procedure on a personal Windows PC after preserving the incident details. For a managed computer, let your security team decide when scanning should begin.
Malwarebytes can find and quarantine threats. Its free Custom Scan is separate from paid real-time protection and Threat Scan. Neither edition supplies ransomware decryption keys.
-
Download the Windows installer.
Open the official download page using the button below. Select Free Download there and save the Windows installer.
If the affected PC cannot browse safely, use a trusted computer and arrange an appropriate transfer without exposing clean backup media.
Malwarebytes for WindowsManual scanning and quarantine, with optional paid protection.
Opens the official free-scanner page. Choose its Windows download; paid protection is optional.
-
Open the setup file.
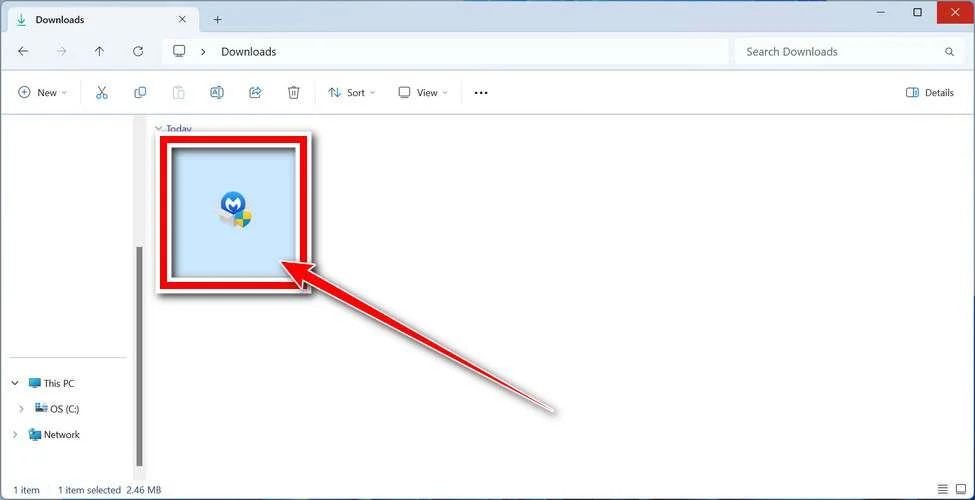
Open Downloads and double-click the MBSetup file. If Windows requests permission, check that the prompt identifies Malwarebytes before allowing the installation.
-
Complete setup without accepting unwanted extras.
Select Install, choose the appropriate Personal or Business device option, and continue. Business-managed computers should be handled through their administrator’s process.
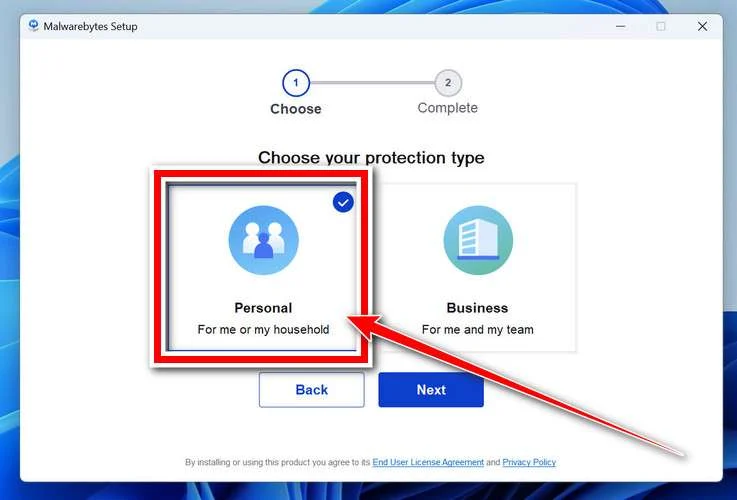
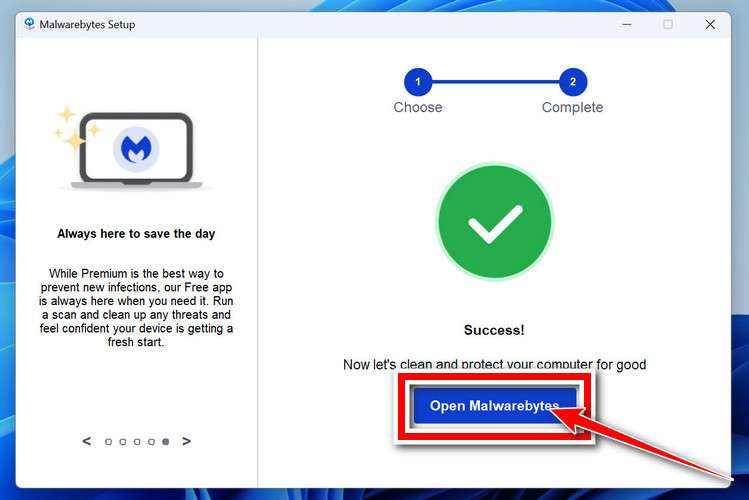
Review any browser extension, trial, or subscription offers. Skip optional features you do not want, then select Open Malwarebytes when setup finishes.
-
Choose a supported scan.
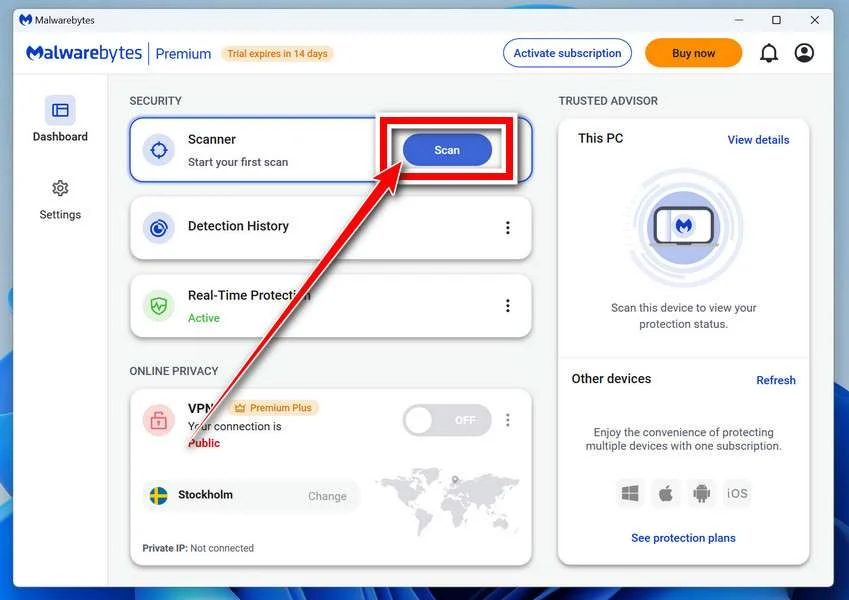
Find the Scanner tile on the dashboard. For a free Custom Scan, open its three-dot menu, select Advanced Scan, and choose Custom Scan.
Expand the file-location selector and select the system drive and relevant locations. Review potentially unwanted program settings, then select Start Custom Scan.
A paid or eligible trial edition may also offer Threat Scan. Use the controls available in your edition; do not disable Windows protections to unlock another option.
-
Let the scan complete and inspect its findings.
Keep the computer powered on while scanning and wait for the results. A large Custom Scan can take longer than a scan limited to common locations.
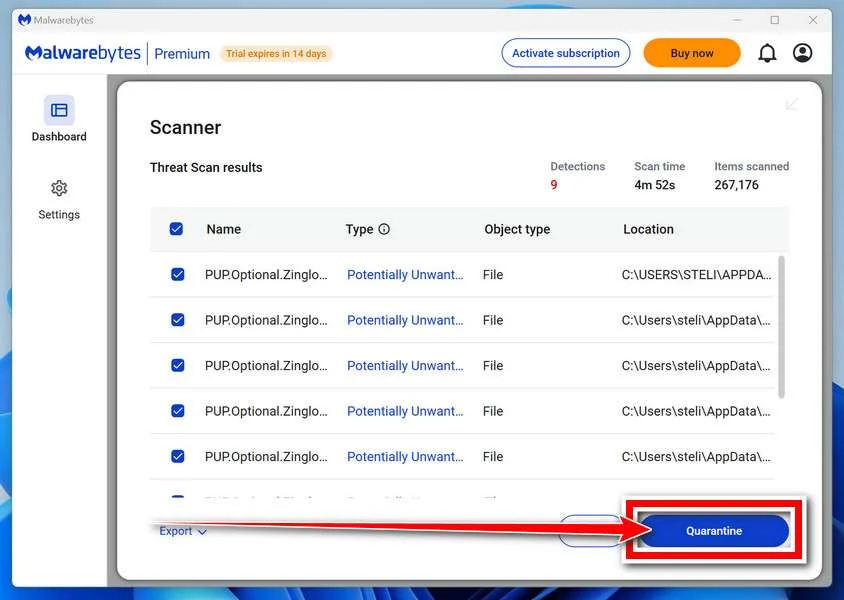
Review each detection and its location. Leave confirmed threats selected and choose Quarantine. Save the report if a detection is unclear rather than adding it to exclusions.
The results illustration uses sample detections to show the Quarantine control. Those names are not identifiers for the malware discussed in this article.
-
Finish removal and handle a requested restart.
Follow the quarantine prompts. If a restart is requested, save your work and coordinate it with anyone preserving evidence before restarting.
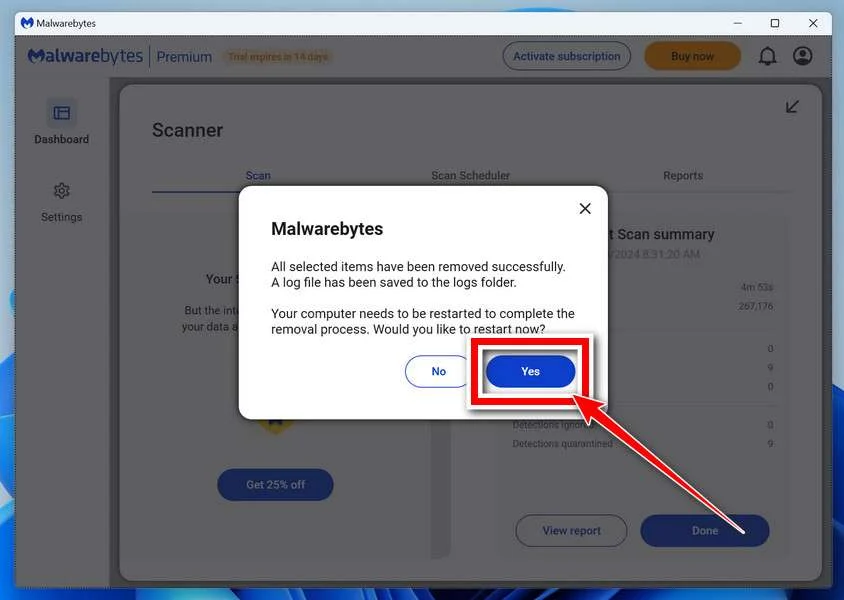
Reopen the application afterward and review the result. Repeated detections, blocked removal, or signs of continuing access need further investigation, not an automatic clean-device conclusion.
The screen design can vary by installed release. Follow the named controls and the vendor’s current scan instructions if your version looks different.
Step 3: Run an additional Windows check when needed
HitmanPro provides an optional second opinion when a Windows infection or unresolved finding warrants another check. Run scanners sequentially, not at the same time.
Scanning is free. Removal needs an eligible one-time 30-day trial or a paid license. A computer that already used its trial may not qualify again.
-
Obtain HitmanPro from the established download route.
HitmanProOptional second-opinion Windows scanner.
Free scan. Removal requires an eligible trial or paid license.
-
Launch the downloaded program.
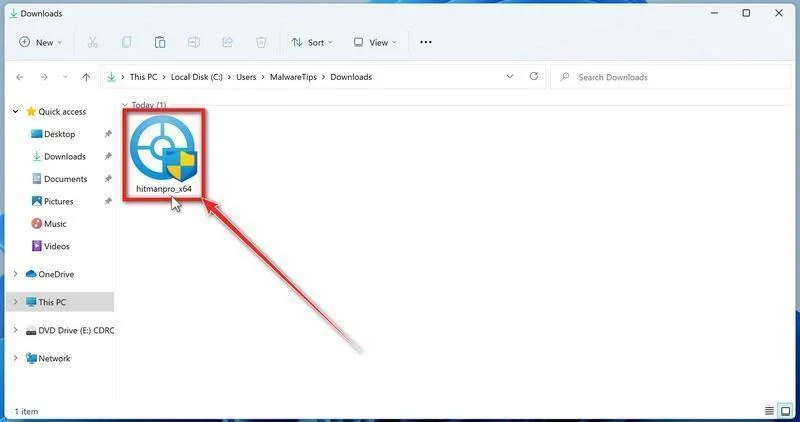
Open Downloads and run the appropriate HitmanPro file for your system. Check the publisher in any Windows permission prompt before allowing it.
-
Start the scan.
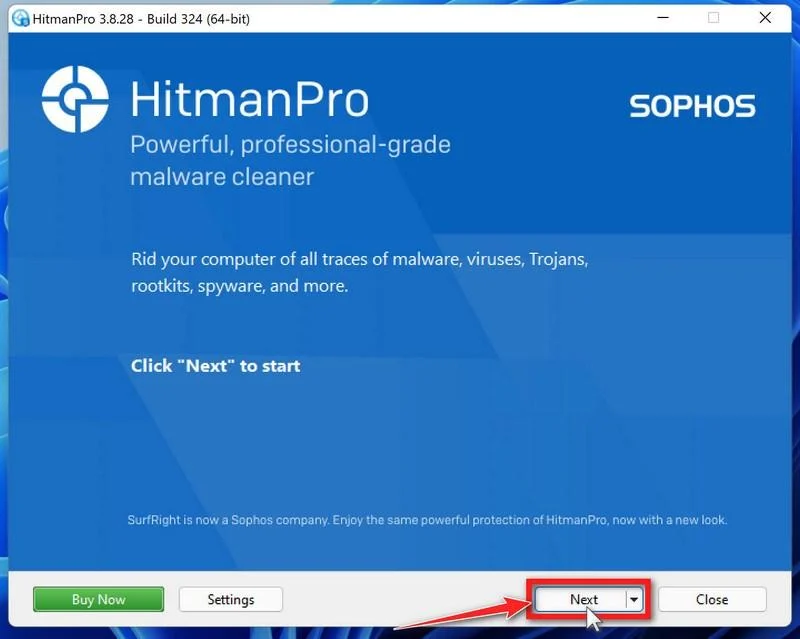
Open HitmanPro, select Next, and follow its license and setup prompts. Its cloud checks require an internet connection; arrange controlled access if the PC was isolated.
-
Review the results before removal.
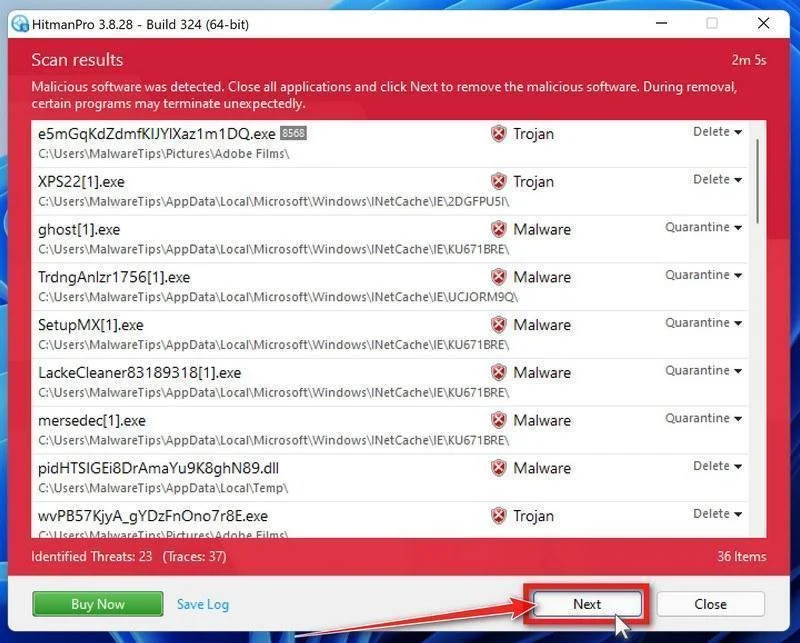
Allow scanning to finish. Inspect the listed objects and proposed actions, then select Next for confirmed unwanted items. Save uncertain findings for qualified assistance.
-
Use an eligible license and complete cleanup.
If available, select Activate free license and follow the trial prompts. Otherwise, use an existing license or retain the report; do not assume purchase is mandatory.
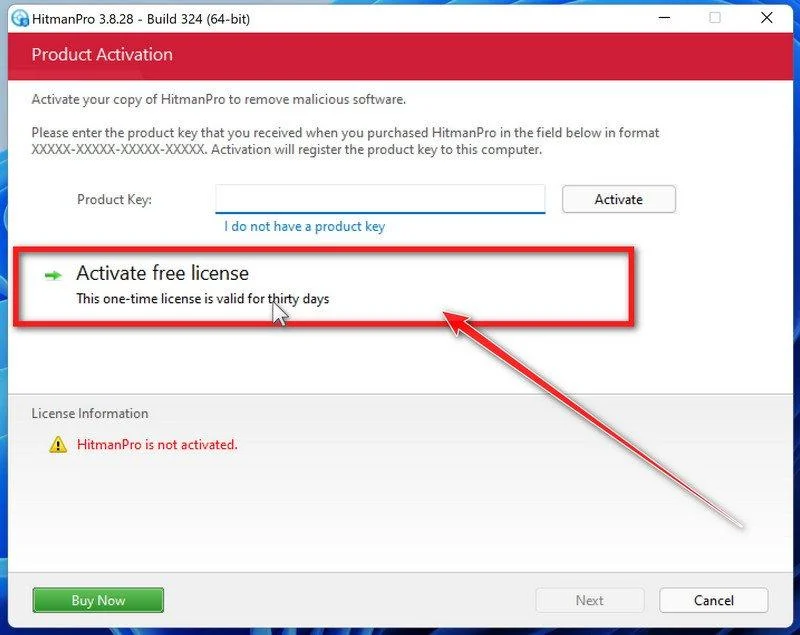
Finish the proposed cleanup and restart if requested. If problems persist, keep both scanners’ reports and seek help rather than repeatedly activating unfamiliar repair tools.
Step 4: Investigate unresolved findings with another supported scan
ESET Online Scanner offers another Windows check when detections remain unresolved or a responder recommends it. It is not necessary to run every available scanner automatically.
-
Download ESET Online Scanner.
ESET Online ScannerOptional one-time Windows malware scan.
Opens the established ESET download route.
-
Open the downloaded scanner.
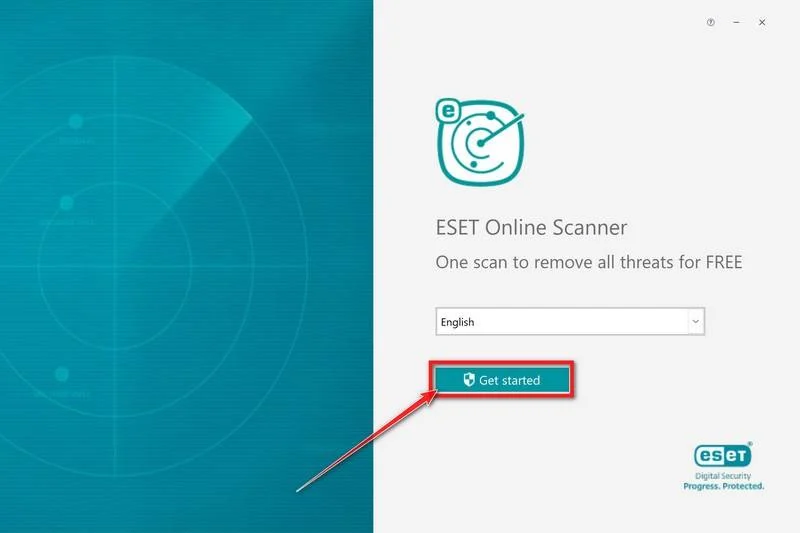
Run esetonlinescanner.exe from Downloads and verify the publisher in any Windows permission prompt. Choose the language and select Get started.
-
Review the setup choices.
Read the terms and continue if you accept them. Choose the available feedback and participation settings rather than assuming every optional feature is required.
Allow the scanner to update. A previously isolated computer needs appropriately controlled access for downloading updates; keep clean backup storage disconnected.
-
Select the scan and unwanted-application settings.
Choose Full Scan for a broader device check. Enable detection of potentially unwanted applications if you want those findings included, then select Start scan.
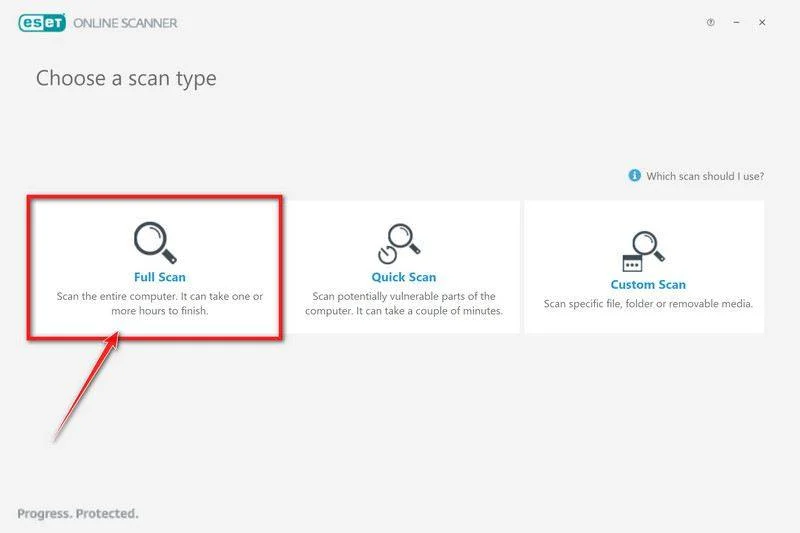
Review the settings before starting. The selected scope and accessible storage determine what can be examined; a full scan does not make inaccessible data readable.
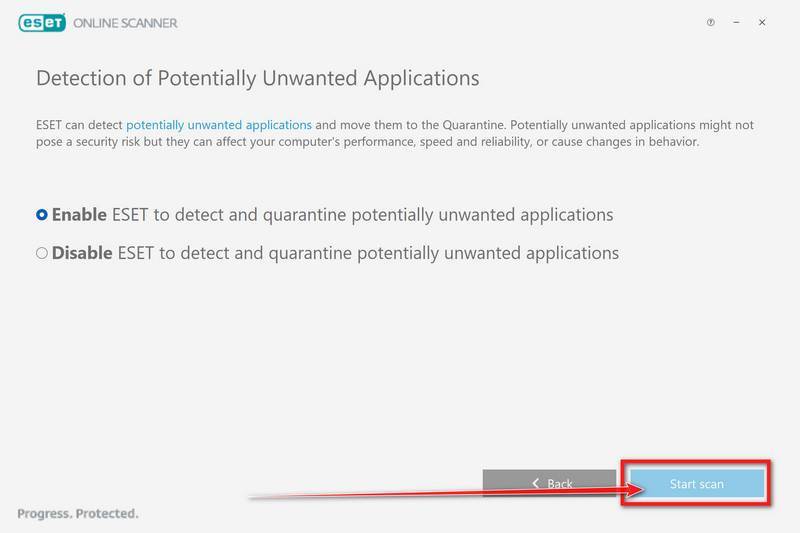
-
Inspect the final report.
Let scanning finish, open the detailed results, and check the action recorded for each detection. Retain any unresolved finding for further assistance.
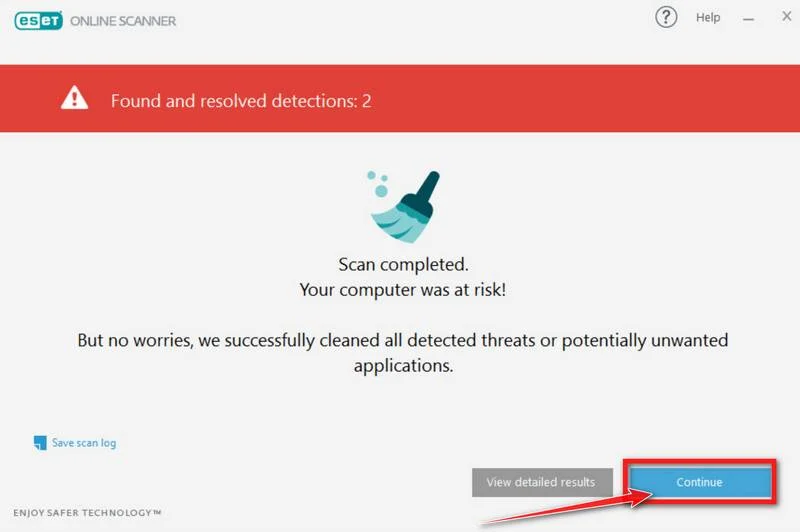
Finish supported cleanup and restart if requested. Continuing symptoms or repeated alerts require investigation even if another scan reports no detections.
Step 5: Establish a trusted system before restoring data
Review the scan reports and any recurring alerts. If unauthorized access or system changes remain unexplained, ask a qualified responder about rebuilding Windows.
Before reinstalling, preserve essential data and incident evidence, and confirm access to recovery keys and important accounts. Reinstallation can erase applications, settings, and local files.
Keep trusted backups separate until the recovery environment is ready. Do not restore the suspicious executable, unknown scripts, or an unverified system image with your documents.
Use the recovery options below for the encrypted files. A clean scan, software purchase, or repaired desktop does not provide their encryption key.
Recover Files Encrypted by One Decryptor
Removing ransomware stops or contains the malicious software. It does not turn encrypted bytes back into working documents. Keep untouched encrypted originals before testing any recovery method.
Use a clean, updated recovery environment and keep it separate from systems still under investigation. Restore files only after the infection and its access path are addressed.
Option 1: Restore a verified backup or earlier cloud version
-
Find a backup dated before the encryption. Keep the original backup unchanged and check that representative documents actually open in a trusted environment.
-
Restore to a separate clean location, not over the only encrypted copies. Use the backup application’s documented restore process for databases and application-specific data.
-
For cloud storage, open its genuine version-history or restore controls from a trusted device. Compare dates and select an unaffected version where one exists.
-
Inspect restored documents and confirm that the required recent work is present. A familiar filename alone does not verify successful restoration.
Windows File History helps only if it was configured and a usable backup survives. Open Control Panel, then System and Security, File History, and Restore personal files.
Browse the available dates and preview the files. Use Restore to for a separate destination when offered, rather than replacing your only copy during testing.
Option 2: Look for a decryptor that matches the actual variant
A decryption tool must support the ransomware family and version involved. A matching extension, similar name, or confident advertisement is not enough.
- No More Ransom’s decryption catalog lists supported families and their tool instructions.
- Emsisoft’s ransomware decryptors provide family-specific tools and limitations.
- ID Ransomware can help identify a family from appropriate evidence, subject to its upload and privacy terms.
-
Record the ransom-note filename, appended extension, and existing detection. Do not identify the ransomware family from a filename extension alone.
-
Check the tool’s exact supported variant and requirements. For sensitive business material, ask your responder what evidence can be shared before uploading anything.
-
Read the developer’s instructions and run a supported tool only on copies in a separate location. Keep the original encrypted data even after an apparent success.
-
If no suitable decryptor is available, retain the copies and revisit trusted catalogs later. Do not pay a stranger to unlock a supposedly hidden download.
Option 3: Assess surviving snapshots without assuming they exist
Some systems retain earlier snapshots or previous versions; others never had them or lost them during the incident. Check availability instead of trusting the ransom note.
On Windows, open the affected folder’s Properties and look for Previous Versions. Open a suitable earlier version first and copy needed data to a different location.
If no version appears, that method has no available copy to restore. It does not establish whether a separate backup or cloud version exists.
Option 4: Consider deleted-file recovery only for recoverable originals
File-recovery software does not decrypt ransomware’s encrypted output. It may help only when readable originals or other usable copies remain recoverable on the storage.
Further writes can overwrite that recoverable data. For valuable files, have a qualified specialist assess or image the source drive before installing software or starting another scan.
Use the procedure below only when that recovery approach is appropriate. Install the tool elsewhere and save recovered files to a separate drive or clean destination.
-
Open the established recovery-tool download route.
EaseUS Data Recovery WizardFile recovery, not ransomware decryption.
View EaseUS Data Recovery Wizard
Check current compatibility, free-edition limits, and licensing before installation or purchase.
-
Install away from the recovery source.
Download and install on a separate suitable system or drive, following a specialist’s plan when necessary. Do not install into the disk you hope to recover.
-
Select the source and scan for recoverable data.
In the recovery application, choose the affected drive or location and begin scanning. Selecting an encrypted file does not make the tool a decryptor.
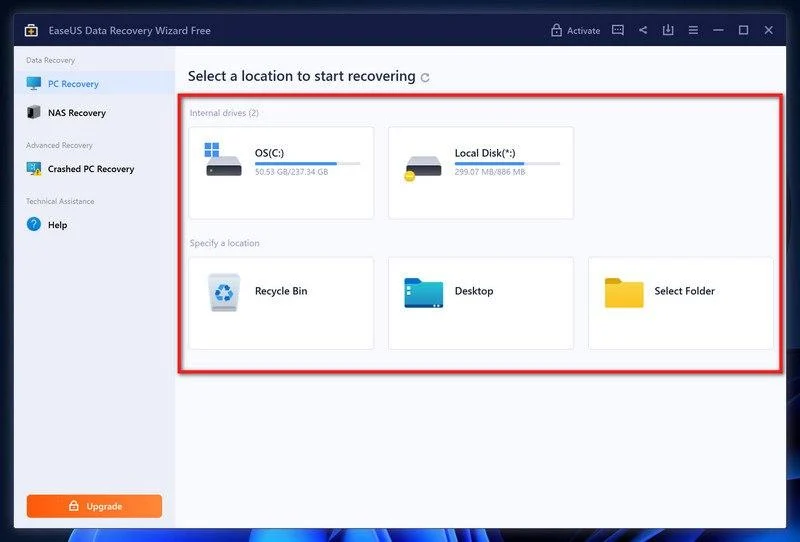
-
Inspect what the scan actually found.
Use the available filters to locate needed document types. Preview representative files to see whether their contents are readable, not merely listed by name.
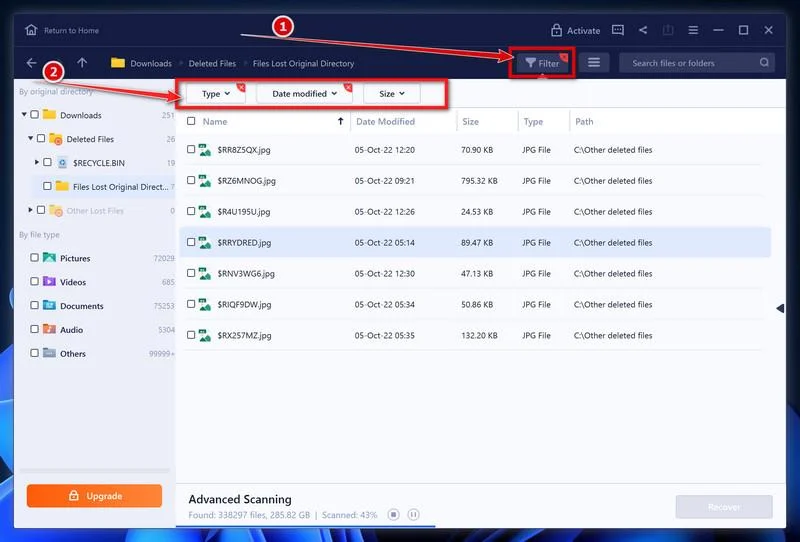
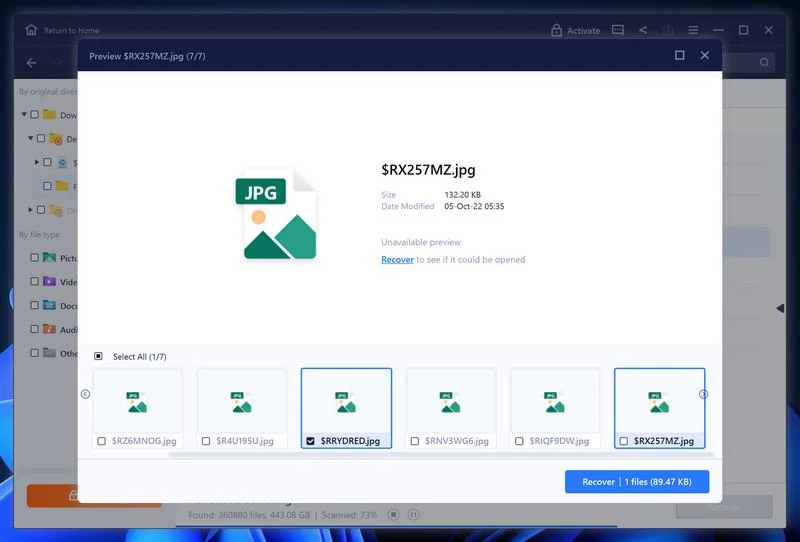
A preview can help evaluate a result, but free-edition export limits may still apply. Do not purchase solely because a scan displays filenames.
An unavailable preview is not a successful recovery. A listed filename may still refer to damaged or unusable data.
-
Recover to a different destination and verify the files.
Select appropriate readable results, choose Recover, and select a different drive or safe location. Never save the recovered output back over the recovery source.
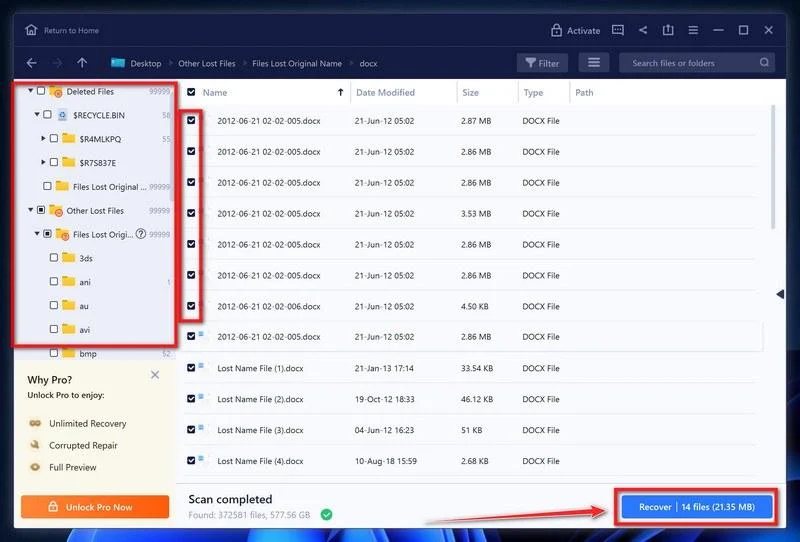
Open representative recovered files in the clean environment. Keep the original encrypted copies, scan reports, and a record of which method recovered each set.
If recovery fails, stop experimenting on the only source. Preserve it for qualified assistance or a future matching decryptor rather than accepting guaranteed-recovery sales claims.
Recovery Offers That Deserve a Second Look
After searching the ransom-note name, you may encounter services promising immediate decryption. Some are legitimate specialists; others sell false hope or simply negotiate with criminals.
Ask what the service actually proposes, what evidence supports recovery, and whether payment is required before a meaningful assessment. Keep that conversation separate from the attacker.
Do not allow an unknown caller remote access to your only encrypted copies. A genuine specialist should explain the preservation plan before changing anything.
Keep invoices, scope, and promised outcomes in writing. A confident sales claim is not proof that the provider has a matching OneCryptor decryptor.
MalwareTips’ Windows malware-removal help forum is an established place to request guidance. Do not post passwords, confidential files, or private business records publicly.
Frequently Asked Questions
Is every .ofx file encrypted by One Decryptor?
No. OFX is also a legitimate financial-data format. Look for a newly appended extension, widespread unreadable files, and the matching ransom note together.
Will removing One Decryptor restore my documents?
No. Malware removal addresses malicious software. File recovery requires a clean backup, surviving version, or a decryption method that actually supports the encryption involved.
Is there a guaranteed free OneCryptor decryptor?
No matching entry appeared in the checked No More Ransom catalog. Avoid guarantees, preserve original encrypted data, and recheck trusted resources for later developments.
Should I obey the note’s instruction not to restart?
Follow a qualified response plan, not the attacker. Keep the system isolated and obtain advice about evidence preservation, ongoing damage, and whether shutdown is necessary.
Can a paid antivirus subscription supply the encryption key?
No. Protection and cleanup features are not decryption keys. Buying security software does not establish that it can unlock files encrypted by this ransomware.
Can I recover files after the payment timer expires?
A backup or suitable independent recovery method does not depend on the criminal’s sales deadline. Keep copies and investigate legitimate options rather than rushing to pay.
The Bottom Line
Do not pay One Decryptor’s ransom or experiment on your only encrypted files. Isolate the machine, preserve the evidence, and arrange appropriate cleanup or rebuilding.
Restore verified clean backups only to a trusted system. If no recovery path currently works, retain untouched encrypted copies and seek qualified help without accepting decryption guarantees.

Join the discussion
0 commentsShare your experience or ask a question about this article.
Your progress
Did these steps help?
Let us know how the guide worked for you.
Describe what you see and the step you reached. Keep passwords and other private information out.
Discussion
Start the conversation
Have a question or something useful to share? Add the first comment.