


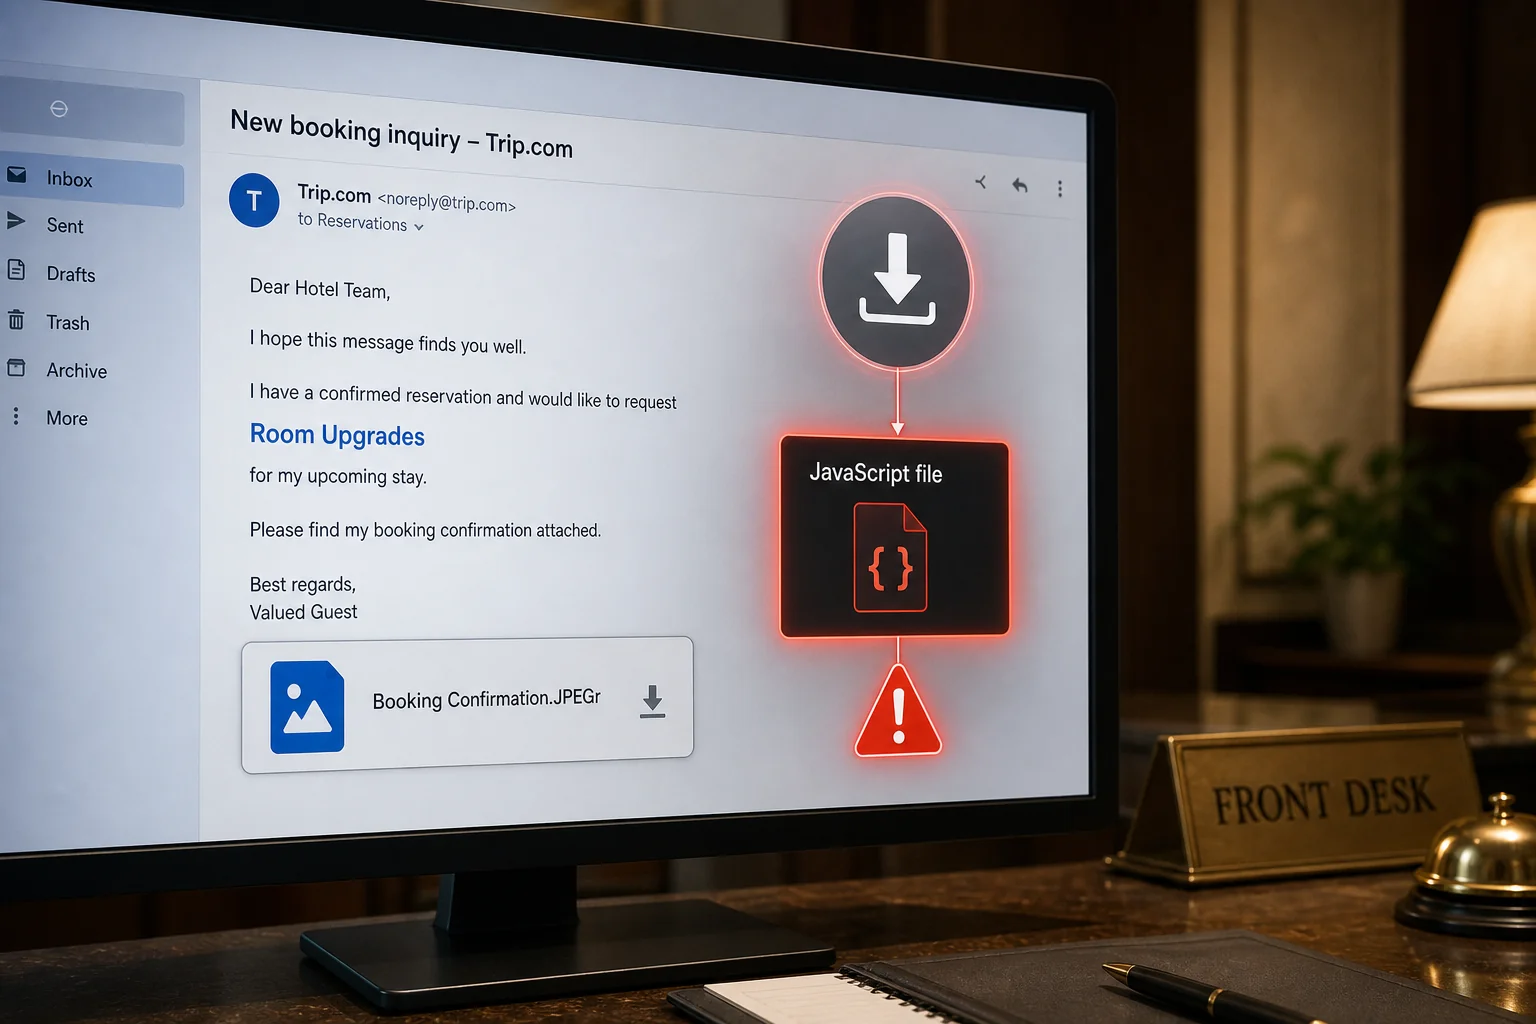
A supposed hotel guest asks about a room upgrade and includes a Trip.com booking confirmation. The attachment looks like a photo, but clicking it downloads a malicious JavaScript file.
This is confirmed malspam targeting hotel and property staff. Trip.com is a legitimate travel company, but it did not send the message and is not connected to the attack.
Overview
The Trip.com Booking Confirmation email virus is a targeted malware campaign disguised as a guest inquiry. The sender, using the name Adam Carter, claims that he and his partner have a stay booked for February 2027 and asks whether an evening meal or half-board room upgrade can be added.
That story is carefully chosen for hotels, guesthouses and property managers. Reservation teams regularly receive questions from unfamiliar guests, so a message referencing a well-known travel platform and a future booking may not look unusual.
The email displays a supposed attachment named Booking Confirmation.JPEGr, a 47 MB file presented with an image or archive-style icon and a Download link. The unusual “JPEGr” ending is meant to resemble JPEG at a glance.
It is not a normal image attachment. Both the attachment graphic and an embedded booking-confirmation image act as links. Clicking either downloads a JavaScript file capable of running code and retrieving additional malware.
The final payload has not been confirmed. It could be a password stealer, downloader, remote-access trojan, ransomware or another Windows threat. The accurate conclusion is that the delivered script is malicious, not that one specific malware family infects every victim.
Reading the email alone is safe. The risk begins when a link is clicked and the downloaded script is opened. Hotel computers are attractive targets because they may contain guest records, payment conversations, booking-platform access and trusted email accounts.
How the Fake Trip.com Booking Email Works
Step 1: The attacker poses as a future guest
The email opens with a normal hospitality request rather than an obvious payment threat. A named guest and February 2027 travel date make the inquiry feel specific.
Step 2: A room upgrade invites a helpful response
The supposed guest asks about dinner, half board and a room upgrade. Front-desk staff are trained to assist with exactly these questions, which makes the lure effective.
Step 3: The booking proof appears to be an image
The message shows Booking Confirmation.JPEGr beside a file size and download control. The filename is visual camouflage, not proof of the real file type.
Step 4: The image and attachment are actually links
Clicking either element initiates a JavaScript download. The email is engineered so even someone avoiding the obvious Download button can trigger the same result by opening the booking image.
Step 5: The victim opens the script
Windows may display the file with an unfamiliar icon or hide the final extension. If executed, the script can contact an external server and install the next-stage payload.
Step 6: Malware compromises the workstation
The final threat may steal passwords, provide remote access, encrypt data or download more malware. Because the exact payload varies, the computer must be treated as compromised if the script ran.
Warning Signs in the Guest Inquiry
- An unexpected reservation request: the name or date does not match the property’s booking system.
- A strange file extension: “JPEGr” is not a normal booking-confirmation format.
- A very large image claim: the 47 MB attachment size is unusual for a simple reservation screenshot.
- Clickable images inside the email: the booking graphic opens a download rather than displaying details.
- A download instead of a platform message: legitimate booking information should be verified inside the property’s Trip.com account.
- A script delivered behind an image lure: JavaScript is not needed to read a reservation.
- Pressure on hospitality staff: the message relies on normal customer-service habits rather than overt threats.
How Hotel Staff Should Verify the Booking
- Search the property-management system for the guest name and dates.
- Open the official Trip.com partner portal from a trusted bookmark.
- Check whether the request appears in the platform’s authenticated messaging system.
- Contact the guest only through details stored in the real reservation.
- Ask a supervisor or security team to inspect unusual attachments.
- Block script-file downloads on front-desk workstations where possible.
What to Do If You Interacted With the Email
If you only read the message
Delete or report it as malicious. Reading the email does not execute the script.
If you clicked the image but did not open the download
Delete the downloaded file without previewing or renaming it. Check the browser’s downloads list to confirm where it was saved, then run a security scan.
If you opened the JavaScript file
Assume malware executed. Disconnect Ethernet and Wi-Fi immediately. Do not sign in to booking platforms, email, banking or remote-management services from that computer.
- Notify the property’s IT or security team.
- Preserve the email, downloaded filename and time of execution.
- Isolate shared drives if the workstation could write to them.
- Review endpoint alerts and outbound connections.
- Reset passwords from a clean device, beginning with email and booking platforms.
- Contact payment processors if cardholder data may have been exposed.
- Warn other properties or staff who received the same message.
Remove Malware Delivered by the Fake Trip.com Email
Follow the complete Windows removal sequence below if the JavaScript file was opened. Finish every step because the script may install more than one component.
- STEP 1: Uninstall malicious programs from Windows
- STEP 2: Reset browsers back to default settings
- STEP 3: Use Rkill to terminate suspicious programs
- STEP 4: Use Malwarebytes to remove Trojans and unwanted programs
- STEP 5: Use HitmanPro to remove rootkits and other malware
- STEP 6: Use AdwCleaner to remove malicious browser policies and adware
- STEP 7: Perform a final check with ESET Online Scanner
STEP 1: Uninstall malicious programs from Windows
First, we’ll manually check your computer for unknown or malicious programs. Adware and browser hijackers often have a working uninstall entry — removing them this way takes care of the easy part before we run the scanners.
-
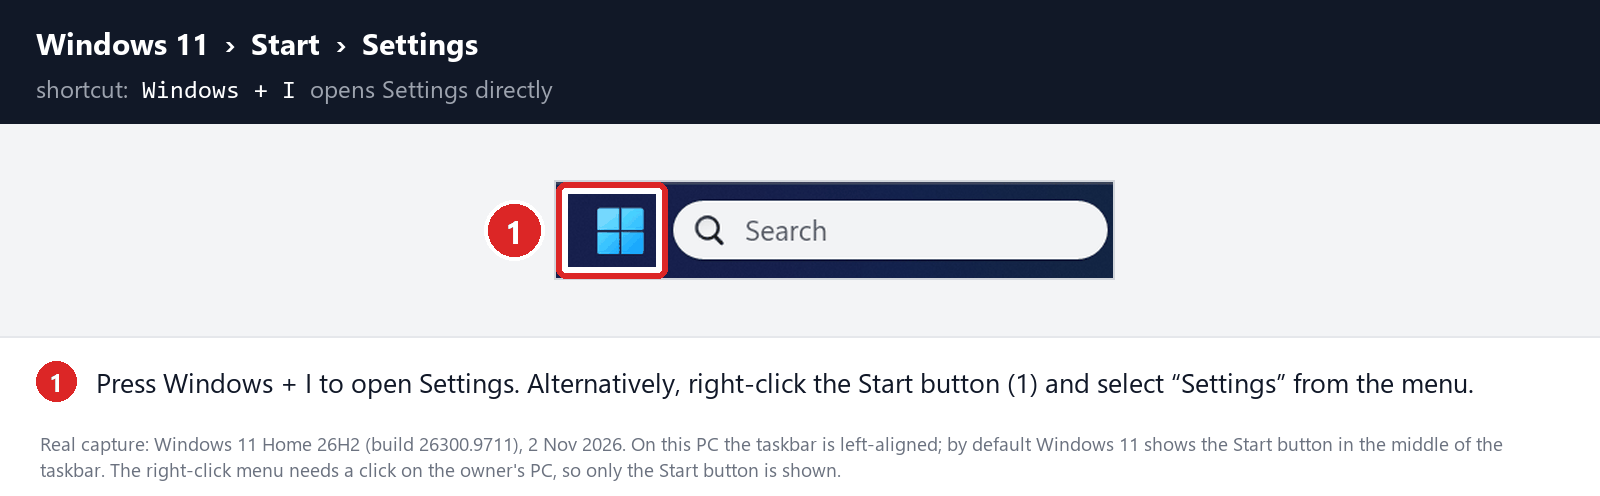
Open the Settings app
Press Windows + I on your keyboard to open Settings. Alternatively, right-click the Start button and select “Settings” from the menu.
-
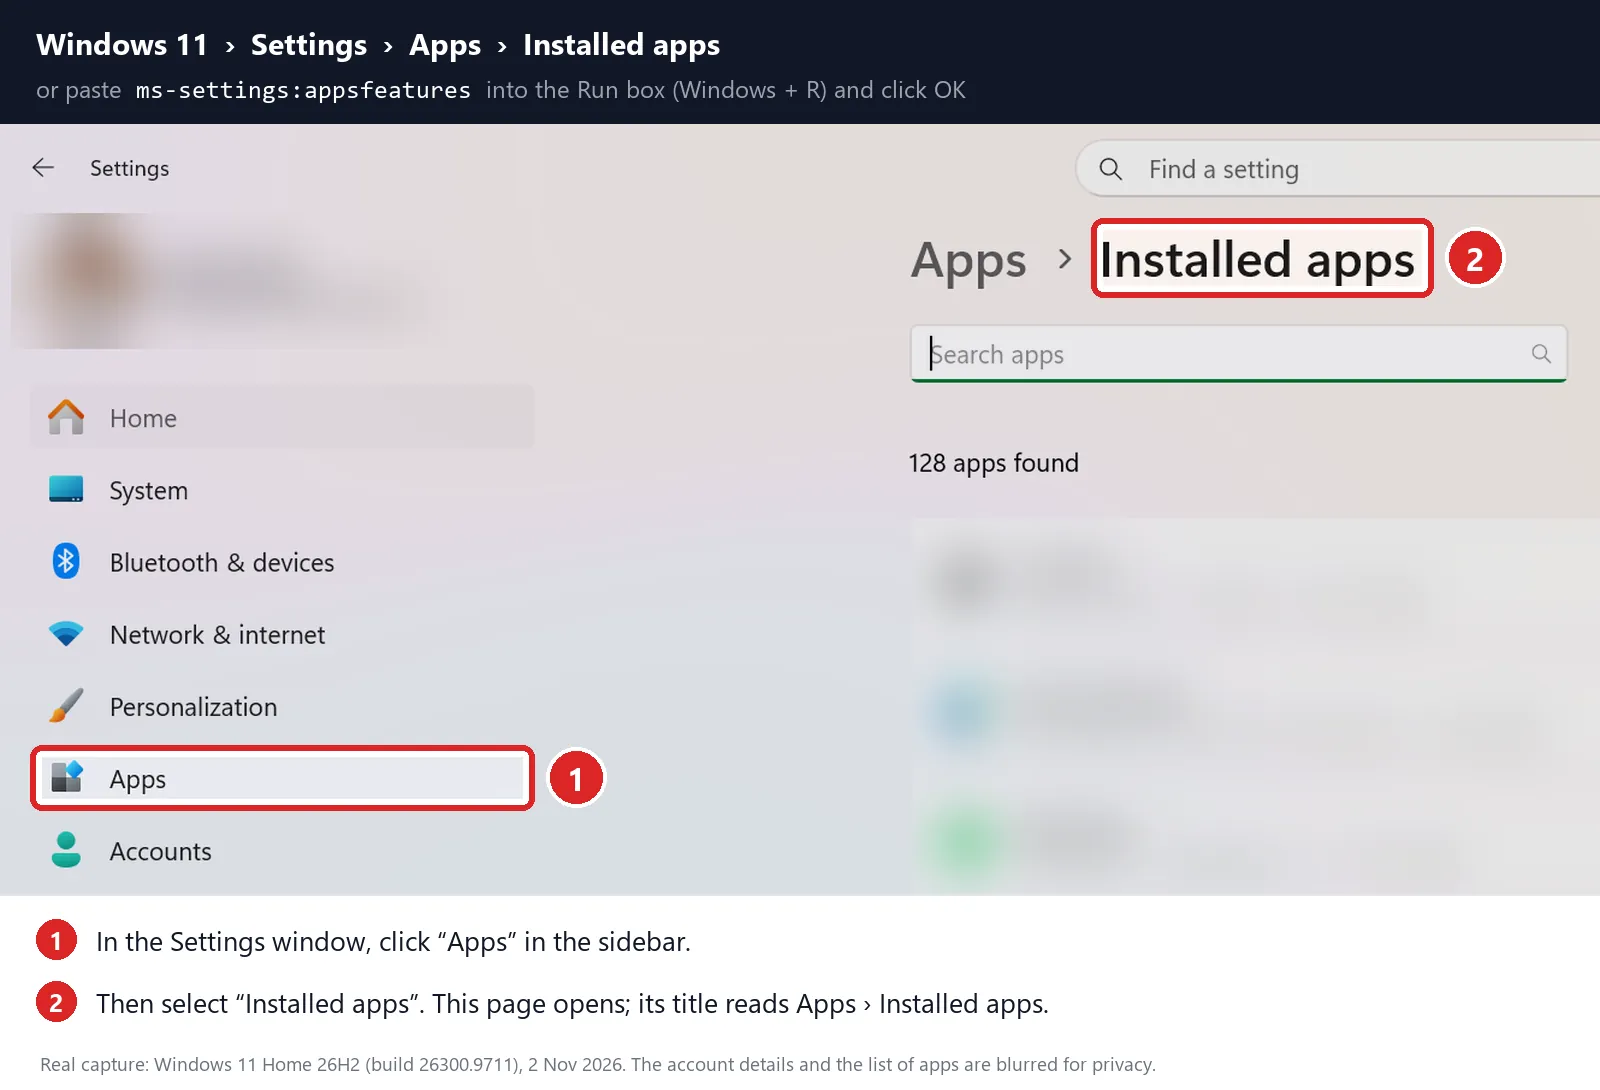
Go to “Installed apps”
In the Settings window, click “Apps” in the sidebar, then select “Installed apps“.
-
Find and uninstall the malicious program
Scroll through the list of installed apps and look for anything suspicious — a program you don’t remember installing, or one with a strange or generic name.
Quick tip: click “Sort by” and choose “Date installed“. Malware is usually one of the most recently installed programs, so it will appear near the top.
When you find the malicious program, click the three dots next to it and select “Uninstall“.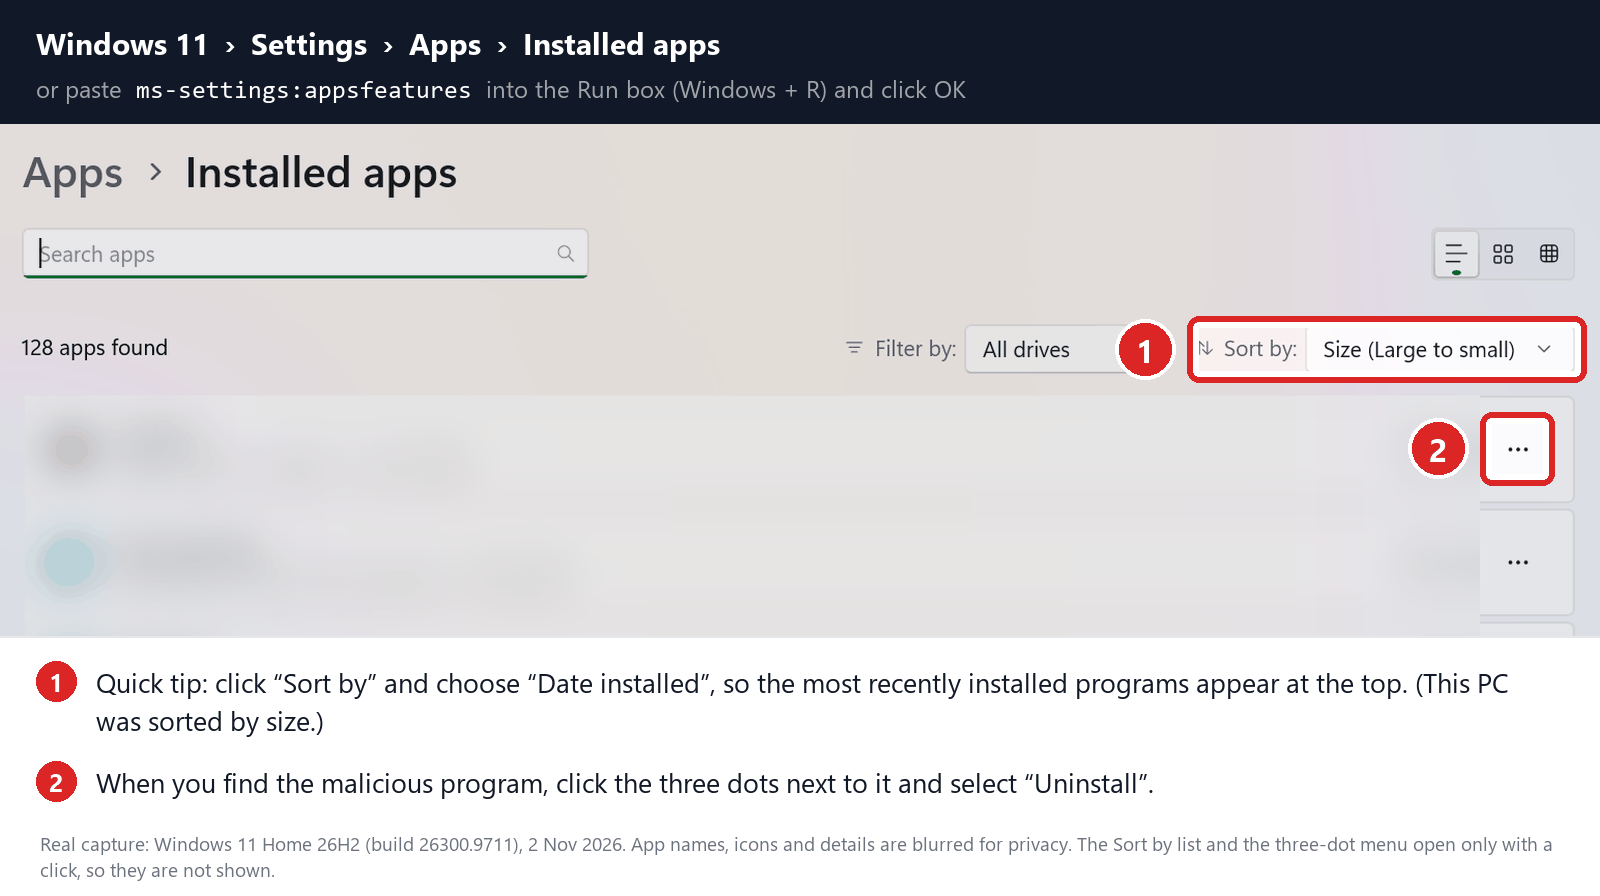 Didn’t find any suspicious programs? That’s fine — not all infections install visible apps. Just continue with the next step in this guide.
-
Complete the uninstall
Confirm by clicking Uninstall in the message box, then follow the remaining prompts.
Read each prompt carefully — some malicious programs use confusing wording or pre-ticked boxes hoping you’ll click through without looking.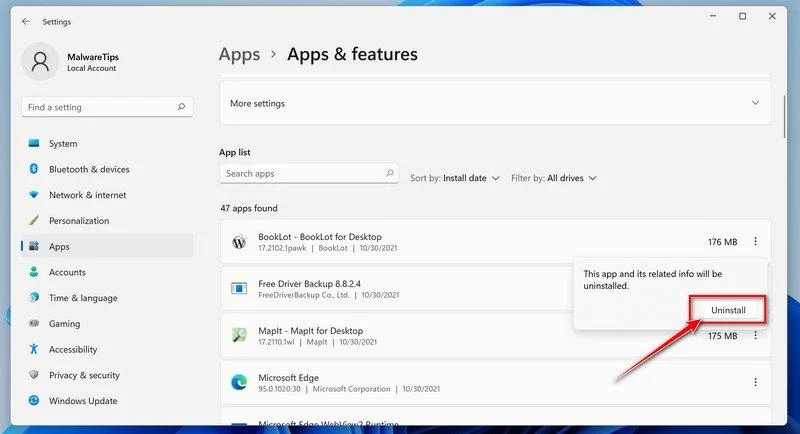
-
Open the Settings app
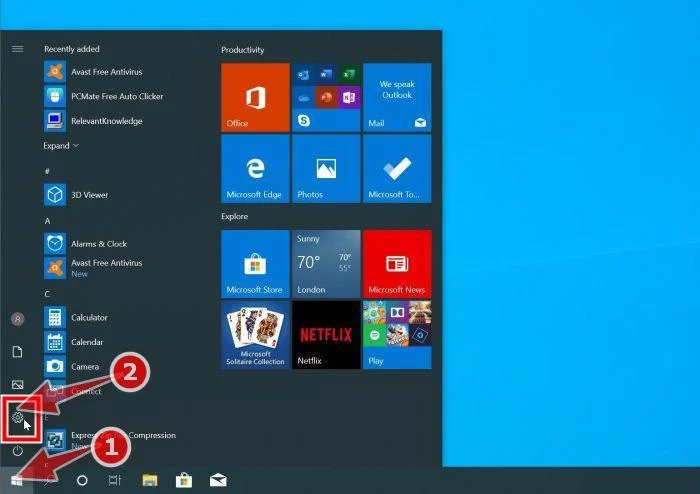
Press Windows + I on your keyboard to open Settings. Alternatively, click the Start button on the taskbar and select “Settings” (the gear icon).
-
Click on “Apps”
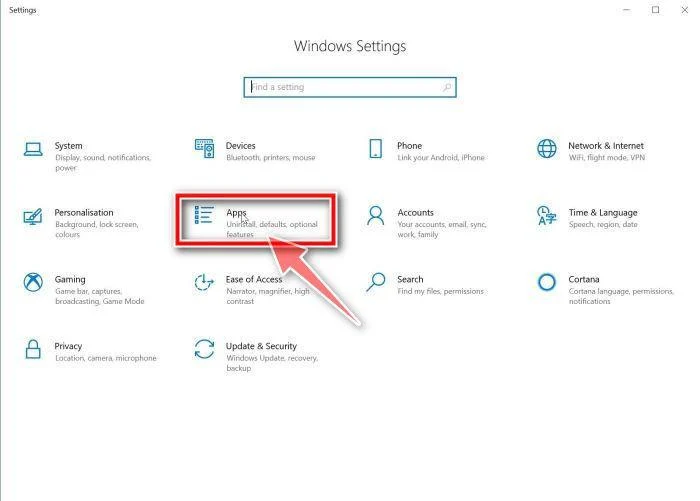
In the “Windows Settings” window, click “Apps“. The “Apps & Features” section should open by default — if it doesn’t, select it from the list on the left.
-
Find and uninstall the malicious program
Scroll through the list of installed apps and look for anything suspicious — a program you don’t remember installing, or one with a strange or generic name.
Quick tip: click “Sort by” and choose “Install date“. Malware is usually one of the most recently installed programs, so it will appear near the top.
When you find the malicious program, click on it and select “Uninstall“.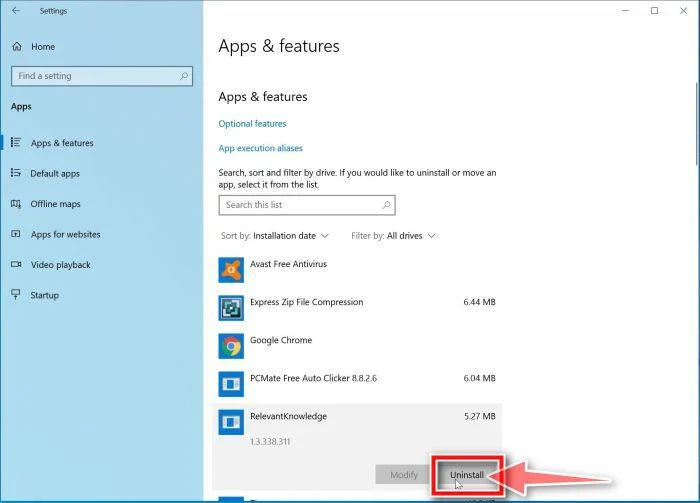 Didn’t find any suspicious programs? That’s fine — not all infections install visible apps. Just continue with the next step in this guide.
-
Complete the uninstall
Confirm by clicking Uninstall in the message box, then follow the remaining prompts.
Read each prompt carefully — some malicious programs use confusing wording or pre-ticked boxes hoping you’ll click through without looking.
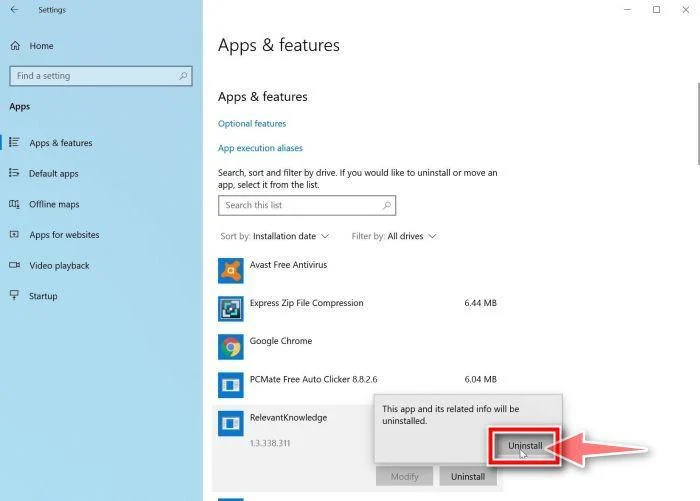
With the malicious programs removed, you’re ready for the next step in this guide.
STEP 2: Reset browsers back to default settings
In this step, we will remove spam notifications, malicious extensions, and change to default any settings that might have been changed by malware.
Please note that a Chrome or Edge reset turns off all your extensions, and a Firefox refresh removes them. Your bookmarks and favorites stay intact. For each browser that you have installed on your computer, please click on the browsers tab below and follow the displayed steps to reset that browser.
Reset Chrome for Windows to default settings
We will now reset your Chrome browser settings to their original defaults. This will reset your startup page, new tab page, search engine, and pinned tabs. It will also disable all extensions and clear temporary data like cookies. Your favorites, history, and saved passwords will not be cleared.
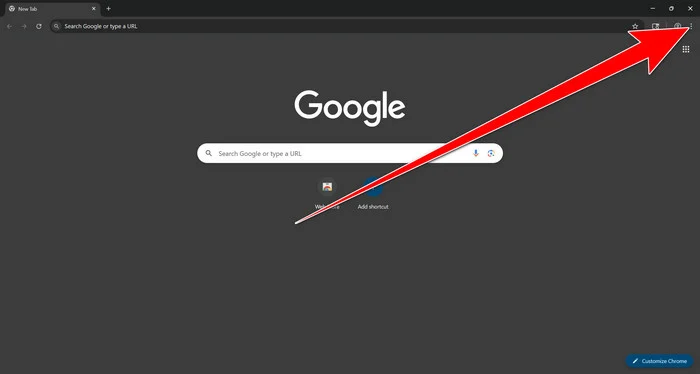
Open the Chrome menu
Open Google Chrome and click the three-dot (⋮) icon in the top-right corner.
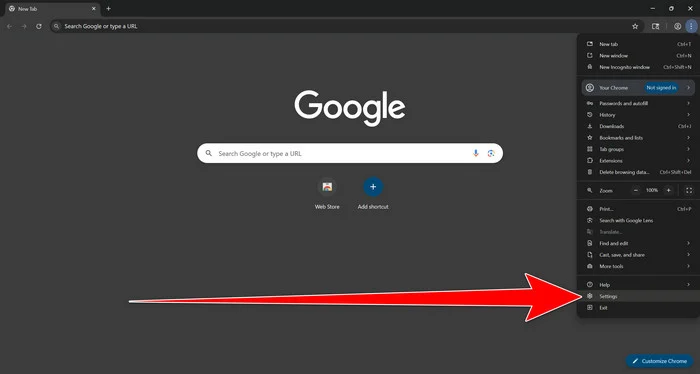
Open Chrome Settings
Select Settings from the Chrome menu.
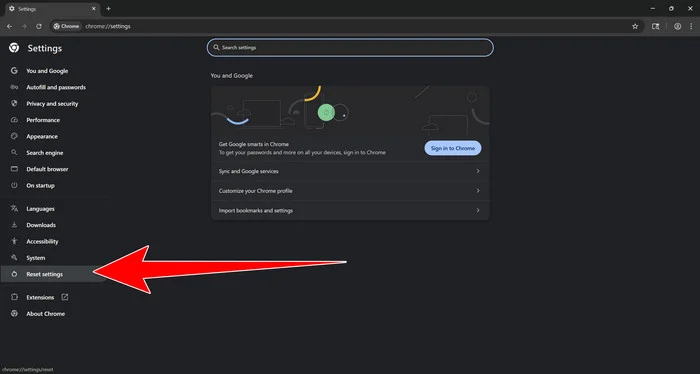
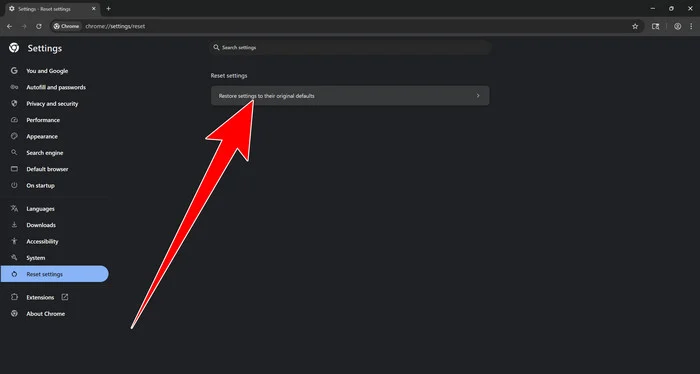
Select “Reset settings”
Look at the menu on the left side of the Settings page. Scroll down and click Reset settings.
Restore Chrome’s original settings
Click Restore settings to their original defaults.
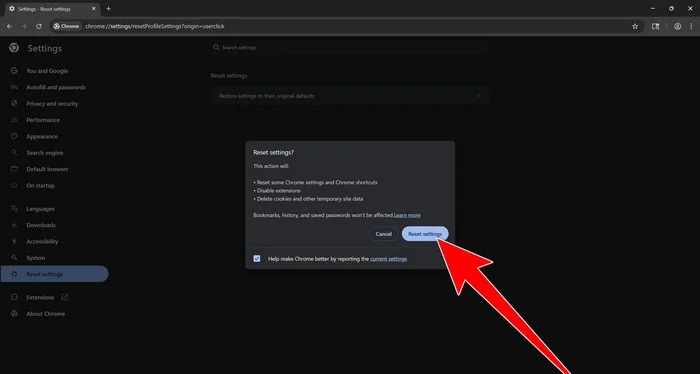
Confirm the Chrome reset
A confirmation window will appear. Click Reset settings.
This will:
- Restore the default search engine, homepage, and new tab page
- Reset startup pages and pinned tabs
- Reset site permissions, such as notifications and pop-ups
- Disable installed extensions
- Clear temporary cookies and website data
Don’t worry: Chrome will not delete your bookmarks, browsing history, or saved passwords. If you’re signed in to Chrome, the reset applies on all devices where you’re signed in.
Restart Chrome and perform a test search. If your searches now open normally in Google, you can stop here.
If searches are still redirected through shady domains complete the additional step below.
Remove persistent search hijacker data
Only complete this step if the redirect continues after resetting Chrome.
Some browser hijackers hide inside Chrome’s local search-engine database. A standard Chrome reset may not remove this database, which is why searches can continue to pass through shady sites.
The following procedure creates a backup of the affected database and allows Chrome to build a new, clean version. This is safer and less disruptive than deleting the entire Chrome profile.
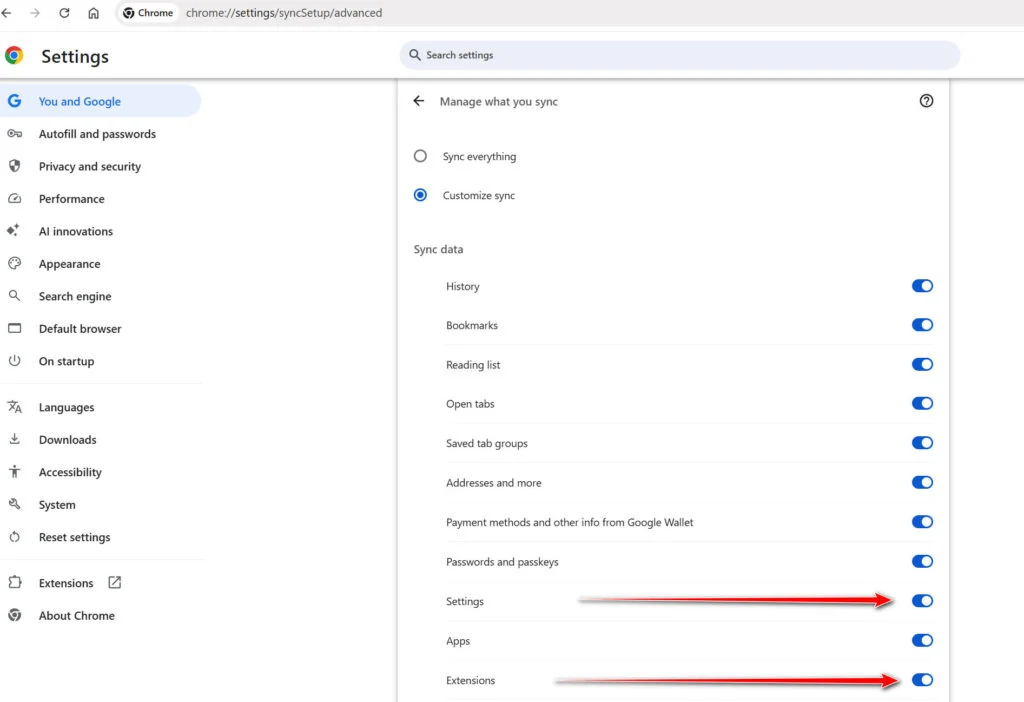
First, prevent Chrome Sync from restoring the hijacked settings:
- Open a new Chrome tab.
- Copy the following address, paste it into Chrome’s address bar, and press Enter:
chrome://settings/syncSetup/advanced - Under Manage what you sync, select Customize sync.
- Turn off Settings and Extensions.
- You can leave Bookmarks and Passwords enabled so your important data remains synchronized.
Note: Some newer Chrome versions may automatically redirect this address to the Google Account settings page. If that happens, locate the list of synchronized Chrome data and turn off Settings and Extensions there.
Now save anything you are working on and close every Chrome window.
Run the cleanup command:
- Press the Windows key on your keyboard.
- Type PowerShell.
- Open Windows PowerShell. Administrator access is not required.
- Copy the entire command shown below.
- Right-click inside the PowerShell window to paste the command, then press Enter.
- If Windows warns you about pasting multiple lines, select the option to continue.
$stamp = Get-Date -Format "yyyyMMdd-HHmmss"

Get-Process chrome -ErrorAction SilentlyContinue |
 Stop-Process -Force

$root = "$env:LOCALAPPDATA\Google\Chrome\User Data"

if (Test-Path $root) {
 $profiles = Get-ChildItem $root -Directory |
 Where-Object {
 $_.Name -eq "Default" -or
 $_.Name -match "^Profile \d+$"
 }

 foreach ($profile in $profiles) {
 foreach ($name in @(
 "Web Data",
 "Web Data-journal",
 "Web Data-wal",
 "Web Data-shm"
 )) {
 $file = Join-Path $profile.FullName $name

 if (Test-Path $file) {
 $backup = "$file.search-hijacker-backup-$stamp"
 Move-Item -LiteralPath $file -Destination $backup
 Write-Host "Backup created: $backup"
 }
 }
 }
}

Write-Host ""
Write-Host "Chrome search data has been cleaned."
Write-Host "You can now reopen Chrome."
Wait until PowerShell displays the following message:
Chrome search data has been cleaned.
You can now reopen Chrome.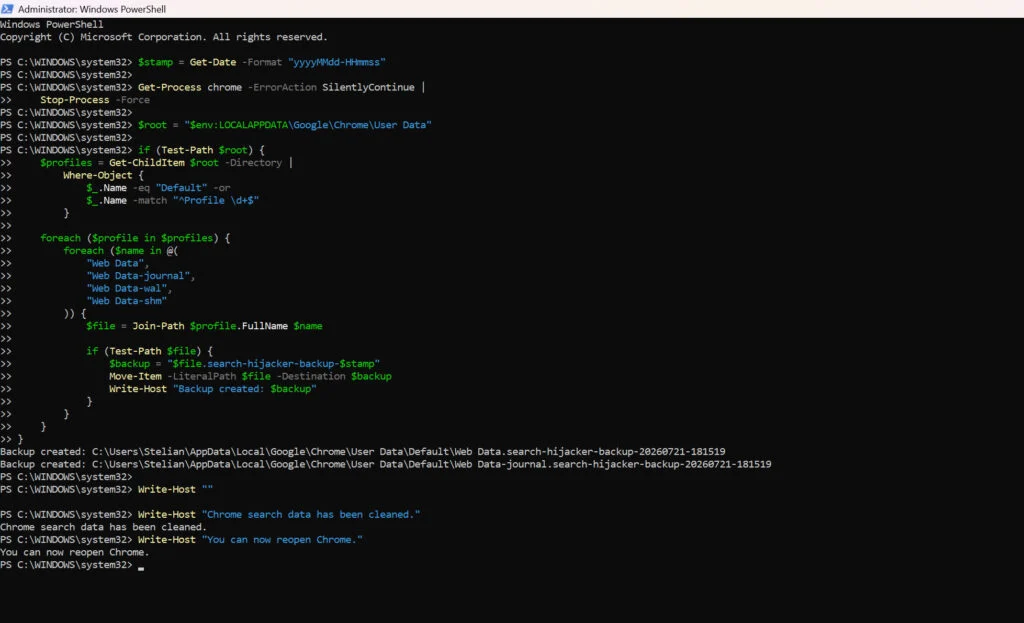
Close PowerShell and reopen Google Chrome. Chrome will automatically create a clean search database for every local profile.
Next, copy the following address, paste it into Chrome’s address bar, and press Enter:
chrome://settings/searchEngines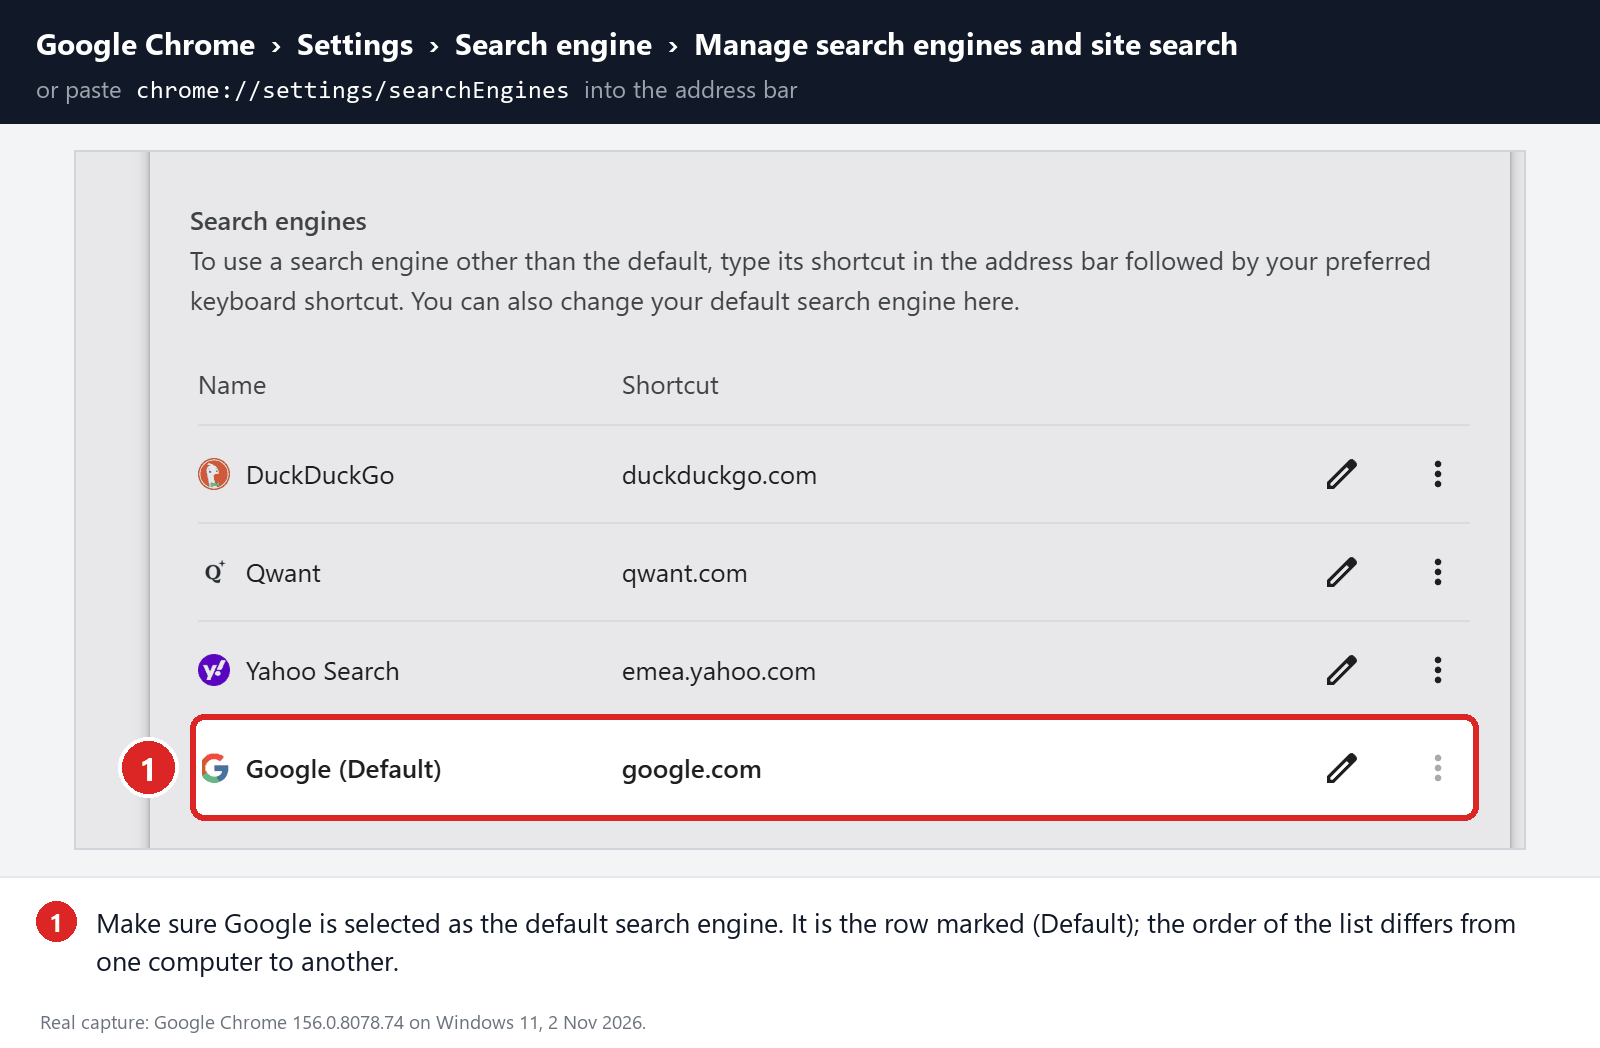
Make sure Google is selected as the default search engine. Test several searches from the address bar and confirm that they no longer pass through shady search engines.
Your important Chrome data is protected: the PowerShell cleanup does not remove bookmarks, saved passwords, browsing history, cookies, or installed extensions. However, it may reset locally stored Autofill addresses, payment cards saved only on this computer, and form suggestions.
The original search database is not deleted. PowerShell renames it and adds
search-hijacker-backupto its filename so it can be recovered if necessary.Keep Settings and Extensions synchronization disabled while testing Chrome. Do not enable every extension at once. Enable only the extensions you recognize, one at a time, and test Chrome after each one.
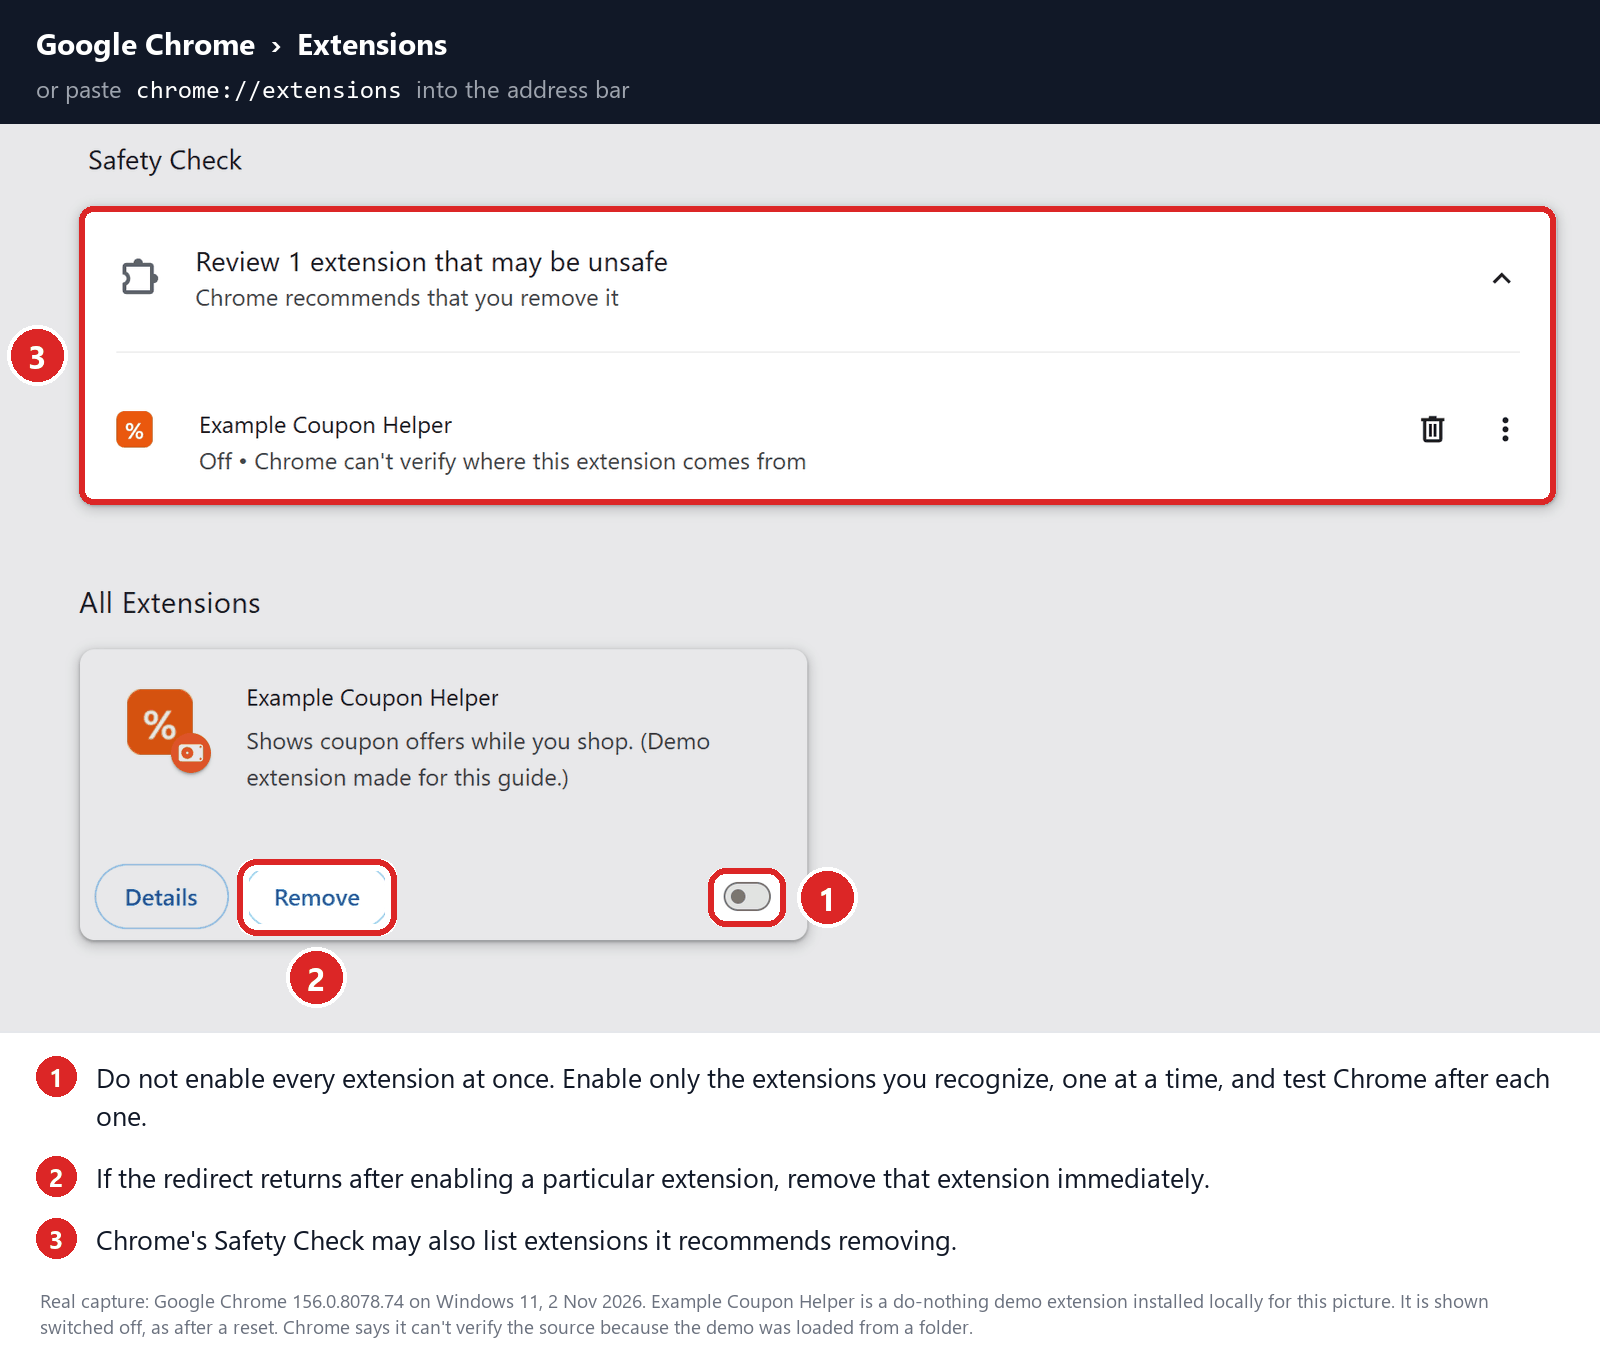
If the redirect returns after enabling a particular extension, remove that extension immediately.
Reset Firefox for Windows to default settings
We will now reset your Firefox browser settings to their default. The reset feature fixes many issues by restoring Firefox to its factory default state while saving your essential information like bookmarks, passwords, web form auto-fill information, browsing history, and open tabs.
-
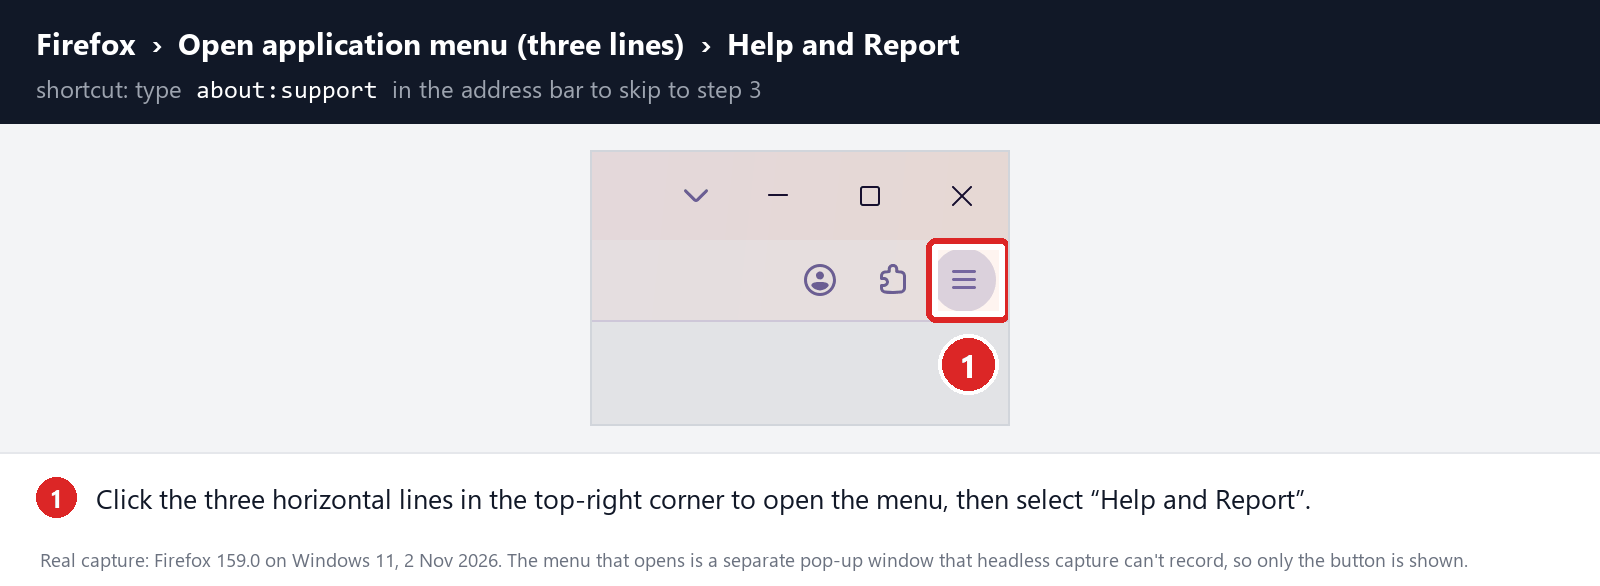
Open the Firefox menu and click “Help and Report”
Click the three horizontal lines in the top-right corner of Firefox to open the main menu, then select “Help and Report“.
-
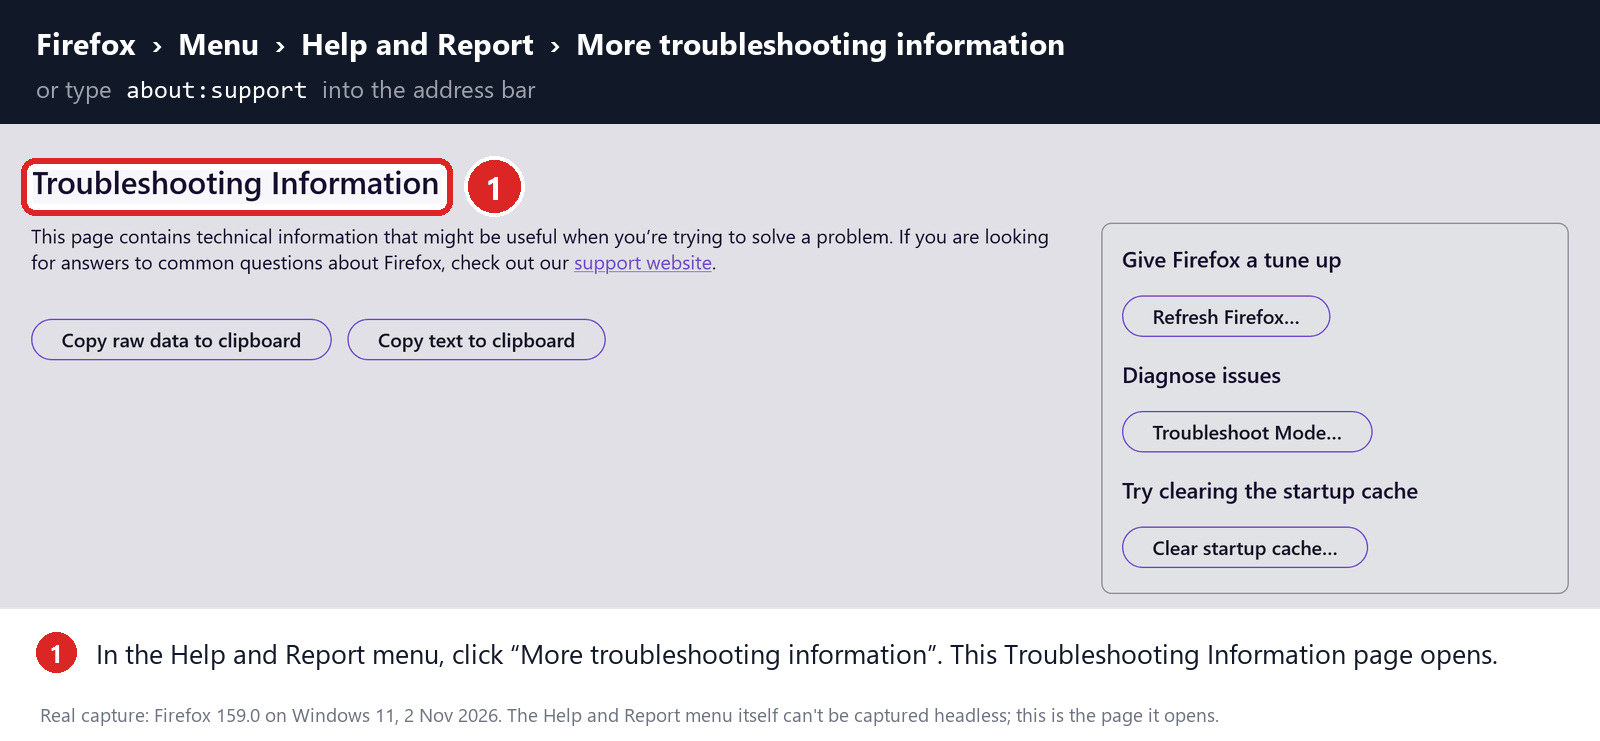
Click “More troubleshooting information”
In the Help and Report menu, click “More troubleshooting information“.
-
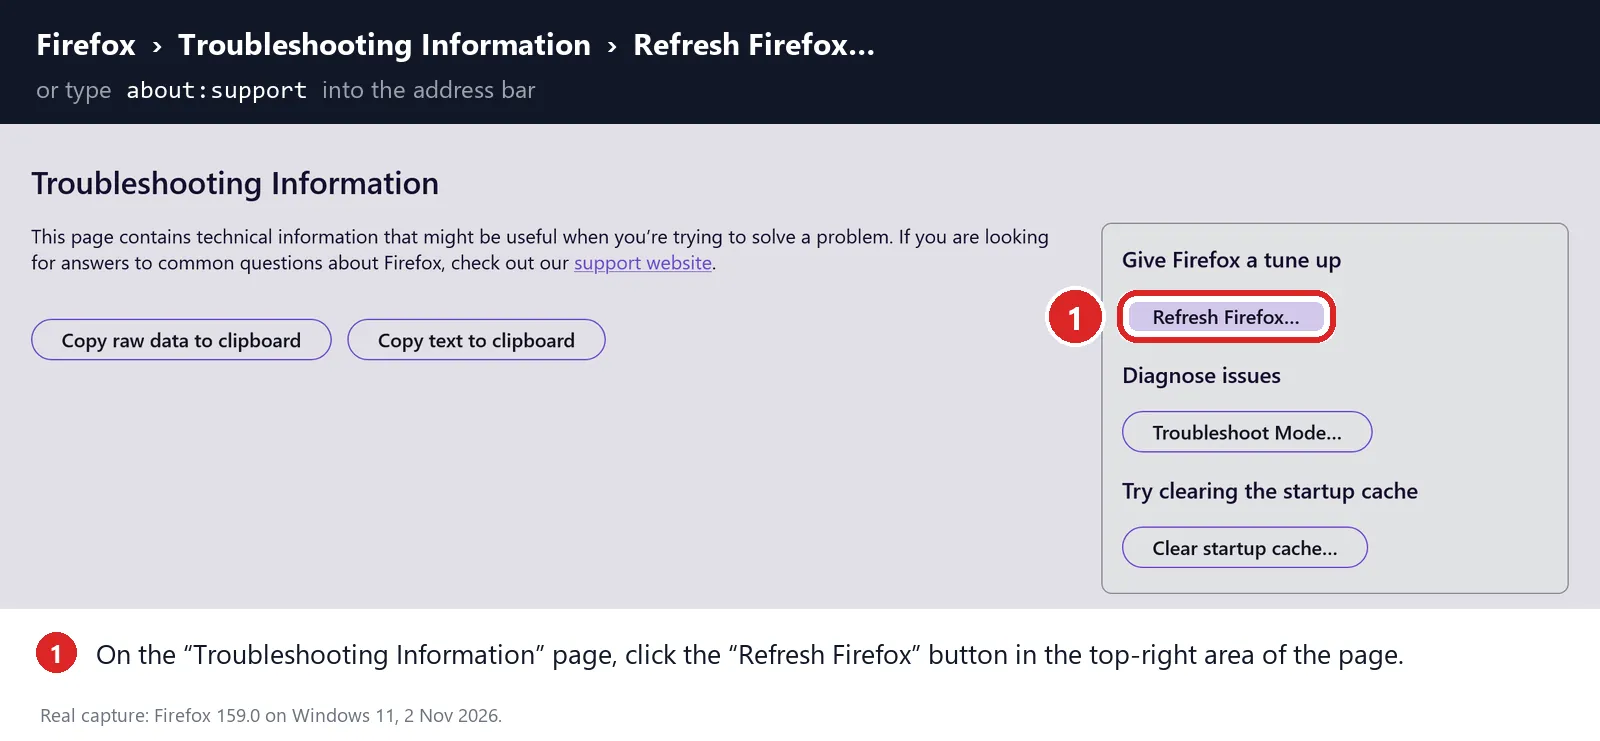
Click “Refresh Firefox”
On the “Troubleshooting Information” page, click the “Refresh Firefox” button in the “Give Firefox a tune up” box in the top-right area of the page.
-
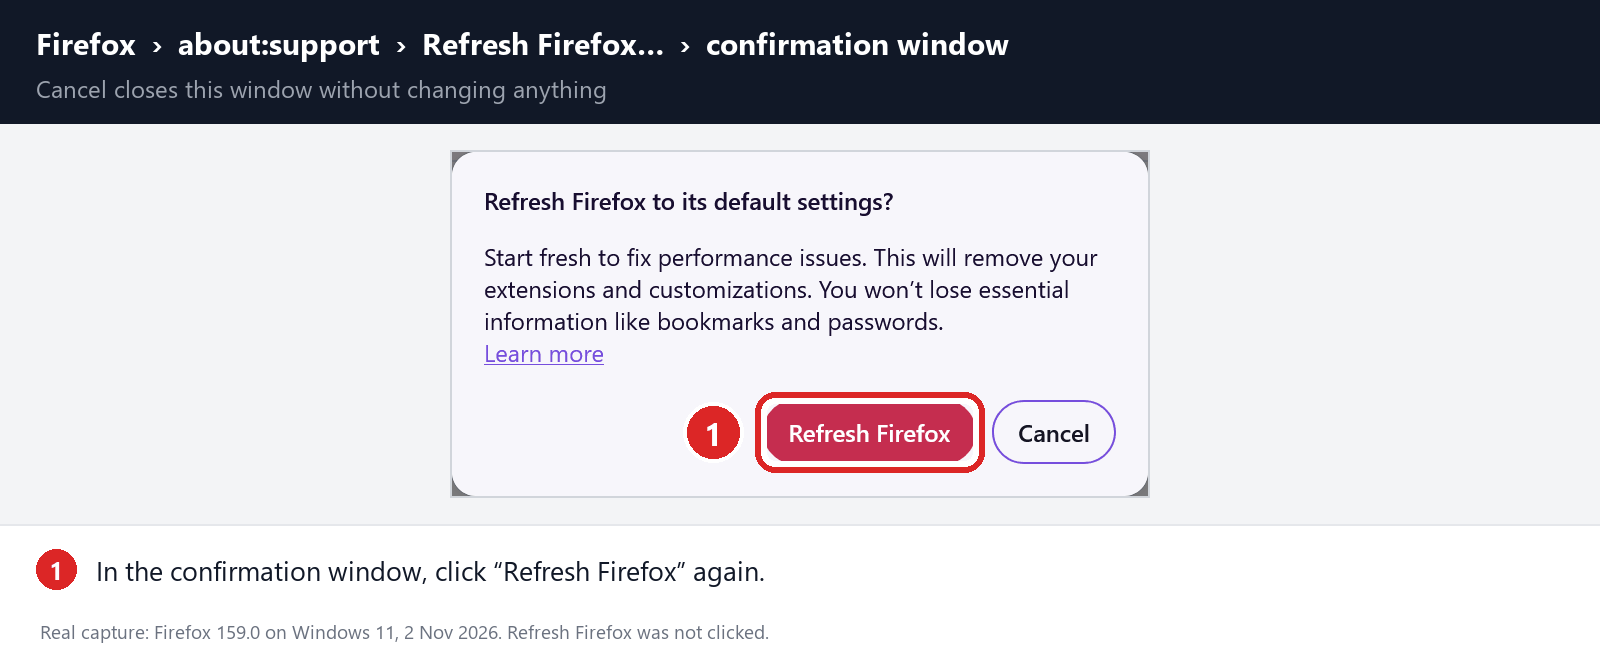
Confirm the refresh
In the confirmation window, click “Refresh Firefox” again. This removes extensions, themes, and customized settings — the usual hiding places for browser hijackers — while keeping your bookmarks, history, and saved passwords safe.
-
Click “Finish”
Firefox will close, reset itself to default settings, and reopen with a window listing the information that was restored. Click “Finish“. Then test Firefox before you add back any extensions.
About the “Old Firefox Data” folder: Firefox saves a copy of your old profile on your desktop. If something you need is missing after the reset, you can recover it from this folder. Otherwise, delete the folder — it contains sensitive data like passwords and cookies, and may also still hold the malicious files you just removed.
Reset Microsoft Edge to default settings
We will now reset your Microsoft Edge browser settings to their default. This will reset your startup page, new tab page, search engine, and pinned tabs. It will also disable all extensions and clear temporary data like cookies. Your favorites, history, and saved passwords will not be cleared.
Updated for Microsoft Edge on Windows 10 and Windows 11 — July 2026.
-
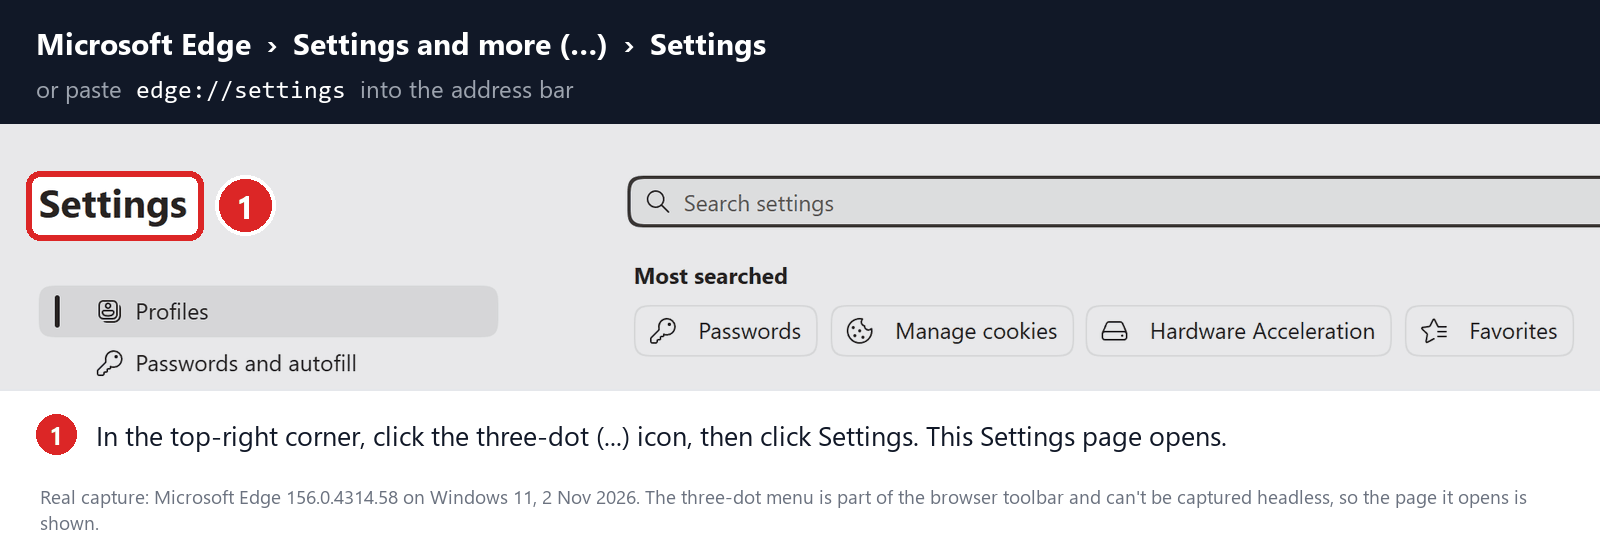
Open the Edge menu and click “Settings”
Open Microsoft Edge. In the top-right corner, click the three-dot (…) icon, then click Settings.
-
Prevent the unwanted settings from returning through Edge Sync
If you are signed in to Microsoft Edge, a bad setting or extension may be stored in your Microsoft account and return after the reset.
Copy the following address, paste it into the Edge address bar, and press Enter:
edge://settings/profiles/syncOn the Sync page, turn off these two options:
- Settings
- Extensions
You can leave Favorites and Passwords turned on.
If Edge says that sync is already off, simply continue to the next step.
Important: Edge Sync settings are separate for each profile. If you use more than one Edge profile, switch to each affected profile and repeat this step.
You do not need to sign out of your Microsoft account or delete the Edge profile.
-
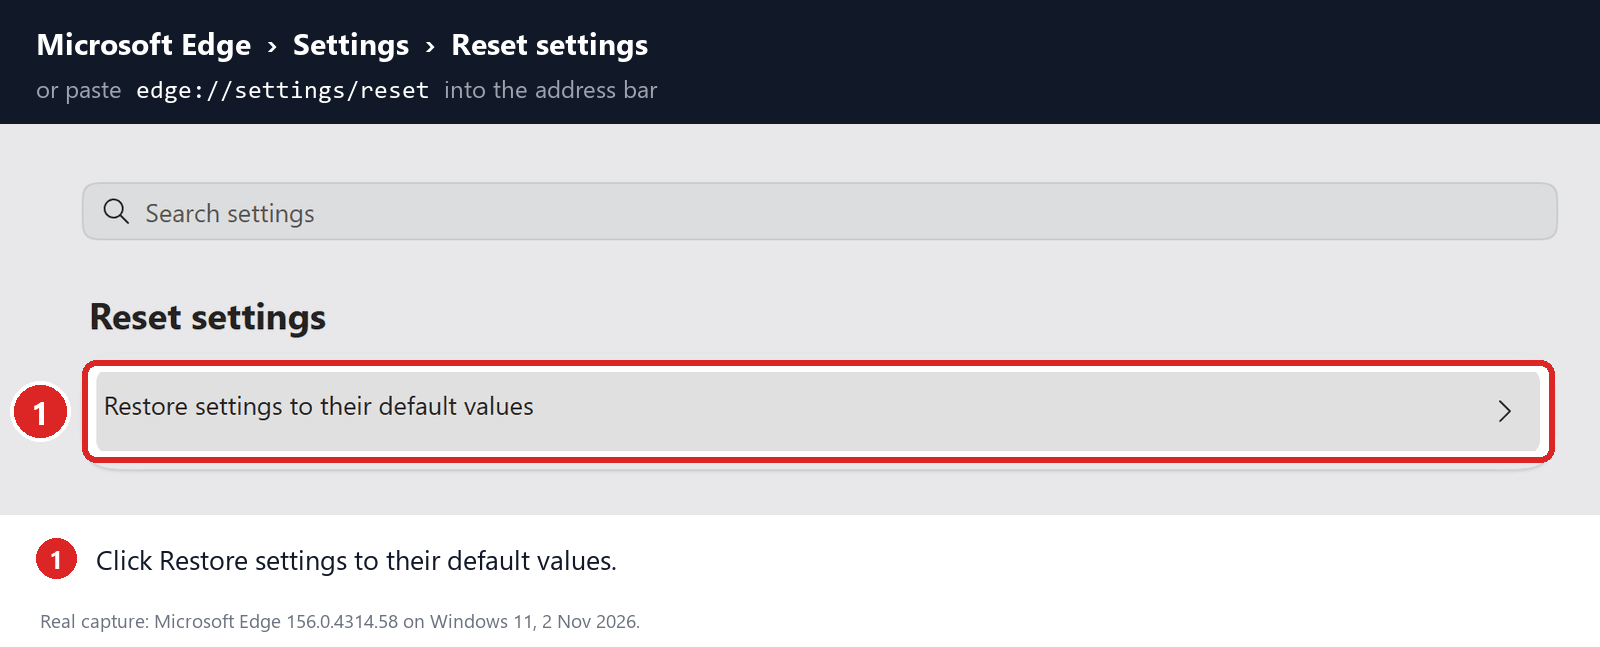
Open “Reset settings”
In the left sidebar, click Reset settings.
You can also open the reset page directly. Copy the following address, paste it into the Edge address bar, and press Enter:
edge://settings/reset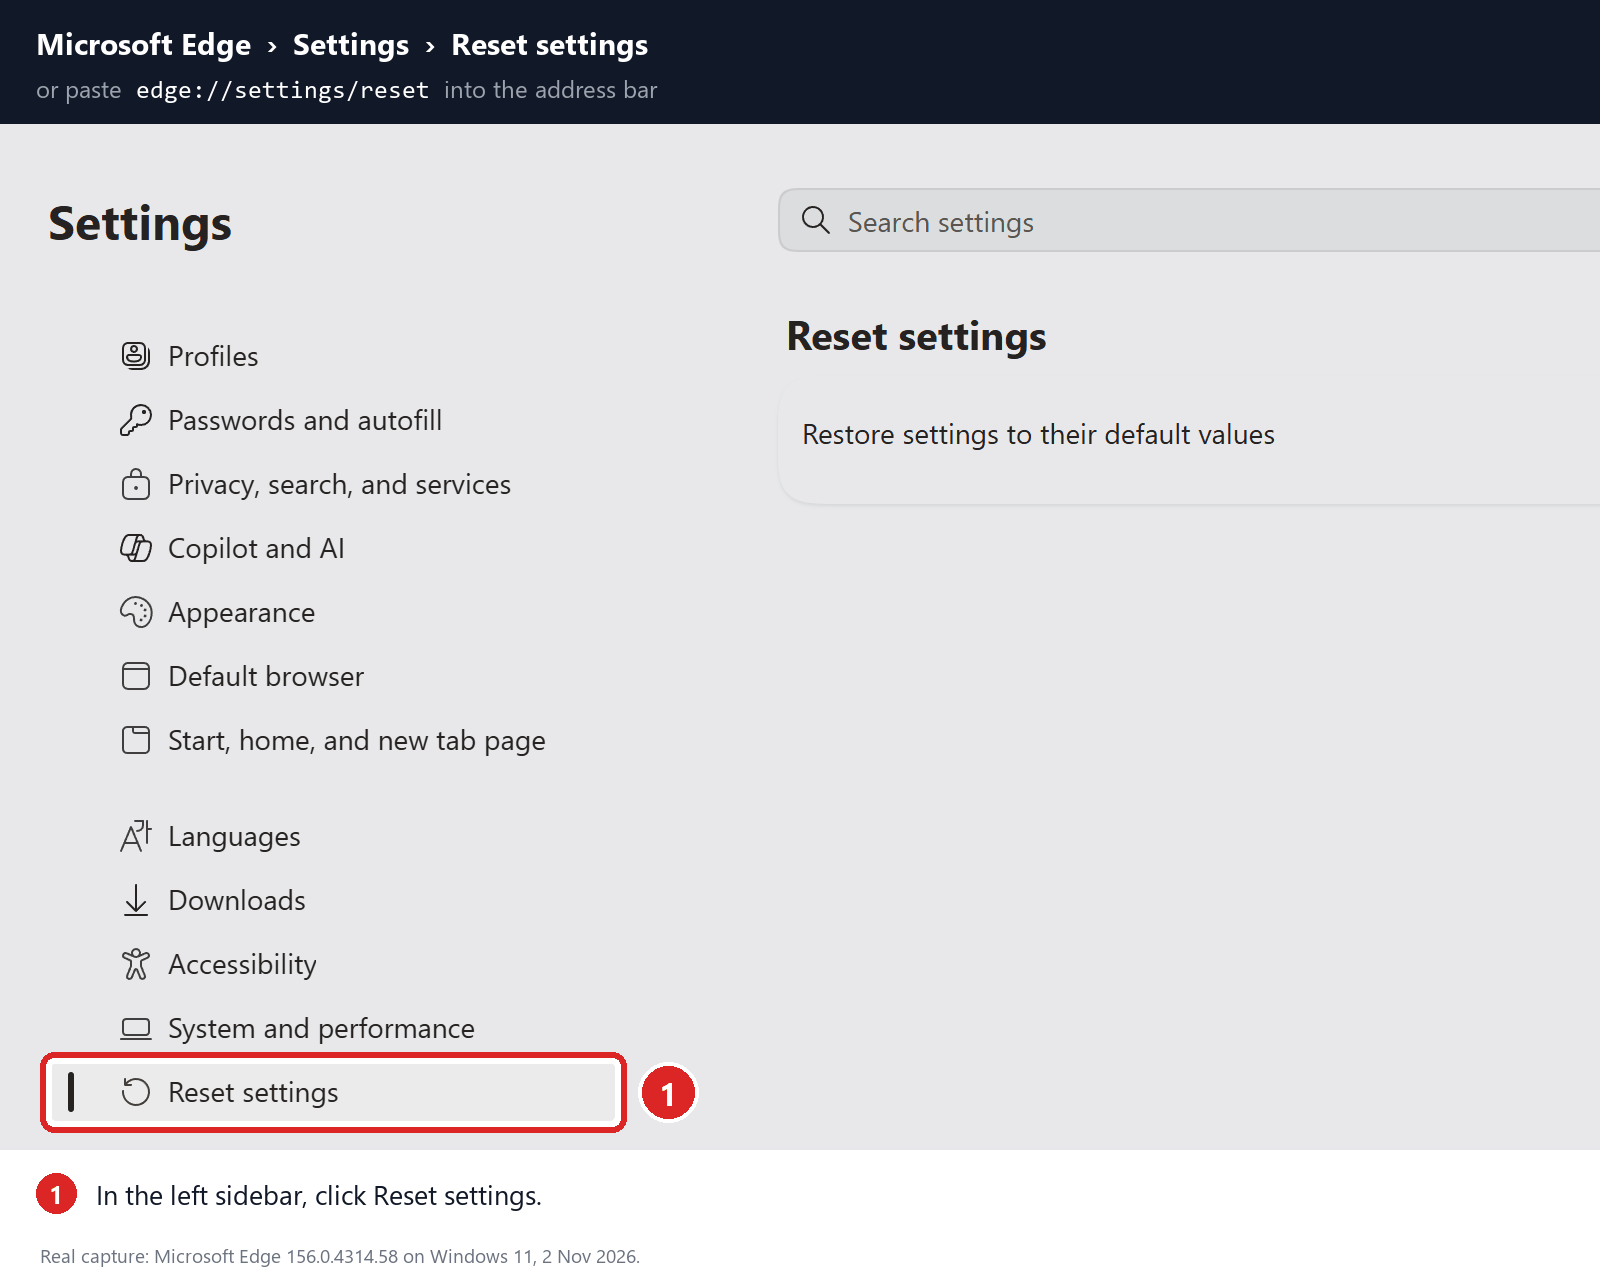
-
Click “Restore settings to their default values”
Click Restore settings to their default values.
-
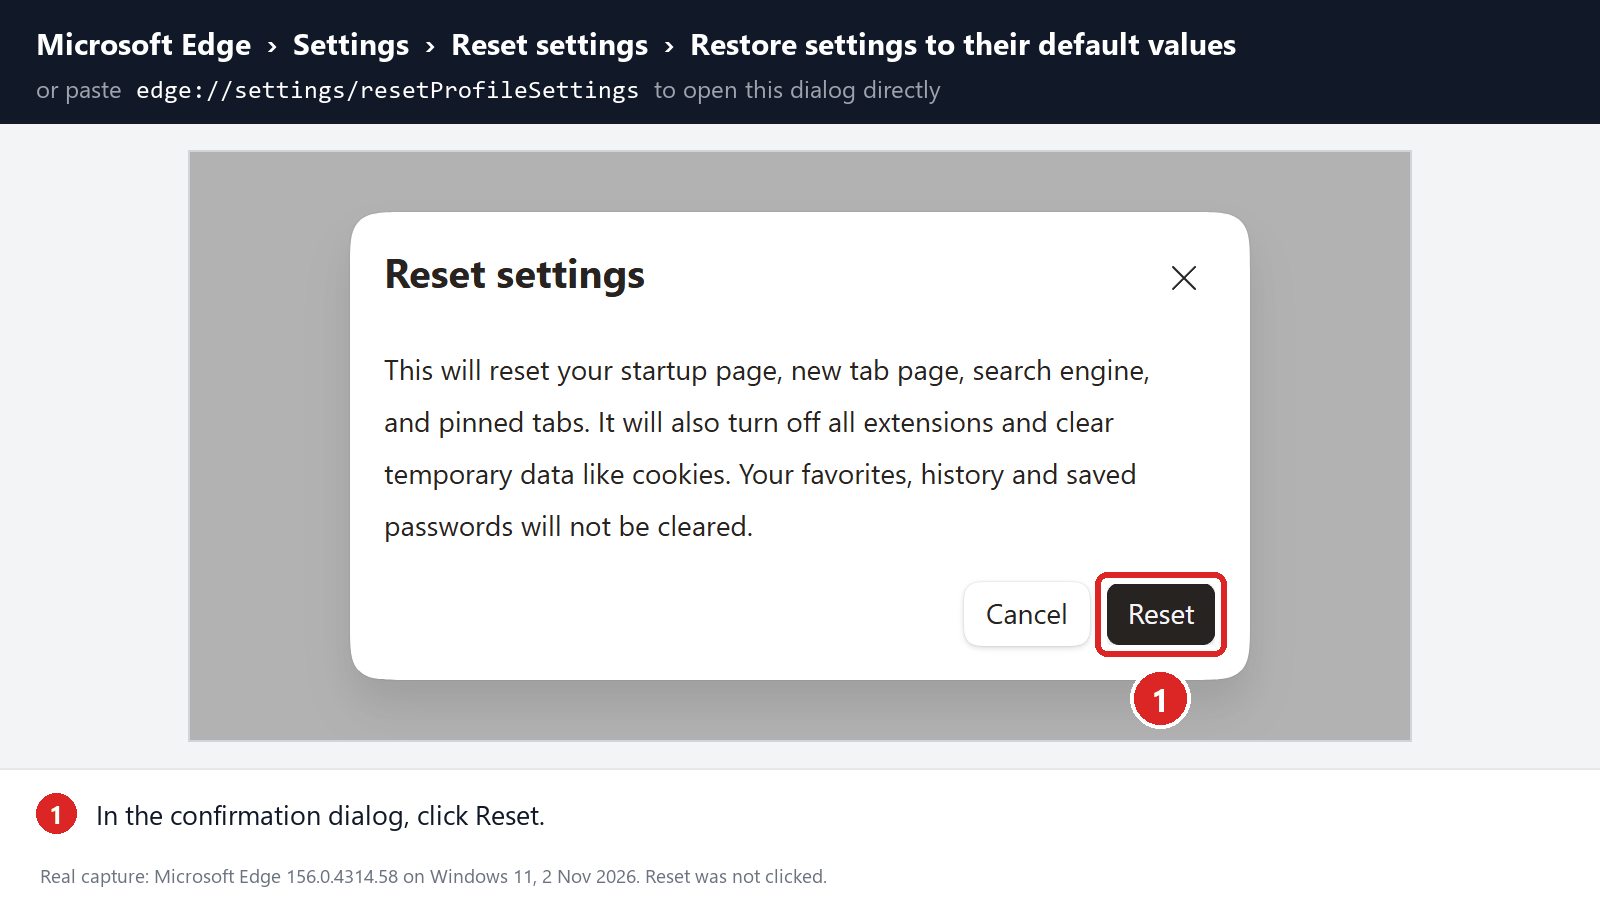
Confirm the reset
In the confirmation dialog, click Reset.
This resets the startup page, new tab page, search engine, and pinned tabs. It also disables all extensions and clears temporary site data, such as cookies.
Don’t worry: your favorites, browsing history, and saved passwords will not be deleted.
-
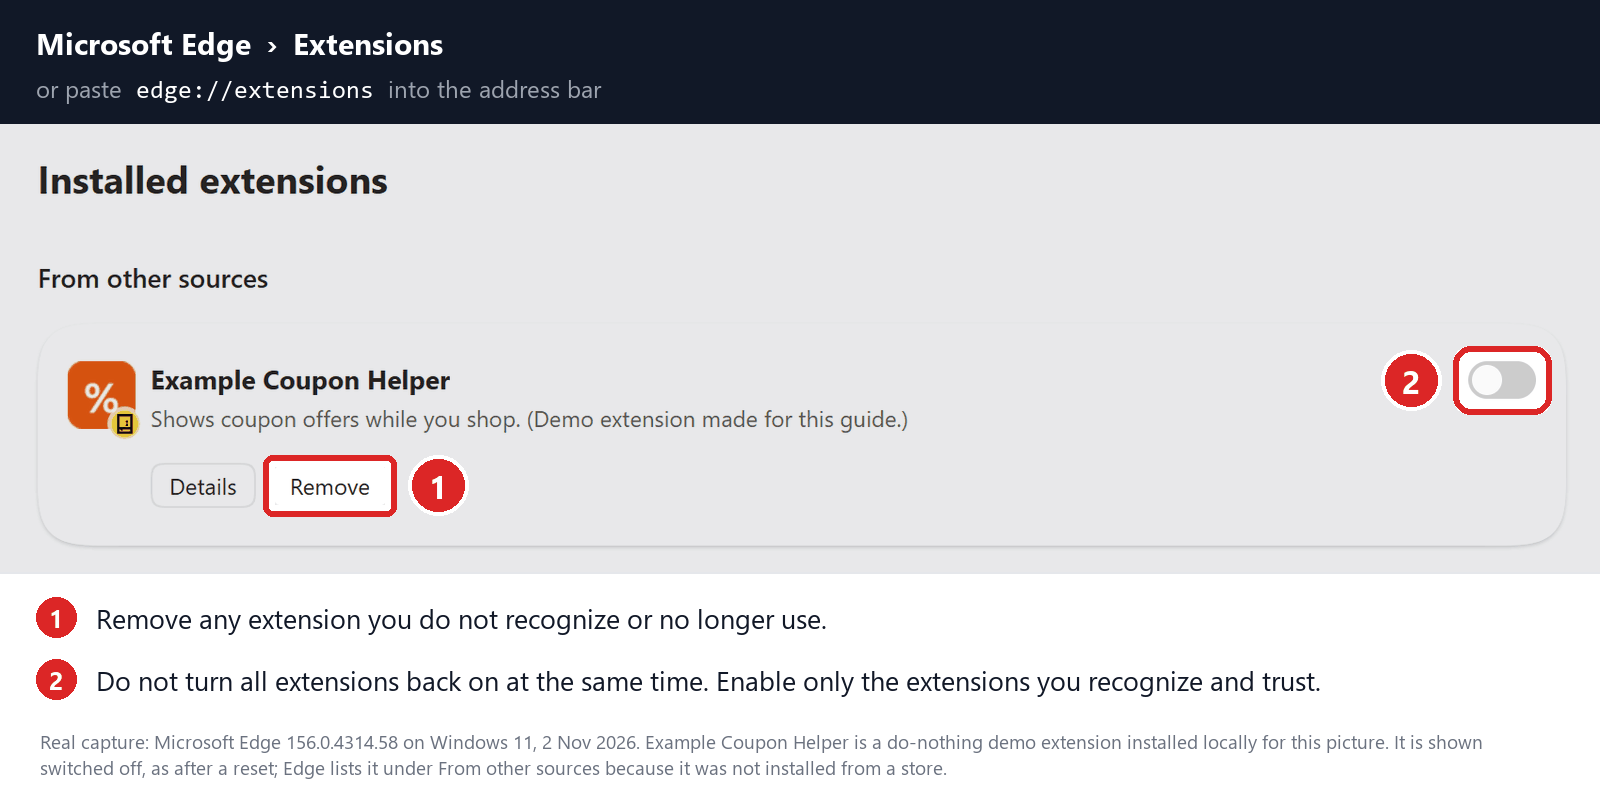
Check your extensions before turning them back on
Copy the following address, paste it into the Edge address bar, and press Enter:
edge://extensionsRemove any extension you do not recognize or no longer use. Pay particular attention to extensions related to search, coupons, shopping, PDF conversion, browser protection, new tabs, or video downloading.
Do not turn all extensions back on at the same time. Enable only the extensions you recognize and trust.
-
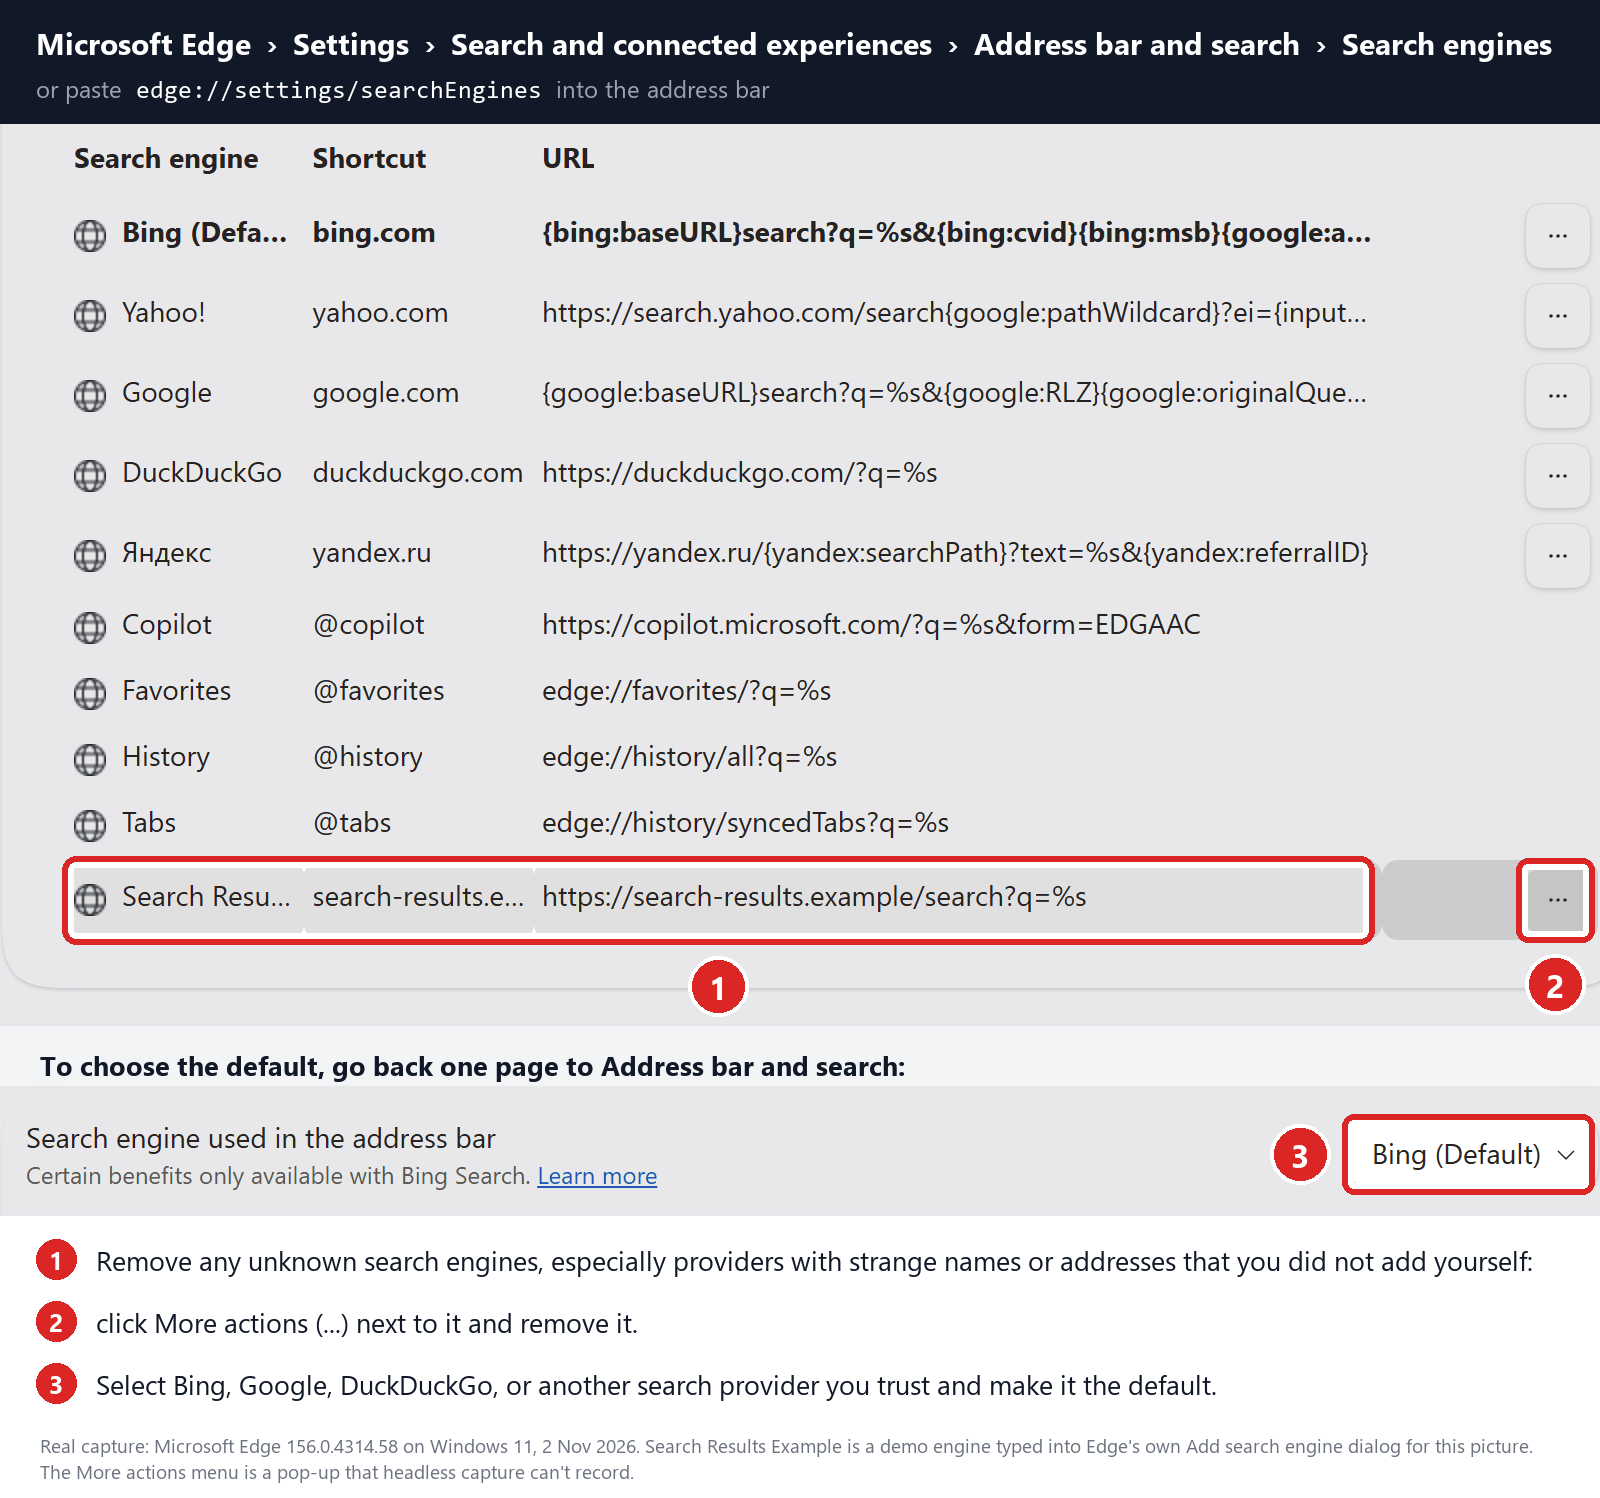
Select a trusted search engine
Copy the following address, paste it into the Edge address bar, and press Enter:
edge://settings/searchEnginesSelect Bing, Google, DuckDuckGo, or another search provider you trust and make it the default. This address opens the list of search engines; the default is set one page back, on Address bar and search, under Search engine used in the address bar.
Remove any unknown search engines from the list, especially providers with strange names or addresses that you did not add yourself: click More actions (…) next to the engine and remove it.
Restart Edge and perform a search from the address bar. If searches are no longer redirected, you can stop here.
-
If the redirect remains, clean the corrupted search data without deleting the Edge profile
Use this additional step only if Edge continues to redirect searches after the normal reset.
This command cleans the search-engine database from every local Edge profile while keeping your favorites, saved passwords, browsing history, cookies, and profiles.
Before continuing: save anything you are working on because the command will close Microsoft Edge.
- Open the Windows Start menu.
- Type PowerShell.
- Open Windows PowerShell. Administrator access is not required.
- Copy the entire command below.
- Paste it into PowerShell and press Enter.
$stamp = Get-Date -Format "yyyyMMdd-HHmmss"
$root = Join-Path $env:LOCALAPPDATA "Microsoft\Edge\User Data"

Get-Process -Name msedge -ErrorAction SilentlyContinue |
    Stop-Process -Force -ErrorAction SilentlyContinue

Start-Sleep -Seconds 2

if (-not (Test-Path -LiteralPath $root)) {
    Write-Host "The Microsoft Edge profile folder was not found:"
    Write-Host $root
    return
}

$profiles = Get-ChildItem -LiteralPath $root -Directory |
    Where-Object {
        $_.Name -eq "Default" -or
        $_.Name -match "^Profile \d+$"
    }

$movedFiles = 0

foreach ($profile in $profiles) {
    foreach ($name in @(
        "Web Data",
        "Web Data-journal",
        "Web Data-wal",
        "Web Data-shm"
    )) {
        $file = Join-Path $profile.FullName $name

        if (Test-Path -LiteralPath $file) {
            $backup = "$file.search-reset-backup-$stamp"

            try {
                Move-Item -LiteralPath $file -Destination $backup -ErrorAction Stop
                Write-Host "Cleaned: $($profile.Name)\$name"
                $movedFiles++
            }
            catch {
                Write-Warning "Could not clean: $file"
            }
        }
    }
}

Write-Host ""

if ($movedFiles -gt 0) {
    Write-Host "Microsoft Edge search data has been cleaned." -ForegroundColor Green
    Write-Host "You can now reopen Microsoft Edge."
}
else {
    Write-Host "No Edge search database files were found." -ForegroundColor Yellow
}
The command does not permanently delete the original files. It renames them as backup files, and Edge creates a clean search database when it starts again.
Note: this additional cleanup may also reset saved form-fill suggestions, saved addresses, payment cards saved only on this computer, and manually added search engines. It does not delete favorites, passwords, or browsing history.
-
Reopen Edge and test the browser
Open Microsoft Edge again, visit edge://settings/searchEngines, and select your preferred search engine (one page back, on Address bar and search, under Search engine used in the address bar).
Perform several searches from the address bar to confirm that the redirect is gone.
Keep synchronization for Settings and Extensions turned off until you are certain that the computer and extensions are clean. If you enable them again, turn them on one at a time and test Edge after each change.
-
If Edge still redirects your searches
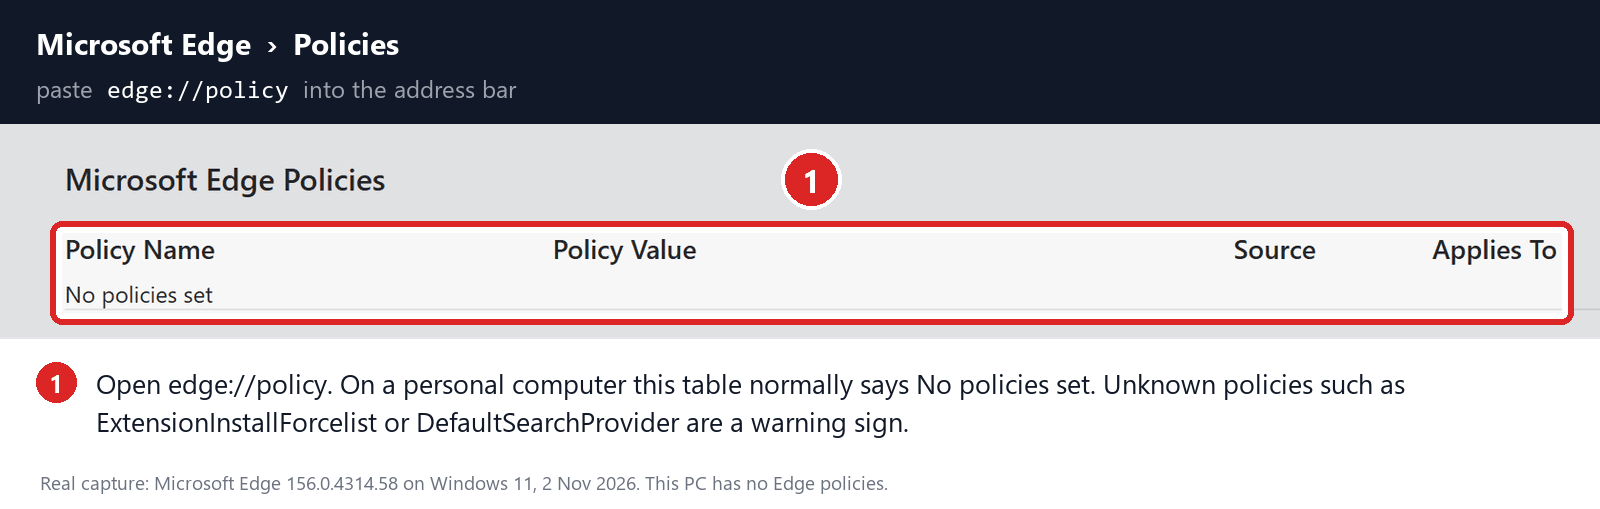
Open edge://policy. If this is your personal computer and Edge displays unknown policies such as ExtensionInstallForcelist or DefaultSearchProvider, the hijacker may be installed outside the browser profile.
In that situation, continue with the next malware-removal steps and run a complete antivirus scan. If the computer belongs to a company or school, contact its IT administrator before changing any policies.
STEP 3: Use Rkill to terminate suspicious programs
Next, we’ll download and run Rkill to stop any suspicious processes running in the background. This prevents the malware from interfering with the removal tools in the following steps.
RKill is a program that was developed at BleepingComputer.com that attempts to terminate known malware processes so that your normal security software can then run and clean your computer of infections. When RKill runs it will kill malware processes and then removes incorrect executable associations and fixes policies that stop us from using certain tools.
-
Download Rkill.
You can download RKill to your computer from the below link. When at the download page, click on the Download Now button labeled iExplore.exe. We are downloading a renamed version of Rkill (iExplore.exe) because some malware will not allow processes to run unless they have a certain filename.
Download RKillOpens the BleepingComputer download page in a new tab. RKillStops malware processes so other tools can run
-
Run RKill.
After downloading, double-click the iExplore.exe icon to kill malicious processes. In most cases, downloaded files are saved to the Downloads folder.
The program may take some time to search for and end various malware programs.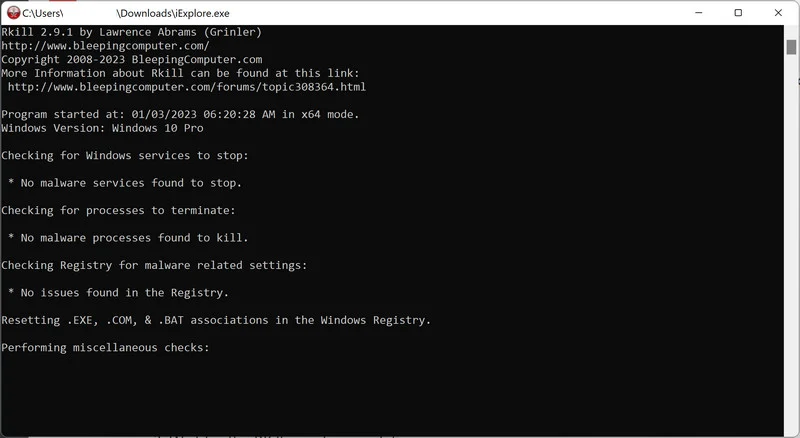
When it is finished, the black window will close automatically and a log file will open. Do not restart your computer. Proceed to the next step in this guide.
STEP 4: Use Malwarebytes to remove Trojans and unwanted programs
Now we’ll install Malwarebytes and run a full scan to detect and remove infections, adware, and potentially unwanted programs from your computer.
Malwarebytes is one of the most popular and trusted anti-malware tools for Windows — and it’s completely free for removing infections. It catches threats that many antivirus programs miss, including adware, browser hijackers, and trojans. Follow the steps below to scan your PC and remove what Malwarebytes finds.
Download Malwarebytes
Click the button below to download the latest version of Malwarebytes for Windows from the official source. The free version is all you need — it will scan your computer and remove adware, browser hijackers, and other malicious software at no cost.
Download MalwarebytesOfficial installer for Windows 11 and 10. Your download starts right away.Want real-time protection? See Malwarebytes Premium Malwarebytes Free for WindowsScans and removes malware at no cost
-
Install Malwarebytes
When the download finishes, open your Downloads folder and double-click the MBSetup file. If Windows shows a User Account Control pop-up, click “Yes” to allow the installation.
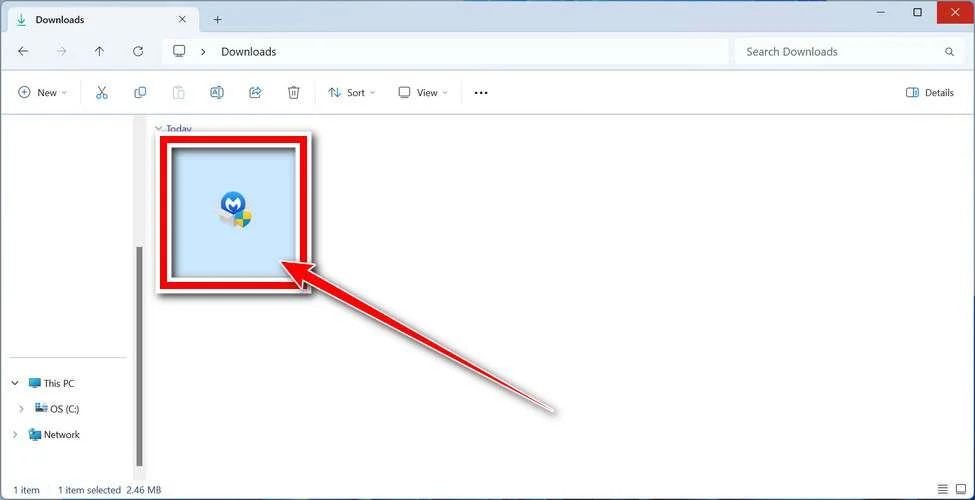
Follow the On-Screen Prompts to Install Malwarebytes
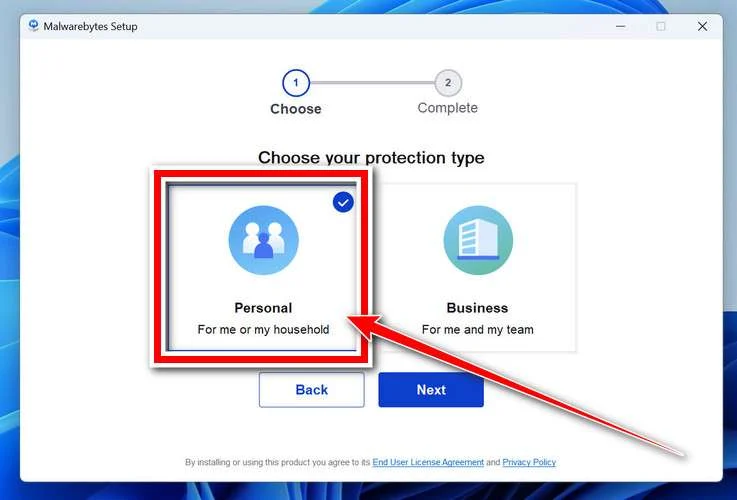
The setup wizard will walk you through a few quick screens:
-
Choose where you’re installing the program — “Personal Computer” or “Work Computer” — then click Next.
-
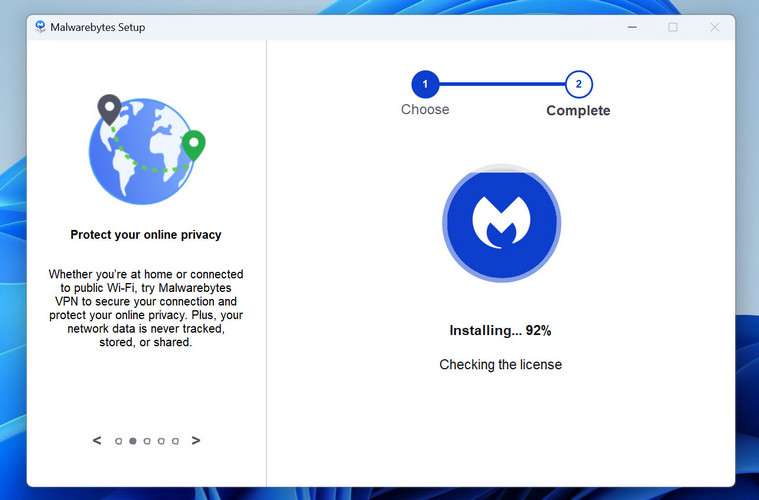
Malwarebytes will now install on your device. This usually takes under a minute.
-
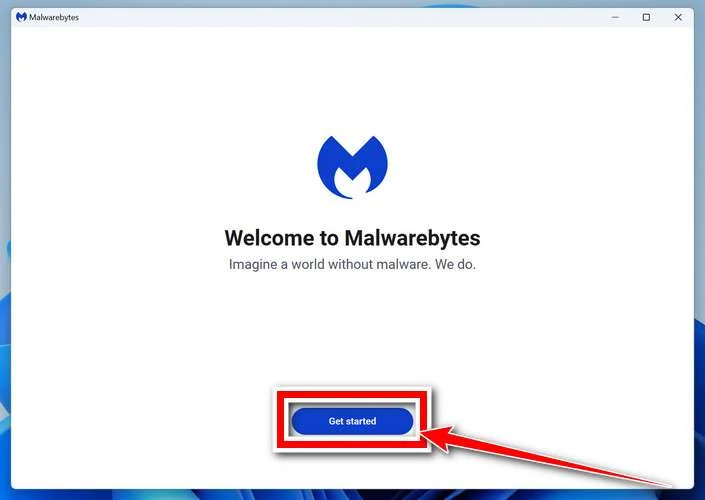
When installation is complete, the “Welcome to Malwarebytes” screen will open automatically.
-
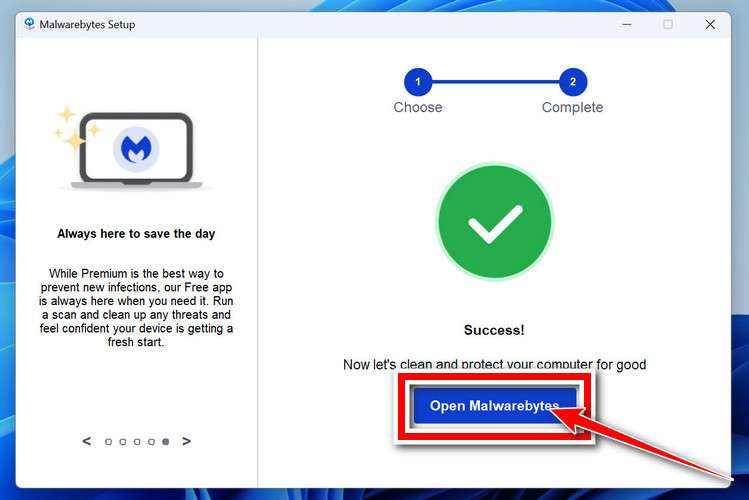
On the final screen, click Open Malwarebytes to launch the program.
-
Optional: Check for rootkits with a Custom Scan
You don’t need to change any settings for a normal scan. The standard Threat Scan in the next step is enough for most problems, so you can go straight to it.
If you also want to check for rootkits, use a Custom Scan. In current versions of Malwarebytes, rootkit scanning is only available there:
- On the Scanner tile, click the three-dot menu and select Advanced Scan.
- Choose Custom Scan. In its options, check Scan for rootkits.
- Select your system drive (usually C:\) as the location to scan, then start the scan. It takes longer than a Threat Scan.
- When it finishes, review and quarantine the results as described in the steps below.
Rootkit scanning isn’t available on Windows devices with ARM processors.
Start the Scan
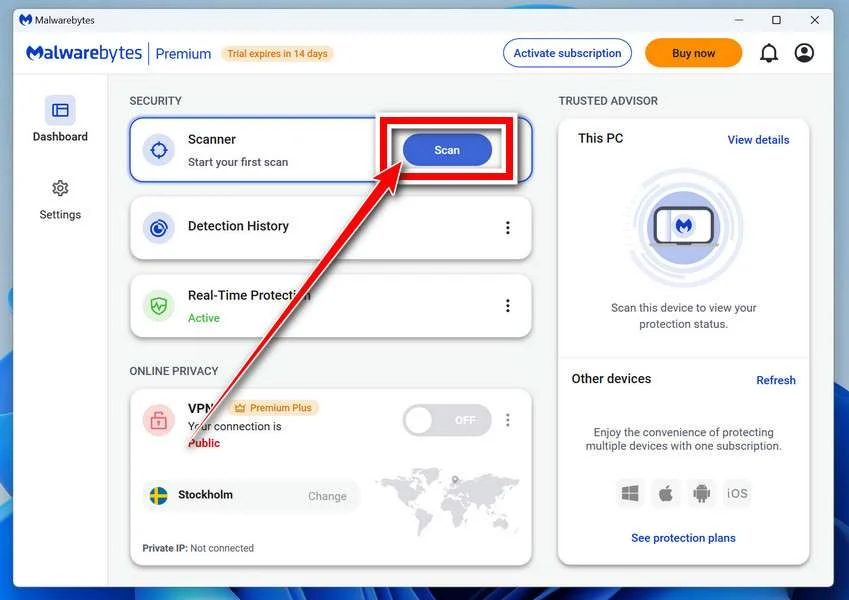
Click the blue Scan button. Malwarebytes will automatically update its virus database and start checking your computer for malware.
-
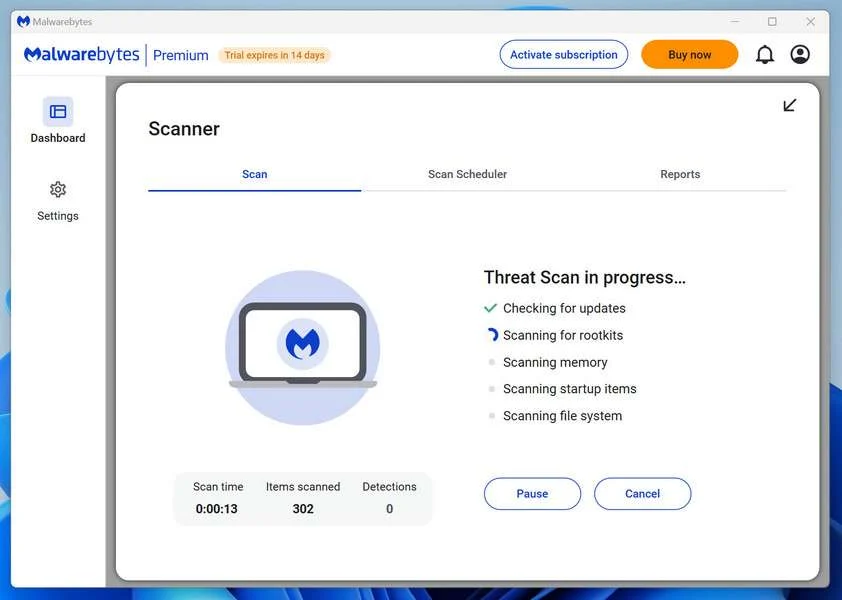
Wait for the Scan to Finish
The scan checks your entire system for browser hijackers and other malicious programs, so it can take 5 to 20 minutes depending on your computer. Feel free to do something else — just check back occasionally to see the progress.
-
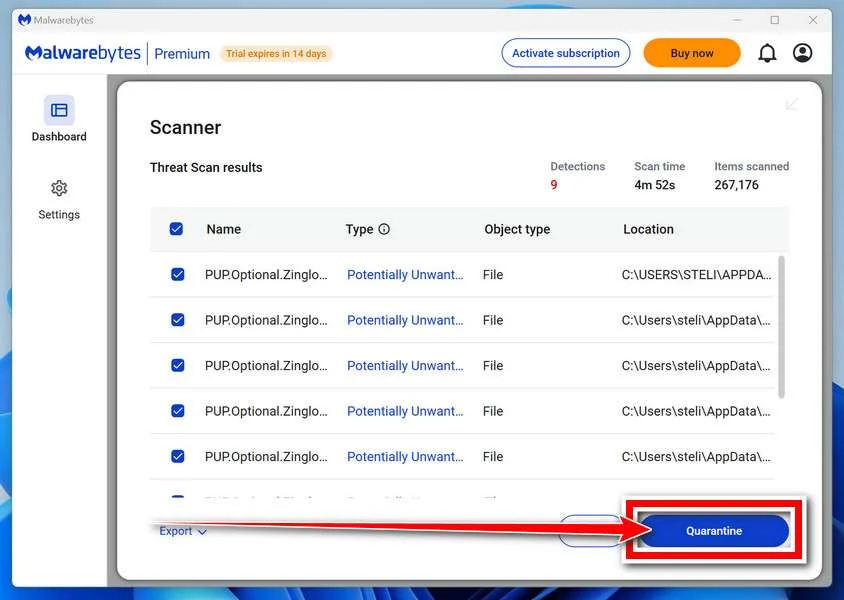
Quarantine the Detected Threats
When the scan is done, you’ll see a list of everything Malwarebytes found — malware, adware, and potentially unwanted programs. Click the “Quarantine” button to remove all of them at once.
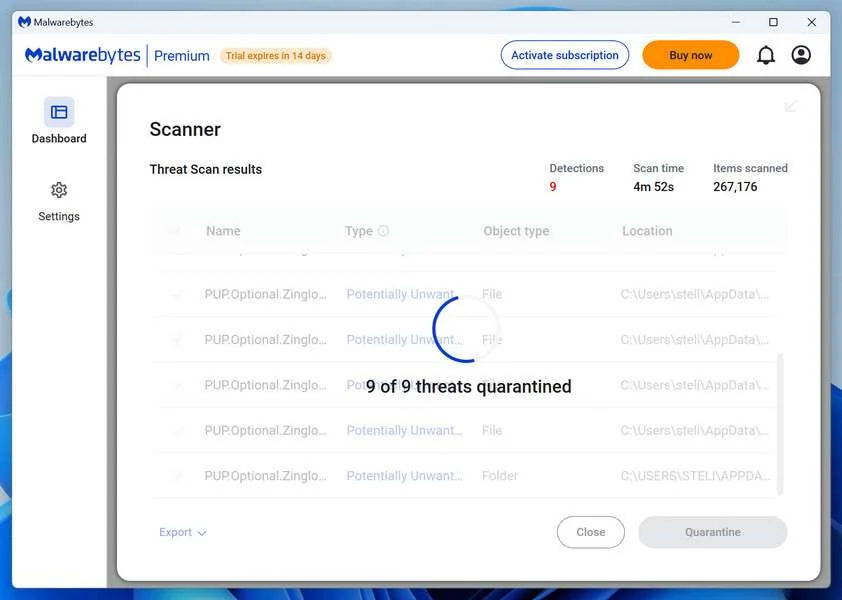
Malwarebytes will now remove the malicious files and registry entries and move them safely into quarantine.
-
Restart Your Computer
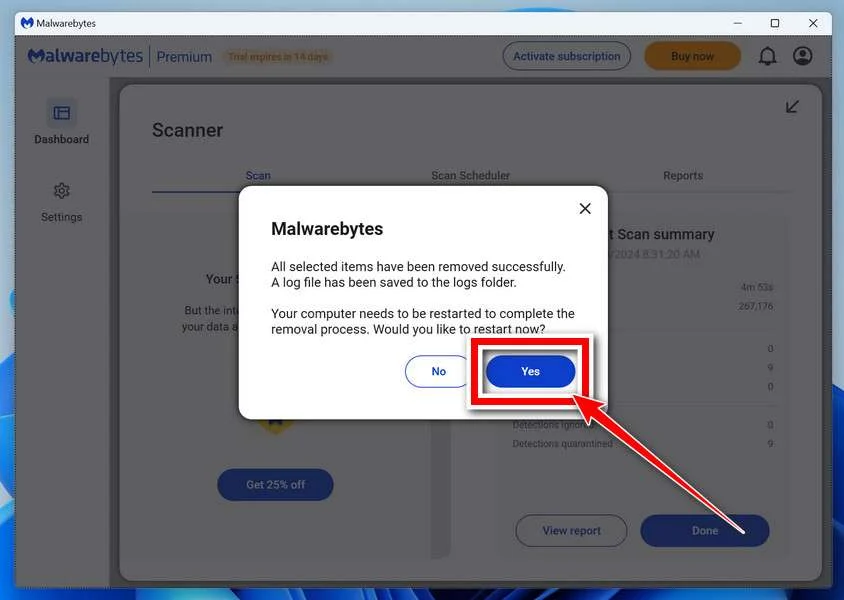
Some threats can only be fully removed after a reboot. If Malwarebytes asks you to restart, click Yes. Once you’re logged back in, Malwarebytes has finished removing the threats it found.
STEP 5: Use HitmanPro to remove rootkits and other malware
Next, we’ll run a second-opinion scan with HitmanPro to catch Trojans, rootkits, and other malicious programs that may have survived the previous step.
HitmanPro is a second-opinion scanner — it’s designed to catch what your main antivirus might have missed. Instead of relying on a single detection engine, it checks the behavior of files in the locations where malware usually hides. Anything suspicious is checked online, where it’s analyzed by several antivirus engines in HitmanPro’s Scan Cloud.
Good news: scanning is completely free, with no limits. You only need a license when it’s time to remove what was found — and even then, you can activate a free one-time 30-day trial to remove what it finds at no cost. The trial works once per computer. After that, removal needs a paid license, and the purchase screen shows the current price.
-
Download HitmanPro
Click the button below to download HitmanPro. Remember — the scan is free, so you have nothing to lose by checking your PC.
Download HitmanProFree scan. Removing threats needs the free 30-day trial. Opens the official HitmanPro page in a new tab. HitmanProSecond-opinion malware scanner from Sophos
-
Install HitmanPro
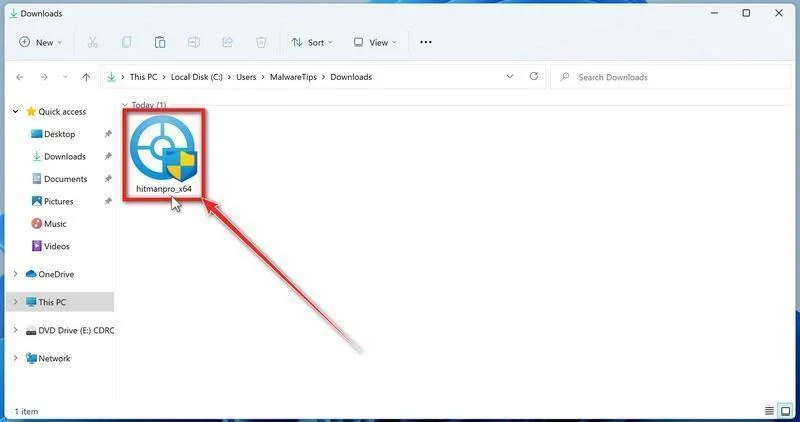
When the download finishes, open your Downloads folder and double-click the file “hitmanpro_x64.exe”. (On 32-bit Windows 10, the file is named “hitmanpro.exe”.)
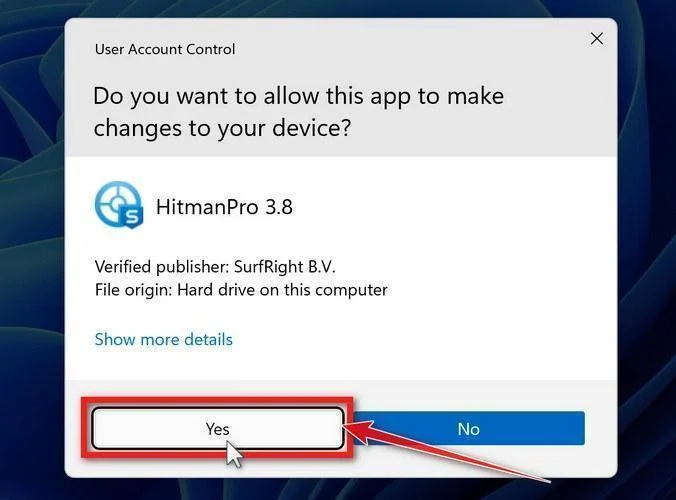
If a User Account Control pop-up asks whether HitmanPro can make changes to your device, click “Yes” to continue.
-
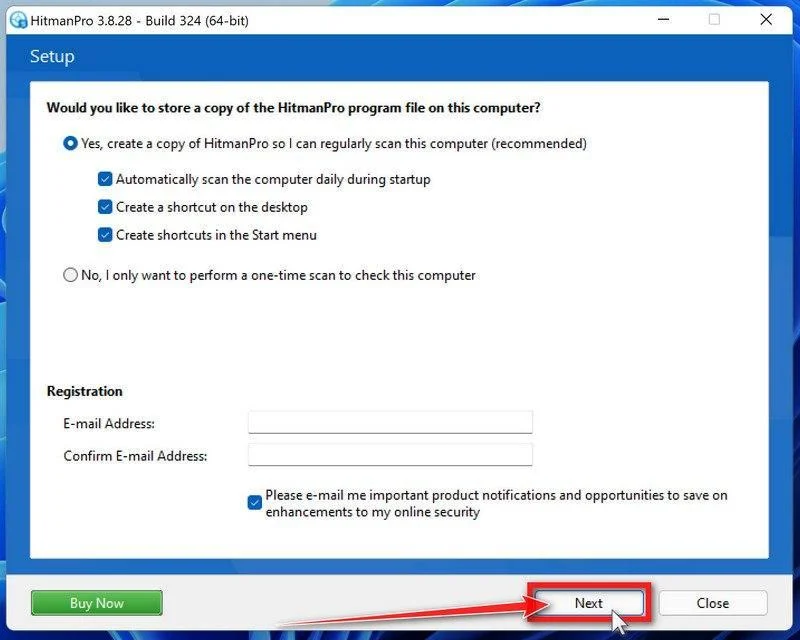
Follow the On-Screen Prompts
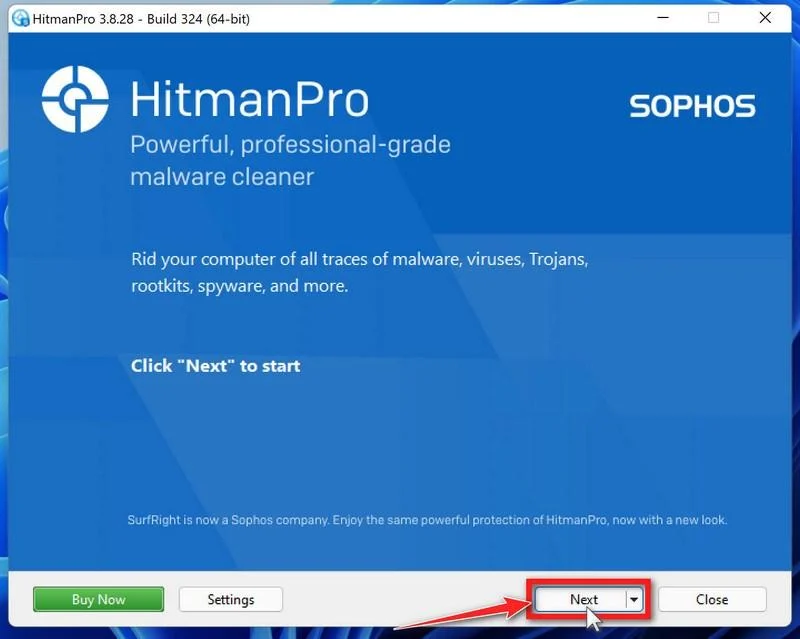
On the HitmanPro start screen, click “Next” to begin the system scan. No lengthy setup required — it goes straight to work.
-
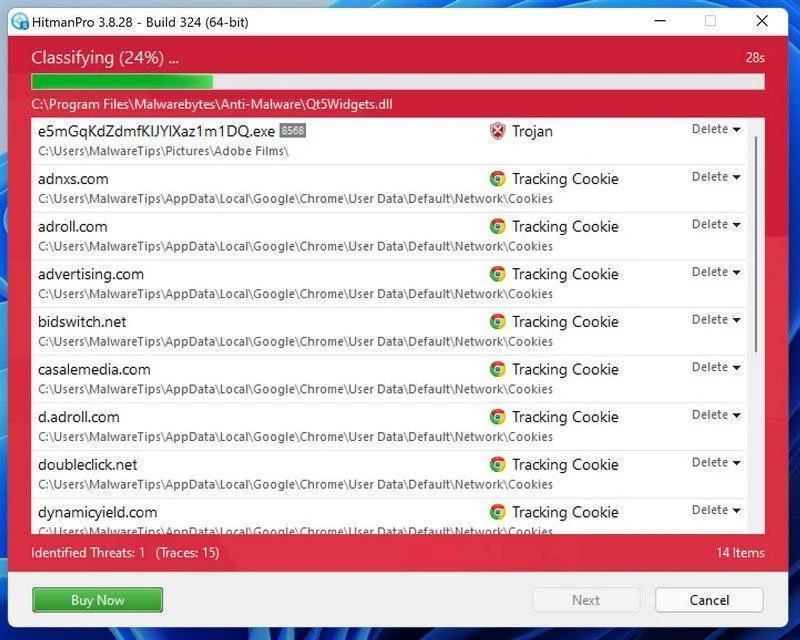
Wait for the Scan to Finish
HitmanPro will now check your computer for malicious programs. This usually takes just a few minutes thanks to its cloud-based scanning.
-
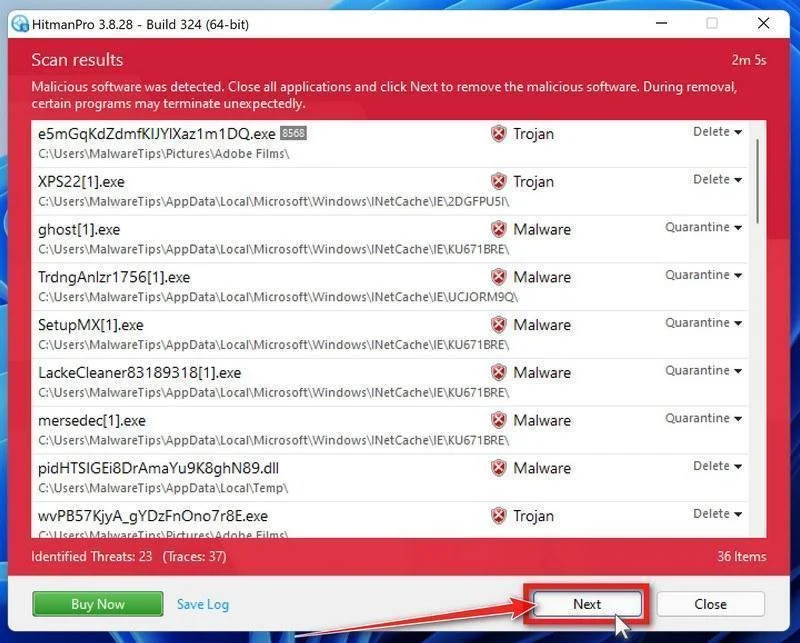
Review the Results and Click “Next”
When the scan is done, HitmanPro will show you everything it found. Click “Next” to remove the detected threats.
-
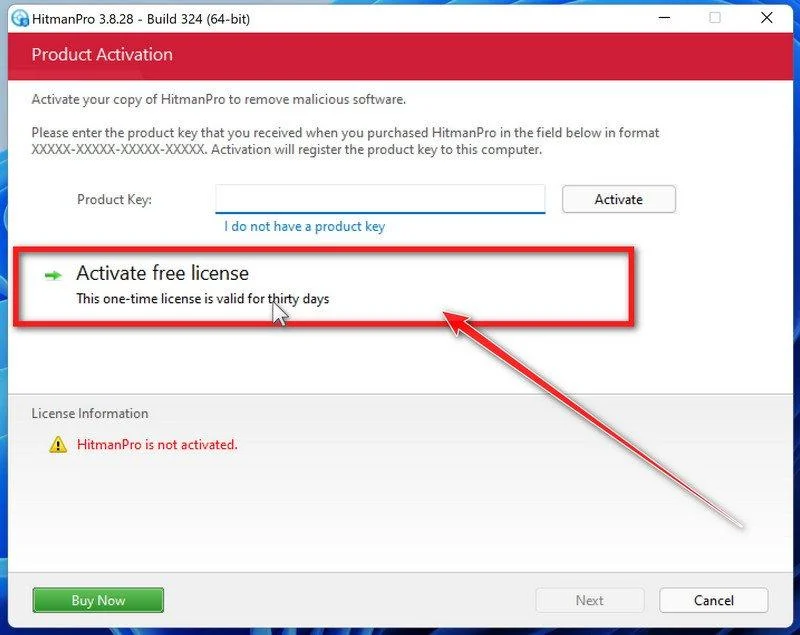
Click “Activate Free License”
To remove the malicious files, click the “Activate free license” button. This starts your free 30-day trial — no payment details needed — and unlocks the full cleanup.
When the removal is complete, HitmanPro will show a summary of everything it cleaned. Click Next, then click Reboot if prompted. If there’s no reboot prompt, click Close. Then check whether the problems you noticed have stopped. If they come back, save the HitmanPro log and ask for help in our forum.
STEP 6: Use AdwCleaner to remove malicious browser policies and adware
We’ll now use AdwCleaner to remove malicious browser policies and unwanted browser extensions — the leftovers that keep hijacking your browser settings even after the malware itself is gone.
AdwCleaner is a free on-demand scanner that specializes in adware, browser hijackers, and unwanted toolbars — the exact threats that mainstream antivirus programs often miss. It also includes tools that repair the damage malware leaves behind, like hijacked browser settings and malicious policies. It’s a quick scan that’s well worth running.
-
Download AdwCleaner
Click the button below to download AdwCleaner — it’s free, portable, and requires no installation.
Download AdwCleanerOpens the official download page in a new tab. Malwarebytes AdwCleanerRemoves adware and unwanted programs at no cost
-
Run AdwCleaner
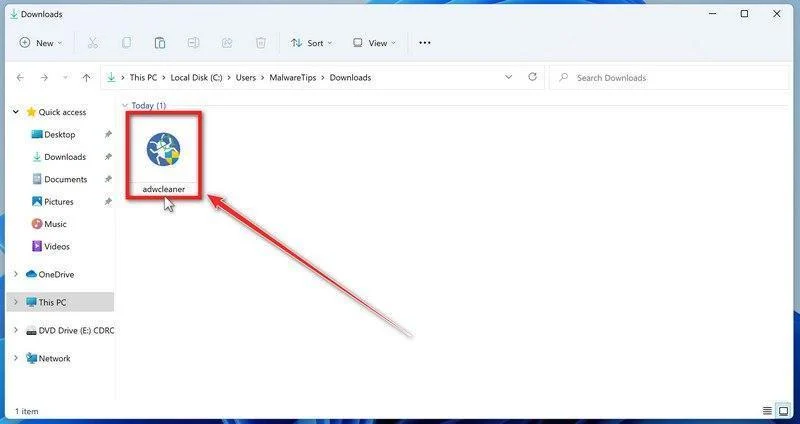
Open your Downloads folder and double-click the file named “adwcleaner.exe“. There’s no installation — the program starts right away.
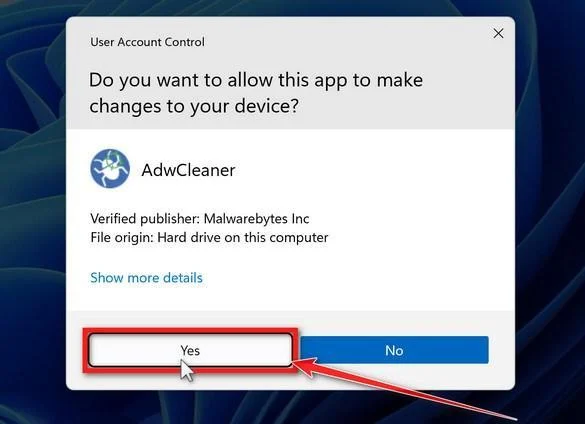
If Windows asks whether you want to allow AdwCleaner to run, click “Yes“. When the license agreement appears, click I agree to continue.
-
Leave “Reset Chrome policies” off unless you need it
AdwCleaner can reset Chrome policies, the settings that malware sometimes uses to lock your browser so you can’t change it back. This option removes every Chrome policy, including legitimate ones set by an employer, a school, or parental-control software, so leave it off for a normal scan.
AdwCleaner applies this option only if you run Basic Repair at the end of the cleanup. Malwarebytes advises running Basic Repair only when a support agent asks you to, and it also runs every other repair action that is turned on in the same list. If this is your own personal PC and chrome://policy in Chrome lists policies you didn’t set, ask for help in our forum instead. On a work or school computer, ask the IT administrator.
-
Start the Scan
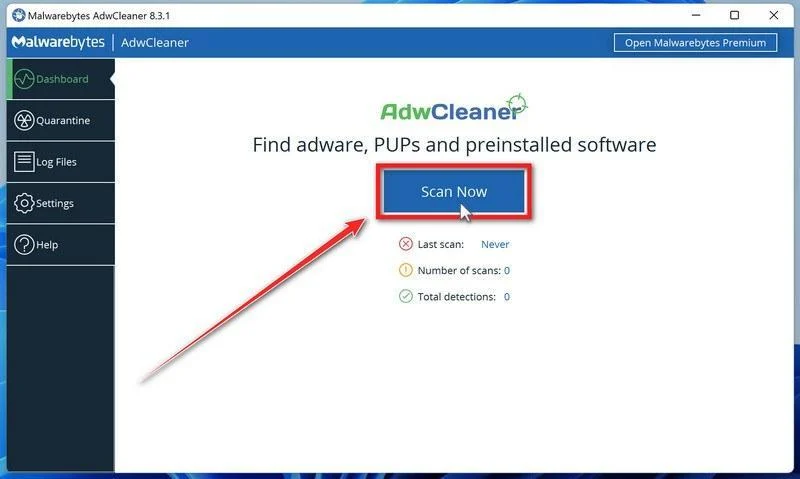
Click “Dashboard” on the left side of the window, then click the “Scan Now” button.
-
Wait for the Scan to Finish
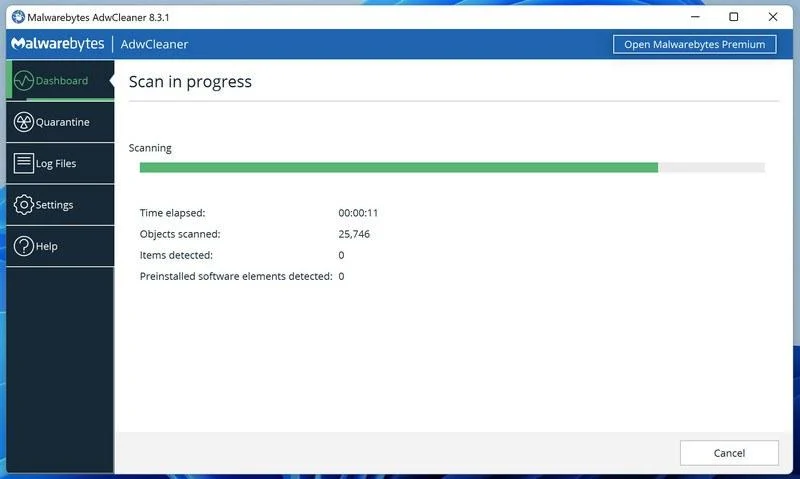
AdwCleaner will now check your computer for adware and other malware. This usually takes only a few minutes — it’s one of the fastest scanners around.
-
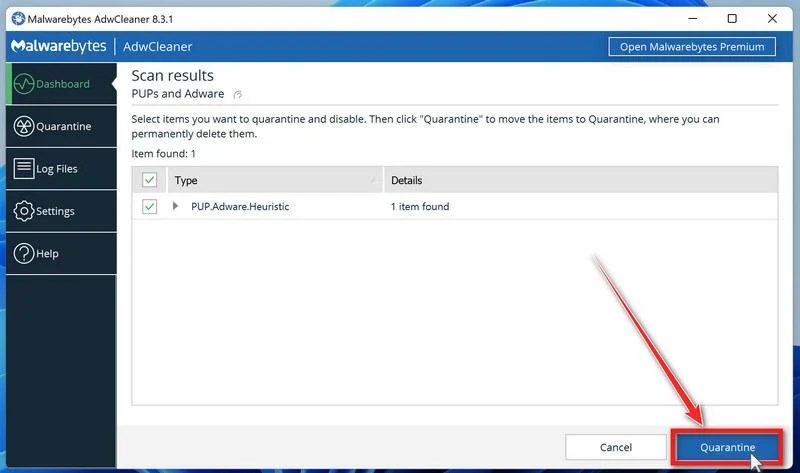
Quarantine the Detected Threats
When the scan finishes, AdwCleaner lists everything it found. Review the list and uncheck any program you installed on purpose and want to keep, then click Next. If AdwCleaner also found preinstalled software, it shows that list next. Review it the same way, then click “Quarantine“. Older versions show the Quarantine button on the first list, as in the image below.
-
Click “Continue” to Finish the Cleanup
Save any open work first — AdwCleaner needs to close your open programs before it can clean. When you’re ready, click the “Continue” button.
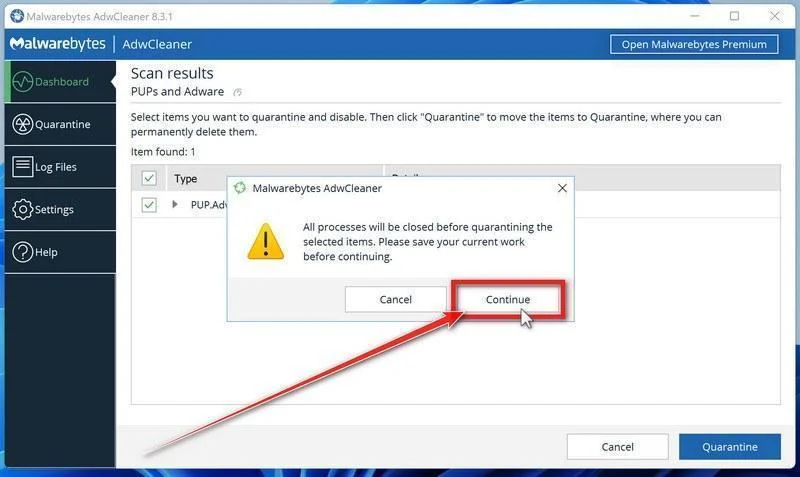
AdwCleaner will now move the selected items to quarantine. If it asks you to restart your PC, allow it. When you’re back in Windows, AdwCleaner may offer a Basic Repair. Click Skip Basic Repair. Malwarebytes recommends running Basic Repair only when a support agent asks you to. Then check whether the problems you noticed have stopped.
STEP 7: Perform a final check with ESET Online Scanner
Finally, we’ll run ESET Online Scanner as a last check for anything the earlier scans missed. A clean result is a good sign, but no scanner can guarantee that a computer is malware-free.
ESET Online Scanner is a free second-opinion scanner that performs a deep, full-system check for viruses, trojans, rootkits, and other malware. We use it as the final step because it’s thorough and can catch threats the earlier scans missed. A clean result is a good sign, but no scanner can guarantee that a computer is malware-free.
-
Download ESET Online Scanner
Click the button below to download ESET Online Scanner.
Download ESET Online ScannerOpens the official download page in a new tab. ESET Online ScannerFree one-time malware scan from ESET
-
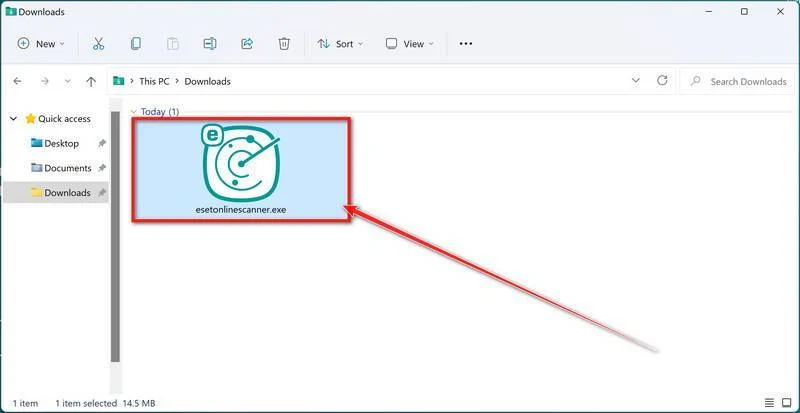
Run the Installer
When the download finishes, open your Downloads folder and double-click “esetonlinescanner.exe“.
-
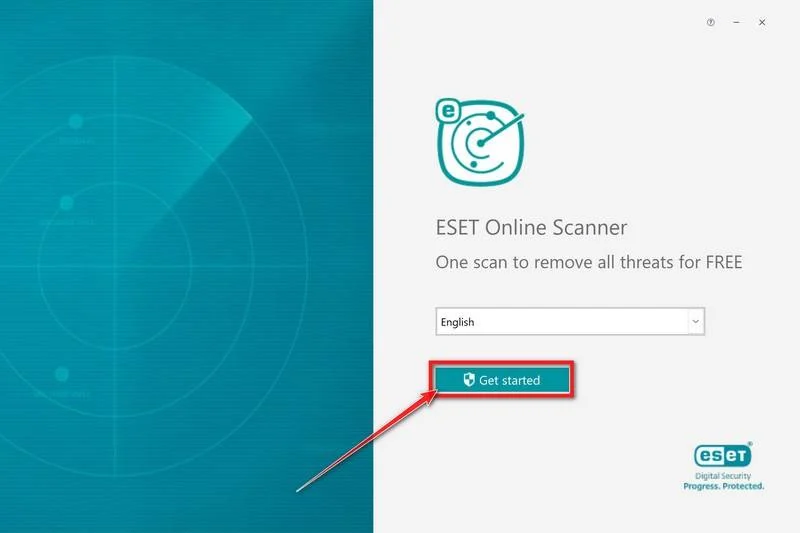
Install ESET Online Scanner
On the start screen, select your language from the drop-down menu and click Get started.
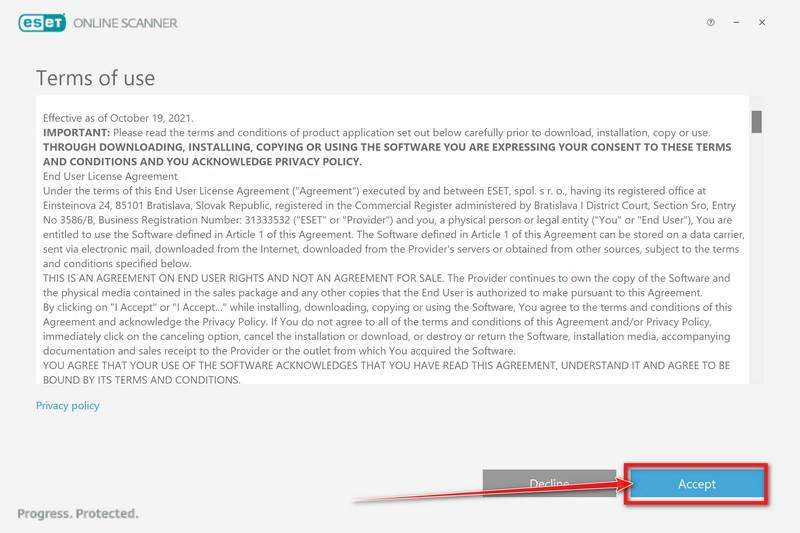
On the Terms of use screen, click Accept.
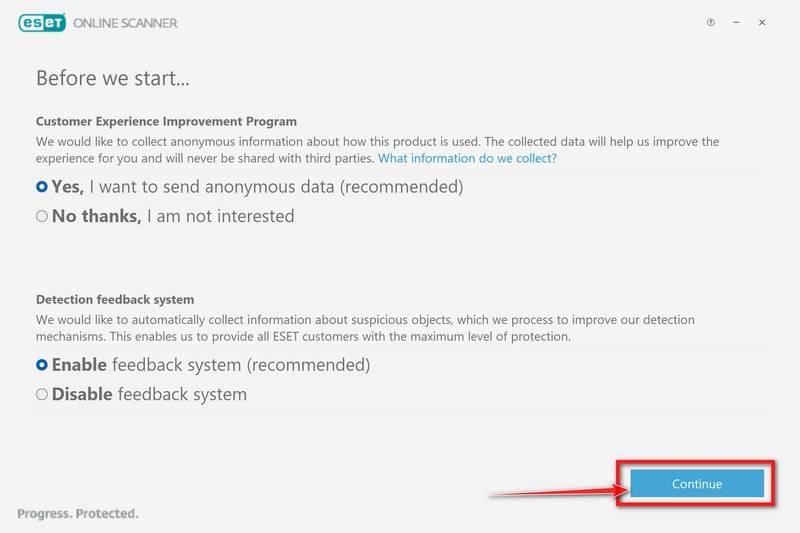
Choose your preferences for the Customer Experience Improvement Program and the Detection feedback system (either choice is fine), then click Continue.
-
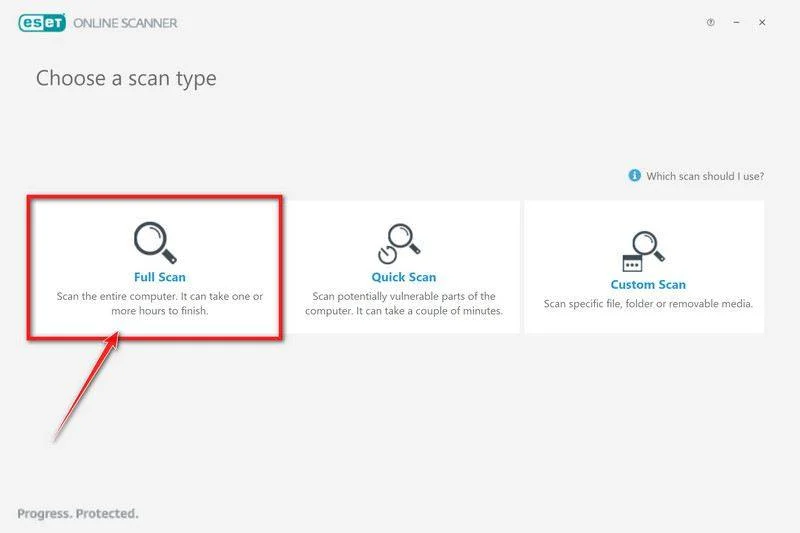
Start a Full Scan
Click Full Scan — this checks your entire computer, not just the common hiding spots.
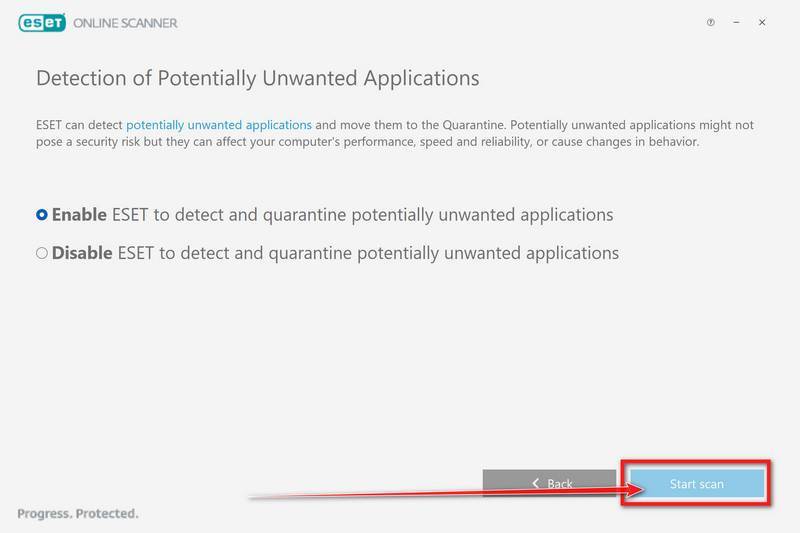
Select Enable for Detection of Potentially Unwanted Applications — this lets ESET catch adware and bundled junk programs, not just viruses. Then click Start scan.
-
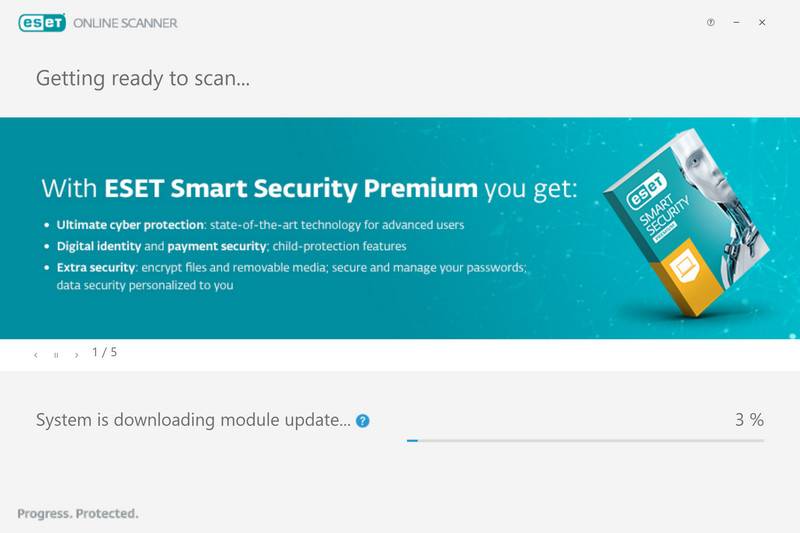
Wait for the Scan to Finish
ESET will now check every file on your computer. Because it’s a full scan, this can take a while — often an hour or more, depending on how much data you have. Leave it running in the background and check on it from time to time.
-
Review the Results
When the scan completes, the Found and resolved detections screen appears. Detected threats are usually cleaned and quarantined automatically. Click View detailed results to see exactly what was removed, and ask for help in our forum if any item could not be cleaned.
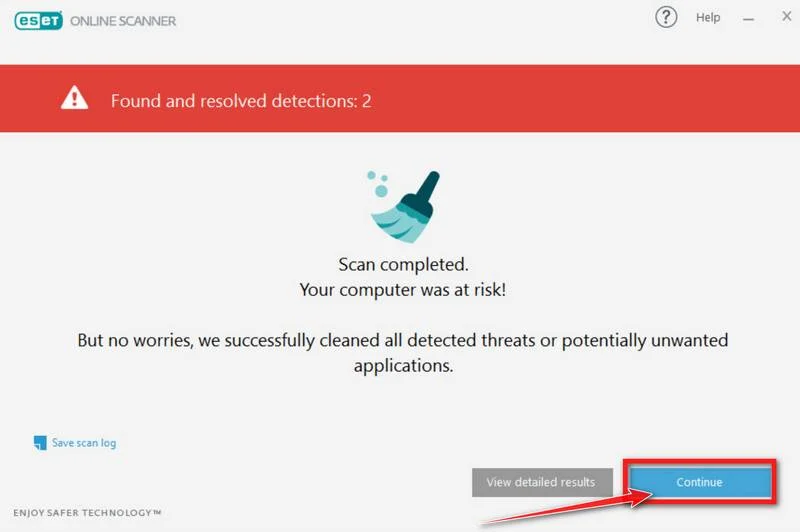
If ESET found nothing, restart your computer and check whether the problems you noticed have stopped. If they continue, ask for help in our forum.
Account and Business Recovery
Secure hotel email and booking accounts
From a clean device, change passwords, revoke active sessions and enable multi-factor authentication. Review mailbox forwarding rules and delegated access for unauthorized changes.
Check guest and payment data exposure
Determine whether the infected workstation could access guest records, ID documents, cardholder data or internal reservation systems. Follow the organization’s incident and breach-response process.
Inspect shared systems
Review network shares, remote-management tools and other workstations for related activity. One malicious script can be the first stage of a broader intrusion.
Rebuild high-risk workstations
A clean Windows reinstall may provide more confidence for front-desk or finance computers than attempting to repair an unknown backdoor. Restore files only from trusted backups.
How to Prevent Booking-Themed Malware
- Keep booking conversations inside authenticated travel-platform portals.
- Display full file extensions in Windows Explorer.
- Block JavaScript, executable and archive attachments at the email gateway where practical.
- Use separate accounts and limited permissions on front-desk computers.
- Train staff that images and attachment icons can be disguised links.
- Keep browsers, Windows and document readers updated.
- Maintain offline or protected backups of reservation and business data.
- Require security review for unexpected files from unverified guests.
Frequently Asked Questions
Did Trip.com send the malicious email?
No. The brand is referenced to make the message believable. Trip.com is legitimate and is not connected to the campaign.
Is Booking Confirmation.JPEGr a real image?
No. The displayed filename and icon are part of the disguise. Clicking them downloads a JavaScript file rather than a normal JPEG.
What malware does the script install?
The final payload has not been confirmed. The script is malicious, but claiming a specific stealer or ransomware family without evidence would be inaccurate.
Can reading the email infect a computer?
No. Infection requires interaction with the link and downloaded file. The dangerous step is opening the downloaded JavaScript file.
The Bottom Line
The Trip.com Booking Confirmation email is a malware delivery attack aimed at the hospitality industry. A friendly guest story and fake image attachment hide a JavaScript download. Verify bookings inside the official partner portal, and isolate any computer that ran the file.

Join the discussion
0 commentsShare your experience or ask a question about this article.
Discussion
Start the conversation
Have a question or something useful to share? Add the first comment.