


A new email scam has been making the rounds that targets Apple users. The scam email has the subject “Unlock Appl឵e ID to Reactivate Apple Pay Services Immediately” and claims your Apple ID has been temporarily restricted, disabling access to Apple Pay.
The email goes on to state that your account was restricted due to a violation of Apple’s terms of service. It claims unauthorized individuals tried to access or impersonate your account. The email then pressures victims to verify their Apple ID within 48 hours or risk permanent suspension.
This is a complete scam designed to steal personal information, install malware, or gain remote access to your devices. Apple will never send an email asking you to verify your account in this manner.

Overview of the Scam
The “Unlock Appl឵e ID to Reactivate Apple Pay” scam is a phishing attack targeting Apple users. Phishing scams use fraudulent emails, texts, calls or websites posing as trusted sources to trick users into sharing private data.
This scam email is carefully crafted to appear legitimate. The email uses Apple branding and logos making it seem like official correspondence from Apple support. The urgent call-to-action pressures victims to act quickly to avoid account suspension.
Here is how the scam email might look:
Subject: Unlock Appl឵e ID to Reactivate Apple Pay Services Immediately.
Veri឵fy ឴Your A឵p឵pl឵e ID឵ ឵Informati឴on
Dear
We’ve T͏emporar឵y ឴Res឵tr͏ict឴ your ͏AppI឵e ID ឵Ac឵cess and A឴pple Pay Ser឵vic឵e . We regret to info឵rm͏ y឵ou tha឴t y឴o͏ur ឵account឴ h឵as be឵en឵ d឴isa͏b឴led͏ as a resul͏t of violating឵ ou͏r឵ pol឵icy ឴a឵nd឴ te឵rms ͏of s឴e឴rvice឴ .
Our ͏sy឴s͏tem͏ d឴etected ឴an឴ unauthor͏ized a឵t឵t឴em឵p឴t឴ by឵ in឴d឵i͏v͏id឴uals͏ to i͏mpersonate you឵r឵ AppI឴e͏ I឴D acco឵u͏n͏t . The͏refore we឵ ͏n͏ee͏d឵ to ͏re឵-verify your a឴ccount͏ ឴da឵ta. ͏if you ឴d͏id not veri឴fy y͏our͏ a឴cco឵u឵nt឴ wi឵thi឴n 48 ho឵u឵r,឴ yo͏u឴r accoun឴t឵ w឵ill឵ ឴be pe͏rm͏anen͏tly locked,឵ ឴g឵o to A឴pple I͏D ឴and verify as ឵s͏oo឴n឵ as poss឵ible . Go to Apple ID Plea឴se be advised that providing͏ false information when creating an Apple ID violates Apple’s Terms of Service and can lead to the ឴suspension or ឴termination of your account.
While Apple may not pursue legal action for such violations, ឴using false information ឴in digital accounts can have broader ឴legal implications. ͏For instance, in ͏many jurisdictions, using a fake ID or providing ឴false information to obtain services can result in legal penalties, including fines or criminal charges .
Ap឵ple Su͏pport
If users click on any links or call the phone number, they will be connected to criminal call centers rather than real Apple support. The criminals will use social engineering tactics to try and steal your Apple ID, password, financial information, or install malware.
This scam takes advantage of people’s reliance on Apple devices and services like Apple Pay. By threatening to cut off access, the criminals hope the victim will panic and hand over sensitive account details.
How the Scam Works
The “Unlock Apple ID” scam uses a multi-step approach to try and steal personal information and money from victims. Here is a step-by-step breakdown:
1. Victims Receive a Phishing Email
The scam starts with an email sent to the victim’s inbox. The sender pretends to be from Apple and uses spoofing techniques to make the email appear legit.
The email has an urgent subject line like “Action Required: Unlock Apple ID to Reactivate Apple Pay.” The body of the email is designed to cause panic with threats of permanent account suspension.
Stylistic elements like logos, colors, and formal language aim to convince the victim the email is from Apple. The criminals may have also harvested data to incorporate the target’s name, account details, or device info.
2. Victims Are Instructed to Call a Fake Support Number
Within the email, the criminals provide a phone number and instruct the victim to call for account verification. This phone number does not connect to real Apple support.
The number leads to a fraudulent call center operated by the scammers themselves. Call centers are set up to handle large volumes of calls from scam victims.
When victims call, they are connected to a scammer pretending to be an Apple support representative. Their goal is to gain remote access or trick the victim into sharing sensitive login credentials and financial information.
3. Criminals Use Social Engineering to Steal Personal Data
Once on the phone, the criminals employ social engineering techniques to extract personal data and money from victims. Common schemes include:
- Requesting remote access – The scammer will claim remote access to the victim’s device is needed to verify the account and remove security risks. This allows them to install malware and steal data.
- Tricking the victim into sharing Apple ID details – The scammer will pretend account verification is needed before they can renew Apple Pay access. This provides them the exact details needed to hijack the account.
- Asking for credit card information – Scammers will claim they need to validate and renew the victim’s payment method for Apple Pay before unlocking the account.
- Directing victims to purchase gift cards – Scammers may claim the account restriction is due to fraudulent purchases, asking the victim to prove they are legitimate by purchasing iTunes or other gift cards. The scammer then demands the gift card codes.
4. Criminals Steal Money and Personal Data
Once scammers gain access to your device or accounts, they leverage this foothold to steal personal data, financial information, and money. Tactics may include:
- Installing spyware, keyloggers, remote access trojans, or other malware that steals data and gives continued access.
- Accessing online accounts linked to the device and resetting passwords.
- Obtaining credit card numbers, bank account details, or other sensitive financial data.
- Using gift card codes or access to online accounts to steal money.
- Impersonating the victim using stolen credentials to commit identity fraud.
The fallout can include emptied bank accounts, damaged credit, compromised personal data, and costly recovery efforts.
What to Do If You Have Fallen Victim to This Scam
If you fell for the unlock Apple ID scam and shared sensitive information or gave remote access, take the following steps immediately:
- Initiate account lockdown – Log into your Apple account and change your password immediately. Also update passwords on any other online accounts accessed from the device. Enable two-factor authentication if available.
- Contact banks and credit cards – Alert your financial institutions to any compromised banking or credit card information. Have them close accounts as needed or issue new cards and account numbers. Closely monitor statements for fraudulent charges.
- Scan devices for malware – If you gave remote access, thoroughly scan all your devices for malware using trusted antivirus software like Malwarebytes or Bitdefender. Remove any harmful software detected.
- Restore devices and accounts – Perform a factory reset on any affected devices to wipe malware. Restore online accounts and remove any unauthorized changes the scammers made.
- Place fraud alert – Contact the major credit bureaus to request an initial fraud alert. This signals creditors to scrutinize applications in your name to protect against identity theft.
- Update account security – Make sure to update passwords across all online accounts. Enable two-factor authentication wherever possible for an added layer of security.
- Watch for suspicious activity – Be on alert for any signs your information was misused like bills for unfamiliar accounts or services. Report any fraud to the FTC and proper authorities.
- Seek help resolving issues – Get assistance from Apple support to address account security, recover lost data, remove malware, and undo financial theft repercussions.
Is Your Device Infected? Run a Free Malware Scan
Slow performance, constant pop-ups, or strange behavior? These are classic signs of a malware infection. A quick way to check is to scan your device with Malwarebytes Free, one of the most trusted malware removal tools available. If you only visited a scam page and didn’t download or install anything, this scan is optional.
The free version detects and removes the most common threats, including:
- Adware — the cause of those annoying pop-ups
- Browser hijackers — unwanted redirects and changed homepages
- Trojans and spyware — hidden programs stealing your data
- Potentially unwanted programs (PUPs) — software you never asked for
👉 Select your device below — Windows, Mac, or Android — then follow the simple steps to download Malwarebytes, scan your system, and remove any threats it finds. The scan usually takes 5 to 20 minutes.
Run a Malware Scan with Malwarebytes for Windows
Malwarebytes is one of the most popular and trusted anti-malware tools for Windows — and it’s completely free for removing infections. It catches threats that many antivirus programs miss, including adware, browser hijackers, and trojans. Follow the steps below to scan your PC and remove what Malwarebytes finds.
Download Malwarebytes
Click the button below to download the latest version of Malwarebytes for Windows from the official source. The free version is all you need — it will scan your computer and remove adware, browser hijackers, and other malicious software at no cost.
Download MalwarebytesOfficial installer for Windows 11 and 10. Your download starts right away.Want real-time protection? See Malwarebytes Premium Malwarebytes Free for WindowsScans and removes malware at no cost
-
Install Malwarebytes
When the download finishes, open your Downloads folder and double-click the MBSetup file. If Windows shows a User Account Control pop-up, click “Yes” to allow the installation.
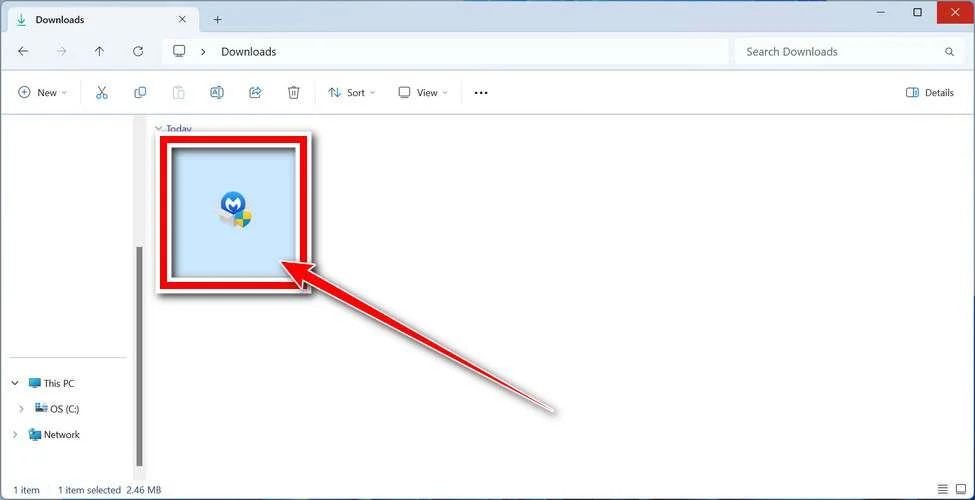
Follow the On-Screen Prompts to Install Malwarebytes
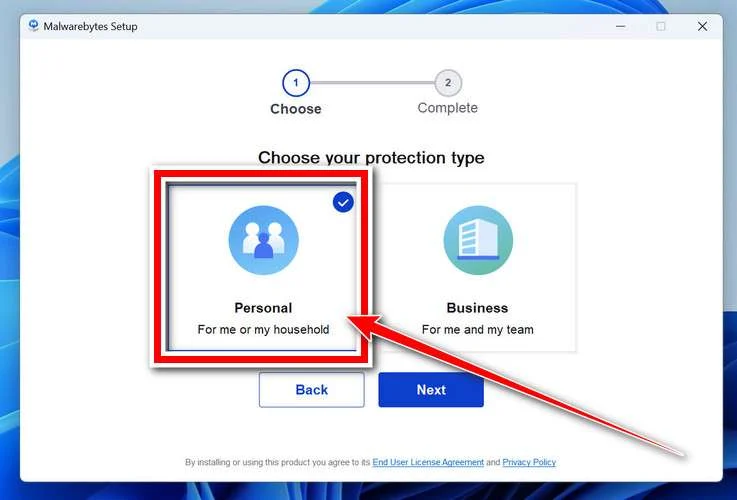
The setup wizard will walk you through a few quick screens:
-
Choose where you’re installing the program — “Personal Computer” or “Work Computer” — then click Next.
-
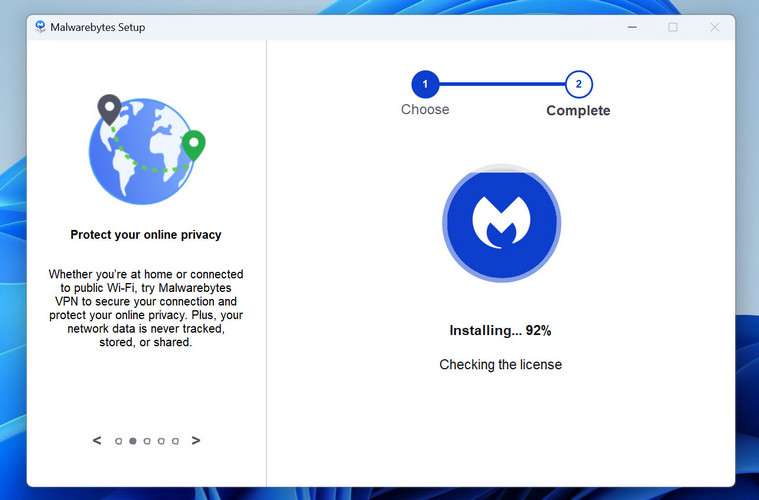
Malwarebytes will now install on your device. This usually takes under a minute.
-
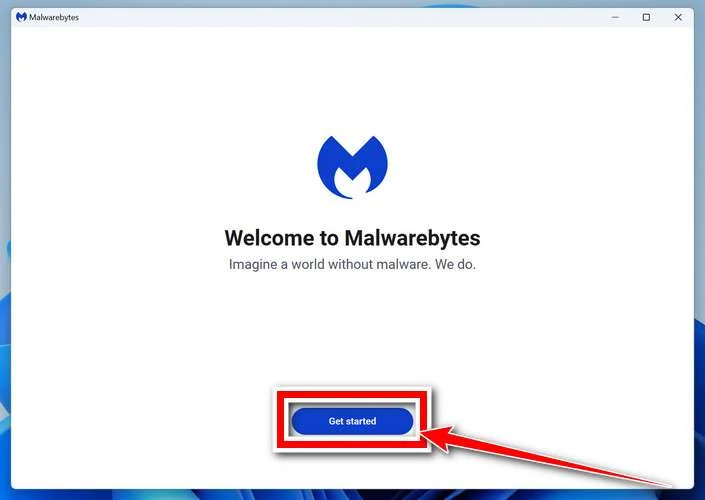
When installation is complete, the “Welcome to Malwarebytes” screen will open automatically.
-
On the final screen, click Open Malwarebytes to launch the program.
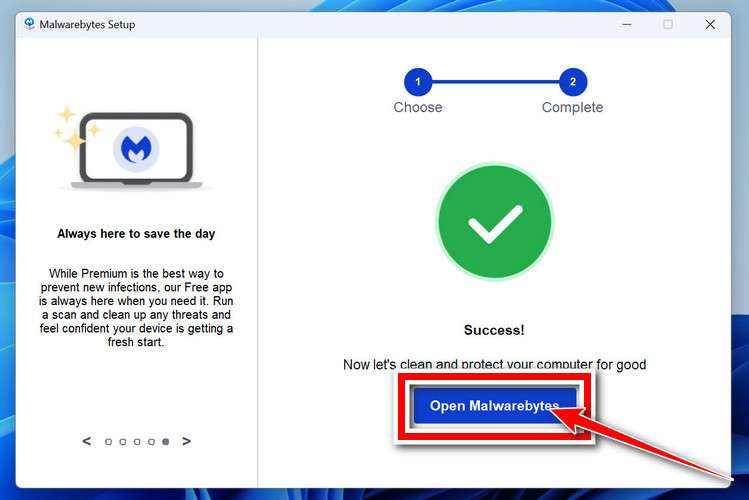
-
Optional: Check for rootkits with a Custom Scan
You don’t need to change any settings for a normal scan. The standard Threat Scan in the next step is enough for most problems, so you can go straight to it.
If you also want to check for rootkits, use a Custom Scan. In current versions of Malwarebytes, rootkit scanning is only available there:
- On the Scanner tile, click the three-dot menu and select Advanced Scan.
- Choose Custom Scan. In its options, check Scan for rootkits.
- Select your system drive (usually C:\) as the location to scan, then start the scan. It takes longer than a Threat Scan.
- When it finishes, review and quarantine the results as described in the steps below.
Rootkit scanning isn’t available on Windows devices with ARM processors.
Start the Scan
Click the blue Scan button. Malwarebytes will automatically update its virus database and start checking your computer for malware.
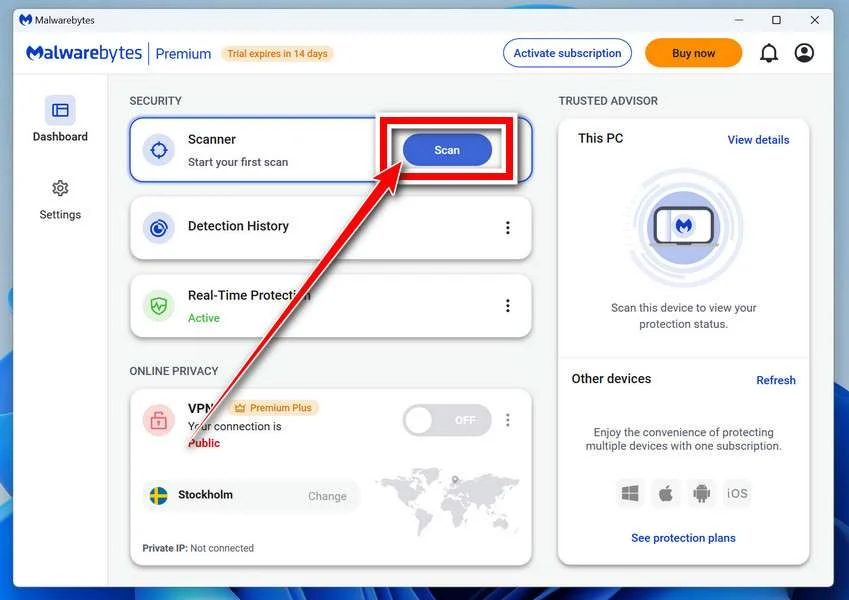
-
Wait for the Scan to Finish
The scan checks your entire system for browser hijackers and other malicious programs, so it can take 5 to 20 minutes depending on your computer. Feel free to do something else — just check back occasionally to see the progress.
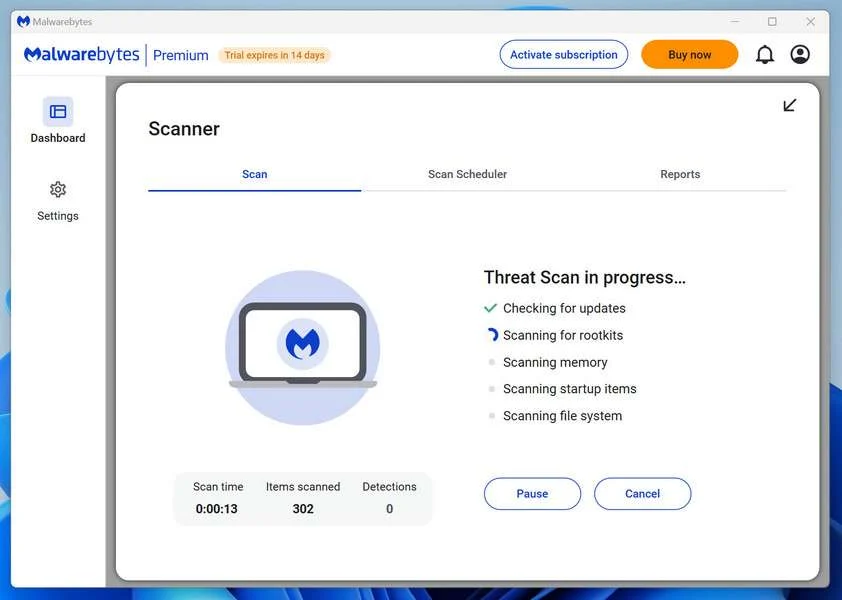
-
Quarantine the Detected Threats
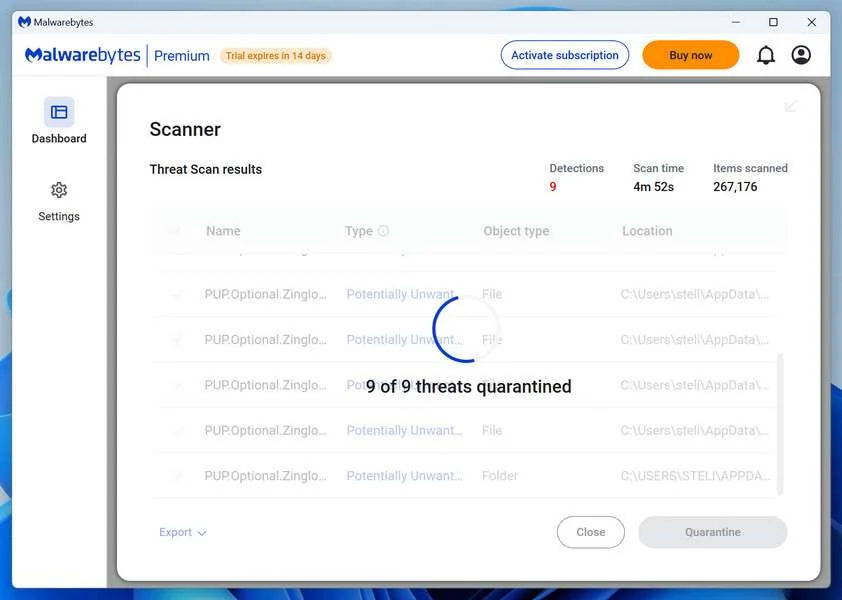
When the scan is done, you’ll see a list of everything Malwarebytes found — malware, adware, and potentially unwanted programs. Click the “Quarantine” button to remove all of them at once.
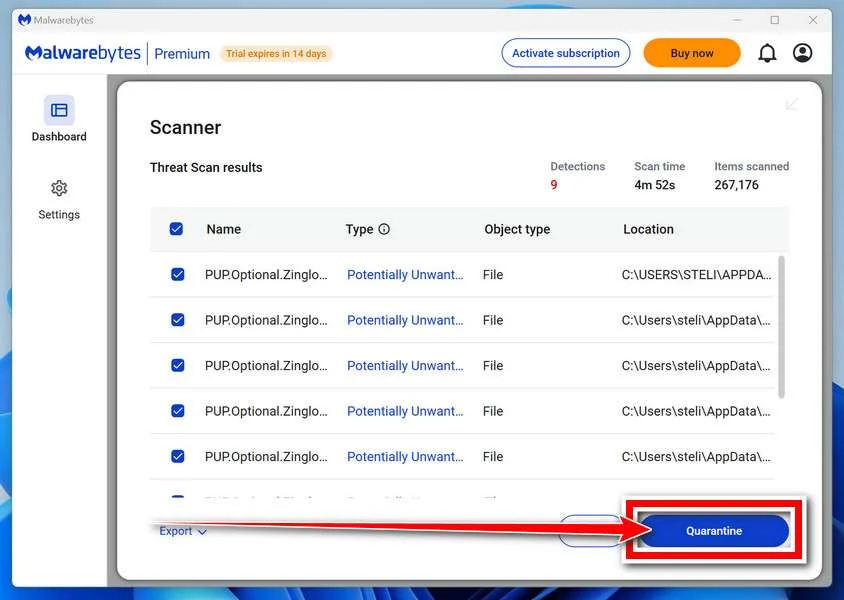
Malwarebytes will now remove the malicious files and registry entries and move them safely into quarantine.
-
Restart Your Computer
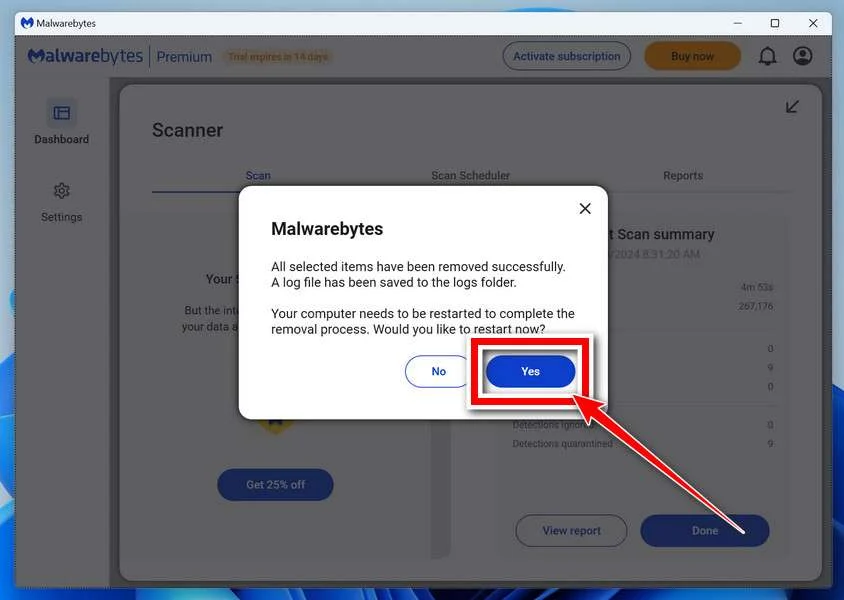
Some threats can only be fully removed after a reboot. If Malwarebytes asks you to restart, click Yes. Once you’re logged back in, Malwarebytes has finished removing the threats it found.
When the scan is done, check whether the problems you noticed have stopped. If they continue, see the options below.
If you are still having problems with your computer after completing these instructions, then please follow one of the steps:
- Run a computer scan with ESET Online Scanner
- Ask for help in our Windows Malware Removal Help & Support forum.
Run a Malware Scan with Malwarebytes for Mac
Malwarebytes for Mac is a free on-demand scanner that removes the malware other security software tends to miss — adware, browser hijackers, and unwanted programs included. Cleaning an infected Mac with Malwarebytes has always been completely free, and it’s our go-to recommendation. Follow the steps below to scan your Mac and remove what Malwarebytes finds.
-
Download Malwarebytes for Mac
Click the button below to download the latest version of Malwarebytes for Mac.
Download MalwarebytesOfficial installer for macOS. Your download starts right away.Want real-time protection? See Malwarebytes PremiumMalwarebytes Free for MacScans and removes malware at no cost -
Open the Malwarebytes setup file
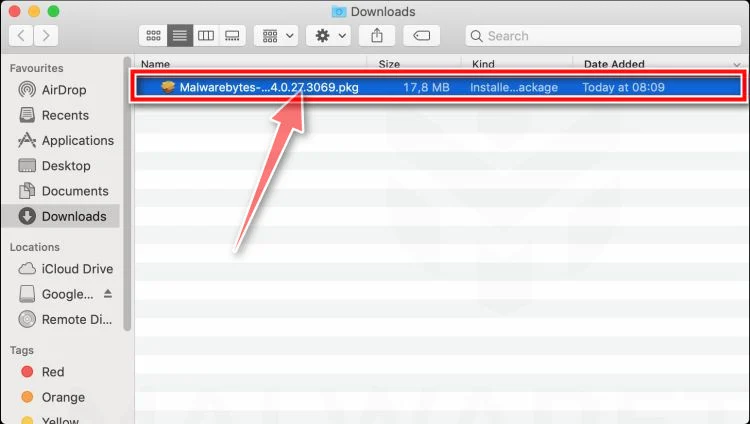
When the download finishes, open your Downloads folder and double-click the setup file to begin the installation.
-
Follow the On-Screen Prompts to Install Malwarebytes
The Malwarebytes for Mac Installer will guide you through a few quick screens. Click “Continue” and keep following the prompts until the installation completes.
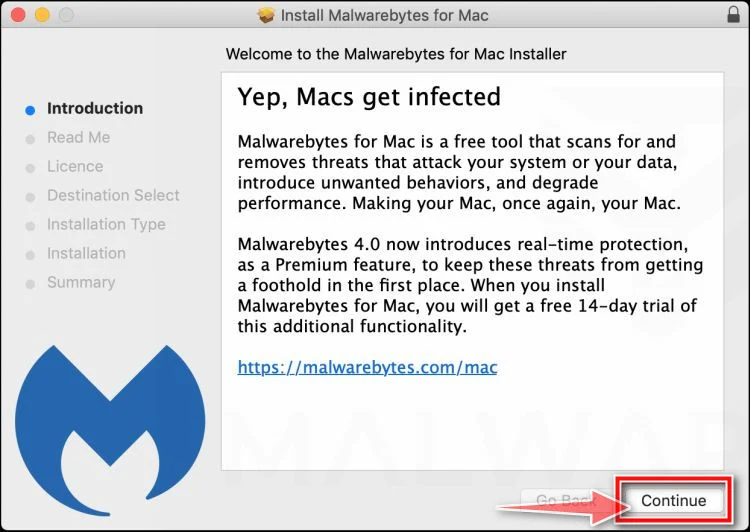
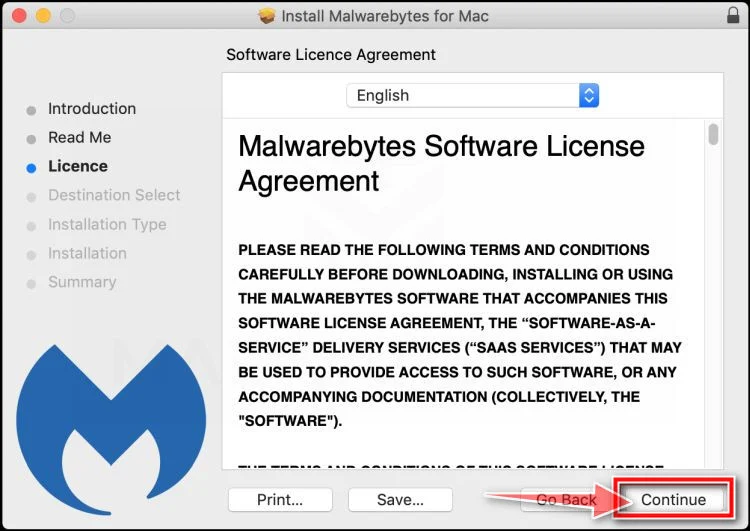
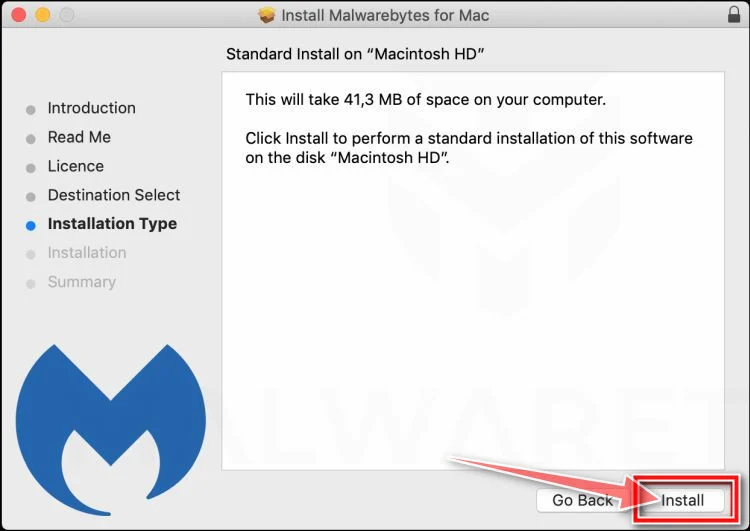
When the installation is complete, Malwarebytes opens to the Welcome to Malwarebytes screen. Click “Get started“.
Malwarebytes needs Full Disk Access to check your whole Mac. When it asks, open System Settings > Privacy & Security > Full Disk Access, turn on Malwarebytes (it may be listed as Malwarebytes Protection), and confirm with your password or Touch ID. Then return to Malwarebytes. On macOS Monterey and earlier, this setting is in System Preferences > Security & Privacy > Privacy.
-
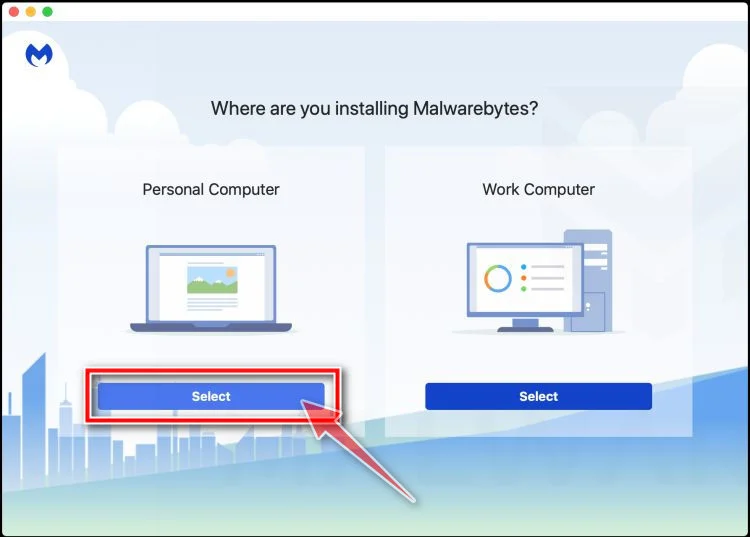
Select “Personal Computer” or “Work Computer”
Malwarebytes will ask what type of computer you’re installing it on. Click either Personal Computer or Work Computer, whichever applies.
-
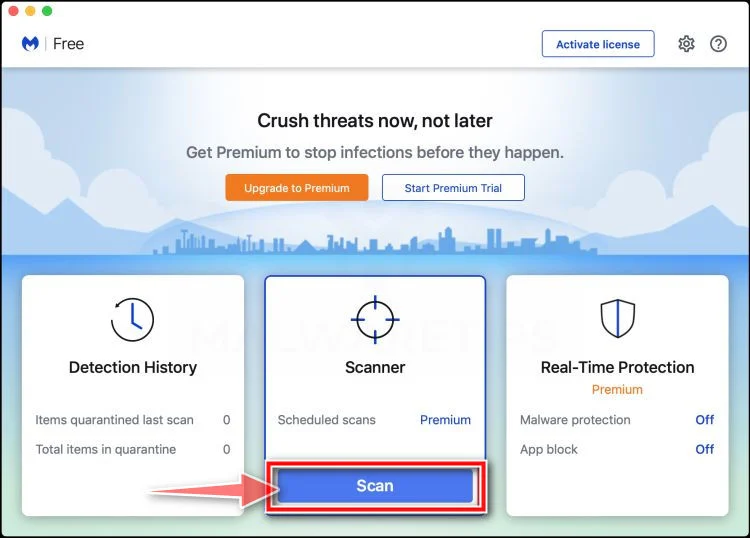
Start the Scan
Click the “Scan” button. Malwarebytes will automatically update its detection database and begin checking your Mac for malware.
-
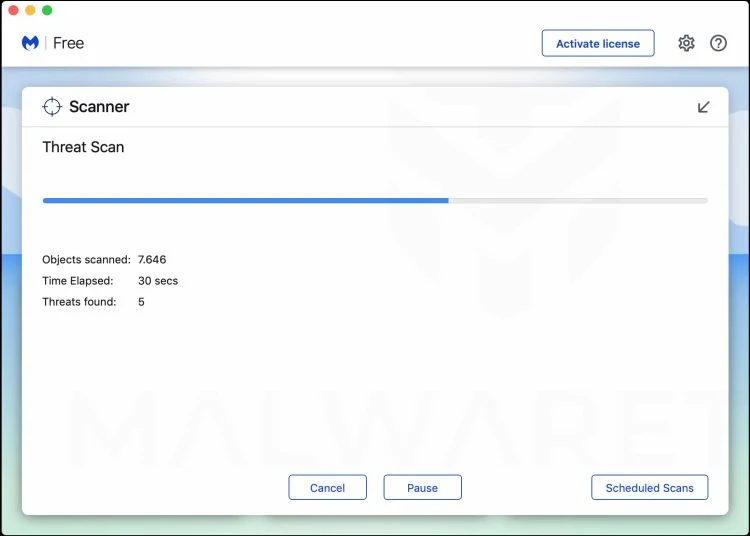
Wait for the Scan to Finish
Malwarebytes will scan your Mac for adware, browser hijackers, and other malicious programs. This can take a few minutes, so feel free to do something else — just check back occasionally to see the progress.
-
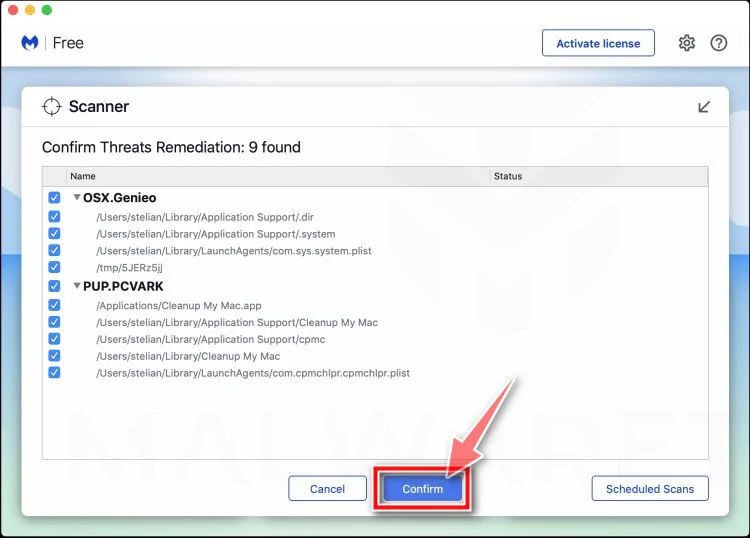
Quarantine the Detected Threats
When the scan is done, you’ll see a list of everything Malwarebytes found. Click the “Quarantine” button to remove all the threats at once.
-
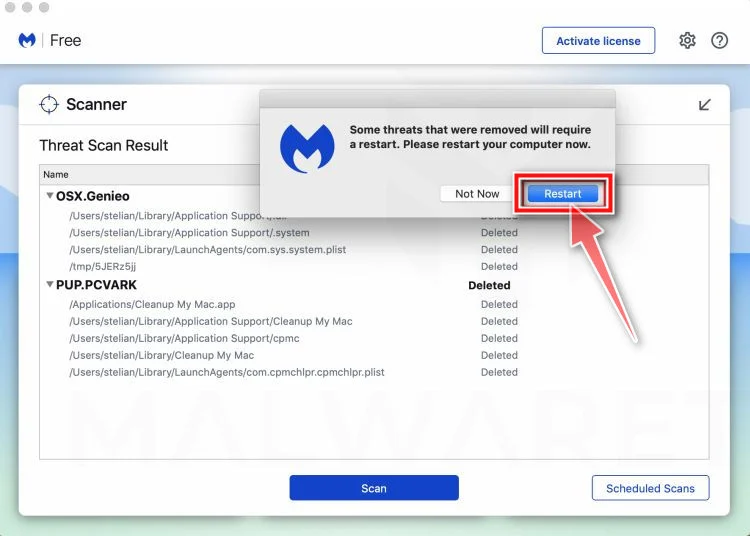
Restart Your Mac
Malwarebytes will now remove all the malicious files it found. Some threats can only be fully removed after a reboot — if Malwarebytes asks you to restart, allow it. Once you’re logged back in, check whether the problems you noticed have stopped. If they come back, save the scan report and ask for help in our forum.
If the problems you noticed continue after the scan, see the options below.
If you are still experiencing problems while trying to remove a malicious program from your computer, please ask for help in our Mac Malware Removal Help & Support forum.
Run a Malware Scan with Malwarebytes for Android
Malwarebytes for Android scans your phone or tablet for malware, adware, and potentially unwanted apps. The free version scans only when you start a scan. Real-time protection, which checks apps automatically, is part of the paid Premium version.
-
Download Malwarebytes for Android.
You can download Malwarebytes for Android by clicking the link below.
Get Malwarebytes for AndroidOpens Google Play in a new tab.Want real-time protection? See Malwarebytes Premium for AndroidMalwarebytes for AndroidScans your phone and removes malware at no cost -
Install Malwarebytes for Android on your phone.
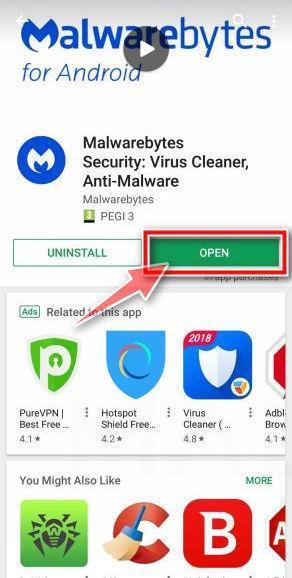
In the Google Play Store, tap “Install” to install Malwarebytes for Android on your device.
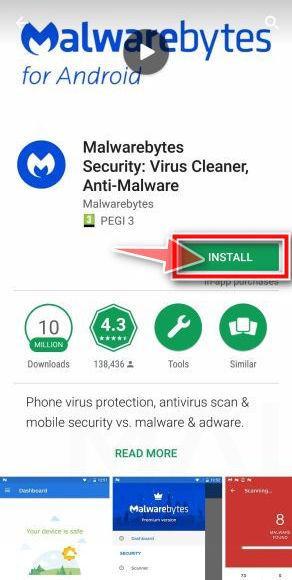
When the installation process has finished, tap “Open” to begin using Malwarebytes for Android. You can also open Malwarebytes by tapping on its icon in your phone menu or home screen.
-
Follow the on-screen prompts to complete the setup process
When Malwarebytes opens, it walks you through a short setup. Tap Get started and follow the prompts. If you see an offer for a trial or a paid plan, read it before you accept. You can skip it and keep using the free scanner.
Malwarebytes will ask for permission to access the files on your phone so it can scan them. Tap Allow, or turn on the permission in the Android screen that opens, then return to Malwarebytes.
-
Run a scan with Malwarebytes for Android
On the main screen, tap Scan now. In some versions, you open the menu, tap Scanner, and then tap Run a scan.
-
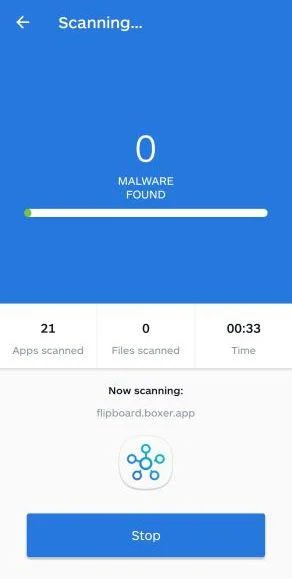
Wait for the Malwarebytes scan to complete.
Malwarebytes will now start scanning your phone for adware and other malicious apps. This process can take a few minutes, so we suggest you do something else and periodically check on the status of the scan to see when it is finished.
-
Remove the detected apps.
When the scan has been completed, you will see a list of the threats that Malwarebytes for Android has detected. Next to each detected item, tap the menu icon (three dots), then choose to uninstall the app or delete the file. Android then asks you to confirm. Tap OK or Uninstall to remove the app.
-
Restart your phone.
When the detected apps are removed, restart your phone if Malwarebytes asks you to. Then check whether the problems you noticed have stopped.
If the problems you noticed continue after the scan, see the options below.
If you are still having problems with your phone after completing these instructions, then please follow one of the steps:
- Ask for help in our Mobile Malware Removal Help & Support forum.
- Only as a last resort, reset your phone to factory settings. Read the warning below first.
- Back up your photos, videos, files, and messages, for example to your Google account or a computer.
- Make sure you know your Google account email and password. The phone asks for them after the reset. If you changed the password recently, Google recommends waiting 24 hours before you reset.
- On a Samsung phone, also make sure you know your Samsung account password.
- If you use an authenticator app for two-step verification, move your accounts to another device or save your backup codes first.
Stay Protected: Block Ads and Malicious Sites
No scan can prove a device is completely clean, so it helps to block threats before they reach you. Most infections start with a malicious ad or a fake download button — so blocking them at the source is your best defense.
We recommend AdGuard, which blocks malicious ads, phishing pages, and dangerous redirects before they can reach you.
👉 Download AdGuard and browse safely
Frequently Asked Questions About the “Unlock Apple ID” Scam
1. How does the “Unlock Apple ID” scam work?
The scam starts with an email claiming your Apple ID has been temporarily restricted, disabling access to Apple Pay. It provides a phone number to call for account verification and threatens permanent suspension if you don’t act quickly. This tricks victims into calling fake Apple support numbers operated by scammers. On the call, scammers use social engineering to get remote access, steal login credentials, or trick you into buying gift cards.
2. What are signs the email is a scam?
Clear red flags include grammatical errors, threats of account suspension, contact by phone number only, Apple logos used without permission, requests for sensitive personal information, or payment/gift card demands.
3. What happens if I call the number in the email?
The number connects you to a criminal call center, not real Apple support. Scammers posing as Apple support will attempt to steal your personal data and money through tactics like demanding gift cards, getting remote access to your device, or tricking you into sharing account login credentials.
4. What is social engineering and how do scammers use it?
Social engineering is when scammers psychologically manipulate victims to break normal security procedures and share sensitive data. On calls, they pretend to be trusted company reps and leverage fear or urgency to get you to comply with requests.
5. How can I tell if I’m speaking to a real Apple rep or scammer?
Real Apple support will never contact you unprompted requesting personal/financial data or remote access. Nor will they demand payment by gift card or threaten account suspension. Ask the rep to verify their name and direct callback number. Hang up and call Apple to confirm if unsure.
6. What should I do if I shared personal information with a scammer?
Immediately change online account passwords, enable two-factor authentication, and monitor for fraudulent activity. Contact banks about compromised financial data. Scan devices for malware and restore software. Place fraud alerts with credit bureaus and watch for identity theft signs.
7. What precautions can I take to avoid this scam?
Avoid clicking links or calling numbers in unsolicited emails/texts. Use strong unique passwords and two-factor authentication. Install comprehensive security software on devices. Learn to identify phishing attempts by spotting red flags.
8. How can I report this scam?
File detailed reports about this scam with the Federal Trade Commission (FTC), Internet Crime Complaint Center (IC3), and Apple Support. Also report to local law enforcement if money was stolen.
9. Where can I get help if my account was compromised?
Contact Apple Support immediately for help addressing account security issues, removing malware, and reversing unauthorized access or changes. Additional assistance recovering from identity theft is available by contacting credit bureaus or the FTC.
10. What resources can help me learn to avoid scams?
Apple, FTC, and AARP provide detailed guides on identifying scams and phishing attempts. Enable scam warnings in Apple Mail. Learn how criminals leverage social engineering and urgency to manipulate victims.
The Bottom Line
The “Unlock Apple ID” phishing scam highlights the threats users face online and the clever tactics scammers employ. Stay vigilant against phishing attempts. Never call a number or click links within an unsolicited email or text message. Go directly to the company’s website if account issues arise.
Protect online accounts with strong unique passwords and two-factor authentication. Install comprehensive security software. Learn to identify signs of phishing emails and social engineering techniques aimed at manipulating emotions and exploiting fears.
Seeking immediate help upon discovery and having robust account security measures in place can help limit the damage from potential scams and cyber attacks.
Protecting your online presence and financial data requires constant vigilance. But a little caution goes a long way in deflecting the majority of scams attempting to hook the unsuspecting.

Join the discussion
0 commentsShare your experience or ask a question about this article.
Community experiences
Did this happen to you?
Your experience could help someone recognize the same scam. Submit a private report for our team to review.
I experienced this tooReports are reviewed before publication. Sharing publicly is always your choice.
Discussion
Start the conversation
Have a question or something useful to share? Add the first comment.