

A polished delivery notice says shipment documentation is ready for review. The timing may feel reasonable, especially when packages and business orders are already moving.
The email asks for one quick download before processing continues. Several missing details reveal why that ordinary request should be handled outside the message.
Overview
What the supposed DHL notice says
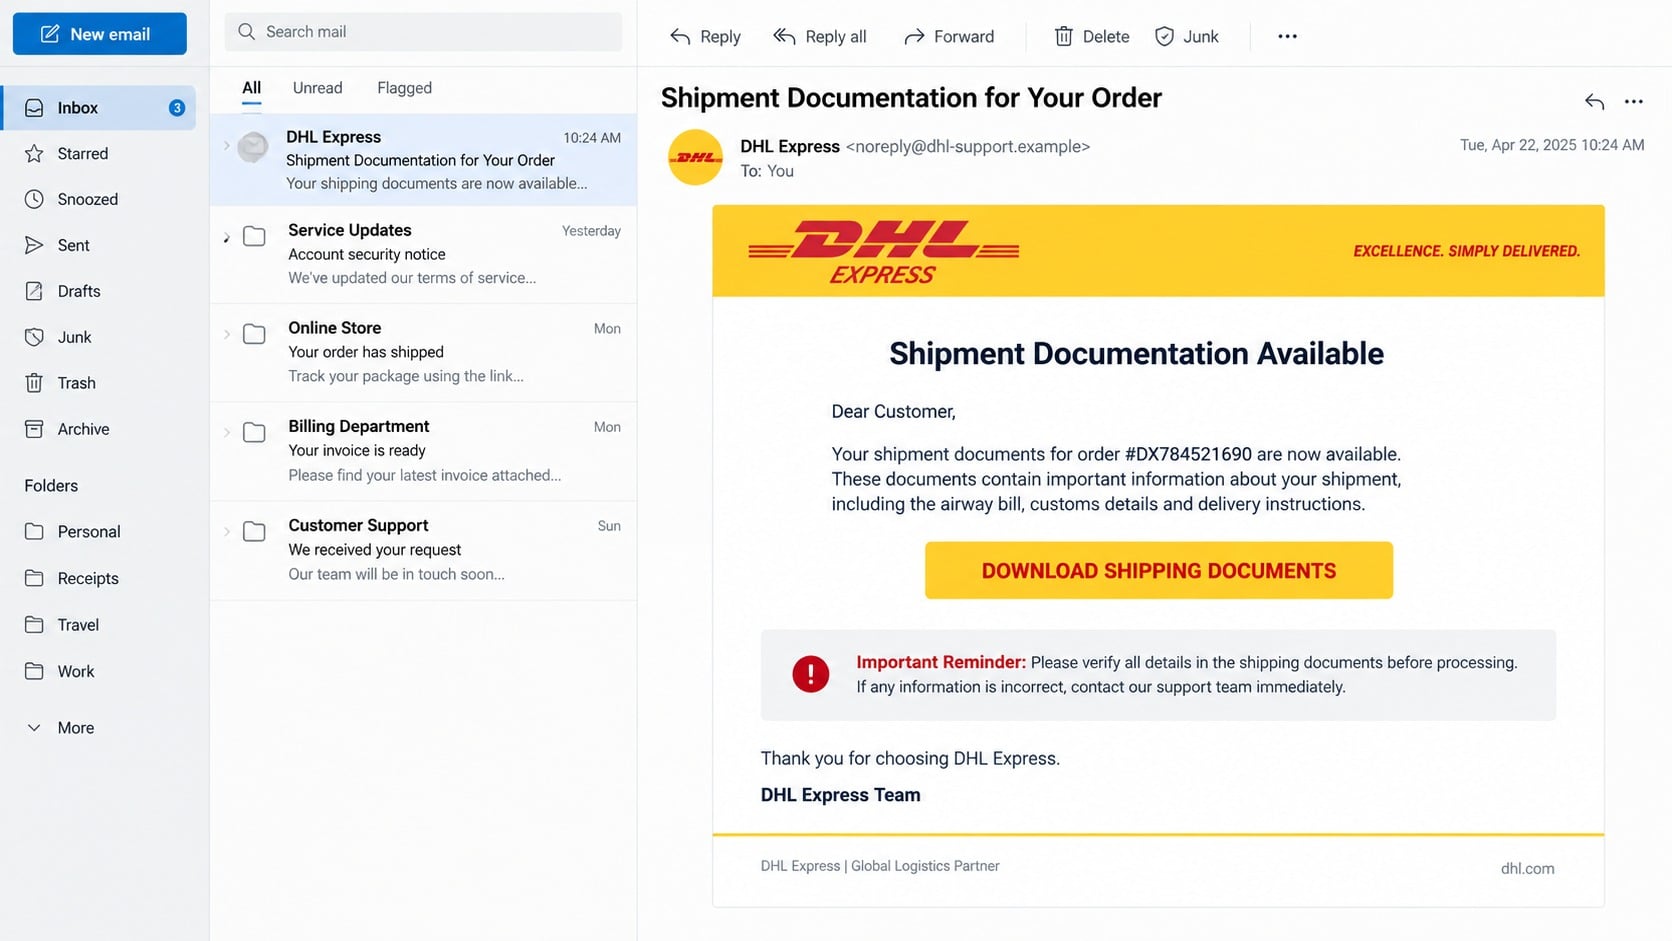
The email impersonates DHL Express and announces that shipping documents are available. It asks the recipient to review them before shipment processing.
A “Download Shipping Documents” button is the main action. A small important notice says discrepancies should be reported to customer support.
The observed subject was “Shipment Documentation for Your Order.” The greeting addressed a generic customer rather than naming an account holder or company.
DHL Express has no connection to this campaign. Its familiar name and visual identity are being used to make an external link appear trustworthy.
What is confirmed and what remains unknown
The email itself is a fraudulent impersonation. Its unsolicited download button and absence of verifiable shipment details justify treating it as dangerous.
When the campaign was examined, the external destination was no longer active. That means its final behavior could not be reproduced reliably.
The link may previously have opened a credential page, redirected to another lure, or delivered a harmful file. Those are possibilities, not confirmed payload observations.
This distinction matters. Readers need an accurate warning, not certainty added after the evidence disappeared.
The risks created by a shipping-document lure
Delivery messages create strong curiosity because recipients want to know whether a parcel is real, delayed, or connected to work.
Shipping documents also provide a believable reason to open PDFs, spreadsheets, archives, or login pages outside the normal customer portal.
A malicious destination could attempt to obtain:
- Email, shipping portal, or business account credentials.
- Payment details through a fabricated customs or processing charge.
- Permission to download and run an unsafe file.
- Personal information presented as shipment verification.
- Browser notifications used for continuing deceptive alerts.
The safest conclusion does not depend on identifying the final payload. An unverified delivery email should never decide where you sign in or download records.
How the DHL Shipment Documentation Scam Works
Step 1: A generic delivery event reaches a large audience
Scammers distribute branded shipping notices to broad address lists. They do not need to know whether every recipient is waiting for a parcel.
Online shopping and commercial logistics make coincidence likely. Someone expecting any delivery may assume the message concerns it.
The generic greeting helps the same template work repeatedly. No customer name, tracking number, shipper, destination, service level, or delivery date is required.
A recognizable courier brand fills those gaps emotionally. Familiarity makes the recipient less likely to ask why the email contains no identifiable shipment.
Step 2: A document review sounds safer than a payment demand
The lure does not immediately ask for money. It frames the action as checking paperwork before processing, which resembles routine administration.
Words such as documentation, review, discrepancies, and customer support create a service-oriented tone. The button appears to solve a minor task.
Recipients may expect an airway bill, customs declaration, invoice, or label. That expectation prepares them to accept whatever file or form appears next.
The message never explains which document exists. Ambiguity lets the landing page choose a different story after the click.
Step 3: The button transfers trust to an external site
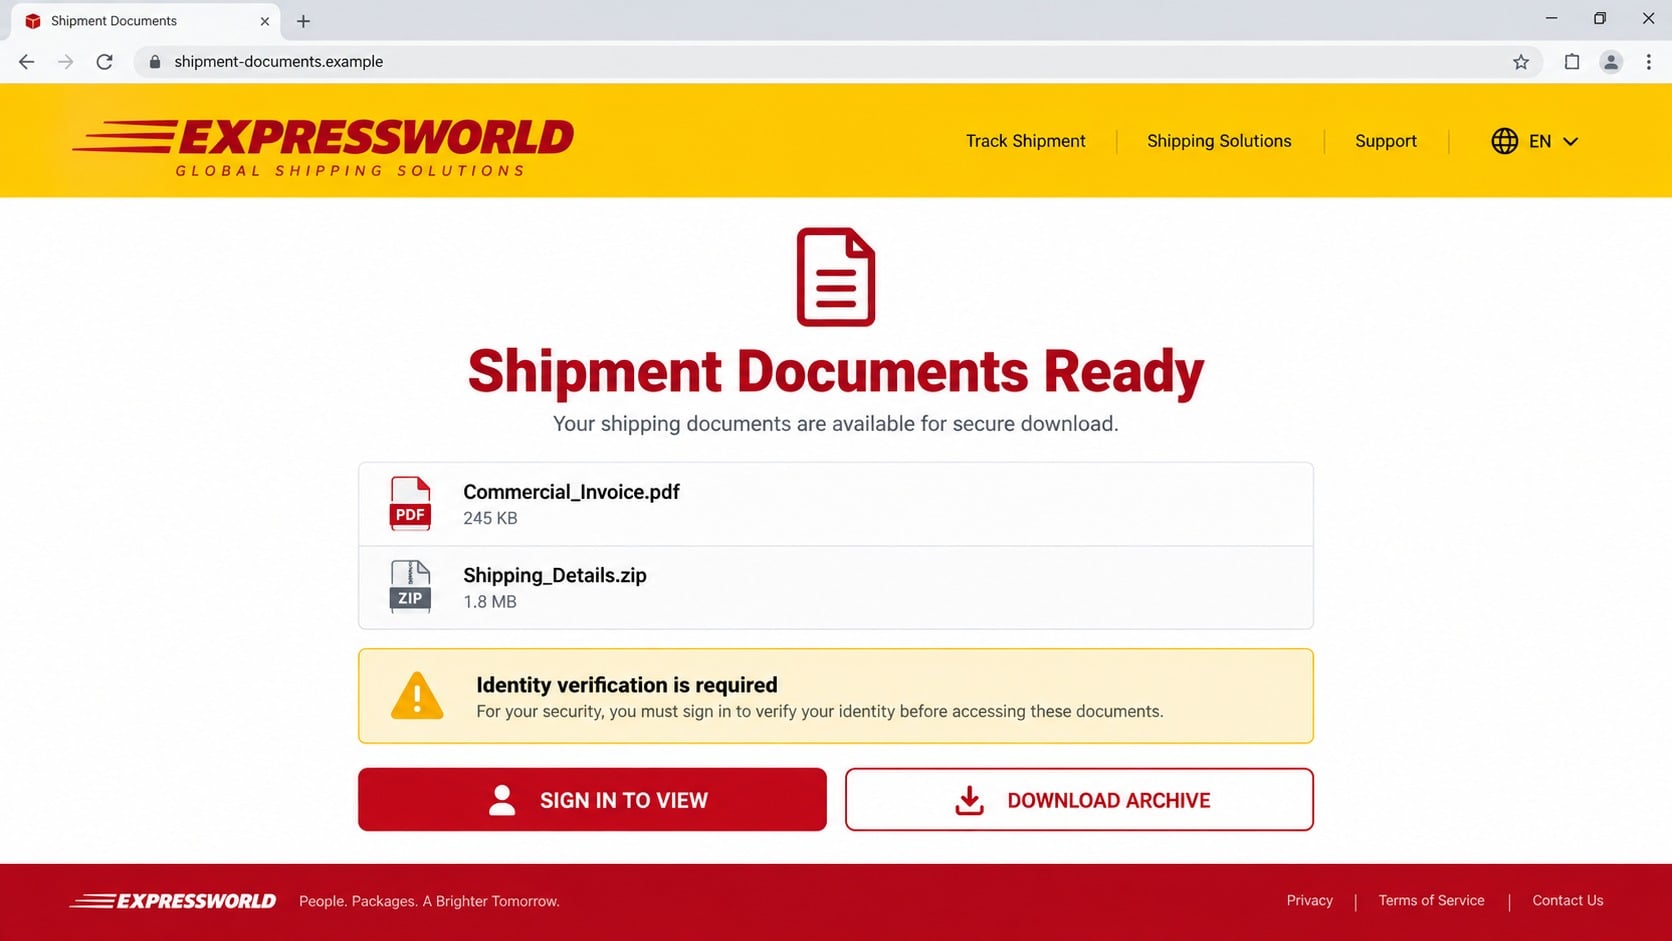
The displayed button hides the destination until someone inspects it. The website can use colors, logos, and document icons copied from delivery services.
A browser padlock would protect only the connection to that site. It would not prove DHL controls the page or provided the files.
Redirect services can place several addresses between the email and final content. Each hop makes the destination harder to judge from the original message.
Because the examined link later stopped responding, investigators cannot state exactly what every recipient saw while the campaign was active.
Step 4: The destination can select a credential or download path
One common path presents a login screen before releasing documents. It may request a DHL account, Microsoft account, or email password.
Another path offers an archive, executable, script, or document containing harmful instructions. A filename can disguise its true type.
Some campaigns vary by browser, location, or time. A scanner might receive harmless content while a selected visitor receives the active lure.
These scenarios explain the risk without proving which occurred here. The unavailable endpoint prevents a definitive payload classification.
Step 5: Additional prompts complete the compromise
A fake login records credentials and may request a multifactor code. A malicious document may ask the user to enable content or bypass security warnings.
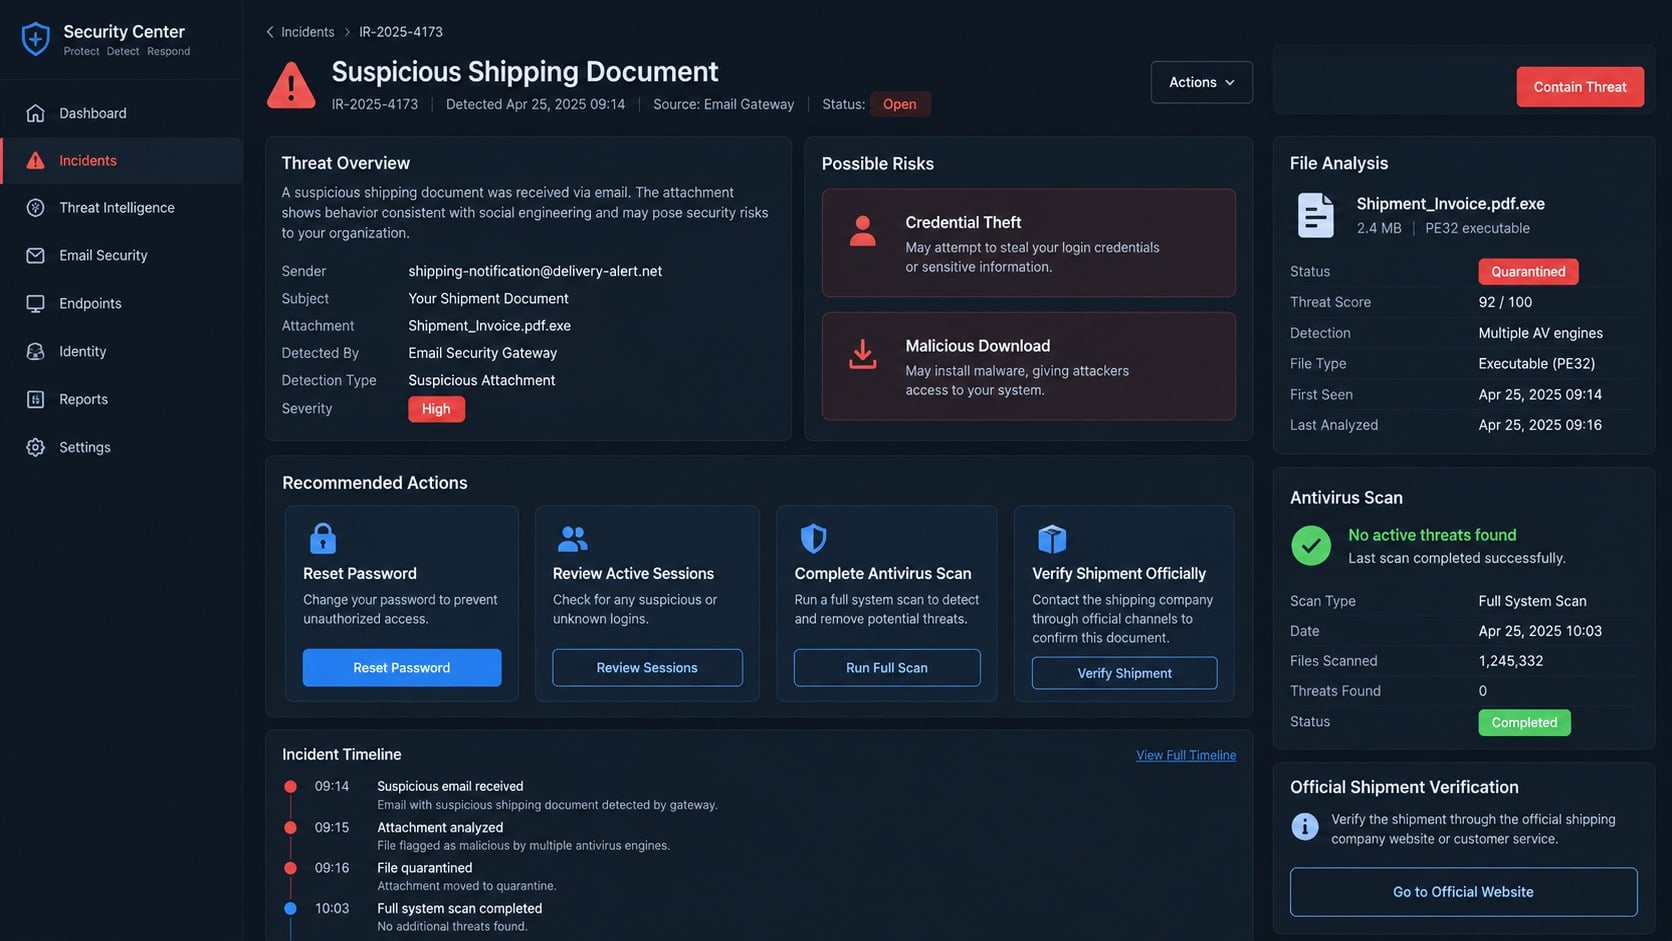
An archive can hide dangerous extensions. A file ending in “pdf.exe” remains an executable even when its icon resembles a document.
A fabricated customs page might request a small card payment and collect billing details. Shipping language provides a new excuse for each prompt.
The victim’s interaction determines the outcome. Simply receiving the email does not infect a device or expose an account.
Step 6: Stolen access supports later delivery and account fraud
Captured email credentials can reveal real order confirmations and tracking messages. Attackers can use that information for more precise follow-up scams.
A compromised courier account could expose saved addresses, shipment history, or available delivery controls, depending on the account and region.
Malware could steal browser sessions, passwords, or files. Payment data could be tested through unauthorized purchases.
Later activity may not mention DHL at all. The delivery notice is only the introduction to whatever data or access the operation obtains.
Why Shipping Document Messages Deserve Extra Care
Business paperwork often contains sensitive context
Real shipping documents may reveal suppliers, customers, contents, values, addresses, and customs information. That makes them attractive bait for workplace recipients.
An attacker who compromises one logistics conversation can imitate its language and timing. Future requests become much harder to identify.
Organizations should route unexpected courier documents through purchasing or logistics staff rather than allowing individual recipients to improvise.
File extensions can be intentionally misleading
Operating systems may hide known extensions, causing “invoice.pdf.exe” to appear shorter. Icons can also be changed to resemble familiar formats.
Archives add another layer by concealing the enclosed filename from email scanners and casual inspection.
Keep extensions visible and never enable macros or content because a document claims it is protected. Verify the sender first.
Inactive links do not make the campaign harmless
Fraud infrastructure frequently changes or disappears. A dead page today may have collected information yesterday.
Recipients should not reopen old messages to test whether links returned. Repeated visits can expose network details or reach replacement content.
Preserved addresses and headers remain useful for reporting, even when investigators cannot retrieve the original payload.
A real delivery can coexist with a fake notice
Coincidence is not authentication. Scammers do not need access to your order when enough recipients are expecting something.
Data breaches and compromised merchants can sometimes improve targeting, but the message itself still requires independent verification.
Track the parcel through the courier’s official application or a number supplied by the merchant. Never let the email define the shipment record.
What Genuine Shipment Documentation Usually Connects To
A traceable commercial transaction
Authentic paperwork relates to an order, sender, recipient, and movement of goods. Those elements should match records held by the merchant or logistics team.
A standalone email with no matching purchase deserves caution. The courier brand cannot replace the missing commercial history.
Consistent identifiers across independent systems
Tracking numbers, references, dates, and destinations should agree across the seller’s account, courier portal, receipts, and earlier notifications.
Scammers can invent one plausible number. They cannot easily make it appear inside systems controlled by unrelated legitimate parties.
A clear reason for every requested action
Real documents explain whether they are invoices, labels, customs declarations, or delivery records. The requested review should fit that purpose.
A surprise password form, software installer, or payment page represents a change in workflow. Stop and verify before continuing.
Sender, Tracking, Link, and File Verification Checks
Find the shipment without using the message
Open the official courier website manually or use its trusted application. Enter a tracking number received from the merchant through an established purchase channel.
If the email lacks a number, check your order history instead. A legitimate shipment should connect to a seller, recipient, origin, and current status.
Contact DHL through details found independently if uncertainty remains. Do not use a support number embedded in the suspicious notice.
Inspect the complete sender information
Expand the From and Reply-To fields. A display name and logo can say DHL while the actual address belongs to an unrelated domain.
Check whether the recipient address was hidden among many targets. Generic greetings and bulk delivery patterns reinforce the impersonation warning.
Message authentication results can help administrators, but an authenticated unrelated domain is still unrelated.
Examine the button before opening anything
On a computer, hover to reveal the destination. Compare the entire hostname with the courier’s known domain, reading from right to left.
Shorteners, advertising redirects, numeric addresses, and unfamiliar download hosts require caution. Do not follow them to learn what they contain.
A safe courier notice remains verifiable after you ignore its button. The official account should show the same shipment independently.
Treat every unexpected file as untrusted
Confirm the document with the shipper or merchant before download. Ask what filename, format, and purpose to expect.
Scan saved files before opening them. Never run executables, scripts, disk images, or password-protected archives supplied through an unverified delivery email.
If a document requests macros, content activation, software installation, or security bypasses, close it and report the incident.
What to Do If You Fell for the DHL Shipment Documentation Scam
Your next steps depend on whether you only clicked, entered credentials, submitted payment data, or opened a downloaded file. Address every action that occurred.
Do not keep testing the page. Preserve the original message and work from official accounts and security tools.
- Close the external page. Cancel downloads, remove any notification permission it received, and do not return through the email.
- Delete unopened files. Empty the download from quarantine or trash after preserving its name and source for an administrator when required.
- Isolate suspicious activity. If you ran an unknown program, disconnect the device from networks and contact organizational security before continuing normal work.
- Run security scans. Use Malwarebytes and the operating system’s built-in protection for a full scan. Quarantine detected items and restart only when instructed.
- Change exposed passwords. Reach each genuine service separately, create unique replacements, revoke sessions, and reject unexpected multifactor prompts.
- Protect payment information. If card or banking details were submitted, call the issuer, replace affected credentials, and monitor transactions.
- Review delivery accounts. Check addresses, authorized users, shipment preferences, and recent activity through the official courier portal.
- Add browsing protection. AdGuard can block many reported malicious pages and redirects. Keep browser safe-browsing features and updates enabled.
- Notify the relevant parties. Tell your employer, merchant, or shipper what happened. They may need to protect related accounts or warn other recipients.
- Report and retain evidence. Save headers, addresses, filenames, scan results, and transaction records. Submit the impersonation through official fraud-reporting channels.
Is Your Device Infected? Run a Free Malware Scan
Slow performance, constant pop-ups, or strange behavior? These are classic signs of a malware infection. The fastest way to find out is to scan your device with Malwarebytes Free — one of the most trusted malware removal tools available.
The free version detects and removes the most common threats, including:
- Adware — the cause of those annoying pop-ups
- Browser hijackers — unwanted redirects and changed homepages
- Trojans and spyware — hidden programs stealing your data
- Potentially unwanted programs (PUPs) — software you never asked for
👉 Select your device below — Windows, Mac, or Android — then follow the simple steps to download Malwarebytes, scan your system, and remove any threats it finds. The scan usually takes 5 to 20 minutes.
Run a Malware Scan with Malwarebytes for Windows
Malwarebytes is one of the most popular and trusted anti-malware tools for Windows — and it’s completely free for removing infections. It catches threats that many antivirus programs miss, including adware, browser hijackers, and trojans. Follow the steps below to scan and clean your PC in just a few minutes.
Download Malwarebytes
Click the button below to download the latest version of Malwarebytes for Windows from the official source. The free version is all you need — it will scan your computer and remove adware, browser hijackers, and other malicious software at no cost.
Download MalwarebytesOfficial installer for Windows 11 and 10. Your download starts right away.Want real-time protection? See Malwarebytes Premium Malwarebytes Free for WindowsScans and removes malware at no cost
-
Install Malwarebytes
When the download finishes, open your Downloads folder and double-click the MBSetup file. If Windows shows a User Account Control pop-up, click “Yes” to allow the installation.

Follow the On-Screen Prompts to Install Malwarebytes
The setup wizard will walk you through a few quick screens:
-
Choose where you’re installing the program — “Personal Computer” or “Work Computer” — then click Next.

-
Malwarebytes will now install on your device. This usually takes under a minute.

-
When installation is complete, the “Welcome to Malwarebytes” screen will open automatically.

-
On the final screen, click Open Malwarebytes to launch the program.

-
Enable “Scan for Rootkits”
Before scanning, turn on rootkit detection so Malwarebytes can find even the most hidden threats. Click the Settings gear icon on the left side of the screen.

In the settings menu, find “Scan for rootkits” and click the toggle so it turns blue.

Done? Click “Dashboard” in the left pane to return to the main screen.
Start the Scan
Click the blue Scan button. Malwarebytes will automatically update its virus database and start checking your computer for malware.

-
Wait for the Scan to Finish
The scan checks your entire system for browser hijackers and other malicious programs, so it can take 5 to 20 minutes depending on your computer. Feel free to do something else — just check back occasionally to see the progress.

-
Quarantine the Detected Threats
When the scan is done, you’ll see a list of everything Malwarebytes found — malware, adware, and potentially unwanted programs. Click the “Quarantine” button to remove all of them at once.

Malwarebytes will now remove the malicious files and registry entries and move them safely into quarantine.

-
Restart Your Computer
Some threats can only be fully removed after a reboot. If Malwarebytes asks you to restart, click Yes. Once you’re logged back in, Malwarebytes has finished removing the threats it found.

That’s it — your Windows PC is now clean of trojans, adware, and other malware, and should be back to running smoothly.
If you are still having problems with your computer after completing these instructions, then please follow one of the steps:
- Run a computer scan with ESET Online Scanner
- Ask for help in our Windows Malware Removal Help & Support forum.
Run a Malware Scan with Malwarebytes for Mac
Malwarebytes for Mac is a free on-demand scanner that removes the malware other security software tends to miss — adware, browser hijackers, and unwanted programs included. Cleaning an infected Mac with Malwarebytes has always been completely free, and it’s our go-to recommendation. Follow the steps below to scan and clean your Mac in just a few minutes.
-
Download Malwarebytes for Mac
Click the button below to download the latest version of Malwarebytes for Mac.
Download MalwarebytesOfficial installer for macOS. Your download starts right away.Want real-time protection? See Malwarebytes PremiumMalwarebytes Free for MacScans and removes malware at no cost -
Open the Malwarebytes setup file
When the download finishes, open your Downloads folder and double-click the setup file to begin the installation.

-
Follow the On-Screen Prompts to Install Malwarebytes
The Malwarebytes for Mac Installer will guide you through a few quick screens. Click “Continue” and keep following the prompts until the installation completes.



When the installation is complete, Malwarebytes opens to the Welcome to Malwarebytes screen. Click “Get started“.
-
Select “Personal Computer” or “Work Computer”
Malwarebytes will ask what type of computer you’re installing it on. Click either Personal Computer or Work Computer, whichever applies.

-
Start the Scan
Click the “Scan” button. Malwarebytes will automatically update its detection database and begin checking your Mac for malware.

-
Wait for the Scan to Finish
Malwarebytes will scan your Mac for adware, browser hijackers, and other malicious programs. This can take a few minutes, so feel free to do something else — just check back occasionally to see the progress.

-
Quarantine the Detected Threats
When the scan is done, you’ll see a list of everything Malwarebytes found. Click the “Quarantine” button to remove all the threats at once.

-
Restart Your Mac
Malwarebytes will now remove all the malicious files it found. Some threats can only be fully removed after a reboot — if Malwarebytes asks you to restart, allow it. Once you’re logged back in, your Mac is clean.

That’s it — your Mac is now free of adware, rogue browser extensions, and other potentially harmful software.
If you are still experiencing problems while trying to remove a malicious program from your computer, please ask for help in our Mac Malware Removal Help & Support forum.
Run a Malware Scan with Malwarebytes for Android
Malwarebytes for Android automatically detects and removes dangerous threats like malware and ransomware so you don’t have to worry about your most-used device being compromised. Aggressive detection of adware and potentially unwanted programs keeps your Android phone or tablet running smooth.
-
Download Malwarebytes for Android.
You can download Malwarebytes for Android by clicking the link below.
Get Malwarebytes for AndroidOpens Google Play in a new tab.Want real-time protection? See Malwarebytes Premium for AndroidMalwarebytes for AndroidScans your phone and removes malware at no cost -
Install Malwarebytes for Android on your phone.
In the Google Play Store, tap “Install” to install Malwarebytes for Android on your device.

When the installation process has finished, tap “Open” to begin using Malwarebytes for Android. You can also open Malwarebytes by tapping on its icon in your phone menu or home screen.

-
Follow the on-screen prompts to complete the setup process
When Malwarebytes will open, you will see the Malwarebytes Setup Wizard which will guide you through a series of permissions and other setup options.
This is the first of two screens that explain the difference between the Premium and Free versions. Swipe this screen to continue.
Tap on “Got it” to proceed to the next step.
Malwarebytes for Android will now ask for a set of permissions that are required to scan your device and protect it from malware. Tap on “Give permission” to continue.
Tap on “Allow” to permit Malwarebytes to access the files on your phone.
-
Update database and run a scan with Malwarebytes for Android
You will now be prompted to update the Malwarebytes database and run a full system scan.

Click on “Update database” to update the Malwarebytes for Android definitions to the latest version, then click on “Run full scan” to perform a system scan.

-
Wait for the Malwarebytes scan to complete.
Malwarebytes will now start scanning your phone for adware and other malicious apps. This process can take a few minutes, so we suggest you do something else and periodically check on the status of the scan to see when it is finished.

-
Click on “Remove Selected”.
When the scan has been completed, you will be presented with a screen showing the malware infections that Malwarebytes for Android has detected. To remove the malicious apps that Malwarebytes has found, tap on the “Remove Selected” button.

-
Restart your phone.
Malwarebytes for Android will now remove all the malicious apps that it has found. To complete the malware removal process, Malwarebytes may ask you to restart your device.
That’s it — your Android phone is now clean — no more malicious apps, adware, or browser redirects.
If you are still having problems with your phone after completing these instructions, then please follow one of the steps:
- Restore your phone to factory settings by going to Settings > General management > Reset > Factory data reset.
- Ask for help in our Mobile Malware Removal Help & Support forum.
Stay Protected: Block Ads and Malicious Sites
Now that your device is clean, keep it that way. Most infections start with a malicious ad or a fake download button — so blocking them at the source is your best defense.
We recommend AdGuard, which blocks malicious ads, phishing pages, and dangerous redirects before they can reach you.
👉 Download AdGuard and browse safely
Frequently Asked Questions
Is the DHL shipment documentation email real?
No. The investigated message is an unauthorized DHL impersonation. It does not provide enough verifiable shipment information to justify its external download.
Check genuine deliveries through DHL’s official service or the merchant’s order history without clicking the email.
Did this specific link install malware?
The final destination was inactive during examination, so its exact earlier payload could not be confirmed. Claiming a definite installation would exceed the evidence.
Credential theft and malicious downloads are credible risks for this lure. Anyone who opened a file should scan the device.
Can opening the email alone infect my computer?
Usually, viewing the message without clicking, downloading, or granting permission does not compromise the device. Modern clients limit active content.
Mark it as phishing and delete it. Investigate further if the client launched a page or saved a file automatically.
What if I am genuinely expecting a DHL parcel?
Expectation makes the timing plausible but does not authenticate the sender. Find the shipment through your purchase record or official tracking portal.
Compare the merchant, tracking number, destination, and status. A real parcel never requires trusting an unrelated email link.
Why would a shipping page ask for my email password?
It should not. Your mailbox password belongs only on your provider’s established authentication domain, not on an outside document page.
A request for that secret indicates credential phishing. Close the form and report its complete address.
Should I contact the telephone number in the email?
No. A fraudulent message can route its telephone number to the same operation that controls the link.
Locate DHL or merchant support independently. Describe the shipment claim before providing any personal information.
The Bottom Line
The fake DHL shipment documentation email uses an ordinary review request to move recipients toward an unverified download whose final payload is no longer available.
Confirm parcels outside the message and treat unexpected files as hostile. If you entered data or opened a download, secure every affected account and device promptly.

Join the discussion
0 commentsShare your experience or ask a question about this article.
Discussion
Start the conversation
Have a question or something useful to share? Add the first comment.