


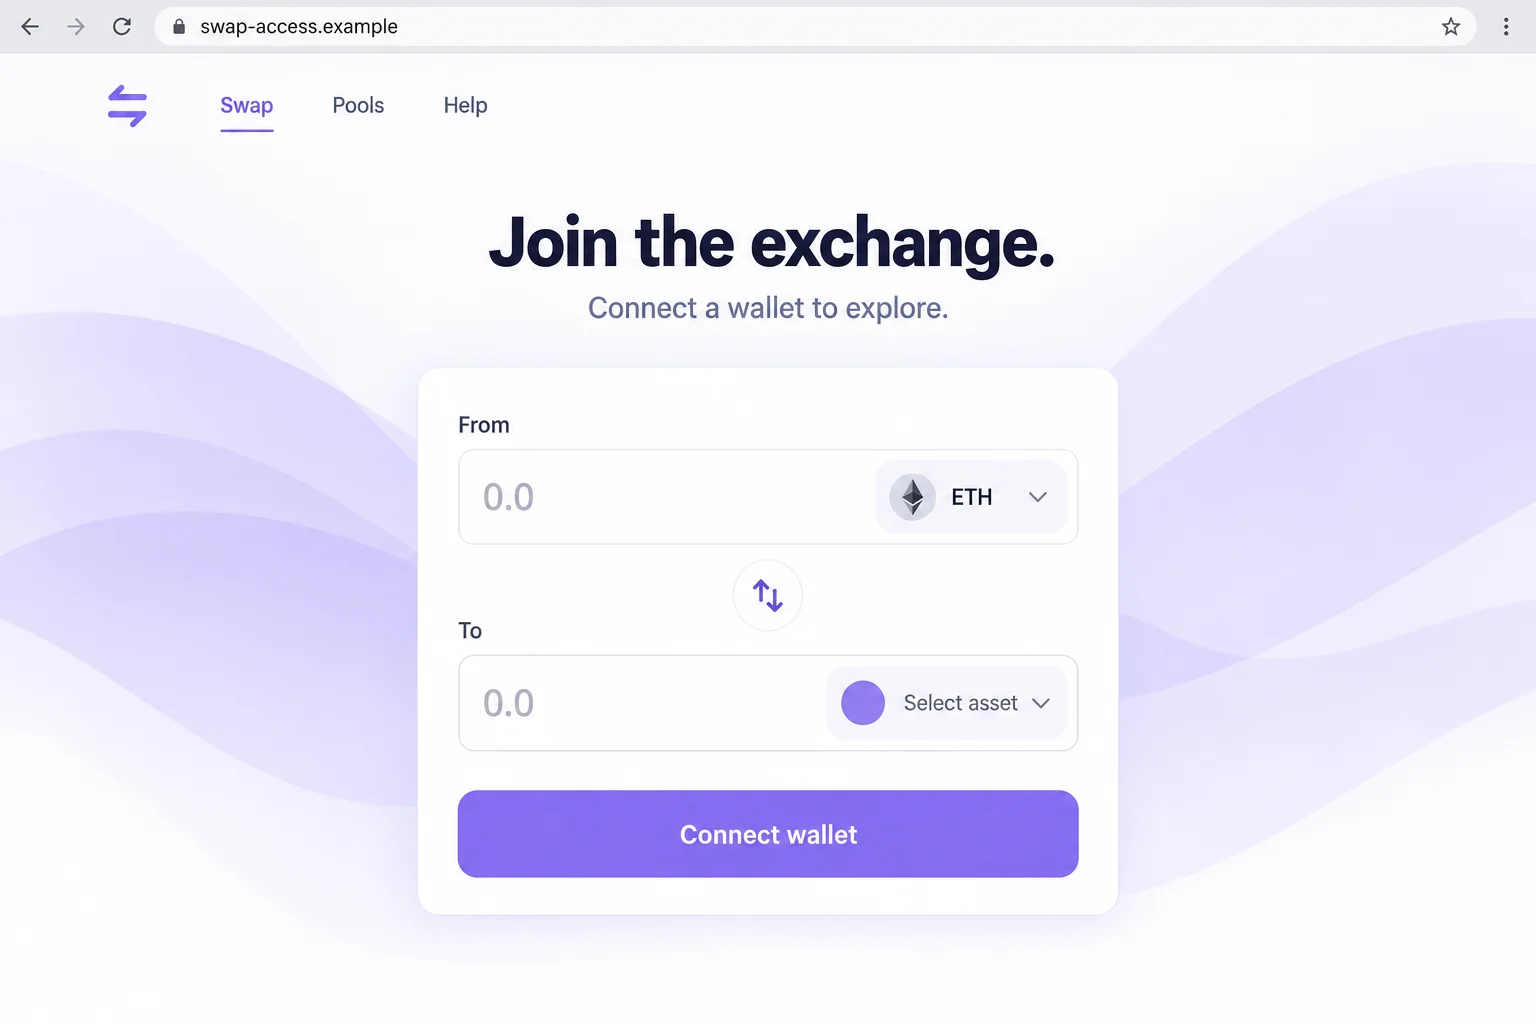
A QuickSwap-looking page invites you to join and explore its exchange features. Connecting a wallet seems like the obvious next step.
Before treating that invitation as routine, check the website making it. A familiar exchange name can appear on a page that belongs somewhere else entirely.
Overview
The exchange identity is borrowed, not verified
The fake Polygon QuickSwap scam uses an imitation exchange page to invite wallet activity. The reported address is connect-layer3[.]com, not an authenticated QuickSwap application route.
QuickSwap is a genuine decentralized exchange with multiple network deployments. This warning targets the page impersonating it, not the real exchange or every service using the word layer.
The imitation’s onboarding language makes the request sound like joining a platform. That description does not tell you what a subsequent wallet prompt would authorize.
A join button can lead to a consequential request
The reported page was associated with a wallet-draining mechanism. Such schemes use misleading requests to obtain authority or transfers that benefit an attacker.
A basic wallet connection is not itself proof that cryptocurrency moved. You must distinguish it from later signatures, spending permissions, transfers, or disclosure of private material.
No wallet or transaction was used to reproduce this page’s payload. Its precise contract, spender, beneficiary, and network were not established through a live authorization test.
The offer should pass these checks first
- The genuine project’s resources should independently establish the application address.
- The requested account and network should match the task you intended.
- An approval should not gain broader authority simply because the page calls it joining.
- A swap, spending permission, and wallet connection should not be confused.
- Secret recovery material should remain outside every promotional web form.
The lead image is a fictional onboarding interface, not a capture of the reported domain. It illustrates the invitation without inventing a completed transaction.
Why Joining Is a Misleading Description of Wallet Access
Joining a website often means creating a profile or accepting an invitation. People can carry that low-stakes expectation into an unfamiliar crypto interface.
A wallet, however, controls assets. Requests made through it can be much more consequential than registering an ordinary username.
That does not make every connection unsafe. It means the website’s friendly description cannot replace an explanation of the action the wallet actually presents.
A fraudulent page benefits when users treat all preliminary prompts as setup. The dangerous authorization can arrive before anyone believes they have begun transacting.
There is no need to finish onboarding to ask whether the site is genuine. Identity verification should happen before the application is allowed near a funded account.
If the interface refuses to show anything until you approve an unexplained request, leave it. Withholding a preview does not entitle the operator to your assets.
Likewise, you should not have to reveal a wallet backup to prove you are a human user, synchronize an account, or unlock a platform tour.
How the Fake Polygon QuickSwap Scam Works
Step 1: An invitation routes the visitor toward an exchange lookalike
The attraction is access to a recognizable service rather than necessarily a prize. A person looking for an exchange can be vulnerable without expecting free tokens.
The destination may be shared through posts, messages, advertisements, or other links. A specific visitor’s route should be established from their own record, not assumed.
Check the complete address before following the page’s instructions. A page can display QuickSwap while loading from an unrelated domain.
The reported connect-layer3 address is an incident identifier. It should not be circulated as an alternative exchange entry point.
Step 2: Familiar exchange language reduces suspicion
Terms such as swap, liquidity, staking, and wallet connection belong in real decentralized finance. A fraudulent site can use the same vocabulary without supplying the real service.
The reader may therefore judge the page by whether its words sound technically plausible. That is a weaker test than establishing who controls the destination.
A copied interface does not need to perform every advertised function. It only needs to make the next request feel consistent with what a genuine platform might ask.
Do not interpret a list of products as evidence that any of them has been independently connected to the genuine exchange.
Even genuine documentation linked from the page can be decoration. Begin from independently reached project resources and verify the route in that direction.
Step 3: Connecting brings the wallet into the interaction
A connection can reveal an address and let an application ask for further activity. The wallet should still be treated as a separate decision boundary.
Read the application identity and account involved. If you use several accounts, confirm which one is being exposed rather than relying on the last account you remember selecting.
A connection prompt is not necessarily an approval to spend. Do not skip the next prompt because you believe the initial connection already settled the question.
Conversely, a rejected follow-up prompt is not evidence of a completed transfer. Keep the response proportional to the actions that actually occurred.
Step 4: The next request may not match the promised task
The page can describe a request as joining or verification while the wallet presents authority over tokens. The wallet’s action details deserve more weight than the page’s reassurance.
For an intended swap, you should understand the assets, amounts, network, and receiving account involved. An unexplained authorization over other holdings is not a minor setup detail.
Spending permissions can be separate from a specific swap. Their scope matters because approving access may outlast the action the visitor thinks they are performing.
Do not assume a request is harmless merely because it does not visibly move money immediately. Some authority can matter later.
The exact malicious request for this imitation was not reproduced. Reject anything you cannot explain rather than testing different prompts to discover its behavior.
Step 5: An approved action can expose assets outside the supposed onboarding
A wallet-draining scheme aims to turn misleading interaction into asset loss. The assets at stake are real even when the page presents the process as preliminary.
If a transaction was approved, inspect its status in genuine wallet records. Pending submission, failure, and final confirmation lead to different conclusions.
If a permission was granted, determine what it allows and whether it remains active. Closing the browser does not necessarily remove it.
If secret material was entered, the problem is broader than the website connection. Someone possessing that material may recreate access independently.
Step 6: A failed result can tempt the visitor into another risky attempt
The page may not deliver the expected exchange access. That can encourage someone to retry, switch wallets, or follow an apparent support link.
Do not bring another funded account into the same situation. A technical-sounding explanation does not fix the missing proof of identity.
Any request to pay a separate verification or release charge should be rejected. This was not an established payment stage of the reported page.
The precaution matters because a new charge can extend an already suspicious interaction. You do not need to wait for it before leaving.
Take the investigation out of the imitation and into records controlled by your genuine wallet and independently verified services.
Checking QuickSwap, the Network, and the Requested Authority
Verify the application independently
QuickSwap’s documentation describes the genuine exchange and its network context. Use official resources as a starting point, not a badge borrowed by another page.
Follow the application link from the project’s independently verified resources. A similar name or familiar design is not enough.
Equally, an unrelated domain does not become official because it combines convincing technical words. The connect-layer3 name does not establish QuickSwap ownership.
Do not infer a network from a headline
Polygon appears in this campaign description, while QuickSwap supports multiple environments. The name alone does not identify the network used in a particular suspicious request.
Look at the genuine wallet’s selected network and transaction details. Recovery instructions should follow those facts rather than the label printed on the page.
Using the wrong network’s permission tool can create confusion or expose you to another imitation. Obtain the relevant instructions through verified wallet support.
Distinguish application access from spending authority
MetaMask’s application-permission guidance explains that connection permissions and other authorizations need separate attention.
Disconnecting a site can stop its current connection. It should not be treated as proof that a transfer was reversed or every existing permission vanished.
Revocation also does not make an exposed private key safe again. If you shared that key, disconnecting the website is not enough to protect the wallet.
A Wallet Warning Is Not an Obstacle to Click Through
Warnings can interrupt a task at exactly the moment you want to finish. A deceptive page may exploit that frustration by offering a simple explanation.
Do not disable protection or change advanced settings just to make this invitation proceed. The operator has not earned that level of trust.
A prompt asking for unusual approval deserves a pause even if the page looks polished and the amount you intended to swap is small.
Read the scope of the action, not just the fee. A low network fee does not imply that the authority being granted is narrow.
If you cannot interpret a prompt, preserve its details without approving it and consult genuine help. Public screenshots should exclude personal information and recovery material.
Do not let a stranger use screen sharing to interpret it while you open financial accounts. That would introduce an additional access risk.
You can reject an unclear request without proving exactly how it would steal funds. Safe refusal does not depend on completing an attack demonstration.
A Permission Review Should Start With the Specific Account
People sometimes use several wallets or account profiles. Before changing anything, identify the one that interacted with the imitation rather than guessing from its displayed name.
Check the relevant activity and network for that account. A clean-looking history on another account says nothing about the request you are investigating.
Where a spending permission exists, its asset and recipient matter. Do not treat an unfamiliar approval as safe simply because you do not recognize the token label.
Use verified help to interpret uncertain entries. A recovery website suggested by the promotion is not a trustworthy place to perform that review.
The aim is to remove actual unwanted authority while preserving legitimate access. Making random changes across every wallet can complicate an already stressful situation.
What to Do if You Have Fallen Victim to This Scam
Stop the onboarding process. Reject outstanding prompts, close the imitation, and do not use its help channel.
Write down whether you connected, signed, approved spending, transferred funds, or entered secret information. Include the affected wallet account and network if known.
Inspect actual account activity. Use the genuine wallet to identify requests and transactions, including their status and destination.
Save public transaction identifiers and relevant screenshots privately. A website’s claim of success or failure should not override the wallet’s record.
Address permissions that remain active. Disconnect the page and follow official instructions to review any separate authority you granted.
Check the affected network carefully. Do not send funds to an operator claiming that a transfer to them is required to revoke access.
Protect assets controlled by exposed keys. If a backup or private key was shared, use verified assistance to establish a genuinely new secure wallet.
Preserve the new secret privately and consider how remaining assets can be protected. Simply reinstalling the old wallet does not replace compromised recovery material.
Check extensions or software introduced by the page. If you installed something, involve trusted technical support and inspect the device appropriately.
Malwarebytes is useful for possible malware exposure. AdGuard can reduce deceptive advertising, but neither repairs an authorization or reverses a finalized crypto transfer.
Report the impersonation with precise records. Share the website address, affected network, public accounts, and transaction evidence through genuine support and appropriate reporting channels.
Tracing may support an investigation without producing a refund. Never include recovery phrases or private keys in a support request.
Decline unsolicited recovery portals. Comments and direct messages offering guaranteed restoration may introduce another fraudulent permission request.
Do not reconnect the compromised account to a stranger’s repair tool. Choose assistance independently and reject demands for a fee to activate a refund.
Is Your Device Infected? Run a Free Malware Scan
Slow performance, constant pop-ups, or strange behavior? These are classic signs of a malware infection. A quick way to check is to scan your device with Malwarebytes Free, one of the most trusted malware removal tools available. If you only visited a scam page and didn’t download or install anything, this scan is optional.
The free version detects and removes the most common threats, including:
- Adware — the cause of those annoying pop-ups
- Browser hijackers — unwanted redirects and changed homepages
- Trojans and spyware — hidden programs stealing your data
- Potentially unwanted programs (PUPs) — software you never asked for
👉 Select your device below — Windows, Mac, or Android — then follow the simple steps to download Malwarebytes, scan your system, and remove any threats it finds. The scan usually takes 5 to 20 minutes.
Run a Malware Scan with Malwarebytes for Windows
Malwarebytes is one of the most popular and trusted anti-malware tools for Windows — and it’s completely free for removing infections. It catches threats that many antivirus programs miss, including adware, browser hijackers, and trojans. Follow the steps below to scan your PC and remove what Malwarebytes finds.
Download Malwarebytes
Click the button below to download the latest version of Malwarebytes for Windows from the official source. The free version is all you need — it will scan your computer and remove adware, browser hijackers, and other malicious software at no cost.
Download MalwarebytesOfficial installer for Windows 11 and 10. Your download starts right away.Want real-time protection? See Malwarebytes Premium Malwarebytes Free for WindowsScans and removes malware at no cost
-
Install Malwarebytes
When the download finishes, open your Downloads folder and double-click the MBSetup file. If Windows shows a User Account Control pop-up, click “Yes” to allow the installation.
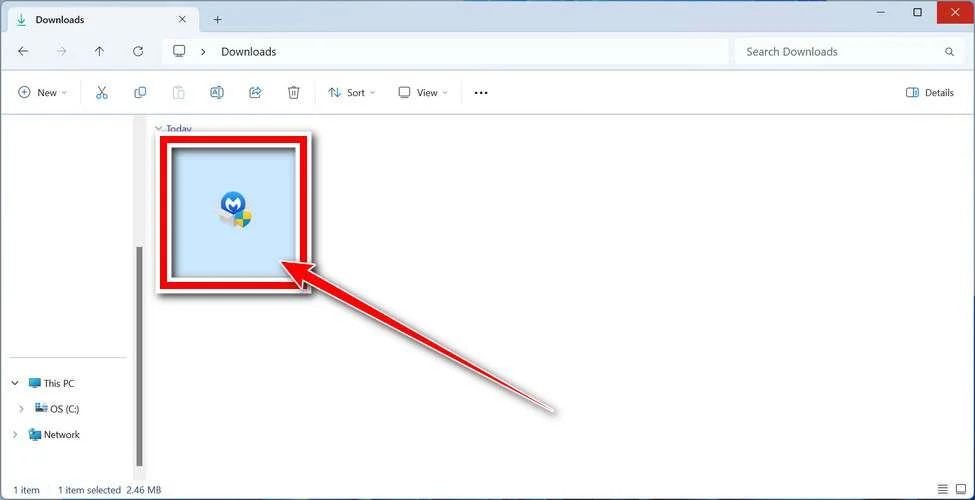
Follow the On-Screen Prompts to Install Malwarebytes
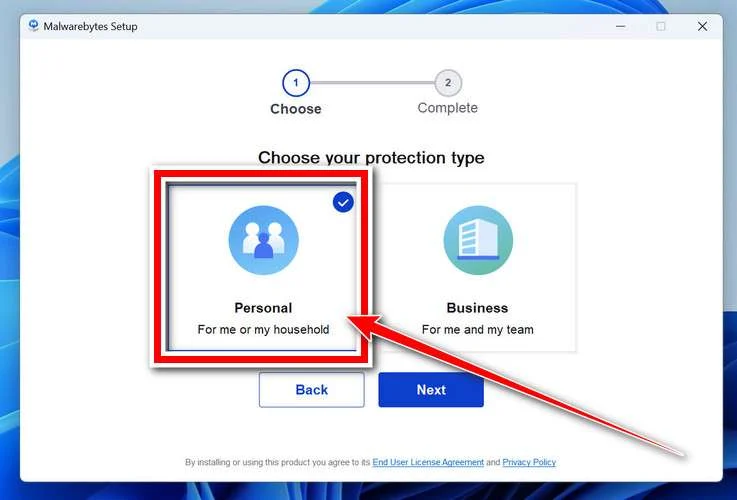
The setup wizard will walk you through a few quick screens:
-
Choose where you’re installing the program — “Personal Computer” or “Work Computer” — then click Next.
-
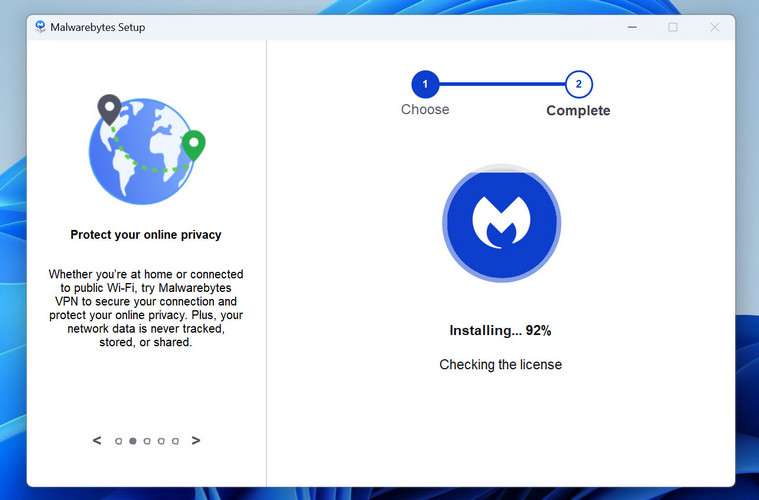
Malwarebytes will now install on your device. This usually takes under a minute.
-
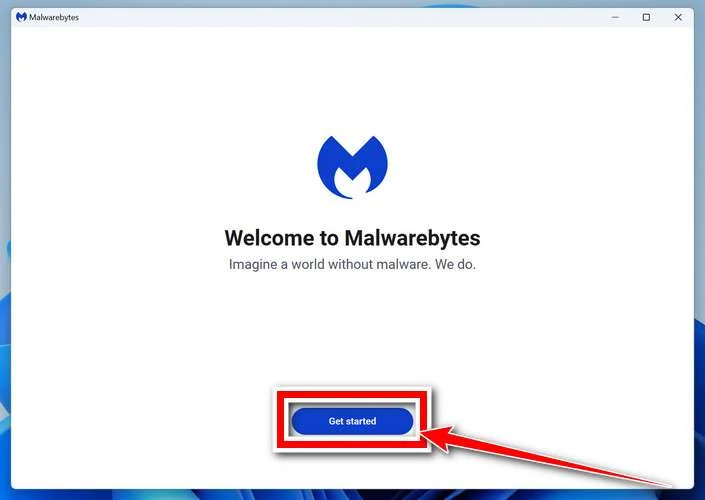
When installation is complete, the “Welcome to Malwarebytes” screen will open automatically.
-
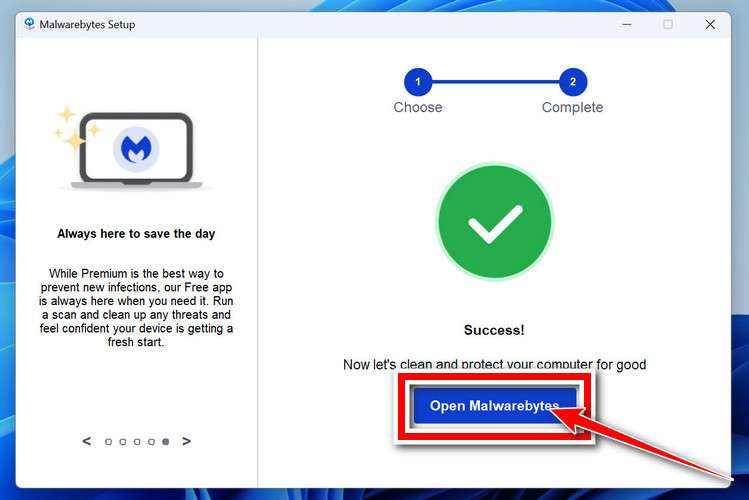
On the final screen, click Open Malwarebytes to launch the program.
-
Optional: Check for rootkits with a Custom Scan
You don’t need to change any settings for a normal scan. The standard Threat Scan in the next step is enough for most problems, so you can go straight to it.
If you also want to check for rootkits, use a Custom Scan. In current versions of Malwarebytes, rootkit scanning is only available there:
- On the Scanner tile, click the three-dot menu and select Advanced Scan.
- Choose Custom Scan. In its options, check Scan for rootkits.
- Select your system drive (usually C:\) as the location to scan, then start the scan. It takes longer than a Threat Scan.
- When it finishes, review and quarantine the results as described in the steps below.
Rootkit scanning isn’t available on Windows devices with ARM processors.
Start the Scan
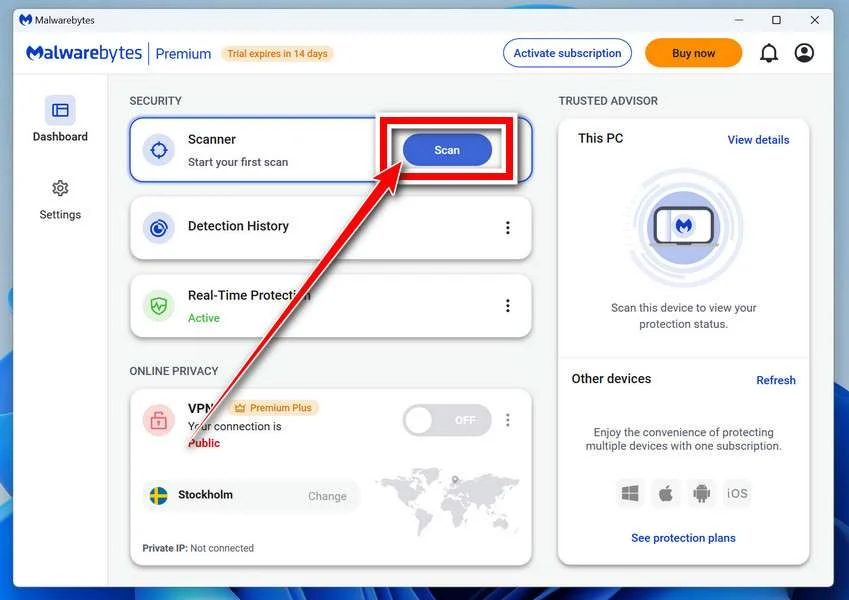
Click the blue Scan button. Malwarebytes will automatically update its virus database and start checking your computer for malware.
-
Wait for the Scan to Finish
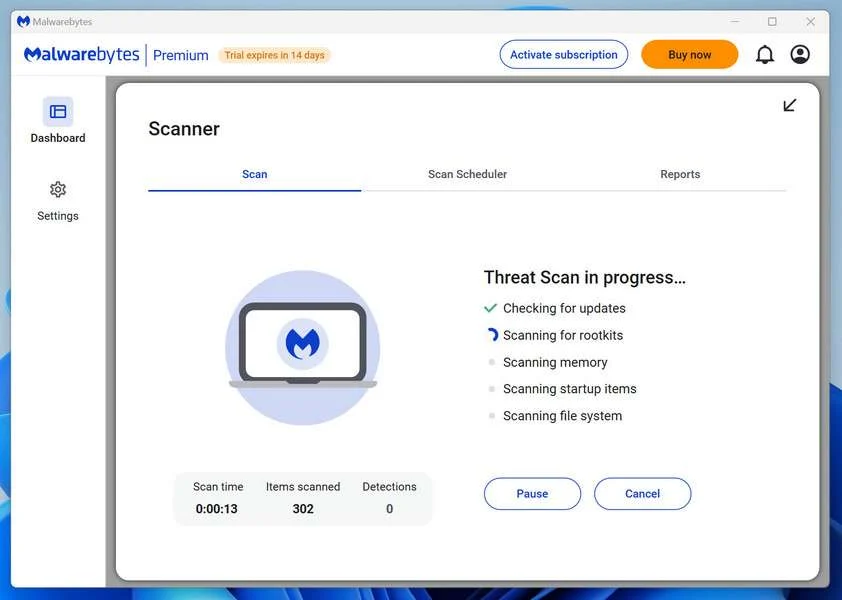
The scan checks your entire system for browser hijackers and other malicious programs, so it can take 5 to 20 minutes depending on your computer. Feel free to do something else — just check back occasionally to see the progress.
-
Quarantine the Detected Threats
When the scan is done, you’ll see a list of everything Malwarebytes found — malware, adware, and potentially unwanted programs. Click the “Quarantine” button to remove all of them at once.
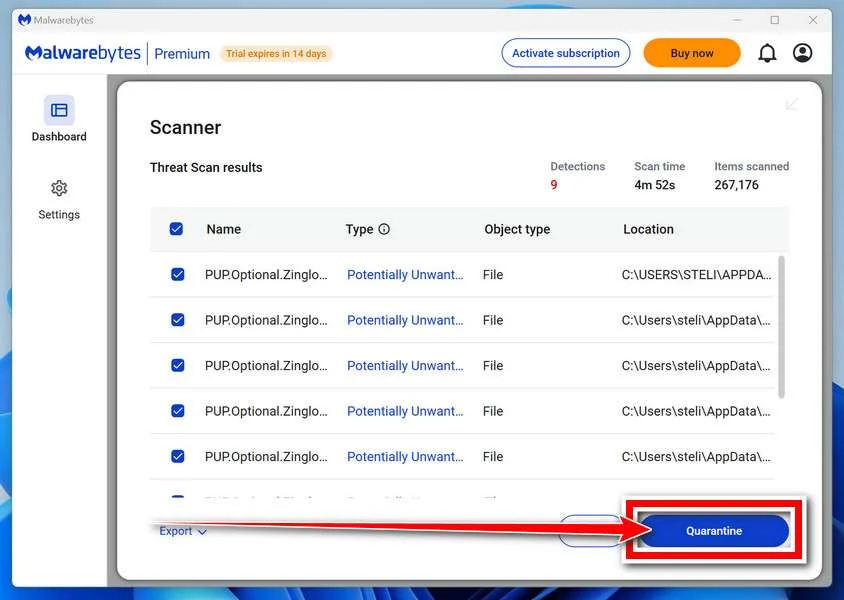
Malwarebytes will now remove the malicious files and registry entries and move them safely into quarantine.
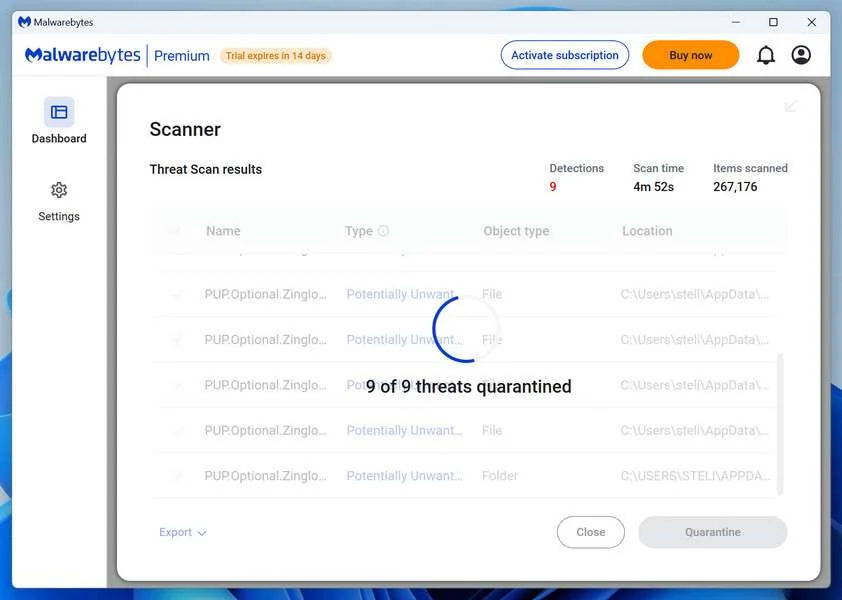
-
Restart Your Computer
Some threats can only be fully removed after a reboot. If Malwarebytes asks you to restart, click Yes. Once you’re logged back in, Malwarebytes has finished removing the threats it found.
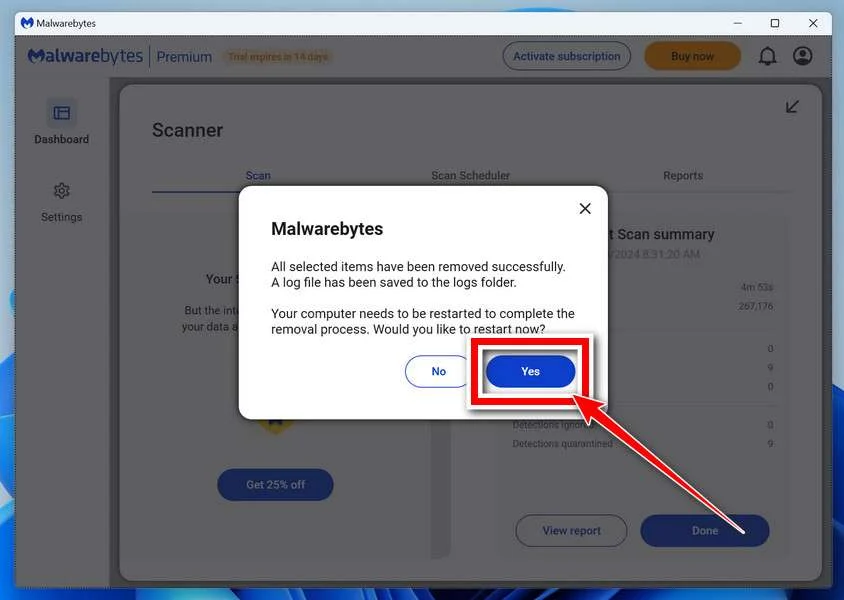
When the scan is done, check whether the problems you noticed have stopped. If they continue, see the options below.
If you are still having problems with your computer after completing these instructions, then please follow one of the steps:
- Run a computer scan with ESET Online Scanner
- Ask for help in our Windows Malware Removal Help & Support forum.
Run a Malware Scan with Malwarebytes for Mac
Malwarebytes for Mac is a free on-demand scanner that removes the malware other security software tends to miss — adware, browser hijackers, and unwanted programs included. Cleaning an infected Mac with Malwarebytes has always been completely free, and it’s our go-to recommendation. Follow the steps below to scan your Mac and remove what Malwarebytes finds.
-
Download Malwarebytes for Mac
Click the button below to download the latest version of Malwarebytes for Mac.
Download MalwarebytesOfficial installer for macOS. Your download starts right away.Want real-time protection? See Malwarebytes PremiumMalwarebytes Free for MacScans and removes malware at no cost -
Open the Malwarebytes setup file
When the download finishes, open your Downloads folder and double-click the setup file to begin the installation.
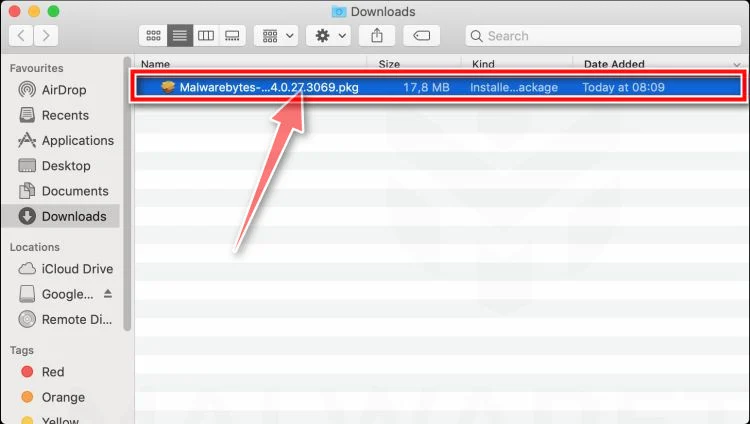
-
Follow the On-Screen Prompts to Install Malwarebytes
The Malwarebytes for Mac Installer will guide you through a few quick screens. Click “Continue” and keep following the prompts until the installation completes.
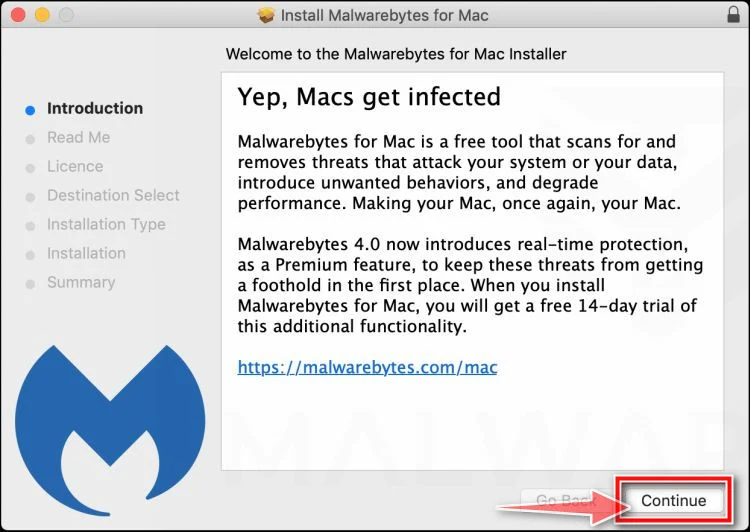
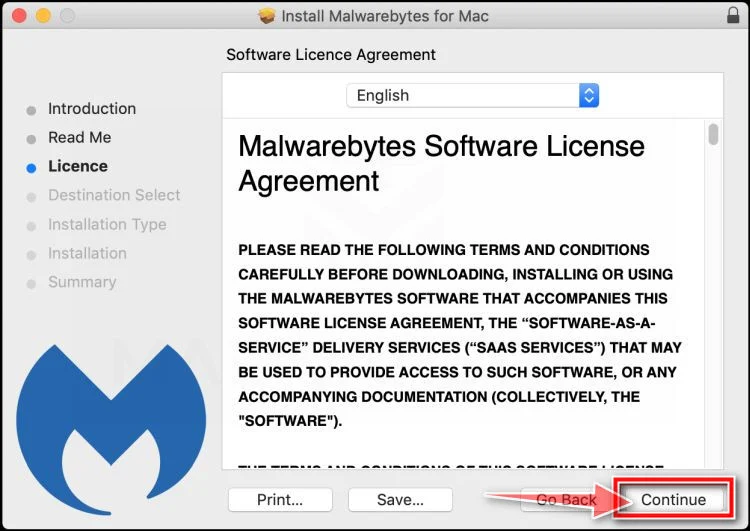
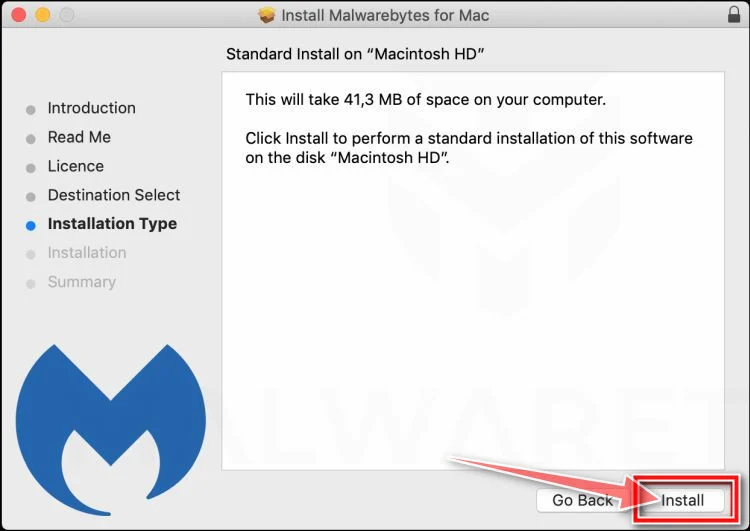
When the installation is complete, Malwarebytes opens to the Welcome to Malwarebytes screen. Click “Get started“.
Malwarebytes needs Full Disk Access to check your whole Mac. When it asks, open System Settings > Privacy & Security > Full Disk Access, turn on Malwarebytes (it may be listed as Malwarebytes Protection), and confirm with your password or Touch ID. Then return to Malwarebytes. On macOS Monterey and earlier, this setting is in System Preferences > Security & Privacy > Privacy.
-
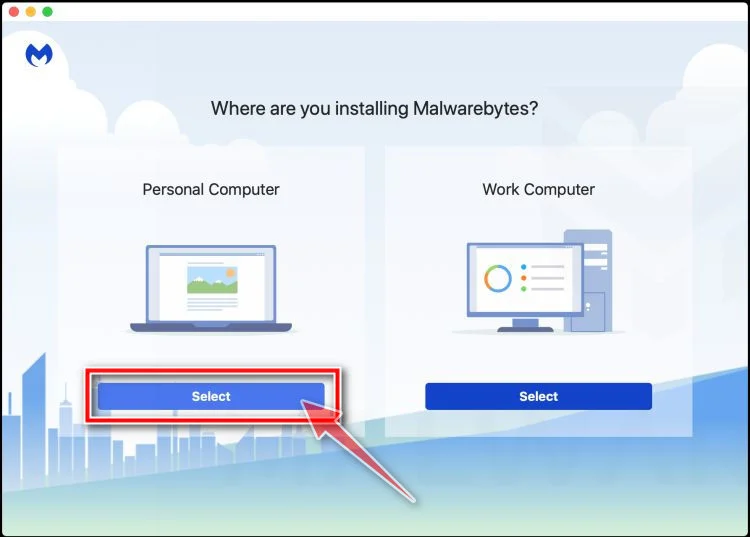
Select “Personal Computer” or “Work Computer”
Malwarebytes will ask what type of computer you’re installing it on. Click either Personal Computer or Work Computer, whichever applies.
-
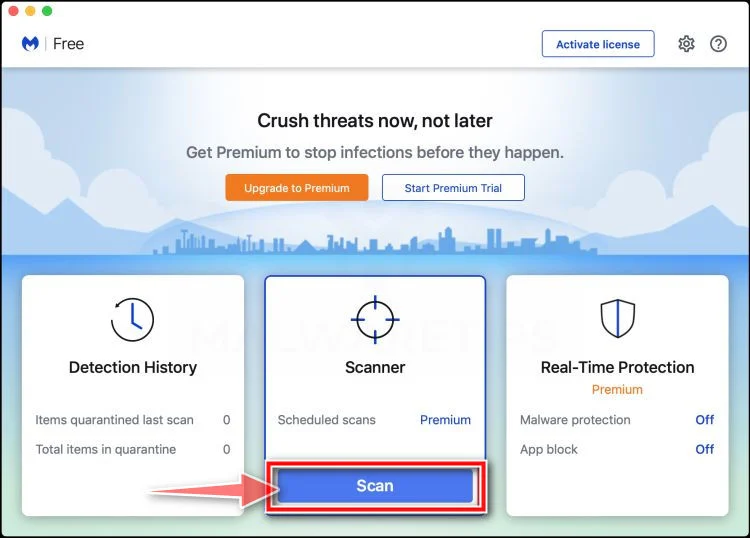
Start the Scan
Click the “Scan” button. Malwarebytes will automatically update its detection database and begin checking your Mac for malware.
-
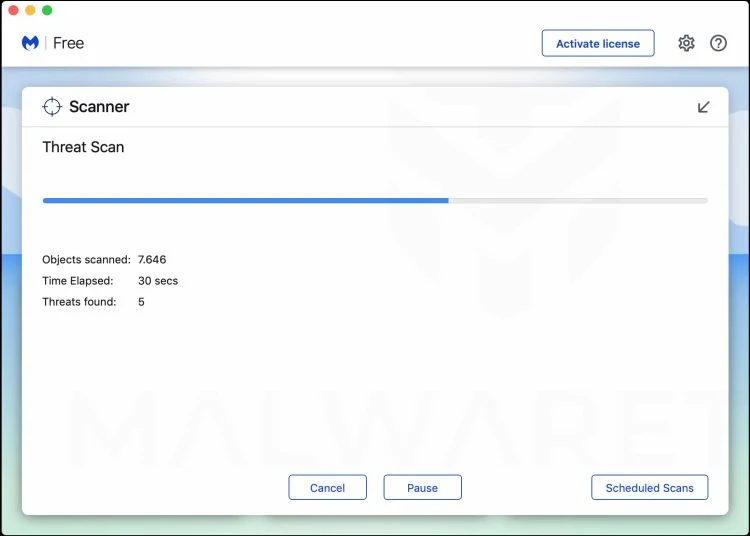
Wait for the Scan to Finish
Malwarebytes will scan your Mac for adware, browser hijackers, and other malicious programs. This can take a few minutes, so feel free to do something else — just check back occasionally to see the progress.
-
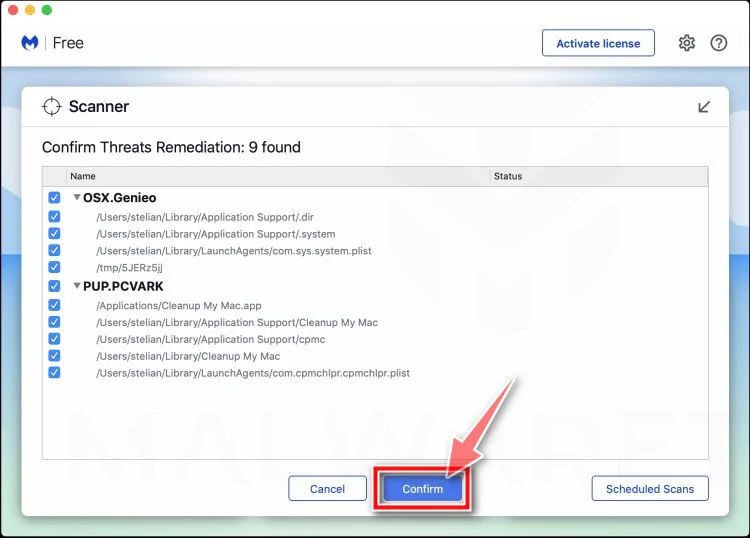
Quarantine the Detected Threats
When the scan is done, you’ll see a list of everything Malwarebytes found. Click the “Quarantine” button to remove all the threats at once.
-
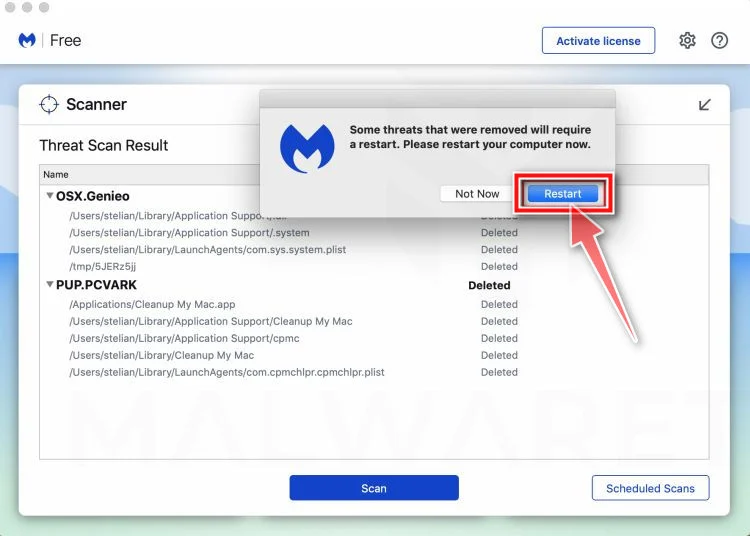
Restart Your Mac
Malwarebytes will now remove all the malicious files it found. Some threats can only be fully removed after a reboot — if Malwarebytes asks you to restart, allow it. Once you’re logged back in, check whether the problems you noticed have stopped. If they come back, save the scan report and ask for help in our forum.
If the problems you noticed continue after the scan, see the options below.
If you are still experiencing problems while trying to remove a malicious program from your computer, please ask for help in our Mac Malware Removal Help & Support forum.
Run a Malware Scan with Malwarebytes for Android
Malwarebytes for Android scans your phone or tablet for malware, adware, and potentially unwanted apps. The free version scans only when you start a scan. Real-time protection, which checks apps automatically, is part of the paid Premium version.
-
Download Malwarebytes for Android.
You can download Malwarebytes for Android by clicking the link below.
Get Malwarebytes for AndroidOpens Google Play in a new tab.Want real-time protection? See Malwarebytes Premium for AndroidMalwarebytes for AndroidScans your phone and removes malware at no cost -
Install Malwarebytes for Android on your phone.
In the Google Play Store, tap “Install” to install Malwarebytes for Android on your device.
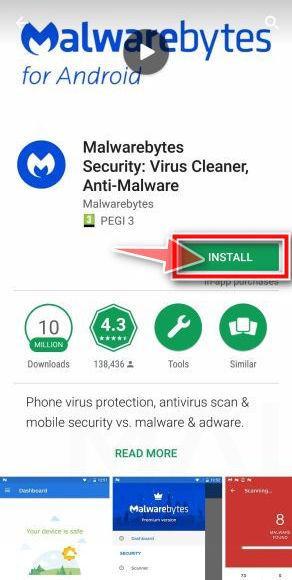
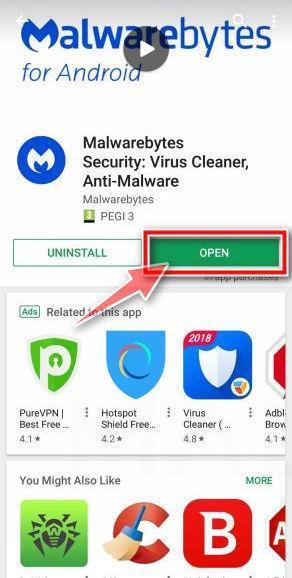
When the installation process has finished, tap “Open” to begin using Malwarebytes for Android. You can also open Malwarebytes by tapping on its icon in your phone menu or home screen.
-
Follow the on-screen prompts to complete the setup process
When Malwarebytes opens, it walks you through a short setup. Tap Get started and follow the prompts. If you see an offer for a trial or a paid plan, read it before you accept. You can skip it and keep using the free scanner.
Malwarebytes will ask for permission to access the files on your phone so it can scan them. Tap Allow, or turn on the permission in the Android screen that opens, then return to Malwarebytes.
-
Run a scan with Malwarebytes for Android
On the main screen, tap Scan now. In some versions, you open the menu, tap Scanner, and then tap Run a scan.
-
Wait for the Malwarebytes scan to complete.
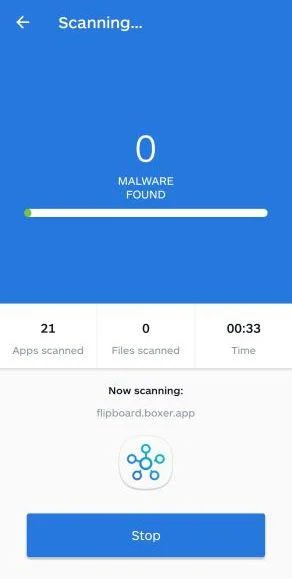
Malwarebytes will now start scanning your phone for adware and other malicious apps. This process can take a few minutes, so we suggest you do something else and periodically check on the status of the scan to see when it is finished.
-
Remove the detected apps.
When the scan has been completed, you will see a list of the threats that Malwarebytes for Android has detected. Next to each detected item, tap the menu icon (three dots), then choose to uninstall the app or delete the file. Android then asks you to confirm. Tap OK or Uninstall to remove the app.
-
Restart your phone.
When the detected apps are removed, restart your phone if Malwarebytes asks you to. Then check whether the problems you noticed have stopped.
If the problems you noticed continue after the scan, see the options below.
If you are still having problems with your phone after completing these instructions, then please follow one of the steps:
- Ask for help in our Mobile Malware Removal Help & Support forum.
- Only as a last resort, reset your phone to factory settings. Read the warning below first.
- Back up your photos, videos, files, and messages, for example to your Google account or a computer.
- Make sure you know your Google account email and password. The phone asks for them after the reset. If you changed the password recently, Google recommends waiting 24 hours before you reset.
- On a Samsung phone, also make sure you know your Samsung account password.
- If you use an authenticator app for two-step verification, move your accounts to another device or save your backup codes first.
Stay Protected: Block Ads and Malicious Sites
No scan can prove a device is completely clean, so it helps to block threats before they reach you. Most infections start with a malicious ad or a fake download button — so blocking them at the source is your best defense.
We recommend AdGuard, which blocks malicious ads, phishing pages, and dangerous redirects before they can reach you.
👉 Download AdGuard and browse safely
Frequently Asked Questions
Is connect-layer3.com a genuine QuickSwap joining page?
It is the reported imitation addressed here. Do not use it as an exchange entry point or authorize wallet activity through its onboarding invitation.
Is QuickSwap itself fraudulent?
This case concerns impersonation of a real exchange. It is not a verdict on the genuine platform’s investment suitability, performance, or every affiliated project.
Does the Polygon label identify the affected network?
Not reliably for an individual incident. Check the actual wallet request and transaction record, especially because the genuine exchange operates across multiple networks.
What is the difference between joining and approving tokens?
Joining is the page’s description. A spending approval grants specific authority. Judge the real wallet action rather than accepting the page’s friendly label.
What if I declined every transaction request?
Check activity, remove the connection, and confirm that no authorization completed. Declining differs from approving, and merely seeing the page does not establish a theft.
Can a scanner remove an on-chain approval?
No. Malware scanning addresses device software. Wallet permissions, disclosed secrets, and transferred assets require their own responses through verified account and network tools.
The Bottom Line
Do not join QuickSwap through this imitation. The familiar exchange identity does not justify an unrelated page directing access to your wallet.
If you already responded, review the exact requests and protect the authority or secrets actually exposed. Avoid another claim or recovery portal promising to fix everything.

Join the discussion
0 commentsShare your experience or ask a question about this article.
Community experiences
Did this happen to you?
Your experience could help someone recognize the same scam. Submit a private report for our team to review.
I experienced this tooReports are reviewed before publication. Sharing publicly is always your choice.
Discussion
Start the conversation
Have a question or something useful to share? Add the first comment.