Is FMovies Safe? Why Clone Streaming Sites Are Riskier Than Ever
Written by: Thomas Orsolya
Published on:
FMovies-style sites should not be treated as safe just because a movie page loads.
That is the trap.
A user searches for a movie, clicks an FMovies result, lands on a familiar-looking streaming page, and sees a video player. At that point, the site may feel safe. But the real danger is usually not the first page. It is the ecosystem around it: fake play buttons, pop-ups, redirect chains, browser notification prompts, fake CAPTCHA pages, fake virus alerts, APK downloads, browser extensions, and “HD player” files that may have nothing to do with the movie.
So, is FMovies safe?
No. Current FMovies clone sites should be treated as risky. Some may only show aggressive ads. Others may push scams, malware, adware, browser hijackers, fake security warnings, suspicious downloads, phishing pages, or payment traps.
If you only opened a page and closed it, the risk is lower. If you clicked fake play buttons, allowed notifications, downloaded a file, installed an app, added an extension, or entered card/login information, treat it as a cleanup and account-safety event.
The Real FMovies Network Was Shut Down
FMovies is not a stable, official streaming service users can safely rely on today. In August 2024, Vietnamese authorities, with support from the Alliance for Creativity and Entertainment, announced the takedown of what ACE described as the world’s largest pirate streaming operation, including FMovies and associated domains. ACE said FMovies and related domains logged more than 6.7 billion visits between January 2023 and June 2024.
That matters because current search results for “FMovies” are likely to lead users into a messy clone ecosystem: mirrors, copycats, lookalikes, rebranded sites, and unrelated domains using the FMovies name for traffic.
A site may look like FMovies. It may use the FMovies name. It may have movie posters and a play button. That does not make it official, safe, or trustworthy.
The name is bait. The behavior is what matters.
Why FMovies Clone Sites Are Risky
FMovies-style clone sites often make money from aggressive ads, redirects, affiliate offers, notification abuse, fake verification pages, and download prompts. That creates a dangerous user journey.
You click Play. A new tab opens. Another play button appears. Then a fake CAPTCHA appears. Then a browser asks you to click Allow. Then a fake warning says your device is infected. Then the site pushes a VPN, APK, browser extension, player, codec, or card verification page.
That is not normal streaming.
That is a funnel.
The page may show a movie player, but the surrounding system is designed to make you click, allow, install, subscribe, or enter information.
The FTC has warned that illegal streaming apps can carry malware and expose personal information, including photos, credit card information, and other sensitive data. Research into illegal streaming ecosystems has also found that users can be exposed to deceptive ads, malicious browser extensions, scams, and extensive tracking
Examples of Current FMovies-Style Clone Domains
Examples of domains currently promoted online as FMovies proxies, mirrors, or lookalike streaming pages include:
fmoviesto[.]cc
fmovies[.]ps
fmoviesf[.]co
fmovies[.]hn
fmovie[.]fm
ww1[.]fmoviefree[.]net
ffmovies[.]la
fmovies[.]cc
ww2[.]fmovies[.]cab
www1[.]fmovies[.]top
fmovies[.]to
hdmovieslive[.]com
These examples should not be treated as safe, official, or recommended. They are listed here for awareness, cleanup reference, and scam-identification purposes only.
The key point is simple: after the FMovies takedown, there is no reliable “official” FMovies domain for users to trust. Any site using the FMovies name today may be a clone, mirror, ad farm, phishing page, malware funnel, or unrelated copycat using the brand for search traffic.
Do not judge these sites by whether a movie page loads. Judge them by their behavior. If the page uses fake play buttons, pop-ups, redirect chains, notification prompts, fake CAPTCHA pages, APK downloads, browser extensions, fake virus alerts, or card-verification forms, treat it as unsafe.
Common FMovies Scam Patterns
1. Fake Play Buttons
The fake play button is the classic trap.
You click what looks like the movie player, but instead of starting the video, the site opens a new tab. That tab may lead to ads, adult pages, gambling pages, fake VPN offers, scam surveys, fake security warnings, or download prompts.
A legitimate streaming player does not need multiple play buttons, new tabs, fake “continue” pages, and suspicious verification steps.
If every click opens another page, stop.
2. Browser Notification Traps
Many FMovies clones use notification prompts to keep spamming users after they leave the site.
The page may say:
“Click Allow to watch”
“Click Allow to continue”
“Press Allow to confirm you are not a robot”
“Allow notifications to start video”
“Enable notifications for HD streaming”
This is not required to watch a video.
It is a trick.
Once allowed, the site can send notifications that look like antivirus alerts, system warnings, delivery alerts, adult messages, prize claims, or urgent security notices. Google’s Chrome Help lists unwanted pop-ups, fake virus alerts, changed browsing behavior, and suspicious extensions as signs of unwanted software or malware-like activity.
3. Fake CAPTCHA Pages
Some clone sites show fake CAPTCHA screens that tell users to click Allow to prove they are human.
Real CAPTCHA checks do not require notification permission.
If a site says “click Allow to verify,” it is usually trying to get browser notification access. Close the page.
4. Fake Virus Alerts
FMovies clones may redirect users to pages claiming:
“Your device is infected”
“Your browser is damaged”
“Your phone has viruses”
“Your data is at risk”
“Your system will be blocked”
“Install this security app now”
These warnings are usually fake. They are scare tactics designed to push users into downloading a fake cleaner, installing unwanted software, calling fake support, or paying for a useless service.
A real antivirus warning does not normally appear inside a random streaming tab with flashing buttons, countdown timers, and dramatic claims.
5. APK, Codec, and Player Downloads
A streaming clone may offer downloads with names like:
HD Player
Video Codec
Browser Update
Movie App
Free Streaming APK
VPN Setup
Media Plugin
Watch Extension
ZIP/RAR archive
Do not open them.
A movie site should not require a random APK, EXE, ZIP, extension, or “codec” to play a video. That is a major red flag.
6. Card Verification Pages
Some clone pages ask for card details while claiming the stream is “free.”
Common claims include:
“Card required for age verification”
“Free account activation”
“No charge today”
“$0 verification”
“Unlock HD streaming”
“Create your free account”
Do not enter payment information.
Card-verification pages on piracy-style streaming clones may lead to subscription traps, unauthorized charges, adult-site billing, or phishing.
7. Suspicious Browser Extensions
Some FMovies-style pages push extensions disguised as:
video downloaders
streaming unlockers
movie search tools
safe search tools
coupon tools
VPN helpers
media players
Unknown extensions are dangerous because they can read browsing data, inject ads, change search settings, redirect pages, or track activity.
FMovies Risk Signs To Take Seriously
What you saw
Why it matters
What to do
Fake play button opened a new tab
Redirect or ad trap
Close the tab. Do not continue clicking.
Site asked to allow notifications
Notification spam risk
Block or revoke the permission.
Fake CAPTCHA asked you to click Allow
Permission trick
Close the page.
Fake virus alert appeared
Scareware or scam funnel
Do not click. Close browser and scan if needed.
Site offered APK, EXE, ZIP, codec, or player
Malware/adware risk
Do not open it. Delete it.
Site asked for card verification
Possible billing scam
Do not enter payment details.
Site asked for login info
Credential theft risk
Change passwords if entered.
Browser keeps opening tabs
Possible adware or permission abuse
Check notifications, extensions, and apps.
Unknown extension appeared
Browser hijacker risk
Remove it and reset browser settings.
Child used the device
Higher accidental-click risk
Check downloads, apps, extensions, and permissions.
What To Do After Visiting FMovies
What you should do depends on what happened.
If You Only Opened the Page
Risk level: lower
If you only opened an FMovies clone, looked at the page, and closed it without clicking prompts, allowing notifications, downloading files, or entering information, the practical risk is usually lower.
Still, do this:
Close the tab.
Do not restore the same browser session.
Check browser notification permissions.
Remove unfamiliar allowed sites.
Clear suspicious downloads.
Watch for pop-ups, fake alerts, or redirects.
A single page visit does not automatically mean your device is infected. But clone sites are unstable, and some use aggressive scripts and redirects. Do not keep interacting with the page.
If You Clicked Fake Play Buttons
Risk level: medium
Close the new tabs immediately. Do not follow:
“continue watching” pages
fake VPN offers
adult pop-ups
surveys
prize pages
browser update pages
fake virus alerts
“install player” prompts
Then check:
notification permissions
downloads folder
browser extensions
pop-up and redirect settings
If the browser keeps opening tabs after you leave, scan the device.
If You Allowed Notifications
Risk level: medium to high
This is one of the most common problems.
Remove the permission immediately.
In Chrome on desktop:
Settings → Privacy and security → Site settings → Notifications
Remove unknown allowed sites. Also check:
Site settings → Pop-ups and redirects
Keep pop-ups and redirects blocked.
On Android, Google’s Chrome guidance recommends removing problematic apps, using Play Protect, and stopping notifications from suspicious websites when unwanted ads or malware-like behavior appears.
If You Downloaded a File But Did Not Open It
Risk level: medium
Do not open it.
Delete the file. Empty the trash or recycle bin. Be especially careful with:
.exe
.apk
.zip
.rar
.dmg
.msi
.scr
suspicious browser extension files
files with double extensions
Do not open a suspicious file “just to check.” That is how a low-risk visit can become a high-risk incident.
If You Installed Something
Risk level: high
If you installed a player, codec, APK, extension, cleaner, VPN, or “movie app,” assume cleanup is needed.
Do this:
Disconnect from suspicious pages.
Uninstall unknown programs or apps.
Remove unknown browser extensions.
Check browser homepage and search settings.
Check startup apps.
Reboot.
Scan with Malwarebytes.
Use Malwarebytes AdwCleaner if adware or browser hijacker symptoms continue.
Malwarebytes says AdwCleaner targets adware, potentially unwanted programs, and browser hijackers, while Malwarebytes Free handles broader threats such as viruses, trojans, botnets, and ransomware.
If You Entered Card Details
Risk level: high
Treat this as a payment-safety issue.
Do this:
Contact your card issuer.
Watch for small test charges.
Cancel suspicious subscriptions.
Consider replacing the card.
Check email for payment confirmations.
Do not trust “free verification” claims.
A piracy-style streaming clone asking for card details is a major red flag.
If You Entered Email or Password Details
Risk level: high
Change the password immediately, especially if it was reused.
Do this:
Change the password on the affected account.
Change reused passwords elsewhere.
Enable two-factor authentication.
Check active sessions.
Log out of unknown devices.
Check recovery email and phone number.
Watch for phishing emails and SMS messages.
If you used the same password for email, banking, shopping, social media, or business tools, change those too.
FMovies Cleanup Checklist
Use this checklist after visiting a suspicious FMovies clone.
Browser cleanup
Close all suspicious tabs.
Do not click fake close buttons inside the page.
Revoke notification permissions.
Block pop-ups and redirects.
Remove unknown extensions.
Reset browser settings if redirects continue.
Check homepage and search engine settings.
Clear suspicious site data.
Device cleanup
Delete suspicious downloads.
Uninstall unknown apps or programs.
Check startup apps.
Reboot the device.
Scan with Malwarebytes.
Use AdwCleaner for adware/browser hijacker symptoms.
Scan again if pop-ups return.
Account cleanup
Change reused passwords.
Enable two-factor authentication.
Revoke unknown sessions.
Check account recovery settings.
Monitor email for phishing attempts.
Payment cleanup
Contact card issuer if payment data was entered.
Monitor for test charges.
Cancel suspicious subscriptions.
Replace the card if needed.
How to Remove Unwanted Apps and Malware
If a pop-up scam tricked you into downloading an unwanted program — or you suspect your device is infected — follow the free, step-by-step removal guide below to clean it completely.
Before you start: this guide may look long, but that’s only because we’ve broken everything down into clear, detailed steps that anyone can follow — no technical skills needed, and every tool we use is free. Please follow the steps in order. If you get stuck or have doubts at any point, stop and ask for help in our free support forum — our team will guide you personally.
Choose your device to get started. Browser hijackers, unwanted apps, and adware can infect Windows, Mac, Android, and iOS devices alike — click your operating system below to jump straight to the right instructions.
In this first step, we will manually check if any unknown or malicious programs are installed on the computer. Sometimes adware and browser hijackers can have a usable Uninstall entry that can be used to remove them.
Windows 11Windows 10Windows 8Windows 7
Open the Settings app
Press Windows + I on your keyboard to open Settings. Alternatively, right-click the Start button and select “Settings” from the menu.
Go to “Apps & Features”
In the Settings window, click “Apps” in the sidebar, then select “Apps & Features“.
Find and uninstall the malicious program
Scroll through the list of installed apps and look for anything suspicious — a program you don’t remember installing, or one with a strange or generic name. Quick tip: click “Sort by” and choose “Install date“. Malware is usually one of the most recently installed programs, so it will appear near the top.
When you find the malicious program, click the three dots next to it and select “Uninstall“.
Didn’t find any suspicious programs? That’s fine — not all infections install visible apps. Just continue with the next step in this guide.
Complete the uninstall
Confirm by clicking Uninstall in the message box, then follow the remaining prompts. Read each prompt carefully — some malicious programs use confusing wording or pre-ticked boxes hoping you’ll click through without looking.
Open the Settings app
Press Windows + I on your keyboard to open Settings. Alternatively, click the Start button on the taskbar and select “Settings” (the gear icon).
Click on “Apps”
In the “Windows Settings” window, click “Apps“. The “Apps & Features” section should open by default — if it doesn’t, select it from the list on the left.
Find and uninstall the malicious program
Scroll through the list of installed apps and look for anything suspicious — a program you don’t remember installing, or one with a strange or generic name. Quick tip: click “Sort by” and choose “Install date“. Malware is usually one of the most recently installed programs, so it will appear near the top.
When you find the malicious program, click on it and select “Uninstall“.
Didn’t find any suspicious programs? That’s fine — not all infections install visible apps. Just continue with the next step in this guide.
Complete the uninstall
Confirm by clicking Uninstall in the message box, then follow the remaining prompts. Read each prompt carefully — some malicious programs use confusing wording or pre-ticked boxes hoping you’ll click through without looking.
Open “Programs and Features”
Right-click the Start button in the taskbar, then select “Programs and Features“. This takes you straight to the list of installed programs.
Find and uninstall the malicious program
Scroll through the list of installed programs and look for anything suspicious — a program you don’t remember installing, or one with a strange or generic name. Click to highlight it, then click the “Uninstall” button.
Didn’t find any suspicious programs? That’s fine — not all infections install visible apps. Just continue with the next step in this guide.
Complete the uninstall
Confirm by clicking Yes in the message box, then follow the remaining prompts. Read each prompt carefully — some malicious programs use confusing wording or pre-ticked boxes hoping you’ll click through without looking.
Open the Control Panel
Click the “Start” button, then click “Control Panel“.
Click on “Uninstall a Program”
In the Control Panel, click “Uninstall a Program” under the Programs category.
Find and uninstall the malicious program
Scroll through the list of installed programs and look for anything suspicious — a program you don’t remember installing, or one with a strange or generic name. Click to highlight it, then click the “Uninstall” button.
Didn’t find any suspicious programs? That’s fine — not all infections install visible apps. Just continue with the next step in this guide.
Complete the uninstall
Confirm by clicking Yes in the message box, then follow the remaining prompts. Read each prompt carefully — some malicious programs use confusing wording or pre-ticked boxes hoping you’ll click through without looking.
Is a stubborn program refusing to uninstall? Use Revo Uninstaller to force-remove it completely, including leftover files and registry entries.
With the malicious programs removed, you’re ready for the next step in this guide.
STEP 2: Reset browsers back to default settings
In this step, we will remove spam notifications, malicious extensions, and change to default any settings that might have been changed by malware. Please note that this method will remove all extensions, toolbars, and other customizations but will leave your bookmarks and favorites intact. For each browser that you have installed on your computer, please click on the browsers tab below and follow the displayed steps to reset that browser.
ChromeFirefoxMicrosoft EdgeInternet Explorer
Reset Chrome for Windows to default settings
We will now reset your Chrome browser settings to their original defaults. This will reset your startup page, new tab page, search engine, and pinned tabs. It will also disable all extensions and clear temporary data like cookies. Your favorites, history, and saved passwords will not be cleared.
Open the Chrome menu
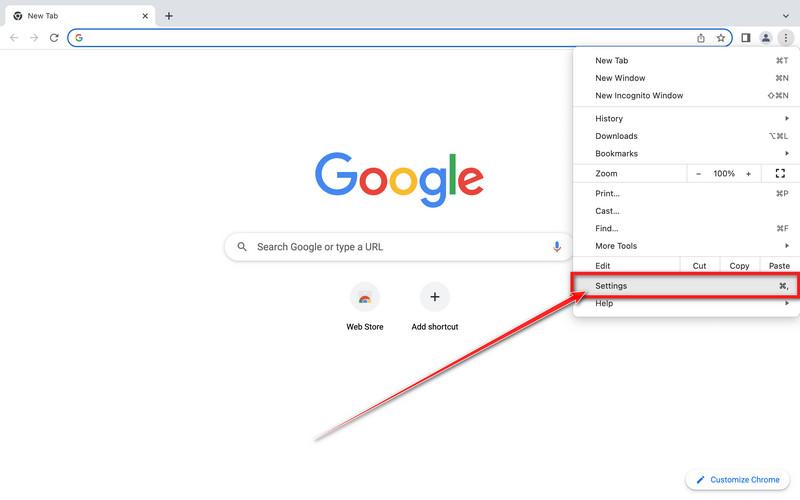
Open Google Chrome and click the three-dot (⋮) icon in the top-right corner.
Open Chrome Settings
Select Settings from the Chrome menu.
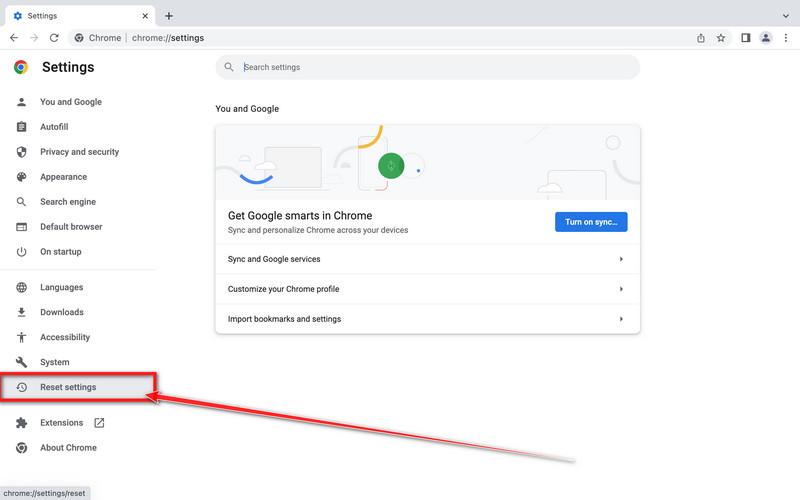
Select “Reset settings”
Look at the menu on the left side of the Settings page. Scroll down and click Reset settings.
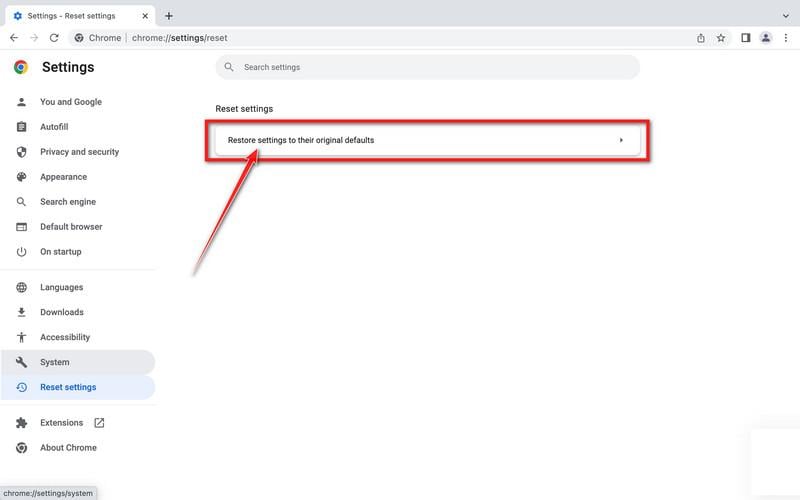
Restore Chrome’s original settings
Click Restore settings to their original defaults.
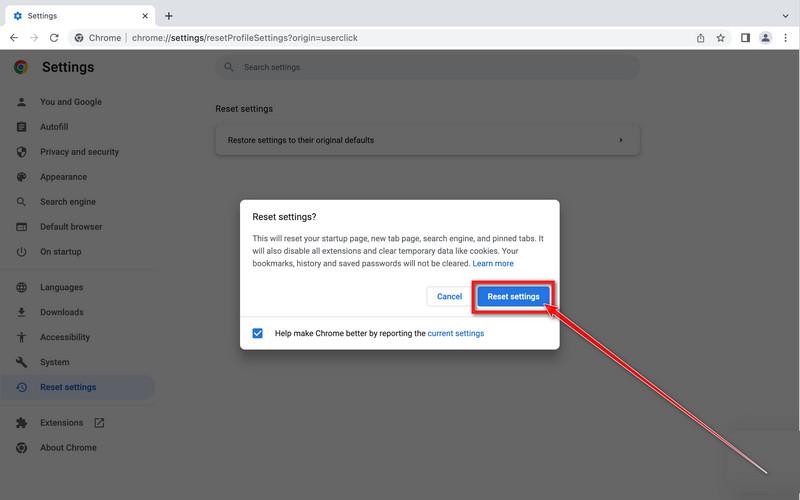
Confirm the Chrome reset
A confirmation window will appear. Click Reset settings.
This will:
Restore the default search engine, homepage, and new tab page
Reset startup pages and pinned tabs
Disable installed extensions
Clear temporary cookies and website data
Don’t worry: Chrome will not delete your bookmarks, browsing history, or saved passwords.
Restart Chrome and perform a test search. If your searches now open normally in Google, you can stop here.
If searches are still redirected through shady domains complete the additional step below.
Remove persistent search hijacker data
Only complete this step if the redirect continues after resetting Chrome.
Some browser hijackers hide inside Chrome’s local search-engine database. A standard Chrome reset may not remove this database, which is why searches can continue to pass through shady sites.
The following procedure creates a backup of the affected database and allows Chrome to build a new, clean version. This is safer and less disruptive than deleting the entire Chrome profile.
First, prevent Chrome Sync from restoring the hijacked settings:
Open a new Chrome tab.
Copy the following address, paste it into Chrome’s address bar, and press Enter:
chrome://settings/syncSetup/advanced
Under Manage what you sync, select Customize sync.
Turn off Settings and Extensions.
You can leave Bookmarks and Passwords enabled so your important data remains synchronized.
Note: Some newer Chrome versions may automatically redirect this address to the Google Account settings page. If that happens, locate the list of synchronized Chrome data and turn off Settings and Extensions there.
Now save anything you are working on and close every Chrome window.
Run the cleanup command:
Press the Windows key on your keyboard.
Type PowerShell.
Open Windows PowerShell. Administrator access is not required.
Copy the entire command shown below.
Right-click inside the PowerShell window to paste the command, then press Enter.
If Windows warns you about pasting multiple lines, select the option to continue.
Write-Host "" Write-Host "Chrome search data has been cleaned." Write-Host "You can now reopen Chrome."
Wait until PowerShell displays the following message:
Chrome search data has been cleaned.
You can now reopen Chrome.
Close PowerShell and reopen Google Chrome. Chrome will automatically create a clean search database for every local profile.
Next, copy the following address, paste it into Chrome’s address bar, and press Enter:
chrome://settings/searchEngines
Make sure Google is selected as the default search engine. Test several searches from the address bar and confirm that they no longer pass through shady search engines.
Your important Chrome data is protected: the PowerShell cleanup does not remove bookmarks, saved passwords, browsing history, cookies, or installed extensions. However, it may reset locally stored Autofill addresses and form suggestions.
The original search database is not deleted. PowerShell renames it and adds search-hijacker-backup to its filename so it can be recovered if necessary.
Keep Settings and Extensions synchronization disabled while testing Chrome. Do not enable every extension at once. Enable only the extensions you recognize, one at a time, and test Chrome after each one.
If the redirect returns after enabling a particular extension, remove that extension immediately.
Reset Firefox for Windows to default settings
We will now reset your Firefox browser settings to their default. The reset feature fixes many issues by restoring Firefox to its factory default state while saving your essential information like bookmarks, passwords, web form auto-fill information, browsing history, and open tabs.
Open the Firefox menu and click “Help”
Click the three horizontal lines in the top-right corner of Firefox to open the main menu, then select “Help“.
Click “More troubleshooting information”
In the Help menu, click “More troubleshooting information“.
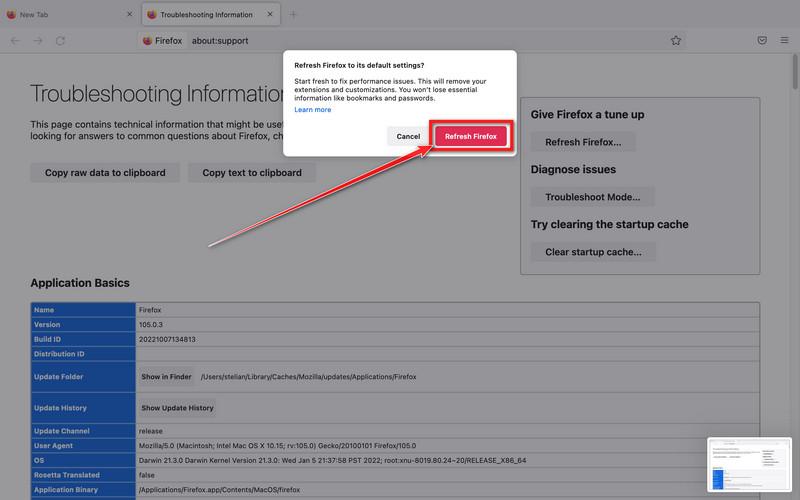
Click “Refresh Firefox”
On the “Troubleshooting Information” page, click the “Refresh Firefox” button in the top-right area of the page.
Confirm the refresh
In the confirmation window, click “Refresh Firefox” again. This removes extensions, themes, and customized settings — the usual hiding places for browser hijackers — while keeping your bookmarks, history, and saved passwords safe.
Click “Finish”
Firefox will close, reset itself to default settings, and reopen with a window listing the information that was restored. Click “Finish” — your Firefox is now clean.
About the “Old Firefox Data” folder: Firefox saves a copy of your old profile on your desktop. If something you need is missing after the reset, you can recover it from this folder. Otherwise, delete the folder — it contains sensitive data like passwords and cookies, and may also still hold the malicious files you just removed.
Reset Microsoft Edge to default settings
We will now reset your Microsoft Edge browser settings to their default. This will reset your startup page, new tab page, search engine, and pinned tabs. It will also disable all extensions and clear temporary data like cookies. Your favorites, history, and saved passwords will not be cleared.
Updated for Microsoft Edge on Windows 10 and Windows 11 — July 2026.
Open the Edge menu and click “Settings”
Open Microsoft Edge. In the top-right corner, click the three-dot (…) icon, then click Settings.
Prevent the unwanted settings from returning through Edge Sync
If you are signed in to Microsoft Edge, a bad setting or extension may be stored in your Microsoft account and return after the reset.
Copy the following address, paste it into the Edge address bar, and press Enter:
edge://settings/profiles/sync
On the Sync page, turn off these two options:
Settings
Extensions
You can leave Favorites and Passwords turned on.
If Edge says that sync is already off, simply continue to the next step.
Important: Edge Sync settings are separate for each profile. If you use more than one Edge profile, switch to each affected profile and repeat this step.
You do not need to sign out of your Microsoft account or delete the Edge profile.
Open “Reset settings”
In the left sidebar, click Reset settings.
You can also open the reset page directly. Copy the following address, paste it into the Edge address bar, and press Enter:
edge://settings/reset
Click “Restore settings to their default values”
Click Restore settings to their default values.
Confirm the reset
In the confirmation dialog, click Reset.
This resets the startup page, new tab page, search engine, and pinned tabs. It also disables all extensions and clears temporary site data, such as cookies.
Don’t worry: your favorites, browsing history, and saved passwords will not be deleted.
Check your extensions before turning them back on
Copy the following address, paste it into the Edge address bar, and press Enter:
edge://extensions
Remove any extension you do not recognize or no longer use. Pay particular attention to extensions related to search, coupons, shopping, PDF conversion, browser protection, new tabs, or video downloading.
Do not turn all extensions back on at the same time. Enable only the extensions you recognize and trust.
Select a trusted search engine
Copy the following address, paste it into the Edge address bar, and press Enter:
edge://settings/searchEngines
Select Bing, Google, DuckDuckGo, or another search provider you trust and make it the default.
Remove any unknown search engines, especially providers with strange names or addresses that you did not add yourself.
Restart Edge and perform a search from the address bar. If searches are no longer redirected, you can stop here.
If the redirect remains, clean the corrupted search data without deleting the Edge profile
Use this additional step only if Edge continues to redirect searches after the normal reset.
This command cleans the search-engine database from every local Edge profile while keeping your favorites, saved passwords, browsing history, cookies, and profiles.
Before continuing: save anything you are working on because the command will close Microsoft Edge.
Open the Windows Start menu.
Type PowerShell.
Open Windows PowerShell. Administrator access is not required.
Copy the entire command below.
Paste it into PowerShell and press Enter.
$stamp = Get-Date -Format "yyyyMMdd-HHmmss"
$root = Join-Path $env:LOCALAPPDATA "Microsoft\Edge\User Data"

Get-Process -Name msedge -ErrorAction SilentlyContinue |
    Stop-Process -Force -ErrorAction SilentlyContinue

Start-Sleep -Seconds 2

if (-not (Test-Path -LiteralPath $root)) {
    Write-Host "The Microsoft Edge profile folder was not found:"
    Write-Host $root
    return
}

$profiles = Get-ChildItem -LiteralPath $root -Directory |
    Where-Object {
        $_.Name -eq "Default" -or
        $_.Name -match "^Profile \d+$"
    }

$movedFiles = 0

foreach ($profile in $profiles) {
    foreach ($name in @(
        "Web Data",
        "Web Data-journal",
        "Web Data-wal",
        "Web Data-shm"
    )) {
        $file = Join-Path $profile.FullName $name

        if (Test-Path -LiteralPath $file) {
            $backup = "$file.search-reset-backup-$stamp"

            try {
                Move-Item -LiteralPath $file -Destination $backup -ErrorAction Stop
                Write-Host "Cleaned: $($profile.Name)\$name"
                $movedFiles++
            }
            catch {
                Write-Warning "Could not clean: $file"
            }
        }
    }
}

Write-Host ""

if ($movedFiles -gt 0) {
    Write-Host "Microsoft Edge search data has been cleaned." -ForegroundColor Green
    Write-Host "You can now reopen Microsoft Edge."
}
else {
    Write-Host "No Edge search database files were found." -ForegroundColor Yellow
}
The command does not permanently delete the original files. It renames them as backup files, and Edge creates a clean search database when it starts again.
Note: this additional cleanup may also reset saved form-fill suggestions, saved addresses, and manually added search engines. It does not delete favorites, passwords, or browsing history.
Reopen Edge and test the browser
Open Microsoft Edge again, visit edge://settings/searchEngines, and select your preferred search engine.
Perform several searches from the address bar to confirm that the redirect is gone.
Keep synchronization for Settings and Extensions turned off until you are certain that the computer and extensions are clean. If you enable them again, turn them on one at a time and test Edge after each change.
If Edge still redirects your searches
Open edge://policy. If this is your personal computer and Edge displays unknown policies such as ExtensionInstallForcelist or DefaultSearchProvider, the hijacker may be installed outside the browser profile.
In that situation, continue with the next malware-removal steps and run a complete antivirus scan. If the computer belongs to a company or school, contact its IT administrator before changing any policies.
Reset Internet Explorer to default settings
We will now reset your Internet Explorer browser settings to their default. You can reset Internet Explorer settings to return them to the state they were in when Internet Explorer was first installed on your computer.
Go to “Internet Options”.
Open Internet Explorer, click on the gear icon in the upper-right part of your browser, then select “Internet Options“.
Select the “Advanced” tab, then click “Reset”
In the “Internet Options” dialog box, select the “Advanced” tab, then click on the “Reset” button.
Click on “Reset”.
In the “Reset Internet Explorer settings” section, select the “Delete personal settings” checkbox, then click on the “Reset” button.
Click on “Close”.
When Internet Explorer has completed its task, click on the “Close” button in the confirmation dialogue box. Close your browser and then you can open Internet Explorer again.
STEP 3: Use Malwarebytes Anti-Malware to remove malware and unwanted programs
In this third step, we will install Malwarebytes to scan and remove any infections, adware, or potentially unwanted programs that may be present on your computer.
Malwarebytes is one of the most popular and trusted anti-malware tools for Windows — and it’s completely free for removing infections. It catches threats that many antivirus programs miss, including adware, browser hijackers, and trojans. Follow the steps below to scan and clean your PC in just a few minutes.
Download Malwarebytes
Click the button below to download the latest version of Malwarebytes for Windows from the official source. The free version is all you need — it will scan your computer and remove adware, browser hijackers, and other malicious software at no cost.
(The link opens in a new page where your download will start)
Install Malwarebytes
When the download finishes, open your Downloads folder and double-click the MBSetup file. If Windows shows a User Account Control pop-up, click “Yes” to allow the installation.
Follow the On-Screen Prompts to Install Malwarebytes
The setup wizard will walk you through a few quick screens:
Choose where you’re installing the program — “Personal Computer” or “Work Computer” — then click Next.
Malwarebytes will now install on your device. This usually takes under a minute.
When installation is complete, the “Welcome to Malwarebytes” screen will open automatically.
On the final screen, click Open Malwarebytes to launch the program.
Enable “Scan for Rootkits”
Before scanning, turn on rootkit detection so Malwarebytes can find even the most hidden threats. Click the Settings gear icon on the left side of the screen.
In the settings menu, find “Scan for rootkits” and click the toggle so it turns blue.
Done? Click “Dashboard” in the left pane to return to the main screen.
Start the Scan
Click the blue Scan button. Malwarebytes will automatically update its virus database and start checking your computer for malware.
Wait for the Scan to Finish
The scan checks your entire system for browser hijackers and other malicious programs, so it can take several minutes. Feel free to do something else — just check back occasionally to see the progress.
Quarantine the Detected Threats
When the scan is done, you’ll see a list of everything Malwarebytes found — malware, adware, and potentially unwanted programs. Click the “Quarantine” button to remove all of them at once.
Malwarebytes will now remove the malicious files and registry entries and move them safely into quarantine.
Restart Your Computer
Some threats can only be fully removed after a reboot. If Malwarebytes asks you to restart, click Yes. Once you’re logged back in, your PC is clean and you can continue with the next steps in this guide.
STEP 4: Use HitmanPro to scan your computer for badware
In this next step, we will scan the computer with HitmanPro to ensure that no other malicious programs are installed on your device.
HitmanPro is a second-opinion scanner — it’s designed to catch what your main antivirus might have missed. Instead of relying on a single detection engine, it checks the behavior of files in the locations where malware usually hides. Anything suspicious gets sent to the cloud, where it’s analyzed by two of the best antivirus engines available: Bitdefender and Kaspersky.
Good news: scanning is completely free, with no limits. You only need a license when it’s time to remove what was found — and even then, you can activate a free one-time 30-day trial to clean your PC at no cost. (A full license is $24.95 per year for 1 PC.)
Download HitmanPro
Click the button below to download HitmanPro. Remember — the scan is free, so you have nothing to lose by checking your PC.
When the download finishes, open your Downloads folder and double-click the file: “hitmanpro.exe” on 32-bit Windows, or “hitmanpro_x64.exe” on 64-bit Windows.
If a User Account Control pop-up asks whether HitmanPro can make changes to your device, click “Yes” to continue.
Follow the On-Screen Prompts
On the HitmanPro start screen, click “Next” to begin the system scan. No lengthy setup required — it goes straight to work.
Wait for the Scan to Finish
HitmanPro will now check your computer for malicious programs. This usually takes just a few minutes thanks to its cloud-based scanning.
Review the Results and Click “Next”
When the scan is done, HitmanPro will show you everything it found. Click “Next” to remove the detected threats.
Click “Activate Free License”
To remove the malicious files, click the “Activate free license” button. This starts your free 30-day trial — no payment details needed — and unlocks the full cleanup.
When the removal is complete, HitmanPro will show a summary of everything it cleaned. Click Next, then click Reboot if prompted. If there’s no reboot prompt, just click Close — your PC is clean.
STEP 5: Use AdwCleaner to remove adware and malicious browser policies
In this final step, we will use AdwCleaner to remove the malicious browser policies that were set by browser hijackers on your computer and delete malicious browser extensions.
AdwCleaner is a free on-demand scanner that specializes in adware, browser hijackers, and unwanted toolbars — the exact threats that mainstream antivirus programs often miss. It also includes tools that repair the damage malware leaves behind, like hijacked browser settings and malicious policies. It’s a quick scan that’s well worth running.
Download AdwCleaner
Click the button below to download AdwCleaner — it’s free, portable, and requires no installation.
Open your Downloads folder and double-click the file named “adwcleaner_x.x.x.exe“. There’s no installation — the program starts right away.
If Windows asks whether you want to allow AdwCleaner to run, click “Yes“. When the license agreement appears, click I agree to continue.
Enable “Reset Chrome policies”
This setting removes malicious browser policies — a trick malware uses to lock your browser settings so you can’t change them back. Click “Settings” on the left side of the window, then turn on “Reset Chrome policies“.
Start the Scan
Click “Dashboard” on the left side of the window, then click the “Scan” button.
Wait for the Scan to Finish
AdwCleaner will now check your computer for adware and other malware. This usually takes only a few minutes — it’s one of the fastest scanners around.
Quarantine the Detected Threats
When the scan finishes, AdwCleaner will list everything it found. Click the “Quarantine” button to remove all the malicious items at once.
Click “Continue” to Finish the Cleanup
Save any open work first — AdwCleaner needs to close your open programs before it can clean. When you’re ready, click the “Continue” button.
AdwCleaner will now delete all detected malware from your computer. If it asks you to restart your PC, allow it — your computer will be clean when you log back in.
That’s it — your Windows computer is now clean. The unwanted apps, adware, and any other malware have been removed.
If your current antivirus allowed this malicious program on your computer, you may want to consider purchasing Malwarebytes Premium to protect against these types of threats in the future. If you are still having problems with your computer after completing these instructions, then please follow one of the steps:
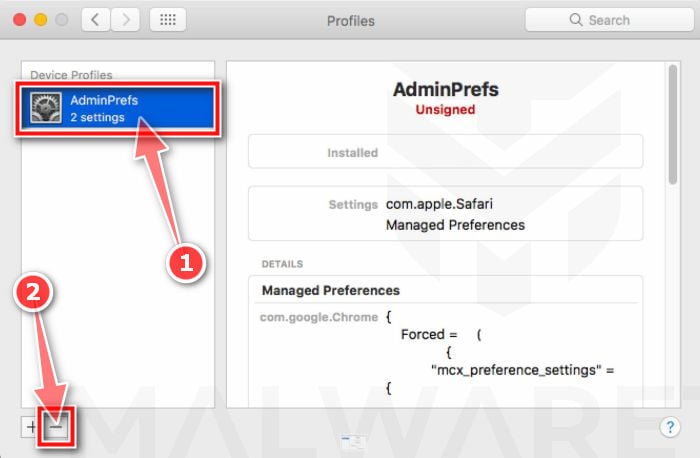
Profiles are used by IT admins in businesses to control the behavior of their Macs. These profiles can configure a Mac to do many different things, some of which are not otherwise possible. When it comes to home users, adware and browser hijackers are using the configuration profile to prevent users from removing malicious programs from the computer. This also prevents the user from changing that behavior in the browser’s settings.
In this first step, we will check your computer to see if any configuration profiles are installed. To do this, follow the below steps:
Open “System Settings”
From the Apple menu () in the top-left corner of the screen, select System Settings. (On macOS Monterey and earlier, this is called System Preferences.)
Look for “Profiles”
In the System Settings window, search for Profiles — on newer macOS versions you’ll find it under Privacy & Security, or you can type “Profiles” in the search box.
No Profiles section? Good news — that means no profiles are installed on your Mac, which is completely normal. Skip ahead to the next step of this guide.
Remove the malicious profiles
Malware uses configuration profiles to lock your browser settings — forcing a fake search engine or homepage on you and preventing you from changing it back. If you see a profile you don’t recognize (and your Mac isn’t managed by your workplace or school), select it, press the − (minus) button, and click Remove to confirm.
STEP 2: Delete malicious apps
In this second step, we will try to identify and remove any malicious apps and files that might be installed on your computer. Sometimes redirects or adware programs can have usable Uninstall entries that can be used to remove these programs.
Quit the malicious programs
Check the Apple menu bar in the top-right corner of your screen. If you see an icon you don’t recognize, click it and select Quit. This stops the malware from running so it can’t interfere while we remove it.
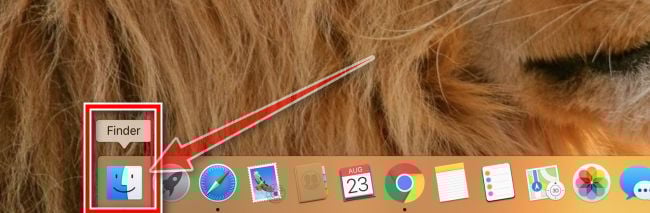
Open “Finder”
Click the Finder icon in your dock.
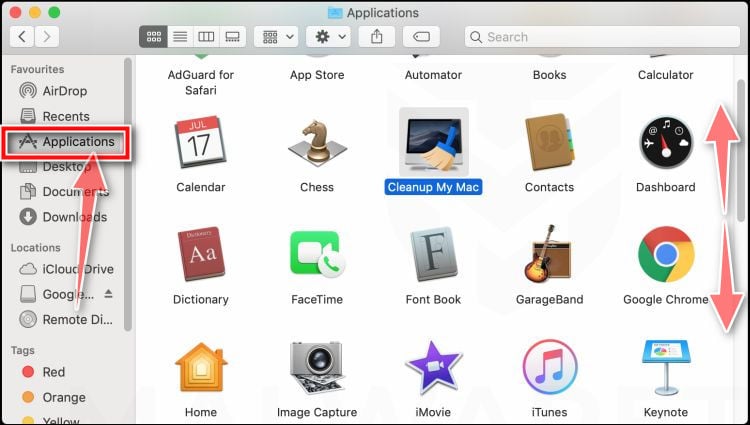
Click on “Applications”
In the Finder sidebar, click “Applications“.
Find and remove the malicious app
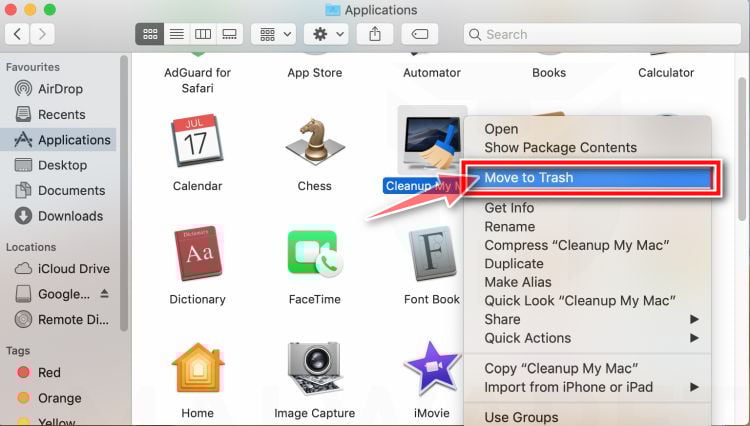
Scroll through the list of installed apps and look for anything suspicious — an app you don’t remember installing, or one with a strange or generic name. When you find it, right-click it and select “Move to Trash“.
Some known malicious programs to look for: SearchMine, TakeFresh, TopResults, FeedBack, ApplicationEvents, GeneralOpen, PowerLog, MessengerNow, ImagePrime, GeneralNetSearch, Reading Cursors, GlobalTechSearch, PDFOnline-express, See Scenic Elf, MatchKnowledge, Easy Speedtest, and WebDiscover. The names change constantly, though — so treat any app you can’t account for as suspect.
Empty the Trash
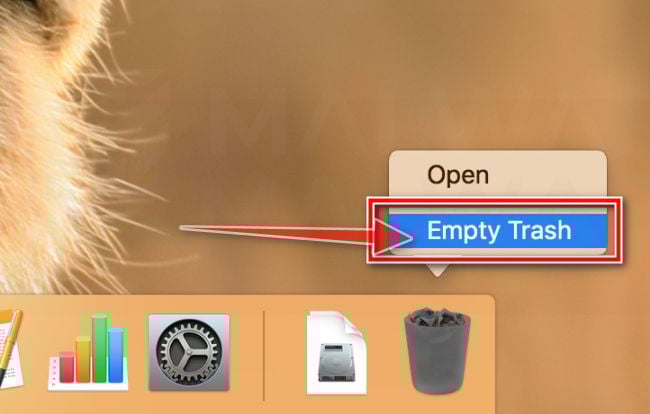
Right-click the Trash icon in your dock and select “Empty Trash“. This permanently deletes the malicious app you just removed — until you do this, the malware is still on your Mac.
Find and remove the malicious files
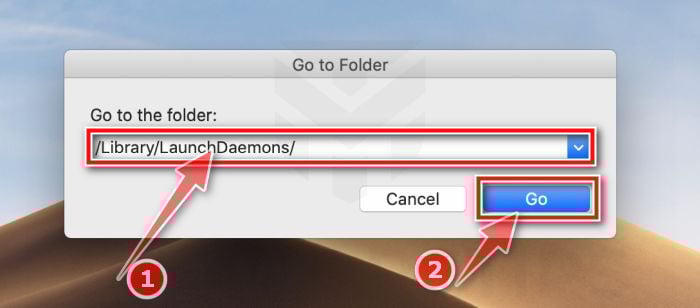
Malware on Mac uses launch agents and launch daemons — small files that automatically restart the malware every time you boot your Mac. We’ll check the four folders where they hide:
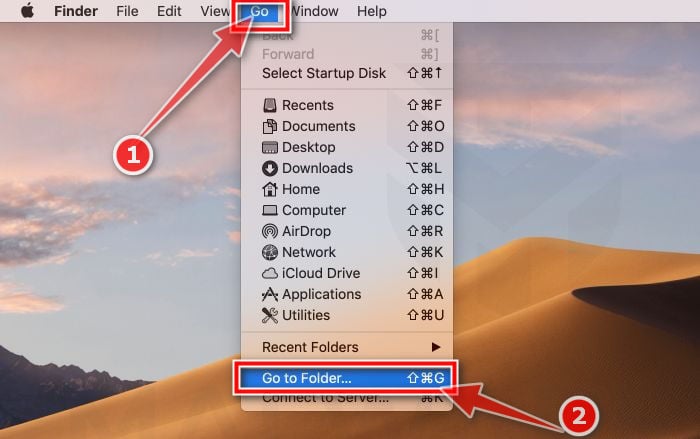
Click the desktop to make sure you’re in Finder, then open the “Go” menu and click “Go to Folder“.
Copy and paste each of the paths below into the window, one at a time, and click Go after each:
/Library/LaunchAgents
~/Library/LaunchAgents
/Library/Application Support
/Library/LaunchDaemons
In each folder, look for suspicious .plist files — typically named after the malware or with odd, random-looking names. Some known examples: “com.adobe.fpsaud.plist”, “installmac.AppRemoval.plist”, “myppes.download.plist”, “mykotlerino.ltvbit.plist”, and “com.myppes.net-preferences.plist”. When you find a malicious file, move it to the Trash — then empty the Trash again when you’re done.
Be careful: these folders also contain files belonging to legitimate apps — especially /Library/Application Support, where programs like Adobe, Google, and Microsoft store their data. Only delete files you’re confident are malicious. If you’re unsure about a file, search its exact name online first — or skip it; the Malwarebytes scan in the next step will catch what you miss.
STEP 3: Reset browsers back to default settings
In this third step, we will remove spam push notifications and malicious extensions, and change to default any settings that might have been changed by malware. For each browser that you have installed on your computer, please click on the tab below and follow the displayed steps to reset that browser.
Safari BrowserChrome for Mac BrowserFirefox for Mac Browser
Remove malicious extensions and settings from Safari
To remove malware from Safari we will check if there are any malicious extensions installed on your browser and what settings have been changed by this malicious program.
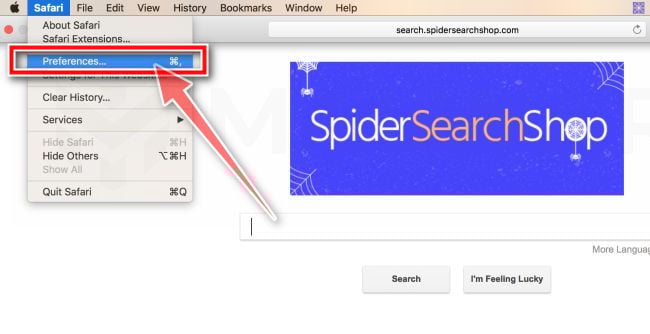
Go to Safari’s “Preferences”.
On the menu bar, click the “Safari” menu and select “Preferences”.
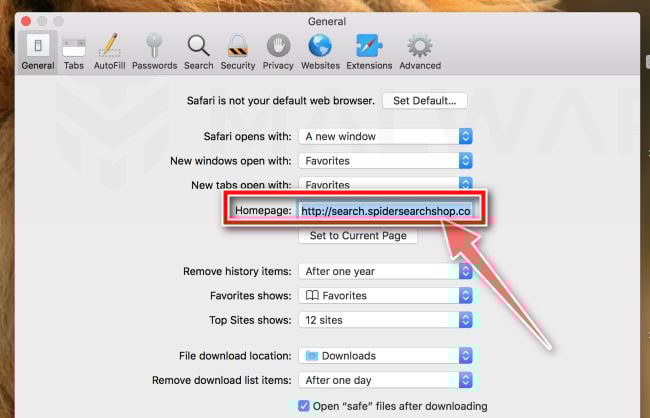
Check Homepage.
This will open a new window with your Safari preferences, opened to the “General” tab. Some browser hijackers may change your default homepage, so in the Homepage field make sure it’s a web page you want to use as your start-up page.
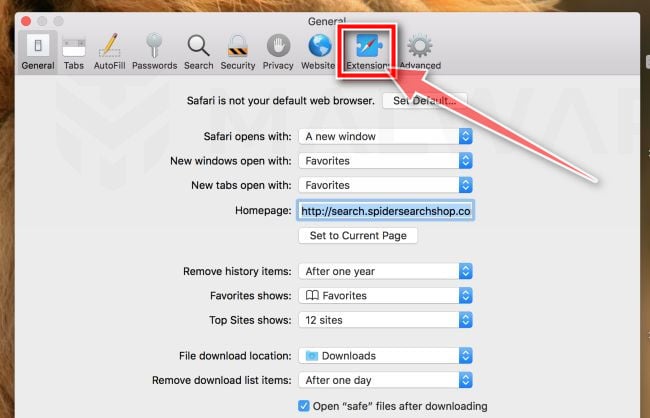
Click “Extensions”
Next, click on the “Extensions” tab.
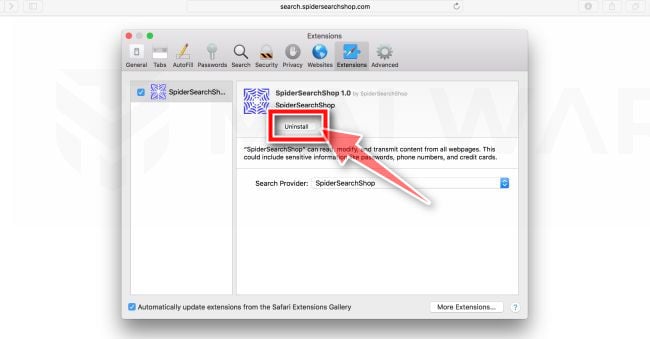
Find and uninstall malicious extensions.
The “Extensions” screen will be displayed with a list of all the extensions installed on Safari. Look out for any suspicious browser extension that could be behind all the drama – anything you don’t remember downloading or that doesn’t sound like a genuine extension. By default, there are no extensions installed on Safari so it’s safe to remove an extension
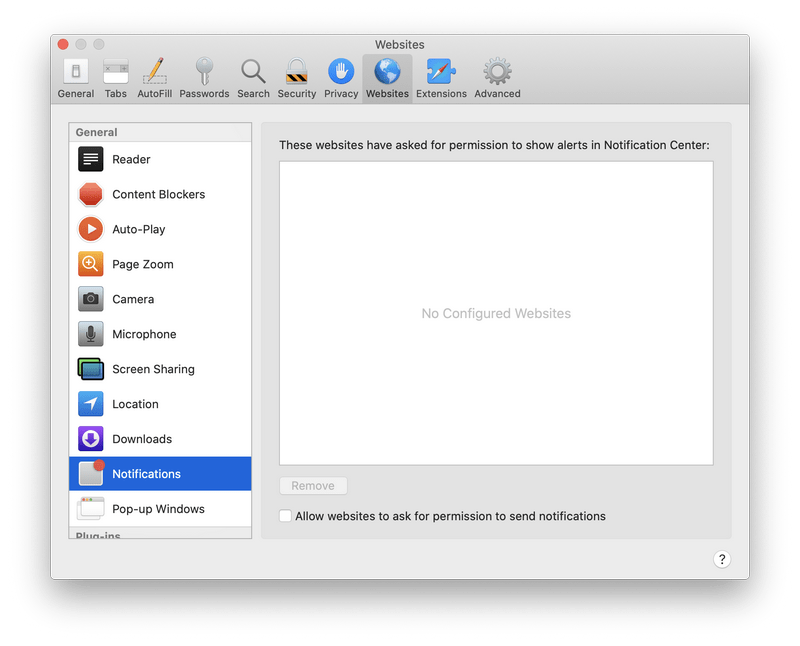
Remove spam notifications ads
Click Preferences, click Websites, then click Notifications. Deselect “Allow websites to ask for permission to send push notifications”.
Remove all data stored by websites on your computer.
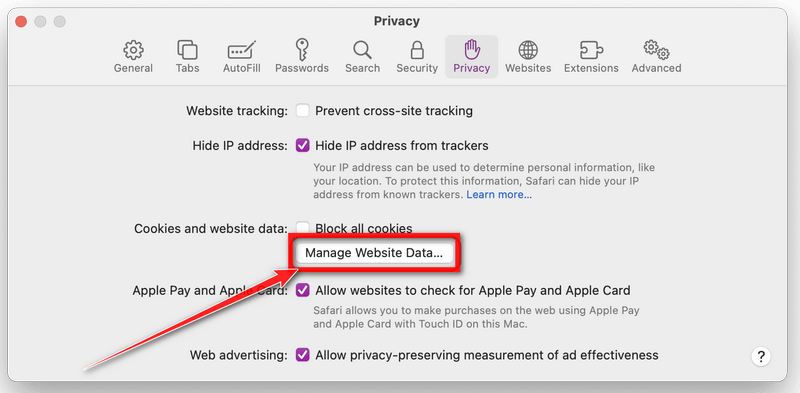
In the Safari menu, choose “Preferences…”, select “Privacy” at the top of the new window that appears, and then click the “Manage Website Data” button.
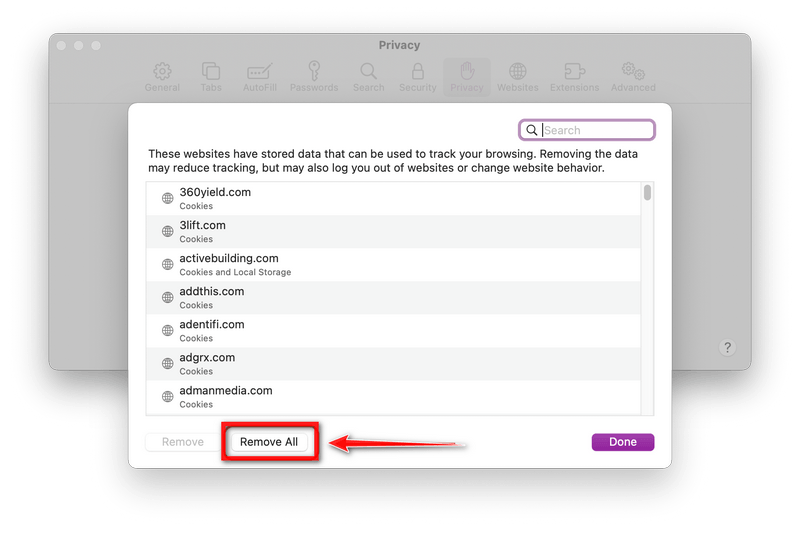
In the next dialog box, click “Remove All“. It will ask you if you are sure you want to remove all data stored by websites on your computer. Select “Remove Now” to clear data that could be used to track your browsing.
Empty Safari Caches.
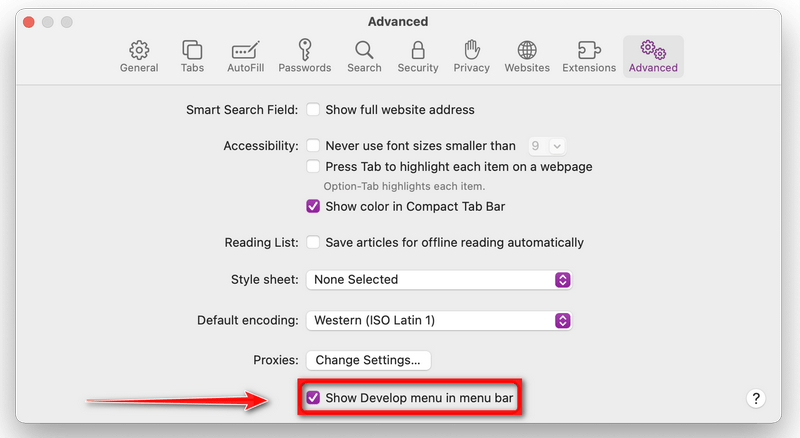
From your Safari menu bar, click Safari and select Preferences, then select the Advanced tab. Enable the checkbox to “Show Develop menu in menu bar“.
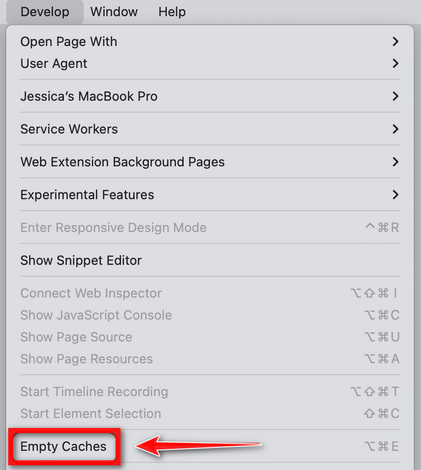
From the menu bar select Develop, then click on Empty Caches as seen in the image below.
Remove malware from Chrome for Mac
To remove malware from Chrome for Mac we will reset the browser settings to their default. Doing these steps will erase all configuration information from Chrome such as your home page, tab settings, saved form information, browsing history, and cookies. This process will also disable any installed extensions. All of your bookmarks, though, will be preserved.
Click on the three dots at the top right and go to Settings.
Click on Chrome’s main menu button, represented by three dots at the top right corner. Now click on the menu option labeled Settings as shown by the arrow in the picture below, which will open the basic settings screen.
In the left sidebar, click on the “Reset and Cleanup” option.
In the left sidebar, click on “Reset and clean up“.
Click “Reset settings to their original defaults”.
Now click on the “Reset settings to their original defaults”. link as shown in the image below.
Click “Reset Settings” button.
A confirmation dialog should now be displayed, detailing the components that will be restored to their default state should you continue with the reset process. To complete the restoration process, click on the “Reset Settings” button.
(Optional) Reset Chrome Data Sync.
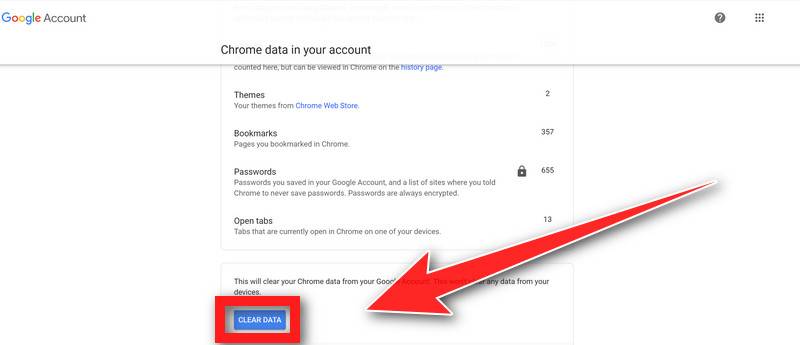
In case a malicious extension reinstalls itself even after performing a browser reset, you have an additional option to reset the data sync for your browser. To do this, navigate to chrome.google.com/sync and click on the Clear Data button.
Remove malware from Firefox for Mac
To remove malware from Firefox for Mac we will reset the browser settings to its default. The reset feature fixes many issues by restoring Firefox to its factory default state while saving your essential information like bookmarks, passwords, web form auto-fill information, browsing history, and open tabs.
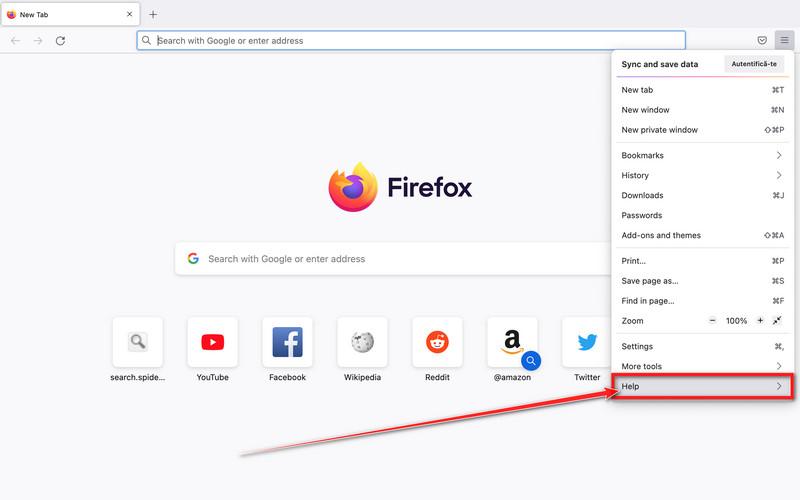
Go to the “Help” menu.
Click on Firefox’s main menu button, represented by three horizontal lines. When the drop-down menu appears, select the option labeled “Help“.
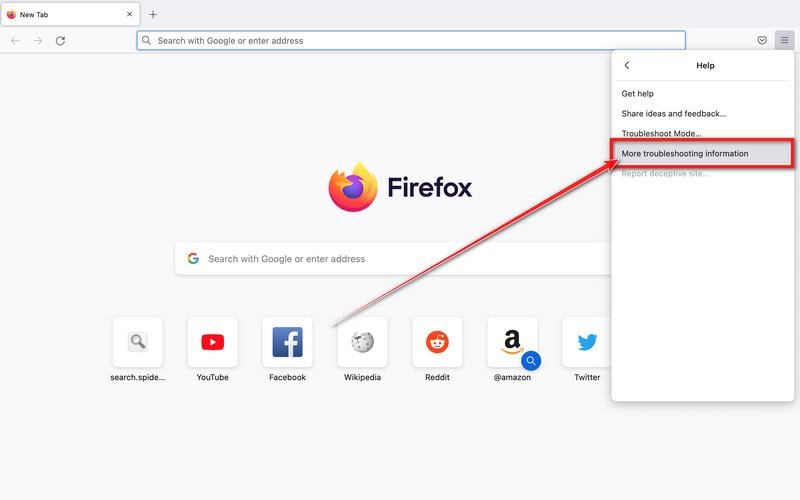
Click “Troubleshooting Information”.
Next click on the “Troubleshooting Information” option as indicated by the arrow in the image below. This will bring you to a Troubleshooting page.
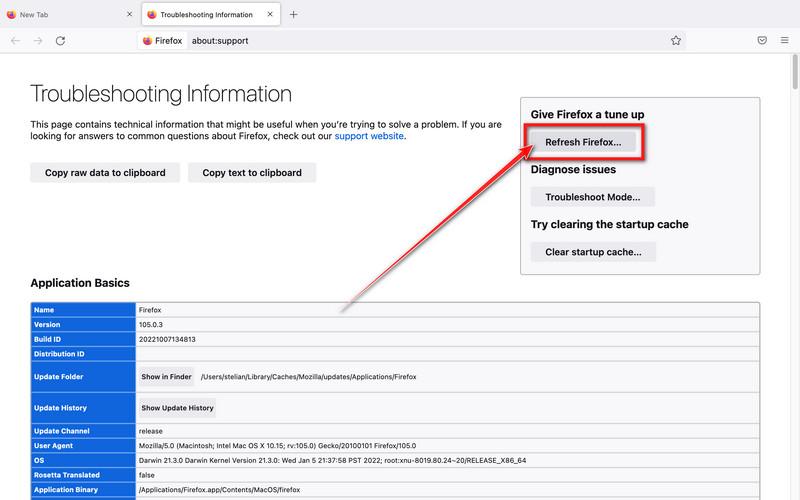
Click on “Refresh Firefox”
Click the “Refresh Firefox” button in the upper-right corner of the “Troubleshooting Information” page.
Confirm.
To continue, click on the “Refresh Firefox” button in the new confirmation window that opens.
Click on “Finish”.
Firefox will close itself and will revert to its default settings. When it’s done, a window will list the information that was imported. Click on the “Finish“.
Your old Firefox profile will be placed on your desktop in a folder named “Old Firefox Data“. If the reset didn’t fix your problem you can restore some of the information not saved by copying files to the new profile that was created. If you don’t need this folder any longer, you should delete it as it contains sensitive information.
STEP 4: Run a scan with Malwarebytes for Mac to remove malware
In this final step, we will scan the computer with Malwarebytes for Mac to find and remove any malicious programs that might be installed on your Mac.
Malwarebytes for Mac is a free on-demand scanner that removes the malware other security software tends to miss — adware, browser hijackers, and unwanted programs included. Cleaning an infected Mac with Malwarebytes has always been completely free, and it’s our go-to recommendation. Follow the steps below to scan and clean your Mac in just a few minutes.
Download Malwarebytes for Mac
Click the button below to download the latest version of Malwarebytes for Mac.
When the download finishes, open your Downloads folder and double-click the setup file to begin the installation.
Follow the On-Screen Prompts to Install Malwarebytes
The Malwarebytes for Mac Installer will guide you through a few quick screens. Click “Continue” and keep following the prompts until the installation completes.
When the installation is complete, Malwarebytes opens to the Welcome to Malwarebytes screen. Click “Get started“.
Select “Personal Computer” or “Work Computer”
Malwarebytes will ask what type of computer you’re installing it on. Click either Personal Computer or Work Computer, whichever applies.
Start the Scan
Click the “Scan” button. Malwarebytes will automatically update its detection database and begin checking your Mac for malware.
Wait for the Scan to Finish
Malwarebytes will scan your Mac for adware, browser hijackers, and other malicious programs. This can take a few minutes, so feel free to do something else — just check back occasionally to see the progress.
Quarantine the Detected Threats
When the scan is done, you’ll see a list of everything Malwarebytes found. Click the “Quarantine” button to remove all the threats at once.
Restart Your Mac
Malwarebytes will now remove all the malicious files it found. Some threats can only be fully removed after a reboot — if Malwarebytes asks you to restart, allow it. Once you’re logged back in, your Mac is clean.
That’s it — your Mac is now clean. The unwanted apps, adware, and any other malware have been removed.
If your current antivirus allowed a malicious program on your computer, you might want to consider purchasing the full-featured version of Malwarebytes Anti-Malware to protect against these types of threats in the future. If you are still experiencing problems while trying to remove a malicious program from your computer, please ask for help in our Mac Malware Removal Help & Support forum.
Remove Unwanted Apps and Malware from Android
Remove Unwanted Apps and Malware from Android
To remove unwanted apps and malware from your Android phone or tablet, follow these steps:
In this first step, we will check if any malicious apps are installed on your phone. Sometimes browser hijackers or adware apps can have usable Uninstall entries that can be used to remove these apps.
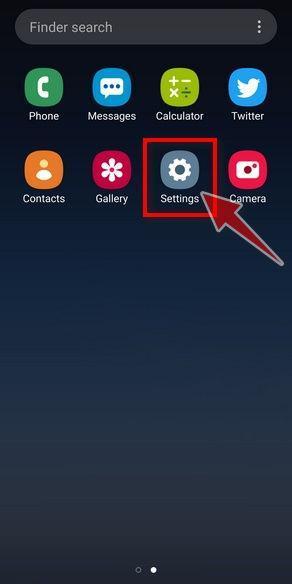
Open the “Settings” menu.
Tap on the “Settings” app from your phone menu or home screen.
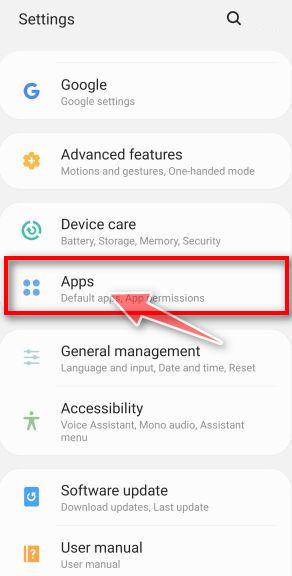
Tap on “Apps”.
When the “Settings” menu opens, tap on “Apps” (or “App Manager”) to see all the installed applications on your phone.
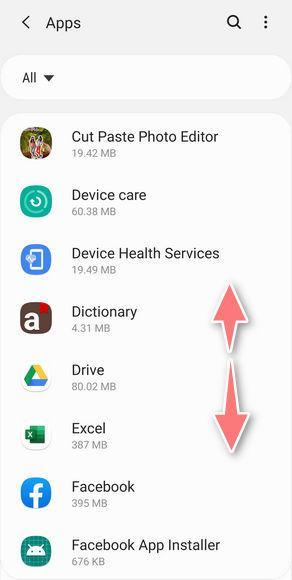
Find the malicious app.
The “Apps” screen will be displayed with a list of all the applications that are installed on your phone. Scroll through the list and look out for any suspicious app that could be behind all the drama – anything you don’t remember downloading or that doesn’t sound like a genuine program. Most often, cyber criminals hide malware inside video or photo editing apps, weather apps, and camera apps.
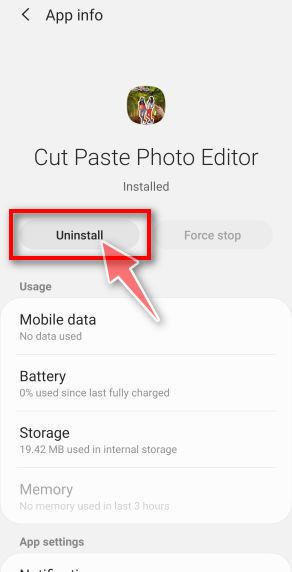
Uninstall the malicious app
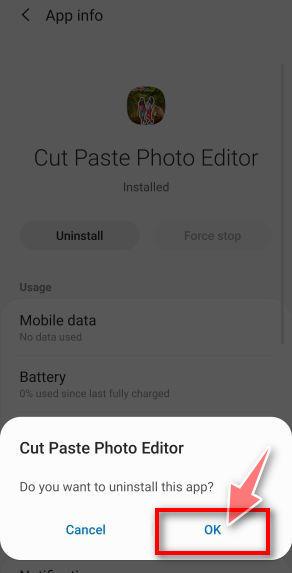
When you find a suspicious or malicious app, tap on it to uninstall it. This won’t start the app but will open up the app details screen. If the app is currently running press the “Force stop” button, then tap on “Uninstall”.
A confirmation dialog should be displayed to confirm you want to uninstall the app, tap on “OK” to remove the malicious app from your phone.
STEP 2: Reset browsers back to default settings
In this second step, we will reset your browser to its default settings to remove spam notifications, unwated search redirects, and restore its factory settings
Resetting the browser settings to their default it’s an easy task on Windows or Mac computers; however, when it comes to Android, this can’t be done directly because it’s not an option built-in into the browser settings. Restoring the browser settings on Android can be done by clearing the application data. This will remove all the cookies, cache, and other site settings that may have been saved. So let’s see how we can restore your browser to its factory settings.
Chrome for AndroidFirefoxOperaSamsung Internet BrowserMicrosoft Edge
Remove malware from Chrome for Android
To reset Chrome for Android to its default settings, follow the below steps:
Open the “Settings” menu.
Tap on the “Settings” app from your phone menu or home screen.
Tap on “Apps”.
When the “Settings” menu opens, tap on “Apps” (or “App Manager”) to see all the installed applications on your phone.
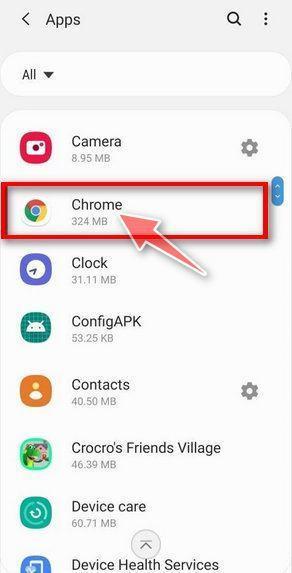
Find and tap on Chrome.
The “Apps” screen will be displayed with a list of all the apps installed on your phone. Scroll through the list until you find the Chrome app, then tap on it to open the app’s details.
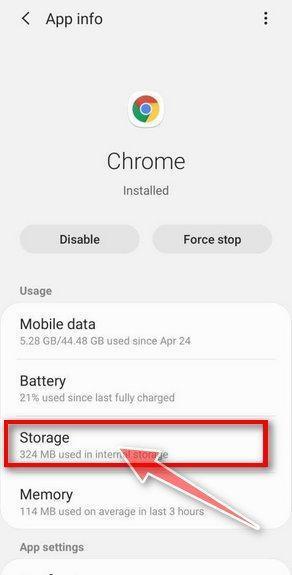
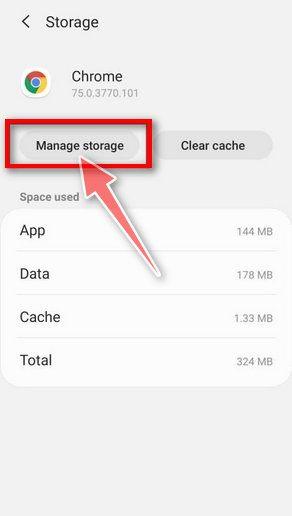
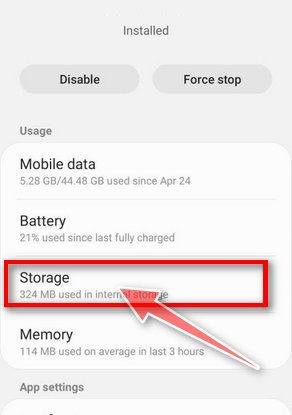
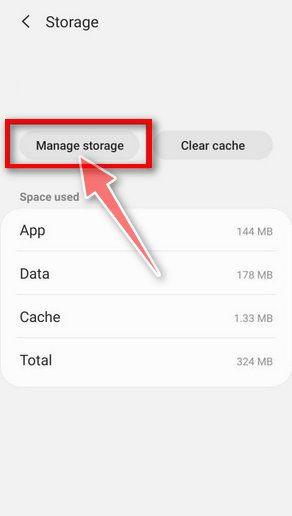
Tap “Storage”.
When Chrome’s app info menu is displayed, tap on “Storage“.
Tap “Manage Space”.
Under the storage settings, you will get two options — Manage Space and Clear Cache. Tap on “Manage Space“.
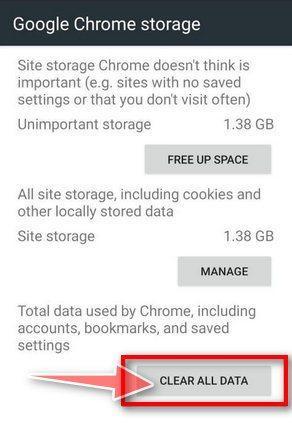
Tap “Clear all data”.
Tap “Clear all data” to delete all Chrome’s data including accounts, bookmarks, and your settings to reset the default settings.
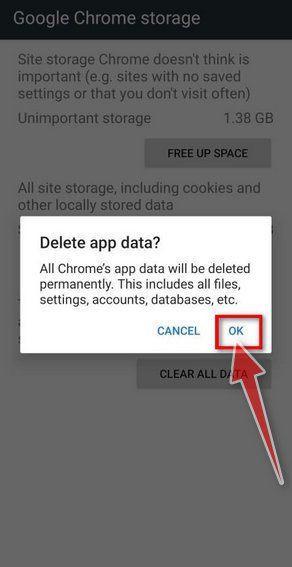
Confirm by tapping “Ok”.
A confirmation dialog should now be displayed, detailing the components that will be restored to their default state should you continue with the reset process. To complete the restoration process, tap “Ok“.
Remove malware from Firefox for Android
To reset Firefox for Android to its default settings, follow the below steps:
Open the “Settings” menu.
Tap on the “Settings” app from your phone menu or home screen.
Tap on “Apps”.
When the “Settings” menu opens, tap on “Apps” (or “App Manager”) to see all the installed applications on your phone.
Find and tap on Firefox.
The “Apps” screen will be displayed with a list of all the apps installed on your phone. Scroll through the list until you find the Firefox app, then tap on it to open the app’s details.
Tap “Storage”.
When Firefox’s app info menu is displayed, tap on “Storage“.
Tap “Manage Space”.
Under the storage settings, you will get two options — Manage Space and Clear Cache. Tap on “Manage Space“.
Tap “Clear all data”.
Tap “Clear all data” to delete all Firefox data including accounts, bookmarks, and your settings to reset the default settings.
Confirm by tapping “Ok”.
A confirmation dialog should now be displayed, detailing the components that will be restored to their default state should you continue with the reset process. To complete the restoration process, tap “Ok“.
Remove malware from the Opera browser
To reset the Opera browser to its default settings, follow the below steps:
Open the “Settings” menu.
Tap on the “Settings” app from your phone menu or home screen.
Tap on “Apps”.
When the “Settings” menu opens, tap on “Apps” (or “App Manager”) to see all the installed applications on your phone.
Find and tap on Opera.
The “Apps” screen will be displayed with a list of all the apps installed on your phone. Scroll through the list until you find the Opera app, then tap on it to open the app’s details.
Tap “Storage”.
When Opera’s app info menu is displayed, tap on “Storage“.
Tap “Manage Space”.
Under the storage settings, you will get two options — Manage Space and Clear Cache. Tap on “Manage Space“.
Tap “Clear all data”.
Tap “Clear all data” to delete all Opera’s data including accounts, bookmarks, and your settings to reset the default settings.
Confirm by tapping “Ok”.
A confirmation dialog should now be displayed, detailing the components that will be restored to their default state should you continue with the reset process. To complete the restoration process, tap “Ok“.
Remove malware from Samsung Internet Browser
To reset the Samsung Internet Browser to its default settings, follow the below steps:
Open the “Settings” menu.
Tap on the “Settings” app from your phone menu or home screen.
Tap on “Apps”.
When the “Settings” menu opens, tap on “Apps” (or “App Manager”) to see all the installed applications on your phone.
Find and tap on Samsung Internet Browser.
The “Apps” screen will be displayed with a list of all the apps installed on your phone. Scroll through the list until you find the Samsung Internet Browser app, then tap on it to open the app’s details.
Tap “Storage”.
When the Samsung Internet Browser’s app info menu is displayed, tap on “Storage“.
Tap “Manage Space”.
Under the storage settings, you will get two options — Manage Space and Clear Cache. Tap on “Manage Space“.
Tap “Clear all data”.
Tap “Clear all data” to delete all Samsung Internet Browser’s data including accounts, bookmarks, and your settings to reset the default settings.
Confirm by tapping “Ok”.
A confirmation dialog should now be displayed, detailing the components that will be restored to their default state should you continue with the reset process. To complete the restoration process, tap “Ok“.
Remove malware from Microsoft Edge for Android
To reset the Microsoft Edge for Android to its default settings, follow the below steps:
Open the “Settings” menu.
Tap on the “Settings” app from your phone menu or home screen.
Tap on “Apps”.
When the “Settings” menu opens, tap on “Apps” (or “App Manager”) to see all the installed applications on your phone.
Find and tap on Microsoft Edge.
The “Apps” screen will be displayed with a list of all the apps installed on your phone. Scroll through the list until you find the Microsoft Edge app, then tap on it to open the app’s details.
Tap “Storage”.
When the Microsoft Edge’s app info menu is displayed, tap on “Storage“.
Tap “Manage Space”.
Under the storage settings, you will get two options — Manage Space and Clear Cache. Tap on “Manage Space“.
Tap “Clear all data”.
Tap “Clear all data” to delete all Microsoft Edge’s data including accounts, bookmarks, and your settings to reset the default settings.
Confirm by tapping “Ok”.
A confirmation dialog should now be displayed, detailing the components that will be restored to their default state should you continue with the reset process. To complete the restoration process, tap “Ok“.
STEP 3: Use Malwarebytes for Android to remove malicious apps
In this final step, we will install Malwarebytes for Android to scan and remove malicious apps from your phone or tablet.
Malwarebytes for Android automatically detects and removes dangerous threats like malware and ransomware so you don’t have to worry about your most-used device being compromised. Aggressive detection of adware and potentially unwanted programs keeps your Android phone or tablet running smooth.
Download Malwarebytes for Android.
You can download Malwarebytes for Android by clicking the link below.
In the Google Play Store, tap “Install” to install Malwarebytes for Android on your device.
When the installation process has finished, tap “Open” to begin using Malwarebytes for Android. You can also open Malwarebytes by tapping on its icon in your phone menu or home screen.
Follow the on-screen prompts to complete the setup process
When Malwarebytes will open, you will see the Malwarebytes Setup Wizard which will guide you through a series of permissions and other setup options. This is the first of two screens that explain the difference between the Premium and Free versions. Swipe this screen to continue. Tap on “Got it” to proceed to the next step. Malwarebytes for Android will now ask for a set of permissions that are required to scan your device and protect it from malware. Tap on “Give permission” to continue. Tap on “Allow” to permit Malwarebytes to access the files on your phone.
Update database and run a scan with Malwarebytes for Android
You will now be prompted to update the Malwarebytes database and run a full system scan.
Click on “Update database” to update the Malwarebytes for Android definitions to the latest version, then click on “Run full scan” to perform a system scan.
Wait for the Malwarebytes scan to complete.
Malwarebytes will now start scanning your phone for adware and other malicious apps. This process can take a few minutes, so we suggest you do something else and periodically check on the status of the scan to see when it is finished.
Click on “Remove Selected”.
When the scan has been completed, you will be presented with a screen showing the malware infections that Malwarebytes for Android has detected. To remove the malicious apps that Malwarebytes has found, tap on the “Remove Selected” button.
Restart your phone.
Malwarebytes for Android will now remove all the malicious apps that it has found. To complete the malware removal process, Malwarebytes may ask you to restart your device.
That’s it — your Android device is now clean. The malicious apps, adware, and browser redirects have been removed.
If your current antivirus allowed a malicious app on your phone, you may want to consider purchasing the full-featured version of Malwarebytes to protect against these types of threats in the future. If you are still having problems with your phone after completing these instructions, then please follow one of the steps:
Restore your phone to factory settings by going to Settings > General management > Reset > Factory data reset.
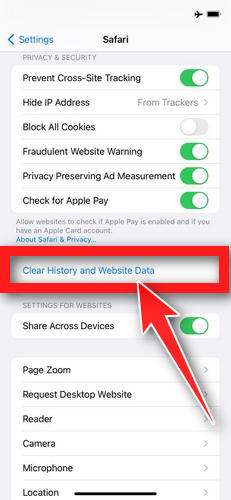
First, we’ll clean Safari using the built-in “Clear History and Website Data” feature. This removes your browsing history, cookies, and cached data — including the stored data that scam sites use to keep showing you pop-ups and redirects. Don’t worry: this won’t delete your photos, apps, or saved passwords.
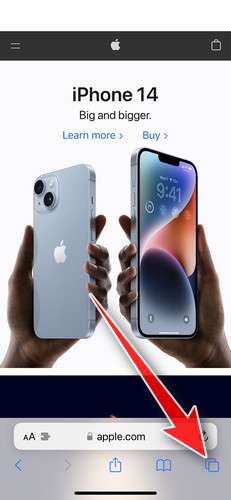
Don’t tap anything inside the scam page or pop-up — the buttons are designed to trick you. Instead, tap the tabs icon in the lower-right corner of Safari, as shown below.
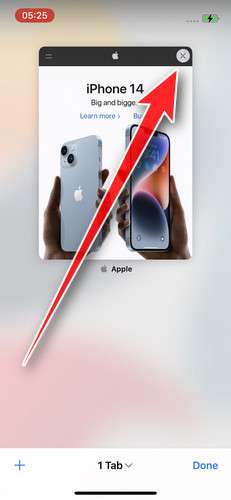
Tap the X on the malicious tab (or swipe it up) to close it safely.
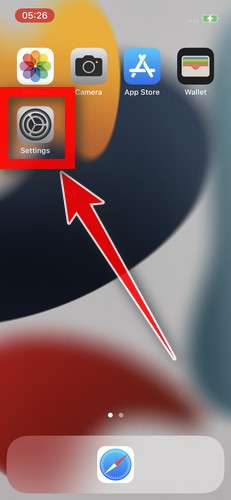
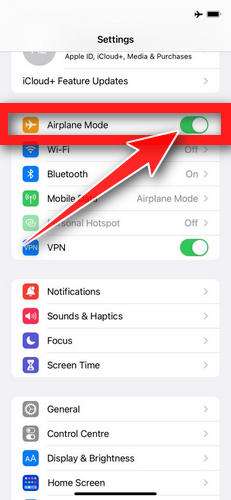
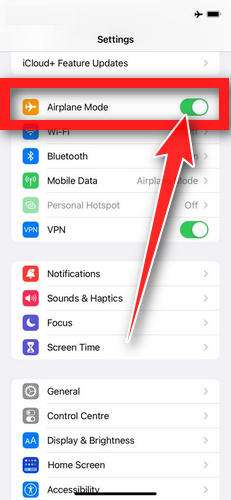
Open the Settings app.
Turn on Airplane Mode. This temporarily disconnects your iPhone from the internet, so the scam site can’t load anything while we clean up. We’ll turn it back off at the end.
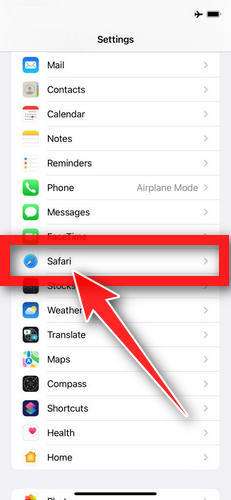
Scroll down and tap Safari.
Tap Clear History and Website Data.
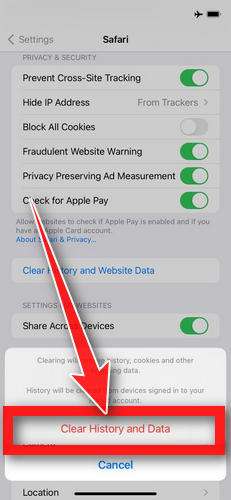
Confirm by tapping “Clear History and Data” in the pop-up.
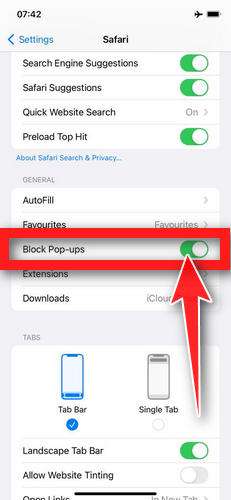
While you’re still in Safari settings, turn on Block Pop-ups and Fraudulent Website Warning. These two switches stop most scam pages before they can even load.
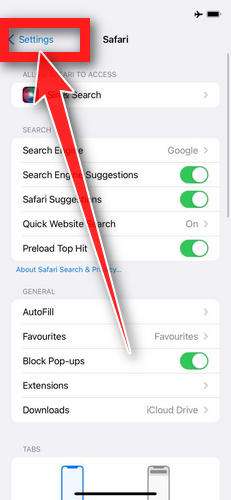
Tap Settings in the upper-left corner to return to the main Settings menu.
Turn Airplane Mode back off to reconnect your iPhone to the internet.
STEP 2: Delete unwanted apps
Next, we’ll remove any suspicious apps from your iPhone. If a shady website redirected you to the App Store and you installed an app — or you spot an app you don’t remember downloading — delete it now:
On the home screen, tap and hold the unwanted app’s icon until the icons start to wiggle.
Tap the minus (–) badge in the corner of the app icon, then tap Delete App. (On older iOS versions, this badge appears as an “X”.)
Confirm by tapping “Delete“.
That’s it — your iPhone is now clean and safe to use.
To stop these scam pages from coming back, we recommend installing an ad blocker like AdGuard. It blocks the malicious ads and redirects that cause these pop-ups in the first place.
Still having issues after completing these steps? Try one of the following:
Use Malwarebytes as a cleanup layer. It is more relevant after suspicious behavior has already occurred.
Should You Use AdGuard?
AdGuard can help as a prevention and blocking layer. Its knowledge base says its browsing security feature protects users from visiting phishing and malicious websites and warns about potential malware. AdGuard also states that it maintains a database of phishing and malware websites that is updated as new threats are discovered.
Use the tools this way:
AdGuard: block ads, trackers, pop-ups, phishing pages, and malicious domains.
Malwarebytes: scan and remove adware, PUPs, browser hijackers, and malware.
Browser settings: revoke notifications and remove suspicious extensions.
Password manager: change reused passwords and enable 2FA.
AdGuard is not a replacement for device cleanup if you already installed something suspicious. Malwarebytes is not a replacement for safe browsing habits. Use both as layers.
What About FMovies Alternatives?
Users often search for alternatives after one FMovies domain stops working. That can lead to the same risk under different names.
Sites using names like:
123Movies
SFlix
Soap2Day
MoviesJoy
MyFlixer
Bflix
WCO
WatchCartoonOnline
KissAnime
Putlocker-style mirrors
often create the same safety question.
The issue is not only the name. The issue is the behavior:
fake play buttons
pop-ups
redirects
browser notifications
fake CAPTCHA pages
fake virus alerts
APK downloads
extensions
card verification forms
Different label. Same trap.
Do not ask, “Which mirror works?”
Ask, “What is this site trying to make me click, allow, install, or enter?”
That question is much safer.
If a Child Used FMovies on the Device
Take this seriously.
Children may click faster, ignore suspicious prompts, allow notifications, download files, or install apps without realizing the risk.
Check:
browser history
downloads folder
notification permissions
installed apps
browser extensions
homepage/search settings
new desktop shortcuts
unknown Android APKs
fake antivirus notifications
If the device is used by children, consider:
legal streaming apps only
parental controls
DNS filtering
browser restrictions
disabling unknown app installs on Android
blocking notification prompts by default
The goal is not only to clean the device once. It is to prevent the same funnel from working again.
Symptoms That Mean the Problem Is Not Finished
Keep cleaning if you still see:
pop-ups after closing the site
fake antivirus alerts
random browser tabs opening
changed search engine
changed homepage
unknown extension returning
unknown app returning after removal
browser marked as “managed by your organization”
redirects from normal Google searches
suspicious desktop shortcuts
slow browser with heavy ads
security tool warnings
These symptoms may mean the problem is no longer just the FMovies page. It may involve an extension, unwanted app, startup item, browser policy, scheduled task, or malicious setting.
Is FMovies Legal?
This article is focused on safety, not legal advice. But users should understand that FMovies has been associated with large-scale piracy enforcement. ACE and Vietnamese authorities described the FMovies takedown as an action against a major pirate streaming operation. (alliance4creativity.com)
That matters for security because piracy-style streaming ecosystems often depend on lower-trust monetization: pop-ups, redirects, shady ads, fake downloads, phishing, and aggressive tracking.
In simple terms:
The “free movie” is often the bait. The clicks are the product.
Final Verdict: Is FMovies Safe or a Scam?
FMovies clone sites should not be considered safe.
The original FMovies network was taken down, and current search results often lead to clones, mirrors, lookalikes, and unrelated sites using the name for traffic. A video page loading does not prove the site is safe.
The real risk is everything around the player:
fake play buttons
redirect chains
notification prompts
fake CAPTCHA pages
fake virus alerts
APK downloads
browser extensions
suspicious installers
card verification scams
credential phishing
If you only visited and left, remove suspicious permissions and move on carefully.
If you clicked, allowed notifications, downloaded, installed, or entered payment/login details, treat it as a cleanup event.
Scan the device. Remove unknown extensions. Revoke notifications. Check installed apps. Change reused passwords. Contact your card issuer if payment data was entered.
The safest rule is blunt:
Do not trust FMovies clones. Do not install anything from them. Do not enter card details. Do not click “Allow.”
FAQ
No. Current FMovies-style sites should not be treated as safe. After the major FMovies piracy network was shut down in 2024, users searching the name are more likely to find clones, mirrors, copycats, or unrelated sites using the FMovies brand for traffic.
Is FMovies a scam?
Many FMovies clone sites behave like scam funnels. They may load a movie page, but the real danger is often around the player: fake play buttons, pop-ups, redirects, notification prompts, fake CAPTCHA pages, APK offers, browser extensions, and card-verification forms.
Can FMovies give you a virus?
Yes, especially if you download or install anything. Illegal streaming apps and piracy-related streaming tools have been used to spread malware and expose personal information, according to the FTC. The biggest risks are fake players, codecs, APKs, EXE files, ZIP/RAR archives, and browser extensions.
What should I do if I only opened FMovies?
Close the tab and do not click further. If you did not allow notifications, download files, install anything, or enter personal data, the risk is lower. Still, check browser notification permissions and remove unfamiliar allowed sites.
What if I clicked a fake play button?
Close the new tab immediately. Do not follow “continue watching,” VPN prompts, fake verification pages, surveys, adult pop-ups, or download pages. Fake play buttons are often used to push users into redirect chains.
What if FMovies asked me to click “Allow”?
Do not click it. This is usually a browser notification trap. A streaming page does not need notification permission to play a video. If you already allowed it, remove the permission from your browser settings. Google lists unwanted pop-ups, redirects, fake alerts, and suspicious browser behavior as signs of unwanted software or malware-like activity.
How do I remove FMovies notification spam?
In Chrome, go to Settings → Privacy and security → Site settings → Notifications and remove unknown allowed sites. Also check Pop-ups and redirects and keep them blocked. On Android, Chrome’s cleanup guidance recommends removing problematic apps, keeping Play Protect on, and stopping notifications from suspicious websites.
What if I downloaded something from FMovies?
Do not open it. Delete it. Be careful with anything named like “HD Player,” “Video Codec,” “Movie App,” “VPN Setup,” “Browser Update,” “Watch Extension,” or an APK installer. A movie site should not require a random download to play a video.
What if I installed an app, APK, or extension?
Uninstall it, remove unknown browser extensions, check startup apps, reboot, and scan the device. Malwarebytes AdwCleaner is designed to remove adware, potentially unwanted programs, and browser hijackers, which are common in pop-up and redirect problems.
What if I entered my card details?
Treat it as a payment-safety issue. Contact your card issuer, watch for test charges, cancel suspicious subscriptions, and consider replacing the card. “Free verification” or “age verification” payment pages on FMovies-style clones are major scam warnings.
What if I entered my email or password?
Change the password immediately, especially if you reused it elsewhere. Enable two-factor authentication, check active sessions, and log out of unknown devices. Also watch for phishing emails or SMS messages afterward.
Are FMovies alternatives safer?
Not necessarily. Sites using names like 123Movies, SFlix, Soap2Day, MoviesJoy, MyFlixer, Bflix, WCO, and KissAnime often lead users into the same clone-site ecosystem: fake play buttons, redirects, notifications, APKs, browser extensions, fake virus alerts, and scam forms.
Why do FMovies clones show fake virus alerts?
Fake virus alerts are scare tactics. They are designed to push users into downloading a cleaner, installing an app, calling fake support, or paying for useless security software. A real antivirus warning does not usually appear as a dramatic countdown inside a random streaming tab.
Should I scan with Malwarebytes after using FMovies?
Yes, if you downloaded anything, installed anything, allowed notifications, saw fake virus alerts, or noticed redirects after leaving the site. Use Malwarebytes for cleanup and removal of adware, browser hijackers, PUPs, and malware-like leftovers.
Should I use AdGuard for FMovies-style sites?
AdGuard can help block ads, pop-ups, trackers, phishing pages, and malicious sites, but it is not a replacement for antivirus cleanup. AdGuard itself notes that it can warn about malicious or phishing sites, but it cannot delete malware after infection. Use AdGuard as a blocking layer and Malwarebytes as a cleanup layer.
What is the safest rule?
Do not trust FMovies clones. Do not click fake play buttons. Do not allow notifications. Do not download players, APKs, codecs, or extensions. Do not enter card details. If something was downloaded or installed, clean the browser, scan the device, and secure your accounts.
10 Rules to Avoid Online Scams
Here are 10 practical safety rules to help you avoid malware, online shopping scams, crypto scams, and other online fraud. Each tip includes a quick “if you already got hit” action.
Stop and verify before you click, log in, download, or pay.
Most scams win by creating urgency. Verify using a trusted method: type the website address yourself, use the official app, or call a known number (not the one in the message).
If you already clicked: close the page, do not enter passwords, and run a malware scan.
Keep your operating system, browser, and apps updated.
Updates patch security holes used by malware and malicious ads. Turn on automatic updates where possible.
If you saw a scary “update now” pop-up: close it and update only through your device settings or the official app store.
Use layered protection: antivirus plus an ad blocker.
Antivirus helps block malware. An ad blocker reduces scam redirects, phishing pages, and malvertising.
If your browser is acting weird: remove unknown extensions, reset the browser, then run a full scan.
Install apps, software, and extensions only from official sources.
Avoid cracked software, “keygens,” and random downloads. During installs, choose Custom/Advanced and decline bundled offers you do not recognize.
If you already installed something suspicious: uninstall it, restart, and scan again.
Treat links and attachments as untrusted by default.
Phishing often impersonates delivery services, banks, and popular brands. If it is unexpected, do not open attachments or log in through the message.
If you entered credentials: change the password immediately and enable 2FA.
Shop safely: research the store, then pay with protection.
Be cautious with brand-new stores, “closing sale” stories, and prices that make no sense. Prefer credit cards or PayPal for dispute options. Avoid wire transfers, gift cards, and crypto payments.
If you already paid: contact your card issuer or PayPal quickly to dispute the transaction.
Crypto rule: never pay a “fee” to withdraw or recover money.
Common patterns include fake profits, then “tax,” “gas,” or “verification” fees. Another is a “recovery agent” who demands upfront crypto.
If you already sent crypto: stop paying, save evidence (wallet addresses, TXIDs, chats), and report the scam to the platform used.
Secure your accounts with unique passwords and 2FA (start with email).
Use a password manager and unique passwords for every account. Enable 2FA using an authenticator app when possible.
If you suspect an account takeover: change passwords, sign out of all devices, and review recent logins and recovery settings.
Back up important files and keep one backup offline.
Backups protect you from ransomware and device failure. Keep at least one backup on an external drive that is not always connected.
If you suspect infection: do not connect backup drives until the system is clean.
If you think you are a victim: stop losses, document evidence, and escalate fast.
Move quickly. Speed matters for disputes, account recovery, and limiting damage.
Stop payments and contact: do not send more money or respond to the scammer.
Call your bank or card issuer: block transactions, replace the card if needed, and start a dispute or chargeback.
Secure your email first: change the email password, enable 2FA, and remove unfamiliar recovery options.
Secure other accounts: change passwords, enable 2FA, and log out of all sessions.
Scan your device: remove suspicious apps or extensions, then run a full malware scan.
Save evidence: screenshots, emails, order pages, tracking pages, wallet addresses, TXIDs, and chat logs.
Report it: to the payment provider, marketplace, social platform, exchange, or wallet service involved.
These rules are intentionally simple. Most online losses happen when decisions are rushed. Slow down, verify independently, and use payment methods and account controls that give you recourse.
Thomas is an expert at uncovering scams and providing in-depth reporting on cyber threats and online fraud. As an editor, he is dedicated to keeping readers informed on the latest developments in cybersecurity and tech.




 Remove Unwanted Apps and Malware from Windows
 Remove Unwanted Apps and Malware from Mac
 Remove Unwanted Apps and Malware from Android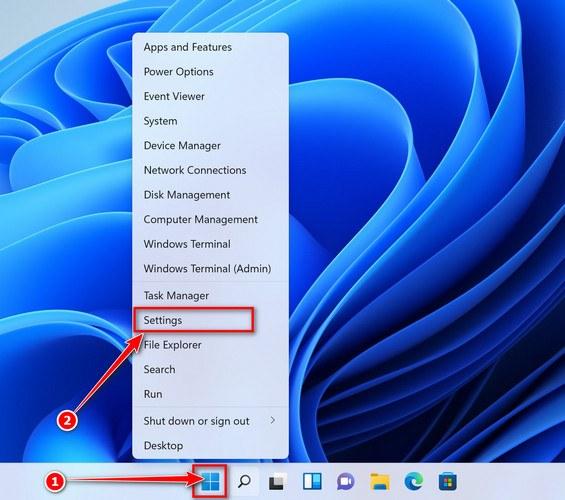
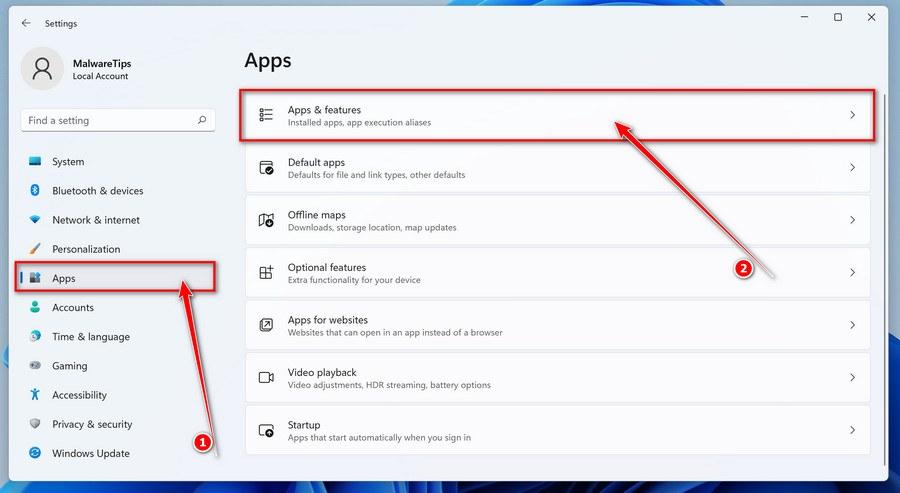
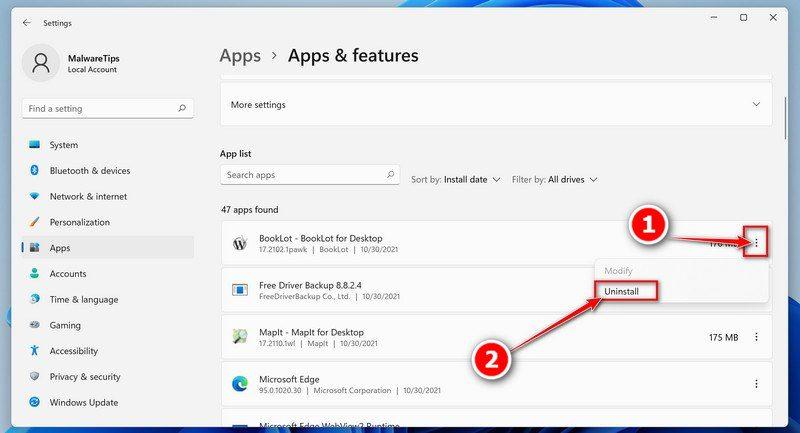 Didn’t find any suspicious programs? That’s fine — not all infections install visible apps. Just continue with the next step in this guide.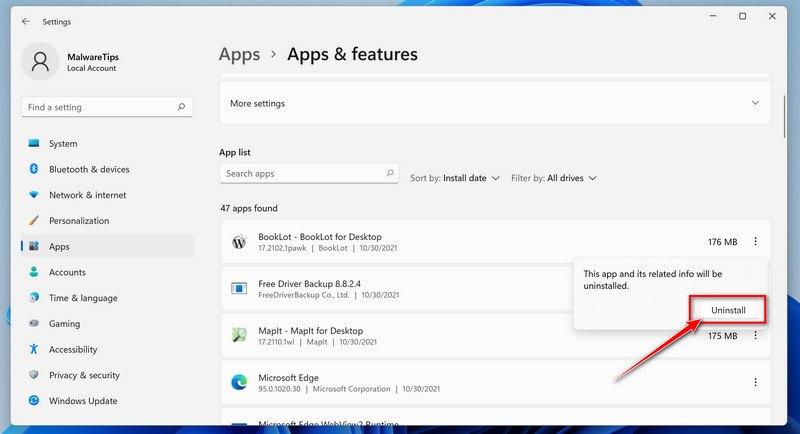
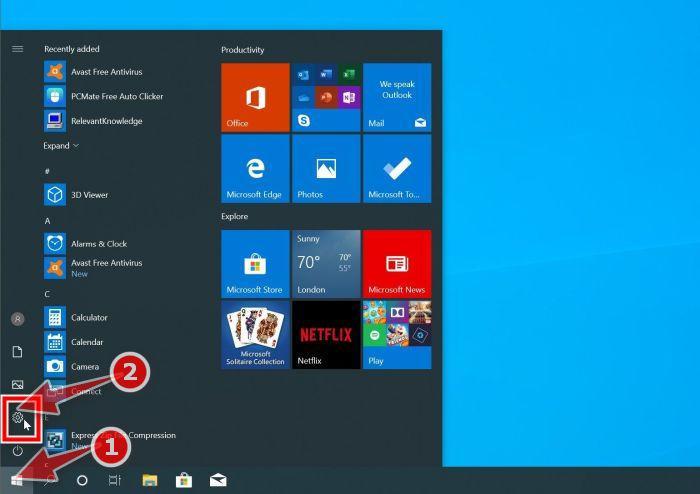
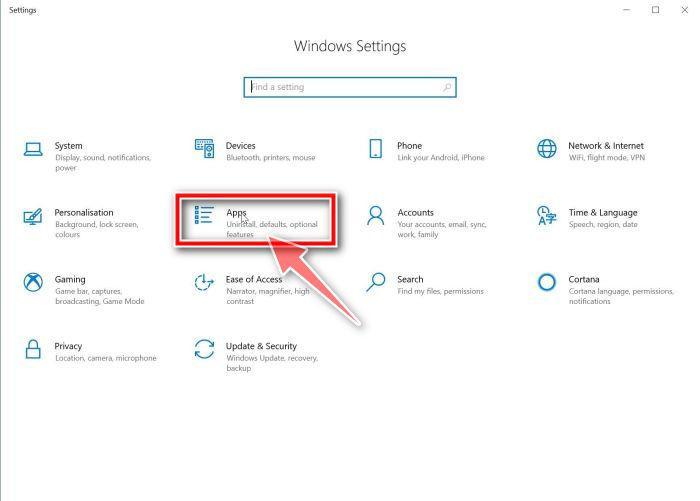
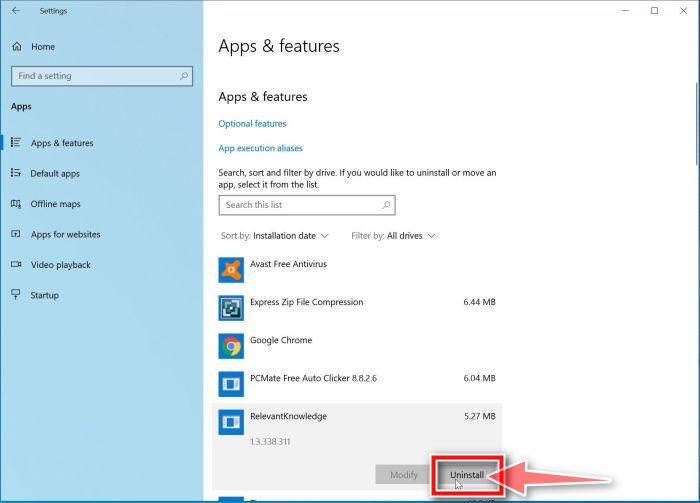 Didn’t find any suspicious programs? That’s fine — not all infections install visible apps. Just continue with the next step in this guide.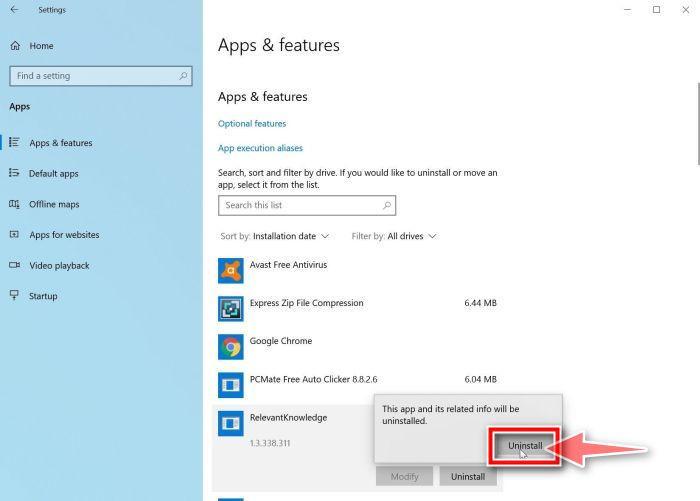
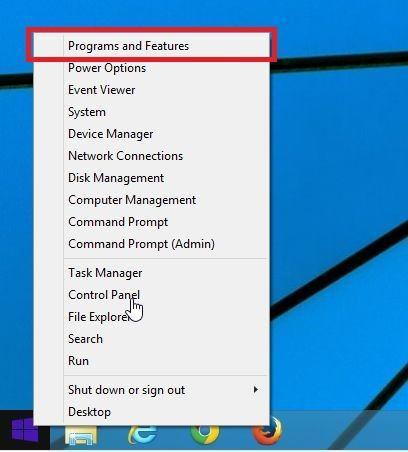
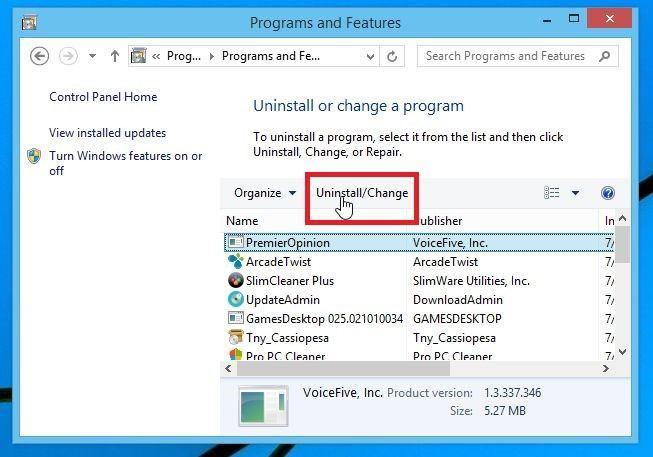
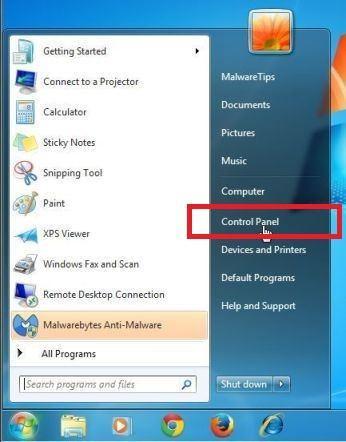
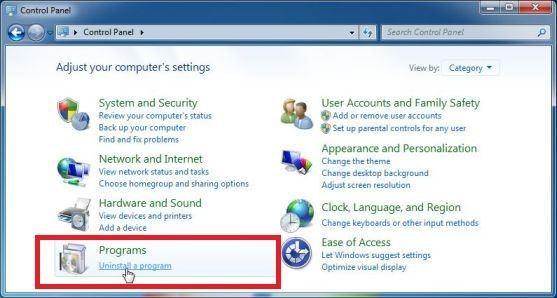
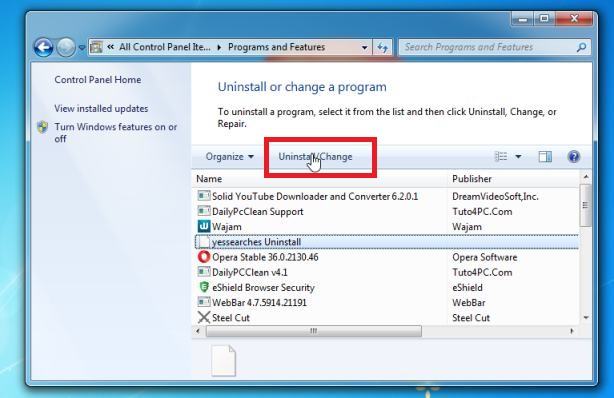
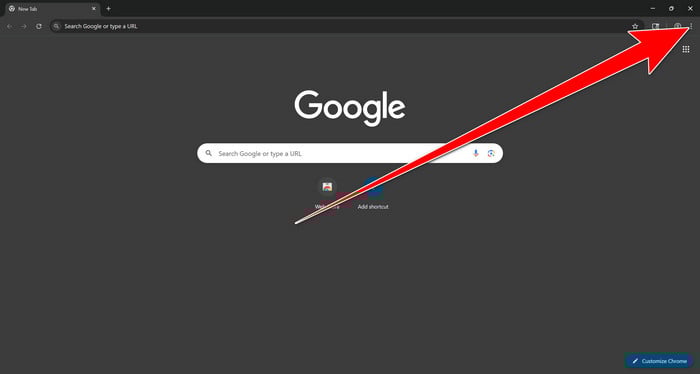
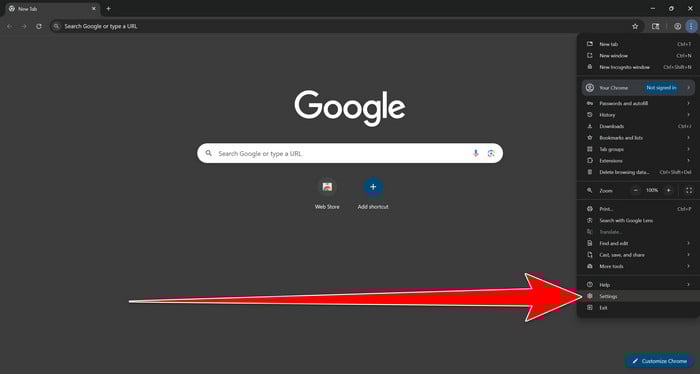
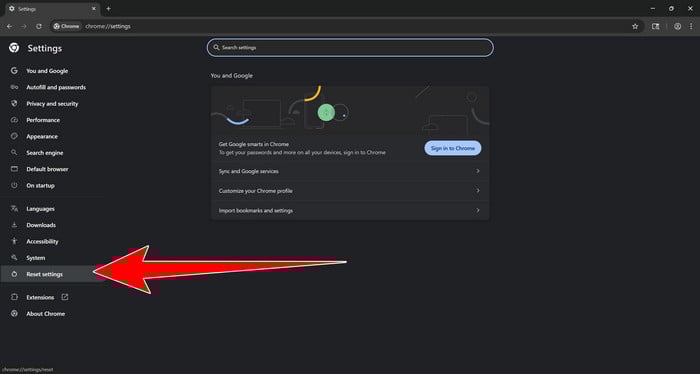
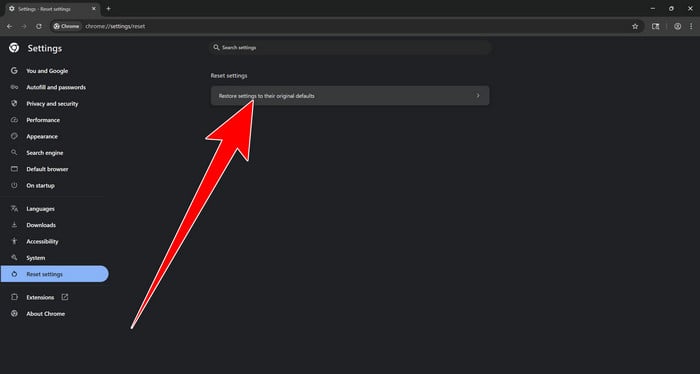
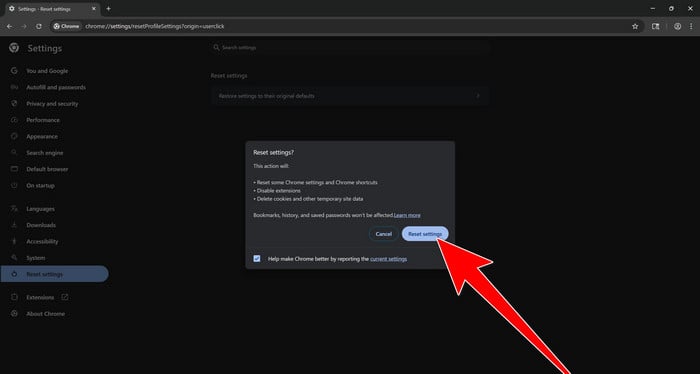
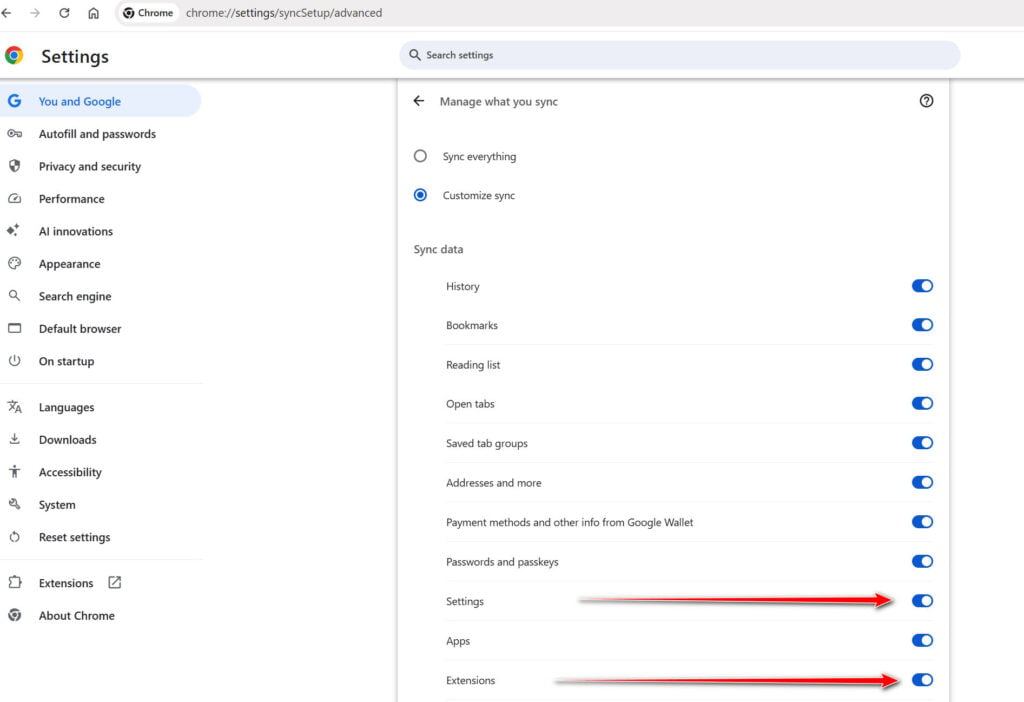
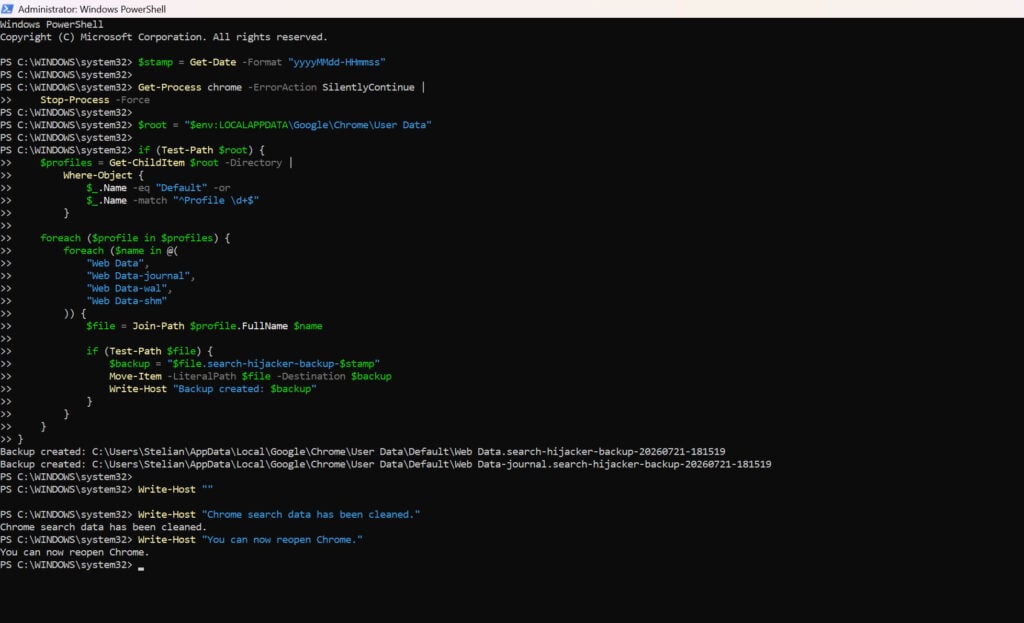
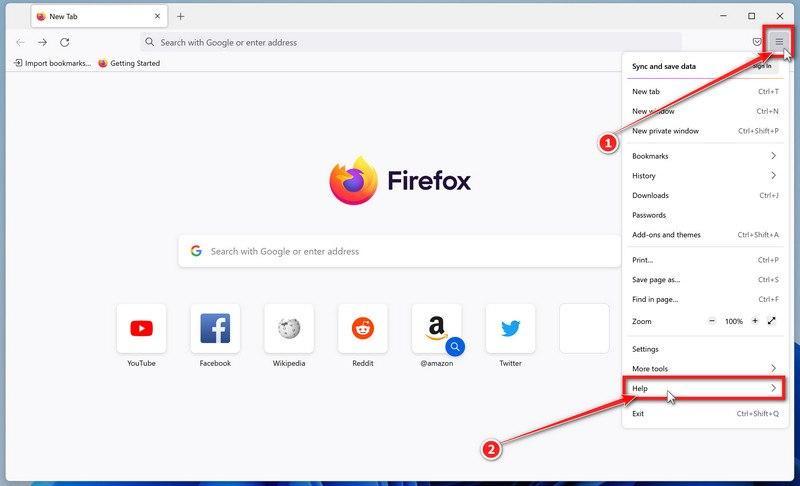
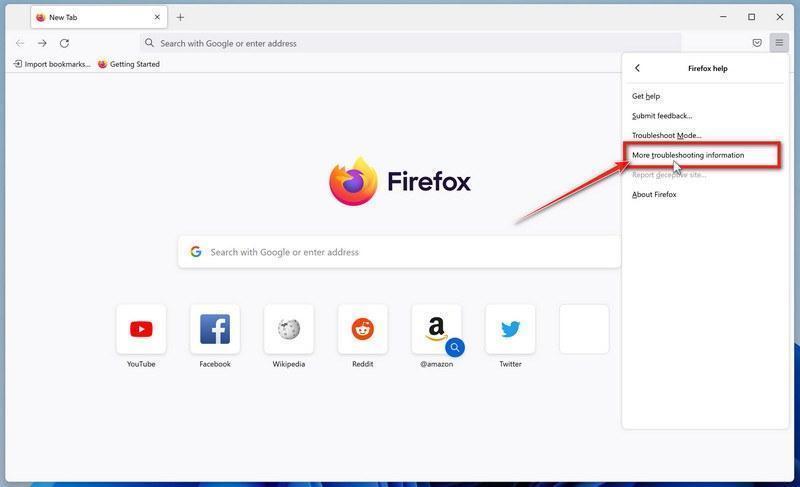
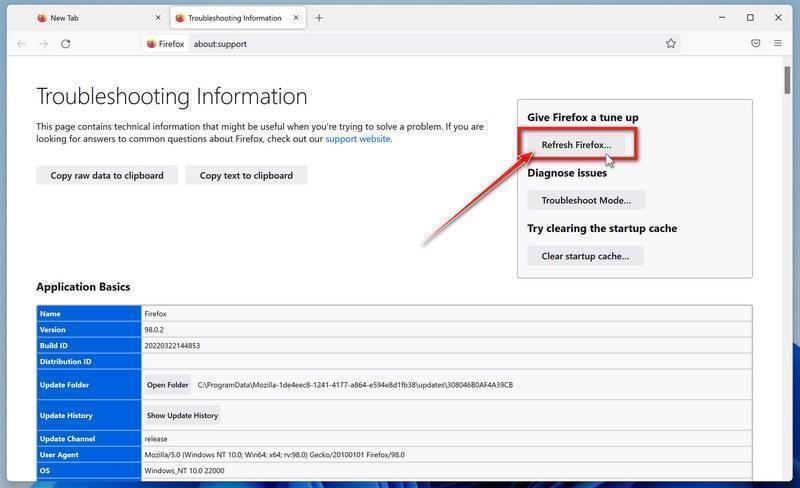
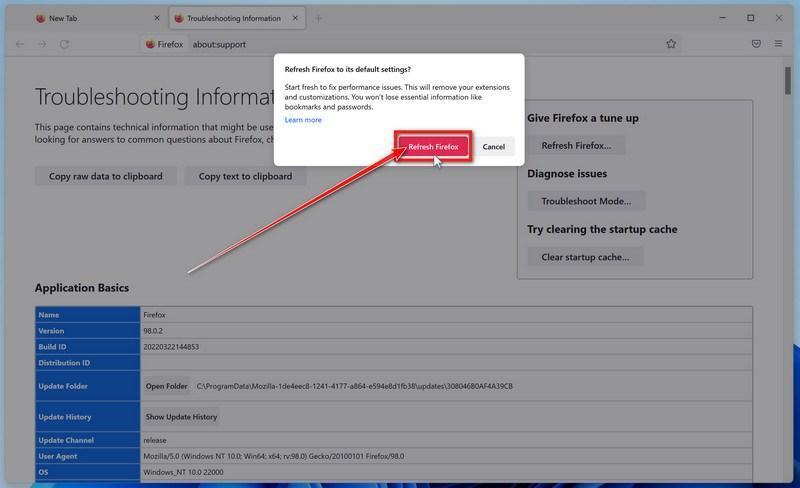
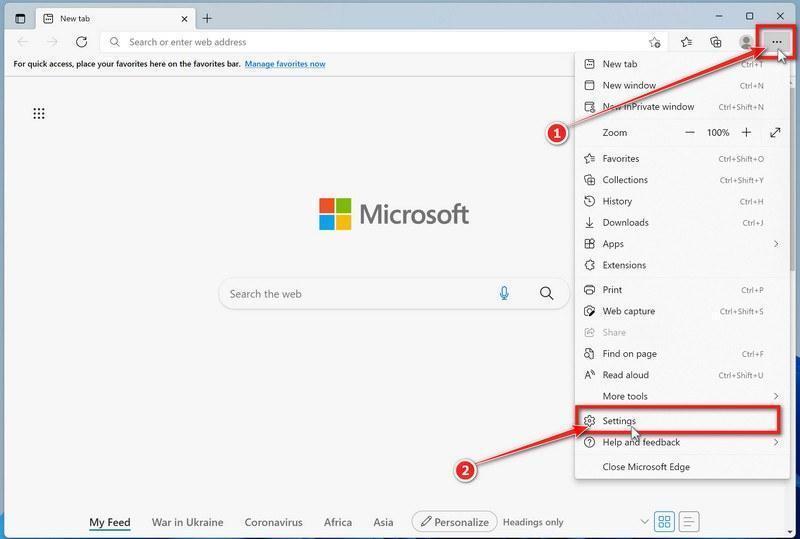
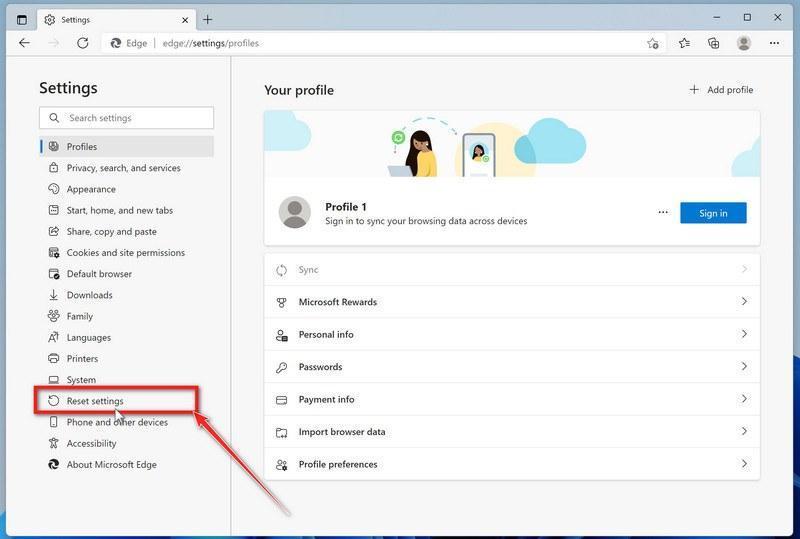
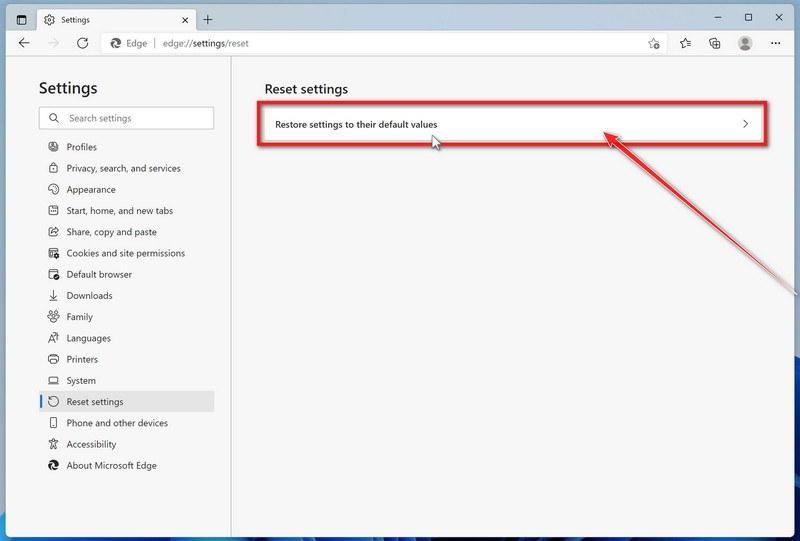
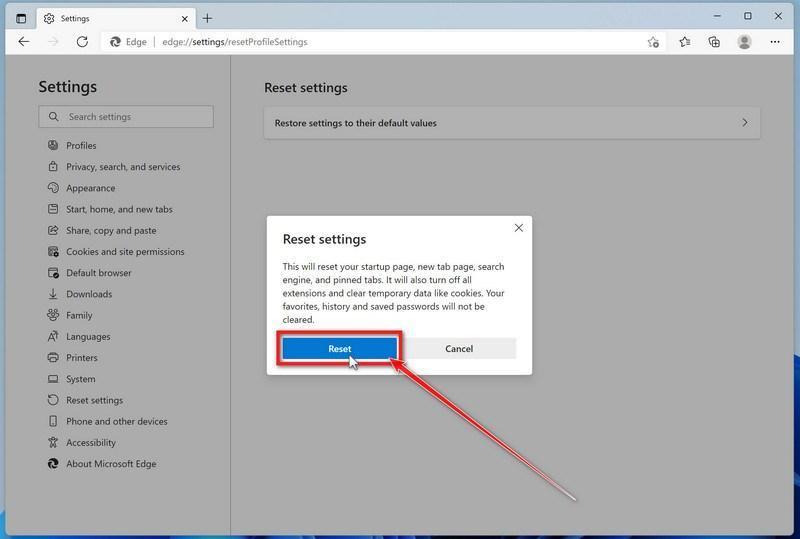













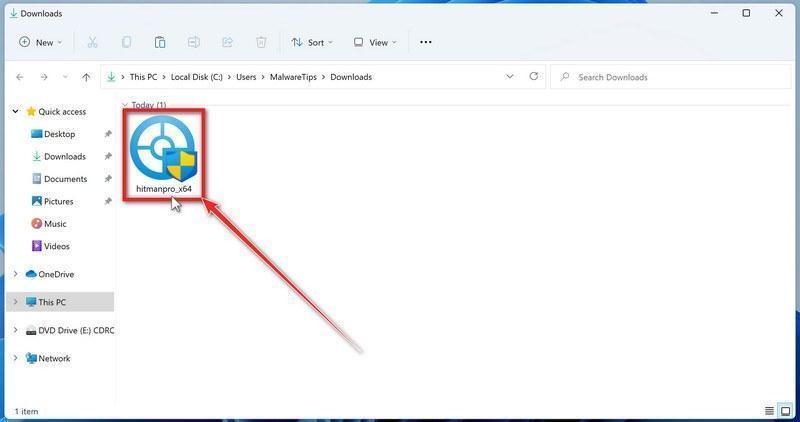
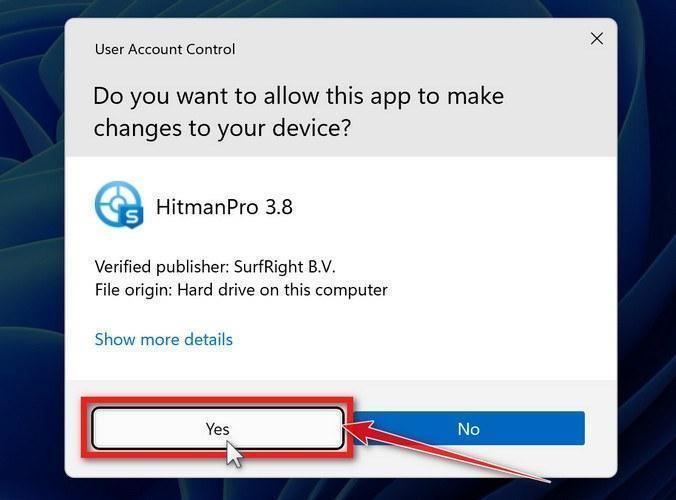
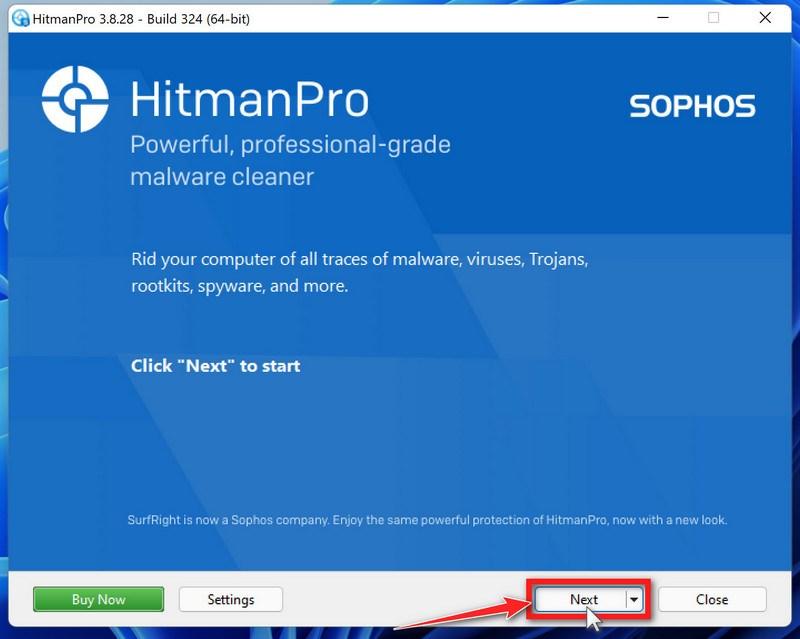
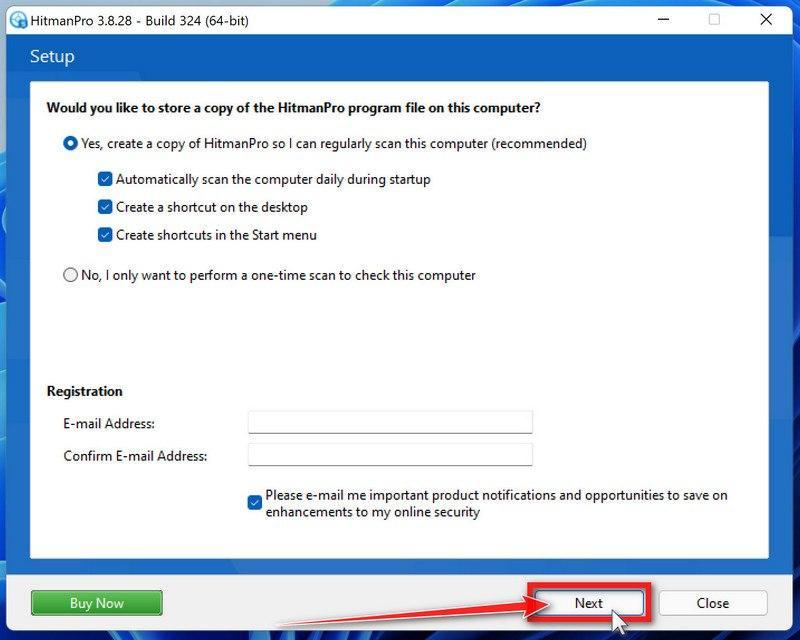
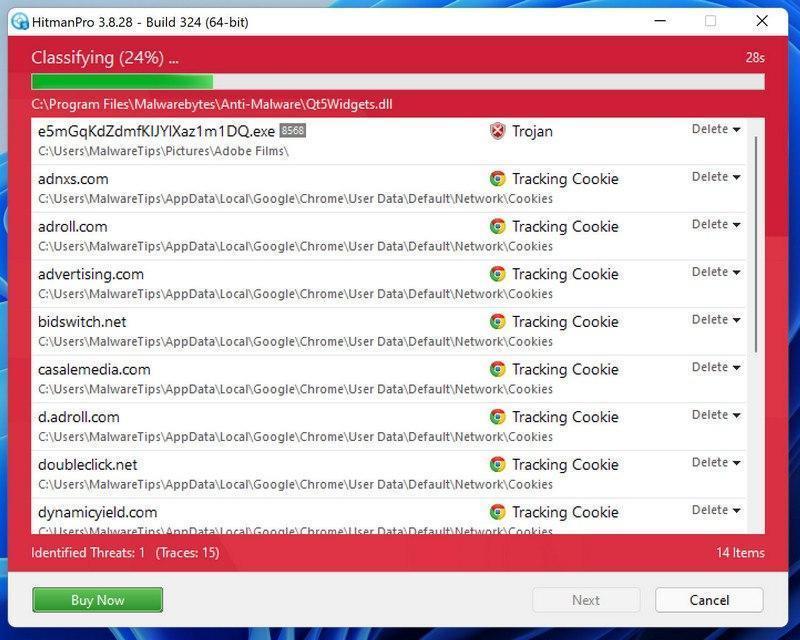
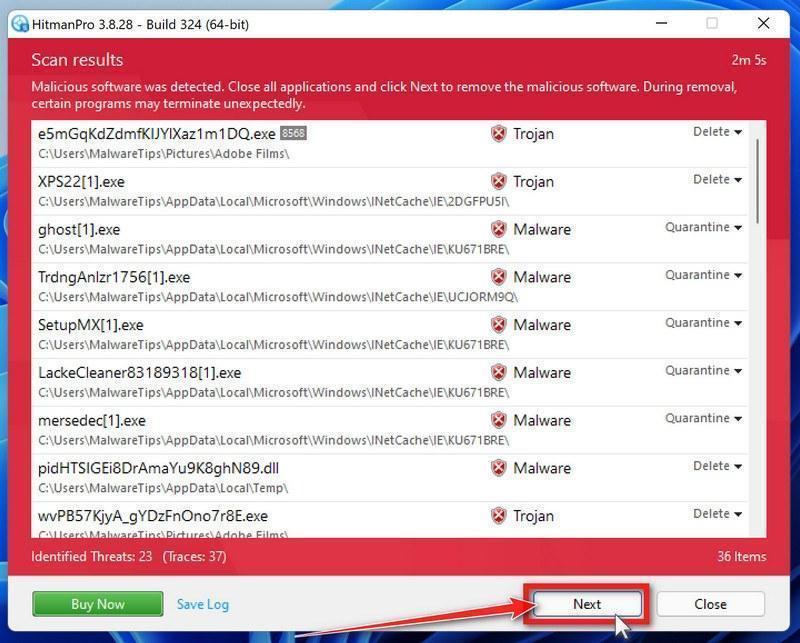
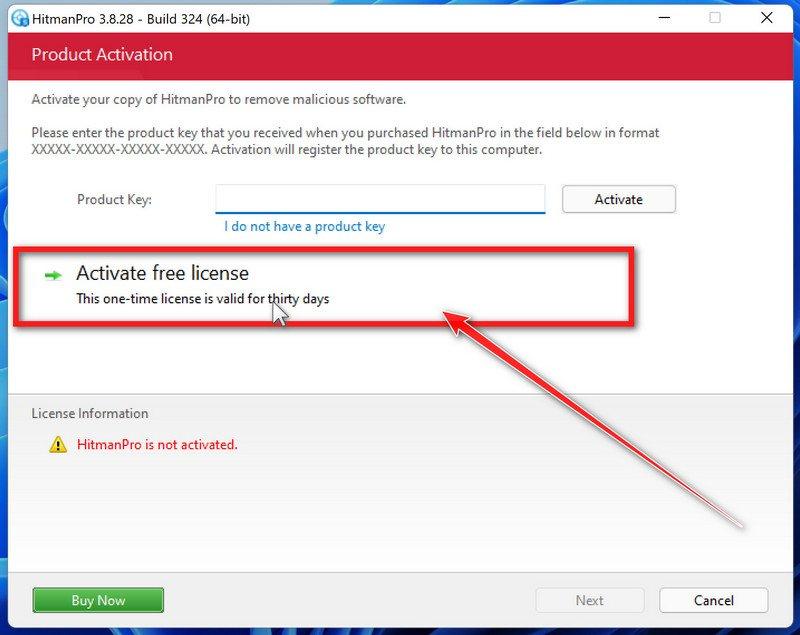

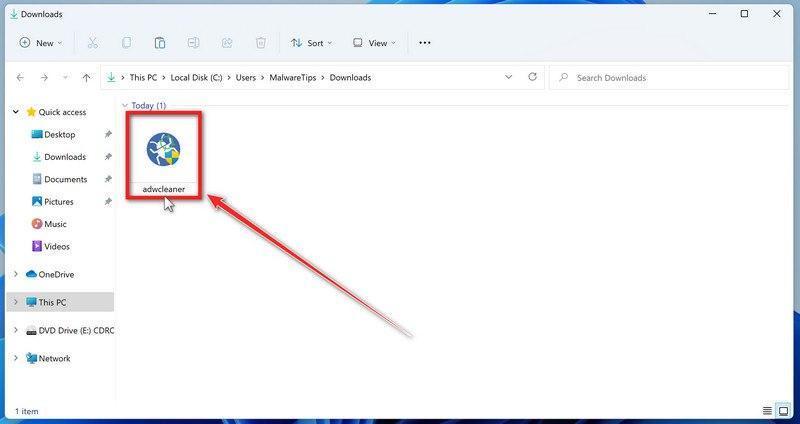
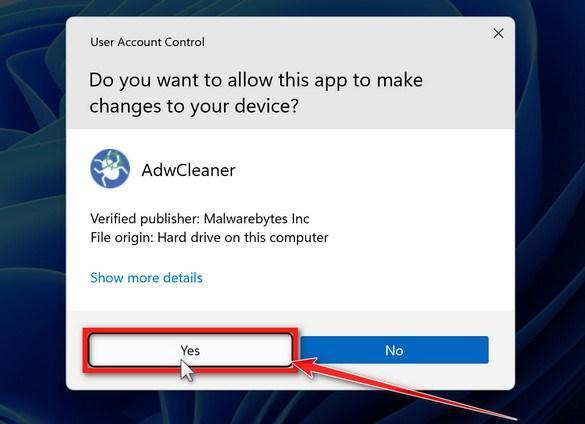
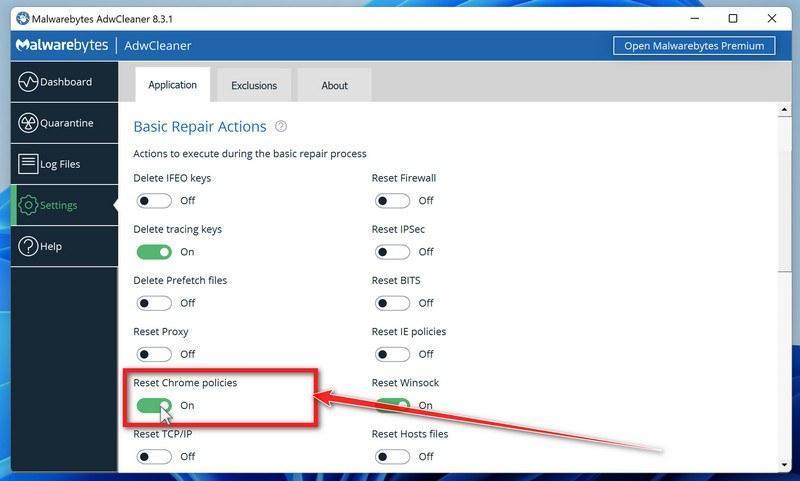
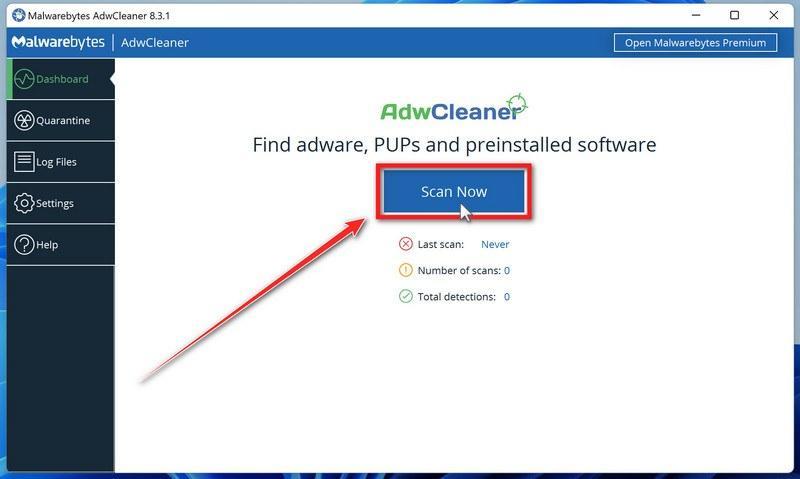
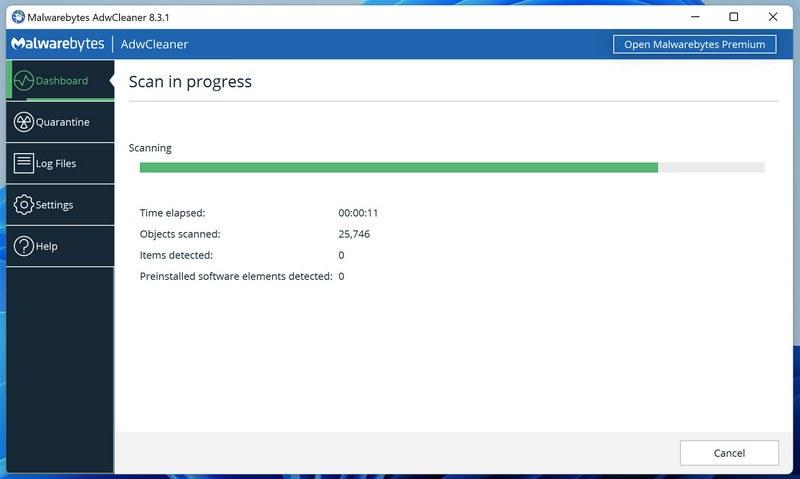
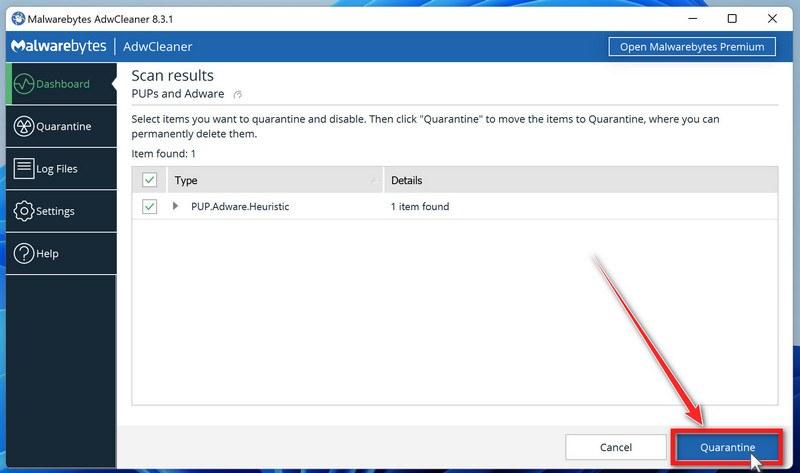
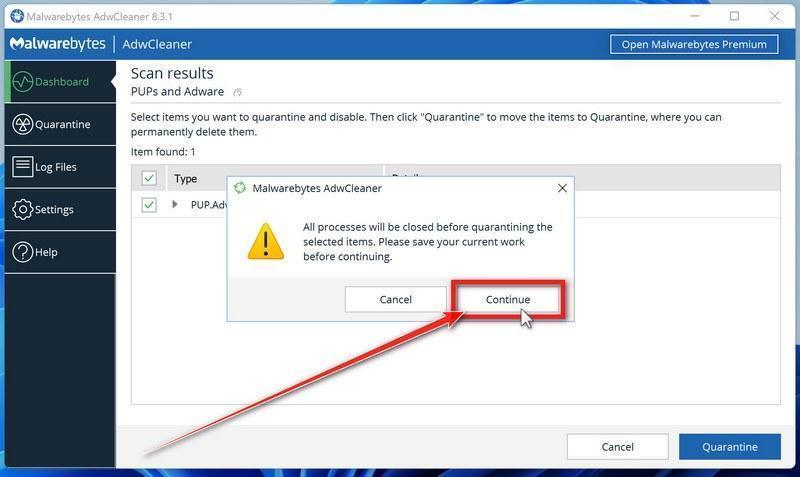

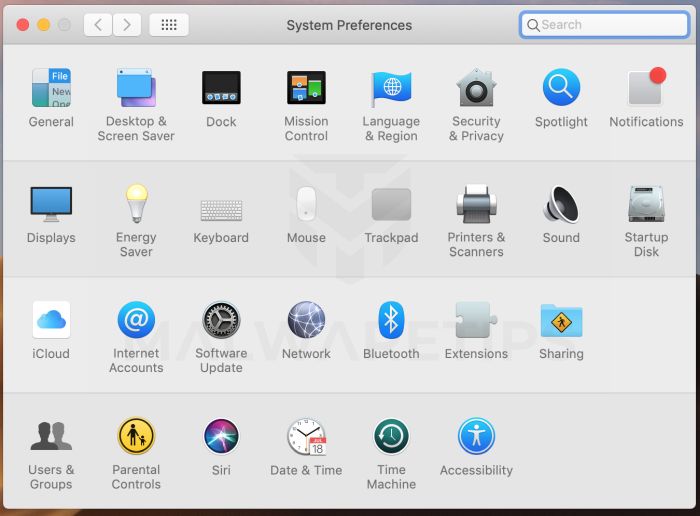 No Profiles section? Good news — that means no profiles are installed on your Mac, which is completely normal. Skip ahead to the next step of this guide.