W32/Injector.ABY.gen!Eldorado is a heuristic detection designed to generically detect a Trojan Horse. Due to the generic nature of this threat, we are unable to provide specific information on what it does.

Typical behavior for Trojans like W32/Injector.ABY.gen!Eldorado is one or more of the following:
- Download and install other malware.
- Use your computer for click fraud.
- Record your keystrokes and the sites you visit.
- Send information about your PC, including usernames and browsing history, to a remote malicious hacker.
- Give remote access to your PC.
- Advertising banners are injected with the web pages that you are visiting.
- Random web page text is turned into hyperlinks.
- Browser popups appear which recommend fake updates or other software.
To check your computer for malware and remove it for free, please use the guide below.
Removal Instructions for W32/Injector.ABY.gen!Eldorado
Please perform all the steps in the correct order. If you have any questions or doubt at any point, stop and ask for our assistance.
- STEP 1: Start your computer in Safe Mode with Networking
- STEP 2: Use Malwarebytes to remove the W32/Injector.ABY.gen!Eldorado
- STEP 3: Scan and clean your computer with HitmanPro
- STEP 4: Double-check for W32/Injector.ABY.gen!Eldorado malware with ESET Online Scanner
- STEP 5: Use AdwCleaner to remove malicious browser policies
STEP 1: Start your computer in Safe Mode with Networking
In this first step, we will start your computer in Safe Mode with Networking to prevent W32/Injector.ABY.gen!Eldorado malicious drivers and services from loading at Windows start-up. We’re using Safe mode because it starts Windows in a basic state, using a limited set of files and drivers.
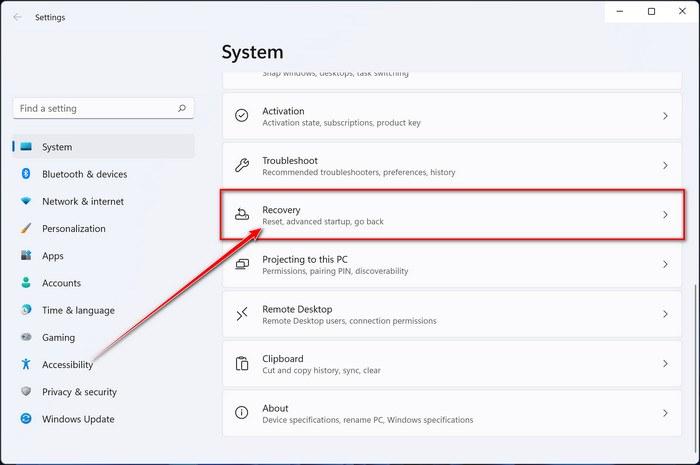
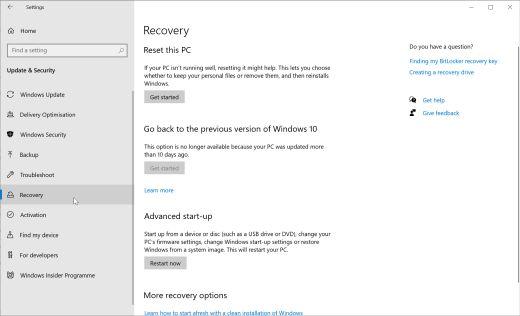
- Press Windows logo key + I on your keyboard to open Settings. If that doesn’t work, right-click on the Start button, then select Settings. In the right window, click on Recovery.

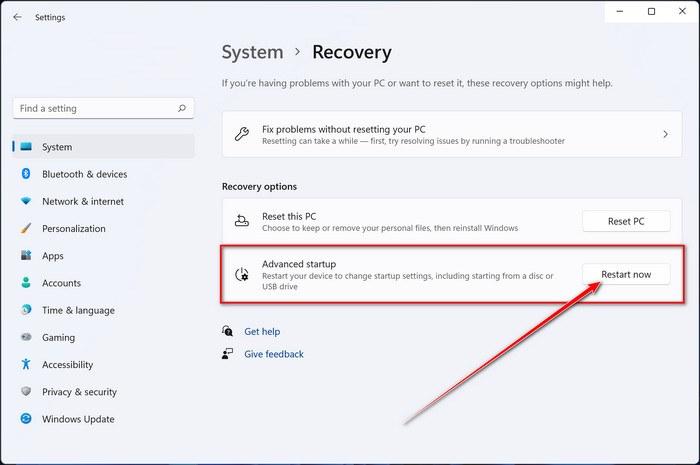
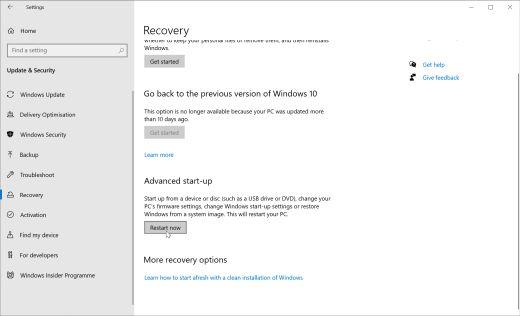
- Under Advanced startup, select Restart now.

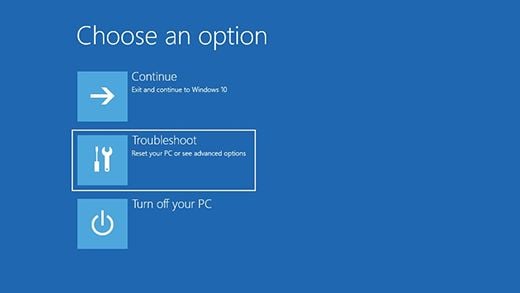
Now that you are in Windows Recovery Environment, you will follow these steps to take you to safe mode:
- On the Choose an option screen, select “Troubleshoot“.

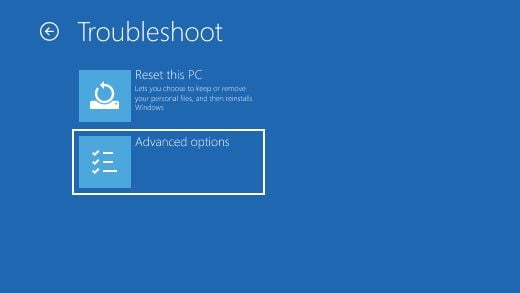
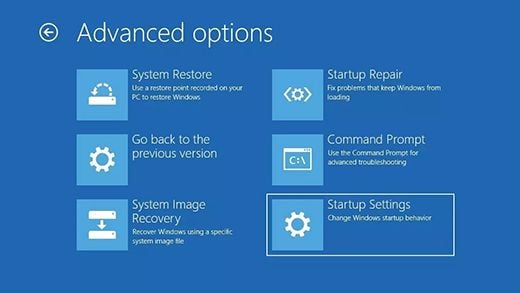
- On the “Troubleshoot” screen, click the “Advanced Options” button.

- On the “Advanced Options” page, click the “Startup Settings” option.

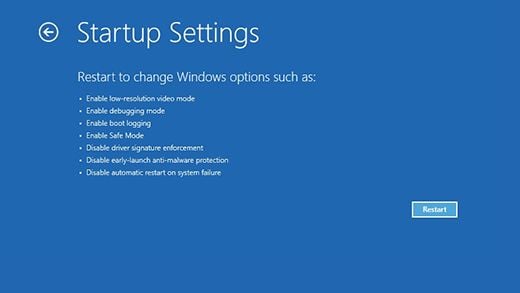
- On the “Startup Settings” page, click the “Restart”.

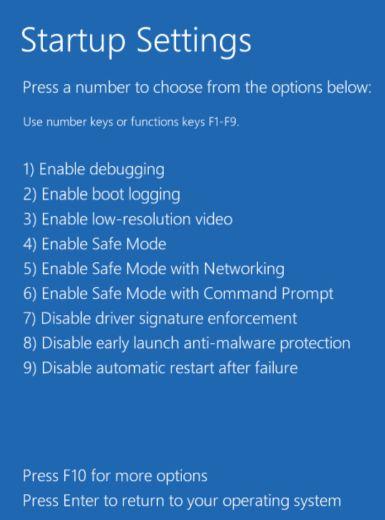
- After your device restarts, you’ll see a list of options. Select option 5 from the list or press F5 to enter Safe Mode with Networking.

- While your computer is running in Safe Mode with Networking, we will need to download, install and run a scan with Malwarebytes (explained in Step 2).
- Press the Windows logo key + I on your keyboard to open Settings. If that doesn’t work, select the Start button, then select Settings.

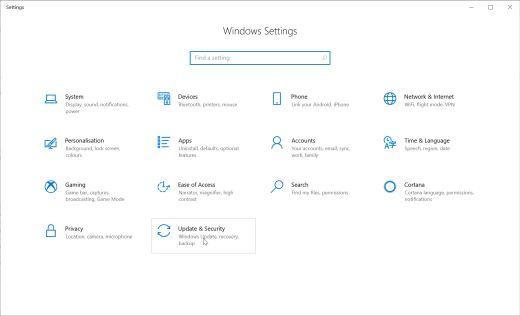
- When the Windows Settings window opens, select Update & Security, then click on Recovery.

- Under Advanced startup, select Restart now.

Now that you are in Windows Recovery Environment, you will follow these steps to take you to safe mode:
- On the Choose an option screen, select “Troubleshoot“.

- On the “Troubleshoot” screen, click the “Advanced Options” button.

- On the “Advanced Options” page, click the “Startup Settings” option. In Windows 8, this option is labeled “Windows Startup Settings” instead.

- On the “Startup Settings” page, click the “Restart”.

- After your device restarts, you’ll see a list of options. Select option 5 from the list or press F5 to enter Safe Mode with Networking.

- While your computer is running in Safe Mode with Networking, we will need to download, install and run a scan with Malwarebytes (explained in Step 2).
- Remove all floppy disks, CDs, and DVDs from your computer, and then restart your computer.
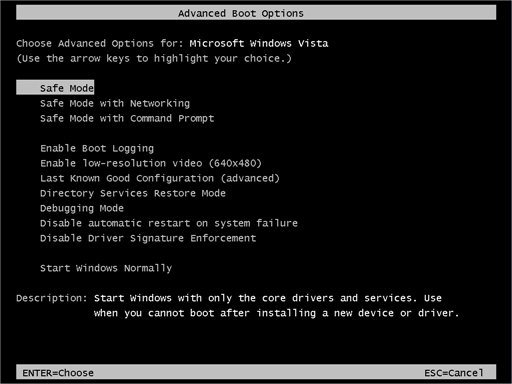
- When the computer starts you will see your computer’s hardware being listed. When you see this information start to press the F8 key repeatedly until you are presented with the Advanced Boot Options.

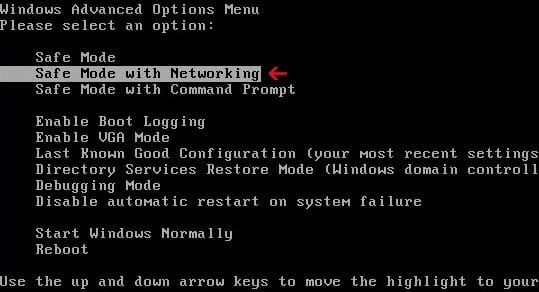
- In the Advanced Boot Options screen, use the arrow keys to highlight Safe Mode with Networking and then press Enter.

- While your computer is running in Safe Mode with Networking, we will need to download, install and run a scan with Malwarebytes (explained in Step 2). In some cases, victims may have issues while trying to start the computer in Safe Mode with Networking, if this happens, you can try to scan your computer with Malwarebytes in normal mode.
STEP 2: Use Malwarebytes to remove W32/Injector.ABY.gen!Eldorado
Malwarebytes Free is one of the most popular and most used anti-malware software for Windows and for good reasons. It is able to destroy many types of malware that other software tends to miss, without costing you absolutely nothing. When it comes to cleaning up an infected device, Malwarebytes has always been free and we recommend it as an essential tool in the fight against malware.
-
Download Malwarebytes.
You can download Malwarebytes for Windows by clicking the link below.
 MALWAREBYTES DOWNLOAD LINK
(The above link will open a new page from where you can download Malwarebytes) -
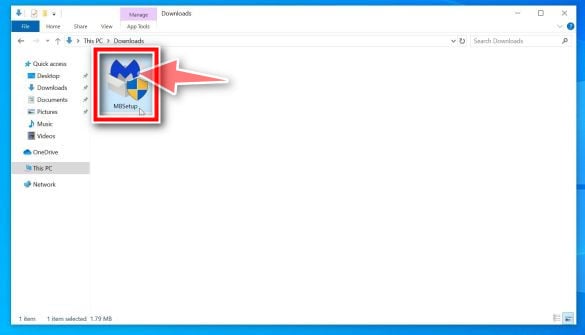
Double-click on the Malwarebytes setup file.
When Malwarebytes has finished downloading, double-click on the MBSetup file to install Malwarebytes on your computer. In most cases, downloaded files are saved to the Downloads folder.

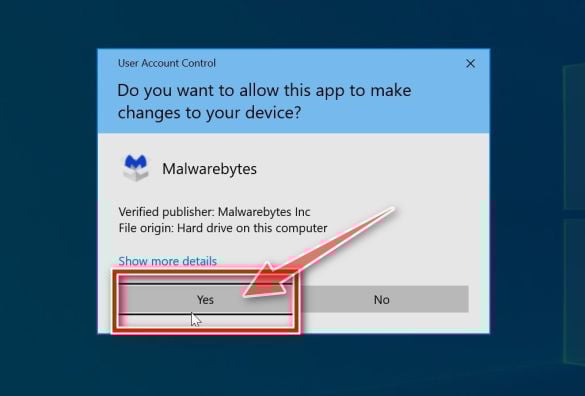
You may be presented with a User Account Control pop-up asking if you want to allow Malwarebytes to make changes to your device. If this happens, you should click “Yes” to continue with the Malwarebytes installation.

-
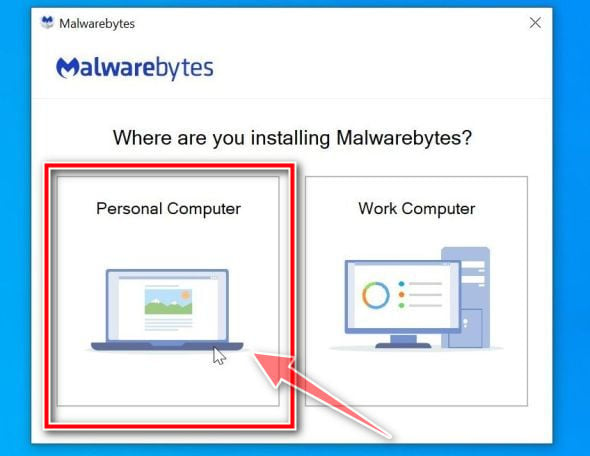
Follow the on-screen prompts to install Malwarebytes.
When the Malwarebytes installation begins, you will see the Malwarebytes setup wizard which will guide you through the installation process. The Malwarebytes installer will first ask you what type of computer are you installing this program on, click either Personal Computer or Work Computer.

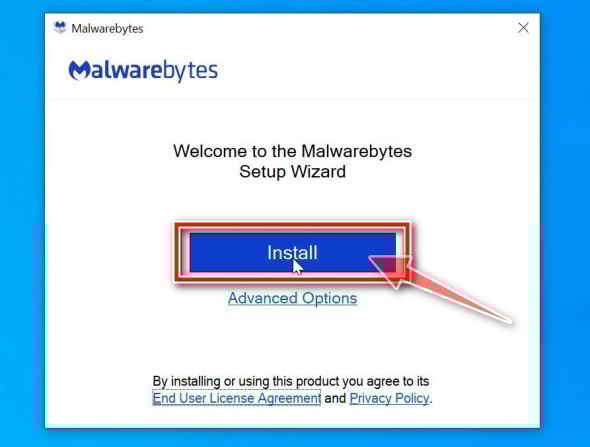
On the next screen, click “Install” to install Malwarebytes on your computer.

When your Malwarebytes installation completes, the program opens to the Welcome to Malwarebytes screen. Click the “Get started” button.
-
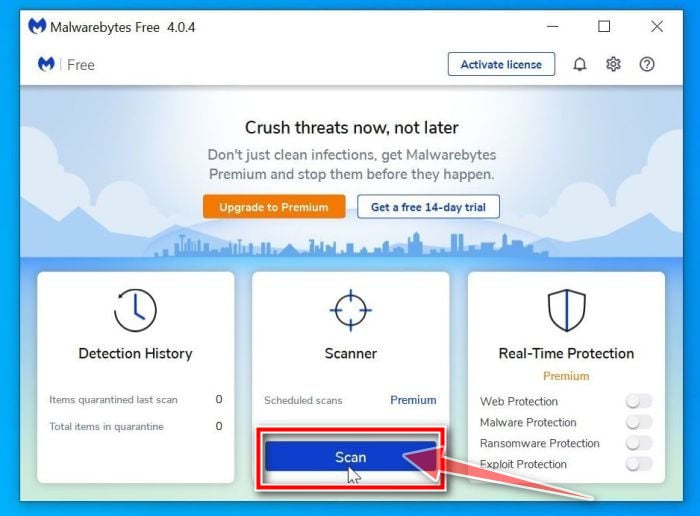
Click on “Scan”.
To scan your computer with Malwarebytes, click on the “Scan” button. Malwarebytes will automatically update the antivirus database and start scanning your computer for malware.

-
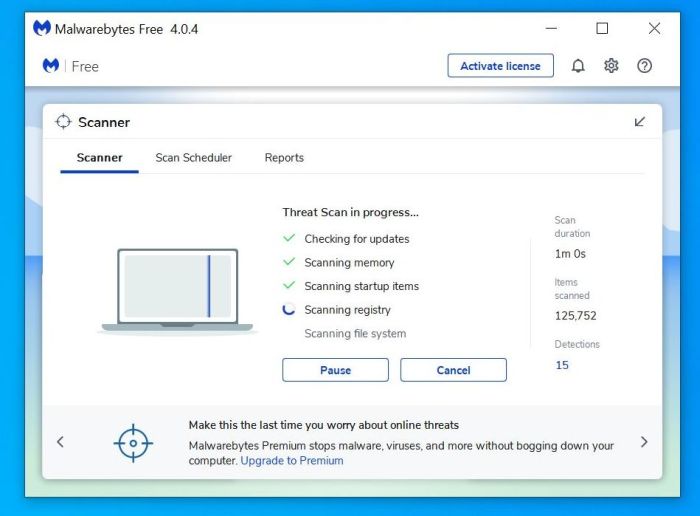
Wait for the Malwarebytes scan to complete.
Malwarebytes will scan your computer for the W32/Injector.ABY.gen!Eldorado and other malicious programs. This process can take a few minutes, so we suggest you do something else and periodically check on the status of the scan to see when it is finished.

-
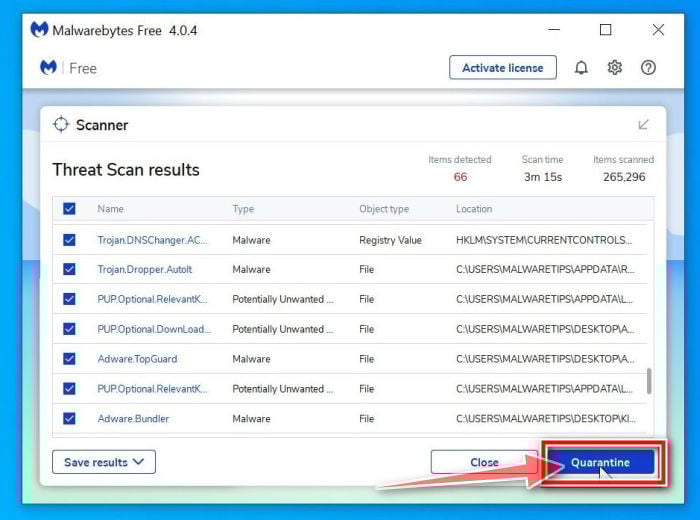
Click on “Quarantine”.
When the scan has been completed, you will be presented with a screen showing the malware infections that Malwarebytes has detected. To remove the JS:Trojan.JS.Agent malicious files that Malwarebytes has found, click on the “Quarantine” button.

-
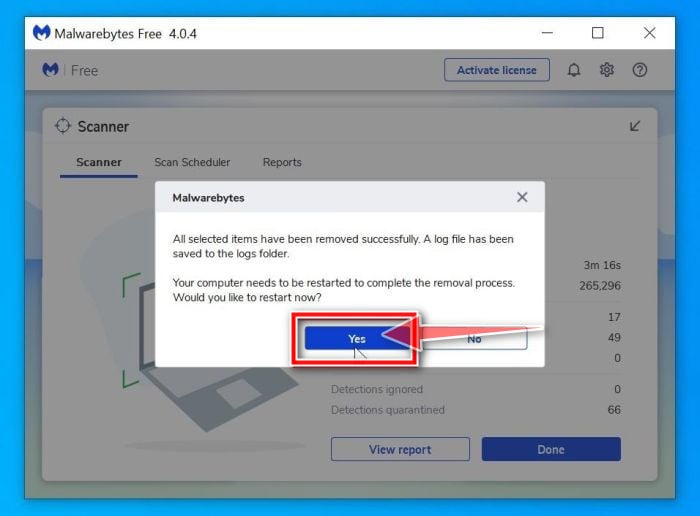
Restart computer.
Malwarebytes will now remove the W32/Injector.ABY.gen!Eldorado malware and other malicious programs that it has found. To complete the malware removal process, Malwarebytes will ask you to restart your computer.
 When the malware removal process is complete, your computer should start in normal mode (if not, simply restart your device to exit Safe Mode) and continue with the rest of the instructions. We do recommend that you run another scan with Malwarebytes once you’re in Normal mode to make sure all the malicious files were removed.
STEP 3: Scan and clean your computer with HitmanPro
In this third step, while the computer is in normal back, we will download and run a scan with HitmanPro to remove the W32/Injector.ABY.gen!Eldorado and other malicious programs.
HitmanPro is a second opinion scanner that takes a unique cloud-based approach to malware scanning. HitmanPro scans the behavior of active files and also files in locations where malware normally resides for suspicious activity. If it finds a suspicious file that’s not already known, HitmanPro sends it to its clouds to be scanned by two of the best antivirus engines today, which are Bitdefender and Kaspersky.
Although HitmanPro is shareware and costs $24.95 for 1 year on 1 PC, there is actually no limit on scanning. The limitation only kicks in when there is a need to remove or quarantine detected malware by HitmanPro on your system and by then, you can activate the one-time 30-days trial to enable the clean up.
-
Download HitmanPro.
You can download HitmanPro by clicking the link below.
 HITMANPRO DOWNLOAD LINK
(The above link will open a new web page from where you can download HitmanPro) -
Install HitmanPro.
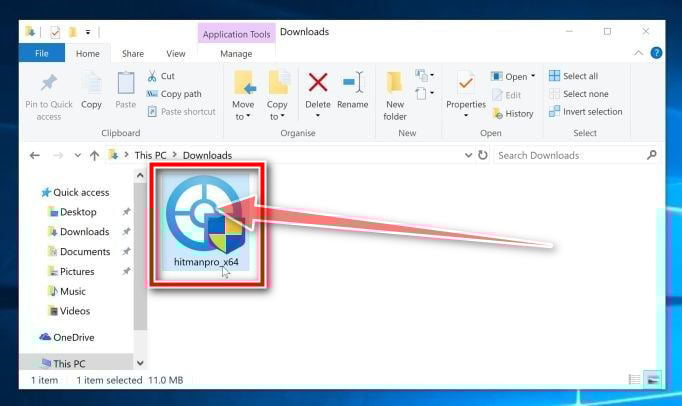
When HitmanPro has finished downloading, double-click on “hitmanpro.exe” (for 32-bit versions of Windows) or “hitmanpro_x64.exe” (for 64-bit versions of Windows) to install this program on your PC. In most cases, downloaded files are saved to the Downloads folder.

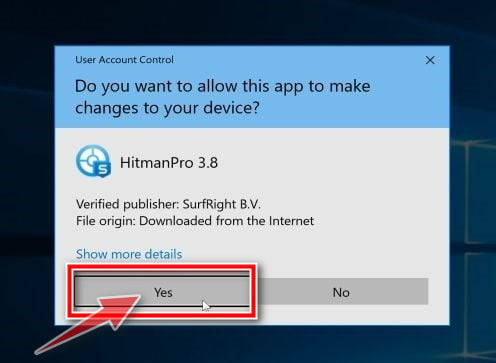
You may be presented with a User Account Control pop-up asking if you want to allow HitmanPro to make changes to your device. If this happens, you should click “Yes” to continue with the installation.

-
Follow the on-screen prompts.
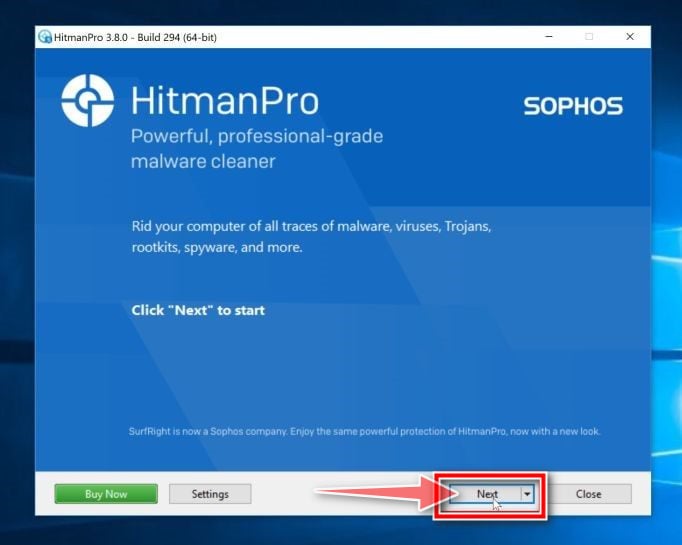
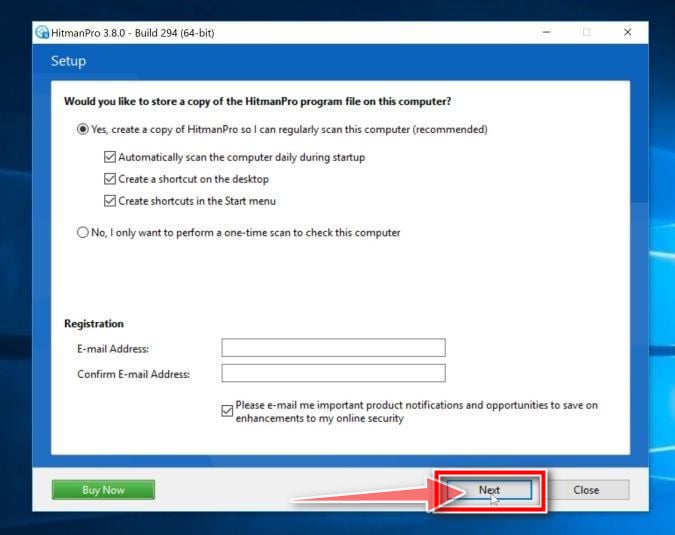
When HitmanPro starts you will be presented with the start screen as shown below. Click on the “Next” button to perform a system scan.


-
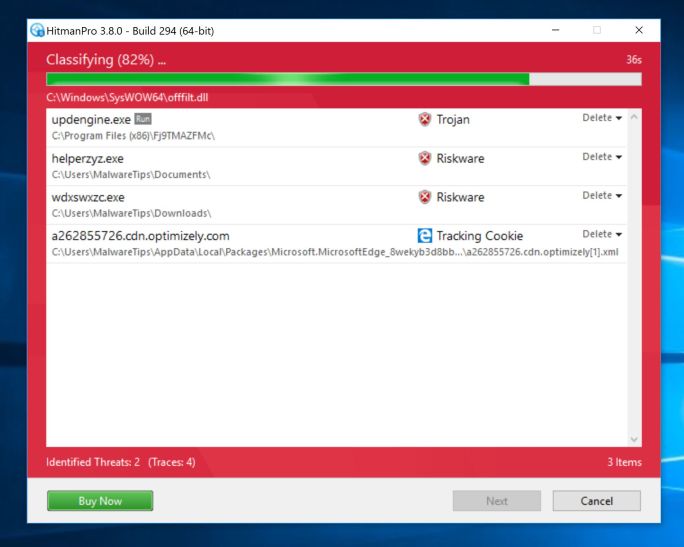
Wait for the HitmanPro scan to complete.
HitmanPro will now begin to scan your computer for the W32/Injector.ABY.gen!Eldorado and other malicious programs. This process will take a few minutes.

-
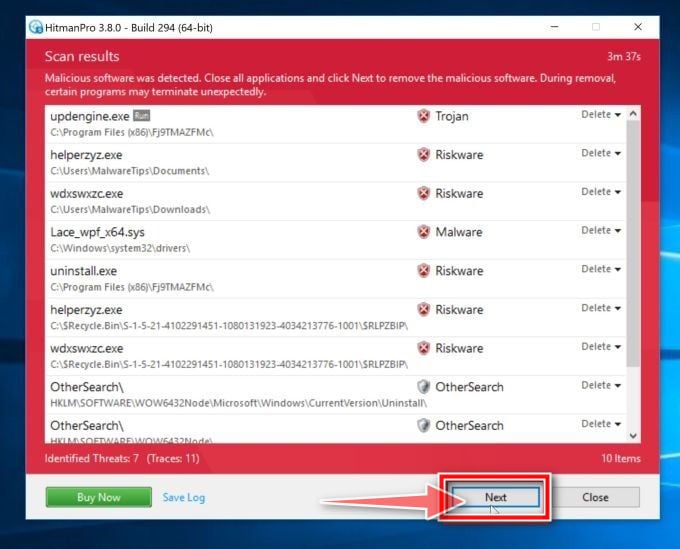
Click on “Next”.
When HitmanPro has finished the scan, it will display a list of all the malware that the program has found. Click on the “Next” button to remove the W32/Injector.ABY.gen!Eldorado and other malicious programs.

-
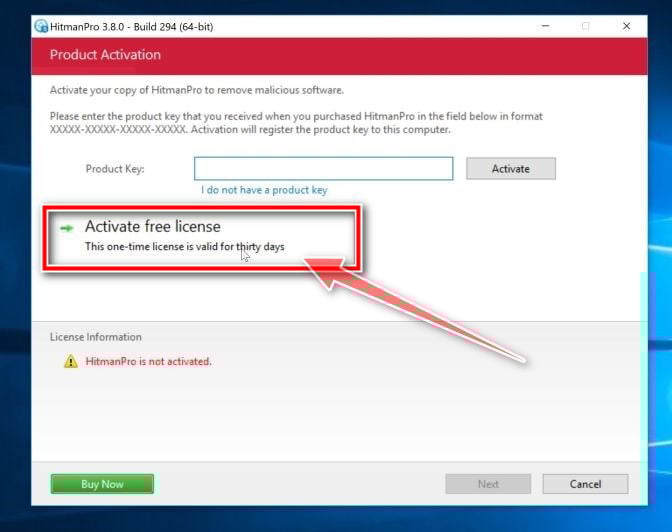
Click on “Activate free license”.
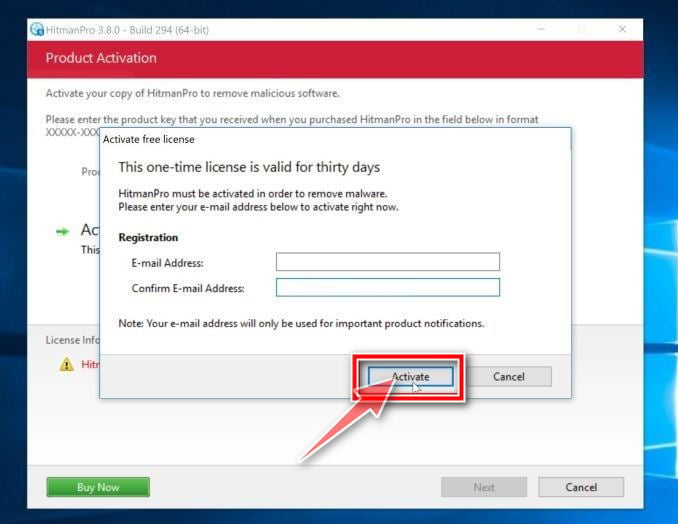
Click on the “Activate free license” button to begin the free 30 days trial and remove the W32/Injector.ABY.gen!Eldorado and other malicious files from the computer.


When the process is complete, you can close HitmanPro and continue with the rest of the instructions.
STEP 4: Double-check for W32/Injector.ABY.gen!Eldorado malware with ESET Online Scanner
In this fourth step, we will scan the computer with ESET Online Scanner to remove any leftover files from the W32/Injector.ABY.gen!Eldorado and other malicious programs.
While the Malwarebytes and HitmanPro scans are more than enough, we’re recommending ESET Online Scanner to users who still have malware-related issues or just want to make sure their computer is 100% clean.
ESET Online Scanner is a free second-opinion scanner, designed to rescue your computer from malware (viruses, trojans, rootkits, etc.) that have infected your computer despite all the security measures you have taken (such as anti-virus software, firewalls, etc.).
-
Download ESET Online Scanner.
You can download ESET Online Scanner by clicking the link below.
 ESET ONLINE SCANNER DOWNLOAD LINK
(The above link will open a new web page from where you can download ESET Online Scanner) -
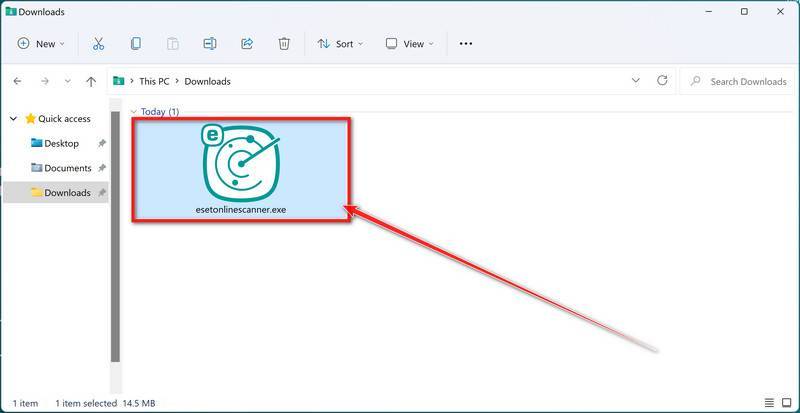
Double-click on esetonlinescanner.exe to run the installer.
When ESET Online Scanner has finished downloading, double-click on “esetonlinescanner.exe” to install it program on your computer. In most cases, downloaded files are saved to the Downloads folder.

-
Install ESET Online Scanner.
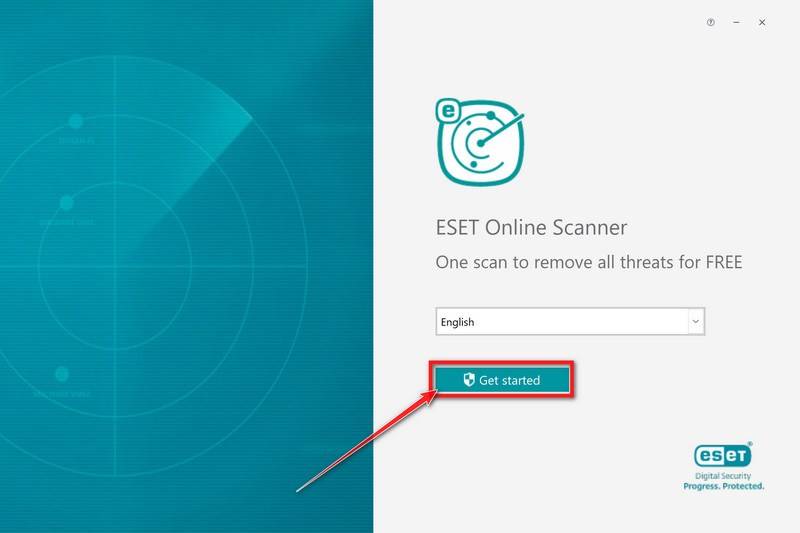
When ESET Online Scanner starts you will be presented with the start screen as shown below. Select your desired language from the drop-down menu and click Get started.

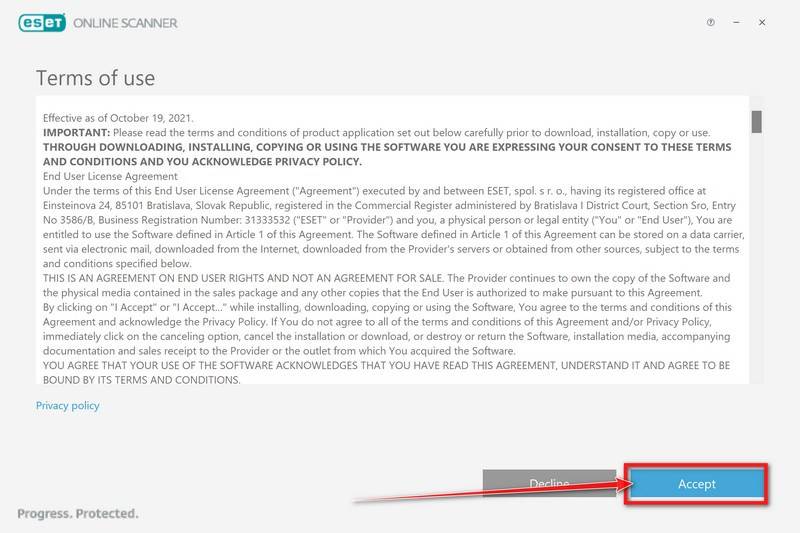
In the Terms of use screen, click Accept.

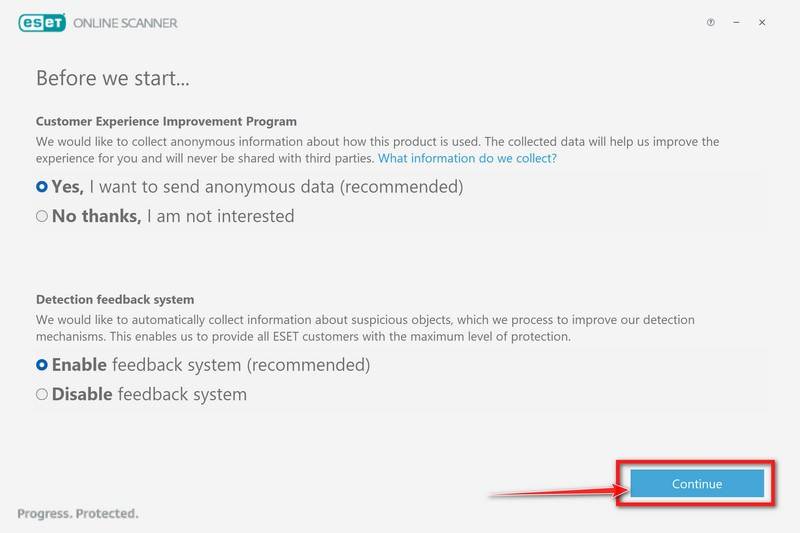
Select your preference for the Customer Experience Improvement Program and the Detection feedback system and click Continue.

-
Start a Full Scan with ESET Online Scanner
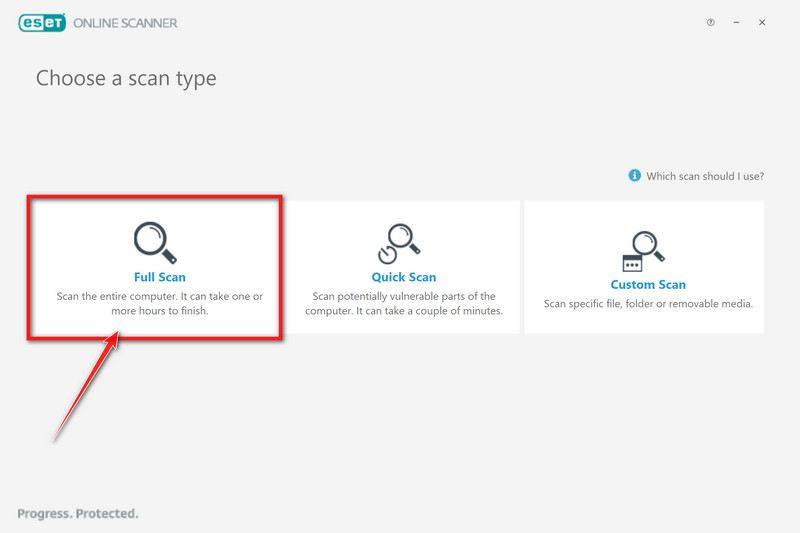
Click on Full Scan to perform an in-depth inspection of the entire computer.

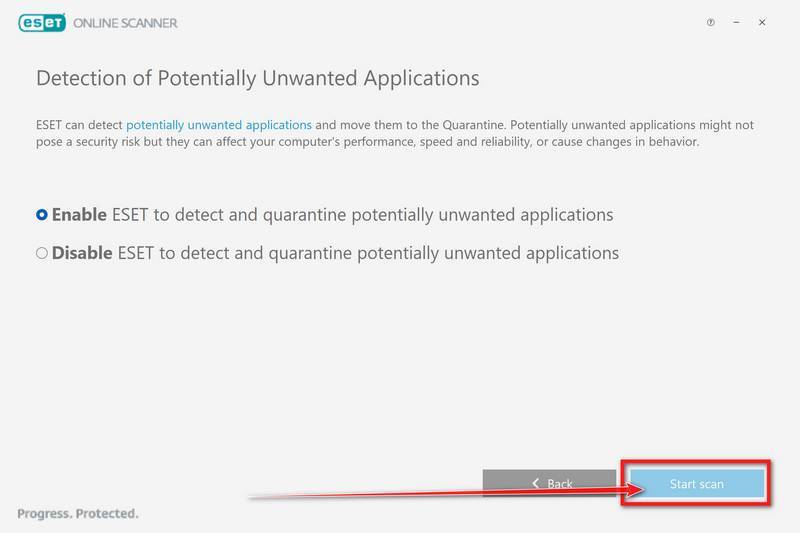
Select Enable for Detection of Potentially Unwanted Applications, then click Start scan.

-
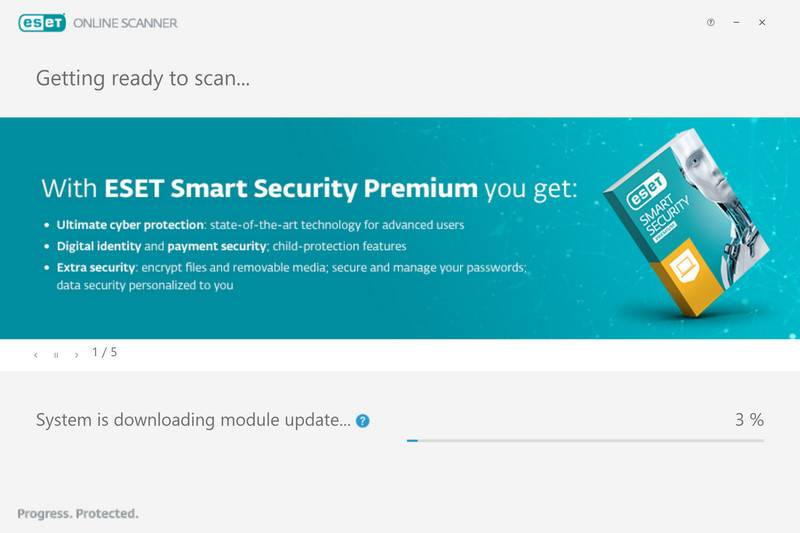
Wait for the ESET Online Scanner scan to finish.
ESET Online Scanner will now begin to scan your computer for malware. This process can take quite a while, so we suggest you do something else and periodically check on the status of the scan to see when it is finished.

-
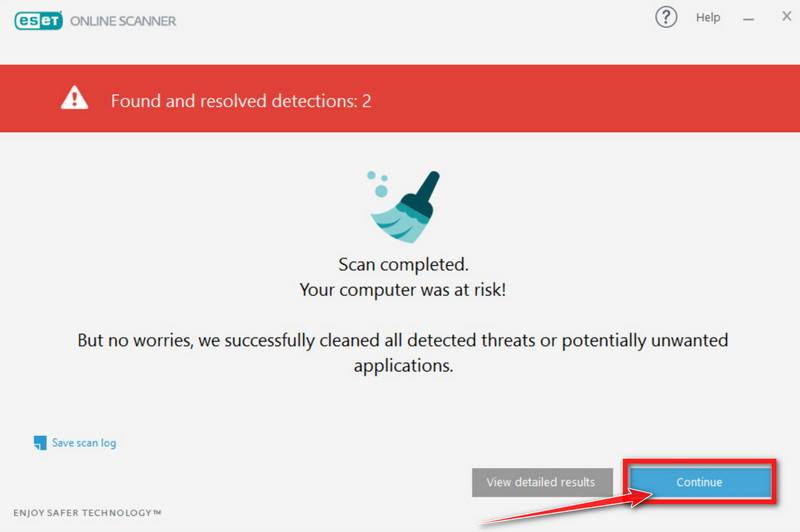
ESET Online Scanner will automatically remove the malicious files.
At the end of the scan, the Found and resolved detections screen will be displayed. You can click View detailed results to view specific information. Detected threats are automatically cleaned and quarantined.

STEP 5: Use AdwCleaner to remove malicious browser policies
In this final step, we will use AdwCleaner to remove malicious browser policies and unwanted browser extensions from your computer.
AdwCleaner is a free popular on-demand scanner that can detect and remove malware that even the most well-known anti-virus and anti-malware applications fail to find. This on-demand scanner includes a lot of tools that can be used to fix the side effects of browser hijackers.
-
Download AdwCleaner.
You can download AdwCleaner by clicking the link below.
 ADWCLEANER DOWNLOAD LINK
(The above link will open a new web page from where you can download AdwCleaner) -
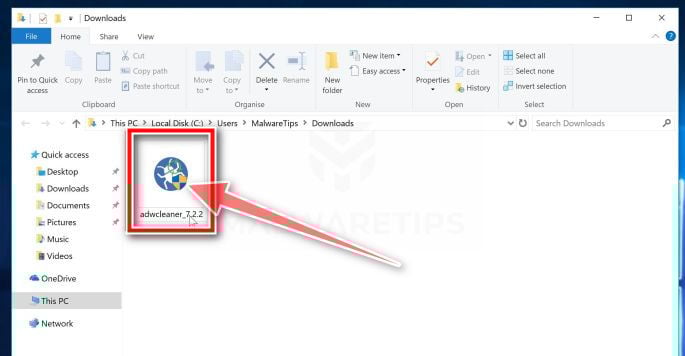
Double-click on the setup file.
Double-click on the file named “adwcleaner_x.x.x.exe” to start AdwCleaner. In most cases, downloaded files are saved to the Downloads folder.

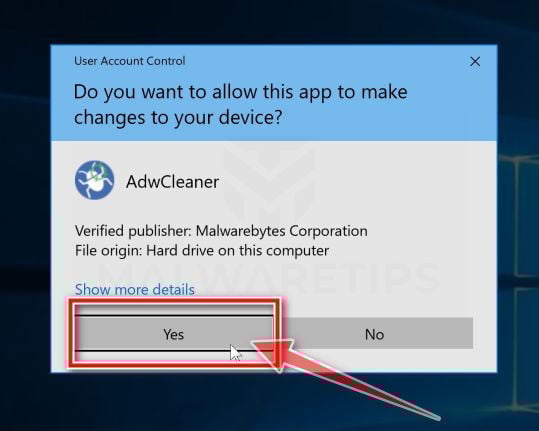
You may be presented with a User Account Control dialog asking you if you want to run this file. If this happens, you should click “Yes” to continue with the installation.

-
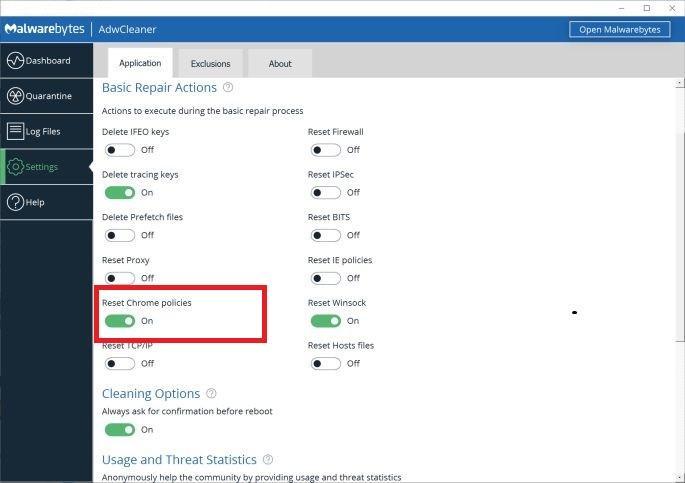
Enable “Reset Chrome policies”.
When AdwCleaner starts, on the left side of the window, click on “Settings” and then enable “Reset Chrome policies“.

-
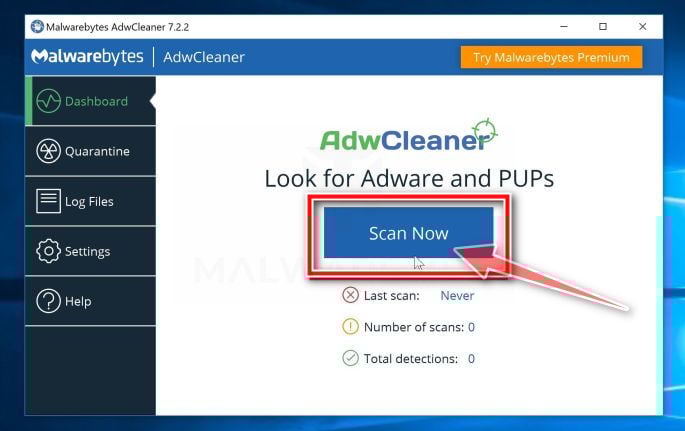
Click on “Scan Now”.
On the left side of the window, click on “Dashboard” and then click “Scan Now” to perform a system scan.

-
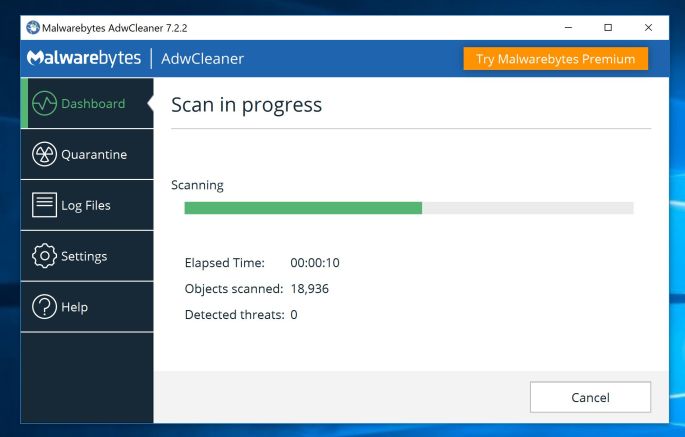
Wait for the AdwCleaner scan to complete.
AdwCleaner will now scan your computer for the W32/Injector.ABY.gen!Eldorado and other malicious programs. This process can take a few minutes.

-
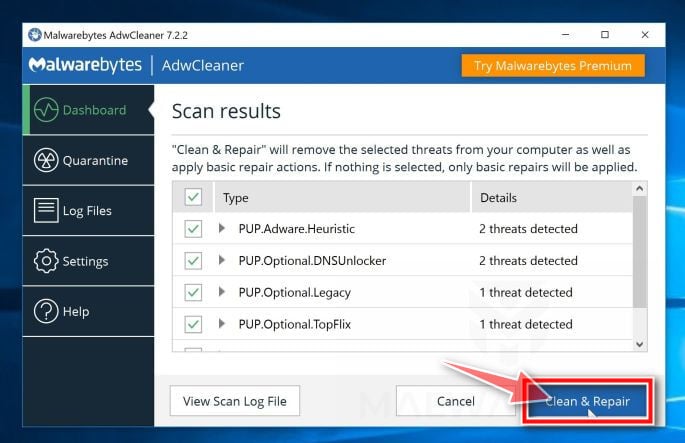
Click on “Clean & Repair”.
When AdwCleaner has finished it will display a list of all the malware that the program found. Click on the “Clean & Repair” button to remove the W32/Injector.ABY.gen!Eldorado and other malicious programs from your computer.

-
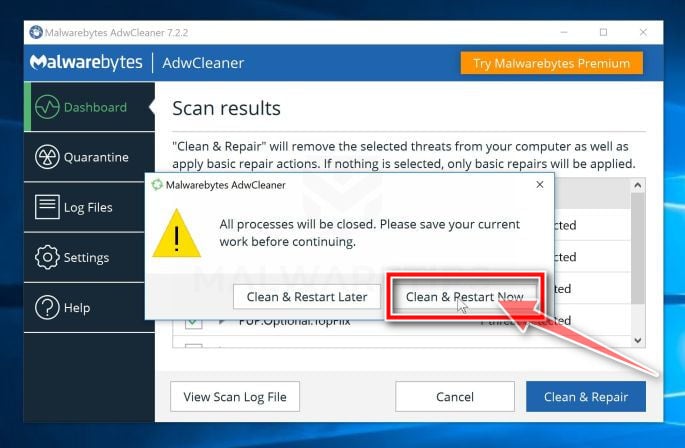
Click on “Clean & Restart Now”
When the malware removal process is complete, AdwCleaner may need to restart your device. Click on the “Clean & Restart Now” button to finish the removal process.

If you are still having problems with your computer after completing these instructions, then please follow one of the steps:
- Run a computer scan with Emsisoft Emergency Kit
- Ask for help in our Malware Removal Assistance for Windows forum.

