


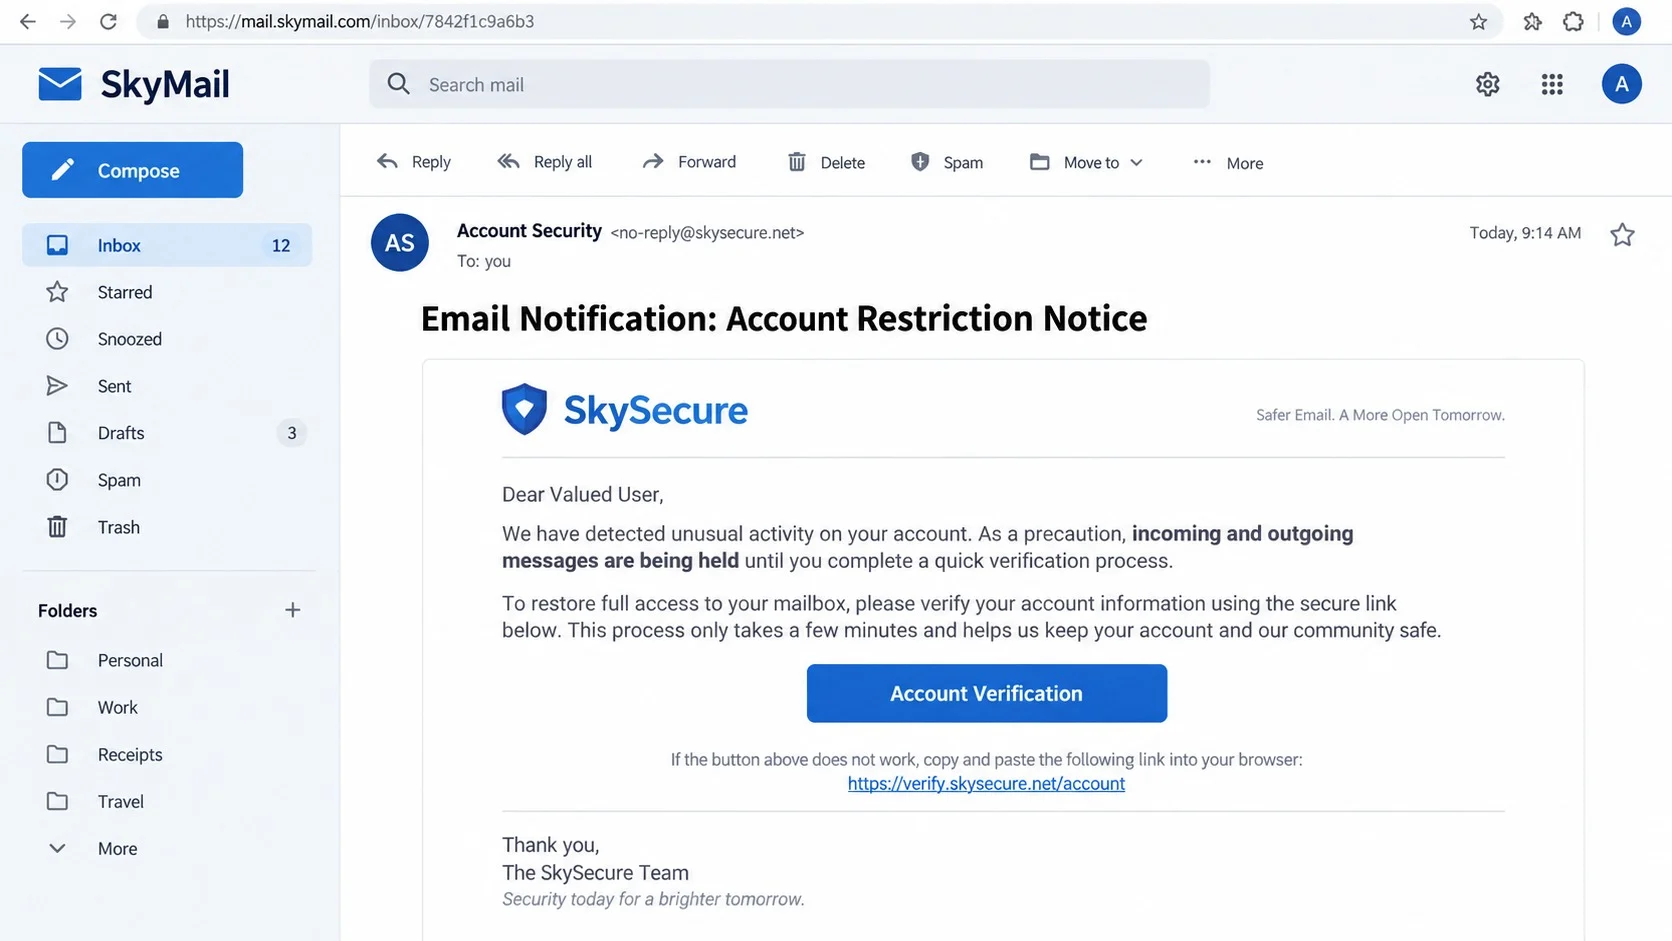
An email notification says every incoming and outgoing message has been placed on hold. Normal service will return only after account verification.
It reads like a technical restriction, not a sales pitch. That administrative appearance hides the most important question: who controls the verification page?
Overview
The warning describes a mailbox that has suddenly stopped
The Restricted Email Account scam claims the recipient’s address has been placed under restriction by an unnamed email support service.
It says incoming and outgoing messages will remain on hold until the user completes a proper verification process.
An “Account Verification” button offers to reactivate access. The message may sign off only as support, without identifying a genuine provider.
The supposed restriction is difficult to disprove from the email alone because delayed mail, empty inboxes, and quiet workdays can feel similar.
The linked page turns the warning into a password request
One examined campaign sent visitors to freschezzafoods[.]com, a domain with no credible role in administering the recipient’s mailbox.
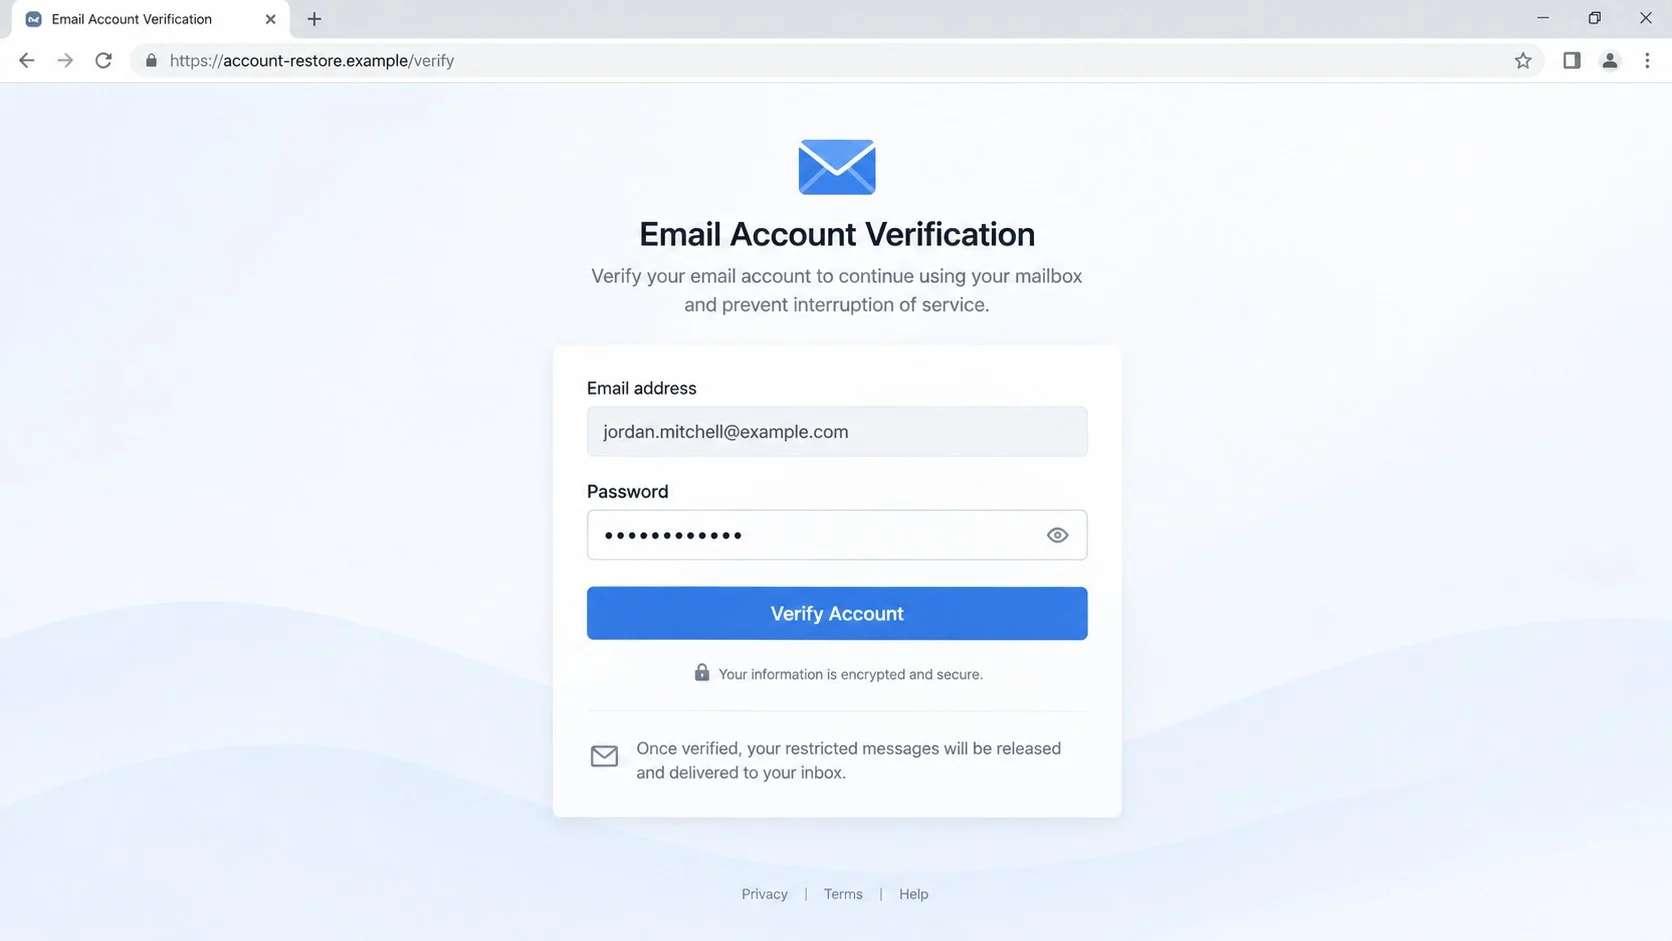
The destination presented an email settings page and inserted the victim’s address into a login form.
It asked for the mailbox password to verify account ownership and release the messages allegedly being held.
Submitting that password transfers the credential to the campaign operator. It does not restore mail or contact the real provider.
The account-status story collapses under independent checks
A real restriction should appear after signing in through the provider’s official application or established website.
The sender should be identifiable, the policy should be documented, and known support should be able to confirm the action.
Warning signs in this campaign include:
- An urgent restriction without a case or policy reference.
- No provider name that can be independently contacted.
- A claim that both incoming and outgoing mail is held.
- A single verification button presented as the only remedy.
- A destination domain unrelated to email administration.
- A form requesting the full mailbox password.
- No matching restriction inside the authentic account.
Why a Message Hold Creates Immediate Pressure
A closed account is a future problem. Held messages feel like an active loss happening at the moment the warning is read.
The recipient may imagine missing a customer request, job update, invoice, travel change, family message, or password-reset email.
Because the missing messages are invisible, the claim cannot be disproved by inspecting the inbox casually.
The email makes verification sound reversible and routine. Enter a password, and everything supposedly resumes.
That framing hides the asymmetry. The user risks a valuable credential, while the sender supplies no verifiable evidence of held mail.
Independent testing reverses that pressure. Send a harmless message from another trusted account and check status through the real provider.
How the Restricted Email Account Scam Works
Step 1: A generic notification reaches many providers at once
The campaign avoids a strong brand identity because its recipient list can contain addresses from numerous personal and workplace services.
A broad “Email Notification” heading works across Gmail, Outlook, hosted webmail, school accounts, and company domains.
The display name may imply support while the actual sender comes from an unrelated or compromised address.
Bulk distribution makes precise targeting unnecessary. Every successful recipient already has the one asset the attackers want, a working mailbox.
Step 2: The email invents a two-way communication failure
The warning says new messages cannot arrive and outgoing messages cannot leave until verification is completed.
That claim encourages immediate action because both receiving and sending appear affected.
The message does not identify which outgoing email failed, when the hold began, or how many messages are queued.
A professional-looking button replaces technical evidence with a simple instruction.
Step 3: The button redirects to unrelated infrastructure
The verification link leads outside the actual provider’s network, sometimes through a compromised website that normally serves a different business.
An ordinary site can host a hidden phishing page after its software, password, or hosting account is breached.
The unrelated domain may not resemble email service infrastructure at all, but many recipients focus on the form after the page loads.
URL inspection before navigation can expose this mismatch before any credential is entered.
Step 4: The page reflects the recipient’s address
The landing page may show the target email automatically and label itself as an account settings portal.
Reflection creates the impression that the page queried a real mail server. In reality, the address can be passed in the link.
The only missing field is the password, so completing the form feels like confirming information already recognized.
No legitimate service uses an unrelated page to validate ownership by collecting the secret protecting the account.
Step 5: Submitted credentials are reused quickly
Phishing operators may test the username and password against popular providers or identify the correct platform from the email domain.
Successful access can reveal messages, contacts, files, invoices, and password-reset links.
If multi-factor authentication appears, the victim may receive repeated prompts designed to trigger an accidental approval.
Reused passwords are also tested against shopping, social, cloud, and financial services.
Step 6: Mailbox rules help hide the intrusion
Attackers can forward all mail, forward only selected messages, or create rules targeting words associated with security and money.
Alerts may be marked read, moved to Trash, archived, or sent to a folder the victim rarely opens.
The attacker can then monitor conversations and insert new payment details at a convincing moment.
Without a settings audit, a password change may end one session while leaving another route available.
Sender, Domain, Mail Flow, and Account Verification Checks
Make the sender identify a real administrator
Expand the sender address, return path, and Reply-To information. Compare them with previous legitimate messages from the provider or internal IT team.
Generic words such as support, administrator, or security are not organizational proof.
Workplace users should consult a known help desk number, internal portal, or employee directory rather than responding to the message.
If the sender cannot be connected to the organization responsible for the mailbox, do not accept its account-status claim.
Read the domain before reading the form
The phishing page’s design can be changed instantly. Domain ownership is harder to explain away.
The observed food-related domain had no operational reason to collect webmail credentials or release held messages.
A padlock proves encrypted transport, not provider ownership. Criminal pages routinely use HTTPS certificates.
Close the page and enter the official provider address manually. Do not search for a similar-looking login through advertisements.
Test mail flow through a clean channel
Send a harmless test from another trusted account and reply through the mailbox’s normal interface.
Check Outbox, Sent, delivery failures, storage quota, service-status pages, and authenticated notices for evidence of an actual restriction.
Business administrators can inspect mail logs and queue events rather than relying on the email’s unverified statement.
A normal send-and-receive test strongly contradicts the claim that every message is being held.
Review the account without using the email link
Open settings from a saved bookmark or official application. Look for security warnings, billing issues, storage limits, or policy notices there.
If no restriction appears, report the email. If a real issue exists, resolve it inside that authenticated session.
Never provide a mailbox password to a page that does not belong to the service operating the mailbox.
Enable a password manager and strong authentication. Both reduce the chance that a copied sign-in form will be treated as genuine.
What Attackers Search for Inside a Mailbox
Criminals do not need to read every conversation. Search tools can surface valuable material within minutes.
Keywords such as invoice, statement, payroll, wire, contract, password, recovery, tax, and identification can reveal high-value threads.
Contacts and signatures show who trusts the victim, where they work, and how they normally communicate.
Calendars and travel messages reveal absences or deadlines that make impersonation more believable.
Cloud notifications expose services where password resets or shared files may be available.
High-impact consequences can include:
- Resetting other accounts through intercepted email links.
- Redirecting payments inside legitimate invoice conversations.
- Sending phishing from the victim’s trusted address.
- Collecting sensitive attachments and personal details.
- Monitoring future messages through hidden forwarding.
- Locking out the owner by changing recovery information.
How to Audit Rules, Forwarding, and Sessions
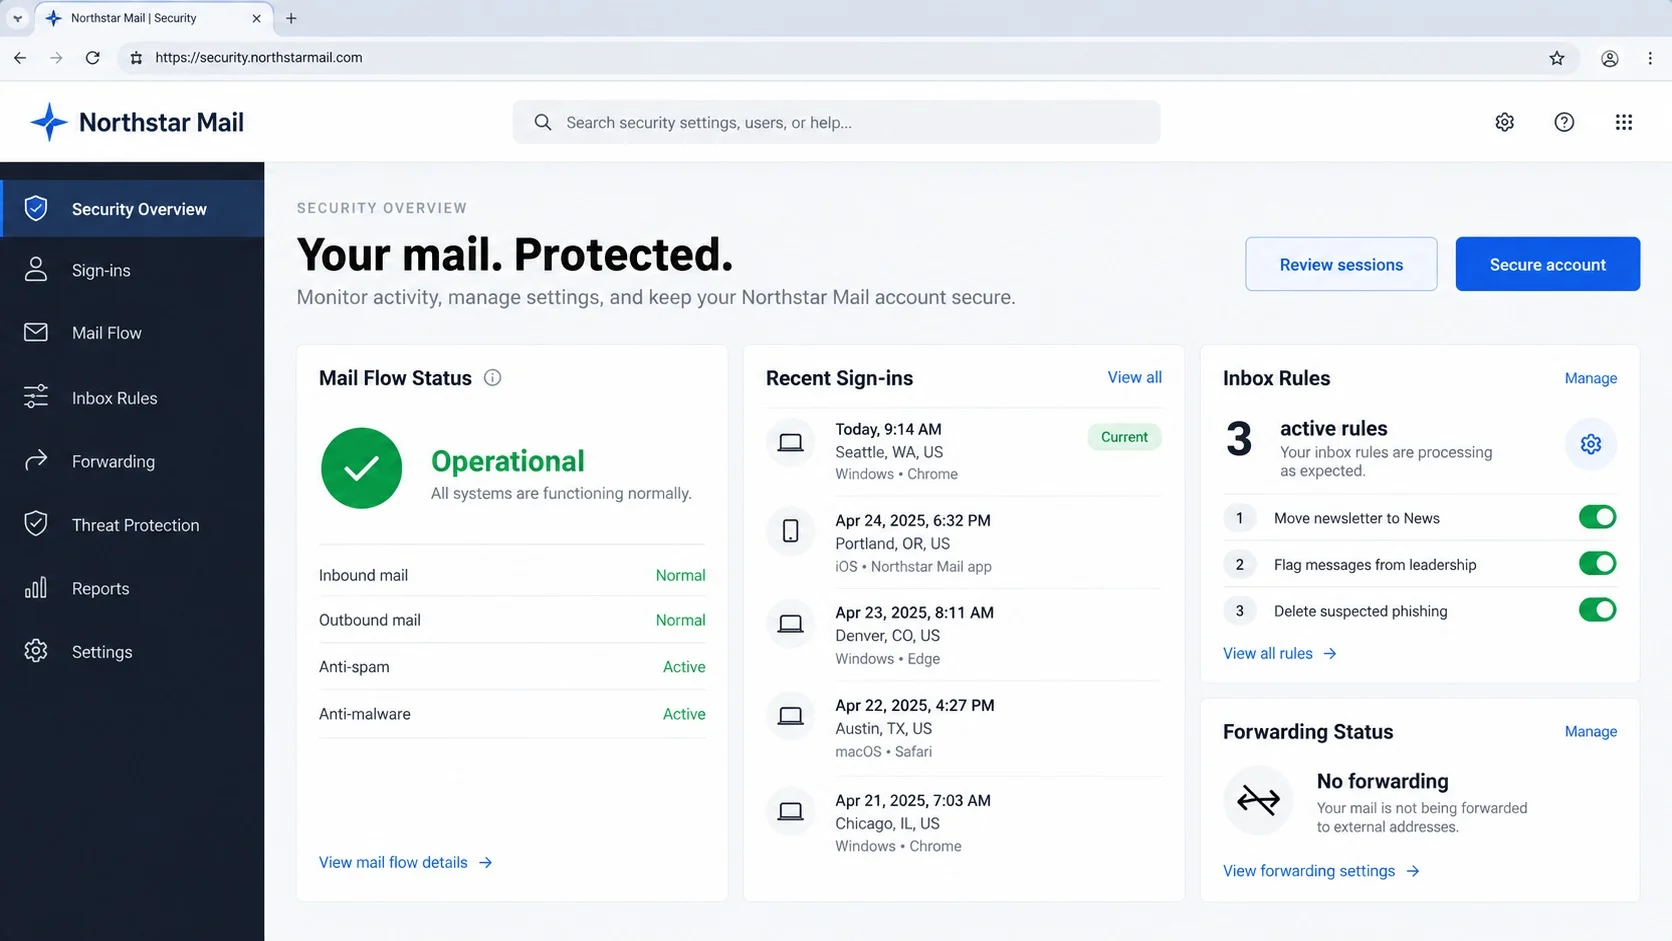
Begin with recent sign-in history. Compare timestamps, locations, operating systems, browser names, and application types against your actual activity.
Revoke anything uncertain. Reauthentication is less costly than leaving an attacker connected.
Inspect automatic forwarding and rules separately. A selective rule may not appear under the account’s general forwarding setting.
Look for actions involving delete, archive, mark read, forward, redirect, or move to a rarely used folder.
Review delegates, connected applications, app passwords, POP, IMAP, recovery methods, and trusted devices.
After cleanup, send additional test messages and watch security notifications to confirm that control has returned.
What to Do if You Have Fallen Victim to This Scam
- Assume a submitted password is exposed. Do not wait for unauthorized activity or trust an error displayed by the fake form.
- Change the password through the official provider. Use a clean device when files were downloaded or the browser behaved unexpectedly.
- Terminate all sessions. Revoke remembered browsers, mobile clients, desktop applications, app passwords, and access tokens associated with the account.
- Remove hidden access. Inspect forwarding, filters, rules, delegates, connected apps, recovery contacts, POP, IMAP, and trusted devices.
- Enable phishing-resistant authentication. A passkey or hardware security key offers stronger protection than an easily approved push notification.
- Change reused credentials. Prioritize services discoverable from the inbox, including banks, stores, cloud storage, social networks, and workplace platforms.
- Check messages and contacts. Review Sent, Trash, Archive, and Spam, then warn recipients if the attacker used the account for impersonation.
- Scan when the incident involved device exposure. Run Malwarebytes after suspicious downloads, extensions, notification permissions, redirects, or unexpected software behavior.
- Reduce repeat exposure. AdGuard can block many known phishing destinations and malicious ads, adding protection before a deceptive page fully loads.
- Notify administrators and financial teams. A business account may require log review, payment holds, customer warnings, and incident-response procedures.
- Preserve evidence before deletion. Save the original message, headers, URL, screenshots, security events, and any fraudulent messages sent from the account.
Is Your Device Infected? Run a Free Malware Scan
Slow performance, constant pop-ups, or strange behavior? These are classic signs of a malware infection. A quick way to check is to scan your device with Malwarebytes Free, one of the most trusted malware removal tools available. If you only visited a scam page and didn’t download or install anything, this scan is optional.
The free version detects and removes the most common threats, including:
- Adware — the cause of those annoying pop-ups
- Browser hijackers — unwanted redirects and changed homepages
- Trojans and spyware — hidden programs stealing your data
- Potentially unwanted programs (PUPs) — software you never asked for
👉 Select your device below — Windows, Mac, or Android — then follow the simple steps to download Malwarebytes, scan your system, and remove any threats it finds. The scan usually takes 5 to 20 minutes.
Run a Malware Scan with Malwarebytes for Windows
Malwarebytes is one of the most popular and trusted anti-malware tools for Windows — and it’s completely free for removing infections. It catches threats that many antivirus programs miss, including adware, browser hijackers, and trojans. Follow the steps below to scan your PC and remove what Malwarebytes finds.
Download Malwarebytes
Click the button below to download the latest version of Malwarebytes for Windows from the official source. The free version is all you need — it will scan your computer and remove adware, browser hijackers, and other malicious software at no cost.
Download MalwarebytesOfficial installer for Windows 11 and 10. Your download starts right away.Want real-time protection? See Malwarebytes Premium Malwarebytes Free for WindowsScans and removes malware at no cost
-
Install Malwarebytes
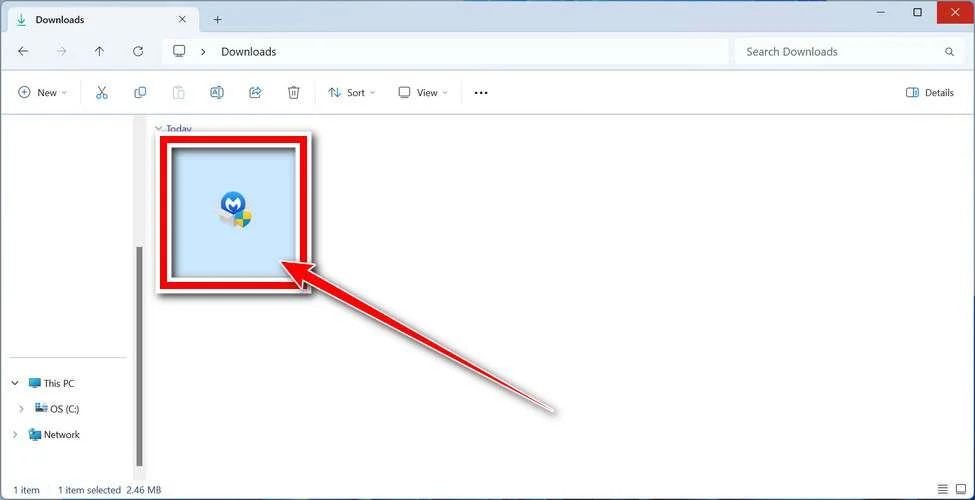
When the download finishes, open your Downloads folder and double-click the MBSetup file. If Windows shows a User Account Control pop-up, click “Yes” to allow the installation.
Follow the On-Screen Prompts to Install Malwarebytes
The setup wizard will walk you through a few quick screens:
-
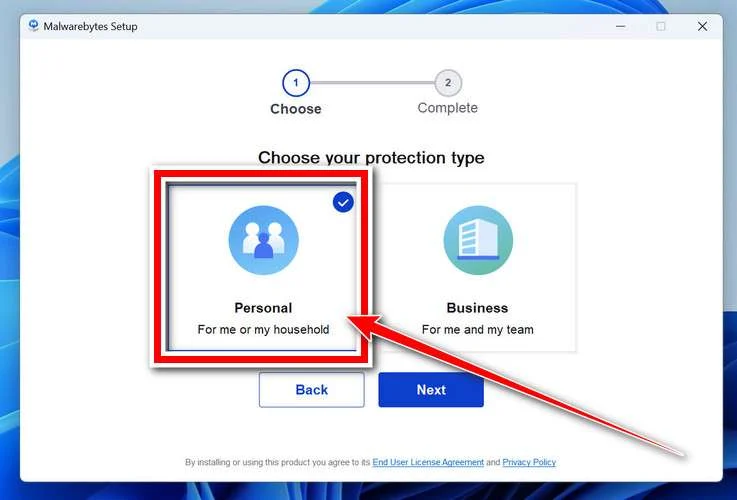
Choose where you’re installing the program — “Personal Computer” or “Work Computer” — then click Next.
-
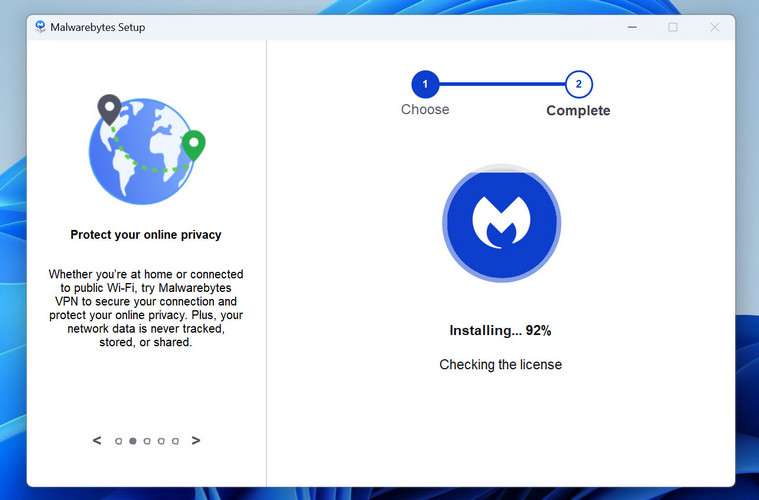
Malwarebytes will now install on your device. This usually takes under a minute.
-
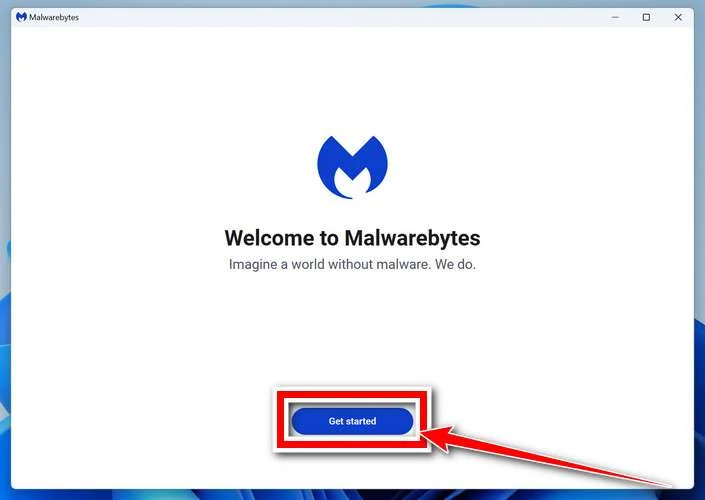
When installation is complete, the “Welcome to Malwarebytes” screen will open automatically.
-
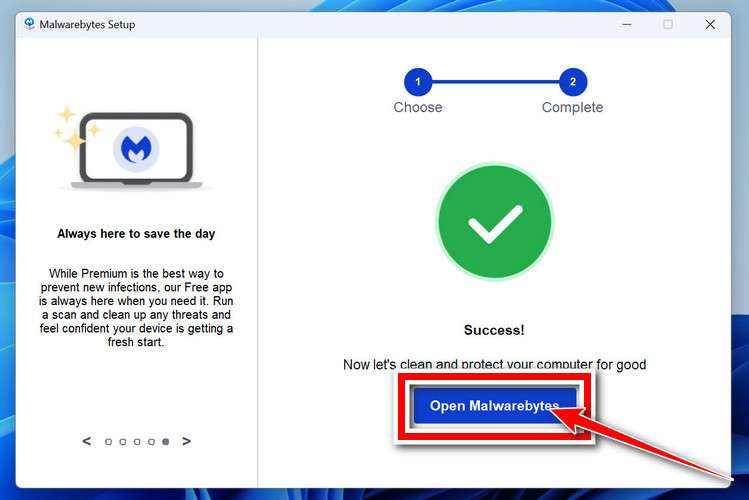
On the final screen, click Open Malwarebytes to launch the program.
-
Optional: Check for rootkits with a Custom Scan
You don’t need to change any settings for a normal scan. The standard Threat Scan in the next step is enough for most problems, so you can go straight to it.
If you also want to check for rootkits, use a Custom Scan. In current versions of Malwarebytes, rootkit scanning is only available there:
- On the Scanner tile, click the three-dot menu and select Advanced Scan.
- Choose Custom Scan. In its options, check Scan for rootkits.
- Select your system drive (usually C:\) as the location to scan, then start the scan. It takes longer than a Threat Scan.
- When it finishes, review and quarantine the results as described in the steps below.
Rootkit scanning isn’t available on Windows devices with ARM processors.
Start the Scan
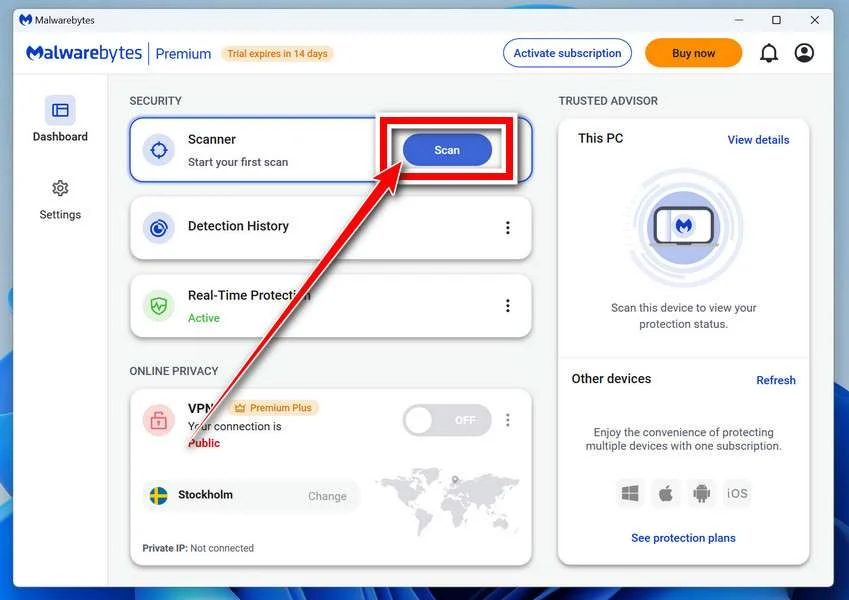
Click the blue Scan button. Malwarebytes will automatically update its virus database and start checking your computer for malware.
-
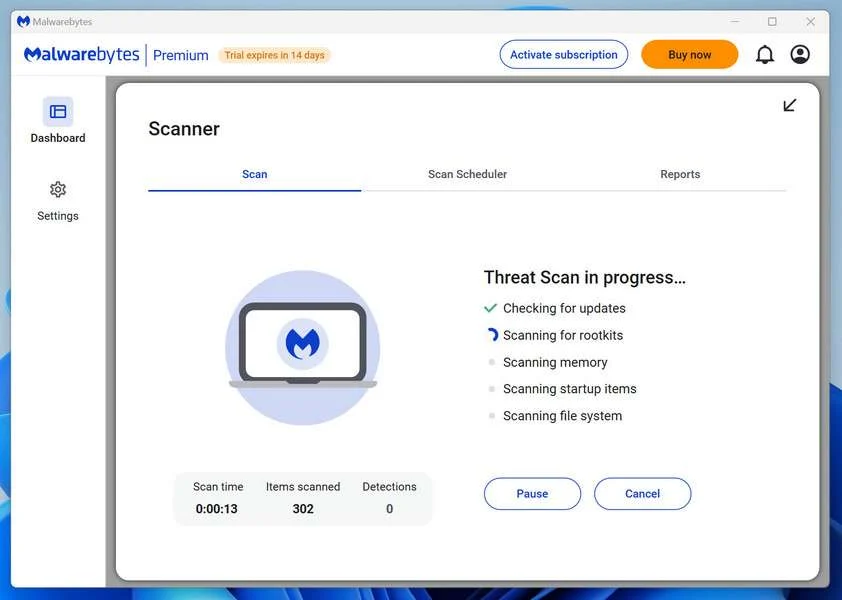
Wait for the Scan to Finish
The scan checks your entire system for browser hijackers and other malicious programs, so it can take 5 to 20 minutes depending on your computer. Feel free to do something else — just check back occasionally to see the progress.
-
Quarantine the Detected Threats
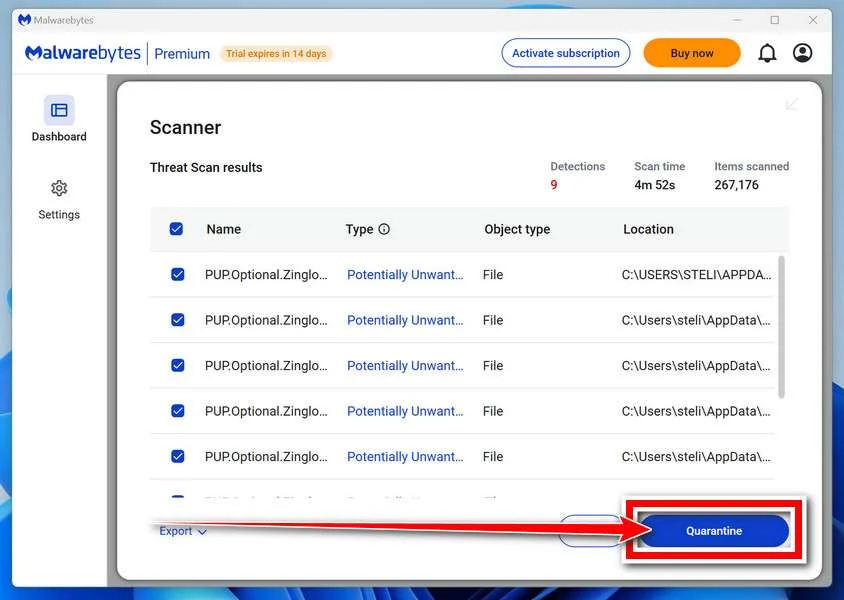
When the scan is done, you’ll see a list of everything Malwarebytes found — malware, adware, and potentially unwanted programs. Click the “Quarantine” button to remove all of them at once.
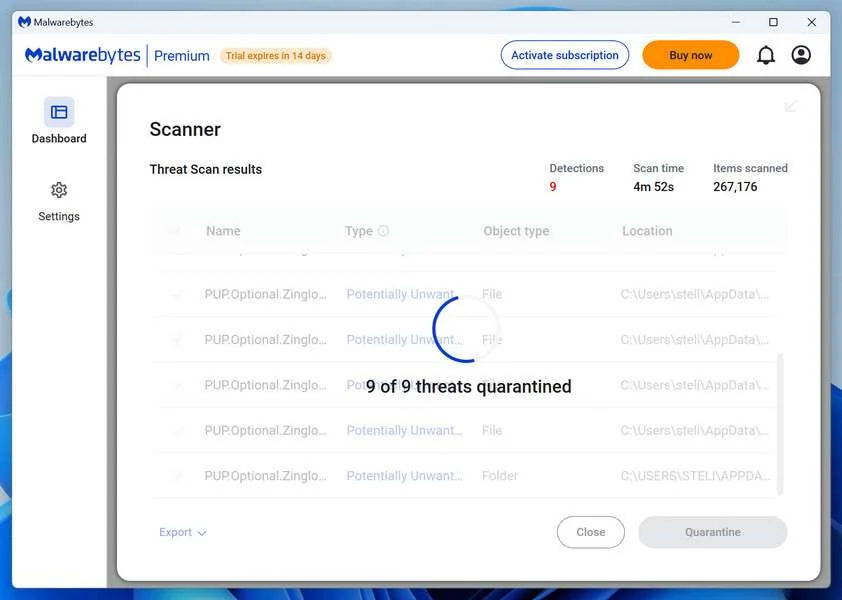
Malwarebytes will now remove the malicious files and registry entries and move them safely into quarantine.
-
Restart Your Computer
Some threats can only be fully removed after a reboot. If Malwarebytes asks you to restart, click Yes. Once you’re logged back in, Malwarebytes has finished removing the threats it found.
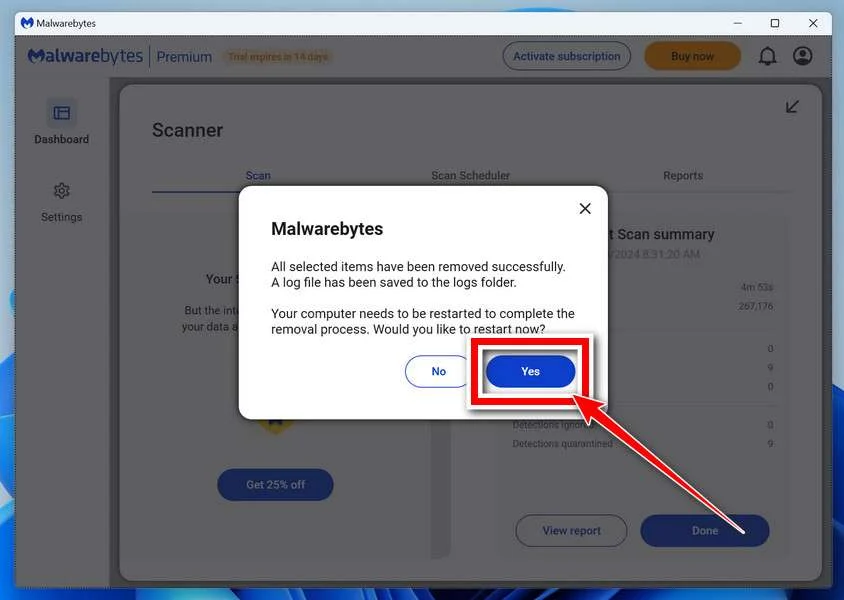
When the scan is done, check whether the problems you noticed have stopped. If they continue, see the options below.
If you are still having problems with your computer after completing these instructions, then please follow one of the steps:
- Run a computer scan with ESET Online Scanner
- Ask for help in our Windows Malware Removal Help & Support forum.
Run a Malware Scan with Malwarebytes for Mac
Malwarebytes for Mac is a free on-demand scanner that removes the malware other security software tends to miss — adware, browser hijackers, and unwanted programs included. Cleaning an infected Mac with Malwarebytes has always been completely free, and it’s our go-to recommendation. Follow the steps below to scan your Mac and remove what Malwarebytes finds.
-
Download Malwarebytes for Mac
Click the button below to download the latest version of Malwarebytes for Mac.
Download MalwarebytesOfficial installer for macOS. Your download starts right away.Want real-time protection? See Malwarebytes PremiumMalwarebytes Free for MacScans and removes malware at no cost -
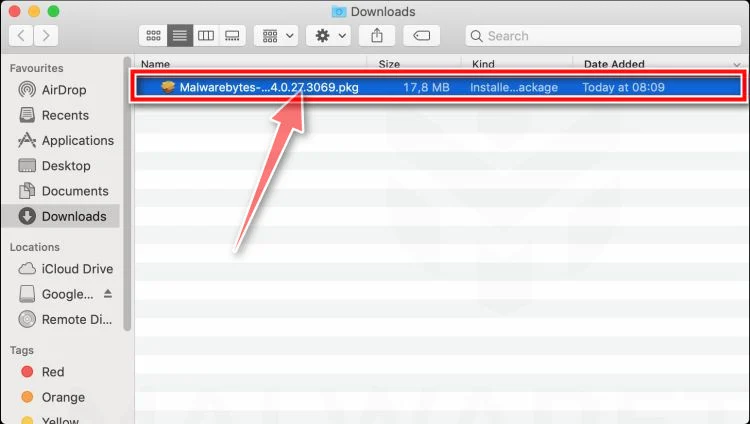
Open the Malwarebytes setup file
When the download finishes, open your Downloads folder and double-click the setup file to begin the installation.
-
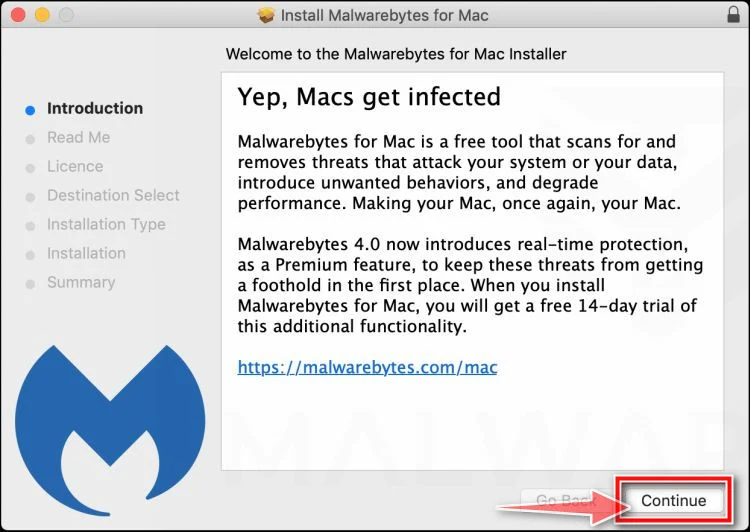
Follow the On-Screen Prompts to Install Malwarebytes
The Malwarebytes for Mac Installer will guide you through a few quick screens. Click “Continue” and keep following the prompts until the installation completes.
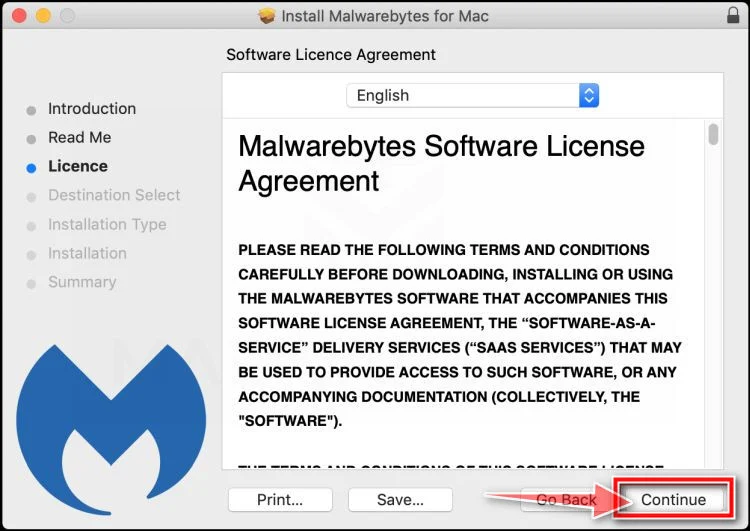
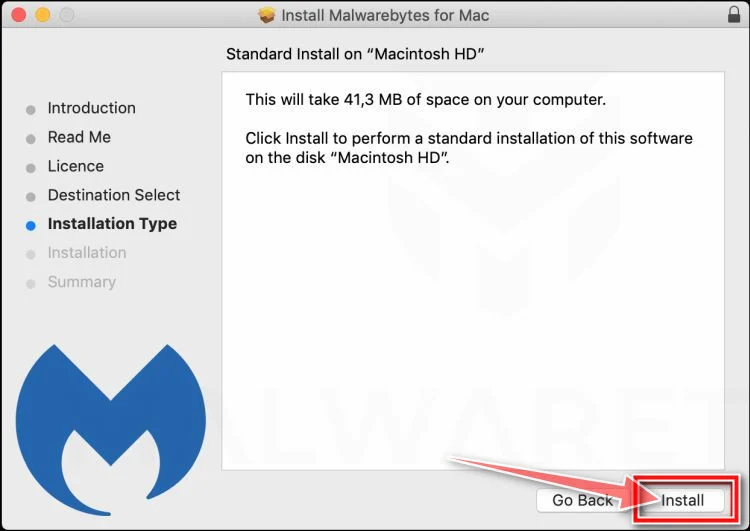
When the installation is complete, Malwarebytes opens to the Welcome to Malwarebytes screen. Click “Get started“.
Malwarebytes needs Full Disk Access to check your whole Mac. When it asks, open System Settings > Privacy & Security > Full Disk Access, turn on Malwarebytes (it may be listed as Malwarebytes Protection), and confirm with your password or Touch ID. Then return to Malwarebytes. On macOS Monterey and earlier, this setting is in System Preferences > Security & Privacy > Privacy.
-
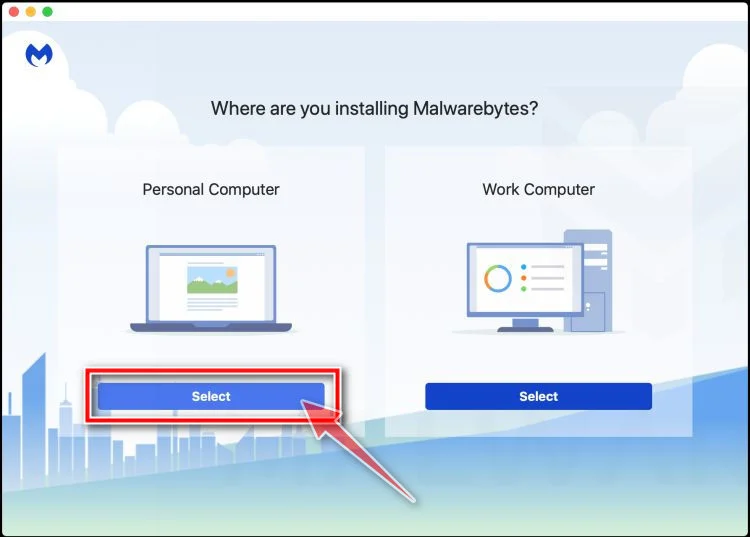
Select “Personal Computer” or “Work Computer”
Malwarebytes will ask what type of computer you’re installing it on. Click either Personal Computer or Work Computer, whichever applies.
-
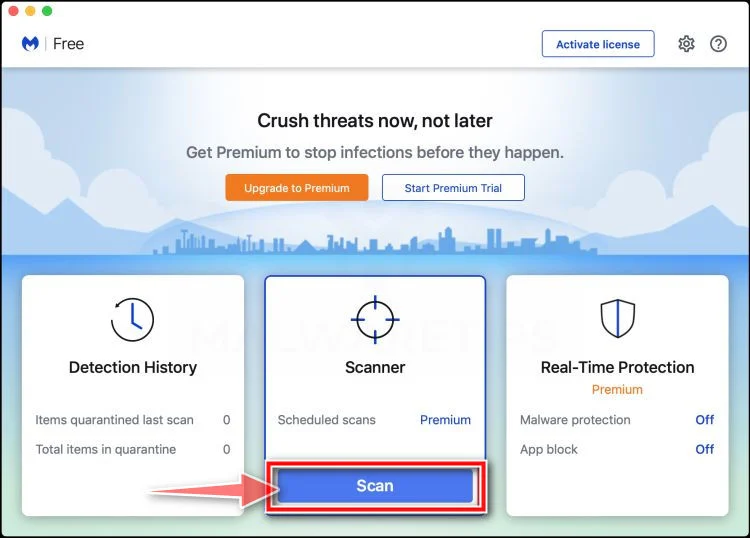
Start the Scan
Click the “Scan” button. Malwarebytes will automatically update its detection database and begin checking your Mac for malware.
-
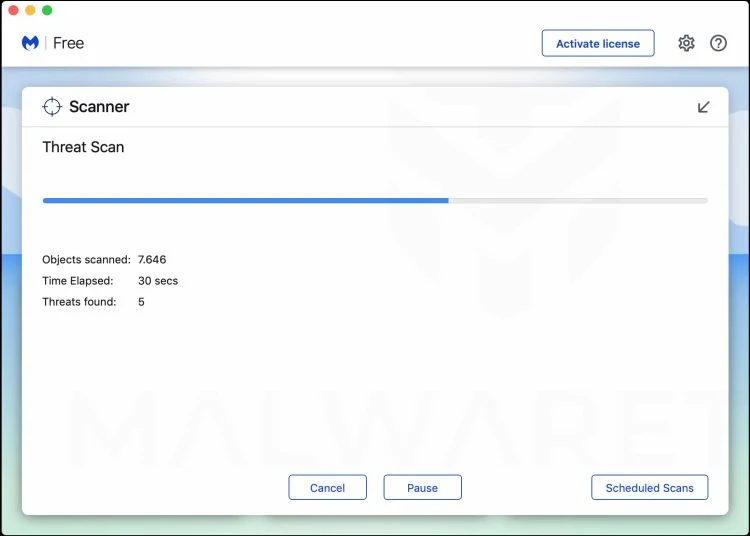
Wait for the Scan to Finish
Malwarebytes will scan your Mac for adware, browser hijackers, and other malicious programs. This can take a few minutes, so feel free to do something else — just check back occasionally to see the progress.
-
Quarantine the Detected Threats
When the scan is done, you’ll see a list of everything Malwarebytes found. Click the “Quarantine” button to remove all the threats at once.
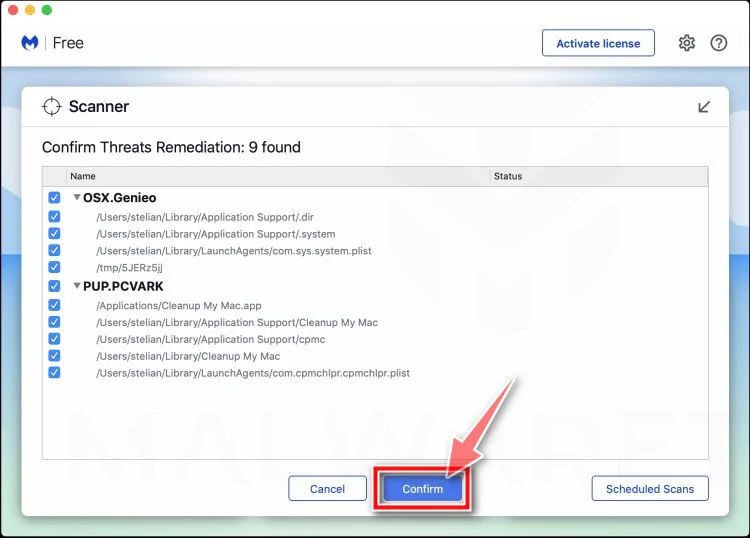
-
Restart Your Mac
Malwarebytes will now remove all the malicious files it found. Some threats can only be fully removed after a reboot — if Malwarebytes asks you to restart, allow it. Once you’re logged back in, check whether the problems you noticed have stopped. If they come back, save the scan report and ask for help in our forum.
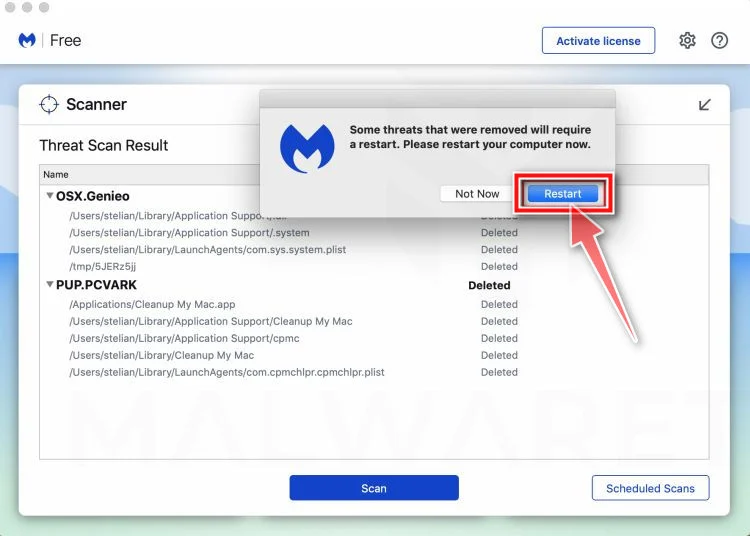
If the problems you noticed continue after the scan, see the options below.
If you are still experiencing problems while trying to remove a malicious program from your computer, please ask for help in our Mac Malware Removal Help & Support forum.
Run a Malware Scan with Malwarebytes for Android
Malwarebytes for Android scans your phone or tablet for malware, adware, and potentially unwanted apps. The free version scans only when you start a scan. Real-time protection, which checks apps automatically, is part of the paid Premium version.
-
Download Malwarebytes for Android.
You can download Malwarebytes for Android by clicking the link below.
Get Malwarebytes for AndroidOpens Google Play in a new tab.Want real-time protection? See Malwarebytes Premium for AndroidMalwarebytes for AndroidScans your phone and removes malware at no cost -
Install Malwarebytes for Android on your phone.
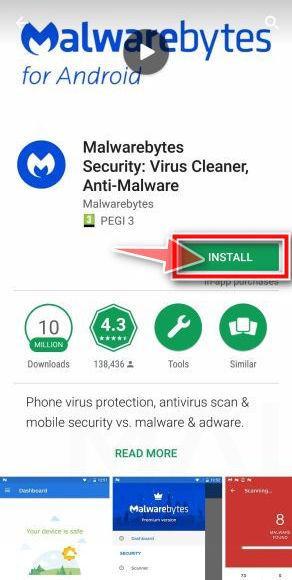
In the Google Play Store, tap “Install” to install Malwarebytes for Android on your device.
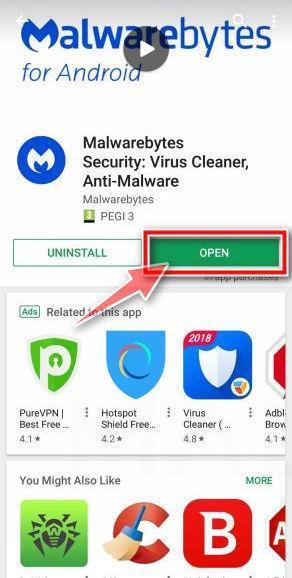
When the installation process has finished, tap “Open” to begin using Malwarebytes for Android. You can also open Malwarebytes by tapping on its icon in your phone menu or home screen.
-
Follow the on-screen prompts to complete the setup process
When Malwarebytes opens, it walks you through a short setup. Tap Get started and follow the prompts. If you see an offer for a trial or a paid plan, read it before you accept. You can skip it and keep using the free scanner.
Malwarebytes will ask for permission to access the files on your phone so it can scan them. Tap Allow, or turn on the permission in the Android screen that opens, then return to Malwarebytes.
-
Run a scan with Malwarebytes for Android
On the main screen, tap Scan now. In some versions, you open the menu, tap Scanner, and then tap Run a scan.
-
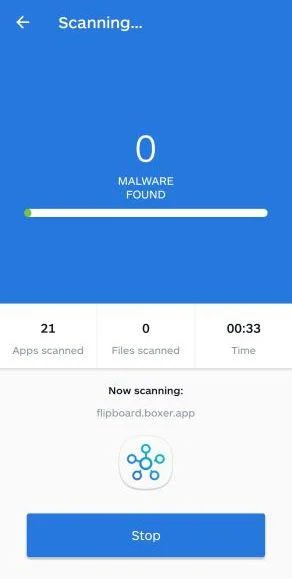
Wait for the Malwarebytes scan to complete.
Malwarebytes will now start scanning your phone for adware and other malicious apps. This process can take a few minutes, so we suggest you do something else and periodically check on the status of the scan to see when it is finished.
-
Remove the detected apps.
When the scan has been completed, you will see a list of the threats that Malwarebytes for Android has detected. Next to each detected item, tap the menu icon (three dots), then choose to uninstall the app or delete the file. Android then asks you to confirm. Tap OK or Uninstall to remove the app.
-
Restart your phone.
When the detected apps are removed, restart your phone if Malwarebytes asks you to. Then check whether the problems you noticed have stopped.
If the problems you noticed continue after the scan, see the options below.
If you are still having problems with your phone after completing these instructions, then please follow one of the steps:
- Ask for help in our Mobile Malware Removal Help & Support forum.
- Only as a last resort, reset your phone to factory settings. Read the warning below first.
- Back up your photos, videos, files, and messages, for example to your Google account or a computer.
- Make sure you know your Google account email and password. The phone asks for them after the reset. If you changed the password recently, Google recommends waiting 24 hours before you reset.
- On a Samsung phone, also make sure you know your Samsung account password.
- If you use an authenticator app for two-step verification, move your accounts to another device or save your backup codes first.
Stay Protected: Block Ads and Malicious Sites
No scan can prove a device is completely clean, so it helps to block threats before they reach you. Most infections start with a malicious ad or a fake download button — so blocking them at the source is your best defense.
We recommend AdGuard, which blocks malicious ads, phishing pages, and dangerous redirects before they can reach you.
👉 Download AdGuard and browse safely
How Organizations Can Reduce Similar Incidents
Teach employees to verify account problems through the internal portal or known help desk, not through buttons in unexpected messages.
Use mail authentication and anti-phishing controls, but explain that compromised legitimate senders can still carry dangerous links.
Enable alerts for new forwarding, new delegates, unusual sign-ins, unfamiliar OAuth applications, and mass message deletion.
Require stronger authentication for mailboxes handling finance, administration, customer data, or privileged password-reset traffic.
Maintain a simple reporting process. Employees act faster when the suspicious-message button is visible and security acknowledges reports promptly.
Test the recovery process before an incident. Staff should know who can revoke sessions, inspect rules, preserve logs, and contact affected partners.
Restriction, Storage Quota, and Delivery Failure Are Different Problems
Phishing messages often blur several genuine mail problems together because most recipients do not manage server terminology every day.
A full storage quota may reject new mail, but the official account normally displays current usage and an established method for freeing space.
A delivery failure usually produces a bounce describing the recipient, server response, and reason that one specific message could not be delivered.
A security restriction may limit sign-in or sending, but it should appear inside the authenticated account and known administrator tools.
None of these conditions requires giving a mailbox password to a food website, unfamiliar form, or generic support page.
Record the exact symptom before seeking help. Is mail missing, sending failing, storage full, or sign-in blocked?
That distinction helps legitimate support diagnose the issue and prevents a vague scam warning from defining the problem for you.
When the mailbox works normally after an independent test, the claimed universal hold has no technical evidence behind it.
Frequently Asked Questions
Can an email provider place all my messages on hold?
Providers can restrict accounts for real reasons, but the status should be visible through the official service and confirmed by known support.
How can I tell whether mail is actually being held?
Check authenticated notices, send controlled test messages, review delivery errors, and ask the legitimate administrator to inspect account or server logs.
Why did the fake page know my email address?
The address can be embedded in the link and displayed automatically. That simple reflection does not prove a connection to the mail system.
Is the unrelated website necessarily hacked?
It may be compromised, maliciously controlled, or hosting deceptive content through another mechanism. The verified fact is that it is not the provider.
Will multi-factor authentication stop the attack?
It helps greatly, but attackers may trigger approval prompts or steal sessions. Never approve an unexpected request, and review active access after exposure.
Should I delete the message immediately?
Report and preserve it first if administrators or investigators need headers. Delete it after the necessary evidence has been collected.
The Bottom Line
The Restricted Email Account scam invents held messages and an urgent reactivation process, then delivers the victim to an unrelated password form.
Test mail flow and account status independently. If the password was submitted, secure the mailbox completely, including sessions, rules, forwarding, and recovery settings.

Join the discussion
0 commentsShare your experience or ask a question about this article.
Discussion
Start the conversation
Have a question or something useful to share? Add the first comment.