


A new buyer wants a quote within five days. The email asks about pricing and lead times and says two spreadsheets are attached for reference.
Before assigning someone to fill it out, take a closer look at what arrived. The attachment’s name tells a different story from the email.
Overview
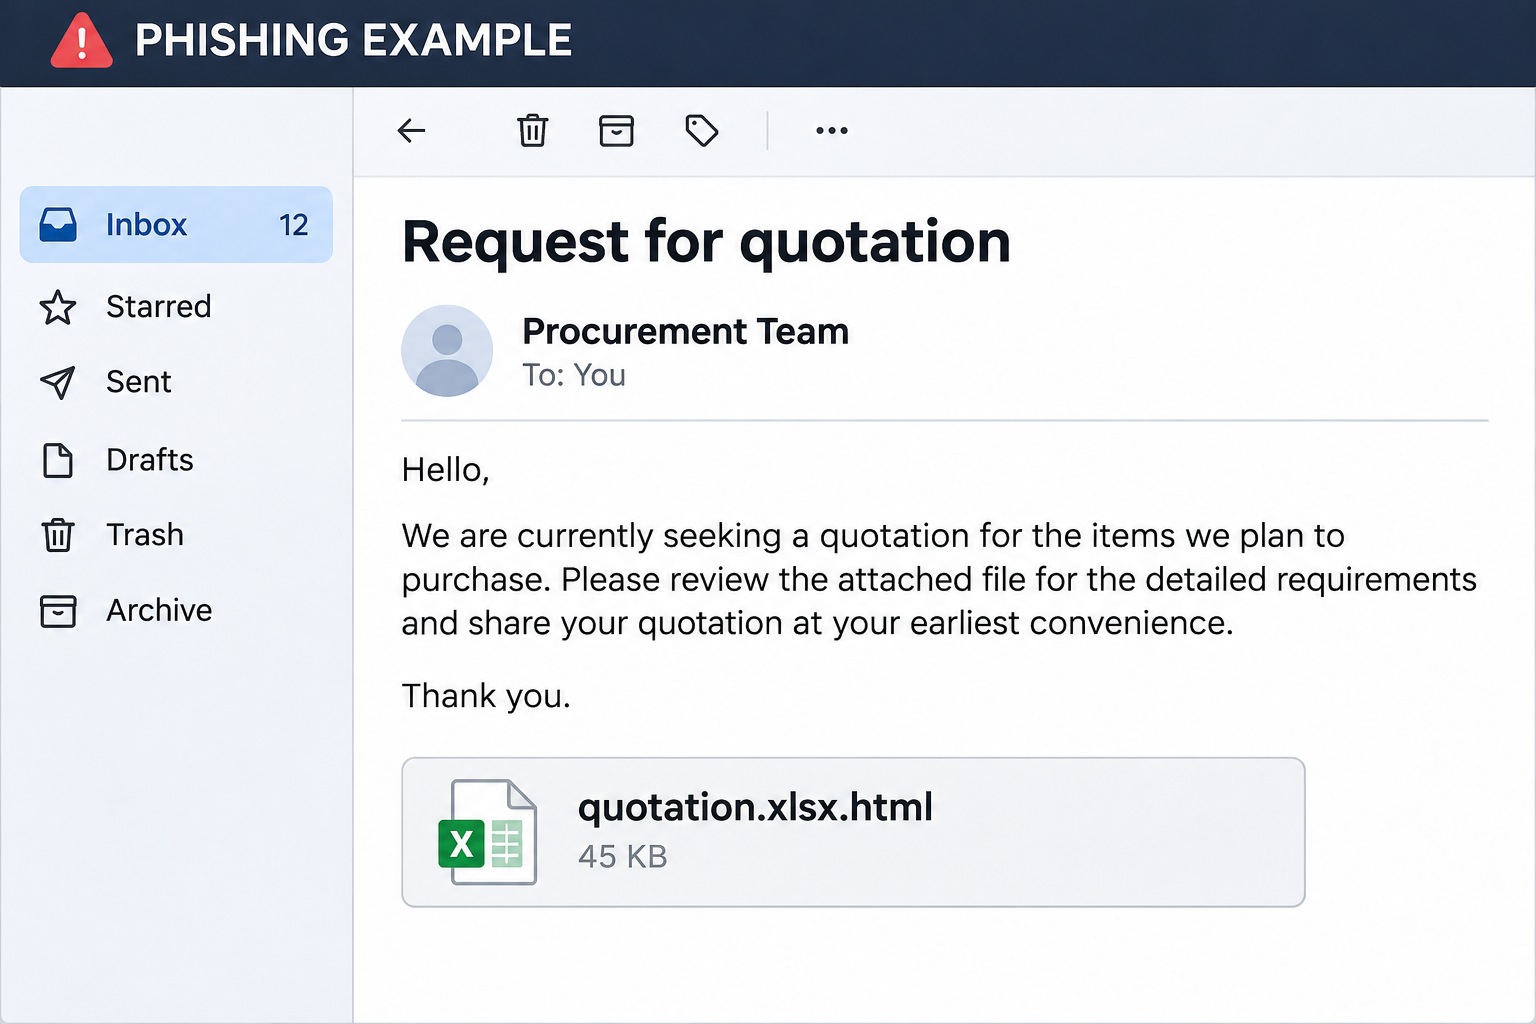
An apparent request for quotation opens like a webpage
The Share Company Details email scam presents a supplier assessment as a potential business opportunity. It asks for company information, product specifications and a quote.
The sample claims to represent Century Financial Consultancy LLC, a real business. It lists office details that resemble the company’s public information, but that doesn’t authenticate the sender.
The described purchase order and price benchmark are presented as spreadsheets. The actual file in the reported example ends in .html, not .xlsx.
Opening that file presented a fake Gmail sign-in in a browser. The observed behavior was a credential request, not proof that it installed a program.
The final extension is more useful than the icon
A name can contain .xlsx without being an Excel workbook. In a name ending in .xlsx.html, the last extension identifies the file as HTML.
An HTML file can show a page inside your browser. That page can resemble a legitimate service even though you opened it from a local attachment.
The reported example claimed the recipient’s session expired and displayed the email address. It was not a sign-in reached through Google’s normal account route.
Don’t open an attachment to verify its extension. Use the filename as displayed by your mail or file manager, or ask your security team to inspect it safely.
What to verify before responding to the buyer
- Whether your business expected a quotation request from that organization.
- Whether the buyer can confirm it through an independently verified contact.
- Whether the file type matches the documents the email describes.
- Whether the request appears in an approved supplier portal or known conversation.
- Whether anyone opened the file, entered credentials or downloaded anything afterward.
Treat the company’s identity and the authenticity of the email as separate questions. A real business with matching office addresses can still be the subject of impersonation.
How the Share Details RFQ Scam Works
Step 1: A plausible inquiry invites an ordinary sales response
The email asks about capabilities, certifications and lead times. Those are normal subjects for a procurement inquiry, especially for a manufacturer or wholesaler.
It also presents a five-day window. That is long enough to look like an ordinary deadline, but short enough to get the attachment assigned to someone quickly.
No single detail proves the email came from a genuine procurement team. Start by asking whether anyone has an existing contact or conversation with that buyer.
If the inquiry arrived in a general sales inbox, give the team a safe way to escalate it. Don’t forward the attachment to everyone who might prepare a quote.
Step 2: The signature borrows credibility from a real organization
The sample includes addresses for several offices. Some details match the company’s public information, which makes the signature look more credible than an anonymous request.
Compare the request with contact information you obtained independently. A copied address, staff title or switchboard detail is not evidence that the person who sent the message works there.
Century Financial’s official contact page has its own impersonation warning. The warning does not identify this exact quotation email.
Don’t use the number printed in the suspicious signature to check the sender. Open a separate route and describe what you received without attaching the file.
Step 3: The purported spreadsheet displays an unexpected sign-in
The reported attachment opened in a browser and displayed an imitation Gmail sign-in. A spreadsheet description in the email didn’t change the actual format of the file.
If you see that prompt, close it. You don’t need to identify every part of the page or enter a password to find out whether there is a price list.
An address already shown on the page doesn’t prove that Gmail authenticated the browser. Start separately from the application where your organization normally works with mail or documents.
If the file opened but you entered nothing, report that distinction. Also report any later download, unusual browser prompt or program you ran.
Step 4: A password disclosure puts supplier conversations at risk
The exposed account might hold quotations, client details or negotiations. What an intruder could see depends on the account’s permissions and whether they actually gained access.
If an account sends orders or invoices, an unfamiliar payment change may look more believable when it arrives in a thread people already recognize.
The source does not document a resulting payment or prove which accounts were accessed. Check your own logs and records before treating the entire supplier list as compromised.
If the mailbox receives requests from outside customers, give the administrator the exposure time. That helps narrow which sessions, messages or forwarding rules warrant review.
How to Check a Real RFQ Without Opening the File
Confirm the request with someone who owns it
Ask internally whether the buyer or opportunity is known. Look up prior quotes, contact records and vendor onboarding steps rather than relying on a professional-looking footer.
If nobody recognizes it, reach out through the organization’s independently published channel if your company permits. Ask whether it has a request with the reference you received.
If the buyer confirms a genuine inquiry, ask for the documents through your approved exchange. Don’t continue with the original attachment simply because the company name is legitimate.
Show extensions without opening files
On Windows 11, open File Explorer and use View, Show, File name extensions. This setting changes how names are displayed; it doesn’t run the files.
If you can see the extension in your mail client, there is no need to save the attachment to check it. Leave it for the approved reporting process.
Do not rename a suspicious .html file to .xlsx to try to open it safely. The name does not change what the file contains.
If an employee already saved it, note the location and report it. Don’t open it again or upload a potentially sensitive attachment to an unapproved public service.
Limit what you share while you verify
A quote may include internal prices, certificates and production details. Don’t send that information to a new contact before verifying the opportunity and obtaining any necessary approval.
For a request that contains a delivery address or named contact, compare it privately with your records. Don’t put the full notice in a public warning.
If there’s a genuine deadline, ask the verified buyer about a safe way to submit the quote. Someone with a real request can identify the right process.
What to Do if You Have Fallen Victim to This Scam
Report the message and leave the file unopened.
Use your organization’s phishing process. Identify the supposed buyer and the final file extension, and say whether anyone already opened the attachment.
Don’t forward the file to another team as a routine work item. Let security tell you how to preserve or submit it.
Describe the difference between viewing a page and entering a password.
If a browser opened, record the time and any prompts or downloads. If you typed a password or accepted an authentication request, tell the account administrator promptly.
Do not revisit the page to reconstruct your actions. An approximate time is more useful than another exposure.
Protect the mailbox from a trusted device.
Follow your provider’s or workplace’s account recovery process. Replace an exposed password and check sessions, connected apps and recovery methods.
Review unexpected rules and sent messages. For a personal Google account, use Google’s account recovery guidance if you can’t get back in.
Check the device if the attachment led to more than a prompt.
If you ran a download, accepted an extension or noticed a security alert, stop using that device for sensitive work. Tell IT or a trusted technician what ran.
Malwarebytes can help investigate a suspected installation on a personal device. AdGuard may reduce exposure to malicious pages; it cannot undo a disclosure or clean an installed program.
Protect any supplier or customer information already sent.
Tell the person who owns the quote or records what was shared. Let them assess whether prices, technical files or customer data need a separate response.
If payment details changed in a related conversation, verify the change with your established contact. Report any money already sent through your finance and bank channels.
Warn the people likely to receive another copy.
Describe the inquiry and the misleading attachment name. Direct colleagues to their approved purchasing process without sending them the file itself.
If your organization has a shared sales inbox, ask the administrator to check who had access and whether other recipients interacted with the request.
Is Your Device Infected? Run a Free Malware Scan
Slow performance, constant pop-ups, or strange behavior? These are classic signs of a malware infection. A quick way to check is to scan your device with Malwarebytes Free, one of the most trusted malware removal tools available. If you only visited a scam page and didn’t download or install anything, this scan is optional.
The free version detects and removes the most common threats, including:
- Adware — the cause of those annoying pop-ups
- Browser hijackers — unwanted redirects and changed homepages
- Trojans and spyware — hidden programs stealing your data
- Potentially unwanted programs (PUPs) — software you never asked for
👉 Select your device below — Windows, Mac, or Android — then follow the simple steps to download Malwarebytes, scan your system, and remove any threats it finds. The scan usually takes 5 to 20 minutes.
Run a Malware Scan with Malwarebytes for Windows
Malwarebytes is one of the most popular and trusted anti-malware tools for Windows — and it’s completely free for removing infections. It catches threats that many antivirus programs miss, including adware, browser hijackers, and trojans. Follow the steps below to scan your PC and remove what Malwarebytes finds.
Download Malwarebytes
Click the button below to download the latest version of Malwarebytes for Windows from the official source. The free version is all you need — it will scan your computer and remove adware, browser hijackers, and other malicious software at no cost.
Download MalwarebytesOfficial installer for Windows 11 and 10. Your download starts right away.Want real-time protection? See Malwarebytes Premium Malwarebytes Free for WindowsScans and removes malware at no cost
-
Install Malwarebytes
When the download finishes, open your Downloads folder and double-click the MBSetup file. If Windows shows a User Account Control pop-up, click “Yes” to allow the installation.
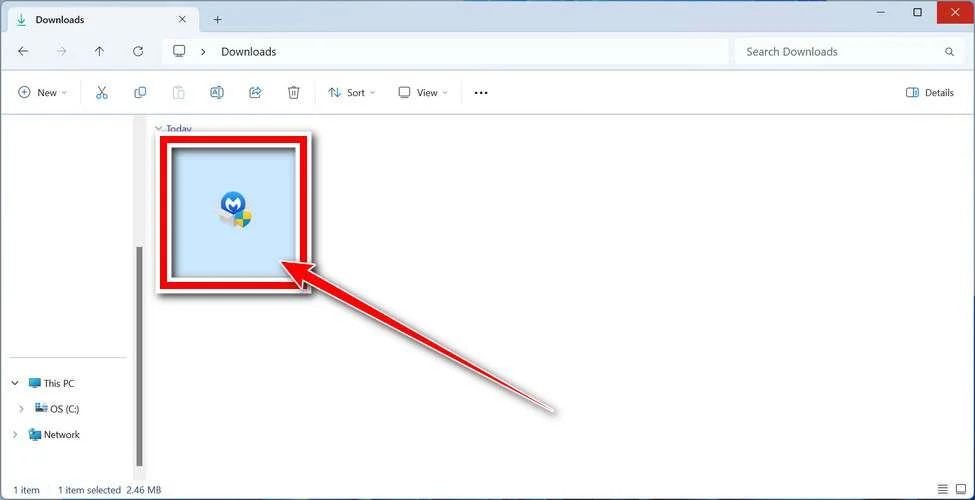
Follow the On-Screen Prompts to Install Malwarebytes
The setup wizard will walk you through a few quick screens:
-
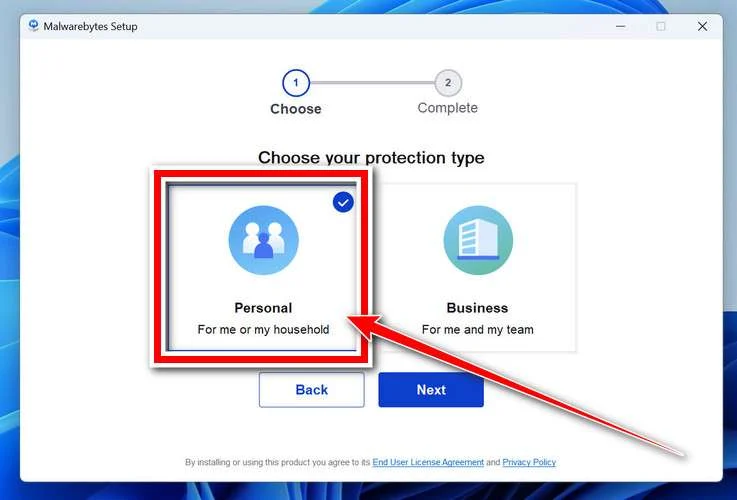
Choose where you’re installing the program — “Personal Computer” or “Work Computer” — then click Next.
-
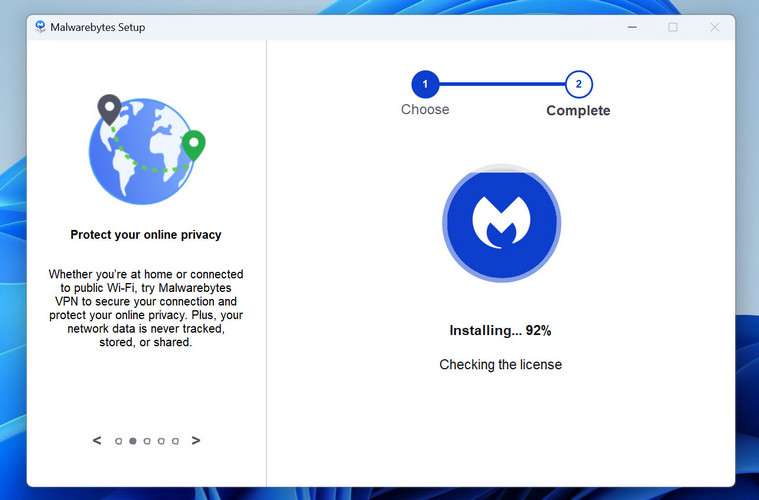
Malwarebytes will now install on your device. This usually takes under a minute.
-
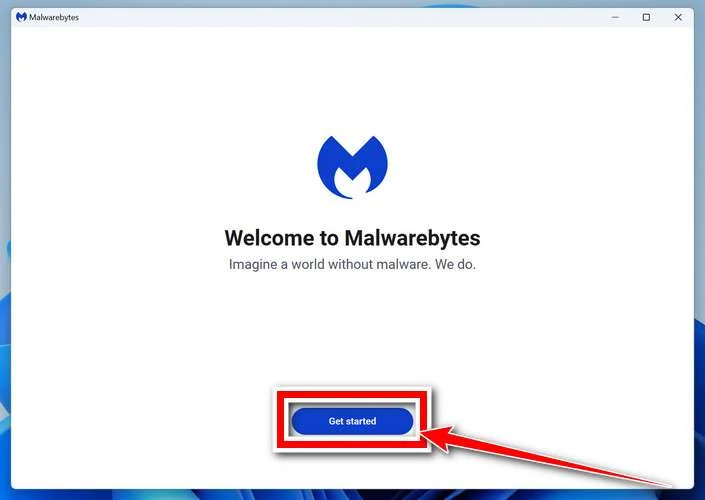
When installation is complete, the “Welcome to Malwarebytes” screen will open automatically.
-
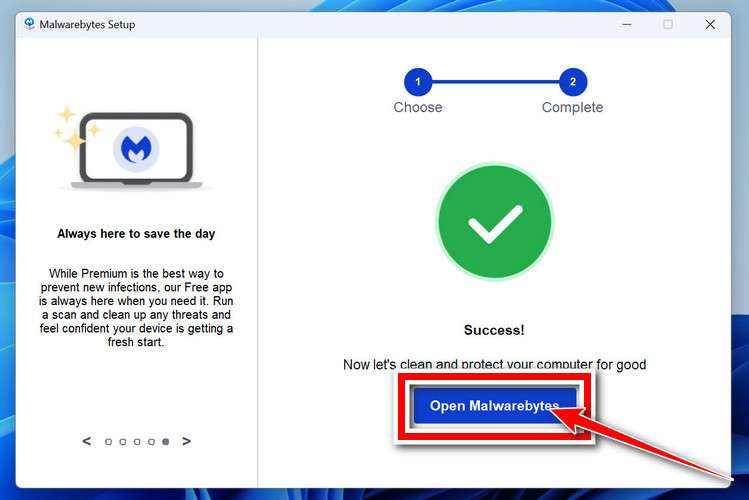
On the final screen, click Open Malwarebytes to launch the program.
-
Optional: Check for rootkits with a Custom Scan
You don’t need to change any settings for a normal scan. The standard Threat Scan in the next step is enough for most problems, so you can go straight to it.
If you also want to check for rootkits, use a Custom Scan. In current versions of Malwarebytes, rootkit scanning is only available there:
- On the Scanner tile, click the three-dot menu and select Advanced Scan.
- Choose Custom Scan. In its options, check Scan for rootkits.
- Select your system drive (usually C:\) as the location to scan, then start the scan. It takes longer than a Threat Scan.
- When it finishes, review and quarantine the results as described in the steps below.
Rootkit scanning isn’t available on Windows devices with ARM processors.
Start the Scan
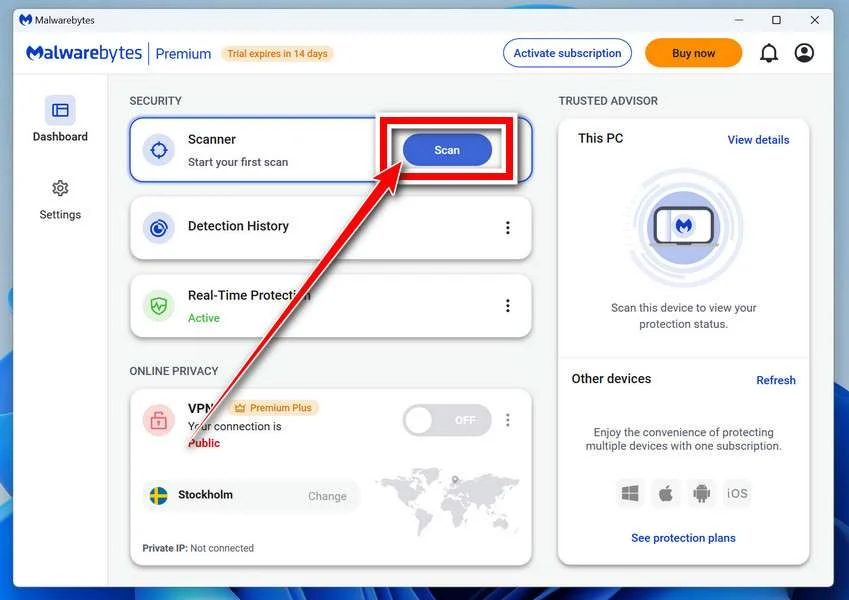
Click the blue Scan button. Malwarebytes will automatically update its virus database and start checking your computer for malware.
-
Wait for the Scan to Finish
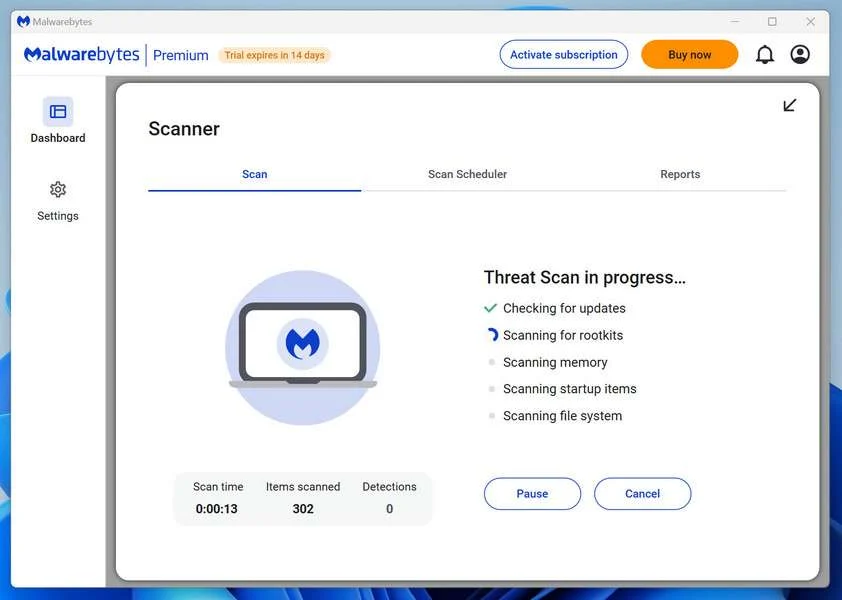
The scan checks your entire system for browser hijackers and other malicious programs, so it can take 5 to 20 minutes depending on your computer. Feel free to do something else — just check back occasionally to see the progress.
-
Quarantine the Detected Threats
When the scan is done, you’ll see a list of everything Malwarebytes found — malware, adware, and potentially unwanted programs. Click the “Quarantine” button to remove all of them at once.
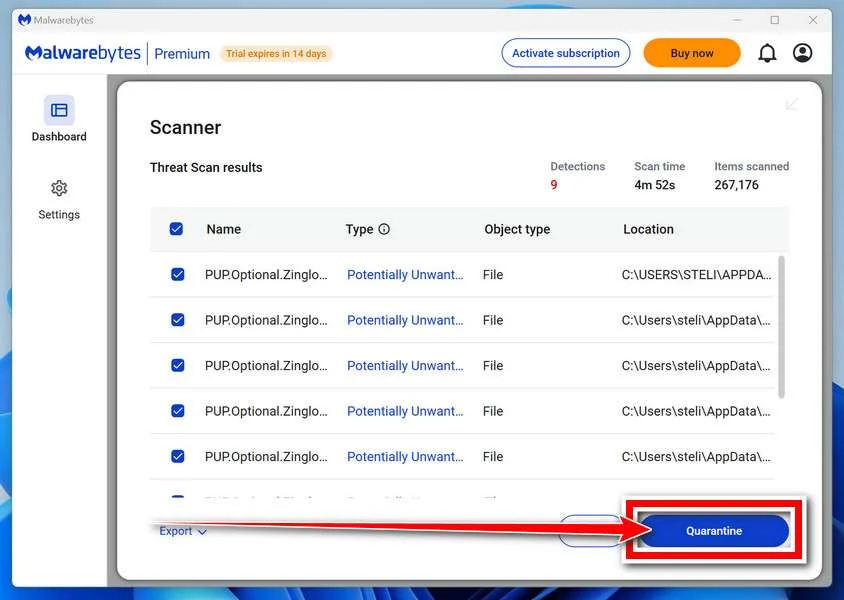
Malwarebytes will now remove the malicious files and registry entries and move them safely into quarantine.
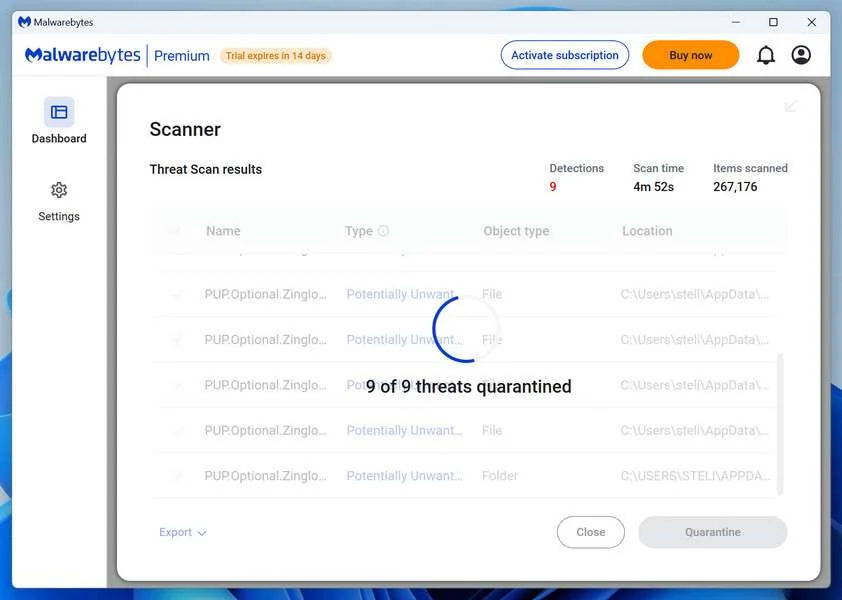
-
Restart Your Computer
Some threats can only be fully removed after a reboot. If Malwarebytes asks you to restart, click Yes. Once you’re logged back in, Malwarebytes has finished removing the threats it found.
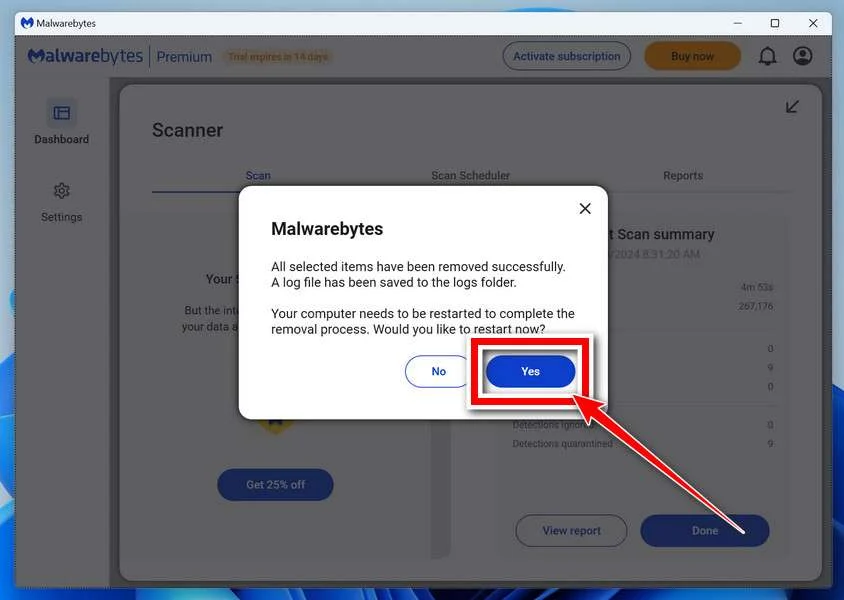
When the scan is done, check whether the problems you noticed have stopped. If they continue, see the options below.
If you are still having problems with your computer after completing these instructions, then please follow one of the steps:
- Run a computer scan with ESET Online Scanner
- Ask for help in our Windows Malware Removal Help & Support forum.
Run a Malware Scan with Malwarebytes for Mac
Malwarebytes for Mac is a free on-demand scanner that removes the malware other security software tends to miss — adware, browser hijackers, and unwanted programs included. Cleaning an infected Mac with Malwarebytes has always been completely free, and it’s our go-to recommendation. Follow the steps below to scan your Mac and remove what Malwarebytes finds.
-
Download Malwarebytes for Mac
Click the button below to download the latest version of Malwarebytes for Mac.
Download MalwarebytesOfficial installer for macOS. Your download starts right away.Want real-time protection? See Malwarebytes PremiumMalwarebytes Free for MacScans and removes malware at no cost -
Open the Malwarebytes setup file
When the download finishes, open your Downloads folder and double-click the setup file to begin the installation.
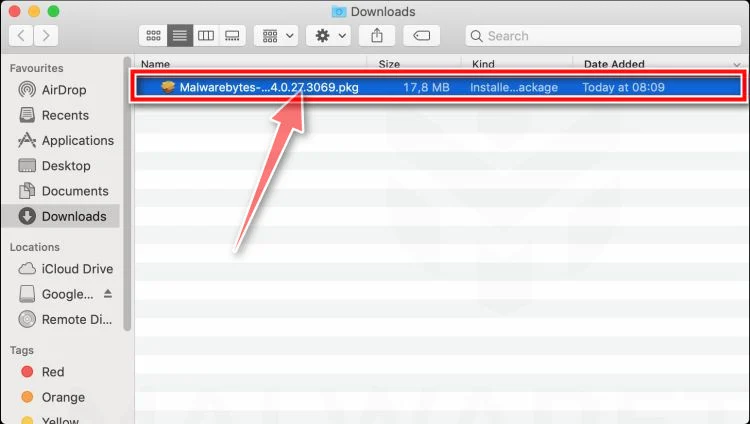
-
Follow the On-Screen Prompts to Install Malwarebytes
The Malwarebytes for Mac Installer will guide you through a few quick screens. Click “Continue” and keep following the prompts until the installation completes.
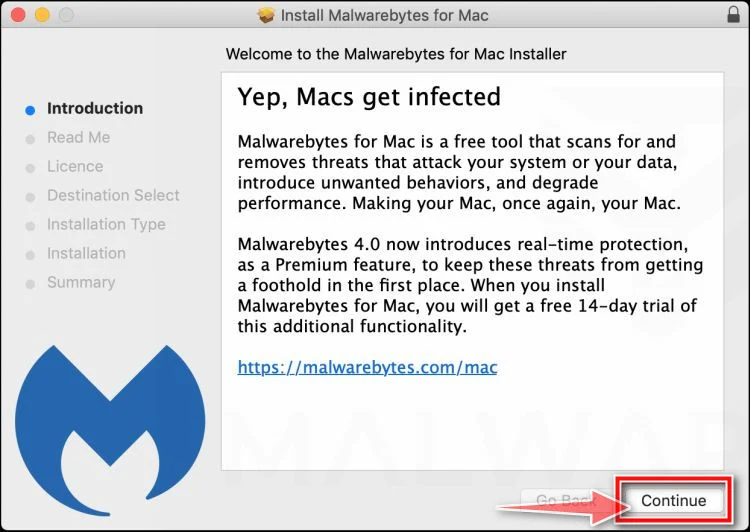
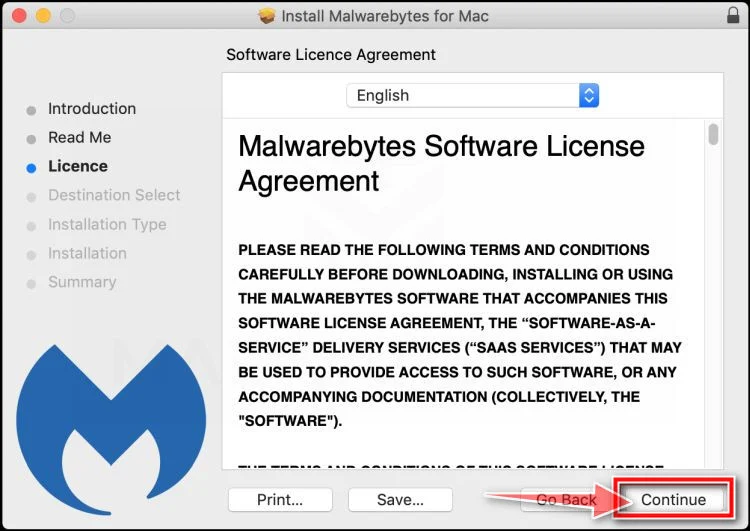
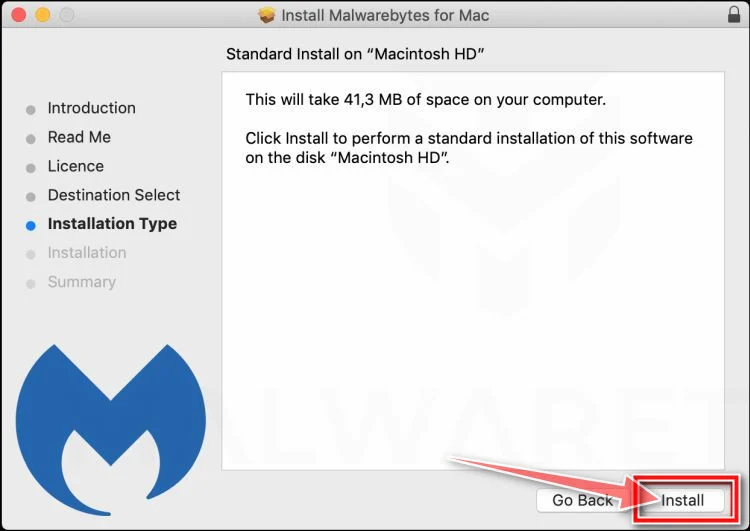
When the installation is complete, Malwarebytes opens to the Welcome to Malwarebytes screen. Click “Get started“.
Malwarebytes needs Full Disk Access to check your whole Mac. When it asks, open System Settings > Privacy & Security > Full Disk Access, turn on Malwarebytes (it may be listed as Malwarebytes Protection), and confirm with your password or Touch ID. Then return to Malwarebytes. On macOS Monterey and earlier, this setting is in System Preferences > Security & Privacy > Privacy.
-
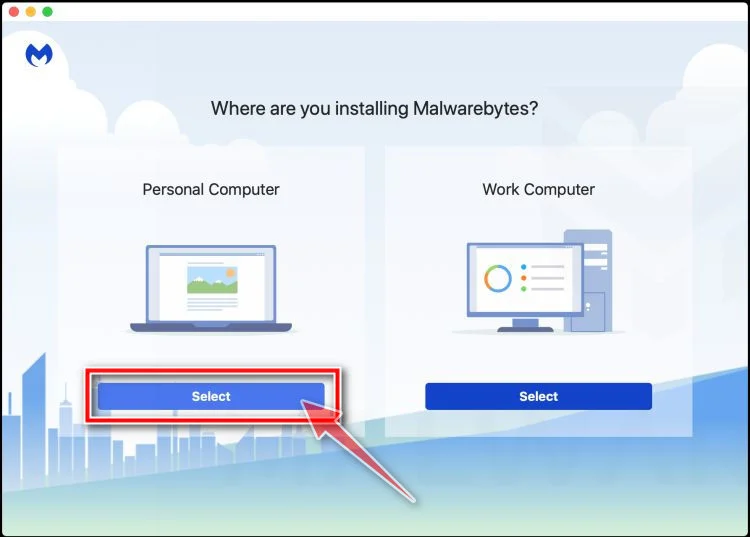
Select “Personal Computer” or “Work Computer”
Malwarebytes will ask what type of computer you’re installing it on. Click either Personal Computer or Work Computer, whichever applies.
-
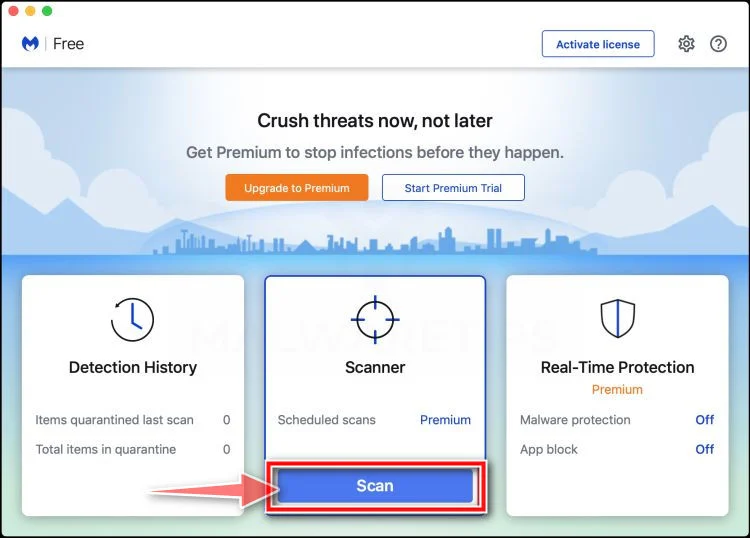
Start the Scan
Click the “Scan” button. Malwarebytes will automatically update its detection database and begin checking your Mac for malware.
-
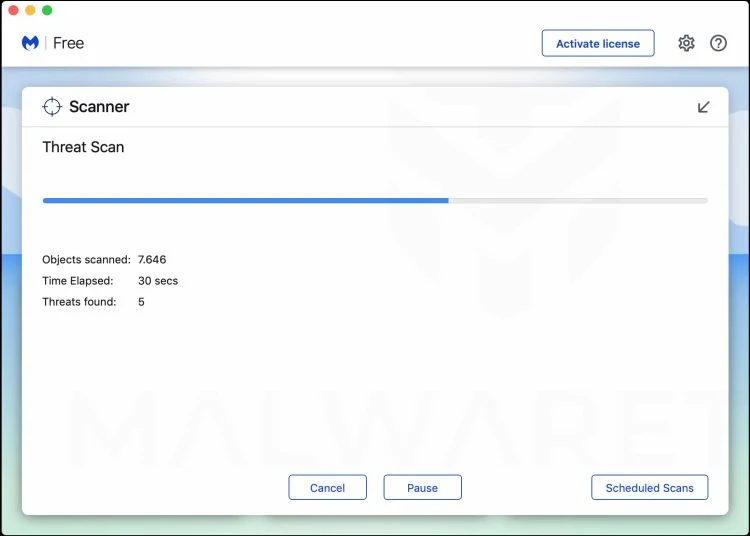
Wait for the Scan to Finish
Malwarebytes will scan your Mac for adware, browser hijackers, and other malicious programs. This can take a few minutes, so feel free to do something else — just check back occasionally to see the progress.
-
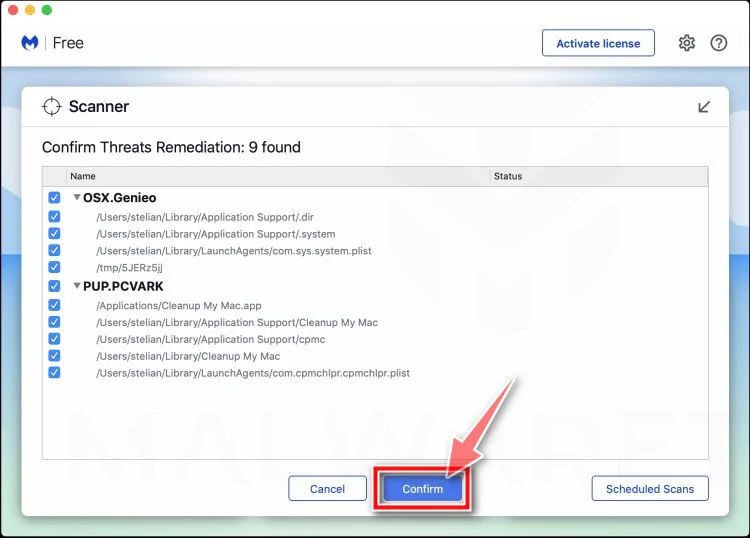
Quarantine the Detected Threats
When the scan is done, you’ll see a list of everything Malwarebytes found. Click the “Quarantine” button to remove all the threats at once.
-
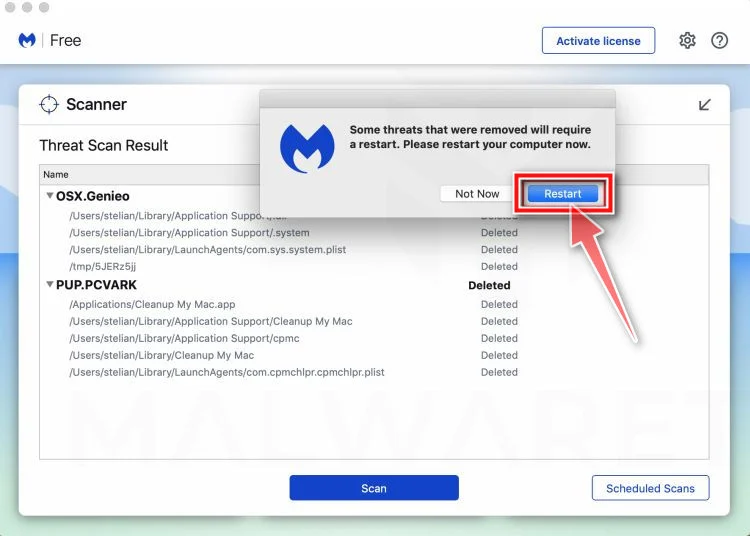
Restart Your Mac
Malwarebytes will now remove all the malicious files it found. Some threats can only be fully removed after a reboot — if Malwarebytes asks you to restart, allow it. Once you’re logged back in, check whether the problems you noticed have stopped. If they come back, save the scan report and ask for help in our forum.
If the problems you noticed continue after the scan, see the options below.
If you are still experiencing problems while trying to remove a malicious program from your computer, please ask for help in our Mac Malware Removal Help & Support forum.
Run a Malware Scan with Malwarebytes for Android
Malwarebytes for Android scans your phone or tablet for malware, adware, and potentially unwanted apps. The free version scans only when you start a scan. Real-time protection, which checks apps automatically, is part of the paid Premium version.
-
Download Malwarebytes for Android.
You can download Malwarebytes for Android by clicking the link below.
Get Malwarebytes for AndroidOpens Google Play in a new tab.Want real-time protection? See Malwarebytes Premium for AndroidMalwarebytes for AndroidScans your phone and removes malware at no cost -
Install Malwarebytes for Android on your phone.
In the Google Play Store, tap “Install” to install Malwarebytes for Android on your device.
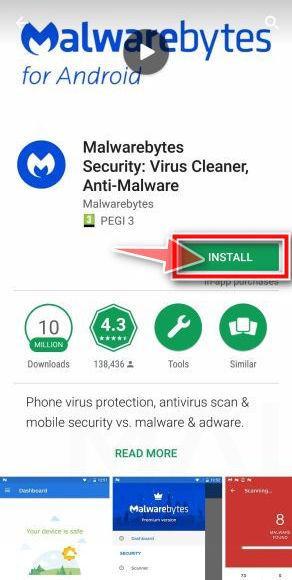
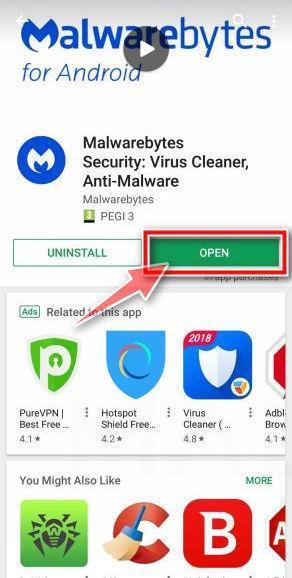
When the installation process has finished, tap “Open” to begin using Malwarebytes for Android. You can also open Malwarebytes by tapping on its icon in your phone menu or home screen.
-
Follow the on-screen prompts to complete the setup process
When Malwarebytes opens, it walks you through a short setup. Tap Get started and follow the prompts. If you see an offer for a trial or a paid plan, read it before you accept. You can skip it and keep using the free scanner.
Malwarebytes will ask for permission to access the files on your phone so it can scan them. Tap Allow, or turn on the permission in the Android screen that opens, then return to Malwarebytes.
-
Run a scan with Malwarebytes for Android
On the main screen, tap Scan now. In some versions, you open the menu, tap Scanner, and then tap Run a scan.
-
Wait for the Malwarebytes scan to complete.
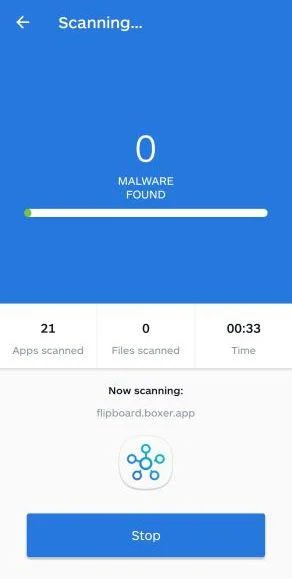
Malwarebytes will now start scanning your phone for adware and other malicious apps. This process can take a few minutes, so we suggest you do something else and periodically check on the status of the scan to see when it is finished.
-
Remove the detected apps.
When the scan has been completed, you will see a list of the threats that Malwarebytes for Android has detected. Next to each detected item, tap the menu icon (three dots), then choose to uninstall the app or delete the file. Android then asks you to confirm. Tap OK or Uninstall to remove the app.
-
Restart your phone.
When the detected apps are removed, restart your phone if Malwarebytes asks you to. Then check whether the problems you noticed have stopped.
If the problems you noticed continue after the scan, see the options below.
If you are still having problems with your phone after completing these instructions, then please follow one of the steps:
- Ask for help in our Mobile Malware Removal Help & Support forum.
- Only as a last resort, reset your phone to factory settings. Read the warning below first.
- Back up your photos, videos, files, and messages, for example to your Google account or a computer.
- Make sure you know your Google account email and password. The phone asks for them after the reset. If you changed the password recently, Google recommends waiting 24 hours before you reset.
- On a Samsung phone, also make sure you know your Samsung account password.
- If you use an authenticator app for two-step verification, move your accounts to another device or save your backup codes first.
Stay Protected: Block Ads and Malicious Sites
No scan can prove a device is completely clean, so it helps to block threats before they reach you. Most infections start with a malicious ad or a fake download button — so blocking them at the source is your best defense.
We recommend AdGuard, which blocks malicious ads, phishing pages, and dangerous redirects before they can reach you.
👉 Download AdGuard and browse safely
If the Buyer Follows Up
A follow-up may ask why you missed the deadline or offer a different copy of the quote. Treat the new message as part of the same verification problem.
If you already contacted the real company, use that independent conversation to resolve the request. Do not let a new attachment restart the process from the suspicious thread.
If someone offers to send a plain PDF instead, verify the sender before accepting it. A different file format doesn’t resolve the question of who is asking for your information.
For an established customer relationship, ask the account owner to confirm which contacts can issue quotes or purchasing requests. Write that down where the sales team can find it.
If an attachment is already in a shared folder
Tell your security team where the file was saved and who can open the folder. Don’t send coworkers to the folder to check whether they recognize the document.
If a link to that file was shared internally, preserve the location and time. An administrator can contain access without asking additional people to download it.
If someone copied the file to another device, say so. That device may need its own review even if the original attachment was removed from the mailbox.
When you already replied with information
Write down what you sent and to whom. A public brochure is different from a nonpublic price schedule, and a password is different from either.
Notify the owner of any proprietary material and give them the conversation through an approved channel. Let them decide whether a customer, legal or privacy team should be involved.
If somebody later emails from a familiar address asking about that quote, confirm the change independently. A legitimate buyer can explain where the original request belongs in your process.
If the attachment caused your browser to download another file, record its name without opening it. The browser’s download history can help you describe that step.
An approved file exchange can reduce ambiguity next time. Ask regular customers where they normally send purchase documents, and keep that route available to the team handling new inquiries.
Keep the quotation process moving without the file
If the opportunity turns out to be real, ask for a new reference through the verified channel. Assign the quote only after the responsible employee can reach the genuine documents.
Make clear which material can go outside the company. A price list sent to all customers may need less review than a technical drawing or an internal cost breakdown.
If staff use a shared folder for incoming RFQs, record the source before uploading documents. It becomes easier to identify the original message if a file is later reported.
When you handle quotes for multiple locations, confirm which office actually received the request and who owns the response. Don’t use the location named in the email as authorization.
Frequently Asked Questions
Is the email really from Century Financial?
The documented quotation request impersonates the business. The real company’s name and addresses don’t make the attachment legitimate. Verify any genuine inquiry through the company’s official route.
Is an attachment ending in .xlsx.html an Excel file?
No. The final extension in that name is .html. A spreadsheet-looking part of the name does not turn a webpage into a workbook.
Does opening the HTML file prove my PC was infected?
No. The documented behavior was a fake browser sign-in. Report the file and any further download or execution so the device risk can be assessed separately.
What if the fake page already displayed my address?
That does not prove a genuine sign-in occurred. Tell IT whether you entered anything or approved a prompt, and use your regular account route to check access.
Can I send the attachment to the real buyer to ask about it?
Don’t send the active file. Describe the request, reference and timing through an independent contact. Follow your security team’s procedure if it needs the original evidence.
What if I already sent our price list?
Tell the person responsible for the information and preserve the conversation. Separately protect any account credentials you entered and verify later requests through known channels.
The Bottom Line
Don’t open the attachment in the Share Company Details email. It’s presented as a spreadsheet, but the reported HTML file shows an unrelated sign-in instead of a verified RFQ.
Confirm real opportunities through your approved sales process. If you opened the file or disclosed information, report exactly what happened so the account and device can be assessed separately.

Join the discussion
0 commentsShare your experience or ask a question about this article.
Discussion
Start the conversation
Have a question or something useful to share? Add the first comment.