


A file appears while you are browsing, or a page tells you to complete an unfamiliar verification. The interruption can feel like a minor part of the visit.
If a later security warning mentions SnappyClient or SilabRAT, pause before treating the names as unrelated alerts. The response starts with reconstructing what you actually did.
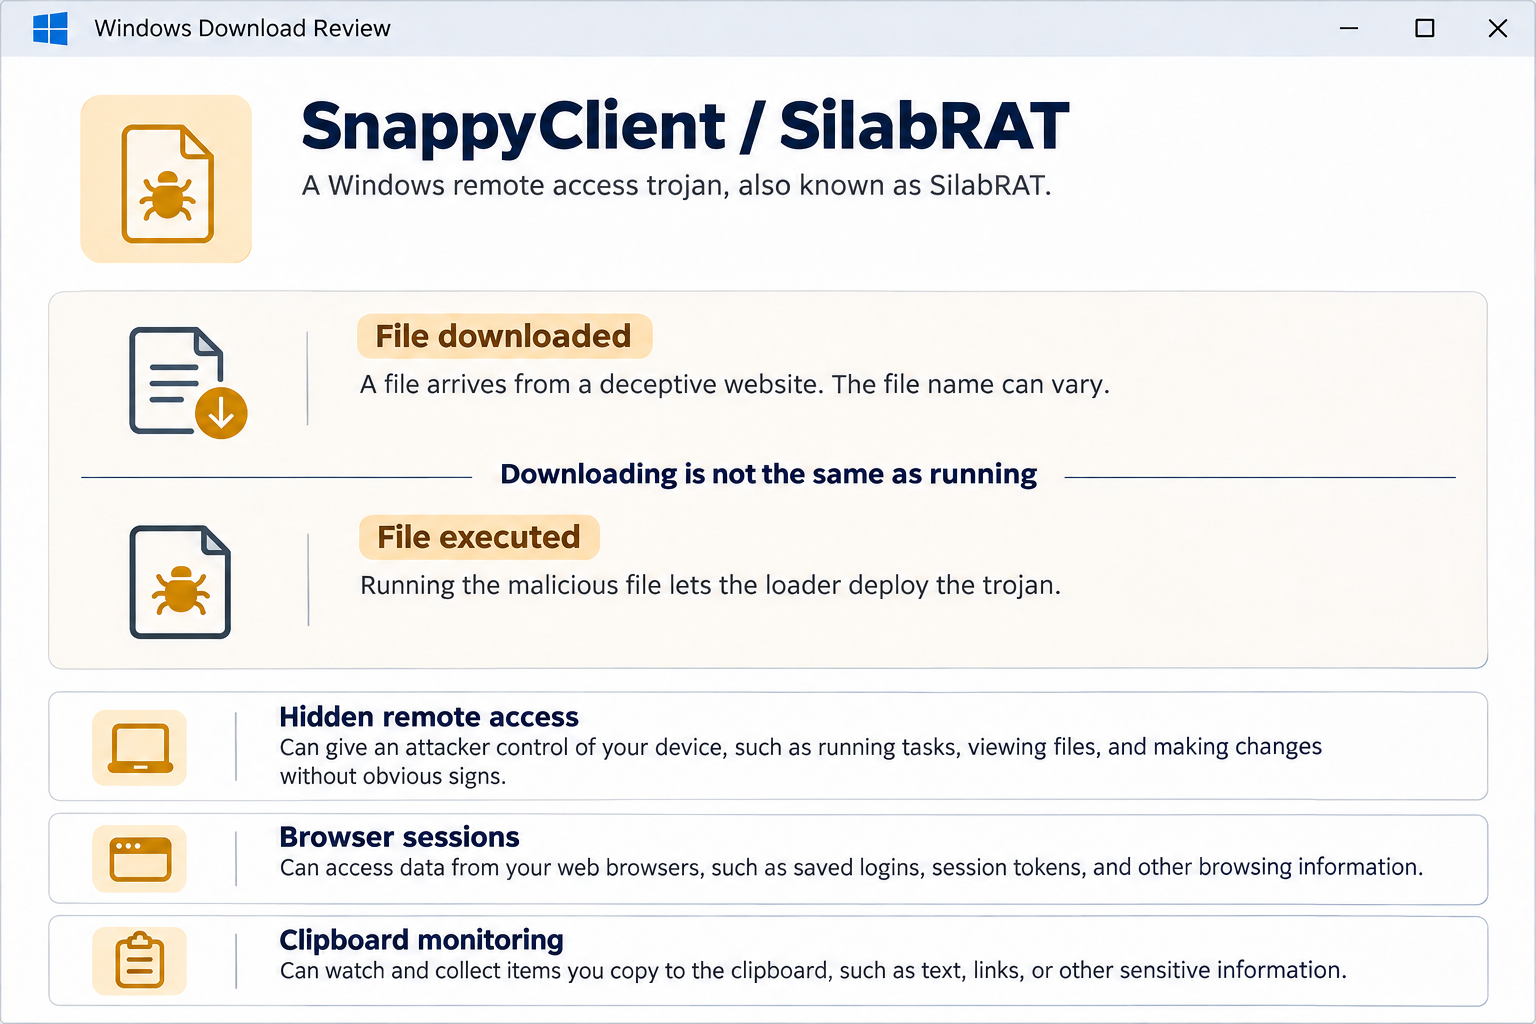
Overview
What SnappyClient and SilabRAT do
SnappyClient is a Windows remote access trojan analyzed by Zscaler ThreatLabz. Group-IB independently investigated the same family under the name SilabRAT and later confirmed the alias.
The trojan can record keystrokes, collect browser data, take screenshots, and accept remote commands. Hidden browser sessions can let an operator act without moving your visible pointer.
How the infection reaches Windows
In one observed campaign, a fake telecommunications website targeting German-speaking users automatically downloaded HijackLoader. SnappyClient was deployed if the victim ran that file.
Other reporting described ClickFix delivery. Those instructions persuade visitors to execute something under a verification or troubleshooting pretext rather than safely completing an ordinary web check.
If you only saved an unexpected file, do not open it to identify it. If you ran the file or an instructed command, begin containment and removal.
Which accounts and information are at risk
Operators can configure the trojan to target browser information, files, and wallet-related data. Stolen sessions can threaten accounts even when multifactor authentication is enabled.
- Saved browser passwords, cookies, and profile information can be collected.
- Keylogging and clipboard monitoring can expose information you type or copy.
- Clipboard replacement can change a pasted cryptocurrency destination.
- Hidden remote access can support further activity on the affected computer.
Disconnect the computer and stop using it for banking or password changes. On a workplace device, contact security before restarting or running cleanup tools.
How to Remove SnappyClient From Windows
For a work or school computer, contact its IT or security team before installing tools or restarting. Its investigation may need evidence from the running system.
If remote access is suspected, disconnect Wi-Fi or Ethernet and stop using this PC for sensitive accounts. Arrange trusted downloads and updates before proceeding with cleanup.
Start with Malwarebytes. HitmanPro and ESET are optional second opinions for unresolved findings or continuing symptoms. Run one scanner at a time.
- STEP 1: Use RKill only if malware blocks your scanner
- STEP 2: Scan and quarantine threats with Malwarebytes
- STEP 3: Optional: Check unresolved threats with HitmanPro
- STEP 4: Optional: Run a second-opinion scan with ESET
Step 1: Use RKill only if malware blocks your scanner
RKill attempts to stop known malware processes so your security software can run. It does not remove the infection.
Use it only on a personal Windows PC when malware is blocking your scanner. Otherwise, skip directly to Malwarebytes.
-
Download Rkill.
Download RKill using the button below. On the download page, choose the iExplore.exe version.
This is a renamed copy of RKill, provided for infections that block security tools by filename.
RKillStops malware processes so other tools can runDownload RKillOpens the BleepingComputer download page in a new tab.
-
Run RKill.
Open your Downloads folder and double-click iExplore.exe. Allow the program time to finish checking for processes that interfere with cleanup.
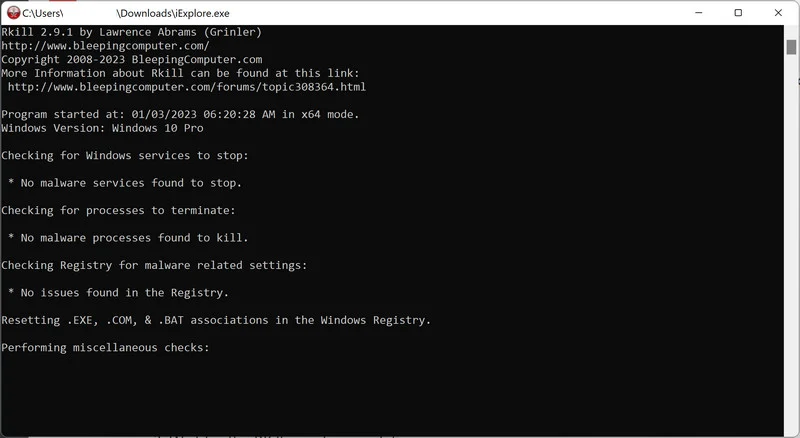
When the black window closes, a log opens. Keep the log, do not restart yet, and continue directly to Malwarebytes.
Step 2: Scan and quarantine threats with Malwarebytes
Malwarebytes for Windows can scan for malware and quarantine detected threats. Use the free Custom Scan below; a paid plan is not required for this cleanup.
-
Download Malwarebytes
Click the button below to download Malwarebytes for Windows. Paid real-time protection is optional.
Malwarebytes Free for WindowsScans and removes malware at no costDownload MalwarebytesMalwarebytes free scanner informationOfficial installer for Windows 11 and 10. Your download starts right away.Want real-time protection? See Malwarebytes Premium
-
Install Malwarebytes
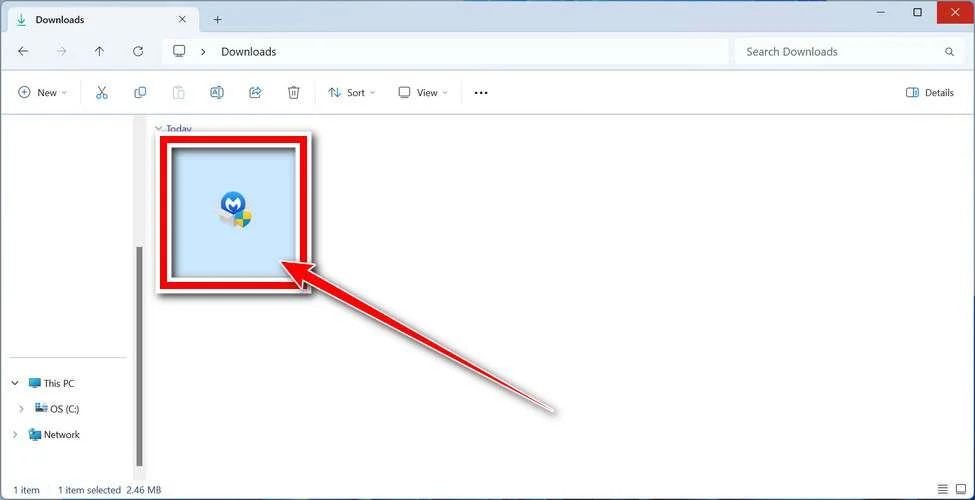
When the download finishes, open Downloads and double-click MBSetup. If Windows asks for permission, check that the prompt identifies Malwarebytes, then click Yes.
-
Follow the On-Screen Prompts to Install Malwarebytes
The setup wizard will walk you through a few quick screens:
Installer screens and optional offers vary. Skip unwanted Browser Guard, trial, or paid-plan offers. The free Custom Scan remains available; Threat Scan may require a paid plan.
-
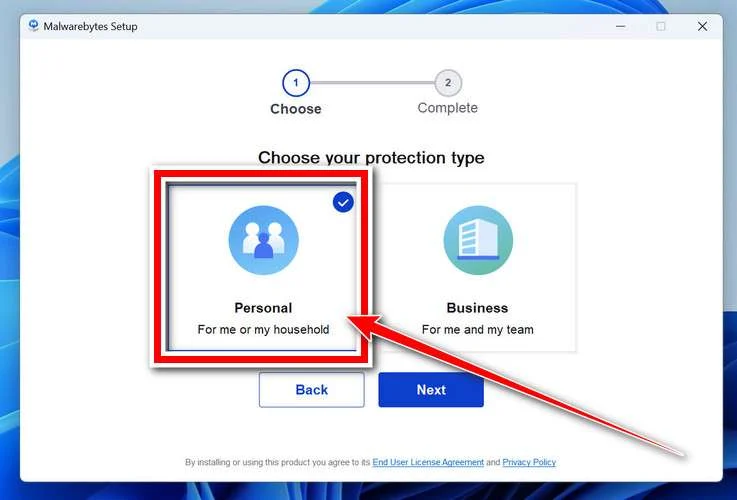
Choose Personal for your own computer, then click Next. For a work-managed device, use your organization’s approved response instead.
-
Wait for installation to finish.
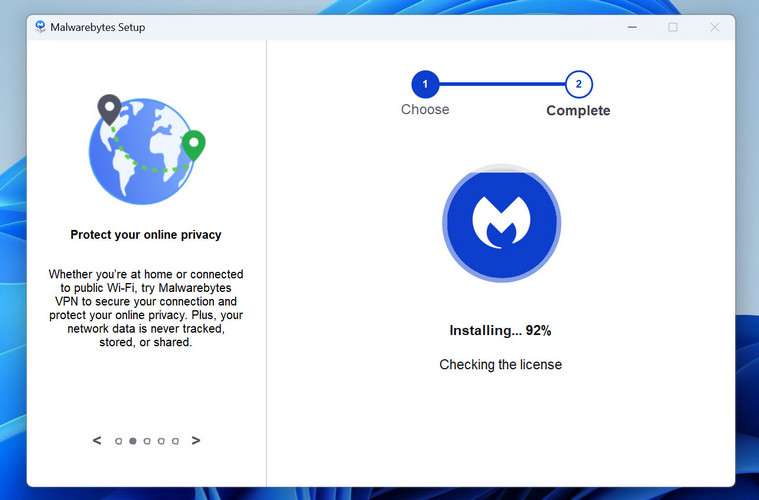
-
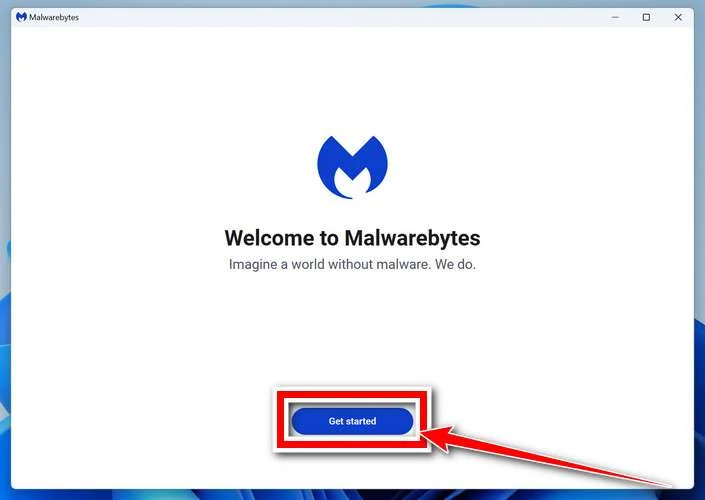
If the Welcome to Malwarebytes screen appears, click Get started and follow the remaining prompts.
-
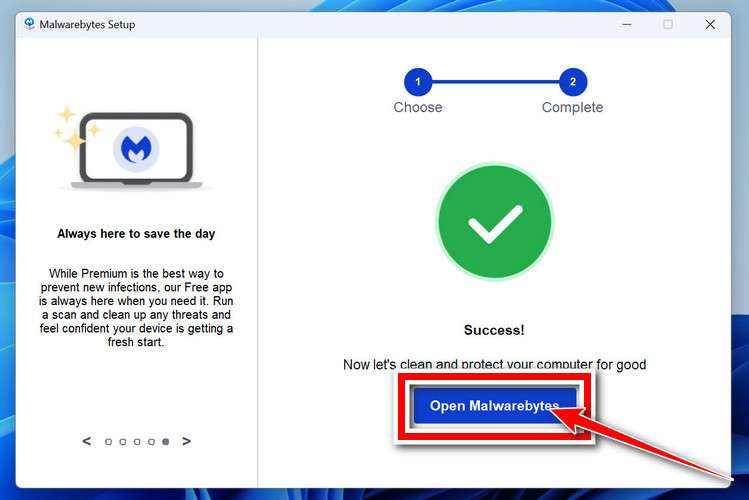
On the final screen, click Open Malwarebytes to launch the program.
-
-
Choose the scan type and optional rootkit check
On the Scanner tile, click the three dots, choose Advanced Scan, then Custom Scan.
Expand the folder selector and select the C:\ system drive. Include any other drive where the suspicious files were stored.
If Scan for rootkits is available, you can enable it. This setting is unavailable on Windows ARM devices; leave Windows security protections enabled.
Review how potentially unwanted programs and modifications will be handled. Keep detection enabled rather than automatically ignoring these items.
-
Start the Scan
Click Start Custom Scan. Allow Malwarebytes to update its detection information if prompted.
-
Wait for the Scan to Finish
Wait for the Custom Scan to finish. The time required depends on the selected locations and the amount of data.
-
Quarantine the Detected Threats
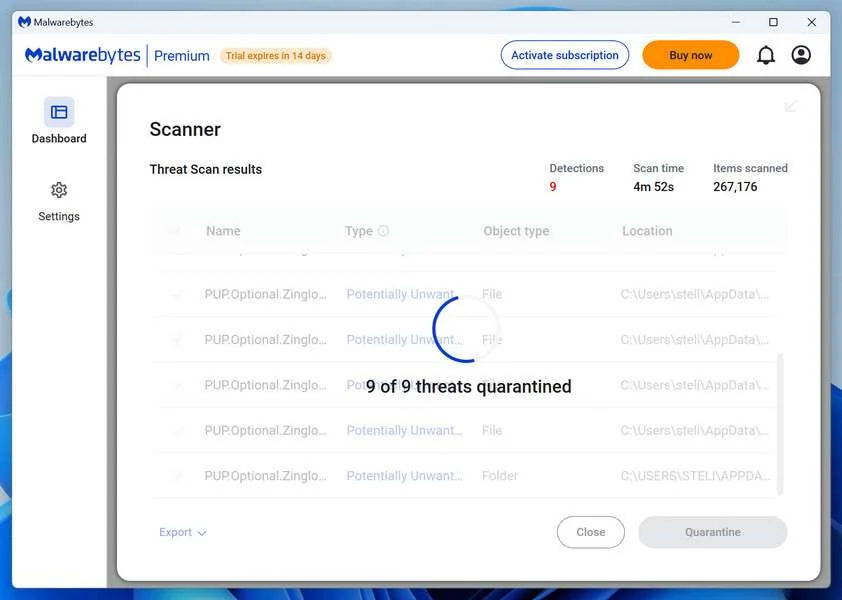
When the scan finishes, review the detections and keep the threats you want removed selected. Click Quarantine.
If a detection is unclear, save the report and ask for help before excluding or restoring it.
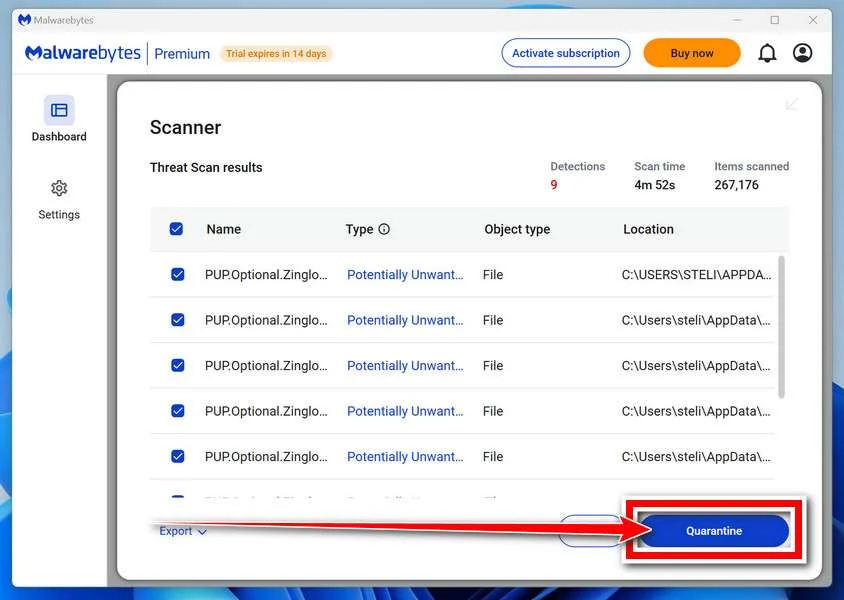
Wait while Malwarebytes quarantines the selected items. Do not restore a file merely because an unfamiliar name appears in the results.
-
Restart Your Computer
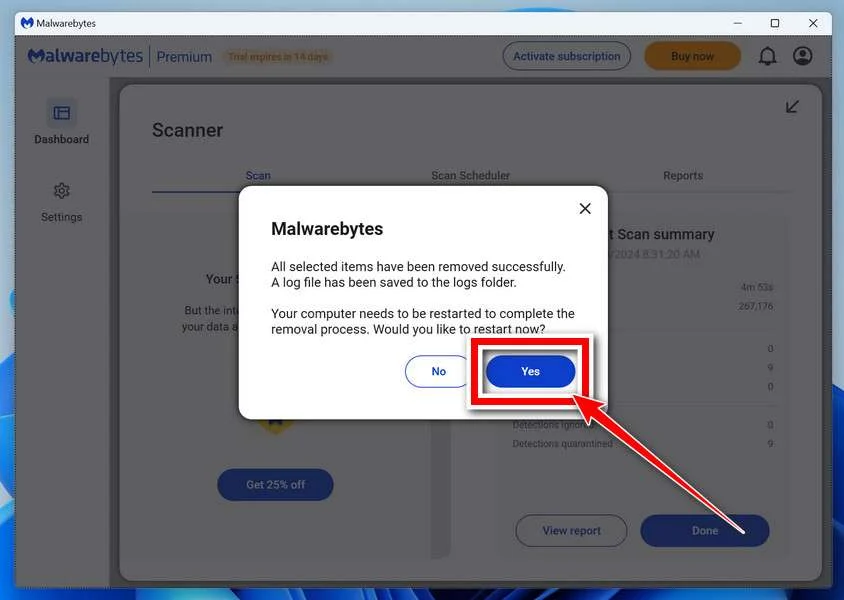
If Malwarebytes asks for a restart, save your work and click Yes. After signing back in, reopen Malwarebytes and check the report for unresolved detections.
Step 3: Optional: Check unresolved threats with HitmanPro
HitmanPro is a second-opinion scanner for Windows. It examines suspicious files using cloud analysis, including SophosLabs. An internet connection is needed for that check.
Scanning is free. Removing detections requires an eligible one-time 30-day trial or a paid license.
A computer that already used its trial may not qualify again. You do not have to buy HitmanPro to follow the Malwarebytes cleanup above.
-
Download HitmanPro
Click the button below to download HitmanPro if you want a second opinion on unresolved symptoms or detections.
HitmanProSecond-opinion malware scanner from SophosDownload HitmanProFree scan. Removal requires an eligible 30-day trial or a paid license. Opens the official HitmanPro page in a new tab.
-
Install HitmanPro
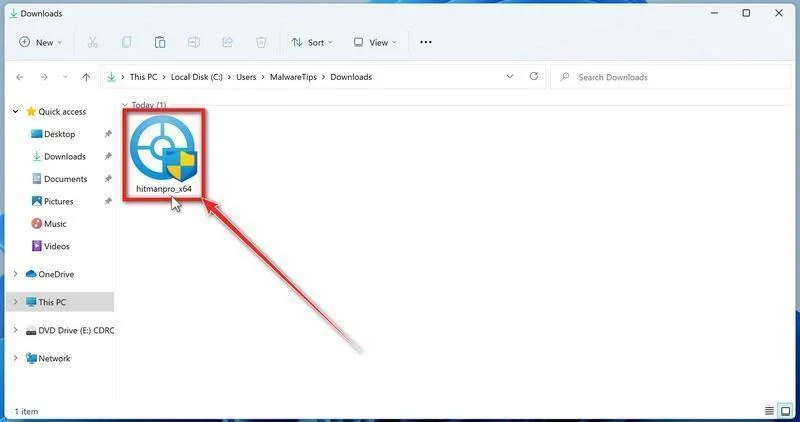
When the download finishes, open your Downloads folder and double-click the file: “hitmanpro.exe” on 32-bit Windows, or “hitmanpro_x64.exe” on 64-bit Windows.
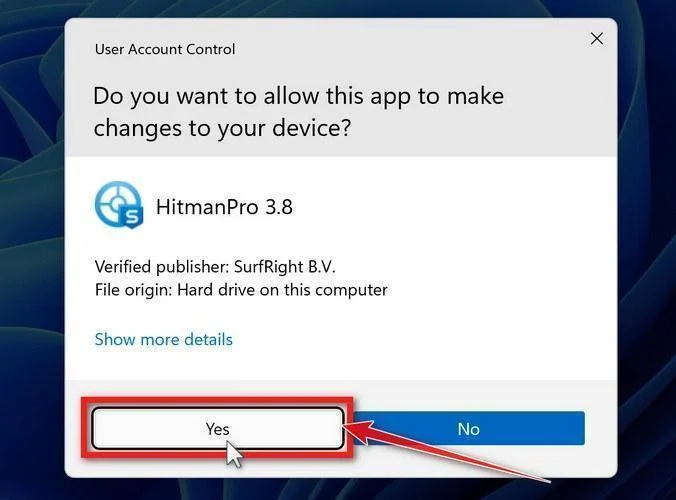
If a User Account Control pop-up asks whether HitmanPro can make changes to your device, click “Yes” to continue.
-
Follow the On-Screen Prompts
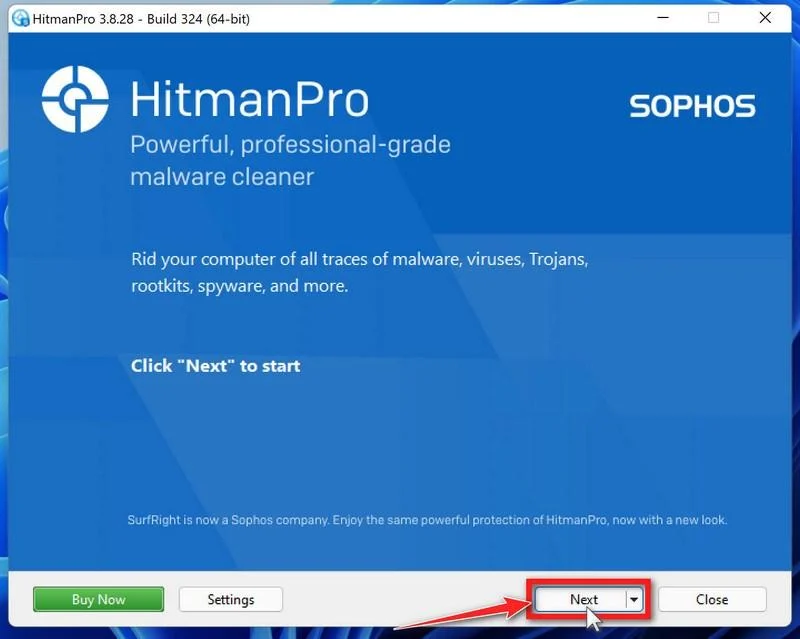
On the HitmanPro start screen, click Next. Read and accept the terms if you agree, then continue.
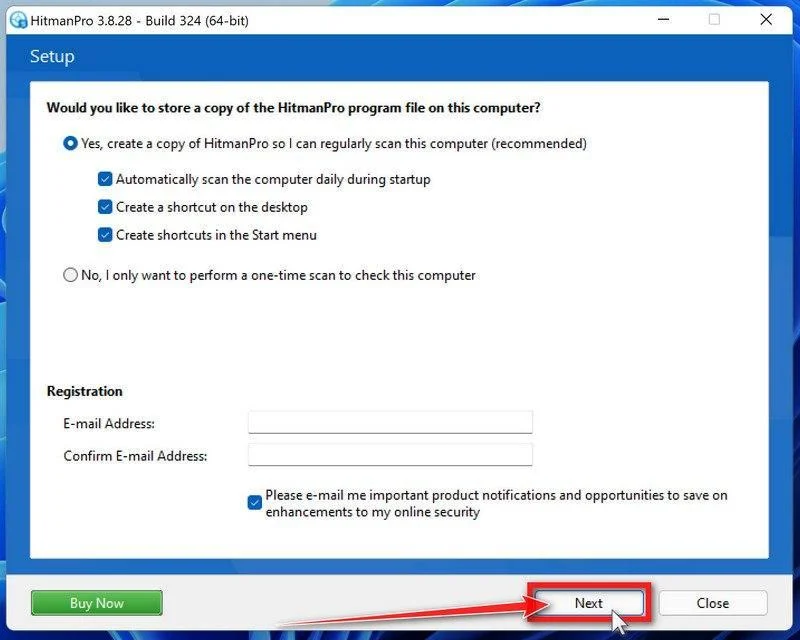
Choose whether to keep a copy for later use or run a one-time scan. Review optional startup and email preferences, then click Next.
-
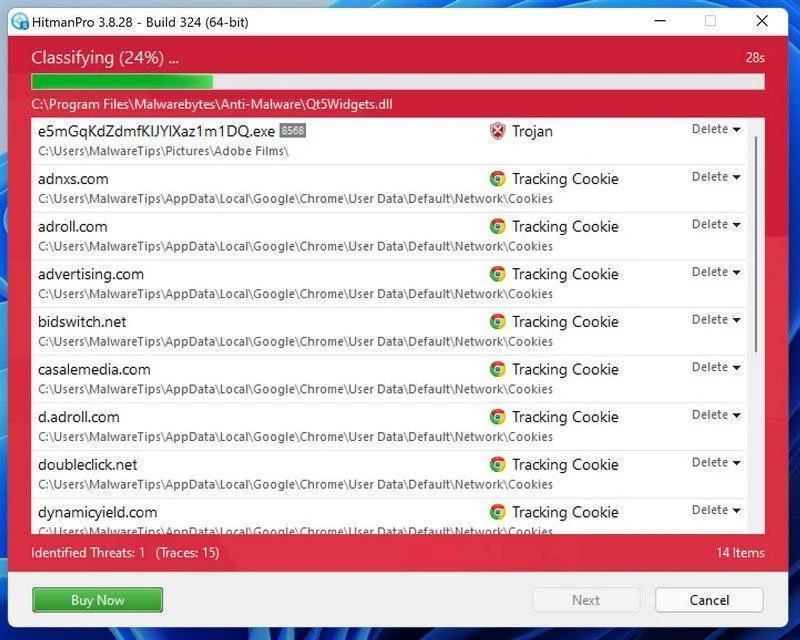
Wait for the Scan to Finish
Let HitmanPro finish scanning. Review its findings once the scan has completed.
-
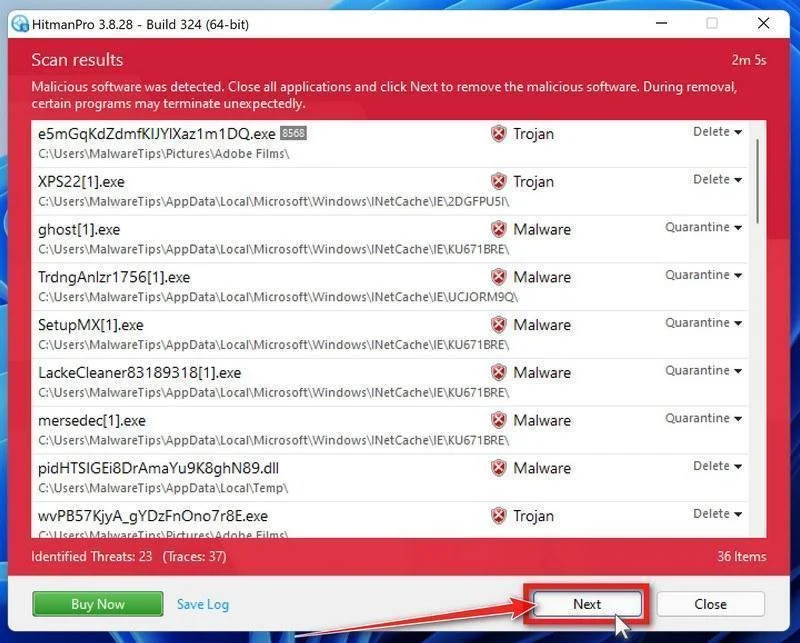
Review the Results and Click “Next”
Review the detected items and their proposed actions. Save the log if you need help with an unfamiliar detection, then click Next to proceed.
-
Click “Activate Free License”
If this computer qualifies, click Activate free license and follow the activation prompts.
If no trial is available, use an existing license or save the report for assistance. Do not assume a purchase is necessary to continue cleanup.
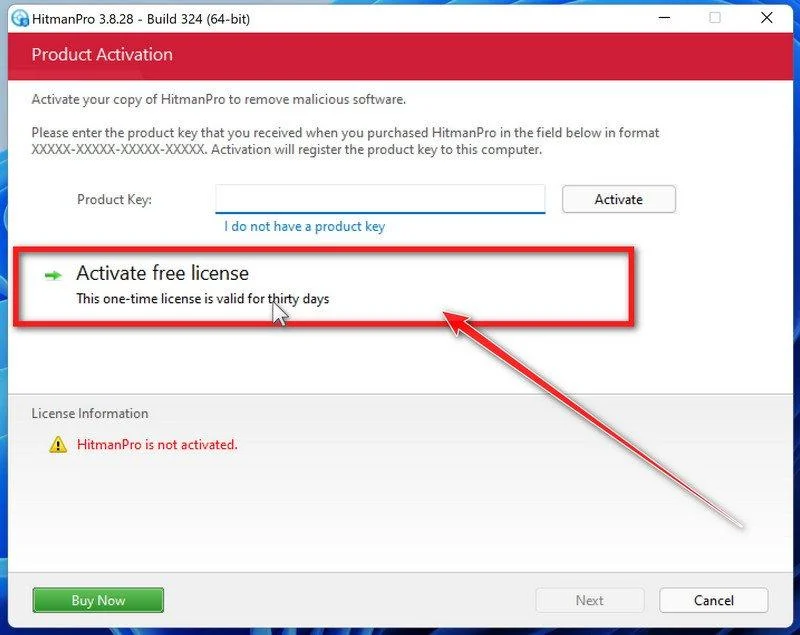
After removal, review the summary and click Next. Choose Reboot if requested, or Close if no restart is needed.
If detections return or the original symptoms persist, keep the reports and ask for help. A clean scan cannot rule out every threat.
Step 4: Optional: Run a second-opinion scan with ESET
ESET Online Scanner is a free second-opinion scanner for Windows. Use it if you need another check after cleanup, rather than running several scanners together.
-
Download ESET Online Scanner
Click the button below to download ESET Online Scanner.
ESET Online ScannerFree one-time malware scan from ESETDownload ESET Online ScannerOpens the official download page in a new tab.
-
Run the Installer
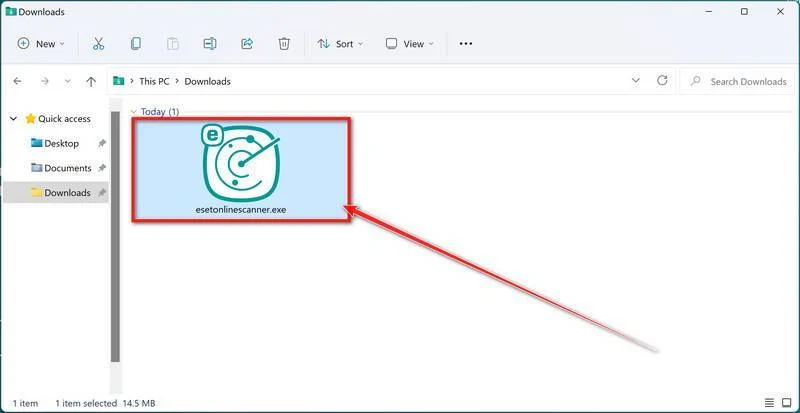
When the download finishes, open Downloads and double-click esetonlinescanner.exe. Approve the Windows permission prompt after checking that it identifies ESET.
-
Install ESET Online Scanner
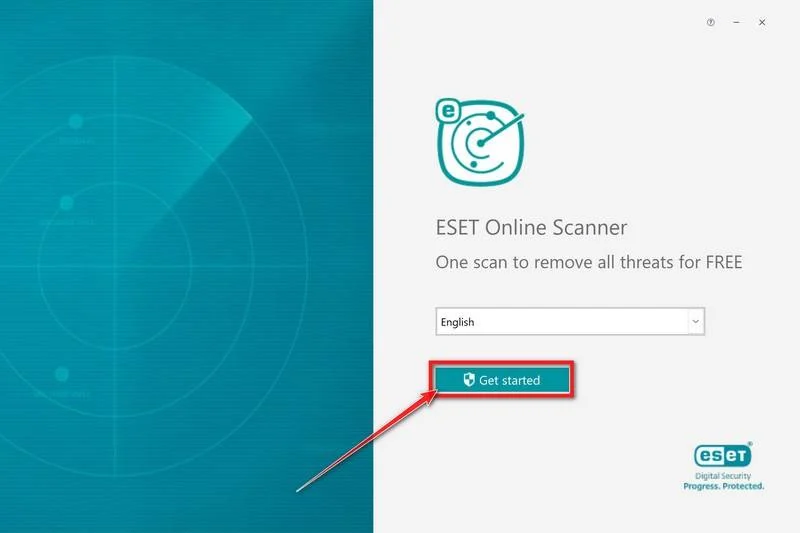
On the start screen, select your language from the drop-down menu and click Get started.
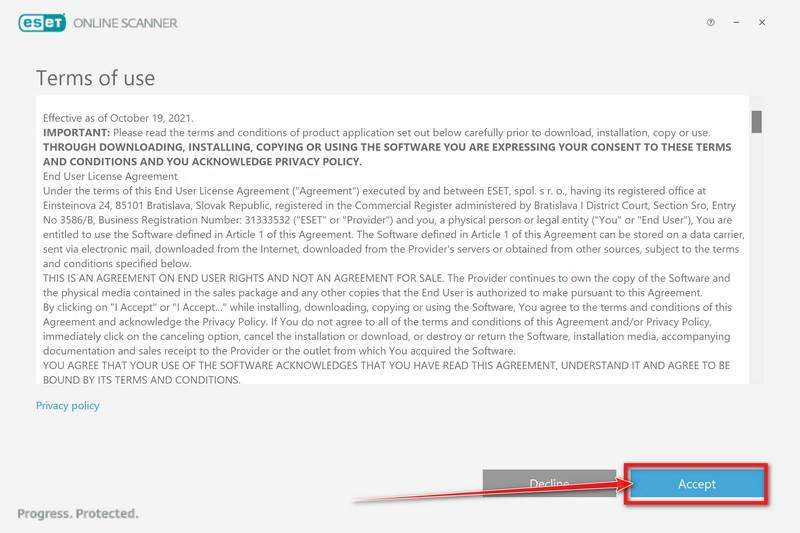
Read the Terms of use. Click Accept if you agree, then Get started if that screen appears again.
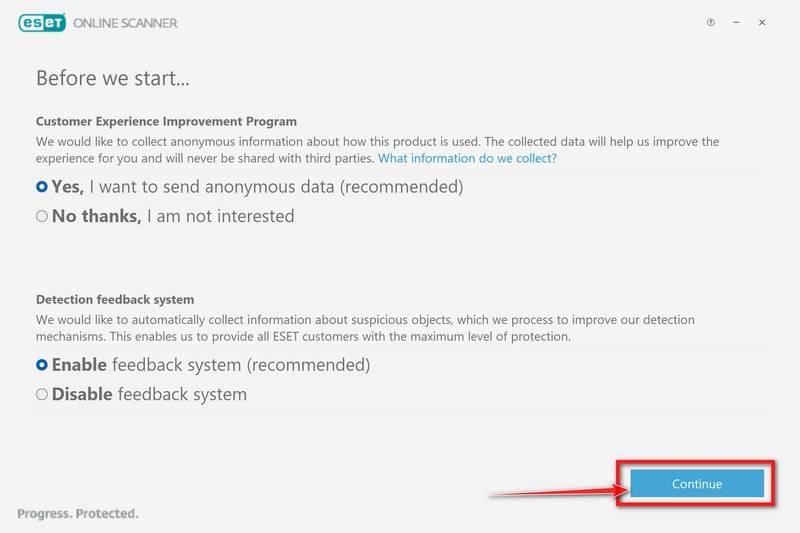
Choose your preferences for the Customer Experience Improvement Program and the Detection feedback system (either choice is fine), then click Continue.
-
Start a Full Scan
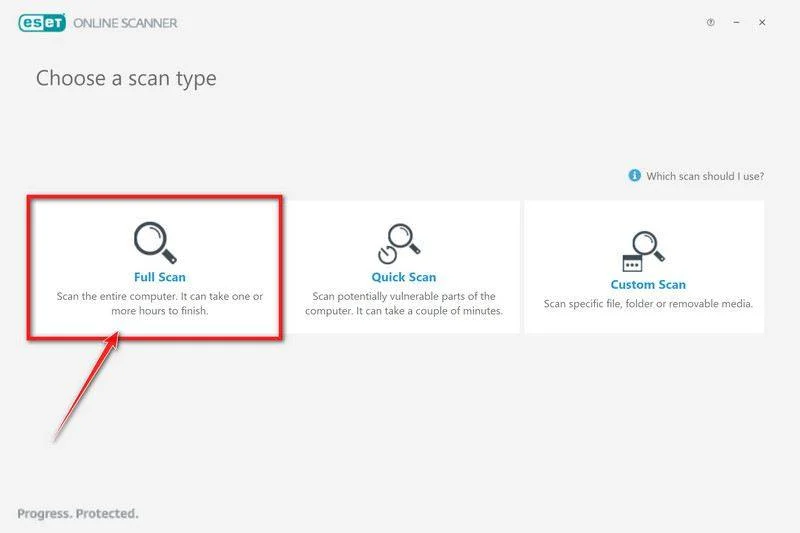
Click Full Scan for a broader check than the quick-scan option.
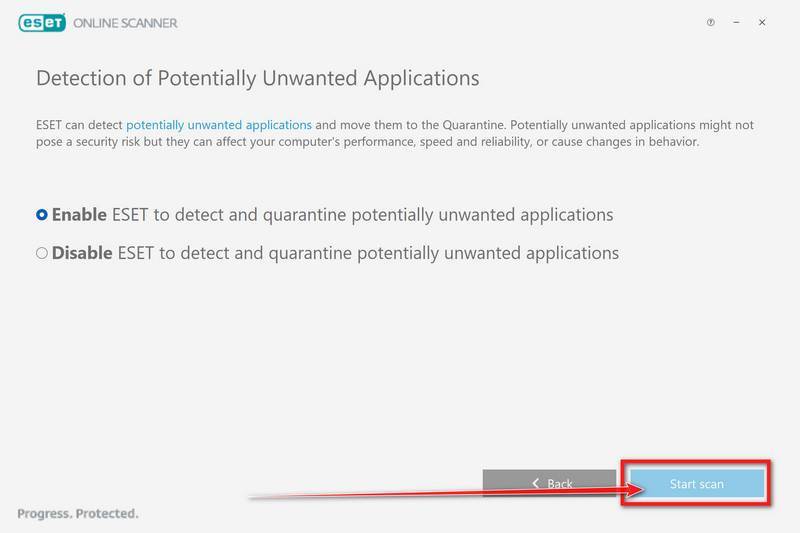
Select Enable for Detection of Potentially Unwanted Applications. Then click Start scan.
-
Wait for the Scan to Finish
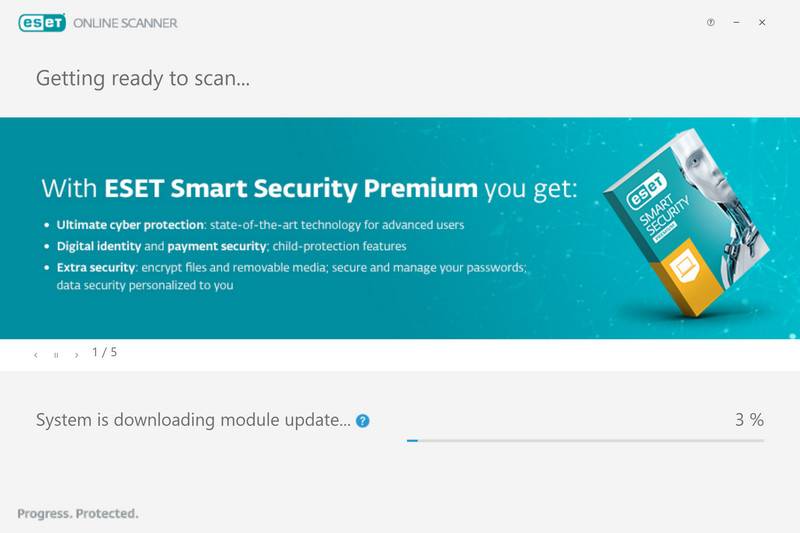
Allow the detection modules to download and update. The file scan begins afterward.
Leave the scan running until it finishes. A full scan can take an hour or longer, depending on your computer and the data being checked.
-
Review the Results
When the scan finishes, open View detailed results and check the action recorded for each detection.
ESET attempts to clean and quarantine detected threats. If an item remains unresolved, keep its details for assistance.
Click Save scan log to keep the results. Then click Continue.
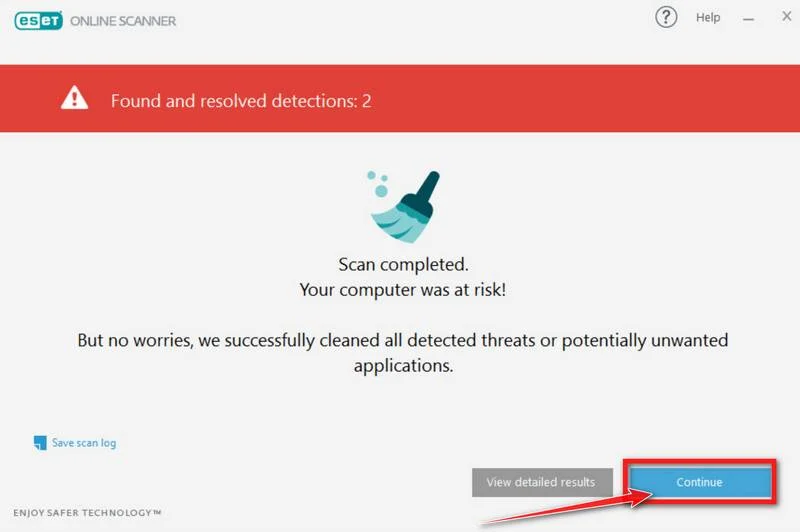
Restart if ESET requests it. Afterward, check whether detections or the original symptoms return.
If problems continue, keep the scan reports and ask for help in the MalwareTips removal forum. Do not repeatedly restore quarantined files.
What to Do After Removing SnappyClient
-
End exposed sessions. On another trusted device, open affected accounts’ security settings, sign out other sessions, and change exposed passwords.
Check sent messages, forwarding rules, recovery contacts, and newly authorized devices where applicable. Remove unfamiliar access through the real provider, not through an emailed recovery link.
-
Report unauthorized transactions. Contact the bank or exchange immediately. Keep the transaction record and case number, then follow up through its official channel.
If you use cryptocurrency, preserve transaction hashes and destination addresses. Never include private keys or recovery words in a report.
-
Escalate continuing activity. If remote behavior or detections return, keep the computer disconnected and seek removal help rather than resuming sensitive work.
Protect Your Wallet After SnappyClient
Research lists both software wallets and applications used with hardware wallets, including Ledger Live and Trezor Suite. These are not all the same kind of key storage.
Collecting files from a desktop application does not prove that malware extracted a seed from the hardware wallet’s protected component.
Check transaction details on the hardware device itself. Do not type recovery words into a website, desktop recovery prompt, or chat to supposedly validate the wallet.
If a phrase or private key was actually disclosed, changing an application password is insufficient. A securely created replacement wallet needs different recovery credentials.
Check pasted destinations on trusted equipment
Someone who pastes a destination and checks only its first characters can miss a changed address. Verify the entire destination using trusted equipment and any hardware-wallet display.
Do not test the suspected machine by making a small payment. That adds financial risk without establishing which malware components are present.
If a transfer went to a different address, save the intended and actual destinations with the transaction hash. Give the records to the exchange or investigator.
Check account actions, not just login locations
Check account actions as well as unfamiliar logins. With hidden browser control, unauthorized activity can come from your own device and usual internet connection.
Ask the provider to review disputed transactions even if its login record shows your normal location.
Frequently Asked Questions
Are SnappyClient and SilabRAT two different infections?
They are names used by different researchers for the same malware family. A matching alias does not mean you need two separate cleanup products.
Does an automatic download mean the trojan already ran?
Not in the documented telecommunications-site chain. The downloaded loader needed execution. Report any command you ran as well, because execution does not always require double-clicking.
Can it steal accounts protected by multifactor authentication?
Stolen active sessions and hidden interaction can threaten accounts beyond a password alone. Keep multifactor protection, but also revoke suspicious sessions and review account access.
Does targeting Ledger Live mean my hardware-wallet seed was extracted?
No. Desktop application artifacts are not the same as secrets inside hardware. Still investigate exposed information, changed destinations, and any transaction you approved.
Should I delete every scheduled task I do not recognize?
No. Windows and legitimate applications use scheduled tasks. Have suspicious entries assessed using their paths, origin, and other evidence rather than names alone.
Will quarantine undo an unauthorized transfer?
No. Local removal and financial recovery are separate. Contact the relevant provider, preserve records, and protect any account or wallet secret that escaped.
The Bottom Line
If SnappyClient or SilabRAT ran, treat it as a remote-access and information-theft incident. Isolate Windows, preserve the delivery trail, and complete appropriate cleanup or rebuilding.
Then secure exposed sessions, credentials, and any affected wallet secrets from trusted equipment. Closing the browser or removing one downloaded file is not a complete response.

Join the discussion
0 commentsShare your experience or ask a question about this article.
Your progress
Did these steps help?
Let us know how the guide worked for you.
Describe what you see and the step you reached. Keep passwords and other private information out.
Discussion
Start the conversation
Have a question or something useful to share? Add the first comment.