

You send an important email, then notice a delivery warning asking you to become a secured sender. With someone waiting for your reply, that sounds worth checking.
Before touching the security button, look at what the notice actually explains about your message. A few missing details can change how you should handle it.
Overview
A delivery problem becomes an account-security task
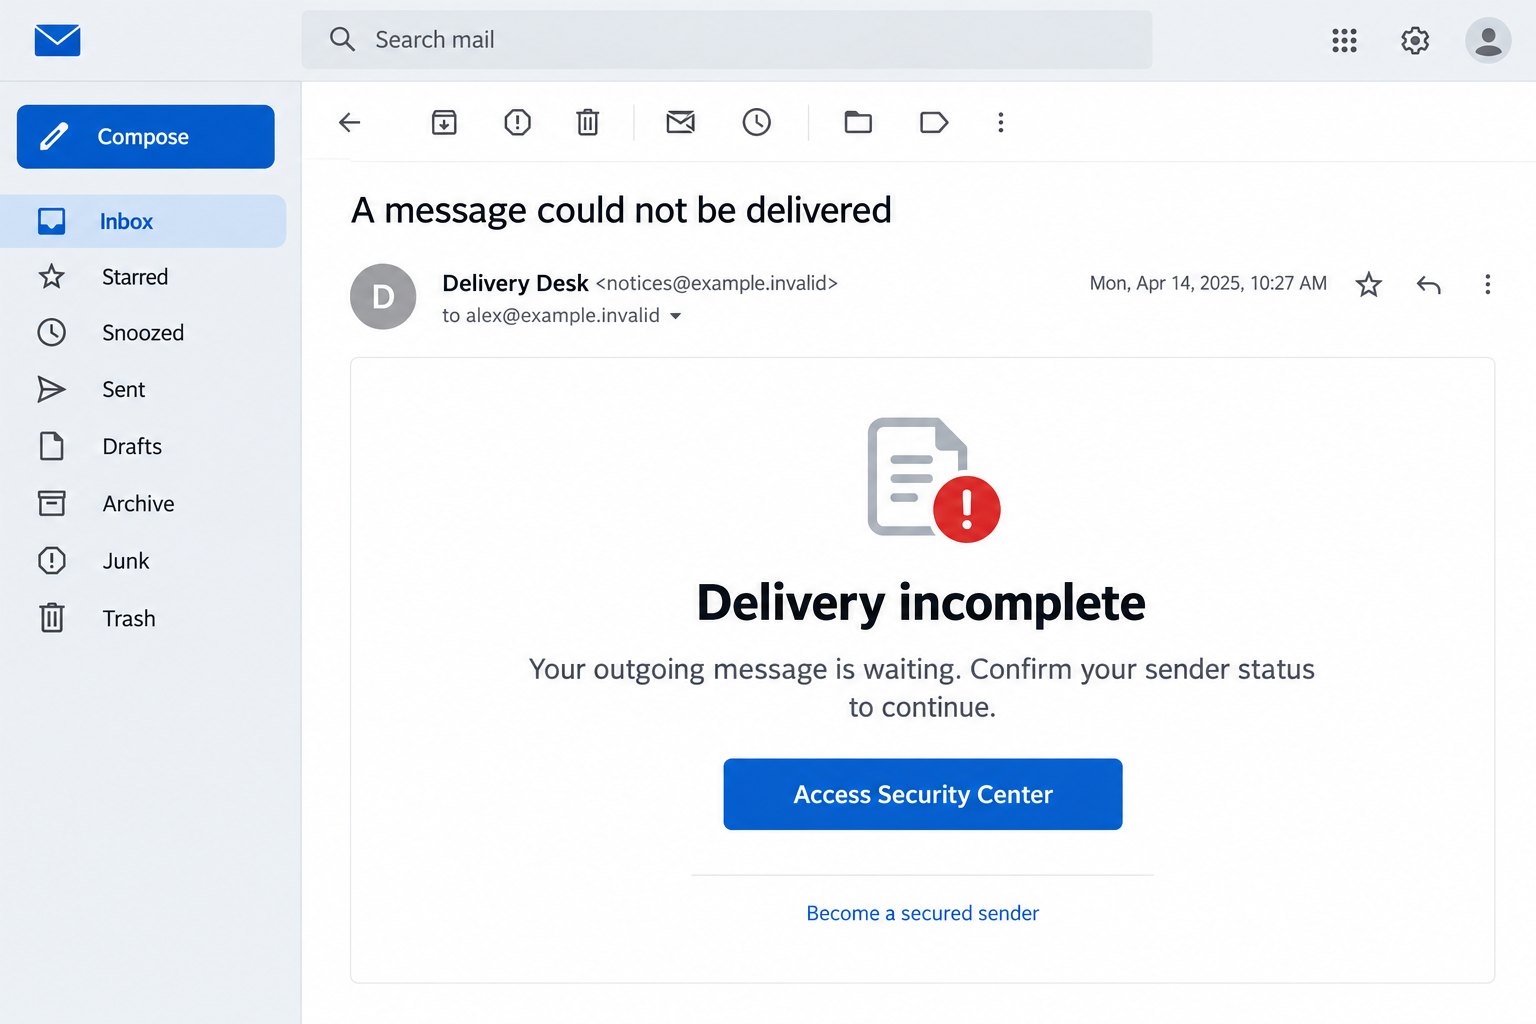
The Become Secured Sender email scam presents a failed outgoing message as something you can fix by confirming your account through an unfamiliar security center.
Its reported subject refers to a temporary delivery problem. Inside, a button labeled Access Security Center offers the supposed repair and leads toward a credential request.
That is the critical switch. Instead of helping you identify a rejected message, the notice asks you to prove control of the mailbox.
The warning signs are in the proposed solution
Real delivery failures happen. A recipient’s server might be unavailable, an address might be mistyped, or a message might exceed a limit.
None of those possibilities makes this unsolicited sign-in route trustworthy. The problem described and the access requested do not fit together.
- The message promotes a vague secured-sender status rather than explaining a specific delivery error.
- Its security button moves the task away from the mailbox you already use.
- A credential request is presented as a routine part of restoring delivery.
- The apparent urgency comes from a message supposedly remaining undelivered.
Check delivery without using the supplied link
Do not sign in through this warning. Open your mail service normally and investigate any actual bounce from there, using the recipient and error details.
The reported campaign link was unavailable when documented, so its final sign-in screen cannot be treated as a currently working page.
The example image illustrates the lure with fictional addresses. It is not an original email received by a customer or proof of a live phishing destination.
Why a Failed Message Is Such an Effective Hook
A delivery notice arrives at an awkward moment. You have already done your part by writing the email, and now something apparently needs fixing.
If the message concerned a job, invoice, appointment, or school deadline, you may worry more about reaching the recipient than checking a sender’s identity.
The lure exploits that unfinished task. It offers a small administrative step that seems easier than understanding a technical error.
There is also a subtle promise of prevention. Becoming a secured sender sounds like an improvement that could stop future delivery trouble.
A reassuring label still needs an explanation. Which setting would change, who controls it, and why does the notice omit the affected message?
A genuine issue might require an account check through your provider. The safe response is to reach that provider yourself, not accept the email’s chosen doorway.
How the Become Secured Sender Email Scam Works
Step 1: A routine-looking bounce interrupts your inbox
The message borrows the language of automated delivery reports. That framing makes it appear less like a stranger’s request and more like feedback from your mail system.
You may even have sent something recently. The sender does not need to know what you wrote for the timing to feel convincing.
Start by checking whether the notice identifies a real recipient, subject, and delivery attempt. Compare them with the correspondence in your own mailbox.
A copied subject or familiar address would still not authenticate the repair link. Those details can be obtained from compromised correspondence or included in fabricated notices.
What matters is whether the troubleshooting instructions lead to your established provider through a route you can independently recognize.
Step 2: The email offers secured-sender status as the repair
The pitch changes a delivery question into a security question. Instead of retrying delivery or explaining a rejection, it tells you to improve your sender status.
This makes an unrelated sign-in feel purposeful. The attacker supplies both the alleged problem and the only button offered to solve it.
Notice what is absent: a practical reason that entering your password on another page would make the recipient’s server accept the original message.
Do not confuse this wording with SPF, DKIM, or DMARC. Those are domain-authentication mechanisms, not a badge granted by an unexpected mailbox-verification button.
A business administrator may genuinely need to repair domain authentication. That work belongs in the organization’s verified mail and DNS administration, not an unsolicited personal-password form.
Step 3: The security link asks for access, not delivery information
The campaign’s credential language reveals the intended destination: a place where the recipient is expected to supply account access to continue.
A phishing form may copy a familiar provider’s appearance. Branding, spacing, and a password field can be reproduced without permission from the company being imitated.
Read the actual website address before entering anything. A secure connection only protects traffic to that website; it does not establish who owns the page.
A password manager that refuses to fill a familiar account can be another reason to stop. Do not override that hesitation just because the page looks normal.
Likewise, a prefilled email address proves very little. The link itself can carry your address, allowing a stranger’s page to display it automatically.
Step 4: A stolen mailbox can become a route into other accounts
If you submit a password, the immediate concern is unauthorized account access. The attacker may try the credentials before you notice anything unusual.
Email often holds password-reset messages, purchase histories, attachments, and conversations identifying other services you use. That makes mailbox access valuable beyond reading new messages.
For a small business, an intruder might find a genuine invoice thread and imitate its participants. A later payment request could look much more convincing.
These are possible consequences of account takeover, not proof that every recipient has already lost money or had a device infected.
Your response should depend on what happened: receiving a message, opening its link, sharing credentials, and running downloaded software are different levels of exposure.
What a Real Delivery Failure Should Help You Check
Match the notice to an actual message
Look for the message you sent, its recipient, and the approximate time. If you cannot connect the warning to your correspondence, do not invent a reason.
Sometimes a forged sender address causes unrelated bounce messages to reach innocent people. Receiving a bounce alone does not show that someone signed into your mailbox.
If a customer is waiting, contact them using an existing phone number or another established channel. Confirm receipt without forwarding the suspicious security button.
Use the error to choose the right fix
Google’s bounce troubleshooting guidance explains several ordinary causes, including invalid addresses, temporary recipient-server trouble, and a full recipient inbox.
A spelling error calls for correcting the destination. An unavailable server may call for waiting. A storage problem may require action by the recipient.
Those are different problems with different solutions. A single demand to become secured does not explain which one your message encountered.
Leave mail-server changes to the right person
If multiple colleagues report delivery failures, collect the error text and contact your mail administrator. Do not start changing security settings based on an anonymous email.
Forward the original notice as an attachment through your approved reporting route, if available. This preserves technical details more reliably than copying its visible text.
Administrators can examine sending logs and authentication results. You should not need to share a password with them just to begin that investigation.
Sender and Security-Center Checks That Actually Help
Expand the sender details instead of relying on the display name. A label such as Delivery Support is something the sender can choose.
Compare the full address with genuine notices from your provider, while remembering that an apparently familiar address can be spoofed.
Technical authentication results need context. A message can pass checks for an attacker’s own domain without having any connection to your email provider.
For organizational accounts, let the security team interpret the headers. Avoid publishing them publicly because headers can expose addresses, routing information, and internal identifiers.
Do not open a suspicious destination simply to inspect it. If you already recorded its address, share it privately with your provider’s abuse or security team.
A broken destination is not a safety certificate. Phishing sites can be removed, replaced, restricted to certain visitors, or moved to another host.
Equally, no destination working today would prove what an older link displayed. Keep your conclusions tied to the message and actions actually observed.
What to Do if You Have Fallen Victim to This Scam
Stop using the security-center page. Close it without entering another password or approving a sign-in prompt. Do not return to see whether it now works.
If you only received the warning, report it as phishing and remove it. Receiving this email alone does not establish account compromise.
Replace any password you supplied. Reach your mail provider using its usual app or a saved bookmark. Choose a new password unrelated to the exposed one.
Use a trusted alternative device if you also installed software. Change reused credentials on other services, starting with accounts that handle payments or recovery.
Close unauthorized routes back into the mailbox. Review signed-in devices, recovery contacts, connected applications, and any app passwords. Remove entries you cannot account for.
Check forwarding and inbox rules too. An intruder could keep receiving messages even after you replace the password used in the original phishing attempt.
Add stronger sign-in protection. Enable your provider’s multifactor options. Where supported, consider a passkey or security key that checks the website involved in signing in.
Do not approve unexpected authentication requests. If you shared a one-time code as well as a password, tell your provider or workplace administrator.
Review the correspondence an intruder could have used. Inspect sent mail, deleted messages, recent security changes, and password-reset notices. Save evidence of unfamiliar activity.
Warn affected contacts through a different channel if your account sent fraudulent messages. For workplace mail, notify the internal incident team promptly.
Address device exposure separately. If the link led you to run a file, install an extension, or change browser settings, investigate those changes.
Malwarebytes can help check for unwanted software. AdGuard can reduce exposure to malicious advertising and some dangerous sites, but neither reverses stolen credentials.
Escalate any financial consequence. Contact the bank using a trusted number if an attacker redirected a payment or accessed financial accounts. Ask what protective action is available.
Keep the original email, suspicious addresses, and transaction records. Avoid anyone who promises guaranteed recovery in exchange for another payment.
Is Your Device Infected? Run a Free Malware Scan
Slow performance, constant pop-ups, or strange behavior? These are classic signs of a malware infection. The fastest way to find out is to scan your device with Malwarebytes Free — one of the most trusted malware removal tools available.
The free version detects and removes the most common threats, including:
- Adware — the cause of those annoying pop-ups
- Browser hijackers — unwanted redirects and changed homepages
- Trojans and spyware — hidden programs stealing your data
- Potentially unwanted programs (PUPs) — software you never asked for
👉 Select your device below — Windows, Mac, or Android — then follow the simple steps to download Malwarebytes, scan your system, and remove any threats it finds. The scan usually takes 5 to 20 minutes.
Run a Malware Scan with Malwarebytes for Windows
Malwarebytes is one of the most popular and trusted anti-malware tools for Windows — and it’s completely free for removing infections. It catches threats that many antivirus programs miss, including adware, browser hijackers, and trojans. Follow the steps below to scan and clean your PC in just a few minutes.
Download Malwarebytes
Click the button below to download the latest version of Malwarebytes for Windows from the official source. The free version is all you need — it will scan your computer and remove adware, browser hijackers, and other malicious software at no cost.
Download MalwarebytesOfficial installer for Windows 11 and 10. Your download starts right away.Want real-time protection? See Malwarebytes Premium Malwarebytes Free for WindowsScans and removes malware at no cost
-
Install Malwarebytes
When the download finishes, open your Downloads folder and double-click the MBSetup file. If Windows shows a User Account Control pop-up, click “Yes” to allow the installation.

Follow the On-Screen Prompts to Install Malwarebytes
The setup wizard will walk you through a few quick screens:
-
Choose where you’re installing the program — “Personal Computer” or “Work Computer” — then click Next.

-
Malwarebytes will now install on your device. This usually takes under a minute.

-
When installation is complete, the “Welcome to Malwarebytes” screen will open automatically.

-
On the final screen, click Open Malwarebytes to launch the program.

-
Enable “Scan for Rootkits”
Before scanning, turn on rootkit detection so Malwarebytes can find even the most hidden threats. Click the Settings gear icon on the left side of the screen.

In the settings menu, find “Scan for rootkits” and click the toggle so it turns blue.

Done? Click “Dashboard” in the left pane to return to the main screen.
Start the Scan
Click the blue Scan button. Malwarebytes will automatically update its virus database and start checking your computer for malware.

-
Wait for the Scan to Finish
The scan checks your entire system for browser hijackers and other malicious programs, so it can take 5 to 20 minutes depending on your computer. Feel free to do something else — just check back occasionally to see the progress.

-
Quarantine the Detected Threats
When the scan is done, you’ll see a list of everything Malwarebytes found — malware, adware, and potentially unwanted programs. Click the “Quarantine” button to remove all of them at once.

Malwarebytes will now remove the malicious files and registry entries and move them safely into quarantine.

-
Restart Your Computer
Some threats can only be fully removed after a reboot. If Malwarebytes asks you to restart, click Yes. Once you’re logged back in, Malwarebytes has finished removing the threats it found.

That’s it — your Windows PC is now clean of trojans, adware, and other malware, and should be back to running smoothly.
If you are still having problems with your computer after completing these instructions, then please follow one of the steps:
- Run a computer scan with ESET Online Scanner
- Ask for help in our Windows Malware Removal Help & Support forum.
Run a Malware Scan with Malwarebytes for Mac
Malwarebytes for Mac is a free on-demand scanner that removes the malware other security software tends to miss — adware, browser hijackers, and unwanted programs included. Cleaning an infected Mac with Malwarebytes has always been completely free, and it’s our go-to recommendation. Follow the steps below to scan and clean your Mac in just a few minutes.
-
Download Malwarebytes for Mac
Click the button below to download the latest version of Malwarebytes for Mac.
Download MalwarebytesOfficial installer for macOS. Your download starts right away.Want real-time protection? See Malwarebytes PremiumMalwarebytes Free for MacScans and removes malware at no cost -
Open the Malwarebytes setup file
When the download finishes, open your Downloads folder and double-click the setup file to begin the installation.

-
Follow the On-Screen Prompts to Install Malwarebytes
The Malwarebytes for Mac Installer will guide you through a few quick screens. Click “Continue” and keep following the prompts until the installation completes.



When the installation is complete, Malwarebytes opens to the Welcome to Malwarebytes screen. Click “Get started“.
-
Select “Personal Computer” or “Work Computer”
Malwarebytes will ask what type of computer you’re installing it on. Click either Personal Computer or Work Computer, whichever applies.

-
Start the Scan
Click the “Scan” button. Malwarebytes will automatically update its detection database and begin checking your Mac for malware.

-
Wait for the Scan to Finish
Malwarebytes will scan your Mac for adware, browser hijackers, and other malicious programs. This can take a few minutes, so feel free to do something else — just check back occasionally to see the progress.

-
Quarantine the Detected Threats
When the scan is done, you’ll see a list of everything Malwarebytes found. Click the “Quarantine” button to remove all the threats at once.

-
Restart Your Mac
Malwarebytes will now remove all the malicious files it found. Some threats can only be fully removed after a reboot — if Malwarebytes asks you to restart, allow it. Once you’re logged back in, your Mac is clean.

That’s it — your Mac is now free of adware, rogue browser extensions, and other potentially harmful software.
If you are still experiencing problems while trying to remove a malicious program from your computer, please ask for help in our Mac Malware Removal Help & Support forum.
Run a Malware Scan with Malwarebytes for Android
Malwarebytes for Android automatically detects and removes dangerous threats like malware and ransomware so you don’t have to worry about your most-used device being compromised. Aggressive detection of adware and potentially unwanted programs keeps your Android phone or tablet running smooth.
-
Download Malwarebytes for Android.
You can download Malwarebytes for Android by clicking the link below.
Get Malwarebytes for AndroidOpens Google Play in a new tab.Want real-time protection? See Malwarebytes Premium for AndroidMalwarebytes for AndroidScans your phone and removes malware at no cost -
Install Malwarebytes for Android on your phone.
In the Google Play Store, tap “Install” to install Malwarebytes for Android on your device.

When the installation process has finished, tap “Open” to begin using Malwarebytes for Android. You can also open Malwarebytes by tapping on its icon in your phone menu or home screen.

-
Follow the on-screen prompts to complete the setup process
When Malwarebytes will open, you will see the Malwarebytes Setup Wizard which will guide you through a series of permissions and other setup options.
This is the first of two screens that explain the difference between the Premium and Free versions. Swipe this screen to continue.
Tap on “Got it” to proceed to the next step.
Malwarebytes for Android will now ask for a set of permissions that are required to scan your device and protect it from malware. Tap on “Give permission” to continue.
Tap on “Allow” to permit Malwarebytes to access the files on your phone.
-
Update database and run a scan with Malwarebytes for Android
You will now be prompted to update the Malwarebytes database and run a full system scan.

Click on “Update database” to update the Malwarebytes for Android definitions to the latest version, then click on “Run full scan” to perform a system scan.

-
Wait for the Malwarebytes scan to complete.
Malwarebytes will now start scanning your phone for adware and other malicious apps. This process can take a few minutes, so we suggest you do something else and periodically check on the status of the scan to see when it is finished.

-
Click on “Remove Selected”.
When the scan has been completed, you will be presented with a screen showing the malware infections that Malwarebytes for Android has detected. To remove the malicious apps that Malwarebytes has found, tap on the “Remove Selected” button.

-
Restart your phone.
Malwarebytes for Android will now remove all the malicious apps that it has found. To complete the malware removal process, Malwarebytes may ask you to restart your device.
That’s it — your Android phone is now clean — no more malicious apps, adware, or browser redirects.
If you are still having problems with your phone after completing these instructions, then please follow one of the steps:
- Restore your phone to factory settings by going to Settings > General management > Reset > Factory data reset.
- Ask for help in our Mobile Malware Removal Help & Support forum.
Stay Protected: Block Ads and Malicious Sites
Now that your device is clean, keep it that way. Most infections start with a malicious ad or a fake download button — so blocking them at the source is your best defense.
We recommend AdGuard, which blocks malicious ads, phishing pages, and dangerous redirects before they can reach you.
👉 Download AdGuard and browse safely
After Recovery, Make the Next Delivery Warning Easier to Judge
Safe-sender lists do a different job
Some mail clients let you mark a contact as trusted or keep legitimate correspondence out of spam. That is a preference within your existing account.
It does not mean an unrelated security page can certify your outgoing messages. The similar vocabulary can make two very different activities sound connected.
Do not add the suspicious sender to an allowlist as a troubleshooting experiment. Doing so could make later messages from that address easier to overlook.
If you manage mail for others, explain this distinction when reporting the campaign. A concrete example is more useful than telling everyone to distrust all delivery reports.
Keep your provider’s official help page bookmarked. That gives you somewhere useful to go when an alarming message arrives during a busy day.
For shared business mailboxes, agree on one reporting route and one person responsible for delivery problems. Conflicting instructions make hurried mistakes more likely.
Do not forward warnings around with requests to try the link. Share the subject and a description, or use your organization’s reporting tool.
If you run a domain, ask the administrator about its legitimate delivery reports and authentication setup. Learn what users should see before another incident occurs.
A missed message should have a straightforward troubleshooting path. It should not require handing an unfamiliar website the password that protects all your correspondence.
Frequently Asked Questions
Is becoming a secured sender a genuine delivery requirement?
Not through this email’s button. Providers have real delivery and authentication requirements, but the campaign uses a vague sender-status promise to lead recipients toward credential collection.
Could I receive this warning even if I sent nothing?
Yes. An attacker can send a generic delivery pretext to any address. Check your own correspondence rather than assuming the warning describes a real outgoing message.
Does a familiar login design make the link safe?
No. A copied sign-in screen does not authenticate its operator. Reach the service independently and verify the website before supplying account information.
What if I clicked but did not enter my password?
Close the page and check whether anything downloaded or permissions changed. A click alone does not show that the attacker obtained your password or installed malware.
Why should I inspect forwarding rules after changing my password?
Unauthorized forwarding can send future correspondence elsewhere. Removing an exposed password does not necessarily remove mailbox settings changed while someone else had access.
Will an antivirus scan fix the delivery problem?
No. Scanning addresses possible device malware. A genuine delivery error needs provider-specific troubleshooting, while exposed login details require account recovery and session review.
The Bottom Line
Do not use the Become Secured Sender email’s security link. Its proposed credential check is not a trustworthy explanation or repair for a failed message.
Check delivery through your real mailbox. If you already shared a password, secure the account and inspect its access settings before resuming sensitive correspondence.

Join the discussion
0 commentsShare your experience or ask a question about this article.
Community experiences
Did this happen to you?
Your experience could help someone recognize the same scam. Submit a private report for our team to review.
I experienced this tooReports are reviewed before publication. Sharing publicly is always your choice.
Discussion
Start the conversation
Have a question or something useful to share? Add the first comment.