Update Your Email Account Scam Exposed: The Fake Mailbox Upgrade Warning
Written by: Lapain Epuran
Published on:
An email says your mailbox belongs to an old version. Unless you confirm your address, the account you use every day could disappear.
The message sounds like another routine update. Before you interrupt your morning to deal with it, take a closer look at what actually needs updating.
Overview
The update story is a password request in disguise
The Update Your Email Account scam uses an outdated-mailbox warning to encourage a sign-in. Its central claim is that confirmation prevents deactivation.
The dangerous transition comes when a supposed maintenance task asks you to disclose credentials on a page reached from the message.
A familiar account name does not establish who owns that page. Anyone can display an email address or copy a provider’s visual style.
This article concerns that deceptive message pattern. Providers can send legitimate maintenance notices, so the instruction and destination matter more than the word update.
Mailbox access and software updates are different things
An email account is a service. Your email app is software that connects to it. A browser is another way to reach that service.
Updating an app normally happens through its built-in updater, an official app store, or an organization’s managed software system.
A webmail redesign can appear when you next visit the service. It does not make every unexpected password request a necessary upgrade.
Hosts sometimes change authentication requirements. Those changes should be confirmed through the host’s established support channel, with instructions that identify the actual configuration involved.
What deserves your attention
An unnamed older version supposedly threatens your entire mailbox.
The message provides a login shortcut instead of verifiable maintenance details.
The destination differs from the account’s usual sign-in address.
Your password manager does not recognize the page.
A failed attempt invites you to enter another password.
None of these clues requires advanced technical knowledge. Start with the simple question: can you verify this task without using anything supplied by the sender?
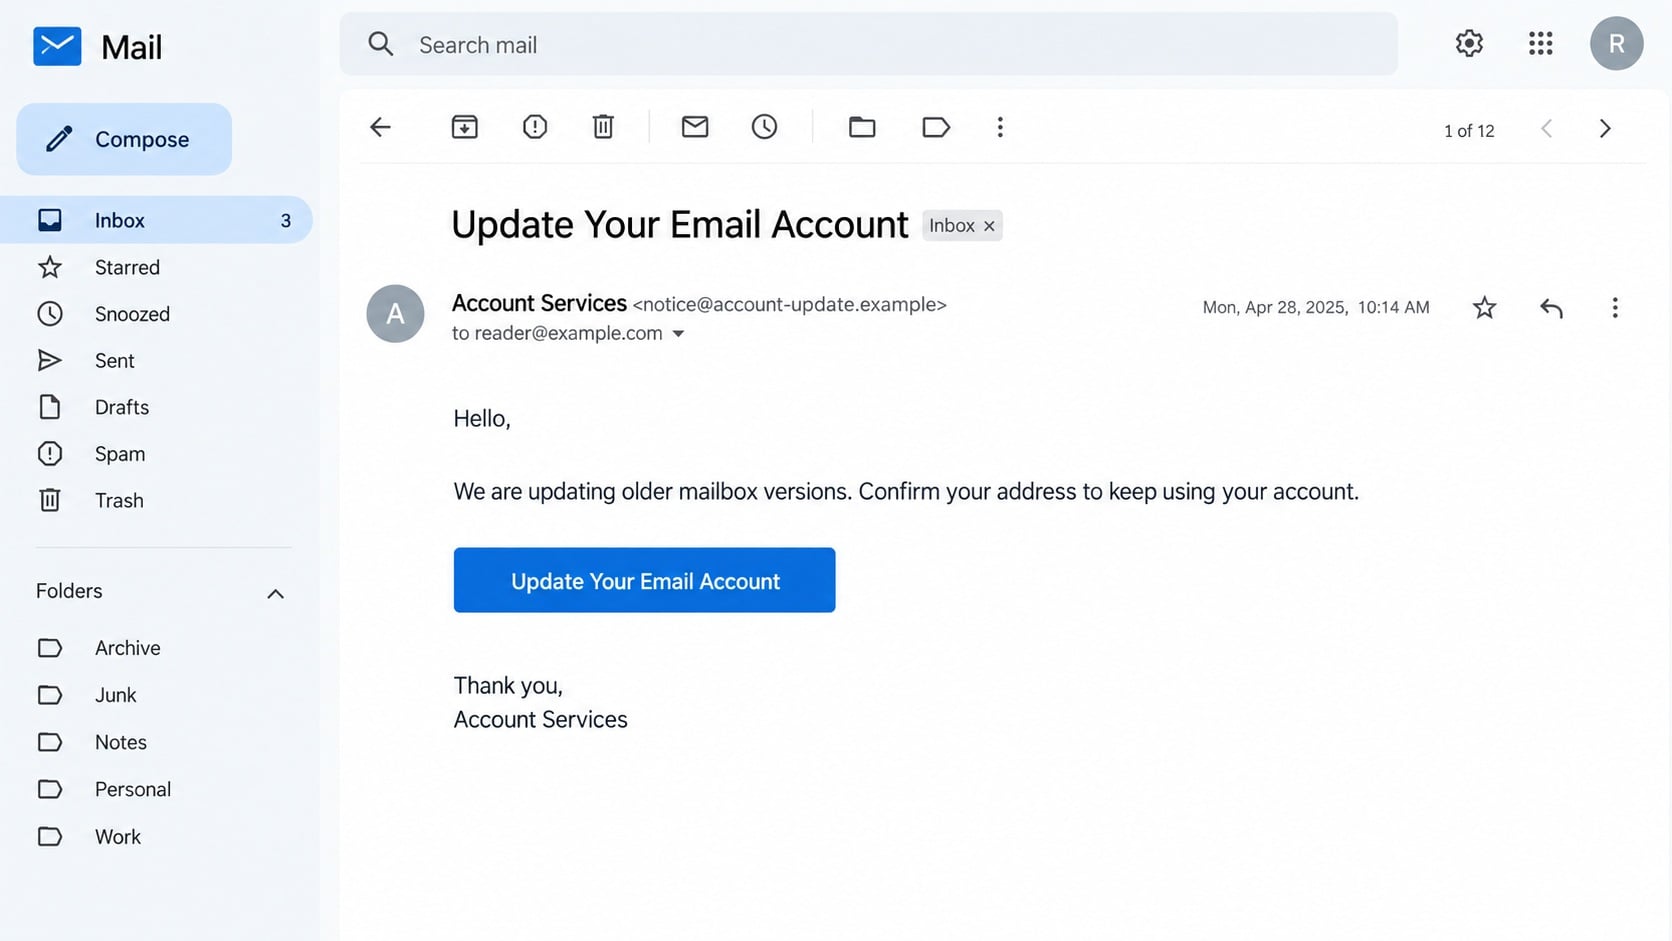
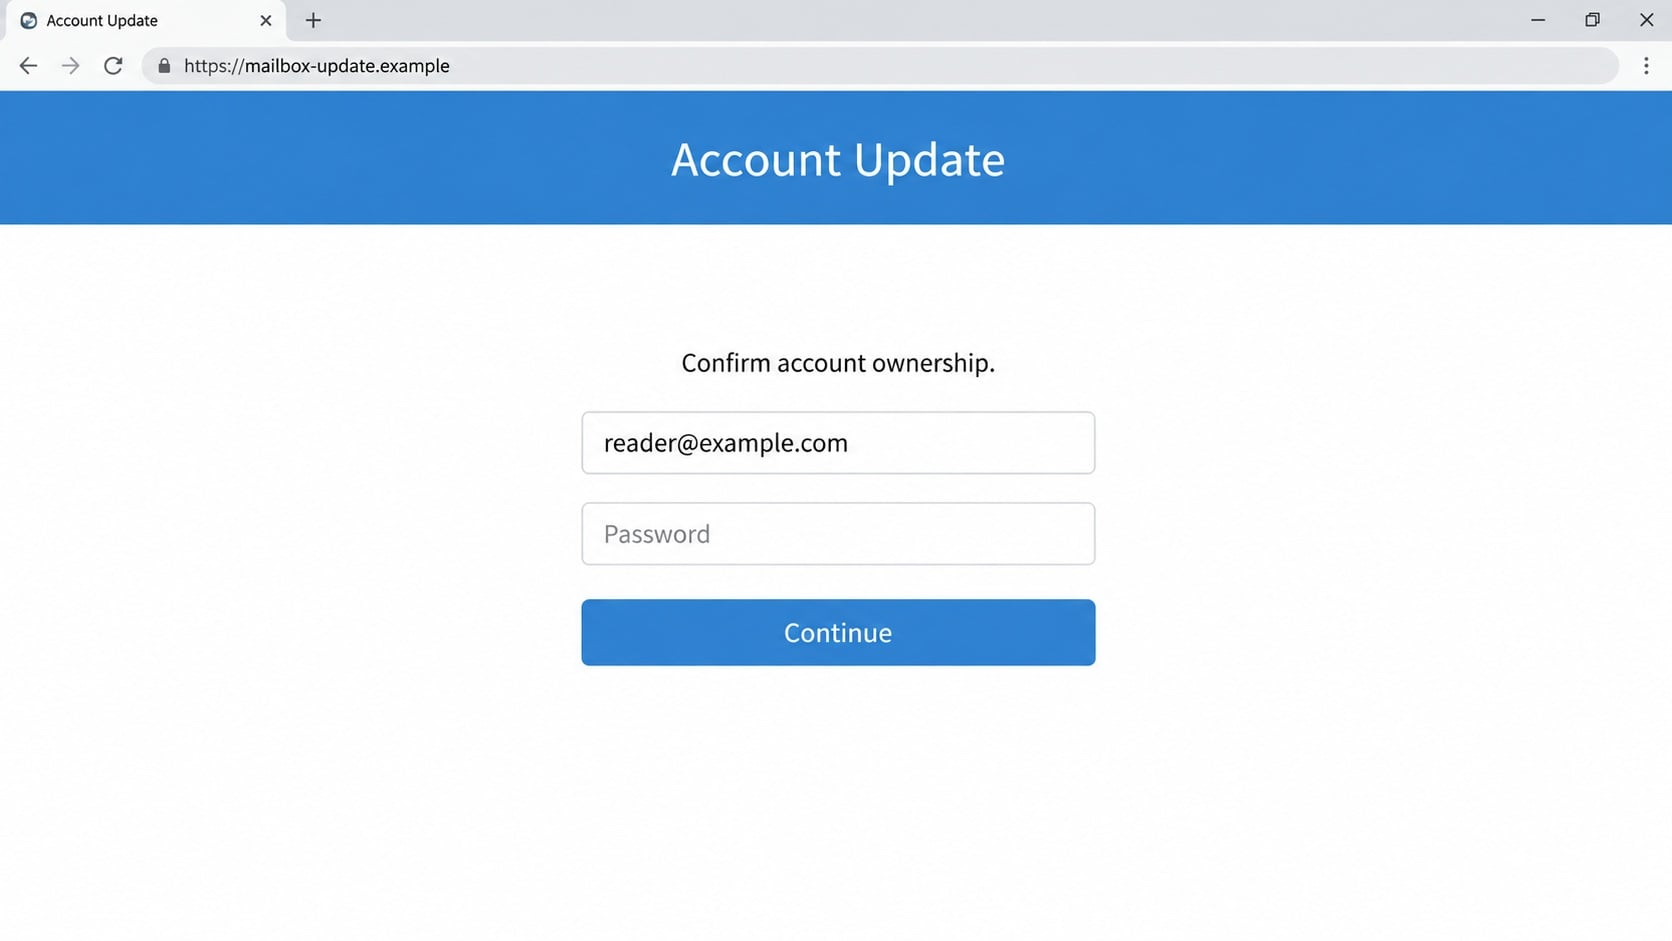
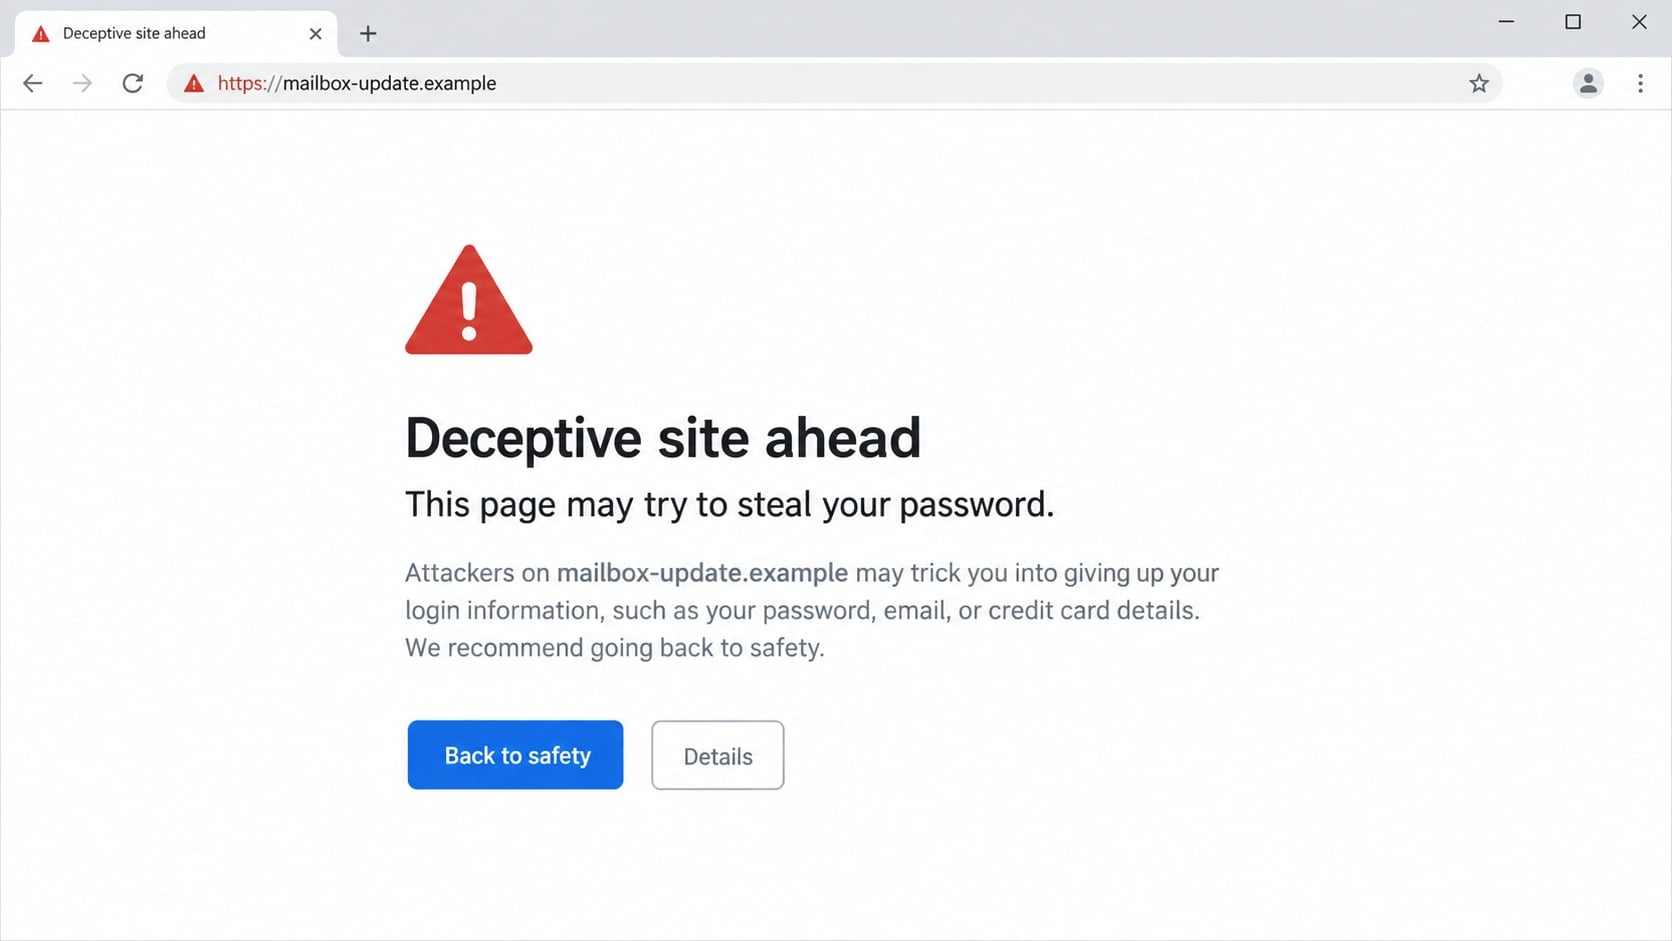
The illustrations here recreate the email lure, a possible credential form, and a browser warning. They are teaching examples rather than captures from an affected account.
Why an Older-Version Warning Gets Attention
Most people have postponed a software update. A message about an outdated account can tap into that familiar sense of unfinished maintenance.
It also attaches a large consequence to a small action. Clicking a button feels easier than risking lost invoices, contacts, or years of correspondence.
Consider a freelancer waiting for a client’s approval. The possibility of missing a reply may make an account warning feel more urgent than it deserves.
That example explains the pressure, not a documented victim’s experience. The same concern can affect students, families, administrators, and anyone relying on email for access.
The message does not need to know your schedule. A widely used service gives a broadly worded threat plenty of opportunities to feel personally relevant.
Personalization is cheap. An address printed in the greeting may simply come from the recipient list, rather than private knowledge of your account.
A footer naming IT support adds another familiar cue. It remains a claim until you confirm that the team actually issued the notice.
Good grammar offers little protection either. A polished maintenance message can conceal the same misleading request as a badly written one.
How the Scam Works
Step 1: The email invents an account maintenance problem
The opening claim puts your mailbox into an outdated category. You are asked to confirm your address to avoid losing access.
Notice what is missing: a recognizable change request, an administrator you know, or instructions you can match to a notice in the real account.
Those omissions matter because the warning asks for action before establishing that the underlying maintenance requirement exists.
Step 2: A convenient update link supplies the route
The embedded button becomes the easiest apparent solution. Its wording encourages you to see a repair action rather than an unfamiliar website.
Link text and link destination are separate. A button can display an account-related phrase while opening a completely unrelated domain.
Previewing a destination can expose that mismatch, but you do not need to open it. Independent navigation is usually the clearer choice.
Step 3: A familiar-looking page asks you to authenticate
A counterfeit sign-in screen turns the update task into a request for your email address and password.
The account name may already be filled in. This can happen when a link includes the address; it does not prove the page authenticated you.
Brand colors, an envelope symbol, or copied login wording also establish appearance rather than ownership. Check the destination before treating the form as legitimate.
Step 4: Entered credentials become exposed
Submitting the form can deliver the information to its operator. A working mailbox upgrade does not need to happen for that collection to succeed.
An error afterward is not reassuring. Treat any password entered on a suspicious page as exposed, even if the screen says it was incorrect.
A second attempt may disclose another password you use. Stop instead of testing combinations or trying to make the unfamiliar portal work.
Step 5: The account may become an entry point
If the captured credentials work, an intruder may read messages or send mail under your name. Additional protections can limit access but should not be assumed sufficient.
Email also receives recovery links. Other services connected to that inbox may need attention if unauthorized access occurred.
These are possible consequences of compromise, not proof that every recipient was hacked. What you entered and the account’s activity records guide the response.
Provider, Update, Domain, and Support Checks
Identify who actually runs your mailbox
A company address may use a hosting provider, a managed email service, or internal infrastructure. Ask the administrator if you do not know.
Someone using a personal account should start with the provider’s established app or website. Avoid sponsored search results offering urgent recovery assistance.
Knowing the operator gives you a reference point. An email signed only by a generic server administrator should not replace that relationship.
Verify the update inside an established channel
Look for a matching notice in the normal account portal. For work email, check the IT announcement system or an existing support ticket.
Ask which product or setting changes, when it changes, and what action users need to take. Specific answers help separate maintenance from pressure.
If support cannot confirm the notice, leave the message’s link alone. A deadline printed in an email does not make the request authoritative.
Check the address requesting your password
Read the actual hostname, not just words in the page title. A provider’s name can appear in a longer address owned by someone else.
An encrypted connection protects traffic traveling to that site. It does not establish that the site belongs to your email provider.
Use a saved bookmark or the official app when uncertain. That approach removes the suspicious sender’s choice of destination from the process.
Use support details you already trust
Contact your help desk through the staff directory or an existing portal. Do not make a new support relationship from the warning’s footer.
For hosted email, an earlier hosting invoice can identify the correct company. Verify its current support route through your established account.
Never share a password with someone offering to perform the update for you. A support conversation should not become another credential collection channel.
What a Click Does and Does Not Prove
Receiving this message does not establish that anyone has accessed your inbox. It shows that someone sent a message to your address.
Opening a link is different from entering a password. Close the destination and think through your actions before choosing recovery steps.
Did you type credentials, approve a sign-in prompt, allow an application, download a file, or run an installer? These actions create different risks.
A download that remains unopened is not the same as executed software. Keep the distinction clear when describing the incident to support.
Similarly, a browser warning is a reason to leave. Do not override it to investigate an account update or to see whether the page looks convincing.
No warning does not establish safety. Detection systems may not recognize a newly created phishing page immediately.
The sample warning below illustrates a protective response a browser may provide. It is not a claim that every destination triggers that warning.
When Several People Receive the Same Warning
At work, one suspicious email can become more convincing when a colleague forwards it and asks whether everyone has completed the update.
That extra message adds social pressure without adding evidence. The colleague may be asking precisely because they are uncertain.
Keep the original request separate from internal discussion. Ask IT to confirm whether any maintenance is scheduled before encouraging others to follow the link.
If you forward a warning for investigation, clearly describe it as suspicious. Use the reporting process rather than a general team distribution list.
Administrators should identify affected recipients without assuming everyone clicked. A received message, a visited page, and a submitted credential are separate incident stages.
Collect a simple timeline from anyone who interacted. Include whether a browser warning appeared and whether the person downloaded or approved anything.
A useful internal response explains where legitimate updates will be announced. It should give employees a trustworthy next step instead of merely repeating the threat.
For personal accounts, the same principle applies to family advice. Someone forwarding a scary notice has not independently authenticated its sender.
Help them open their usual mail app and check account notifications there. This resolves the concern without requiring them to understand the suspicious page.
Once the notice is confirmed fraudulent, report it and stop circulating it as a possible task. Clear closure prevents repeated questions from reviving the lure.
A Safer Routine for Future Update Notices
Keep a bookmark for your email provider and another for your organization’s support portal. Familiar routes reduce the appeal of convenient email buttons.
Let official applications handle their own updates. Check the app store directly when a message claims that your installed version has expired.
For business accounts, agree on a standard maintenance announcement process. Users should know where a real change can be confirmed independently.
Keep recovery details current before an incident. An accessible secondary method can make account restoration easier if your primary mailbox becomes unavailable.
Use a unique password for email. Sharing one password across services gives a stolen credential more places to work.
A password manager can help identify an unexpected domain when saved credentials do not appear. Investigate that mismatch rather than forcing an autofill.
Do not rely on memory of one scam’s design. The durable habit is checking the requested action against your actual provider and account state.
Teach family members the same simple routine. They do not need to recognize every technical term to open the trusted app instead.
What to Do if You Have Fallen Victim to This Scam
Stop using the update page.
Close it without retrying credentials. If you only read the email, report it as phishing and remove it from your inbox.
Record what you actually shared.
Note whether you submitted a password, approved authentication, downloaded software, or granted access. Keep the email for your administrator if needed.
Replace an exposed password.
Open the real provider from a trusted device. Set a unique replacement, and change reused copies on other services too.
End unauthorized access.
Review active sessions, devices, connected applications, and recovery options. Use the provider’s controls to revoke access you do not recognize.
Inspect the mailbox itself.
Check forwarding, filters, delegates, automatic replies, and sent mail. An unfamiliar rule may keep sending information away after a password change.
Involve the right support team.
Tell your workplace administrator promptly if business email was affected. Share the timeline so they can examine relevant sign-in records.
Scan when downloads or suspicious software are involved.
Malwarebytes can help check for malware. A clean scan does not replace password recovery or establish that no mailbox access occurred.
Reduce repeat exposure.
AdGuard can help filter deceptive ads and known malicious destinations. Keep browser protections enabled and continue checking unfamiliar account requests.
Check for impersonation.
If unauthorized messages were sent, warn affected contacts through a trustworthy channel. Ask them to verify unusual requests associated with your address.
Monitor the recovery.
Watch for unrequested resets, changed recovery information, and new login alerts. Report fresh changes instead of assuming the first password reset ended everything.
Is Your Device Infected? Run a Free Malware Scan
Slow performance, constant pop-ups, or strange behavior? These are classic signs of a malware infection. The fastest way to find out is to scan your device with Malwarebytes Anti-Malware Free — one of the most trusted malware removal tools available.
The free version detects and removes the most common threats, including:
Adware — the cause of those annoying pop-ups
Browser hijackers — unwanted redirects and changed homepages
Trojans and spyware — hidden programs stealing your data
Potentially unwanted programs (PUPs) — software you never asked for
👉 Select your device below — Windows, Mac, or Android — then follow the simple steps to download Malwarebytes, scan your system, and remove any threats it finds. The whole process takes about 5 minutes.
Malwarebytes for WindowsMalwarebytes for MacMalwarebytes for Android
Run a Malware Scan with Malwarebytes for Windows
Malwarebytes is one of the most popular and trusted anti-malware tools for Windows — and it’s completely free for removing infections. It catches threats that many antivirus programs miss, including adware, browser hijackers, and trojans. Follow the steps below to scan and clean your PC in just a few minutes.
Download Malwarebytes
Click the button below to download the latest version of Malwarebytes for Windows from the official source. The free version is all you need — it will scan your computer and remove adware, browser hijackers, and other malicious software at no cost.
(The link opens in a new page where your download will start)
Install Malwarebytes
When the download finishes, open your Downloads folder and double-click the MBSetup file. If Windows shows a User Account Control pop-up, click “Yes” to allow the installation.
Follow the On-Screen Prompts to Install Malwarebytes
The setup wizard will walk you through a few quick screens:
Choose where you’re installing the program — “Personal Computer” or “Work Computer” — then click Next.
Malwarebytes will now install on your device. This usually takes under a minute.
When installation is complete, the “Welcome to Malwarebytes” screen will open automatically.
On the final screen, click Open Malwarebytes to launch the program.
Enable “Scan for Rootkits”
Before scanning, turn on rootkit detection so Malwarebytes can find even the most hidden threats. Click the Settings gear icon on the left side of the screen.
In the settings menu, find “Scan for rootkits” and click the toggle so it turns blue.
Done? Click “Dashboard” in the left pane to return to the main screen.
Start the Scan
Click the blue Scan button. Malwarebytes will automatically update its virus database and start checking your computer for malware.
Wait for the Scan to Finish
The scan checks your entire system for browser hijackers and other malicious programs, so it can take several minutes. Feel free to do something else — just check back occasionally to see the progress.
Quarantine the Detected Threats
When the scan is done, you’ll see a list of everything Malwarebytes found — malware, adware, and potentially unwanted programs. Click the “Quarantine” button to remove all of them at once.
Malwarebytes will now remove the malicious files and registry entries and move them safely into quarantine.
Restart Your Computer
Some threats can only be fully removed after a reboot. If Malwarebytes asks you to restart, click Yes. Once you’re logged back in, your PC is clean and you can continue with the next steps in this guide.
When the scan finishes, click Quarantine to remove everything Malwarebytes found. That’s it — your Windows PC is now clean of trojans, adware, and other malware, and should be back to running smoothly.
If your current antivirus allowed this malicious program on your computer, you may want to consider purchasing Malwarebytes Premium to protect against these types of threats in the future. If you are still having problems with your computer after completing these instructions, then please follow one of the steps:
Malwarebytes for Mac is a free on-demand scanner that removes the malware other security software tends to miss — adware, browser hijackers, and unwanted programs included. Cleaning an infected Mac with Malwarebytes has always been completely free, and it’s our go-to recommendation. Follow the steps below to scan and clean your Mac in just a few minutes.
Download Malwarebytes for Mac
Click the button below to download the latest version of Malwarebytes for Mac.
When the download finishes, open your Downloads folder and double-click the setup file to begin the installation.
Follow the On-Screen Prompts to Install Malwarebytes
The Malwarebytes for Mac Installer will guide you through a few quick screens. Click “Continue” and keep following the prompts until the installation completes.
When the installation is complete, Malwarebytes opens to the Welcome to Malwarebytes screen. Click “Get started“.
Select “Personal Computer” or “Work Computer”
Malwarebytes will ask what type of computer you’re installing it on. Click either Personal Computer or Work Computer, whichever applies.
Start the Scan
Click the “Scan” button. Malwarebytes will automatically update its detection database and begin checking your Mac for malware.
Wait for the Scan to Finish
Malwarebytes will scan your Mac for adware, browser hijackers, and other malicious programs. This can take a few minutes, so feel free to do something else — just check back occasionally to see the progress.
Quarantine the Detected Threats
When the scan is done, you’ll see a list of everything Malwarebytes found. Click the “Quarantine” button to remove all the threats at once.
Restart Your Mac
Malwarebytes will now remove all the malicious files it found. Some threats can only be fully removed after a reboot — if Malwarebytes asks you to restart, allow it. Once you’re logged back in, your Mac is clean.
Once the scan is done, remove every threat it detected. Your Mac is now free of adware, rogue browser extensions, and other potentially harmful software.
If your current antivirus allowed a malicious program on your computer, you might want to consider purchasing the full-featured version of Malwarebytes Anti-Malware to protect against these types of threats in the future. If you are still experiencing problems while trying to remove a malicious program from your computer, please ask for help in our Mac Malware Removal Help & Support forum.
Run a Malware Scan with Malwarebytes for Android
Malwarebytes for Android automatically detects and removes dangerous threats like malware and ransomware so you don’t have to worry about your most-used device being compromised. Aggressive detection of adware and potentially unwanted programs keeps your Android phone or tablet running smooth.
Download Malwarebytes for Android.
You can download Malwarebytes for Android by clicking the link below.
In the Google Play Store, tap “Install” to install Malwarebytes for Android on your device.
When the installation process has finished, tap “Open” to begin using Malwarebytes for Android. You can also open Malwarebytes by tapping on its icon in your phone menu or home screen.
Follow the on-screen prompts to complete the setup process
When Malwarebytes will open, you will see the Malwarebytes Setup Wizard which will guide you through a series of permissions and other setup options. This is the first of two screens that explain the difference between the Premium and Free versions. Swipe this screen to continue. Tap on “Got it” to proceed to the next step. Malwarebytes for Android will now ask for a set of permissions that are required to scan your device and protect it from malware. Tap on “Give permission” to continue. Tap on “Allow” to permit Malwarebytes to access the files on your phone.
Update database and run a scan with Malwarebytes for Android
You will now be prompted to update the Malwarebytes database and run a full system scan.
Click on “Update database” to update the Malwarebytes for Android definitions to the latest version, then click on “Run full scan” to perform a system scan.
Wait for the Malwarebytes scan to complete.
Malwarebytes will now start scanning your phone for adware and other malicious apps. This process can take a few minutes, so we suggest you do something else and periodically check on the status of the scan to see when it is finished.
Click on “Remove Selected”.
When the scan has been completed, you will be presented with a screen showing the malware infections that Malwarebytes for Android has detected. To remove the malicious apps that Malwarebytes has found, tap on the “Remove Selected” button.
Restart your phone.
Malwarebytes for Android will now remove all the malicious apps that it has found. To complete the malware removal process, Malwarebytes may ask you to restart your device.
After the scan, tap Remove Selected to delete all detected threats. Your Android phone is now clean — no more malicious apps, adware, or browser redirects.
If your current antivirus allowed a malicious app on your phone, you may want to consider purchasing the full-featured version of Malwarebytes to protect against these types of threats in the future. If you are still having problems with your phone after completing these instructions, then please follow one of the steps:
Restore your phone to factory settings by going to Settings > General management > Reset > Factory data reset.
Now that your device is clean, keep it that way. Most infections start with a malicious ad or a fake download button — so blocking them at the source is your best defense.
We recommend AdGuard, which blocks malicious ads, phishing pages, and dangerous redirects before they can reach you.
A scammer’s warning does not control your account. Check any real maintenance requirement through the provider or your administrator, using an established route.
Can a provider legitimately change email settings?
Yes. Authentication methods and server settings can change. Verify the notice independently and follow instructions from the actual provider, rather than an unexplained email shortcut.
Why does the page already know my address?
Your address can be included in the link or campaign data. Displaying it is not proof that the page has a legitimate connection to your account.
Does a rejected password mean nothing was stolen?
No. A fraudulent form can collect an entry and then display an error. Replace any valid password you submitted through the real provider.
Should I install the update offered on the page?
Do not install software from an unverified mailbox warning. Check the official app store or your organization’s managed update process instead.
Is a malware scan enough after entering credentials?
No. Scanning addresses possible device threats. Exposed credentials also require account recovery, session review, and inspection of mailbox settings.
The Bottom Line
The Update Your Email Account scam uses maintenance language to steer readers toward credential disclosure. The account’s real provider is the place to verify any required change.
Open that trusted route yourself. If you entered a password, act promptly on the account rather than trying to finish the supposed update.
10 Rules to Avoid Online Scams
Here are 10 practical safety rules to help you avoid malware, online shopping scams, crypto scams, and other online fraud. Each tip includes a quick “if you already got hit” action.
Stop and verify before you click, log in, download, or pay.
Most scams win by creating urgency. Verify using a trusted method: type the website address yourself, use the official app, or call a known number (not the one in the message).
If you already clicked: close the page, do not enter passwords, and run a malware scan.
Keep your operating system, browser, and apps updated.
Updates patch security holes used by malware and malicious ads. Turn on automatic updates where possible.
If you saw a scary “update now” pop-up: close it and update only through your device settings or the official app store.
Use layered protection: antivirus plus an ad blocker.
Antivirus helps block malware. An ad blocker reduces scam redirects, phishing pages, and malvertising.
If your browser is acting weird: remove unknown extensions, reset the browser, then run a full scan.
Install apps, software, and extensions only from official sources.
Avoid cracked software, “keygens,” and random downloads. During installs, choose Custom/Advanced and decline bundled offers you do not recognize.
If you already installed something suspicious: uninstall it, restart, and scan again.
Treat links and attachments as untrusted by default.
Phishing often impersonates delivery services, banks, and popular brands. If it is unexpected, do not open attachments or log in through the message.
If you entered credentials: change the password immediately and enable 2FA.
Shop safely: research the store, then pay with protection.
Be cautious with brand-new stores, “closing sale” stories, and prices that make no sense. Prefer credit cards or PayPal for dispute options. Avoid wire transfers, gift cards, and crypto payments.
If you already paid: contact your card issuer or PayPal quickly to dispute the transaction.
Crypto rule: never pay a “fee” to withdraw or recover money.
Common patterns include fake profits, then “tax,” “gas,” or “verification” fees. Another is a “recovery agent” who demands upfront crypto.
If you already sent crypto: stop paying, save evidence (wallet addresses, TXIDs, chats), and report the scam to the platform used.
Secure your accounts with unique passwords and 2FA (start with email).
Use a password manager and unique passwords for every account. Enable 2FA using an authenticator app when possible.
If you suspect an account takeover: change passwords, sign out of all devices, and review recent logins and recovery settings.
Back up important files and keep one backup offline.
Backups protect you from ransomware and device failure. Keep at least one backup on an external drive that is not always connected.
If you suspect infection: do not connect backup drives until the system is clean.
If you think you are a victim: stop losses, document evidence, and escalate fast.
Move quickly. Speed matters for disputes, account recovery, and limiting damage.
Stop payments and contact: do not send more money or respond to the scammer.
Call your bank or card issuer: block transactions, replace the card if needed, and start a dispute or chargeback.
Secure your email first: change the email password, enable 2FA, and remove unfamiliar recovery options.
Secure other accounts: change passwords, enable 2FA, and log out of all sessions.
Scan your device: remove suspicious apps or extensions, then run a full malware scan.
Save evidence: screenshots, emails, order pages, tracking pages, wallet addresses, TXIDs, and chat logs.
Report it: to the payment provider, marketplace, social platform, exchange, or wallet service involved.
These rules are intentionally simple. Most online losses happen when decisions are rushed. Slow down, verify independently, and use payment methods and account controls that give you recourse.
Hello! I'm Lapain Epuran, your go-to source for detailed and honest product reviews. From tech gadgets to miracle cures, I provide insights to help you make informed choices. Join me as we discover what's truly worth your time and money.